
Audio Commander - Hi-Fi System DENON - Free user manual and instructions
Find the device manual for free Audio Commander DENON in PDF.


| Product type | Portable Hi-Fi system with integrated amplifier and speakers |
| Brand | Denon |
| Model | Audio Commander |
| Power supply | Mains via included power cable; rechargeable lead-acid internal battery |
| Internal battery | Rechargeable lead-acid battery, replaceable |
| Estimated battery life | Approximately 6 to 8 hours depending on usage |
| Microphone/line inputs | 2 combo XLR+6.35mm inputs with mic/line selector |
| Auxiliary inputs | 1 3.5mm input (Aux 1); 2 RCA coaxial inputs (Aux 2) |
| Outputs | 1 TRS 6.35mm line output to connect a second speaker |
| USB ports | 2 USB ports (2.1A charging); the top port allows MP3/WMA playback |
| SD card reader | SD card slot, MP3/WMA playback |
| Wireless connectivity | Bluetooth 5.0 (typical range 10 m); NFC for quick pairing |
| Wireless microphone | 2 built-in receivers; wireless microphone included (AA batteries) |
| Headset microphone | Included with wireless beltpack transmitter (AA batteries) |
| EQ settings | 3-band equalizer (treble, midrange, bass) |
| Reverb effect | Adjustable for wired and wireless microphone channels |
| Display | Backlit LCD screen: battery level, source, track information |
| Main controls | Master volume, W.Mic 1/2, USB/SD/BT, Mic/Line 1/2, Aux 1/2, reverb, EQ, Browse wheel navigation |
| Wireless transmission | 2 adjustable antennas for optimal microphone reception |
| Included accessories | Audio Commander, wireless microphone, headset microphone, beltpack transmitter, power cable, user guide |
| Safety instructions | Do not expose to temperatures >32°C or <0°C; lead-acid battery: fully charge before storage |
| Repairability | Replaceable fuse (near power input); replaceable battery; spare parts available by contacting customer service |
Frequently Asked Questions - Audio Commander DENON
User questions about Audio Commander DENON
0 question about this device. Answer the ones you know or ask your own.
Ask a new question about this device
Download the instructions for your Hi-Fi System in PDF format for free! Find your manual Audio Commander - DENON and take your electronic device back in hand. On this page are published all the documents necessary for the use of your device. Audio Commander by DENON.
USER MANUAL Audio Commander DENON
User Guide (English)
Introduction
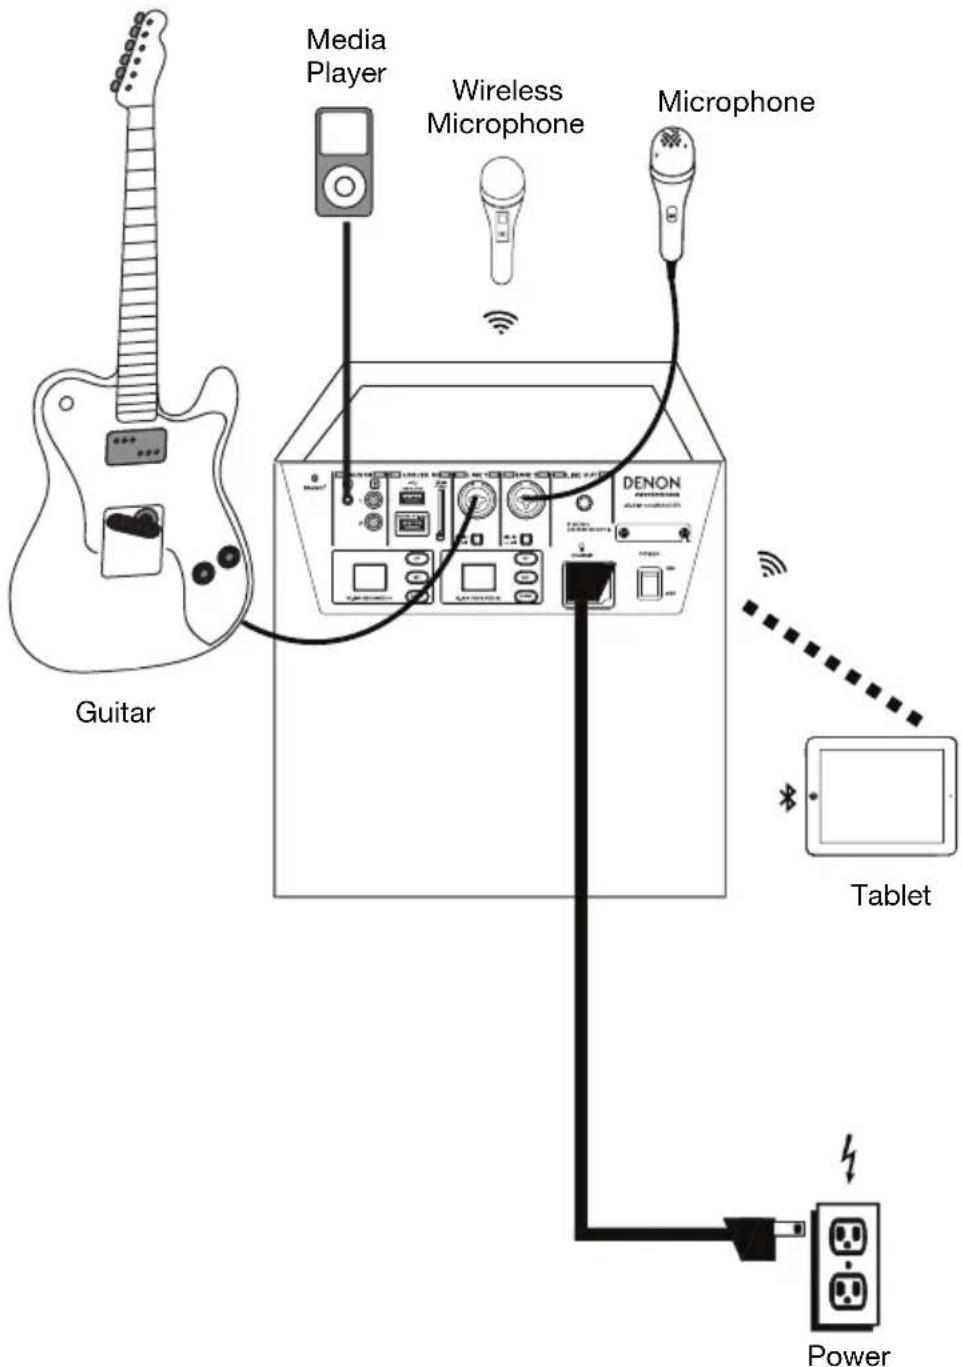
Please see this guide's Setup chapter to see an example of how to use Audio Commander and its accessories, and then refer to the Operation chapter to start using Audio Commander.
Box Contents
Audio Commander
Wireless Handheld Microphone
Headset Microphone
Wireless Beltpack Transmitter
Power Cable
User Guide
Safety & Warranty Manual
Support
For the latest information about this product (documentation, technical specifications, system requirements, compatibility information, etc.) and product registration, visit denonpro.com.
For additional product support, visit denonpro.com/support.
The accessories can be stored in the side panel compartments.
Rechargeable Batteries
Rechargeable lead-acid batteries are the same type used in automobiles. As with your car battery, how you use this battery has a significant impact on its lifespan. With proper use and treatment, a lead-acid battery can last for years. Here are some recommendations for getting the longest life from the internal battery.
General Usage Charge fully before use.
Charge fully before storing.
Storage For best product longevity, do not store at exceedingly hot (greater than 90^ F / 32^ C) or exceedingly cold (less than 32^ F / 0^ C) temperatures.
It is acceptable to leave your sound system plugged in. This will not overcharge the battery.
If you leave the battery level low and do not charge it for 6 months, it may permanently lose capacity.
Repair If the battery fails to charge, check the fuse near the power cable input. If the fuse is not intact, please replace it.
The battery can be replaced (details in the Technical Specifications).
For Warranty and Parts, contact the Parts Dept. at 401-658-3743 or by visiting denonpro.com/support.
Disposal Bring the unit to a recycling center or dispose of in accordance with local ordinances.
Features
Front Panel
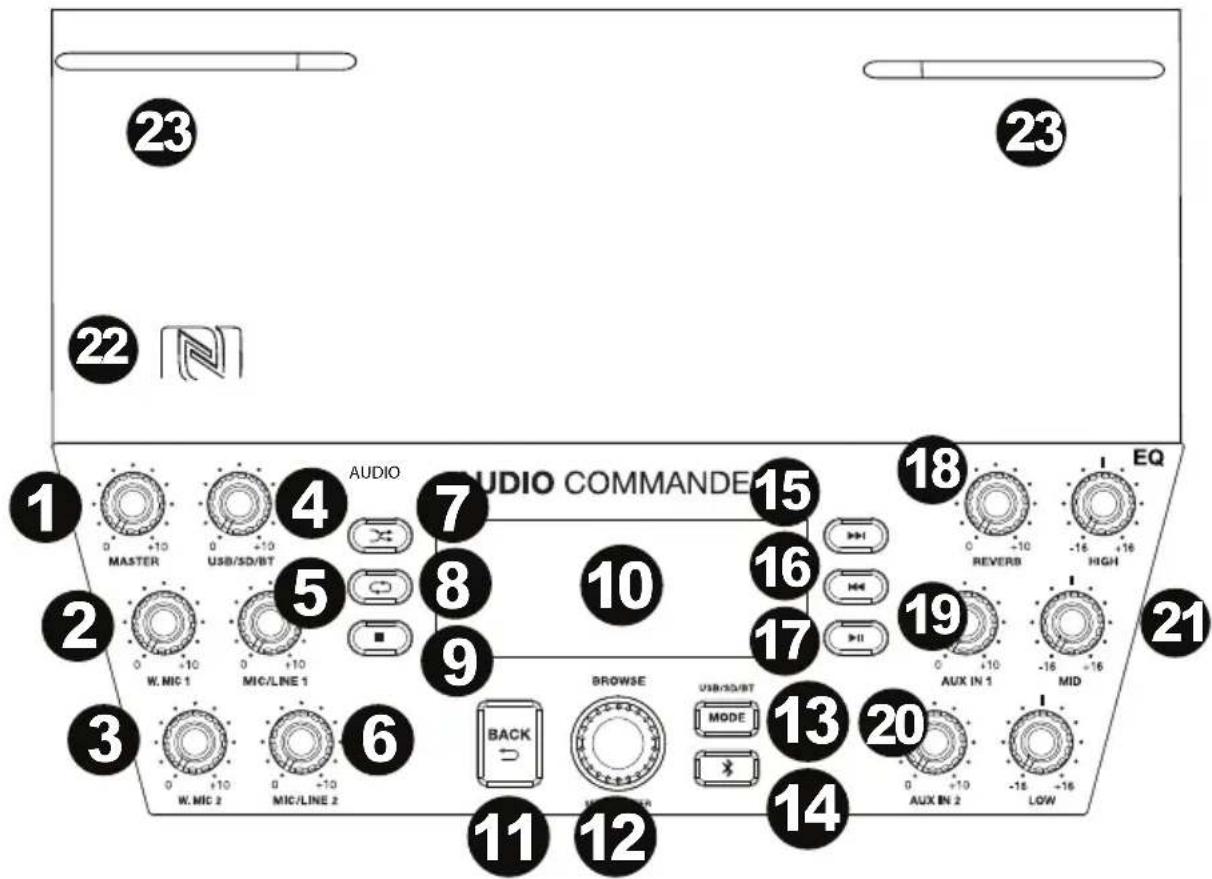
- Master Volume: Adjust this knob to control the level for the master volume going to the Line Output.
- Wireless Mic Volume 1: Adjust this knob to control the level for the wireless mic receiver 1.
- Wireless Mic Volume 2: Adjust this knob to control the level for the wireless mic receiver 2.
- USB/SD/BT Volume: Adjust this knob to control the level for the USB, SD, and Bluetooth sources.
- Mic/Line 1 Volume: Adjust this knob to control the mic/line input level.
- Mic/Line 2 Volume: Adjust this knob to control the mic/line input level.
- Random: Press this button to have USB or SD card tracks play in a random order.
- Repeat: Press this button to repeat a track from a USB or SD card source.
- Stop: Press this button to stop audio track playback from a Bluetooth, USB, or SD card source.
- LCD Display: This shows the battery level, charging status, Bluetooth connection, input sources, and track playback information.
- Back: Press this button to exit out of a folder or menu.
- Browse: Press in this knob and scroll to select to use W. Mic 1 or W. Mic 2 (if you want to use the beltpack transmitter and headset microphone). Also, use this knob to select a track or folder when playing SD card or USB sources.
- Mode: Press to cycle through USB, SD, and Bluetooth source modes.
-
Bluetooth Disconnect: Press this button to disconnect from a paired Bluetooth device.
-
Next Track: Press this button to go to the next audio track from a Bluetooth, USB, or SD card source.
Note: When listening to Bluetooth sources, pressing this button may go to another playlist or music genre in some apps. - Previous Track: Press this button to go to the previous audio track from a Bluetooth, USB, or SD card source.
Note: When listening to Bluetooth sources, pressing this button may go to another playlist or music genre in some apps. - Play/Pause: Press this button to play/pause an audio track from a Bluetooth, USB, or SD card source.
- Reverb: Adjust this knob to control the amount of reverb applied to the wired and wireless mic channels.
- Aux In 1 Volume: Adjust this knob to control the volume for the Aux 1 input.
- Aux In 2 Volume: Adjust this knob to control the volume for the Aux 2 input.
- 3-Band EQ: Adjust these knobs to control the treble, mid-range, and bass frequencies for the input signal.
- NFC (near-field communication): Touch and briefly hold your supported and enabled device to the NFC logo to pair the device.
- Wireless Antennas: Adjust the antennas to get the best wireless mic reception.
Rear Panel
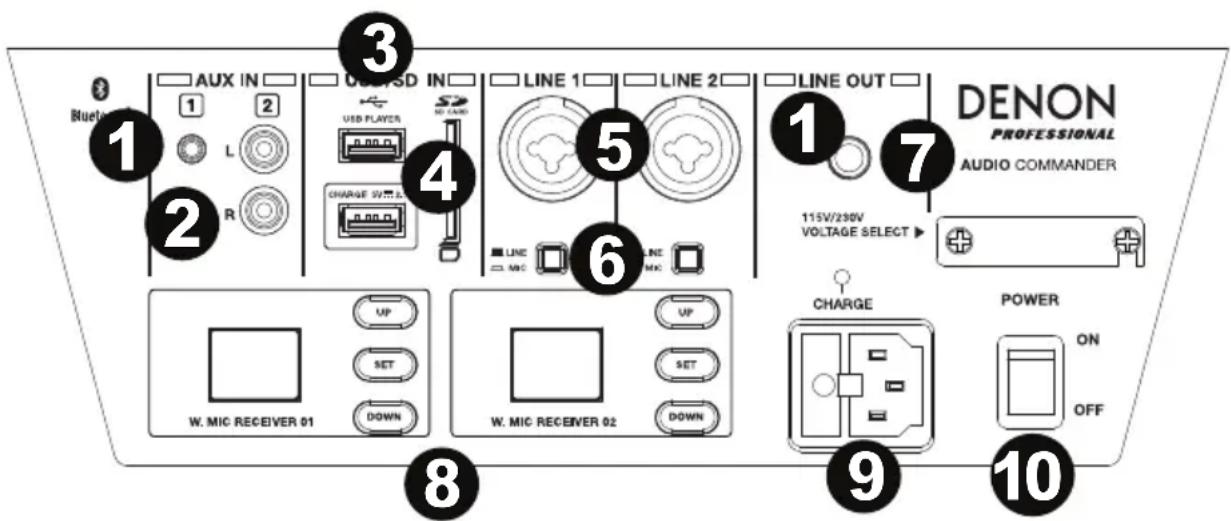
- Aux Input 1: Connect a line-level device, such as a CD player, laptop, smartphone, or media device, to this 1/8" (3.5 mm) input.
- Aux Input 2: Connect a line-level device, such as a CD player, tablet, smartphone, or media device to these coaxial inputs.
- USB Ports: Both USB ports are capable of 2.1A charging. The top USB port also supports USB flash drive playback of MP3 and WMA files.
- SD Card Slot: Connect a SD card here to play your MP3 and WMA files.
- XLR+1/4": Connect dynamic microphones to these mic inputs.
- Mic/Line Switch: Press this switch in to have the gain set for mic level sources. Have the switch in the outward position for line-level sources.
- Line Output: Connect this 1/4" TRS (6.35 mm) output to another Audio Commander.
- Wireless Receivers: Select the wireless mic channel using the Up/Down buttons and press the Set button to link the channel to the wireless mic. See Operation > Wireless Microphone Setup for more details.
- Power Input: Connect the included power cable here.
- Power Switch: Adjust this switch to power Audio Commander on/off.
Display
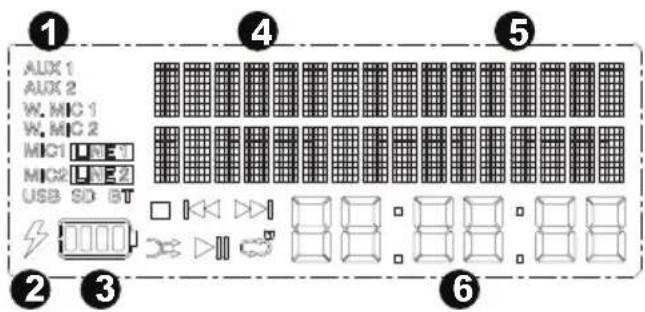
- Input Sources
- Power Charging Indicator
- Battery Level
- USB/SD Card Folder
- USB/SD Card Track
- Track Playback Time
Setup
Items not listed under Introduction > Box Contents are sold separately.
Headset Microphone Setup
Headset
Microphone
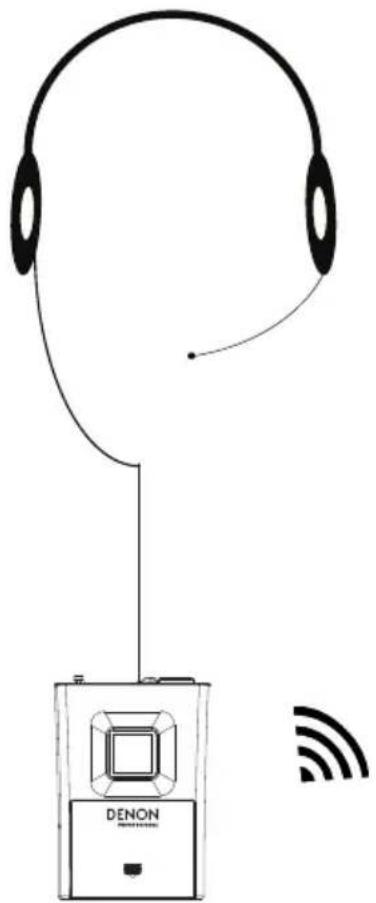
natural_image
Line drawing of a DENON audio recording device with earphones and signal icon (no text or symbols on device)Beltpack Transmitter
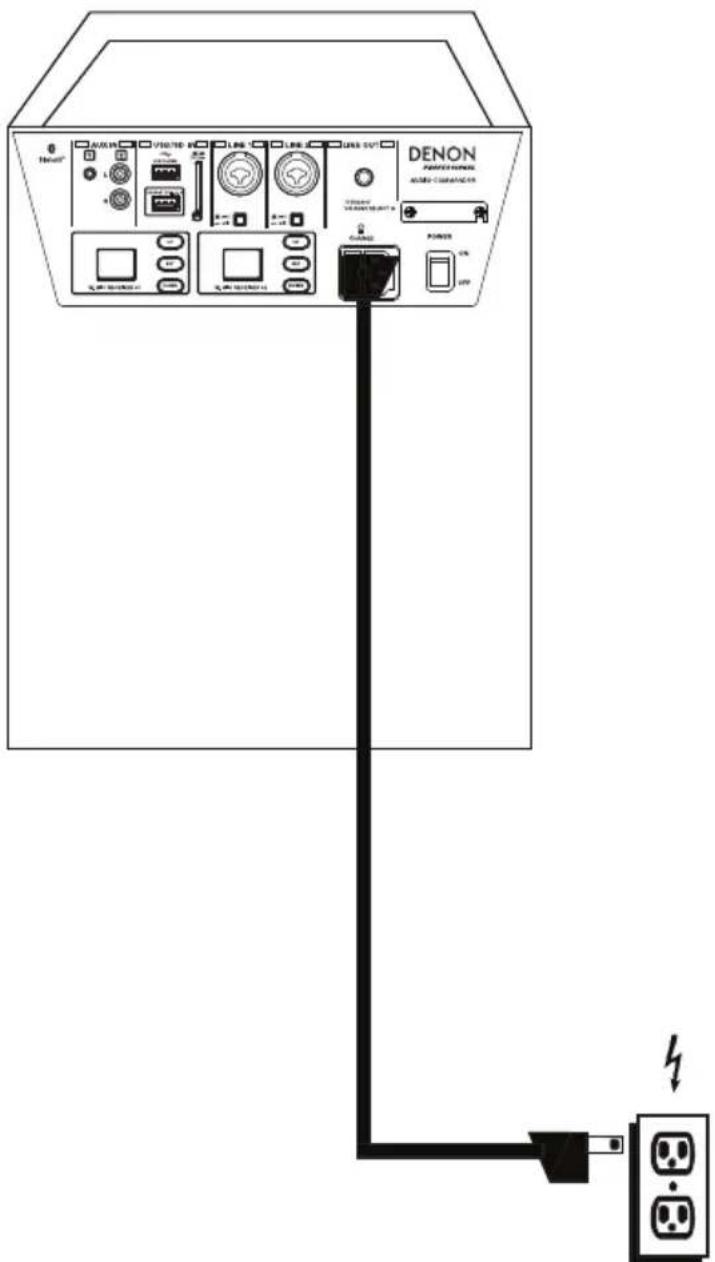
Wireless Microphone Setup
To use a wireless microphone, follow these setup steps:
- Ensure 2 new AA alkaline batteries are installed in the wireless microphone.
- Pair the wireless microphone (found in the side compartment) to W. Mic Receiver 01 on Audio Commander.
a. Turn on Audio Commander and the wireless microphone.
b. Select a channel with the best reception using the Up/Down buttons on the receiver.
c. Place the wireless microphone IR sensor (found above the power button) near the receiver's IR LED and press the Set button on the receiver. Wait for about 3 seconds until the IR LED stops flashing. When it finds an interference-free channel, the RF LED will illuminate on the receiver showing the mic is matched to that channel.
- Adjust the wireless microphone gain using the W. Mic 1 knob on Audio Commander.
- As you speak, watch the AF indicator on W. Mic Receiver 01 to make sure a signal is being received.
Note: Make sure to turn the Browse knob and select the appropriate W.Mic source in order to output a signal.
To set up the second wireless microphone, follow the same steps above for pairing to W. Mic Receiver 02.
Headset Microphone Setup
To use the included headset microphone, follow these setup steps:
- Ensure new batteries are installed in the beltpack transmitter.
- Connect the headset microphone to the beltpack transmitter.
- Pair the beltpack transmitter to the wireless receiver on Audio Commander.
a. Turn on Audio Commander.
b. Turn on the beltpack transmitter.
c. Select a channel with the best reception using the Up/Down buttons on the Audio Commander receiver.
d. Lift the cover from the compartment and place the beltpack transmitter IR sensor near the receiver's IR LED. Press the Set button on the receiver. Wait for about 3 seconds until the IR LED stops flashing. When it finds an interference-free channel, the RF LED will illuminate on the receiver to show that the beltpack transmitter is matched to that channel.
- Adjust the microphone gain using the W. Mic knob on Audio Commander.
- As you speak, watch the AF indicator on the receiver to make sure a signal is being received.
Note: Make sure to turn the Browse knob and select the appropriate W.Mic source in order to output a signal.
Playing Music from a USB Flash Drive
- Connect your USB flash drive to the top USB port on the rear panel.
- Press and release the Mode button until the USB device appears on the display screen.
- Use the |<< and >>| buttons to scroll through your files and press Play to select the track to play.
Playing Music from a SD Card
- Insert a SD card into the card slot.
- Press and release the Mode button until the SD card appears on the display screen.
- Use the |<< and >>| buttons to scroll through your tracks and press Play when a file is selected to play.
Playing Music from the Aux Input
- Connect your media device's output to one of the Aux inputs on Audio Commander.
- Play your music device and adjust the source volume if needed.
Note: A source played through the Aux inputs will be blended along with the USB, SD, Bluetooth, Mic/Line inputs, and W.Mic 1/2 sources. Adjust the Aux In volume as needed.
Pairing a Bluetooth Device
- Turn on your Bluetooth device.
- Navigate to your Bluetooth device's setup screen, find "Audio Commander" and connect.
Note: If your Bluetooth device prompts for a pairing code, enter "0000".
Note: Use the Mode button to select Bluetooth as the source.
To disconnect pairing while the Bluetooth icon is lit solid, press and release the Bluetooth button.
To connect to another Bluetooth device, repeat step 3.
Pairing a Bluetooth Device Using NFC
NFC (near-field communication) allows data exchange from devices, such as pairing, by gently bumping them together. Check in your device's manual to see if this feature is supported.
To use NFC to pair with Audio Commander:
- In order to use NFC, your device must be turned on and unlocked.
- Enter your device's Settings menu and check that NFC is turned On.
- Power on Audio Commander.
- Press and release the Bluetooth button on Audio Commander.
- Touch and briefly hold your device to the NFC logo.
- Follow the pairing instructions that appear on your phone. If a passcode is required, enter '0000'.
Note: Use the Mode button to select Bluetooth as the source.
To unpair, gently bump your device against the NFC logo located on top of Audio Commander.
Linking Two Audio Commanders
- Power on each Audio Commander.
- Connect a 1/4" (6.35 mm) audio cable from the Line Out of the first Audio Commander to the Line In of the second Audio Commander.
- Ensure the Line/Mic switch is set to Line.
- Play your music on the first Audio Commander.
- Adjust the Master volume knob on the first Audio Commander and then adjust the Mic/Line volume on the second Audio Commander.
Assistance technique
Batteries rechargeables
Technical Specifications
| Speaker | Tweeter: Compression driverWoofer: 12.0" / 305 mm200 W (RMS) |
| Bluetooth Specifications | Version: 4.0Profiles: A2DPRange: Up to 60 feet / 20 metersMaximum Transmission Power: +4 dBmFrequency: 2400 - 2480 GHz |
| Connectors | (1) 1/4" (6.35 mm) output(2) XLR+1/4" (6.35 mm) inputs(1) RCA stereo input pair(1) 1/8" (3.5 mm) input(2) USB ports(1) SD card slot(1) IEC power input |
| Power | Connection: IECInput Voltage: 100–120 V, 60 Hz220–240 V, 50 HzFuse: T6.3A / T3.15AConsumption: 280 W |
| Dimensions(width x depth x height) | 17.2" x 13.5" x 25.4"438 x 343 x 647 mm |
| Weight | 2.2 lbs.21.5 kg |
Specifications are subject to change without notice.
Bluetooth range is affected by walls, obstructions, and movement. For optimal performance, place the product in the center of the room so it is unobstructed by walls, furniture, etc.
Wireless reception and range are affected by walls, obstructions, and movement. For optimal performance, place the product in the center of the room so it is unobstructed by walls, furniture, etc.
Trademarks & Licenses
Denon is a trademark of D&M Holdings Inc., registered in the U.S. and other countries. Denon Professional products are produced by inMusic Brands, Inc., Cumberland, RI 02864, USA.
The Bluetooth word mark and logos are registered trademarks owned by Bluetooth SIG, Inc. and any use of such marks by Denon Professional is under license.
SD is a registered trademark of SD-3C, LLC.
All other product names, company names, trademarks, or trade names are those of their respective owners.
denonpro.com
- User Guide (English)
- Introduction
- Box Contents
- Support
- Rechargeable Batteries
- Features
- Front Panel
- Rear Panel
- Display
- Setup
- Headset Microphone Setup
- Wireless Microphone Setup
- To use a wireless microphone, follow these setup steps:
- To use the included headset microphone, follow these setup steps:
- Playing Music from a USB Flash Drive
- Playing Music from a SD Card
- Playing Music from the Aux Input
- Pairing a Bluetooth Device
- Pairing a Bluetooth Device Using NFC
- To use NFC to pair with Audio Commander:
- Linking Two Audio Commanders
- Assistance technique
- Batteries rechargeables
- Trademarks & Licenses
- denonpro.com
Brand : DENON
Model : Audio Commander
Category : Hi-Fi System