
ES205 - Telephone Escene - Free user manual and instructions
Find the device manual for free ES205 Escene in PDF.


| Type | IP VoIP phone |
| Display | 128×64 graphic LCD, up to 4-line display |
| Lines | 2 SIP lines with dual-color (green/red) LEDs |
| Audio | HD voice, HD handset, speakerphone, headset support |
| Network | Ethernet (10/100), PoE (IEEE 802.3af, model ES205-P), DHCP/Static/PPPoE |
| Power | DC 5V via AC adapter or PoE (IEEE 802.3af) |
| Keypad | Numeric keypad, 4 programmable keys, navigation key, mute, redial, speaker, soft keys |
| Phonebook | Personal, enterprise, LDAP, blacklist; up to 300 contacts |
| Call Features | Hold, transfer (blind/consult), conference (3-way), DND, mute, call waiting, auto-answer, call forwarding |
| Configuration | Via phone menu or web interface (HTTP); supports auto-provision (TFTP/HTTP/FTP) |
| Security | SIP and RTP encryption (RC4), password protection for web/admin access |
| Languages | Multilingual (English, French, Italian, Polish, Portuguese, Russian, Spanish, Turkish, Chinese) |
| Bracket | Adjustable 2-angle stand |
| What's in the box | Phone, handset, handset cord, Ethernet cable, bracket, quick setup guide |
Frequently Asked Questions - ES205 Escene
User questions about ES205 Escene
0 question about this device. Answer the ones you know or ask your own.
Ask a new question about this device
Download the instructions for your Telephone in PDF format for free! Find your manual ES205 - Escene and take your electronic device back in hand. On this page are published all the documents necessary for the use of your device. ES205 by Escene.
USER MANUAL ES205 Escene
ES205 IP Smart VoIP Phone User Manual
Escene Communication Co.Ltd
INDEX
INDEX 2
- Getng Started....4
About....4
Feature Highlights .... 4
-
Set up the Phone....4
-
Phone User Interface....6
3.1 Hardware Component Instrucons....6
3.2 Phone Screen Display Features 8
3.3 Basic Network Settings....9
3.4 SIP Account Setngs....10
3.5 Basic Features....11
3.5.1 Making a Call....11
3.5.2 Anonymous Call....11
3.5.3 Redial....12
3.5.4 Call Log....12
3.5.5 Making Calls to Contact....12
3.5.6 Mul-lines to Answer the Call....13
3.5.7 Auto-Answer .... 13
3.5.8 Ending a Call....13
3.5.9 Using Hold and Recover (Switch Calling Line) 14
3.5.10 Transferring Calls....14
3.5.11 Using Mute 15
3.5.12 Do Not Disturb 15
3.5.13 3-way Conference....16
3.5.14 Voice Mail....16
3.6 Advanced Sengs....17
3.6.1 Using the phone book 17
3.6.2 Using Call Logs....20
3.6.3 Peer-to-Peer 20
3.7 Keypad Setng....20
3.7.1 Language Setng....21
3.7.2 Message 21
3.7.3 Time & Date 21
3.7.4 Ring Tone and Volume Seing 22
3.7.5 Searching Phone Book....22
3.7.6 Cannot Set the Features with Keypad 23
- WEB User Interface 23
Main Interface-Phone Status 23
4.1 Net Work 24
4.1.1 LAN Port 24
4.1.2 PC Port....26
www.escene.cn/en/
4.1.3 Advanced....27
5 SIP Account....28
5.1Basic 28
5.2 Call....29
5.3 Security....30
6 Phone Setng....31
6.1 Basic 31
6.1.1 Time Setngs....32
6.1.2 Call....33
6.1.3 VoIP Call Forward 34
6.1.4 QoS....35
6.2 Advanced....35
6.2 .0 Audio 35
6.3 Line Keys....37
6.4 Funcon Keys ....38
6.5 So Key....38
6.6 Dial Plan....39
6.7 IP Strategy 40
7 Phone Book 40
7.1 Group 40
7.2 Contact....41
7.3 LDAP 41
7.4 Ban List 42
8 Phone Maintenance 43
8.1 Basic 43
8.1.1 HTTP Upgrade....43
8.1.2 FTP Upgrade 44
8.1.3 TFTP Upgrade 45
8.1.4 Default Setng....46
8.1.5 Reboot....46
8.2 Advanced....47
8.2.1 Log....47
8.2.2 Auto Provision 47
9 Password ....49
10 WEB Other Sengs or Information - Appendix....49
10.1 WEB User....49
10.2 Mul-Language 49
10.3 Note Tips....50
1. Geng Started
About
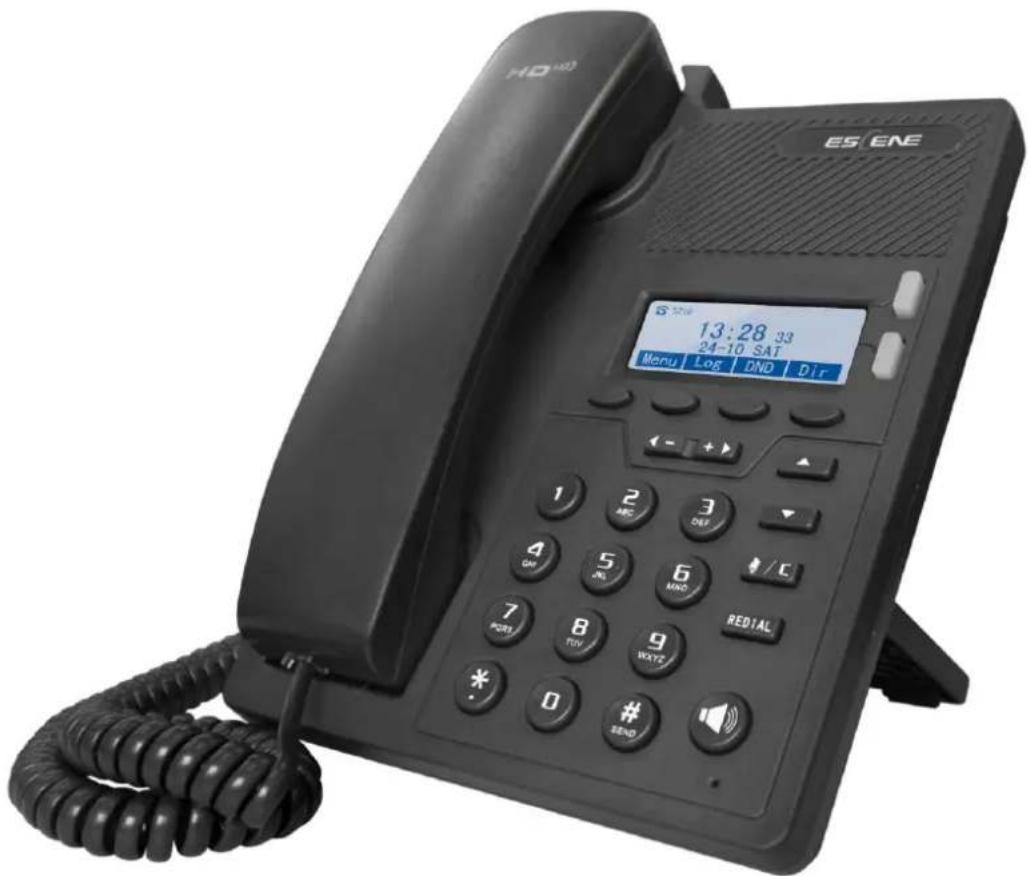
ESCENE ES205 is an compact oce IP phone with rich features. It has 128*64 HD graphic LCD up to 4-line display; it also has HD Sound Quality, unique art design, demountable bracket to provide mul-angle, 4 programmable keys, and friendly user interface to sasfy users's communicaon needs.
Feature Highlights
a) Mul-Language
The LCD display supports Mul-Language.
b) HD Voice
Special voice processing technology, high-delity voice quality, HD encoding, HD Handset, ensure clear, realisc smooth communicaon.
c) Senior Calling Ability
2 lines with double color(GREEN & RED) LEDs, Synchronously control or manage 2 calls, Call queue, Switch between lines. Mul-pares conference, call transfer.
d) All kinds of Phone Book
It supports XML Personal Phone Book\LDAP\Enterprise Phone Book etc. This feature sases customer's phone book requirements.
e) Support HTTP\TFTP\FTP\Auto-Provision.
f) Support POE(Remark: ES205-P) and Power Adapter.
g) 2-angle adjustable bracket.
h) Support 5 programmable keys.
2. Set up the Phone
a) Packing List:
Check the packing list before installaon, if you nd anything missing, contact your system administrator.
● 1*ES205 IP Phone
- 1*Handset
● 1* Handset Cord
- 1*Ethernet Cable
● 1*Phone Bracket
- 1*Quick Setup Guide
b) Phone Installaon:
This secon introduces how to install the phone with the components in the packing list:
- Aach the Bracket
- Connect the Handset and oponal Headset
- Connect the Network and Power
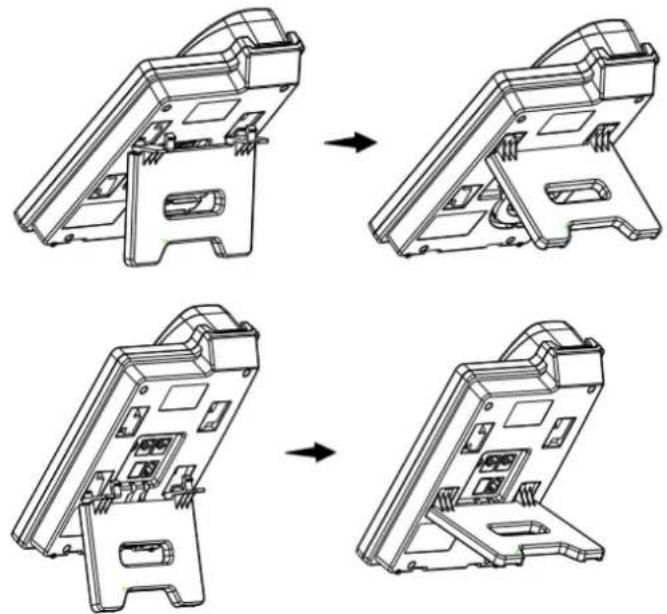
Aach the Bracket
Pls follow as below pictures to each the bracket.
natural_image
Technical line drawing of a device casing assembly showing four sequential steps (no text or symbols)Connect the Handset and oponal Headset

NOTE: Headset port & PSTN port is option. The Back light of LCD also is option.
Connect the Network and Power
You have two opons for power supply. Your system administrator will advise you which one to use.
- AC power adapter
● POE(Power over Ethernet) IEEE802.3af
NOTES: PIs make sure your phone support POE feature. You can check the label on the back of the phone, for example "Model: ES205-PN Rev:2.1.0", the P means it support POE feature.

Note: If POE works, the phone doesn't need to connect to the AC power adapter. Make sure the Ethernet cable and switch/hub is POE compliant.
3. Phone User Interface
3.1 Hardware Component Instrucons
The main hardware components of the ES205 IP Phone are the LCD screen and the keypad.

Hardware component instrucons of the ES205 IP Phone are:
| ITEM | DESCRIPTION |
www.escene.cn/en/
| 1 | LCD Screen | Displayed informaon about calls, messages, so keys, me, date and other relevant data:Call informaon — caller ID, call duraonIcons (e.g.DNDMissed calls or second incoming caller's informaonTime and date |
| 2 | Line Key | Red, ashing: Incoming callRed, steady: Pick up but not on communicaonGreen, steady: On communicaonGreen, ashing: On holdLight o: IdleNOTE: Light yellow steady: Under the idle status, the light will on when:Missed Call, Transfer, DND, Message, Mute,SIP-Unregistered. |
| 3 | So Key | Labels automacally to identify their context-sensitive features |
| 4 | NavigaonKey&Volume Key | In the idle status, press UP or DOWN key can check the call log:UP: Open the "All CONTACT LOG",DOWN: Open the "MISSED CALL",RIGHT and LEFT can check other list, like "RECEIVED CALL\DAIL CALL". In the idle or talking status, press RIGHT or LEFT key can adjust th volume. |
| 5 | Mute & C Key | Cancels acons or rejects an incoming call, and the other feature:In the idle: Open the "Phone Status".Diagnosis: Press and hold 3 second to open "Hardware Diagnosis".MUTE: "MUTE" feature is enabled if you press it while the conversaon making on the phone. |
| 6 | Redial Key | Dial the latest number. |
| 7 | Programmable Key | In the idle status, press and hold 3s will enter programmable funcon, the default password is empty:Line 1 & 2: press and hold can quickly enter account seng. If you want set it to another funcon, you need to login into website to change it.Navigaon key UP & DOWN, Redial key press and hold can quickly enter programmable key seng funcon, they can change to Redial\DND\Personal Phonebook\Enterprise Phonebook\LDAP\Directory\Speed Dial\Call History\Received Calls\Dialed Calls\Main Menu\New Message\Forwarded Calls\View Status\Enable/Disable SIP Account\Default.NOTE: MUTE&C key isn't support programmable funcon. |
| 8 | Speaker Key | Toggles the hands-free speaker phone mode. Press and hold can change to headset mode |
| 9 | MIC | High sensitive pickup Mic. |
| 10 | Keypad | Provides the digits, leers and special characters in context-sensitive applicaons. |
| 11 | Speaker | HD speaker. |
3.2 Phone Screen Display Features
If the phone has successfully started up and aer using, the idle LCD display will show informaon as below:

| ITEM | DESCRIPTION | |
| 1 | TIME & DATE | TIME & DATE display in the middle of the screen. |
| 2 | Auto-Answer icon | Enable this feature, it will display "AA" at the top right corner. |
| 3 | Missed Call | Missed Call under the TIME in the middle of screen |
| 4 | Line Status | There are four status as below:a. Disconnect the networkb. Account failed to registerc. Account successfully registeredd. Account successfully registered and DND feature is enabled.The DND icon also will display at the top right corner. |
| 5 | So Key Area | Labels automacally to identify their context-sensitive features |
| 6 | Screen Top Icon | The Screen Top Icon from le to right is: Handset Hand on status Handset Hand on status Speaker Hand on status Speaker Hand on status Headset Hand on status Headset Hand on status Call MUTE Call MUTE Missed Call Missed Call Call Forward Call Forward Text Message Text Message :Keypad Lock :Keypad Lock :Network is unavailable :Network is unavailable |
3.3 Basic Network Sengs
The phone supports Three Modes of Network Seng. Include PPPoE\Stac IP\DHCP.
DHCP Seng
| Feature | Operang Steps |
| DHCP | Press MENU> System Sengs> Advanced Sengs> Password(Default is Empty)> Network> LAN Port● Press LAN Port to login in to the menu● Select "DHCP" mode● Press "Enter" key● Set the DNS\web port\telnet port● Press "Save" key to make it work● Tips "Network is changed, press OK reboot " |
Stac IP Seng
| Feature | Operang Steps |
| Stac IP | Press MENU> System Sengs> Advanced Sengs> Password(Default is Empty)> Network> LAN Port● Press LAN Port to login in to the menu● Select "Stac" mode● Press "Enter" key● Set the IP\Mask\GW\DNS\web port\telnet port● Press "Save" key to make it work● Tips "Network is changed, press OK reboot " |
PPPoE Seng
| Feature | Operang Steps |
| PPPoE | Press MENU> System Sengs> Advanced Sengs> Password(Default is Empty)> Network> LAN Port● Press LAN Port to login in to the menu● Select "PPPoE" mode● Press "Enter" key● Set the User Name\Password\web port\telnet port● Press "Save" key to make it work● Tips "Network is changed, press OK reboot " |
3.4 SIP Account Sengs
ES205 IP phone makes calls based on sip accounts, It can support Single account or Mul-account, Each account can be congured to the dierent SIP server.
| If you want to... | Then... |
| Create an SIP account | --1) Select “System setng” > “Advanced setng”;--2) Enter the password required (The default is empty);--3) Select “SIP” > “Account sip”;--4) Select one of the account you want to seng, you can congure the following parameters-Enable account*: Select Enable-Number of lines: Default is 2-Descripon: descripon of this account-Display Name: The name displayed on the screen-Authencaon user: the Authenticated users are matched with the SIP server.(The default With the same account)-Account*: the account matches with the SIP server.(extension number)-User pass word*: the user password matches with the SIP server-SIP Server*: The primary SIP server, all calls through this server-Out Bound Server: The out bound SIP server-STUN Type: Enable/Disable STUN feature-STUN: Input STUN URL-Auto Answer: Enable/Disable this account auto answer feature* Note: When you nish the setng, you can press Save to make it work, and then you can see the status icon in the LCD idle.The parameters with the * mark must be set. |
| Disable sip account | --1) Select “System setng” > “Advanced setng”;--2) Enter the password required (The default is empty);--3) Select “SIP” > “Account sip”;--4) Select “Enable account” > “Disable”;--5) Select “Save” to saves sengs |
3.5 Basic Features
3.5.1 Making a Call
Here are some easy ways to place a call on SayHi IP Phone:
| If you want to... | Then... | |
| Place a call using the handset | Pick up the handset | --1) You can hear dial tone;--2) Enter a number;--3) Press # buon (default),-or wait 5s (default), then it send the number automacally. |
| Place a call using a speakerphone | Press Speaker buon | |
| Place a call using a headset | Put on your headset,Press and hold the speakerbuon to acve Headsetfeature, and then do asusing speakerphone | |
3.5.2 Anonymous Call
You can use anonymous call feature to block the identity and phone number from showing up to the called party when you call someone. E.g, you want to call to consult some of the services, but you don't want to be harassed.
| Enable Anonymous Call | Press MENU> Funcon Seng> Anonymous |
| --Press Enter button ,-You can select which Account want to use, enable/disable this feature and enable/disable reject anonymous |
3.5.3 Redial
To redial the last placed call from your phone
| Redial | --Press REDIAL buon to dial the last number-or press Navigaon buon-Le > “Dialed number”, select a number, and press Dial |
3.5.4 Call Log
| Dial from a call log | --1) Press MENU button > “Call history”, you can select "All Calls", “Missed calls”, “Received calls” and “Dialed numbers”,- or press Navigaon UP/DOWN buon (in idle status) > select "All Calls"(up) “Missed calls”(down), le and right can select “Dialed numbers” or “Received calls”--2) Then press [Dian]NOTE: You also can press the "log" to login this menu when in the idle. |
3.5.5 Making Calls to Contact
You can also dial a contact from the Personal Phone Book.
| Placing Calls to Contacts | --1) Press MENU buon > “Phone Book”, you can select "Personal Phone Book", “Enterprise Phone Book”, “LDAP” and “Black List”, - or press Navigaon UP/DOWN button (in idle status) > select the desired contact.--2) Then press [Din]NOTE: You also can press the "DIR" to login this menu when in the idle. |
3.5.6 Mul-lines to Answer the Call
| Mul-lines to Answer the Call | --1) Another Line buon is Red and ashing, Light strip is Red and ashing;--2) Press the ashing Line buon to answer (at this me, the original call will be hold.) |
3.5.7 Auto-Answer
You can set the phone and let it auto-answer the coming call.
| Auto-Answer the Coming Call | --1) Enable the Auto-Answer feature.--2) Auto-Answer mode you can set in the MENU>Funcon Seng>Auto Answer >DeviceSpeakerHandsetHeadsetWhen you use the Handset mode, at this me you need to hands up the handset and then it can work at this status.--3)Filter GroupsAuto-answer the coming call in this special groups. |
3.5.8 Ending a Call
To end a call, hang up. Here are some more details. NOTE: Press and hold the speaker key can change to Handset feature.
| Hang up while using the Handset | --Return the handset to its cradle, -or press End |
| Hang up while using the | --Press Speaker button, |
| Speakerphone | -or press Line buon for the appropriate line,-or press End |
| Hang up while using the Headset | --Press Handset button, (Do not keep the headset mode),-or press End (keep the headset mode) |
| Hang up one call, but preserve another call on the other line | --Press End,-or refer to the above three methods |
3.5.9 Using Hold and Recover (Switch Calling Line)
You can hold and resume calls. You can take a call in one line at anyme, and the other lines would be hold. As a result of that, you can switch dierent calling line on our phone. Note: If the phone isn't have the hold buon, pls using the so key.
| If you want to... | Then... |
| Put a call on hold | --Press HOLD buon,-or press so key Hold |
| Hold a line and switch to another line | Press another Line buon for the appropriate line |
| Resume a call on current line | --Press Line buon, |
| Release a call on dierent line | Select the line want to release hold, press the line, so recovery; |
NOTES
- Engaging the Hold feature typically generates music or a beeping tone.
- A held call is indicated by the Yellow-green and ashing Line button or Hold in the LCD.
3.5.10 Transferring Calls
Transfer redirects a connected call. The target is the number to which you want to transfer the call.
| Talk to the transferrecipient before | --1) Press TRANSFER buon or press XFER;--2) Enter number; |
| transferring a call(consult transfer) | --3) press “#” (default),-or press then transfer the call,-or wait ve seconds(default)then transfer the call |
| Transferred to idle lines or other numbers without talking to the transfer recipient(Blind transfer) | --1) Press TRANSFER button or XFER;--2) Press Blind--3) Enter number;--4) Press “#” (default)-or press Send transfer the call;-or wait ve seconds(default)then transfer the call |
| Blind transfer to the held line | --1) Press TRANSFER buon or press XFER;--2) Press the Line buon of held line |
3.5.11 Using Mute
With Mute enabled, you can hear other pares on a call but they cannot hear you. You can use mute in conjuncon with the handset, speakerphone, or a headset.
| Toggle Mute on | Press C buon, then the screen top and le will have a MUTEicon  |
| Toggle Mute o | Press C buon again, then the buon light o |
3.5.12 Do Not Disturb
You can use the Do Not Disturb(DND) feature to block incoming calls on your phone with a busy tone (Can also be set to their voice mail or other extension numbers, etc.).
| Enable global DND | --1) Press DND;--2) All enabled line on the phone would changes to  us. and the icon isDND us. and the icon isDND |
| Enable DND on a single line | PressMENUbutton > “Funcon seng” > “DND” > (select line) “Enable” |
| Disable DND | --Global DND enabled, pressDNDto disable global DND;--Line DND enabled, press twiceDND,-or press MENU buon > “Function setng” > “DND” >(select line)“Disable” |
3.5.13 3-way Conference
You can enable a three-party conference, during the conversaon three phone pares can communicate with every party.
| If you want to... | Then... |
| Invite the transfer recipient into a conference in a transferring | --1) When the transfer recipient answer the call, press CONFERENCEbuon or "CONF" on your phone;--2) Then the held one, transfer recipient and you will be into a conference, and the LCD will display status. |
| Invite the third party into a conference in a acve call | --1) Press "CONFERENCE" button or "CONF" in an acve call;--2) Enter the third party number;--3) Aer connected the third party, press "CONFERENCE" buon or "CONF" again |
| establish a conference with held line | --1) when one phone line is holding on and the other line is busy;--2) Press "CONFERENCE" buon,-or Press "CONF" So key--3)Press the held line's programmable buon, the 3-way Conference is enable. |
3.5.14 Voice Mail
You can seng Voice Mail funcon in Menu> Message.
| Voice Mail | --1)Dial the voice mail number, e.g *97--2)Enter the User Password--3)It will login into the voice mail server. You need to follow the IVR to do it. |
3.6 Advanced Sengs
3.6.1 Using the phone book
Enterprise Phone Book
| Search the Contacts from Enterprise Phone Book | --1) Press DIR in the idle status, -or press "MENU" button > “Phone book”>“Enterprise Phone Book”, --2) Select “Enterprise Phone Book”, press "OK" buon; --3) Press "Find" and input the name who you want to search. |
| Call the Contact from Enterprise Phone Book | --1) Press "DIR" in the idle, -or press "MENU" buon > “Phone book”>“Enterprise Phone Book”, --2) Select “Enterprise Phone Book”, press "OK" buon; --3) Press "Find" and input the name who you want to search. --4) When you search the person, you can dial it. |
Personal Phone Book
| Add Contacts | --1) Press Phone Book,-or press "MENU" button > “Phone book”>“Personal phone book>View All”,-or press "OK" buon > “Phone book”>“Personal phone book>View All”;--2) Select “Add contact”, press "OK" button;--3) Use the navigaon keys to select content, press "OK" buon to set and modify:-Name: set the name of contact,-Oce Number: Seng the contact Oce Number -Mobile Phone Number: Seng the contact Mobile Phone Number -Others Number: Seng the contact Others Number -SIP Account: Seng the contact call SIP account -Group: the contacts be divided into dierent user's groups --4) Press "Save" so key to complete |
| Add group | --1) Press "DIR" so key, -or press "MENU" button > "Phone book">"Personal phone book>View All", -or press "OK" buon > "Phone book">"Personal phone book>View All"; --2) Select the "add group" then press OK button; --3) Use the navigaon keys to select content, press OK buon to set and modify: -Group name: name of the group --4) Press "Save" so key to complete |
| Modify group | --1) Press "DIR" so key, -or press "MENU" button > "Phone book">"Personal phone book>View All", -or press "OK" buon > "Phone book">"Personal phone book>View All"; --2) Select the "Modify group" then press "OK" button; --3) Select the group you want to modify, press the "OK" buon to set and modify, press "Save" to save the change |
| Delete group | --1) Press "DIR" so key, -or press "MENU" button > "Phone book">"Personal phone book>View All", -or press "OK" buon > "Phone book">"Personal phonebook>View All";--2) Select the “Delete group” buon;--3) Select a group you want to delete, press OK buon |
LDAP
| Search the Contacts from LDAP | --1) Press "DIR" in the idle, -or press "MENU" button > "Phone book">“LDAP”, --2) Select "LDAP", press "OK" button; --3) Press "Find" and input the name or number who you want to nd search from the LDAP server. |
| Call the Contact from LDAP | --1) Press "DIR" in the idle, -or press "MENU" buon > "Phone book">“LDAP”, --2) Select "LDAP", press "OK" button; --3) Press "Find" and input the name or number who you want to nd from the LDAP server. --4) When you search the person, you can dial it. |
Black List
| Add the Contacts | --1) Press "DIR" in the idle,-or press "MENU" button > "Phone book">“Black List”,--2) Select "Black List", press "OK" buon;--3) Press "Add" and input the name\oce number\mobilenumber\other number\SIP account who what you want to add intthe Black List. |
| View the Contactfrom Black List | --1) Press "DIR" in the idle,-or press "MENU" or "OK" buon > "Phone book">“Black List”, |
| --2) Select “Black List”, press "OK" buon;--3) Press "RUN" to view someone who what you want to nd.--4)If you want to move or change it, you can follow the RUN to do. |
3.6.2 Using Call Logs
Your phone maintains records of your missed, placed, and received calls.
| View call logs | --1) Press "MENU" or "LOG" button > "All Call" > "Missed Calls", "Received Calls", or "Dialed numbers"--2) Use the navigaon keys to view the call record informaon. |
| Delete/Save Call Logs | --1) Login in to the Call Logs--2) Use the navigaon keys to view the call record or select DEL key.--3) Use the navigaon keys to view the call record or select Save key. |
3.6.3 Peer-to-Peer
When all of the phone accounts were disable or not register, it will be show this mode in the idle. It can use by when the new workstaon isn't have SIP server.
| Peer-to-Peer | Disable all of accounts or not register. |
| Make Call with Peer-to-Peer | --1)Press MENU buon> System Seng> Advanced Seng> SIP Account;--2)Disable all of accounts or un-register;--3)Turn back the phone idle, you can call someone use IP address. |
3.7 Keypad Seng
SayHi series IP Phone can through two ways conguraon it, one is seng in MENU, another is seng in website. Here just descripon in MENU.
NOTES: When you want to input the IP address like ".", it was replaced by the "*".
3.7.1 Language Seng
ES205 IP Phone support Mul-Language seng, as below is an example.
| Switch the Language between Chinese and English | --1) Press MENU button> System Seng> Phone Seng> Language--2) Here you can selectEnglish\French\Italian\Polish\Protuguese\Runssian\Spanish\Turkish\Chinese--3) Aer you nish select, press Save to make it work. |
3.7.2 Message
ES205 have Message feature. It will display in the LCD when it has a New Message.
| Create a Message | --1) Press MENU buon;--2) Select "Messaging"--3) Voice Message: Seng the Voice Message code in here.Text Message: Write down the Text Message in here.--4) Select Text Message> New Message.--5) Input the receiver and write down message body, and then press send to nish. |
| Message Inbox | --1) Select Message Inbox.--2) Select which one you want to check.--3) You can press Enter to read or press Del to delete. |
3.7.3 Time & Date
| SNTP | --1) Press MENU buon;--2) Press MENU buon> System Setng> Phone Seng> Time & Date> Time and Date seng> SNTP--3) SNTP-Time Zone: Seng the me zone-NTP Server 1: NTP server address 1-NTP Server 2: NTP server address 2-DayLight: Enable/Disable Day Light |
| SIP Server | --1) Press MENU buon;--2) Press MENU buon> System Setng> Phone Seng> Time & Date> Time and Date seng>SIP Server--3) Press Save to make it work |
| Manual Seng | Press MENU buon;--2) Press MENU button> System Setng> Phone Setng> Time & Date> Time and Date seng> Manual Seng--3) Manual Seng- Manual Seng: Year\Month\Days\Hours\Minutes\Seconds |
| Time Display Format | --1) Press MENU buon;--2) Press MENU button> System Setng> Phone Setng> Time & Date> Time Display Format--3) Time Mode: 24hour\12hourDate mode:DDMMWWW\MMDDWWW\WWWDDMMM\DDMMMYY\YYYYMMDD\DDMMYYYY\MMDDYY\DDMMMYYYY\WWWDDMMM etc. |
3.7.4 Ring Tone and Volume Seng
| Ring Type | --1) Press MENU buon;--2) Press MENU button> System Seng> Phone Seng>Ring Type--3) Select the ring type from 1 to 8 or custom ring, and then press Save to make it work. |
| Volume Seng | --1) Press MENU buon;--2) Press MENU button> System Seng> Phone Seng> Volume Seng--3) Volume Seng: Handset\Speaker\Headset\Ring volume--4) Press Enter to adjust the volume and press Save to make it work |
NOTES: For the Custom Ring Type you need to upload it from website.
3.7.5 Searching Phone Book
| Accurate Search | --1) Press MENU buon > “Funcon Seng”, you can select " Accurate Search "--2) Then press Enable/Disable and Save.--3) When you back to idle, you can use the digital keypad to search the contact. |
| T9 Search | --1) Press MENU buon > “Funcon Seng”, you can select " T9 search"--2) Then press Enable/Disable and Save.--3) When you back to idle, you can use the digital keypad to search the contact. |
NOTES: The Search Phone Book seng default is Accurate Search.
3.7.6 Cannot Set the Features with Keypad
As below features are cannot seng with the keypad:
1) Dial Plan.
2) Custom Ring Type
3) SNTP Server and Time & Date
4) Update the Firmware or Backup.
4. WEB User Interface
In addition to the phone user interface, you can also customize your phone via web user interface. In order to access the web user interface, you need to know the IP address of your new phone. To obtain the IP address, press the C key on the phone. Enter the IP address (e.g.
HTTP://192.168.0.10 or 192.168.0.10) in the address bar of web browser on your PC. The default user name is root (case-sensitive) and the password is root (case-sensitive).
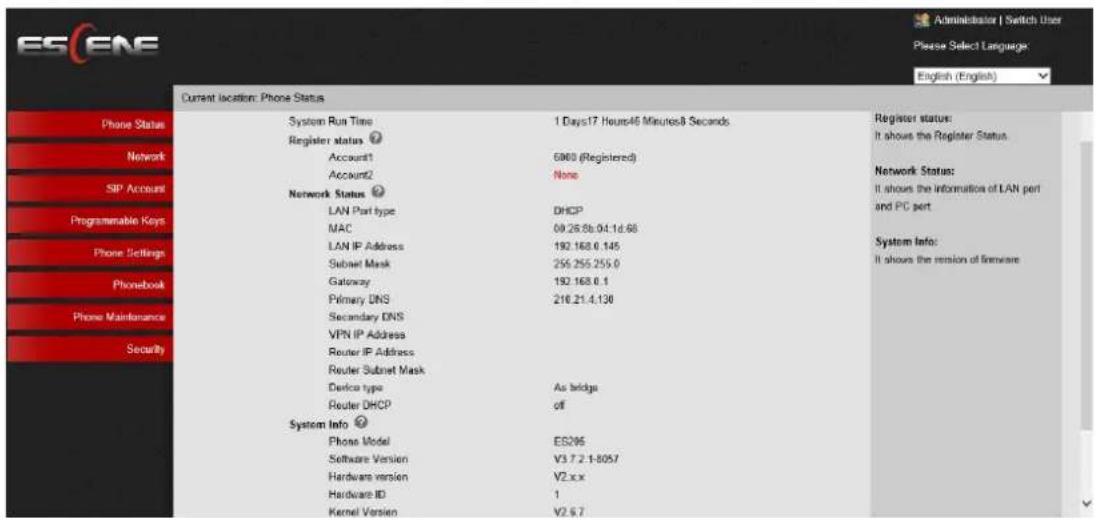
Main Interface-Phone Status
Here you can see as below informaon: System Run Time, Register Status, Network Status, System Informaon,
| ITEM | DESCRIPTION |
| System Run Time | The phone system normal running me. |
| Register Status | The status with Account 1~3. |
| Network Status | The status with LAN, MAC, LAN IP, Net mask, Gateway, Primary DNS, Secondary DNS, VPN IP, PC IP, PC Net mask, Device Type, DHCP Server. |
| System Informaon | The status with Phone Model, Soware Version, Hardware Version, Hardware ID, Kernel Version, Auto-Provision Server URL, TFTP Server IP. |
4.1 Net Work
4.1.1 LAN Port
Basic

| ITEM | DESCRIPTION |
| Network Connecon Mode | Network Connecon Mode has DHCP, Stac IP, PPPoE. |
| DNS Sengs | Select the DNS mode that you want. |
Advanced
Port Management Settings
| HTTP Port | 80 |
| Telnet Port | 23 |
Socket5 Proxy Server
| Socket5 Proxy Server | ● off ○ on |
| Server IP | |
| Port | 1080 * |
| Anonymous Login | ✓ |
| Username | |
| Password |
Paging Setting
| Paging 1 | ● off ○ on | |
| Group IP | Port: 10000 | |
| Paging 2 | ● off ○ on | |
| Group IP | Port: 10000 | |
| Paging 3 | ● off ○ on | |
| Group IP | Port: 10000 | |
| Paging 4 | ● off ○ on | |
| Group IP | Port: 10000 | |
| Paging 5 | ● off ○ on | |
| Group IP | Port: 10000 |
Please Note: Changing the default HTTP Port (80) will require using the new port number to access the IP phone web interface. Please note that changes require a reboot. Use the following format when not using the default HTTP (http://ip address:portnumner).
| ITEM | DESCRIPTION |
| Port Management Sengs | |
| HTTP Port | The default web port is 80,if you want to change it(for example change it to88),You must input IP and Web port to login the web page(for example HTTP://192.168.0.200:88). It will take eect on next reboot. |
| Telnet Port | The default Telnet port is 23,if you want to change it(for example change it to 2003). You must input IP and Telnet port to login the manage page (for example telnet 192.168.0.200:2003).It will take eect on next reboot. |
| Socket5 Proxy Server | |
| Socket5 Proxy Server | Enable/Disable Socket5 Proxy Server. |
| Server IP | Socket5 Proxy Server IP address. |
| Port | Socket5 Proxy Server port, default is 1080. |
| Anonymous Login | Enable/Disable Socket5 Proxy Server login username. |
| Paging Seng(NOTE: This feature priority is followed the serial number, In other words, "paging 1" is the highest priority) | |
| Paging1 | Enable/Disable Paging feature. |
| Group IP and Port | Group IP and Port with Paging. |
4.1.2 PC Port
Normally choose Bridge, if you choose Router, you need to input router IP address, net mask.

Bridge
Normally, you should choose "bridge" feature, it means that pc port and LAN port will share the same network.
Router
Router feature is for the phone PC Port. You must input IP address (it's equivalent to a gateway) and Net mask. If you want to use DHCP funcon, please turn it on, input start IP and end IP.
4.1.3 Advanced
VPN Seng

When using VPN Seng opon, you can set several parameters as follow:
| VLAN Seng | |
| Enable VPN | You can enable/disable VPN for phone and pc. |
| VPN Type: | Choose the appropriate type of VPN. |
| VPN Server Addr | VPN server's IP. |
| VPN User Name | VPN user's name |
| VPN Password | A password be used for authencaon |
VLAN Seng

When using VLAN Seng opon, you can set several parameters as follow:
| VLAN Seng | |
| Enable VLAN | You can enable/disable vlan for phone and pc |
| VID[LAN/PC Port] | The vlan ID you want the phone or pc to join |
5 SIP Account
5.1Basic
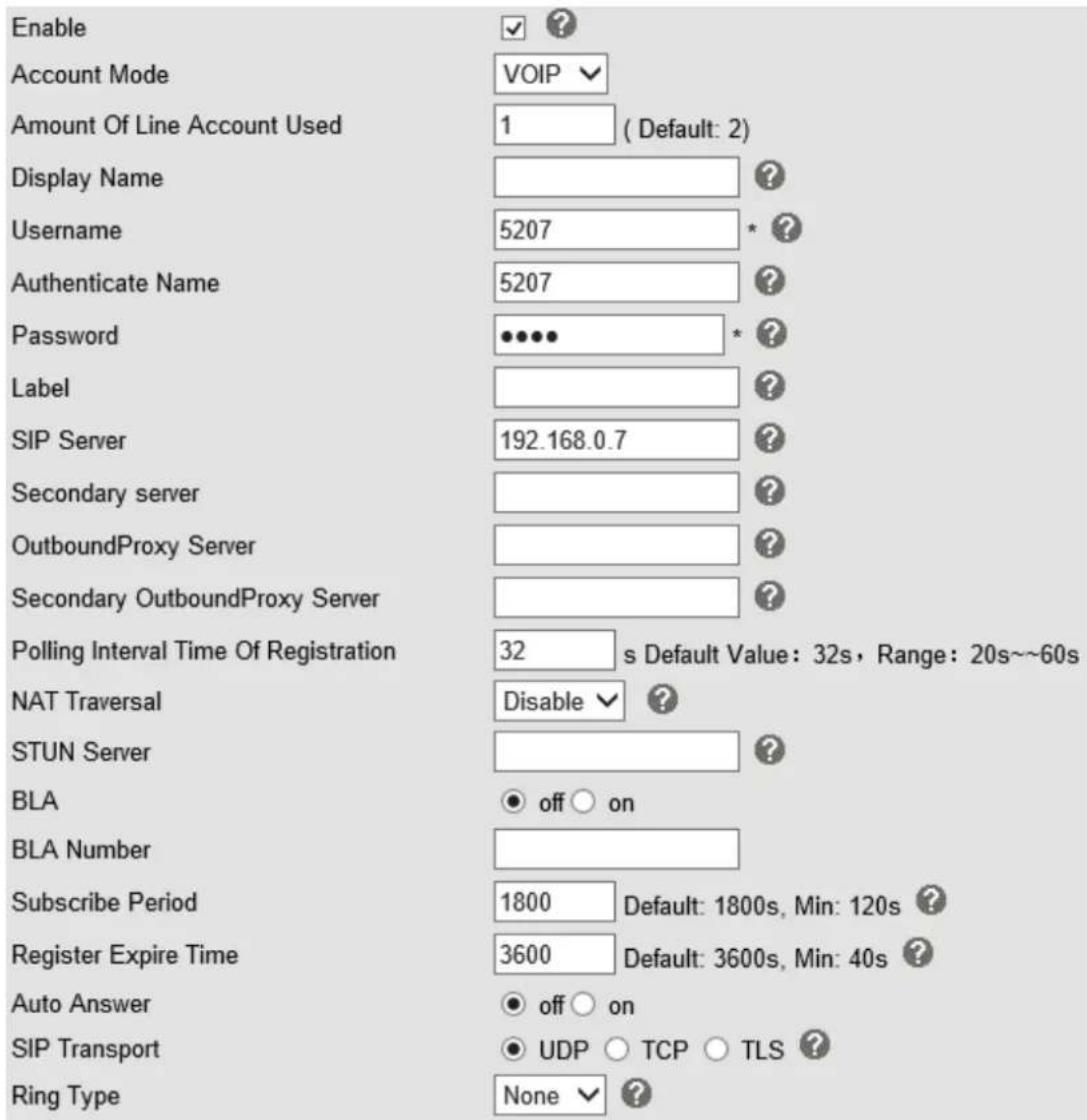
Choose one Account, you will nd the following parameters:
| ITEM | DECSRIPTION |
| Enable | You can choose on/o to enable/disable the line. |
| Account Mode | You can choose VOIP/PSTN, but this model nonsupport PSTN, If you need, PIs contact us to buy another model that can supports PSTN. |
| Amount Of Line Account Used | The line key of account used, default is 2 |
| Display Name | It is showed as Caller ID when making a phone call |
| Username | It is a username provided by SIP Server |
| Authenticate Name | It is authenticated ID for authencaon |
| Password | It is a password provided by SIP Server |
| Label | Label with this account. |
| SIP Server | Server for registration, provided by administrator |
| Secondary server | When the main server can't work, it also can register in this secondary server. |
| Outbound Proxy Server | Put into the address with the outbound proxy server. |
| Secondary Outbound Proxy Server | When the main out bound server can't work, it also can use this secondary server. |
| Poling Interval Time Of Registraon | Poling Interval Time Of Registraon, default is 32 s. |
| NAT Traversal | Denes the STUN server will be acve or not |
| STUN Server | Session traversal ulies for NAT. |
| BLA | Share with the line. |
| BLA Number | BLA Number |
| Subscribe Period | Subscribe expire me. |
| Register Expire Time | IP phone automacally registered every me |
| SIP Transport | There are UDP/TCP/TLS three opons |
| Ring Type | Select this account ringing type. |
5.2 Call
| Do Not Disturb | ● off ○ on |
| Anonymous Call | ● off ○ on ? |
| Anonymous Call Rejection | ● off ○ on ? |
| Use Session Timer | ● off ○ on |
| Session Timer | 300 (min:150s) |
| Call Method | ● SIP ○ TEL |
| DNS-SRV | ● off ○ on |
| Allow-events | ● off ○ on |
| Registered NAT | ○ off ● on |
| UDP Keep-alive Message | ● off ○ on |
| UDP Keep-alive Interval | 30 (15-60s) |
| ITEM | DECSRIPTION |
| Call | |
| Do Not Disturb | Enable/Disable Do Not Disturb |
| Anonymous Call | Enable/Disable anonymous call. |
| Anonymous CallRejecon | Enable/Disable anonymous call rejecon. |
| Use Session Timer | Enable/Disable refresh session funcon. The device will send an Invite packet to refresh the session during a call if it enable. |
| Session Timer | The refresh session me interval. |
| Call Method | This method include SIP and TEL. |
| DNS-SRV | Enable/Disable DNS-SRV. |
| Allow-events | Enable/Disable Allow-events. |
| Registered NAT | Enable/Disable Registered to NAT |
| UDP Keep-aliveMessage | The phone periodically sends a UDP packet to keep the port acve and to avoid the server to shut down the port |
| UDP Keep-alive Interval | Default is 30 second. |
5.3 Security
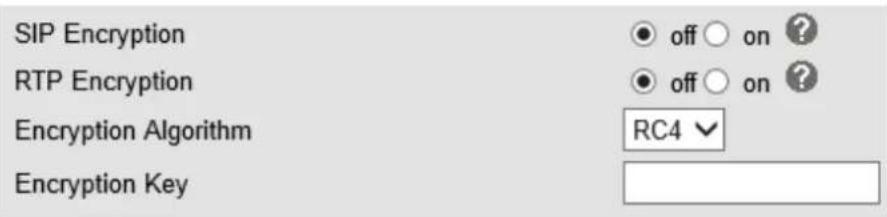
| ITEM | DECSRIPTION |
| Security | |
| SIP Encrypon | Enable/Disable SIP encrypon. |
| RTP Encrypon | Enable/Disable RTP encrypon. |
| Encrypon Algorithm | The encrypon algorithm at this me we only have RC4. |
| Encrypon Key | The key with encrypon. |
6 Phone Seng
6.1 Basic

| ITEM | DECSRIPTION |
| Basic | |
| Back Light | The backlight of the phone LCD. |
| Keyboard Lock | Enable/Disable keyboard lock, you can lock: MENU Key, FUNCTION Key., ALL Keys, LOCK all keys but auto Answer. |
| Hot Line funcon | When you pick up the handset, it will dial out with the hot number. |
| Hot Number | Input the number what you want to. |
| Auto Answer | Auto-answer the coming call, it also can lter a contact group. |
| Auto Answer Mode | Auto-answer the coming call, it also can lter a device to answer. |
| Call Waing | When there's coming a call or the phone is talking, the second call will be in the queue. |
| Call Waing Tone | Select the frequency with the tone when call waing. |
| DTMF | The DTMF transmied mode, include RFC2833,Inband,SIP Info, Auto |
| Fuzzy Search | Fuzzy search someone with the phone book in the idle. |
| Phone Book Search | Enable/Disable the phone book search feature with accurate or T9 mode. |
| Call List Save | You can choose to save the call list into the phone or not. |
| Network Packet Mirroring | When select on, then you can capture the phone's packet use notebook which connect to pc port of the phone |
6.1.1 Time Sengs

| ITEM | DECSRIPTION |
| Time Sengs | |
| Set Time Mode | Include SNTP/SIP Server/PSTN/Manual |
| SNTP Server | You can select in the list or input owner server address. |
| Update Interval | The update interval with SNTP. |
| Day Light Saving Time | Enable/disable the DST for the phone |
| Time Format | You can use 24 hour me format or 12 hour me format |
| Date Format | You can choose the appropriate me format. |
| Time Zone-GMT | You can select dierent me zone for the phone |
| Manual Seng | Seng me manually. |
6.1.2 Call

| ITEM | DECSRIPTION |
| Call | |
| Pickup Funcon | When you are not in the posion, others can help you to answer. |
| Pickup Code | Fill in server's pickup code. |
| Message | The code with voice message. |
| Booking Voice Mail | Open this feature, the phone light(Message) will be bright when it get message. |
| Play Voice Mail Tone | Open this feature, it will be ringing when it get message. |
| Miss Call Display | Turn on or o the display with Miss call in the phone LCD. |
| DND So key | Enable/Disable the DND feature. |
| Play Hang-up Tone | The tone with hang up in busy. |
| Transfer Code | The code with transfer. |
| Conference Exit Result | Conference originator hang up the phone, hang up two ways of it. |
| Return Code When Refuse | Select the code feedback to the server when you reject the call. |
| Return Code When DND | Select the code feedback to the server when you open DND funcon. |
| Flash Hook Time(<800ms) | The me with the ash hook. |
| Called No Answer Time | When it has coming call and enable this feature, the caller will be request me out in the spulated me. |
| Pound Send Method | When you to use the code, such as: #28#123 or %23123, you need to set this feature. |
| RFC 2833 Play Load | Default is 101, RTP Payload for DTMF Digits, Telephony Tones and Telephony Signals |
| P-Asserted-Identity | Enable/Disable the P-Asserted-Identity feature. |
| SIP Session Timer T1 | The SIP Session Timer seng. |
| SIP Session Timer T2 | The SIP Session Timer seng. |
| SIP Session Timer T4 | The SIP Session Timer seng. |
| Local SIP Port | The port range seng with SIP, default is 5060. |
| RTP Port Range | The port range with RTP |
| Aliated Port | Enable/Disable the aliated port feature. |
| Headset Mode | Select headset mode with normal or seat. |
| Ring Type On Seat Mode | Select ring type mode with headset or speaker. |
6.1.3 VoIP Call Forward

| ITEM | DECSRIPTION |
| Always | All ways transfer the call to others. |
| If Busy | If the phone was busy working, the call will be transfer to others. |
| If No Answer | If the phone was no answer, the call will be transfer to others. |
| Ring Frequency | The ring frequency with the VOIP Call Forward. |
www.escene.cn/en/
6.1.4 QoS
| SIP Qos | 26 | (0-63) |
| Voice Qos | 46 | (0-63) |
| ITEM | DECSRIPTION |
| SIP QoS | The range is 0~63,default is 26 |
| Voice QoS | The range is 0~63,default is 46 |
6.2 Advanced
6.2 .0 Audio
6.2.1 Basic

| ITEM | DECSRIPTION |
| Basic | |
| Select Country | Select the country dial tone. Default is United States. |
| Ring Volume | The ring volume default is Lv3, the range is 0~9. |
| Handset Volume | The handset volume default is Lv5, the range is 1~9. |
| Speaker Phone Volume | The speaker volume default is Lv5, the range is 1~9. |
| Headset Volume | The headset volume default is Lv3, the range is 1~9. |
| Handset MIC Volume | The handset MIC volume default is Lv3, the range is 1~7. |
| Speaker Phone MIC Volume | The speaker MIC volume default is Lv3, the range is 1~7 |
| Headset MIC Volume | The headset MIC volume default is Lv3, the range is 1~7 |
6.2.2 Advanced

| ITEM | DECSRIPTION |
| Ring | |
| Ring Type | Select the ring type. Default is Ring 1. |
| Uploading Ring Tone | Please upload a ring tone with G711A audio coding, Maximum 10 rings and the total sizes must less than 150k. |
| Audio Codec | Use the navigaon keys to highlight the desired one in the Enabled/DisableCodes list, and press the >>/ << to move to the other list. |
| Jier Buer | |
www.escene.cn/en/
| Type | The type of Jier Buer is Adapve or Fixed, default is adapve. |
| Min Delay | The min delay range seng , default is 60. |
| Max Delay | The max delay range seng , default is 150. |
| Normal Delay | The normal delay range seng , default is 120. |
| Other | |
| Play Load Length | The play load length seng, default is 30ms. |
| High Rate Of G723.1 | Enable/Disable High Rate of G723.1 feature. |
| VAD | Enable/Disable VAD feature. |
| Echo Suppression Mode | Enable/Disable Echo Suppression Mode feature. |
| Side Tone | Enable/Disable Side Tone feature. |
6.3 Line Keys


| ITEMS | DESCRIBES |
| Line | The default value. |
| Speed Dial | You can use this key feature to speed up dialing the numbers oen used or hard to remember. |
| Speed Dial Prex | You can use this key feature to speed up dial a call with a specied prex number. |
| DTMF | You can use this key feature to send the specicaon of arbitrary key sequences via DTMF. |
| BLF | You can use the BLF feature to monitor a specic user for status changes on the phone. |
| Paging | You can use mulcast paging to quickly and easily forward me sensitive announcements out to people within the mulcast group. |
| Call Park | You can use call park feature to place a call on hold, and then retrieve the call |
www.escene.cn/en/
| from another phone in the system (for example, a phone in another oce or conference room). | |
| Intercom | You can press the congured intercom key to automacally connect with a remote extension for outgoing intercom calls, and the remote extension will automacally answer the incoming intercom calls |
| BLA | This feature such as the BLF. |
NOTE: ONLY WHEN YOU CHOOSE "SPEED DIAL", THE RIGHT OF "NAME","NUMBER" WILL TAKE EFFECT.
6.4 Funcon Keys
Funcon Keys: If you do not like the default seng with the funcon keys feature. You can change to whatever you like.
NOTE: IF THE PHONE WITHOUT THE KEY, YOU CAN IGNORE IT.
| Operation | Account | Name | Number | |
| Up: | Contacts | Account1 | ||
| Down: | Redial | Account1 | ||
| Left: | Default | Account1 | ||
| Right: | Default | Account1 | ||
| OK: | Redial | Account1 | ||
| DND | ||||
| Conference: | Contacts | Account1 | ||
| Enterprise Phonebook | ||||
| Redial: | LDAP | Account1 | ||
| Dir | ||||
| Transfer: | Speed Dial | Account1 | ||
| Hold: | Call List | Account1 | ||
| Missed Calls | ||||
| Service: | Received Calls | Account1 | ||
| Dialed Calls | ||||
| Diretories: | Menu | Account1 | ||
| SMS | ||||
| Menu: | New SMS | Account1 | ||
| Call Forward | ||||
| Mute: | View Status | Account1 | ||
| Message: | Call Forward | Account1 |
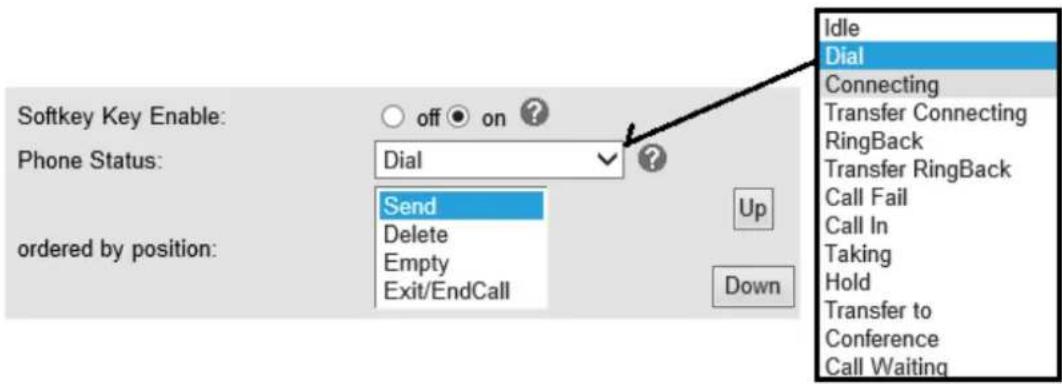
6.5 So Key
So Keys: So key is the key with below display in the LCD. You can change it for your mind to the other features in many all kinds of status. As below example, when you dialing with someone, the LCD display so key is Send \Del \Empty\End, Empty means nothing in it.
6.6 Dial Plan
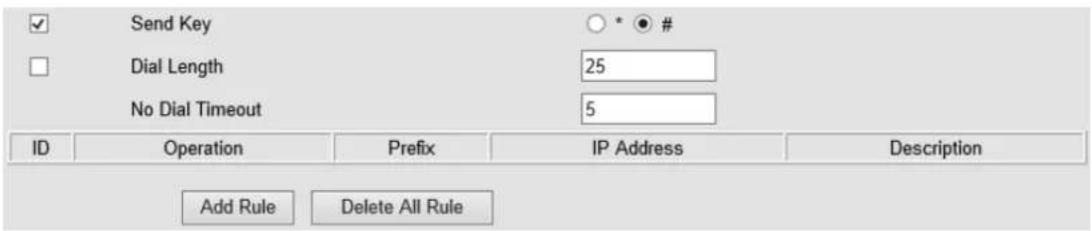
If you want to setup a dial plan, you can click "Dial Plan"
| ITEM | DECSRIPTION |
| Send Key | Select the default send key mode you want to use. |
| Dial Length | Enable this feature will limit the dial length. Default is 25. |
| No Dial Timeout | Seng the range with no dial meout, default is 5. |
| Dial Rule | Select the Add Rule buon to add dial rule, pls see as below detail. |

(Note: When you want to add code and delete at the same time, you can add code first, after that base on the number you add, decide the position and length of the delete code.)
| ITEM | DECSRIPTION |
| ID | Dial Plan ID |
| IP | The ip of a phone which you want to call |
| Descripon | Descripon with this dial rule. |
| Port | Seng the Port with this dial rule, default is 5060. |
| Prex | The number which you need to press actually if you want to call the phone |
| Called Insert Number | There have two opon, Enable or Disable. |
| Posion | Which posion you want insert the number |
| Number | Which number you want to insert |
| Called Delete Number | There have two opon, Enable or Disable. |
NOTES: If you want to know more detail about Dial Rule, pls nd it in the ocial website to download the specic document. HTTP://www.escene.cn/en.
6.7 IP Strategy
You can use IP Strategy feature to make a list which can be set to only allow the incoming call on the list.
e.g. As following picture you can see it has 192.168.0.248 in the list. When you open this feature. It means you just allow come from this IP address meeng

7 Phone Book
The phone book including Group, Contact, LDAP and Ban list, please review the following for more details:
7.1 Group
You can add, edit and delete group in a phone book on this web page.
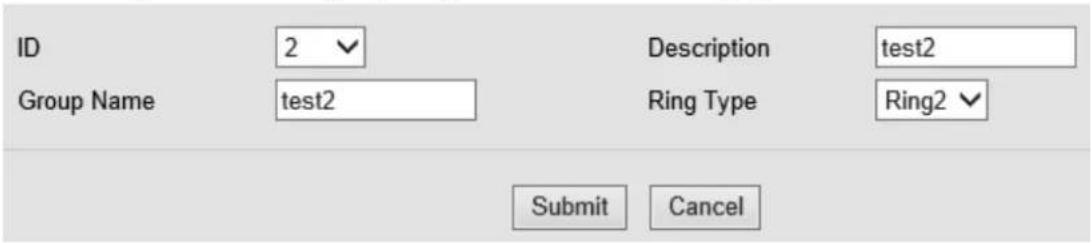
Click the groupname you can modify or delete the member of the group
| ID | Operation | Group Name | Group Member | Description | Ring Type |
| 1 | test | 0 | test | Ring1 |
Attention: If you Click 'Delete Group' or 'Delete All Group', the member of group can not within a group, please click the group and delete the group.
Add Group
Delete All Group
If you want to add a Group, you just ought to click 'Add Group'.
You can edit an existed Group by click.
You can delete an existed Group by click, if you want to delete all Groups, you just ought to click 'Delete All Group'.
7.2 Contact
You can add, edit and delete contact in a phone book on this web page.
The phonebook can storage 300 contacts entry

Submit
Cancel
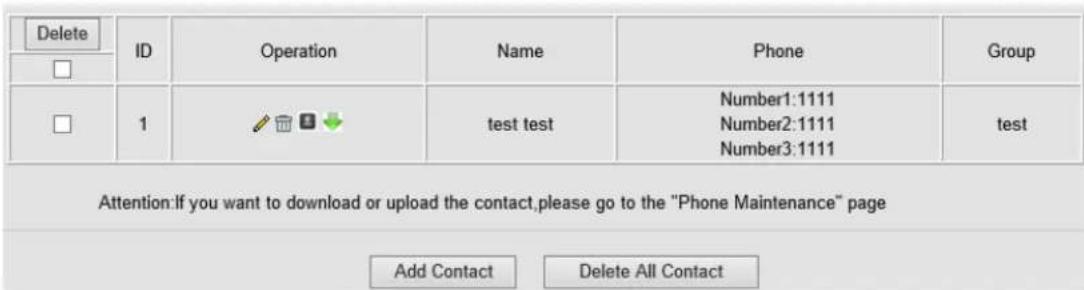
If you want to add a Contact, you just ought to click 'Add Contact'.
You can edit an existed Contact by click.
You can delete an existed Contact by click, if you want to delete all Contacts, you just ought to click 'Delete All Contact'.
You can edit or move this contact to Ban List aer you select .
You can download and save this contact to PC aer you select


7.3 LDAP
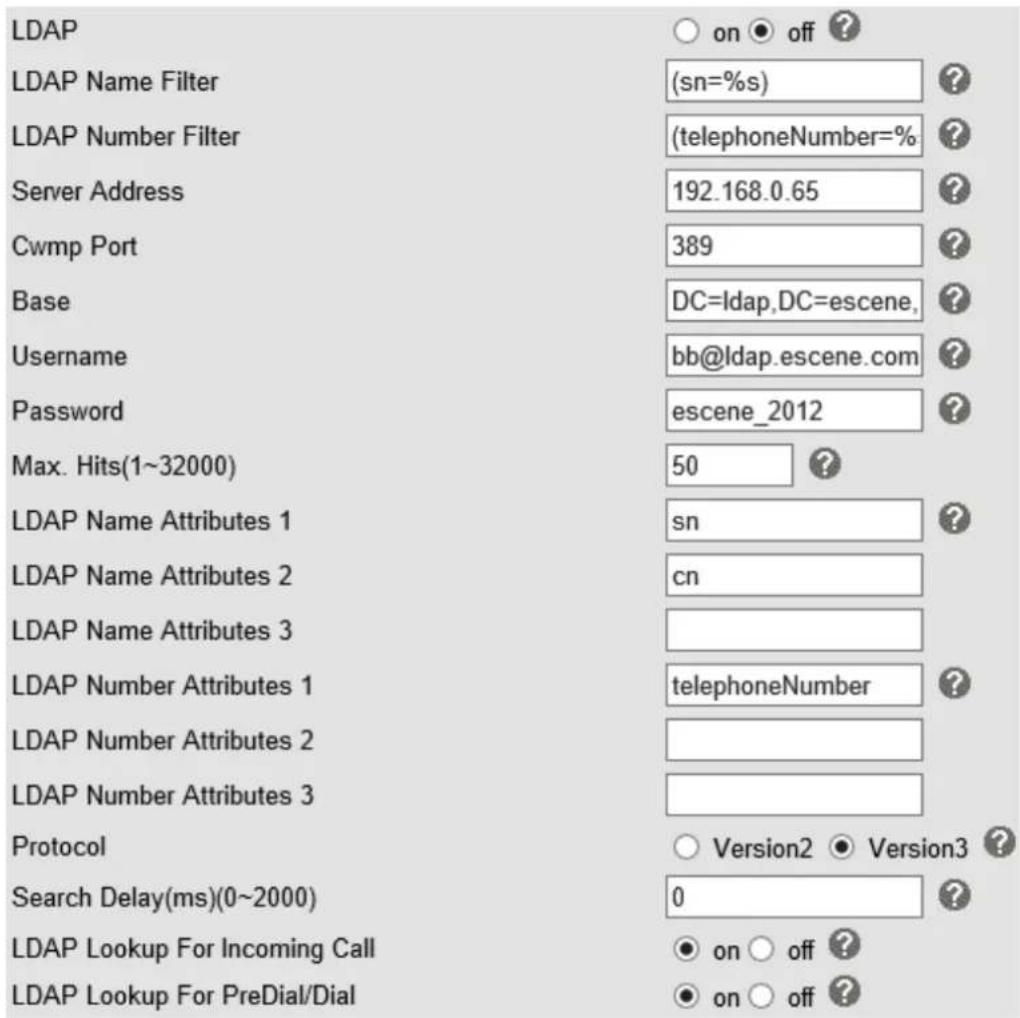
NOTES: If you want to know more detail about LDAP, pls nd it in the oice website to
www.escene.cn/en/
download the specic document. HTTP://www.escene.cn/en. As below gure is an example.
e.g.
LDAP Name Filter:(sn=%s)
LDAP Number Filter:(telephoneNumber=%s)
Server Address:192.168.0.65
BASE:DC=ldap,DC=escene,DC=com
User Name: bb@ldap.escene.com
Pass Word: escene_2012
LDAP Name Aributes 1:sn
LDAP Name Aributes 2:cn
LDAP Number Aributes 1:telephoneNumber
7.4 Ban List
You can add, edit and delete contact in a Ban List on this web page.
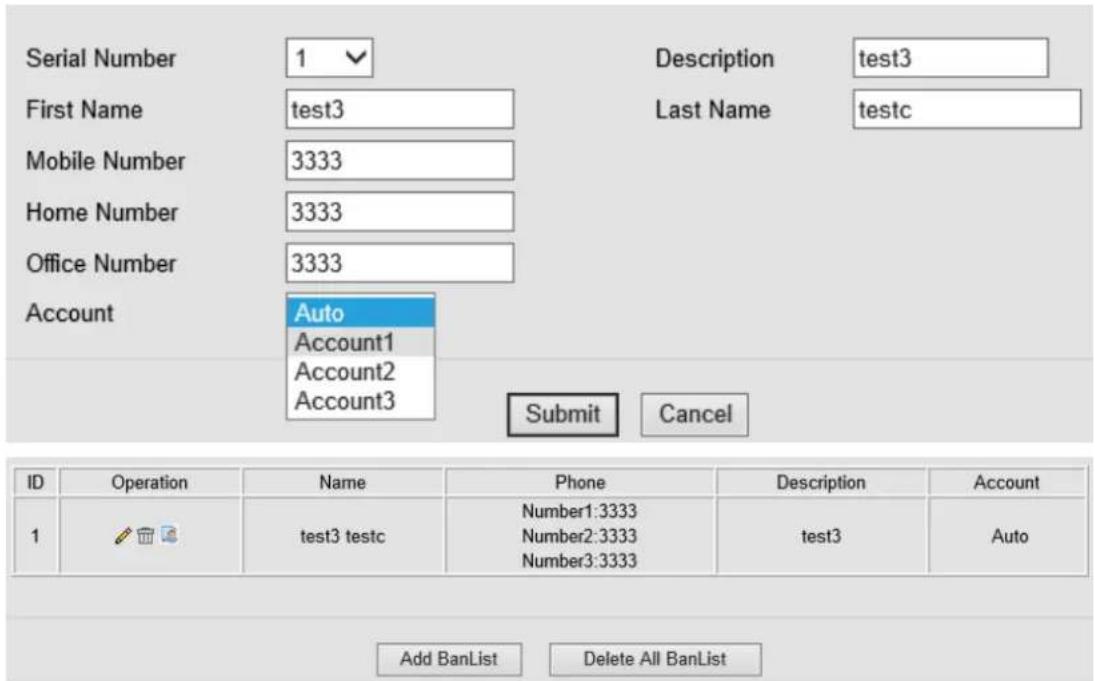
If you want to add a Ban List, you just ought to click 'Add Ban List'.
You can edit an existed Ban List by click.
You can delete an existed Ban List by click, if you want to delete all Ban List, you just ought to click 'Delete All Ban List'.
You can edit or move this contact to Contact aer you select .
8 Phone Maintenance
8.1 Basic
NOTES: Don't cut o the electricity or network cable when doing upgrade in the below ways!
8.1.1 HTTP Upgrade
You can upgrade the soware, kernel and conguraon etc. les by HTTP.

When using HTTP upgrade, you can set several parameters as follow:
| HTTP Upgrade | |
| Select a File | Browse the soware/kernel/conguraon le which you need to upgrade from HTTP |
| Soware Upgrade | Used for upgrading the soware of the phone |
| Kernel Upgrade | Used for upgrading the kernel of the phone |
| Conguraon | You can used upload/download to upload/download the congure le of the phone |
| XML Phone Book | Used for uploading/downloading the XML phonebook of the phone |
| Vcard | Downloading all contacts in the Vcard mode, but upload only support one by one. |
| EXT Module | Used for updang/backup the expansion of the phone[NOTES: The mode doesn't support this feature] |
| Log | Used for the administrator to nd out or making sure the problem with this equipment. |
| All Cong File | All Cong File includes: Conguraon, Extern, Log, XML Phone book, Enterprise Phone Book. |
8.1.2 FTP Upgrade
You can upgrade the soware, kernel and congure les by FTP.

When using FTP upgrade, you can set several parameters as follow:
| FTP Upgrade | |
| Server IP | The IP address of the FTP server |
| Filename | Downloading from FTP server |
| Username | Providing by FTP server |
| Password | Providing by FTP server |
| Soware Upgrade | Used for upgrading the soware of the phone |
| Kernel Upgrade | Used for upgrading the kernel of the phone |
| Conguraon | Used for updang/backup to update/backup the congure le of the phone |
| Phone Book | Used for updating/backup to update/backup the phonebook of the phone |
| EXT Module | Used for updang/backup the expansion of the phone[NOTES: The mode doesn't support this feature] |
NOTES: It's not necessary to input lename when doing backup Conguraon, Phone Book, EXT Module.
8.1.3 TFTP Upgrade
You can upgrade the soware, kernel and congure les by TFTP.

When use TFTP upgrade, you can set several parameters as follow:
| TFTP Upgrade | |
| Server IP | The IP address of the TFTP server |
| Filename | Downloading from FTP server |
| Soware Upgrade | Used for upgrading the soware of the phone |
| Kernel Upgrade | Used for upgrading the kernel of the phone |
| Conguraon | Used for updang/backup the congure le of the phone |
| Phone Book | Used for updang/backup the phonebook of the phone |
| EXT Module | Used for updang/backup the expansion of the phone[NOTES: The mode doesn't support this feature] |
NOTES: It's not necessary to input lename when doing backup Conguraon, Phone Book, EXT Module.
8.1.4 Default Seng
You can load the phone to the factory default seng in default seng opon.

Press the 'Reset to Factory Seng' opon, the phone will load to factory default seing on next reboot.
8.1.5 Reboot
You can use reboot opon to reboot the phone.

8.2 Advanced
8.2.1 Log
This feature is use for the administrator to managing the equipment, like debugging, SIP etc., If you need to catch a debugging Level, you need to setup on this interface.

8.2.2 Auto Provision
When you open this auto provision feature, the phone will do auto provision aer it detect a dierent soware or kernel (Higher or Lower) which are pued on the TFTP,HTTP,HTTPS,FTP, server. For the detailed informaon about auto provision, you can nd it in the ocial website:
HTTP://www.escene.cn/en
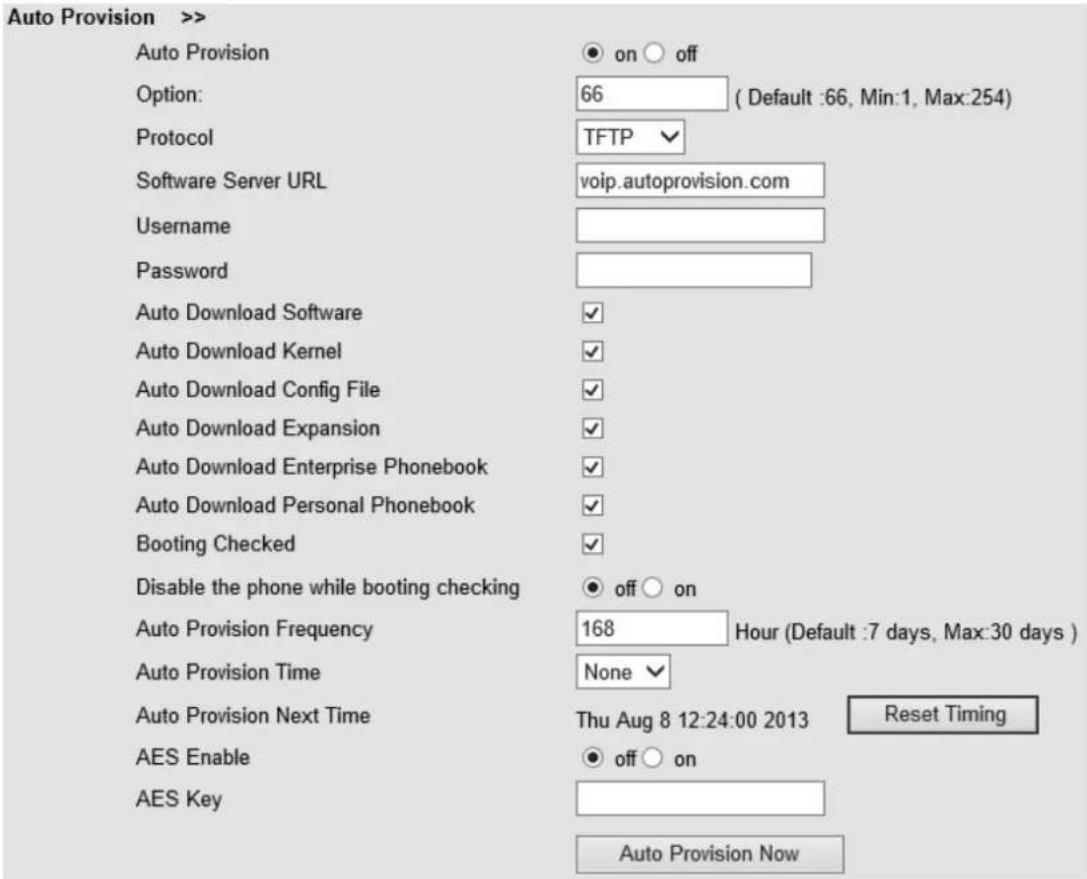
When using auto provision, you can set several parameters as follow:
| Auto Provision | |
| Auto Provision | You can enable/disable auto provision by select on/o |
| Protocol | Used for auto provision, it includes TFTP/HTTP/FTP |
| Soware Server URL | The server address of the auto provision |
| Username | Providing by provision server |
| Password | Providing by provision server |
| Auto Download Soware | Used for auto download soware from server |
| Auto Download Kernel | Used for auto download kernel from server |
| Auto Download Cong File | Used for auto download cong le from server |
| Auto Download Expansion | NOTES: The model doesn't support this feature. |
| Auto Download Enterprise Phonebook | Used for auto download Enterprise Phonebook from server |
| Auto Download Personal Phonebook | Used for auto download personal phonebook from server |
| Boong Checked | Used for checking the auto provision when phone boong |
| Disable the phone while boong checking | Enable/Disable the boong checking feature. |
| Auto Provision Frequency | Used for seng the me interval for auto provision |
| Auto Provision Time | Used for the specic me for auto provision |
| Auto Provision Next Time | Reset the Auto Provision Next Upgrading me. |
| AES Enable | You can enable/disable AES encrypt for auto provision |
| AES Key | The key of the AES |
| Auto Provision Now | Used for doing auto provision immediately |
9 Password
Here you can seng the administrator or user WEB password management. Select your type. If you login as an administrator, you can modify both the user's and admin's passwords.

10 WEB Other Sengs or Informaon - Appendix
10.1 WEB User
In the upper right corner of the website page, you can select the user or logout.

Administrator | Logout
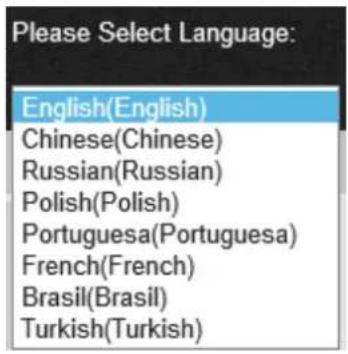
10.2 Multi-Language
In the upper right corner of the website page, you can select the language in the below list.
10.3 Note Tips
In the right middle of the website page, there is a Note ps in every funcon page. Hope it can help you to know something about that.
Note
Register status:
It shows the Register Status.
Network Status:
It shows the information of LAN port and PC port.
System Info:
It shows the version of firmware


- ES205 IP Smart VoIP Phone User Manual
- INDEX
- INDEX 2
- Geng Started
- About
- Feature Highlights
- Set up the Phone
- a) Packing List:
- b) Phone Installaon:
- Aach the Bracket
- Connect the Handset and oponal Headset
- Connect the Network and Power
- Phone User Interface
- Hardware Component Instrucons
- Phone Screen Display Features
- Basic Network Sengs
- SIP Account Sengs
- Basic Features
- Making a Call
- Anonymous Call
- Redial
- Call Log
- Making Calls to Contact
- Mul-lines to Answer the Call
- Auto-Answer
- Ending a Call
- Using Hold and Recover (Switch Calling Line)
- NOTES
- Transferring Calls
- Using Mute
- Do Not Disturb
- 3-way Conference
- Voice Mail
- Advanced Sengs
- Using the phone book
- Using Call Logs
- Peer-to-Peer
- Keypad Seng
- Language Seng
- Message
- Time & Date
- Ring Tone and Volume Seng
- Searching Phone Book
- Cannot Set the Features with Keypad
- WEB User Interface
- Main Interface-Phone Status
- Net Work
- LAN Port
- Basic
- Advanced
- PC Port
- Bridge
- Router
- Advanced
- VPN Seng
- VLAN Seng
- SIP Account
- 5.1Basic
- Call
- Security
- Phone Seng
- Basic
- Time Sengs
- Call
- %23
- VoIP Call Forward
- QoS
- Advanced
- .0 Audio
- Basic
- Advanced
- Line Keys
- Funcon Keys
- So Key
- Dial Plan
- IP Strategy
- Phone Book
- Group
- Contact
- LDAP
- Ban List
- Phone Maintenance
- Basic
- HTTP Upgrade
- FTP Upgrade
- TFTP Upgrade
- Default Seng
- Reboot
- Advanced
- Log
- Auto Provision
- Password
- WEB Other Sengs or Informaon - Appendix
- WEB User
- Multi-Language
- Note Tips
- Note
- Register status:
- Network Status:
- System Info:
Brand : Escene
Model : ES205
Category : Telephone