
ES620-PEN - Telephone Escene - Free user manual and instructions
Find the device manual for free ES620-PEN Escene in PDF.


| Product Type | Desktop SIP Phone |
| Model | ES620-PEN |
| Brand | Escene |
| Dimensions (WxHxD) | 220 x 180 x 120 mm |
| Weight | 800 g |
| Power Supply | PoE (802.3af) or 5V DC/1A adapter |
| Display | 2.8-inch color LCD (320x240) |
| Network Interfaces | 2 x 10/100 Mbps Ethernet (RJ45) |
| Number of Lines | 4 SIP lines |
| Programmable Keys | 20 programmable keys with BLF |
| Speakerphone | Full-duplex with echo cancellation |
| Audio Codecs | G.711, G.729, G.722, Opus |
| Call Features | Call waiting, hold, transfer, forward, conference (3-way) |
| Phonebook | 500 contacts with search |
| VoIP Protocols | SIP (RFC3261), TCP/UDP, TLS, SRTP |
| Headset Jack | RJ9 handset and headset |
| Wall Mount | Not supported |
| Operating Temperature | 0°C to 40°C |
| Cleaning Instructions | Wipe with a soft, dry cloth. Do not use liquids. |
| Safety Warning | Use only the approved power adapter. Avoid exposure to water. |
| Spare Parts Available | Handset, handset cord, power adapter, stand |
| Repairability | Designed for easy component replacement; refer to service manual. |
| Certifications | CE, FCC, RoHS |
Frequently Asked Questions - ES620-PEN Escene
User questions about ES620-PEN Escene
0 question about this device. Answer the ones you know or ask your own.
Ask a new question about this device
Download the instructions for your Telephone in PDF format for free! Find your manual ES620-PEN - Escene and take your electronic device back in hand. On this page are published all the documents necessary for the use of your device. ES620-PEN by Escene.
USER MANUAL ES620-PEN Escene
-
Connecting Your Phone....4
-
Phone overview....7
Understanding Buttons and Hardware....7
Understanding Phone Screen Features.... 10
- Basic Call Handing....12
Placing a Call....12
Answering a call....14
Ending a Call....14
Using Hold and Resume.... 15
Transferring Calls....16
Using Mute....16
Do Not Disturb....17
3-way Conference....17
Expansion Installation....18
Expansion Settings....18
Time & Date....19
VOIP Call Forwarding....19
- Advanced Call Handling....20
Speed Dialing....20
Using the phone book....21
Using Call Logs.... 23
- Keypad Instruction....24
Language....24
SIP Account Settings....25
Network Setting....26
Load default settings....27
Modify password....27
Customizing Rings and Volume....27
WIFI setting(only WS620 have this item)....28
Bluetooth setting(only ES620-N have this item)....29
View status....30
Diagnose....30
WIFI setting(only WS620 has this item)....30
- Web Settings....31
Phone Status....31
Network....32
WIFI Setting(only WS620 has this item).... 32
www.escene.cn/en/
IP Settings.... 33
PC Port....35
Advanced....35
SIP Account....37
Programmable Keys....40
Paperless Program Keys....41
Line keys....42
Function keys....43
Softkey....43
EX Module....44
Phone Setting....46
Basic....46
Featuers....49
Advanced....52
Phone Book....53
Group....53
Contact....54
LDAP....55
BanList....56
Phone Call Info....57
Phone Maintenance....57
Basic....57
Advanced....60
Security....62
- WEB Other Settings or Information....63
WEB User....63
Multi-Language....63
Note Tips....63
1. Getting Started
About
620 SERIES IP Phone series is a new generation intellectual desktop terminal. It brings in you a completely new and more efficient work experience in modern offices.
IP Phone series is a fashionable, beautifully shaped and high-tech product. Its excellent speech quality gives you an unprecedentedly comfortable talking and its rich function keys make the operation very convenient. One key dial can be easily achieved with proper settings. 4.3", high resolution LCD displayer provides you a friendly user interface. Benefit from which, more detail information can be displayed. With the help of the integrated browser, users can access any XML based information, and extend more commercials.
620 SERIES IP Phone series support multi account registering and multi call management. Call Waiting, Call Queuing and Call Forward can be well implemented; meanwhile, it makes conference to be created very quickly. No matter how busy the calls will be, IP Phone can easily satisfy the requirement.
620 SERIES IP Phone series supports 4 ESM32 extend modules that totally contain 128 programming buttons, and up to 2 ESM20-LCD expansion modules and 80 programmable buttons. With the Busy Lamp Field function, operators can manage and monitor the calls more efficiently. It provides headset jack that compatible with professional microphone headsets, which will finely satisfy the call centre.
Illustrate
Firstly, before you use this user manual, please check the below illustrate carefully. This user manual is common use in WS620-PEGV4、ES620-PEGV4. please check the different.
WS 620 is wifi phone, it has wifi module, it is the different from ES620, but the function is the same.
ES: Enterprise Series, WS: Wi-Fi Series, P: support POE, E: support Expansion Module, G: Gigabit Port.
Expansion support list. Pls make sure your model is support or not.
| Model | ES/WS620-PEGV4 | ES/WS330-PEGV4 | ES/WS/GS620-PEN | ES/GS410-PEN | ES/WS/GS330-PEN |
| ESM32 | 4 | 4 | 4 | 4 | 4 |
| ESM20-LCD | 2 | - | 2 | - | - |
| ESM32 Programmable Keys | 128 | 128 | 128 | 128 | 128 |
| ESM20-LCD Programmable Keys | 80 | - | 80 | - | - |
Features
4.3"480x272 Pixels HD LCD
- Customizable Screen
• HD Voice: HD Codec
- Advanced Call capability:
8 VoIP Line/programmable buttons (dual-colors LED) and support BLF in programmable buttons.
- Expansion Module:
Up to 4 EMS32 expansion modules and 128 programmable buttons, and up to 2 ESM20-LCD expansion modules and 80 programmable buttons, BLF supported.
- Extensible Markup Language(XML)
• Support PoE and AC power adapter
Technical Parameters
| Item | 620 SERIES |
| Screen | High-definition color LCD with Background light |
| 480*272 pixel, 4.3 inch. | |
| Line | 8 Light status: Coming call (Red flashing) Hold(Green flashing);Talki (Green) |
| Language | Multi-Language(e.g.CN/EN/Spain/Portugal/Poland/Turkey/French/Italy etc.) |
| Function Keys | 4 soft keys, 8 Line keys6 Navigation keys(Arrow button, OK button, C button)Volume adjust, Hands-free, Mute, Headset, Message, MenuDirectory, Service, Hold, Redial, Conference, Transfer |
| VoIP Protocol | SIP 2.0 |
| Network Protocol | HTTP, BOOTP, FTP, TFTP, IEEE 802.1Q, *IEEE 802.1X |
| Codec | G.723.1(5.3Kb/s,6.4Kb/s), G.729 A/B(8Kb/s), G.711 A/U, G.722(64Kb/s) |
| QoS | TOS, Jiffer Buffer, VAD, CNG, G.168 (32ms) |
| Network | 3×RJ45 10/100/1000M Ethernet Interfaces (LAN/PC/EXT), EXT port just only in E model;Tips: ES620 only have 2xRJ45 10/100M Ethernet InterfacesIP Assignment: static IP, DHCP, PPPoEPC port support Bridge and RouterDNS SRV,STUN, VPN(L2TP), VLAN/QoSSTUN,DTMF(In-band/RFC2833/SIP INFO)WIFI support IEEE 802.11 a/b/g/n/ac |
| Function APP | Always Forward, Busy Forward, No-answer ForwardHotline line (Immediately/Delay)Call Waiting, Call Queuing |
| Call Forward, Call Transfer, Call Holding, Call Pickup, *Callback RedialPhone directory speed dial, Call record direct dial3-way conferenceDnD, Blacklist, SMSVoice mail, Voice Prompt, Voice MessageP2P(Pccr-to-Pccr) | |
| PBX | Call Transfer, Call Pick-Up, Network-Meeting, DND, Call Waiting, C Hold.Call Barring, Call Back On Busy, Anonymous Call ,Intercom, I |
| Expansion Interface | EXT: ESM32 & ESM20-LCD programmable key moduleSOR: FXS, FXO, Record |
| Application | LDAP(2): search someone in two LDAP server.Enterprise phone directory, download with server, and it support 800 Public phone directoryXML Phonebook : Search /Input/ Out putPrivate phone directory: input/output 300 contacts, every contact can numbers and the size of number is 19 byte.Call History(600): every records is 200 with Miss Calls /Received Calls/Dialed Calls.Voice Message, Voice Mail Box, Light of Message.Ringing Update, Input, Del,*we also support to order the other APP. |
| Security | Login the website by passwordLogin the LCD by passwordSignaling encryption(RC4)Media encryption(RC4)VPN, 802.1X, VLAN QoS(802.1pq), *LLDPAES, ROOT/USER Management |
| Management | Upgrade: HTTP/TFTP/FTP Auto-provision/TR069Configurations: Phone/HTTP/Auto-provision/TR069Debug: Telnet/Phone/Web |
| Power Supply | Power adapter:AC100~240V input and DC 12V/1A outputPoE(IEEE 802.af); USB(Standard DC 5V) |
| Specifications | Infineon Chipset42 Buttons, include 8 programmable keysStorage Temperature: 0°C ~ 60°COperating Humidity: 10%~90%Size: 275mm*215mm*90mmNet weight:1.37kg |
| Certifications | CE、FCC、RoHS、Avaya、Broadsoft、Alcatel、Yeastar、Digium |
Note: “*” Sign means function has not been published yet.
2. Connecting Your Phone
Your system administrator will likely connect your new ES620 IP Phone to the corporate IP telephony network. If that is not the case, refer to the graphic and table below to connect your phone.
1) Open the box ES620 IP Phone; carefully check the packing list, Packing List as follows:
| Item | Counts |
| IP Phone | 1 |
| Handset | 1 |
| Handset Cord | 1 |
| Power adapter | 1 |
| RJ45 cable | 1 |
| Quick Reference | 1 |
| Product certification | 1 |
2) As shown in figure 2.1 and figure 2.2, Please plug Handset Cord into RJ11 interface(IP Phone and Handset), RJ45 cable into the LAN interface; IP Phone will automatically start if IP Phone with POE function.
3) The phone must work together with power adapter without POE support.
4) Connect your computer to PC interface of the phone with cable.
* More detailed description please refers to the 3.Phone overview-Understanding phone buttons and hardware.
Figure 2.1 Interfaces of 620 Series

Figure 2.2 Footstand of 620 Series

natural_image
Technical line drawing of a mechanical component with directional arrows indicating movement (no text or symbols)5) If you want to connect an ESM(Expansion module), you could connect it (any interface on the ESM) to the EXT interface on the phone with a RJ-45 cable (a straight-through cable), and the second ESM can be connected to the first one too.
3. Phone overview
Understanding Buttons and Hardware
From figure 3.1 to figure 3.2, you can understand buttons and hardware about 620 Series.
Figure 3.1 620 Series overview

| Num | Buttons | Description |
| 1 | Headset button: Toggles the headset on or offRed means the feature is enabled. | |
| 2 | Mute button: Toggles the Mute feature on or off.Red means the feature is enabled. | |
| 3 | Message button: Typically auto-dials your voice message senRed means have unread voice mail. | |
| 4 | SERVICE | Service button: Open or Close the Services menu. |
www.escene.cn/en/
| 5 | DIRECTORIES | Directories button: Use it to access call logs and corporate directories. |
| 6 | MENU | Menu button: Allows you to scroll through menus. |
| 7 |  | Volume button: Controls the volume and other settings. |
| 8 | CONFERENCE | Conference button: Connect calling / called party to the cc |
| 9 | REDIAL | Redial button: To Redial the last number. |
| 10 | TRANSFER | Transfer button: Transfer redirects a connected |
| 11 | HOLD | Hold button: Put a call on hold |
| 12 | 0-9, *, # | Basic Call Handling: Press “#” send out a call(default) |
| 13 | Speaker button | Speaker button: Toggles the speakerphone on or off.Red, steady: Pick up and enter normal call. |
| 14 | Softkey | Each displays a softkey function, To activate a softkey, pr softkey button. |
| 15 | Line/Programm able Buttons | Line button: Select the phone line(Call or Answer)Different colors for different status:1) Red, flashing: There is an incoming call.2) Red, steady: Pick up and enter normal call.3) Yellow-green, flashing: Holding call.4) Yellow-green, steady: Active call.Programmable Keys:Hotline number can be used to bind in order to achieve Turn on BLF:1) Red, steady: Remote line is busying.2) Yellow-green, steady: Remote line is idle. |
| 16 | C | Back button: Return to the standby interface; |
| 17 | Navigationbutton | “Up”: Open “Speed Call” list;“Down”: Open “Missed Calls” list:“Left”: Open “Received Calls” list;“Right”: Open “Dialed Numbers” list |
| 18 | OK | OK button: To confirm the action; |
| 19 | Hands-freespeakerphone | Hands-free voice of the output. |
| 20 | LCD screen | 480*272 pixel Color high-definition display. |
| 21 | Status light | Red flashing: There are incoming call;Red, steady: Missed Calls, or phone busy; |
| 22 | Hands-freec microphone | Hands-free voice of the output. |
Figure 3.2 Interfaces of 620 Series
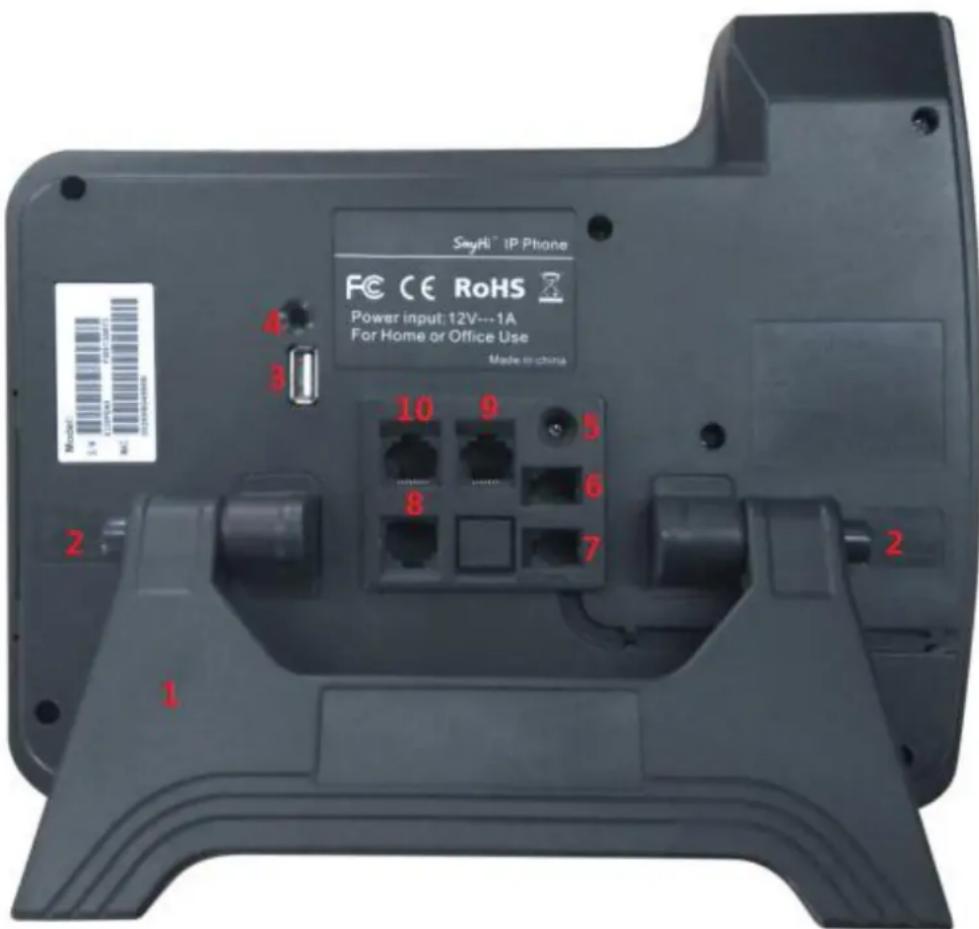
www.escene.cn/en/
| Num | Hardware | functions |
| 1 | Footstand | Hold up phone |
| 2 | Footstand button | Press buttons at the same time to adjust the angle |
| 3 | Reserved for USB po | Enhanced scalability |
| 4 | Microphone port | Connect the Microphone |
| 5 | Power port | 12VDC |
| 6 | Headset port | Support RJ9 interface connection |
| 7 | Handset port | Connect the Handset |
| 8 | EXT port | Expansion module interface |
| 9 | LAN port | Connect to a LAN interconnecting device |
| 10 | PC port | Connect to a local PC |
Understanding Phone Screen Features
This is what your main phone screen might look like with an active call: Figure 3.3 LCD of 620 Series
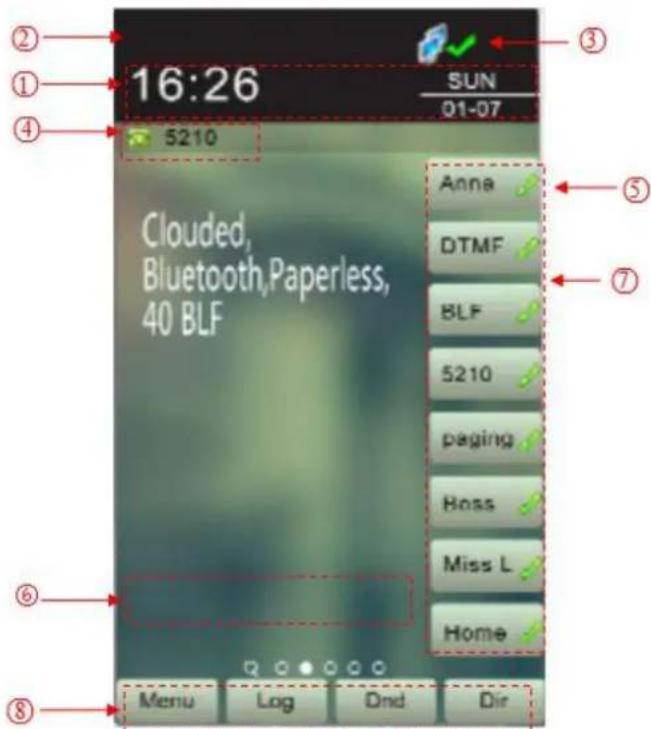
| Num | Screen | Functions |
| 1 | Time and Data | Display current time and data |
| 2 | Service status | 1) [70ZH]Headset turned on2)  There are Missed calls3) There are Missed calls3)  Auto-answer turned on4) Auto-answer turned on4)  Mute turned on5) Mute turned on5)  DND turned on DND turned on |
| 3 | Network connection status | Phone LAN interface network connection status display:1) Network connection is successful2) Network is disconnected. |
| 4 | Primary phone Line | Displays the phone number(extension number)for your prima Phone line. |
| 5 | Call activity Area | Displays calls per line, including caller ID, for the highlig |
| 6 | Missed calls tip | Show the number of missed calls. |
| 7 | Line status/Speed Call | 1) 8001 : Line is successfully registered to a SIP server2) 8001 : Line is not successfully registered to a SIP server3) 8001 : DND turned on in this line4) 8001 : Line is held5) : Peer-to-Peer status6) 8001 : dialing7) 8001 : talking8) 8001 : ringing9) : Transferring a call10)  s conference11) s conference11)  dial key dial key |
| 8 | Softkey labels | Each displays a softkey function. To activate a softkey, p softkey button. |
4. Basic Call Handing
You can perform basic call-handling tasks using a range of features and services. Feature availability can vary; see your system administrator for more information.
Note: The bold type of the following text and following a "button" in table signifies the phone's
button (for example, OK button), and NewCall
signifies softkey.
Placing a Call
Here are some easy ways to place a call on 620 Series IP Phone: :
| If you want to... | Then... | |
| Place a call using th handset | Pick up the handset; | --1) Hcar the dial tone;--2) The first line light and displ8001 ;--3) Enter number;--4) Press “#” button(default);or press  ;or wait five seconds(default) Then send the call; ;or wait five seconds(default) Then send the call; |
| Place a call using a Speakerphone | Press Speaker button;or Programmable buttons;or |  | |
| Place a call using a headset | Press Headset button. | |
| Redial | --Press REDIAL button to dial the last number-or press Navigation button-Right > “Dialed number”, select a number, and press Dial or OK button. | |
| Dial from the | --1) Press MENU or OK button > “Call history”, you can select | |
| Directory on your phone | “Missed calls”, “Received calls” and “Dialed numbers”,- or pressNavigation button(in Standby interface) > select“Missed calls” (down), “Received calls” (left) and “Dialed numbers” (right);--2) Then pressOKbutto | |
| Place a call whileAnother call is active | --1) PressHoldbutton --2) Enter a number;--3) Press‘#’button (default);-or press --2) Enter a number;--3) Press‘#’button (default);-or press the number. the number. | |
Tips
- You can dial on-hook, without a dial tone (pre-dial). To pre-dial, enter a number, and then go off-hook by lifting the handset or pressing Send, Headset or Speaker button.
- If you make a mistake while dialing, press C button to erase digits.
Answering a call
You can answer a call by simply lifting the handset, or you can use other options if they are available on 620 Series:
| If you want to. | Then... | |
| Answer with a handset | --1) Your phone ring;--2) Line button of the ring line is Red and flashing, Light strip is Red and flashing;--3) Status of the line on t phone is 8001 | --Pick up the handset |
| Answer with the speakerphone (Non-headset mode) | --Press Speaker button-or press the Line button flashing Red-, -or press Answer | |
| Answer with the headset | --Put on headset, press Headset but so that the status light is Red- and then do as using speakerphone | |
| Switch from a connected Call to answer a ringing Call | --1) Another Line button is Red and flashing, Light strip is Red and flashing;--2) Press the flashing Line button to answer (at this tim original call will be hold.) | |
| Auto-answer | --1) Press MENU or OK button > “Function settings” > “Auto answer”;--2) Select “Enable”;--3) Your phone answers incoming calls automatically after a few | |
Ending a Call
To end a call, simply hang up, here are some more details:
| If you want to... | Then... |
| Hang up while using the Handset | --Return the handset to its cradle,-or press EndCall |
| Hang up while using the | --Press Speaker button that is Red , |
| Speakerphone | -or pressLinebutton for the appropriate line,-or press |
| Hang up while using the Headset | --PressHandsetbutton, (Do not keep the headset mode-or press the headset mode) the headset mode) |
| Hang up one call, but preserve another call on the other line | --Press -or refer to the above three methods -or refer to the above three methods |
Using Hold and Resume
You can hold and resume calls. You can take a call in one line at anytime, and the other lines would be hold. As a result of that, you can switch different calling line on our phone.
| If you want to... | Then... |
| Put a call on hold | --Press HOLD button, -or press  |
| Hold a line and switch to another line | Press another Line button for the appropriate line |
| Resume a call on current | --Press appropriate line button, |
| Release a call on different line | Select the line want to release hold, press the line, sc |
Tips
- Engaging the Hold feature typically generates music or a beeping tone.
• A held call is indicated by the Yellow-green and flashing Line button. And line status

Transferring Calls
Transfer redirects a connected call. The target is the number to which you want to transfer the call.
| If you want to... | Then... |
| Talk to the transferrecipient beforetransferring a call(consult transfer) | --1) Press TRANSFER button or press;--2) Enter number;--3) press “#” (default),-or press then transfer the call,-or wait five seconds(default)then transfer the call |
| Transferred to idlelines or other numbewithout talking to thtransfer recipient(Blind transfer) | --1) Press TRANSFER button or press;--2) Press Blind--3) Enter number;--4) Press “#” (default)-or press, then transfer the call;-or wait five seconds(default)then transfer the call |
| Blind transfer to theHeld line | --1) Press TRANSFER button or press;--2) Press the Line button of held line |
Using Mute
With Mute enabled, you can hear other parties on a call but they cannot hear you. You can use mute in conjunction with the handset, speakerphone, or a headset.
| If you want to... | Then... |
| Toggle Mute on | PressMutebutton, then the button is Red |
| Toggle Mute off | PressMutebutton, then the button light off |
Do Not Disturb
You can use the Do Not Disturb(DND)feature to block incoming calls on your phone with a busy tone(Can also be set to their voice mail or other extension numbers, etc.).
| If you want to.. | Then... |
| Enable global DND | --1) Press  --2) All enabled line on the phone would cl --2) All enabled line on the phone would cl  status. status. |
| Enable DND on a single line | Press MENU or OK button > “Function setting” > “DND” > (select line) “Enable” |
| Disable DND | --Global DND enabled, pre e global DND; --Line DND enabled, press-or press MENU or OK button > “Function setting” > “DND” >(select line) “Disable” --Line DND enabled, press-or press MENU or OK button > “Function setting” > “DND” >(select line) “Disable” |
3-way Conference
You can establish a three-party conference, during the conversation three phone parties can communicate with each other.
| If you want to... | Then... |
| Invite the transfer recipient into a conference in a transferring | --1) When the transfer recipient answer the call, press CONFERENCE button  on your phone; --2) Then the held one, transfer recipient and you will be in conference. on your phone; --2) Then the held one, transfer recipient and you will be in conference. |
| Invite the third party into a conference in active call | --1) Press CONFERENCE button  in an active --2) Enter the third party number; --3) After connected the third party, press CONFERENCE b in an active --2) Enter the third party number; --3) After connected the third party, press CONFERENCE b  again again |
| establish a conference | --1) when one phone line is holding on and the other line |
| with held line | --2) Press CONFERENCE button,-or Press  --3) press the held line's programmable button, the 3-way Co will establish. --3) press the held line's programmable button, the 3-way Co will establish. |
Expansion Installation
| If you want to... | Then... |
| Expansion installation | --1) Press MENU or OK button > “Function setting” > “ex installation”,--2) if you want to install expansion, please according to tip do ,after you install ,press"finish". |
Expansion Settings
| If you want to... | Then... |
| Expansion setting | --1) Press MENU or OK button > “Function setting” > “expansion installation”,--2) choose which you want to set “expansion”--3)choose which you want to set “programmable keys --4)you can set :Mode:Speed Dial、Asterisk BLF、Speed Dial Prefix、BLA、DTMFAccount :choose account which you want to setName:give it a name which you wantNumber: set your expansion number |
Time & Date
| If you want to... | Then... |
| Time & Date | --1) Press MENU or OK button > “Function setting” date”,--2)you can select :SNTP: select “enable ”to set parameter: time 、server 、daylightSIP server: select “enable ” to set parameter: root can date .manual Settings: select “enable ”to set parameter: date a |
VOIP Call Forwarding
| If you want to... | Then... |
| Unconditional transfer | --1) Press MENU or OK button > “Function setting” call forwarding”;--2)select “unconditional transfer”, select enable.--3)input number which you want to transfer, when h: call in ,it will unconditional transfer. |
| Busy transfer | --1) Press MENU or OK button > “Function setting” call forwarding”;--2)select “busy transfer”, select enable.--3) input number which you want to transfer, when call in conversation ,it will transfer. |
| No answer transfer | --1) Press MENU or OK button > “Function setting” call forwarding”;--2)select “no answer transfer”, select enable.--3) input number which you want to transfer, when call in but you don’t have time to answer ,it will trans |
5. Advanced Call Handling
Speed Dialing
Speed dialing allows you to enter an index number, press a button, or select a phone screen item to place a call.
| If you want to.. | Then... |
| Set up Speed Dialson your phone | --1) Press MENU or OK button > “Function setting” > “Hot line, You can configure twelve speed dial numbers on the 620 Series II --3) Press OK button to set and modify:-Mode:-Hot Line: Dial quickly.-Warn Line: It will auto dial after 5 sec.-Press OK to save the changes |
Using the phone book
You can store a large number of contacts in your phone's directory. You can add, edit, delete, dial, or search for a contact in this directory.
The personal phonebook can storage 300 contact entry, and the enterprise phonebook can storage 800 contact entry.
| If you want to.. | Then... |
| Add Contacts | --1) PressDIR-or pressMENU button > “Phone book”>“Personal phone b-or pressDirectories button > “Phone book”>“Personal phor book”;--2) PressOPT.;--3) Select “Add contact”, pressOKbutton or;--4) Use the navigation keys to select content, pressOKbutton and modify:-Name: set the name of contact,-NO.1-3: you can set up 3 contacts’ numbers,-Group: the contacts be divided into different user’s group;-5) PressSavesoft key to complete |
| Add group | --1) PressDIRsoft key,-or pressMENU button > “Phone book”>“Personal phone b-or pressDirectories button > “Phone book”>“Personal phor book”;--2) PressOPT. soft key;--3) Select the “add group” then pressOKbutton or;--4) Use the navigation keys to select content, pressOKbutton and modify:-Group name: name of the group--5) PressSavesoft key to complete |
| Modify group | --1) PressDIRsoft key,-or press MENU button > “Phone book”>“Personal phone b- or press Directories button > “Phone book”>“Personal phor book”;--2) Press OPT. soft key;--3) Select the “Modify group” then press OK button or pres:  --4) Select the group you want to modify, press the OK butt to set and modify, press Save to save the change --4) Select the group you want to modify, press the OK butt to set and modify, press Save to save the change |
| Delete group | --1) Press DIR soft key,-or press MENU button > “Phone book”>“Personal phone b- or press Directories button > “Phone book”>“Personal phor book”;--2) Press OPT. soft key;--3) Select the “Delete group” or OK b  -4) Select a group you want to delete, press OK -4) Select a group you want to delete, press OK  r r |
| View/Edit Contacts | --1) Press DIR soft key,-or press MENU button > “Phone book”>“Personal phone b- or press Directories button > “Phone book”>“Personal phor book”;--2) Select “View ALL”,-or select a contact who are belong to different group;--3) Select the contact, press the OK button  edit the contact’s information, press OK button or OPT.) edit the contact’s information, press OK button or OPT.) |
| LDAP | --1) --1) Press DIR soft key,-or press MENU button > “Phone book”-or press Directories button > “Phone book”--2)Select “LDAP”, press the OK button.--3)Select “Search name->name”, then input the name ,and proor Del.--4)Select “Search number->Number”, then input the number ,a press OK or Del.Pay attention: before you use LDAP function, you need to configure LDAP rule in the web configure page. |
| Call from phone book | --1) PressDIRsoft key,-or pressMENUbutton > “Phone book”>“Personal phone b-or pressDirectoriesbutton > “Phone book”>“Personal phor book”;--2) Select “View ALL”,-or select a contact who are belong to different group;--3) Select a contact, then  (If there are multiple numbers of one contact, I (If there are multiple numbers of one contact, I  enter the interface of “call options”, select the one you want to call and press ) enter the interface of “call options”, select the one you want to call and press ) |
Using Call Logs
Your phone maintains records of your missed, placed, and received calls.
| If you want to.. | Then... |
| View your call log | --1) Press MENU button > “Call history” > “Missed Calls”, “Received Calls”, or “Dialed numbers”--2) Use the navigation keys to view the call record informati |
| Dial from a call 1 | Please refer to the previous part 4.Basic call handing - Placi |
| Erase your call log | --1) If you want to delete a call record, you have to select from the logs and press Del;--2) If you want to delete an entire call record list, you hav this record list from the logs |
Tips
www.escene.cn/en/
• Each call log store up to 100 entries on 620 Series IP phone.
6. Keypad Instruction
series IP phones are can be configured in two ways. The first you can use the phone keypad when you can settings for you IP phones, the other you can log in to User Options web pages where y can settings for you IP phones.
Use phone keypad to setting. Press MENU or OK button to the main menu, Use the navigation keys to select menu, press OK button to confirm menu selections, press C button or Del to delete input information.
Language
620 IP Phone supports Simplified Chinese、English、Russian、French、Polish、Spanish、Portuguese
| If you want to... | Then... |
| To change the language via phone interface | --1) Choose “System setting” > “Phone settings” > “Language --2) Scroll through the list of available languages. --3) Press OK button or OPT. when the desired language is highlighted. The language appears on the graphic display w changed to the one you chose. --4)Or press OK button or MENU, navigate to Language, then select the language you want, press OK it will be c the one you chose. |
SIP Account Settings
620 series IP phone make calls based on sip accounts, 620 series IP phones can support 8 independent SIP account, each account can be configured to different SIP server.
| If you want to... | Then... |
| Create an sip accoun | --1) Choose “System settings” > “Advanced settings”;--2) Enter the password required (The default is empty);--3) Choose “SIP” > “Accounts SIP”;--4) Choose one of the account you want to setting, you c the following parameters-Enable account: choose Enable-Account Mode: VOIP-Display Name: The name displayed on the screen-User Name: the account matched with the SIP server. (extension number),-Authen user: the Authenticated users matched with the server. (The default With the same account)-user pwd: the user password matched with the SIP ser-Description: description of this account,-SIP1: the primary SIP server, By default all calls throu server,-SIP2: the secondary SIP, When the primary server is unavailable, use the SIP server-Refresh time: Registration refresh interval, the minimum is 20 The default value is 3600.-Con type: the protocol use to communicate with SIP s -Amount of used lines: the lines the extension used,can 1-8,default is 2.--5) Set up the above parameters, Press Save softkey to saves settings, Complete the account creation;* Note: the parameters with the * mark must be setted. |
| Disable sip account | --1) Choose “System setting” > “Advanced settings”;--2) Enter the password required (The default is empty);--3) Choose “SIP” > “Account sip”;--4) Choose “Enable account” > “Disable”;--5) Press Save soft key |
Network Setting
| If you want to. | Then... |
| network setting | --1) Choose “System settings” > “Advanced settings”;--2) Enter the password required (The default is empty);--3) Choose “Network”>“LAN Settings”, you can configure the fo parameters:-Type: static IP or DHCP or PPPOE-IP: enter IP address, Note: Do not duplicate the ip ad other devices on the network-Mask: enter appropriate sub mask-GW: enter appropriate gateway-DNS1: enter IP address of the primary DNS server-DNS2: enter IP address of the secondary DNS server-Web port: the default Web port is 80,if you change it(for change it to 88),you must use IP and Web port to login the example http://192.168.0.200:88).It will take effect on next reboot-Telnet port: the default Telnet port is 23,if you change it example change it to 2003),you must use IP and Telnet port manage page (for example telnet 192.168.0.200:2003).It will take on next reboot. |
Load default settings
| If you want to... | Then... |
| Load default settings | --1) Choose “System settings” > “Advance settings”;--2) Enter the password required (The defa empty);--3) Choose “load default settings”,and pr “OK”, then “Reboot” the phone. |
Modify password
| If you want to... | Then... |
| Modify password | -1) Choose “System settings” > “Advanced settings”;-2) Enter the password required (The default empty);--3) Choose “modify password”,then input “old password ,new password to change “Advanced password” to login IP phone |
Customizing Rings and Volume
| If you want to. | This... |
| Change the ring tone | --1) Choose “System settings” > “Phone settings” > “Ring type”--2) Press navigation to choose ring tone;--3) Press  softkey to choose a ring tone to play a sit.Press softkey to choose a ring tone to play a sit.Press  softkey to Stop PlayingPress OK softkey to set the ring tone,Press softkey to Stop PlayingPress OK softkey to set the ring tone,Press  return to previous menu. return to previous menu. |
| Adjust the volume level | --1) Choose “System settings” > “Phone settings” > “Volume se--2) You can adjust the volume level of following types-Ring volume: Phone call ring volume,-Handset volume: Handle output volume,-Handset mic volume: Handle input volume,-Speaker volume: Hands-free speaker output volume,-Speaker mic volume: Hands-free input volume,-Headset volume: Headphone output volume,-Headset mic volume: Headset microphone input volume |
WIFI setting(only WS620 have this item)
| If you want to. | This... |
| Set WIFI | --1)Choose "System settings">"advanced settings">"advanced password;--2) Press navigation to choose WIFI setting;--3) Press "ok" button, -Current site: the wifi which the phone use now-Site list: where you can choose wifi--4) Press "site list", choose one wifi network which the phone-SSID: SSID name-BSSID: the mac address of the WIFI network-Channel:the channel of the WIFI network use-Type:the type of the WIFI network-Encrypt:the encrypt of the WIFI network-Signal:the signal of the WIFI network--5) Press "SSID",set WIFI which you choose-Encryption: the encryption of the WIFI network-Key type: the key type of the WIFI network-Key: the password which you should set to allow yourself the WIFI network -Current site: the wifi which the phone use now-Site list: where you can choose wifi--4) Press "site list", choose one wifi network which the phone-SSID: SSID name-BSSID: the mac address of the WIFI network-Channel:the channel of the WIFI network use-Type:the type of the WIFI network-Encrypt:the encrypt of the WIFI network-Signal:the signal of the WIFI network--5) Press "SSID",set WIFI which you choose-Encryption: the encryption of the WIFI network-Key type: the key type of the WIFI network-Key: the password which you should set to allow yourself the WIFI network |
Bluetooth setting
This is a new feature It allowing you to receive calls wherever you are in the office through Bluetooth headset. You can be free to answer or hang up the calls.
When you using this feature, please make sure you have BWM36. If you didn't have, you cannot use this Bluetooth feature.
Make your Bluetooth headset working:
● Make sure BWM36 equipment is connected and work normal.
● Make sure your IP phone support this Bluetooth feature.
● Make sure you have Bluetooth headset and work normal.
Note: In the IP phone Bluetooth searching mode, you need to make your Bluetooth headset also in the searching mode. How to make your Bluetooth headset into the searching mode, please find and follow the Bluetooth headset User Guide. If the Bluetooth headset not in the searching mode, it will make the IP phone searching failed.
- Setting way: Menu> System Setting> Advanced Settings>Password(Default is empty)>Bluetooth
| If you want to.... | Then... |
| Bluetooth | You can Enable/Disable Bluetooth feature |
| Current Bluetooth | You can saw the Bluetooth headset information with Name/MAC/State. Also can disconnect the current Bluetooth head and researching another equipment. |
| Bluetooth Searching | You can searching and connect the Blue headset in the Bluetooth range. Please n sure your Bluetooth headset also in the searching mode. After connected, the interface will transfer to Current Bluetooth you can saw the state and begin to us |
Main Features:
Plug and play, easy to use
Support wideband audio
Operating distance: 10 meters, Optimum distance: 1\~2 meters(3\~6 feet)
www.escene.cn/en/
Answer incoming calls through Bluetooth headset
Terminate calls through Bluetooth headset
Adjusts the volume through Bluetooth headset
Transmitted power: Class 2
Bluetooth frequency range: 2.402GHz-2.480GHz
Support 3xx/4xx/620 series IP Phone
Symbol rate: 3Mbit/sec
View status
If you want to see the phone status, Press MENU button > “view status”, or press OK button > “view status”, you can see the detail information of the phone.
| If you want to ...... | Then...... |
| Network | You can see the network detail information the phone |
| Lines | You can see the SIP account |
| software | It include phone Mode、software version、kernel version、Upgrade date、Running time |
| Expansion | Can check the expansion |
Diagnose
If you want to check the phone hardware function, Press C button > “diagnose” you can check the phone item as below.
| If you want to .... | Then .... |
| Keys | You can check the phone keys |
| LCD | Press’OK’to start,press’C’to exit |
| Lights | Press’OK’to start,press’C’to exit |
| Sound | Press’OK’to start |
WIFI setting(only WS620 has this item)
Tips: The WIFI ip phone support 802.11b/g/n/ac.
| If you want to. | This... |
| Set WIFI | --1)Choose "Menu">"System settings">"advanced settings">"advance password (default is empty)>"Network""--2) Press navigation to choose WIFI settings;--3) Press "ok" button to change the it Enable or Disable-Hot list: search site what you want to connect.--5) Press "Hot List >Manual", set WIFI which you choose-Encryption: the encryption of the WIFI network-Key type: the key type of the WIFI network-Key: the password which you should set to allow yourself the WIFI network |
7. Web Settings
We can configure the IP Phone more handy through web setting. Press OK button on the keypad of the phone to enter the status page and find out the IP address of IP phone. Enter it (for example you can enter the default ip of the phone: http://192.168.0.200) into the address bar of web browser. The default login name and password are both “root”.
Phone Status
You can see the currently status of the phone when use Phone Status option.
| Phone Status | |
| System Run Time | 4 Days 23 Hours 33 Minutes 20 Seconds |
| Register status ? | |
| Account 1 | 5221 (Registered) |
| Account 2 | None |
| Account 3 | None |
| Account 4 | None |
| Account 5 | None |
| Account 6 | None |
| Account 7 | None |
| Account 8 | None |
| EX Module 1 | Offline |
| EX Module 2 | Offline |
| Wi-Fi Status | |
| SSID | |
| State | |
| Signal: | 100 |
| Mode | |
| Band | 5745 |
| BSSID | |
| Encryption | |
| WLAN IP Address | |
| WIFI MAC | 3c:33:00:60:30:d5 |
| System Version | V0.6 |
| Network Status ? | |
| LAN Port type | DHCP |
| MAC | 00:26:8b:05:3b:04 |
| LAN | 192.168.0.171 |
| Subnet Mask | 255.255.255.0 |
| Gateway | 192.168.0.1 |
| Primary DNS | 202.96.134.133 |
| Secondary DNS | |
| VPN IP Address | |
| Router IP Address | |
| Router Subnet Mask | |
| Device type | As bridge |
| Router DHCP | off |
| System Info ? | |
| Phone Model | WS620NV3 |
| Software Version | V0.1.10.0908_Alpha(987) |
| Hardware version | V2.x.x |
| Hardware ID | 0 |
| Kernel Version | v1.0.0 |
| Auto Provision Server URL | voip.autoprovision.com |
| TFTP Server IP | voip.autoprovision.com |
Network
WIFI Setting(only WS620 has this item)
Open wireless function, scan hot spots, connect to hot spots, remove hot spots.
Connected with WIFI as following the picture. You can open it up and select the support encryption mode. Press "Scan" to refresh the SSID information.
| SSID | BSSID | Band | Encryption | Signal | Select |
| Aeromat | e4:f4:c6:14:ea:44 | 2417 | [WPA2-PSK-CCMP][WPS][ESS] | 100% | ○ |
| Wirelelss_0364E0 | d8:38:0d:03:64:e1 | 2462 | [ESS] | 100% | ○ |
| gzxx_hys | 80:89:17:c0:d0:7c | 2417 | [WPA2-PSK-CCMP][ESS] | 96% | ○ |
| Linksys5G | 94:10:3e:04:84:7b | 5745 | [WPA-PSK-TKIP][WPA2-PSK-CCMP][ESS] | 92% | ○ |
| Huawei-333 | 94:10:3e:04:84:7a | 2437 | [WPA-PSK-TKIP][WPA2-PSK-CCMP][ESS] | 91% | ○ |
| Aeromat_5G | e4:f4:c6:14:ea:48 | 5745 | [WPA2-PSK-CCMP][ESS] | 88% | ○ |
| TPGuest_07Cδ | 16:69:68:65:07:c6 | 2462 | [ESS] | 78% | ○ |
| ThomsonCCDE1F | 00:24:17:1c:9e:4f | 2462 | [WPS][ESS] | 77% | ○ |
| Wirelelss_0365E0 | d8:38:0d:03:65:e1 | 2437 | [ESS] | 77% | ○ |
| Aeromat-T | ec:26:ca:b7:6d:28 | 2437 | [WPA-PSK-TKIP+CCMP][WPA2-PSK-TKIP+CCMP][ESS] | 74% | ○ |
| gzxx | ec:6c:9f:24:7d:50 | 2432 | [WPA2-PSK-CCMP][ESS] | 72% | ○ |
| TENDA | 00:b0:0c:01:4a:31 | 2437 | [ESS] | 65% | ○ |
| gzxx_ywb | 80:89:17:3f:4d:e8 | 2412 | [WPA2-PSK-CCMP][ESS] | 64% | ○ |
| ABCD | ac:a2:13:b5:e5:80 | 2437 | [WPA-PSK-CCMP][WPA2-PSK-CCMP][WPS][ESS] | 60% | ○ |
| Peng_ASUS | 00:0c:43:e1:76:28 | 2447 | [WPA2-PSK-CCMP][ESS] | 58% | ○ |
| Aeromat-D | 28:10:7b:4ff5:d8 | 2452 | [WPA-PSK-TKIP+CCMP][WPA2-PSK-TKIP+CCMP][WPS][ESS] | 58% | ○ |
| cgb | 00:0e:e8:d8:4e:31 | 2472 | [WPA2-PSK-CCMP][ESS] | 56% | ○ |
| winson-2 | bc:46:99:b8:b3:68 | 2412 | [WPA-PSK-CCMP][WPA2-PSK-CCMP][ESS] | 48% | ○ |
| pmyy009 | 8c:21:0a:c4:cf.16 | 2437 | [WPA-PSK-CCMP][WPA2-PSK-CCMP][WPS][ESS] | 48% | ○ |
| Matthew Home | 40:16:9f:7d:16:50 | 2412 | [WPA-PSK-CCMP][WPA2-PSK-CCMP][WPS][ESS] | 48% | ○ |
| FMCN | 00:1d:45:ce:04:60 | 2442 | [WEPI][ESS] | 48% | ○ |
| SS8304 | 20:dc:e6:b:c:9b:7e | 2412 | [WPA-PSK-CCMP][WPA2-PSK-CCMP][WPS][ESS] | 47% | ○ |
| 29 | b0:d5:9d:44:84:e7 | 2437 | [WPA2-PSK-CCMP][ESS] | 47% | ○ |
| MERCURY_65DA5E | a8:57:4e:65:da:5e | 2462 | [WPA-PSK-CCMP][WPA2-PSK-CCMP][WPS][ESS] | 47% | ○ |
| TP-LINK_8D436A | cc:34:29:8d:43:6a | 2412 | [WPA-PSK-CCMP][WPA2-PSK-CCMP][WPS][ESS] | 46% |
When you choose an SSID above, press "Connect" you can connect to it.
IP Settings
You can config the network parameters for the phone on the web page.

Choose network, you will find the following parameters:
| Field | Description |
| DHCP | Config the phone get ip info from DHCP server |
| IP Address | Config the ip manual for phone |
| Netmask | Config the netmask manual for phone |
| Gateway | Config the gateway manual for phone |
| Username (pppoe) | The pppoe username |
| Password (pppoe) | The pppoe password |
| MTU (pppoe) | The mtu for pppoe,default is 1500 |
| Primary DNS | The primary DNS server |
| Secondary | The secondary DNS server |
| MAC Address | Display the MAC of the phone |
| HTTP Port | The default web port is 80,if you change it(for example change You must use IP and Web port to login the web page(for exa http://192.168.0.200:88). It will take effect on next reboot. |
| Telnet Port | the default Telnet port is 23,if you change it(for example chang 2003),you must use IP and Telnet port to login the manage pa example telnet 192.168.0.200:2003).It will take effect on next reb |
PC Port
Bridge mode and router mode can be configured as needed.
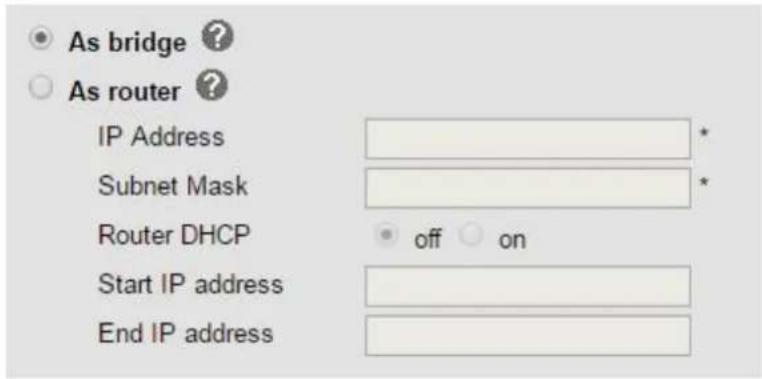
Bridge mode
Normally, you should choose "bridge" feature, it means that pc port and LAN port will share the same network.
Router mode
Router feature is for the phone PC Port. You must input IP address (it's equivalent to a gateway) and Net mask. If you want to use DHCP function, please turn it on, input start IP and end IP.
Advanced
VPN Settings

VLAN Settings
Current location: Network > Advanced
Advanced
VLAN Settings >>
LAN Port
Enable VLAN:
VID:
Priority:

When using VLAN Setting option, you can set several parameters as follow:
| VLAN Setting | |
| Enable VLAN | You can enable/disable vlan for phone and pc |
| VID[LAN/PC Port] | The vlan ID you want the phone or pc to join |
Port management Settings
Port Management Settings >>
HTTP Port
Telnet
Telnet Port
Local SIP port
RTP port range
80 (1-65535)
○ off ● on
23 (1-65535)
5060 (Default: 5060)
10000 -- 10128
Please Note: After changing the default HTTP port 80, please restart the machine to take effect. Using the new HTTP port to access the Web user interface "http://ipaddr:port".
QoS
Qos >> ?
SIP Qos
Voice Qos
26 (0-63)
46 (0-63)
Network Packet Mirroring
Network Packet Mirroring >>
Network Packet Mirroring
Off
LLDP
LLDP >>
LLDP
LLDP Packet Interval
○ off ● on
60 s(1-3600)
Paging settings
Paging Setting(NOTE: This feature priority is followed the serial number, In other words, "paging1" is the highest priority)
www.escene.cn/en/

Socket5 Proxy Server
| Socket5 Proxy Server | |
| Socket5 Proxy Server | Enable/Disable Socket5 Proxy Server. |
| Server IP | Socket5 Proxy Server IP address. |
| Port | Socket5 Proxy Server port, default is 1080. |
| Anonymous Login | Enable/Disable Socket5 Proxy Server login username. |

SIP Account
The phone attempts to register to the SIP server using the account/registrar data provided by the automatic or manual initialization.
Basic
Account1

Choose one Account, you will find the following parameters:
| ITEM | DECSRIPTIO |
| Enable | You can choose on/off to enable/disable the line. |
| Account Mode | You can choose VOIP/PSTN, but this model nonsupport PSTN, need, Pls contact us to buy another model that can supports P |
| Display Name | It is showed as Caller ID when making a phone call |
| Username | It is a username provided by SIP Server |
| Authenticate Name | It is authenticated ID for authentication |
| Password | It is a password provided by SIP Server |
| Label | Label with this account. |
| SIP Server | Server for registration, provided by administrator |
| Secondary server | When the main server can't work, it also can register in this server. |
| Outbound Proxy Serv | Put into the address with the outbound proxy server. |
| Secondary Outbound Proxy Server | When the main out bound server can't work, it also can use t server. |
| Poling Interval Time Registration | Poling Interval Time Of Registration, default is 32 s. |
| NAT Traversal | Defines the STUN server will be active or not |
| STUN Server | Session traversal utilities for NAT. |
| Register Expire Time | IP phone automatically registered every time |
| SIP Transport | There are UDP/TCP/TLS three options |
| Ring Type | Select this account ringing type. |
Advanced

| ITEM | DECSRIPTIO N |
| Call | |
| Do Not Disturb | Enable/Disable Do Not Disturb |
| Anonymous Call | Enable/Disable anonymous call. |
| Anonymous Call Rejection | Enable/Disable anonymous call rejection. |
| Use Session Timer | Enable/Disable refresh session function. The device will send an packet to refresh the session during a call if it enable. |
| Session Timer | The refresh session time interval. |
| Call Method | This method include SIP and TEL. |
| DNS-SRV | Enable/Disable DNS-SRV. |
| Allow-events | Enable/Disable Allow-events. |
| Registered NAT | Enable/Disable Registered to NAT |
| Keep-alive Type | Select keep alive type. |
| Keep-alive Interval | Default is 30 second. |
| BLA | Share with the line. |
| BLA Number | BLA Number |
| Subscribe Period | Subscribe expire time. |
| ITEM | DECSRIPTION |
| Security | |
| SIP Encryption | Enable/Disable SIP encryption. |
| Encryption Algorithm | The encryption algorithm at this time we only have RC4. |
| Encryption Key | The key with encryption. |
| Voice encryption (SRTP) | Enable/Disable voice encryption(SRTP). |
Programmable Keys
Paperless Program Keys
| Paperless Program Keys | |||||
| Key1: | Mode: | BLF▼ | Key17: | Mode: | BLF▼ |
| Account: | Speed Dial | Account: | Account1▼ | ||
| Name: | Speed Dial Prefix | Name: | |||
| Number: | DTMF | Number: | |||
| BLF | |||||
| Key2: | Mode: | Paging | |||
| Account: | Call Park | Key18: | Mode: BLF▼ | ||
| Name: | Intercom | Account: | Account1▼ | ||
| Number: | Pickup | Name: | |||
| Broadsoft BLF | Number: | ||||
| BLA | |||||
| Key3: | Mode: | BLF▼ | Key19: | Mode: | BLF▼ |
| Account: | Account1▼ | Account: | Account1▼ | ||
| Name: | Name: | ||||
| Number: | Number: | ||||
| Key4: | Mode: | BLF▼ | Key20: | Mode: | BLF▼ |
| Account: | Account1▼ | Account: | Account1▼ | ||
| Name: | Name: | ||||
| Number: | Number: | ||||
| Key5: | Mode: | BLF▼ | Key21: | Mode: | BLF▼ |
| Account: | Account1▼ | Account: | Account1▼ | ||
| Name: | Name: | ||||
| Number: | Number: | ||||
| Key6: | Mode: | BLF▼ | Key22: | Mode: | BLF▼ |
| Account: | Account1▼ | Account: | Account1▼ | ||
| Name: | Name: | ||||
| Item | Description |
| Speed Dial | Use specific Key as Speed Dial key |
| Speed Dial Prefix | Use specific Key as Speed Dial Prefix key |
| DTMF | Use specific Key as DTMF key |
| BLF | Use specific Key as BLF key |
| Paging | Use specific Key as Paging key |
| Call Park | Use specific Key as call park key |
| Intercom | Use specific Key as intercom key |
| Pickup | Use specific Key as pickup key |
| Broadsoft BLF | Use specific Key as Broadsoft BLF key |
| BLA | Use specific Key as BLA key |
www.escene.cn/en/
Line keys
In the Programmable Keys option, you can use all the 8 line keys of ES620 as programmable keys.

Choose Programmable Keys, you will find the following parameters:
| Item | Description |
| Line | Use specific Key as Line key,default is Line key |
| Speed Dial | Use specific Key as Speed Dial key |
| Speed Dial Prefix | Use specific Key as Speed Dial Prefix key |
| DTMF | Use specific Key as DTMF key |
| BLF | Use specific Key as BLF key |
| Paging | Use specific Key as Paging key |
| Call Park | Use specific Key as call park key |
| Intercom | Use specific Key as intercom key |
| Pickup | Use specific Key as pickup key |
| Broadsoft BLF | Use specific Key as Broadsoft BLF key |
| BLA | Use specific Key as BLA key |
Function keys
Function Keys: If you do not like the default setting with the function keys feature. You can change to whatever you like.
NOTE: IF THE PHONE WITHOUT THE KEY, YOU CAN IGNORE IT.

Softkey
Soft Keys: Soft key is the key with below display in the LCD. You can change it for your mind the other features in many all kinds of status. As below example, when you dialing with someone, the LCD display soft key is Send \Del \Empty\End, Empty means nothing in it.

EX Module
Setting extend modules and its programmable keys in here.
Expansion module is extended Hotline function; you can believe it support more hotline by using Expansion module. You can refer to 2. Connecting Your Phone about connecting of Expansion module.
After connecting Expansion module to a phone, you can install it as follow: After installing, you can set parameters of each Extension as follow:
EX Module1
Please select EX EX Module 1 ▼


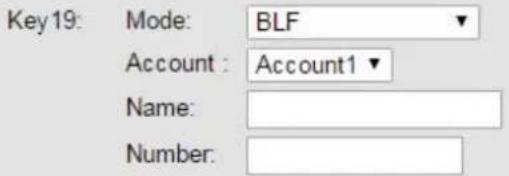


| Ex Module | |
| Key n | Each Expansion module supports ESM32 & ESM20-LCD . |
| Mode | Five modes:--Speed Dial: Enable speed dialing in this key;--Speed Dial Prefix--DTMF-- BLF: Enable BLF in this key;-- Paging-- Call Park-- Intercom-- Pickup-- Broadsoft BLF--BLA |
| Account | A SIP account relates to this key, another word, you will hotline by this SIP account. |
| Name | Description of this hotline. |
| Number | Number relates to this key. |
*Regarding the settings of Expansion module, please confirm the model of your phone is GS/WS/ES620_E.
Phone Setting
Basic
Time Settings
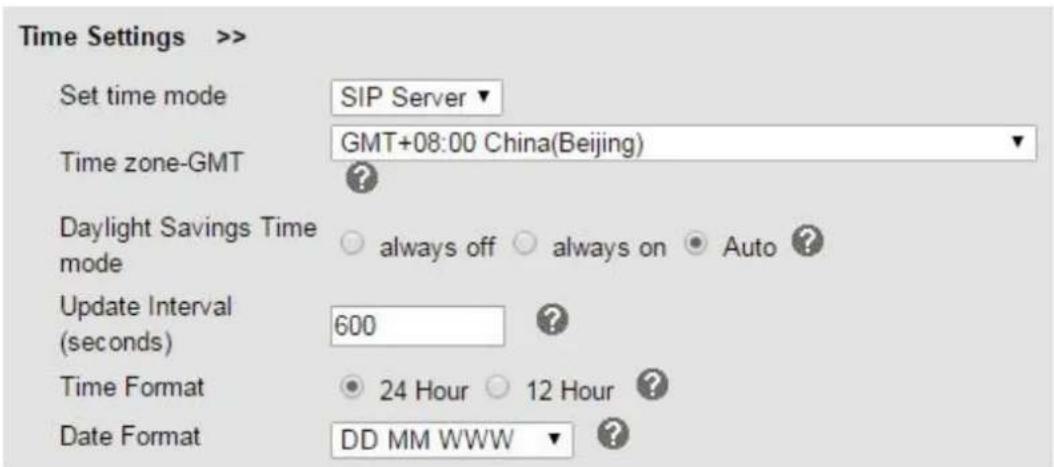
| ITEM | DECSRIPTIO |
| Time Settings | |
| Set Time Mode | Include SNTP/SIP Server/PSTN/Manual |
| SNTP Server | You can select in the list or input owner server address. |
| Update Interval | The update interval with SNTP. |
| Day Light Saving Ti | Enable/disable the DST for the phone |
| Time Format | You can use 24 hour time format or 12 hour time format |
| Date Format | You can choose the appropriate time format. |
| Time Zone-GMT | You can select different time zone for the phone |
| Manual Setting | Setting time manually. |
Backlight

Keyboard Lock
Keyboard Lock >>
Keyboard Lock
Disabled

Phone Lock Time Out
0 (0-3600s)
Phone Unlock PIN(0\~15 character)

Emergency
112,911,110

Ring
Ring >> ?
Ring type
Upload ring tone
Ring1 ▼ Delete
选择文件 未选择任何文件
Upload Cancel
(Please upload a ring tone with G711A(*.wav) audio coding, maximum is 10 rings and the total size must be less than 150kB.)
| ITEM | DECSRIPTIO |
| Ring | |
| Ring Type | Select the ring type. Default is Ring 1. |
| Uploading Ring Tone | Please upload a ring tone with G711A audio coding, Maximum and the total sizes must less than 150k. |
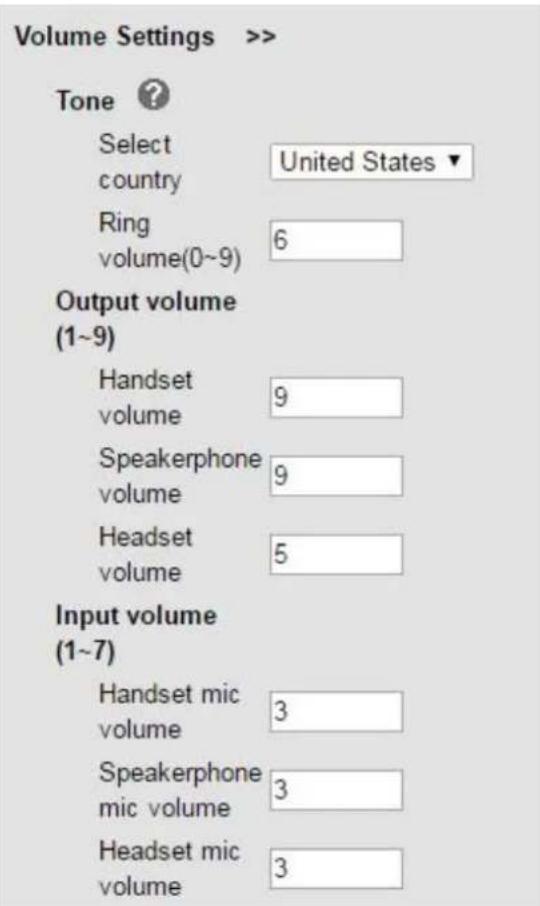
Volume Settings
| ITEM | DECSRIPTIO |
| Basic | |
| Select Country | Select the country dial tone. Default is United States. |
| Ring Volume | The ring volume default is Lv3, the range is 0~9. |
| Handset Volume | The handset volume default is Lv5, the range is 1~9. |
| Speaker Phone Volum | The speaker volume default is Lv5, the range is 1~9. |
| Headset Volume | The headset volume default is Lv3, the range is 1~9. |
| Handset MIC Volume | The handset MIC volume default is Lv3, the range is 1~7. |
| Speaker Phone MIC Volume | The speaker MIC volume default is Lv3, the range is 1~7 |
| Headset MIC Volume | The headset MIC volume default is Lv3, the range is 1~7 |
Wallpaper
Wallpaper >>
Please select picture type
Standby
Please input picture file
选择文件 未选择任何文件
Upload
(It supports *.bmp/jpg/png, the size of picture must be smaller than 100KB; Screensavers picture resolution: 272*345 pixels; other picture resolutions: 272*480 pixels. PS: It only supports RGB image, suggest using Adobe Photoshop to transform it to RGB before uploading.)
Featuers
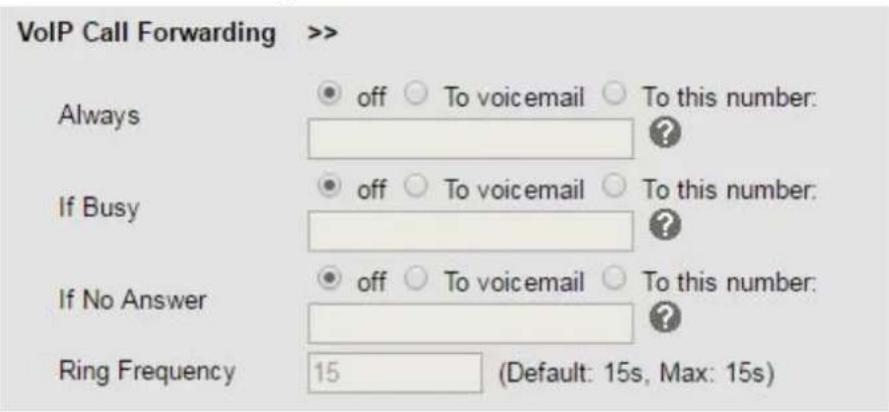
VoIP Call Forwarding
Auto Redial

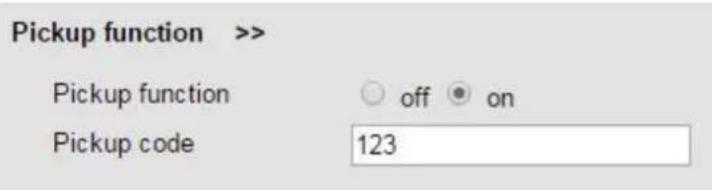
Pickup function
Hot Line Function

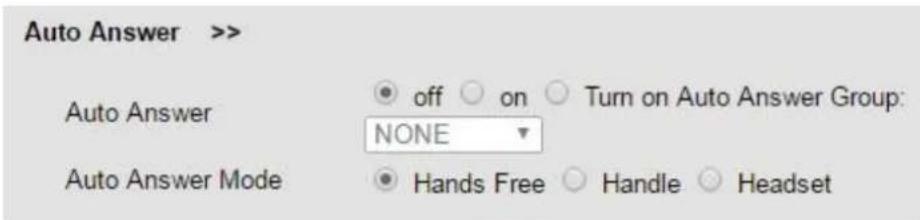
Auto Answer
Remote Control

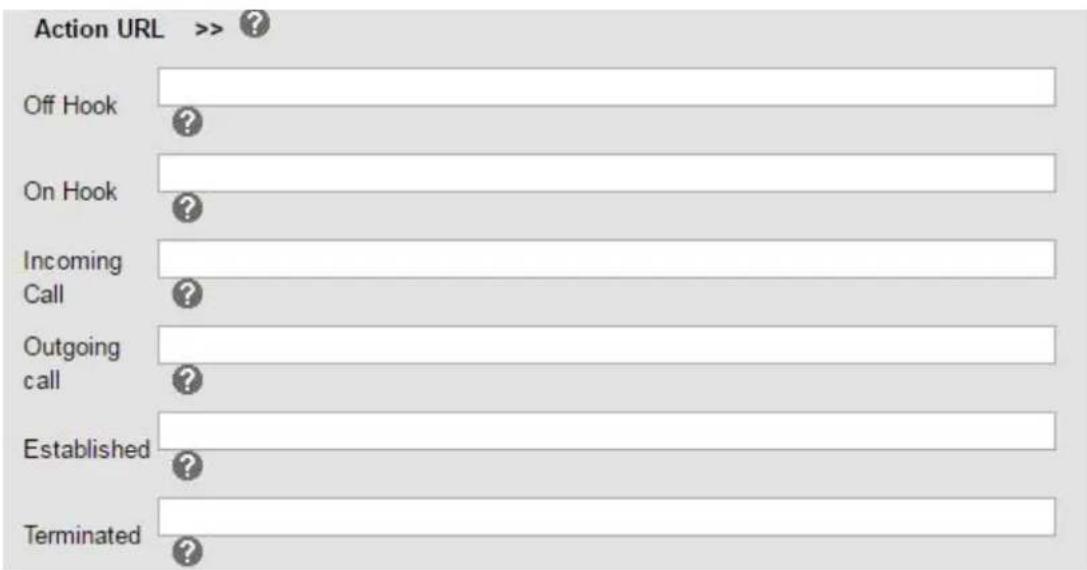
Action URL
EP+

Other Features Settings

Advanced
Audio
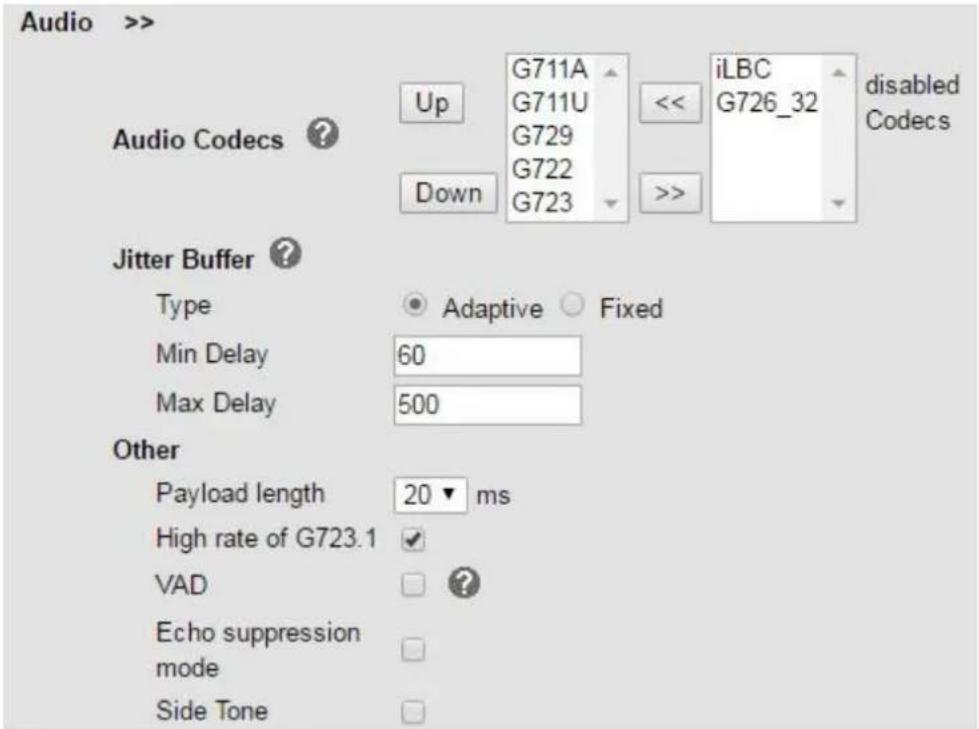
| ITEM | DECSRIPTIO |
| Audio Codec | Use the navigation keys to highlight the desired one in the En Codes list, and press the / to move to the other list. |
| Jitter Buffer | |
| Type | The type of Jitter Buffer is Adaptive or Fixed, default is adap |
| Min Delay | The min delay range setting, default is 60. |
| Max Delay | The max delay range setting, default is 150. |
| Normal Delay | The normal delay range setting, default is 120. |
| Other | |
| Play Load Length | The play load length setting, default is 30ms. |
| High Rate Of G723. | Enable/Disable High Rate of G723.1 feature. |
| VAD | Enable/Disable VAD feature. |
| Echo Suppression Mo | Enable/Disable Echo Suppression Mode feature. |
| Side Tone | Enable/Disable Side Tone feature. |
Dial Plan

Phone Book
Group
You can add, edit and delete group in a phone book on web page of ES620.
1) Click "Phone Book" > "Group",
If you want to add a Group, you just ought to click 'Add Group'.
You can edit an existed Group by click.
You can delete an existed Group by click, if you want to delete all Groups, you just ought to click 'Delete All Group'.
www.escene.cn/en/
2) When you add a group or edit an existed group, you can set several parameters as follow:

| Group | |
| ID | Serial number of a group |
| Description | Description of a group |
| Group Name | Name of a group |
Contact
You can add, edit and delete contact in a phone book on web page of ES620. The phonebook can storage 300 contact entry.
1) Click "Phone Book" > "Contact",
| Delete | ID | Operation | Name | Phone | Group |
| 1 | 总经办 | ||||
| 2 | Number1: Number2: | Group1:硬件组 Group2:开发部 | |||
| 3 | Number1: Number2: | Group1:硬件组 Group2:开发部 | |||
| 4 | Number1: Number2: | Group1:硬件组 Group2:开发部 | |||
| 5 | Number1: Number2: | 品质部 |
Attention: If you want to download or upload the contact, please go to the "Phone Maintenance" page
Add Contact
Delete all Contacts
Upload Phonebook
Hangup
If you want to add a Group, you just ought to click 'Add Contact'.
You can edit an existed Contact by click .
You can delete an existed Contact by click, if you want to delete all Contacts, you just ought to click 'Delete All Contact'.
2) When you add a Contact or edit an existed Contact, you can set several parameters as follow:
| Contact | |
| Serial Number | Serial number of a contact |
| First Name | The First Name of a contact |
| Last Name | The Last Name of a contact |
| Mobile Number | The Number1 phone number of a contact |
| Office Number | The Number2 phone number of a contact |
| OtherNumber | The Number3 phone number of a contact |
www.escene.cn/en/
| Group | You can assign a contact to a specific group. If there isn't on the phone, the group is None by default. |
| Account | Select a SIP account relating this contact, that is you can dia contact from this SIP account. |
LDAP
1).Overview
LDAP stands for Lightweight Directory Access Protocol which is a client-server protocol for accessing a directory service. LDAP lets you locate organizations, individuals, and other resources such as files and devices in a network, whether on the Internet or on a corporate intranet, and whether or not you know the domain name, IP address, or geographic whereabouts.
An LDAP directory can be distributed among many servers on a network, then replicated and synchronized regularly.
2).Configuration
Please note that LDAP Phonebook support on ES620\ES410\ES330\ES320\ES310\ES210, the version must be V2.2.3.1-2210 and higher, then access to the web "PhoneBook>LDAP page, you can find the configured option is like following picture. the detail configure in the appendix.
LDAP

BanList
You can add, edit and delete banlist in a phone book on web page of ES620. 1) Click "PhoneBook" > "BanList",

If you want to add a BanList, you just ought to click 'Add BanList'.
You can edit an existed BanList by click.
You can delete an existed BanList by click, if you want to delete all BanLists, you just ought to click 'Delete All BanList'.
2) When you add a BanList or edit an existed BanList, you can set several parameters as follow:
| BanList | |
| Serial Number | Serial number of a BanList |
| Description | Description of a BanList |
| First Name | The First Name of a ban contact |
| Last Name | The Last Name of a ban contact |
| Mobile Number | The number1 phone number of a ban contact |
| Home Number | The number2 phone number of a ban contact |
| Office Number | The number3 phone number of a ban contact |
| Account | Select a SIP account relating this ban contact, that is the bar can't dial to this SIP account. |
Phone Call Info

Phone Maintenance
Basic
HTTP Upgrade
You can upgrade the software and configuration etc. files by HTTP.

When using HTTP upgrade, you can set several parameters as follow:
| HTTP Upgrade | |
| Select a File | Browse the software/kernel/configuration file which you need to up from HTTP |
| Software | Used for upgrading the software of the phone |
www.escene.cn/en/
| Upgrade | |
| Configuration | You can used upload/download to upload/download the configure: the phone |
| XML Personal Phonebook | Used for uploading/downloading the XML personal phonebook of phone |
| Vcard | Downloading all contacts in the Vcard mode, but upload only su by one. |
| EXT Module | Used for updating/backup the expansion of the phone[NOTES: The mode doesn't support this feature] |
| Log | Used for the administrator to find out or making sure the problem equipment. |
| All Config File | All Config File includes: Configuration, Extern, Log, XML Phone Enterprise Phone Book. |
FTP Upgrade
You can upgrade the software and configuration etc. files by FTP.
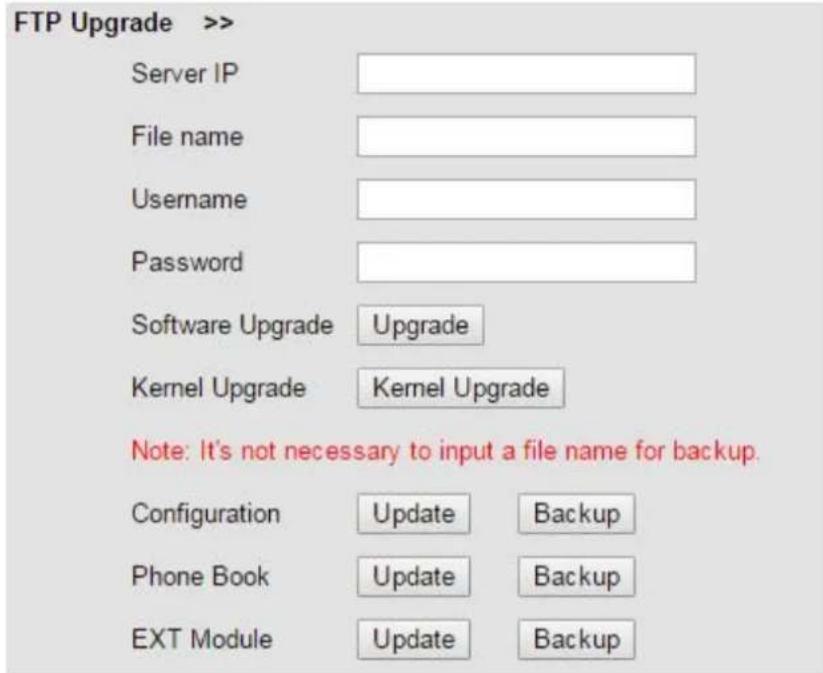
When using FTP upgrade, you can set several parameters as follow:
| FTP Upgrade | |
| Server IP | The IP address of the FTP server |
| File name | Downloading from FTP server |
| Username | Providing by FTP server |
| Password | Providing by FTP server |
| Software Upgrade | Used for upgrading the software of the phone |
| Kernel Upgrade | Used for upgrading the kernel of the phone |
| Configuration | Used for updating/backup to update/backup the configure file of phone |
| Phone Book | Used for updating/backup to update/backup the phonebook of tl |
| EXT Module | Used for updating/backup the expansion of the phone[NOTES: The mode doesn't support this feature] |
NOTES: It's not necessary to input filename when doing backup Configuration, Phone Book, EXT Module.
TFTP Upgrade
You can upgrade the software and configuration etc. files by TFTP.

When use TFTP upgrade, you can set several parameters as follow:
| TFTP Upgrade | |
| Server IP | The IP address of the TFTP server |
| Filename | Downloading from FTP server |
| Software Upgrade | Used for upgrading the software of the phone |
| Kernel Upgrade | Used for upgrading the kernel of the phone |
| Configuration | Used for updating/backup the configure file of the phone |
| Phone Book | Used for updating/backup the phonebook of the phone |
| EXT Module | Used for updating/backup the expansion of the phone[NOTES: The mode doesn't support this feature] |
NOTES: It's not necessary to input filename when doing backup Configuration, Phone Book, EXT Module.
Default Settings
You can load the phone to the factory default setting in default setting option.
Default Settings >>
Click to confirm
Attention: restoring the phone to factory default will result in loss of service, accounts, and preferences that have been previously set by the user.
Reset to Factory Settings
Press the 'Reset to Factory Setting' option, the phone will load to factory default setting on next reboot.
Reboot
You can use reboot option to reboot the phone.
Reboot >>
Attention: Rebooting the phone will result in temporary loss of phone and web services, click reboot to continue.
Reboot
Advanced
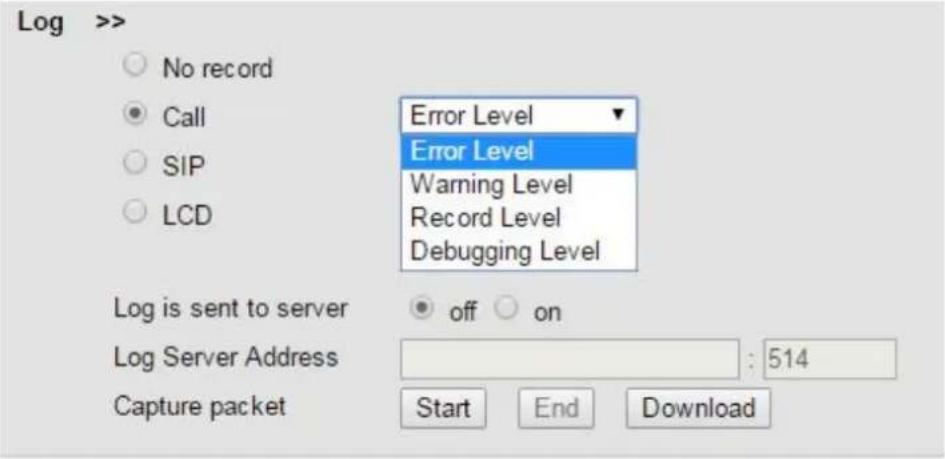
Log
This feature is use for the administrator to managing the equipment, like debugging, SIP etc., If you need to catch a debugging Level, you need to setup on this interface.
Auto Provisioning
When you open this auto provision feature, the phone will do auto provision after it detect a different software or kernel (Higher or Lower) which are putted on the TFTP,HTTP,HTTPS,FTP, server. For the detailed information about auto provision, you can find it in the official website: HTTP://www.cscene.cn/cn

When using auto provision, you can set several parameters as follow:
| Auto Provisioning | |
| Auto Provision | You can enable/disable auto provision by select on/off |
| Protocol | Used for auto provision, it includes TFTP/HTTP/FTP |
| Software Server URL | The server address of the auto provision |
| Username | Providing by provision server |
| Password | Providing by provision server |
| Auto Download Software | Used for auto download software from server |
| Auto Download Kernel | Used for auto download kernel from server |
| Auto Download Config Fil | Used for auto download config file from server |
| Auto Download Expansion | NOTES: The model doesn't support this feature. |
| Auto Download Enterprise Phonebook | Used for auto download Enterprise Phonebook from ser |
| Auto Download Personal Phonebook | Used for auto download personal phonebook from serve |
| Booting Checked | Used for checking the auto provision when phone boot |
| Zero Active | |
| Wait Time | |
| Disable the phone while | Enable/Disable the booting checking feature. |
| booting checking | |
| Auto Provision Frequency | Used for setting the time interval for auto provision |
| Auto Provision Time | Used for the specific time for auto provision |
| Next Auto Provisioning | Reset the Auto Provision Next Upgrading time. |
| AES Enable | You can enable/disable AES encrypt for auto provision |
| AES Key | The key of the AES |
| Auto Provision Now | Used for doing auto provision immediately |
Security
Password
Here you can setting the administrator or user WEB password management. Select your type. If you login as an administrator, you can modify both the user's and admin's passwords.

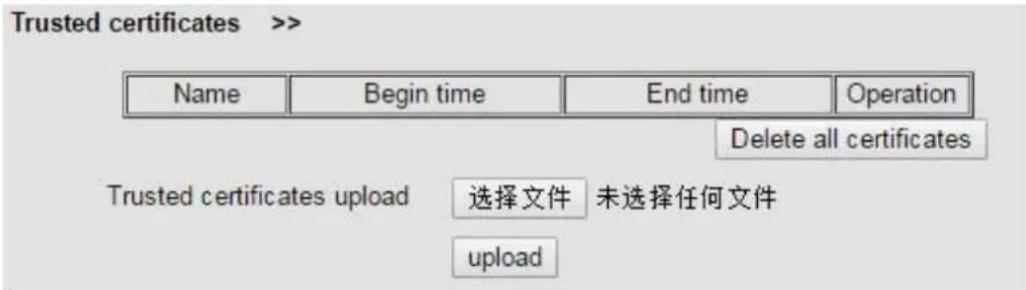
Trusted certificates
IP Strategy

8. WEB Other Settings or Information
WEB User
In the upper right corner of the website page, you can switch user.

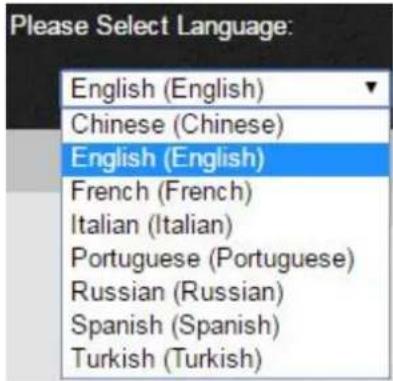
Multi-Language
In the upper right corner of the website page, you can select the language in the below list.
Note Tips
In the right middle of the website page, there is a Note tips in every function page. Hope it can help you to know something about that.
Note
Register status:
It shows the Register Status.
Network Status:
It shows the information of LAN port and PC port.
System Info:
It shows the version of firmware


- Getting Started
- About
- Illustrate
- Features
- Connecting Your Phone
- Phone overview
- Understanding Buttons and Hardware
- Understanding Phone Screen Features
- Basic Call Handing
- Placing a Call
- Tips
- Answering a call
- Ending a Call
- Using Hold and Resume
- Transferring Calls
- Using Mute
- Do Not Disturb
- 3-way Conference
- Expansion Installation
- Expansion Settings
- Time & Date
- VOIP Call Forwarding
- Advanced Call Handling
- Speed Dialing
- Using the phone book
- Using Call Logs
- Keypad Instruction
- Language
- SIP Account Settings
- Load default settings
- Modify password
- Customizing Rings and Volume
- WIFI setting(only WS620 have this item)
- Bluetooth setting
- Main Features:
- View status
- Diagnose
- WIFI setting(only WS620 has this item)
- Web Settings
- Phone Status
- Network
- IP Settings
- PC Port
- Bridge mode
- Router mode
- Advanced
- VPN Settings
- VLAN Settings
- Port management Settings
- Network Packet Mirroring
- SIP Account
- Account1
- Programmable Keys
- Paperless Program Keys
- Line keys
- Function keys
- Softkey
- EX Module
- EX Module1
- Phone Setting
- Basic
- Featuers
- %23
- Phone Book
- Group
- Contact
- LDAP
- 1).Overview
- 2).Configuration
- BanList
- Phone Call Info
- Phone Maintenance
- HTTP Upgrade
- FTP Upgrade
- TFTP Upgrade
- Default Settings
- Default Settings >>
- Click to confirm
- Reboot
- Reboot >>
- Log
- Auto Provisioning
- Security
- Password
- Trusted certificates
- IP Strategy
- WEB Other Settings or Information
- WEB User
- Multi-Language
- Note Tips
- Note
- Register status:
- Network Status:
- System Info:
Brand : Escene
Model : ES620-PEN
Category : Telephone