
ESM32 - Telephone Escene - Free user manual and instructions
Find the device manual for free ESM32 Escene in PDF.


| Product Type | SIP IP Phone |
| Brand | Escene |
| Model | ESM32 |
| Dimensions (approx.) | 200 x 170 x 85 mm |
| Weight (approx.) | 0.8 kg |
| Power Supply | 5V DC, 1A via USB-C or PoE (802.3af) |
| Display | 2.4-inch color LCD |
| Key Features | 2 SIP accounts, hands-free speakerphone, HD audio, dual Gigabit Ethernet ports |
| Audio Codecs | G.711, G.722, G.729, iLBC |
| Network Protocols | SIP (RFC3261), TCP/IP, UDP, RTP, DHCP, DNS, TFTP |
| Compliance | CE, FCC |
| Operating Temperature | 0°C to 40°C |
| Storage Temperature | -20°C to 60°C |
| Humidity | 10% to 90% non-condensing |
| Cleaning Instructions | Wipe with a soft, dry cloth. Do not use liquid cleaners. |
| Safety Warnings | Use only supplied power adapter. Avoid exposure to water. |
| Spare Parts / Repairability | Handset, base stand, power adapter available. Not user-serviceable. |
| Warranty | 1 year limited warranty |
Frequently Asked Questions - ESM32 Escene
User questions about ESM32 Escene
0 question about this device. Answer the ones you know or ask your own.
Ask a new question about this device
Download the instructions for your Telephone in PDF format for free! Find your manual ESM32 - Escene and take your electronic device back in hand. On this page are published all the documents necessary for the use of your device. ESM32 by Escene.
USER MANUAL ESM32 Escene
Escene Communication Co., Ltd 2016-06-16
www.escene.cn/en
Tables of Contents
- Getting Started....1
About....1
Technical features....1
- Connecting Expansion Module ESM32....2
- ESM32 Expansion Module Overview....4
- Installing Expansion Module ESM32....6
- Setting Expansion Module....9
- Web Setting.... 10
1. Getting Started
About
Expansion Module ESM32 greatly improve the features and extensibility of Escene IP Phones (ES6xx, ES4xx, ES330 and so on). Each Expansion Module ESM32 supports 32 programmable keys (Dual-color LEDs), Conecting to IP Phone through RJ-45 Straight-Through Wired Cable. ES6XX and ES4XX and ES330 support 4pcs Expansion Modules ESM32 including paperless programmable keys (Please refer to IP Phone User Manual to learn paperless programmable keys). Combined with IP-PBX, each programmable key can support speed-dial, BLF, and collaborate with the server to achieve call forwarding, call transfer, call holding, call pick-up, and other functions.
Expansion Module ESM32 is suitable for the front desk attendant, administrative assistants, call center agents and the user who needs to monitor or manage a large number of calls.
Technical features
| Items | ESM32 |
| Keys | 32 programmable keys (Dual-color LEDs) |
| Interface | 2xRJ-45, including IN& OUT to easily connect IP Phones and other Expansion Modules ESM32 |
| Maintain | IP Phone keypad installationmaintenance of all data via Web page |
| Physical Specifications | Storage Temperature: 0°C ~ 60°COperating Humidity: 10% ~ 90%Size: 174mm*100mm*35mm (L*W*H) |
| Applies to | ES6XX、ES4XX、ES3XX and other IP Phone Platforms* The corresponding IP phones described as follows, |
*IP Phone description:

2. Connecting Expansion Module ESM32
Generally Speaking, system administrator will install your new Expansion Module ESM32 to IP phone. If not, please read as below.
1) Open the packing box of Expansion Module ESM32. Compare with the packing list and check whether the related accessories of ESM32 are complete, the packing list is as follows:
- 1x Expansion Module ESM32
● 1x RJ-45 network cable
- 1x metal mounting fasteners (including 4 mounting screws)
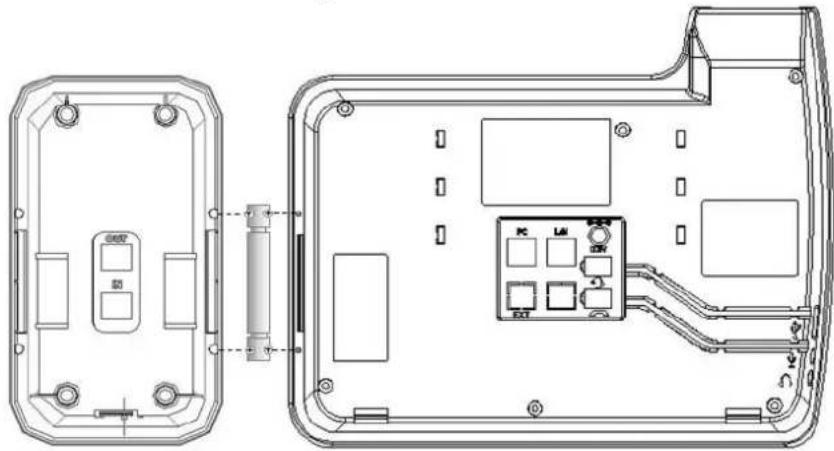
2) shown in Figure 2.1, connect IP phone and Expansion Module ESM32 by a metal mounting fasteners, and install by mounting screws.
*More description of Interface, please refer to 3. ESM32 Expansion Module Overview - Buttons and Hardware
Figure 2.1 EMS32 connect to SayHi Series IP Phone A
natural_image
Technical line drawing of a device rear panel with internal components and mounting holes (no text or symbols)3) Use RJ-45 network cable(Straight-Through Wired Cable). One side for ESM32 "IN" interface, another side for IP Phone "EXT" interface, Figure 2.1 as follows:
Figure 2.2 EMS32 connect to SayHi Series IP Phone B

4) If you need to connect other Expansion Modules, please connect via metal mounting fasteners, and install via mounting screws. Figure 2.3 as follows: Figure2.3 EMS32 connect to ESM32

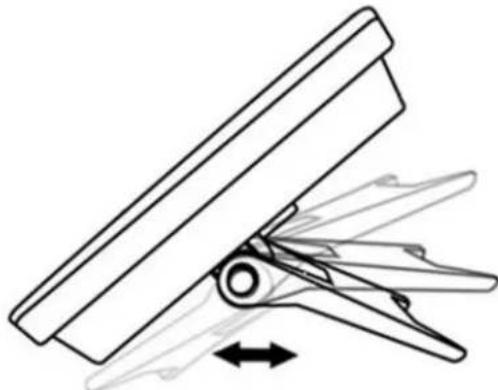
5) On the back of ESM32, press the button on the side of the bracket, then adjust the angle to make it as same as the angle of IP Phone. Figure 2.4 as follows:
Figure2.4 ESM32 Expansion Module bracket angle adjustment
natural_image
Diagram of a mechanical assembly with directional arrows indicating movement or force (no text or symbols)6) After connecting, you can install and set Expansion Modules ESM32, more details please refer to the following sections.
3. ESM32 Expansion Module Overview
3.1. Buttons and Hardware
Figure 3.1 - 3.2, you can learn the buttons and hardware of Expansion Module ESM32
Figure 3.1 Expansion Module ESM32 front view

| No. | Buttons and Hardware | Functional Description |
| 1 | programmable buttons | Used to bind the speed-dial number to achieve Speed-dial; Used to set the function code and achieve this function v Server; After opening BLF * (busy line detection), can view the corresponding number: 1) Red, steady: Remote line is busying. 2) Red, flashing: There is an incoming call. 3) Yellow-green, steady: Remote line is idle. Sorting programmable keys: Left (from top to bottom): 1 to 16; Right (from top to bottom): 17 to 32 |
| 2 | Expansion Module Lable | allow users with convenient look-up by providing identity definition for quick dial number as well as the set functi |
www.escene.cn/en
| Paper |
*BLF is "off" - No light.
**"BLF" default is off, please turn on "BLF". More details refer to the section of 6.Web setting
Fiture 3.2 Expansion Module ESM32 Rear view

| No. | Hardware components | Function Description |
| 1 | OUT Interface | used to connect "IN" interface of Expansion Module ESM |
| 2 | IN Interface | used to connect EXT interface or Expansion Module ESM "OUT" interface |
| 3 | Fastening screw | used to install the metal fasteners |
| 4 | Bracket | supporting ESM32, easy to use |
| 5 | Button of bracket | Press the button to adjust bracket angle |
4. Installing Expansion Module ESM32
Currently Expansion Module ESM32 is only supported to install by IP telephone keypad. Besides, the more important is, In the telephone keypad configuration menu, you can diagnose Expansion Module LED to check if the LED is normal; but if you want to set the buttons of Expansion Module, you can only configure on the Web.
After connecting with Expansion Module ESM32, you need to choose serial number to install Expansion Module and make IP Phone recognize the serial number of the corresponding Expansion Module. After the successful installation, you could check Expansion Module state from the page"IP phone state ":
| implemented function | Specific operation |
| Install Expansion Module | --1) Connect Expansion Module EMS to IP Phone with network --2) Select Function Setting> Expansion Module Installation*;--3) IP Phone will prompt "Please select serial number from buttons "1-6", press button"finish" to complete the modification" (generally, set Expansion Module as "Expansion Module1" to directly connect IP Phone, the Expansion next to Expansion Module "1" is "Expansion Module2", and so on, of course, you can also define by yourself);--4) Now all buttons with optional serial number on Expansion will be " yellow-green" (Left from top to bottom: 1 to 6), corresponding button of Expansion Module serial number is flashing".Pressing the corresponding button, you can determine or modify the Expansion Module Serial number: --5) Press button "OK" or the "Enter" to submit**。*The serial number of Expansion Module is default "1", Don't install when only one Expansion Module**If not press button "OK" or "Enter" within 35seconds, it will automatica Serial number of Expansion Module --5) Press button "OK" or the "Enter" to submit**。*The serial number of Expansion Module is default "1", Don't install when only one Expansion Module**If not press button "OK" or "Enter" within 35seconds, it will automatica Serial number of Expansion Module |
| Check the status of the Expansion Module | --1) select viewing state on the page;--2) If successfully installed and connected to Expansion Module, show "online", otherwise show "offline". |
| Diagnose Expansion Module LED | --1) hold down button“C” to enter Diagnostics> Expansion Module>Indicator;--2) Press Button OK to start:Press 1st: LED, all "red"Press 2nd: LED, all "off"Press 3rd: LED, all "yellow-green"Press 4th: LED, all "off"Press 5th: LED, all "orange"Press 6th: LED, all "off"And so on......Press C key to exit diagnostic procedures |
| Diagnose Expansion Module buttons* | --1) hold down button “C” to enter Diagnostics> Expansion Module>Button;--2) Press Button button “OK” to start, Press different buttons on Expansion Module, the corresponding number will disappear in the LCD screen to test if the button is normal.*when diagnosing, the relation of he corresponding number of each button,(left from top to bottom & right from top to botton) need to correspond with the numbers. |
After installing Expansion Module (designating the corresponding ID for each Expansion Module), In order to facilitate the user to know the number of each Expansion Module, when turning on Expansion Module, the corresponding button will quickly flash "red" in 2 seconds.
www.escene.cn/en
Like, Expansion Module with serial number "1" will flash firstly, Expansion Module with serial number "2" will flash secondly,
Specific button configuration of Expansion Module, please refer to the next section.
5. Setting Expansion Module
After installing Expansion Module (setting the serial number for Expansion Module), you can set the buttons on expansion module, also binding the buttons as a remote extension number to achieve speed-dial, or set some function code with SIP Server code.
Of course, you may also need to apply to BLF* function of expansion module keys, to view call state of the corresponding remote extension.
| implemented function | Specific operation |
| Setting Expansion Module | --1) select function setting>Expansion Module setting;--2) select Expansion Module you need to configure;--3) Select the button you need to configure (Specific key seque refer to Chapter3. ESM32 expansion module Overview - But Hardware);--4) Select each parameter, press the corresponding modified soft LCD to set and modify:-Mode: depending whether need to use BLF function, the n buttons can be divided into two parts:-BLF: Set button to support BLF function and speed-dial-Speed-dial: Set this button to support speed-dila only;-Account: Select the related outgoing SIP account of this b (call this number or function code through which SIP a-Name: Set the Name Description of this button-Number: Set the speed-dial number for the button or achie function code for the certain platform and function.--5) Press Submit Soft key to submit |
*Note: About normal usage of expansion module BLF, please note as follows:
1) Select "Mode" - "BLF";
2) Set the button number as a remote extension number (such as 8888), rather than a function code of SIP server platforms (such as * 97);
www.escene.cn/en
3) The remote extension number set by bottom number and the binding of accounts should be under the same SIP server platform;
4) On the Web: "Phone Settings"> "Features"> "Other features setting", please make sure "BLF on or off." to choose "on", like:
BLF Light

(More specific web
setting, refer to next section)
6. Web Setting
It could make ESM32 configuration and statusmore simple and convenient via web setting. When setting on WEB page, please make sure the following points:
1) Connect Expansion Module ESM32 to IP Phone, then connect IP Phone and computer to the same network. If there is no networking equipment, the computer could be directly connected to the PC interface of IP Phone by Straight-line.;
2) Ensure IP Phone is working, view the IP address of IP phone;
3) Enter IP phone address in address bar of browser ;
4) Enter the administrator user name and password to enter the web configuration page, the default administrator user name is root, the default password is root;
The system after landing as figure:

5) Click on the left navigation bar ("programmable keys"> "expansion module") to open the settings page of Expansion Module.
Expansion Module provides users with the flexible Extension, like speed-dial, hot keys and function keys and so on. More connecting method refer to Chapter2. Connecting Expansion module ESM32.
After connecting Expansion Module, it can be installed and set by IP phone keyboard.
After installing, Expansion Module could be configured separately after installing, and configured a variety of speed-dial and speed function code for users' scenarios:
www.escene.cn/en
Current location: Programmable Keys >EX Module

| Expansion module n configuration | |
| Configure n | Each Expansion Module provides 32 programmable hotline in |
| Mode | Button mode can be divided into two parts:--Speed -dial: Provide fast outgoing calling method of the the basic working mode;--BLF : In addition to providing speed-dial function, but a provides the BLF (busy line detection) function, if the n button is set as extension number instead of function coc can combined with SIP server platforms (such as Asterisk detect the call state of the extension (free/busy). |
| Account | Select the related outgoing SIP account of the button, through SIP account to call this number or function code |
| Name | Setting the key Name Description |
| Number | Set the speed-dial number for the button or achieve function the certain platform and function. |
If you want to view the status of Expansion Module, you may open the page "IP Phone status" for viewing, figure as follows:
EX Module1
Offline
EX Module2
Offline
Online: Expansion Module with the corresponding serial number is installed normally;
Offline: Expansion Module with the corresponding serial number is not normally connected, or did not normally designate the serial number of Expansion module.
ES CENE
Escene Communication Co., Ltd
Add: Floor 4, Building C, YueAn Industrial Park, No.54 Huangcun Road, Tianhe District, Guangzhou, China.
Website: http://www.escene.cn/en
www.escene.cn/en


Brand : Escene
Model : ESM32
Category : Telephone