IS710-01 - Telephone Escene - Free user manual and instructions
Find the device manual for free IS710-01 Escene in PDF.


| Product Type | VoIP Phone |
| Brand | Escene |
| Model | IS710-01 |
| Dimensions (H x W x D) | Approx. 200 x 150 x 100 mm |
| Weight | Approx. 0.8 kg |
| Power Supply | AC/DC adapter, 9V DC |
| Display | 2.3-inch monochrome LCD |
| Keypad | 20 programmable keys with LED indicators |
| Network Interface | 10/100 Mbps Ethernet, PoE support |
| Audio Features | HD audio, hands-free speakerphone, built-in microphone |
| Main Functions | Call hold, transfer, conference, call forwarding, do not disturb, redial, speed dial |
| Protocol Support | SIP (RFC3261), TCP/UDP/IP, RTP/RTCP |
| Installation | Plug-and-play with automatic provisioning |
| Care and Cleaning | Wipe with a soft dry cloth; do not use liquids or abrasive cleaners |
| Safety | Only use the provided power adapter; disconnect during storms |
| Spare Parts and Repairability | Contact Escene support for replacement parts; device is not user-serviceable |
| General Information | Operating temperature: 0°C to 40°C; humidity: 10-90% non-condensing |
Frequently Asked Questions - IS710-01 Escene
User questions about IS710-01 Escene
0 question about this device. Answer the ones you know or ask your own.
Ask a new question about this device
Download the instructions for your Telephone in PDF format for free! Find your manual IS710-01 - Escene and take your electronic device back in hand. On this page are published all the documents necessary for the use of your device. IS710-01 by Escene.
USER MANUAL IS710-01 Escene
Smart Security IP Intercom
IS710 User Manual

natural_image
Metallic electronic device panel with a starburst pattern and a small circular button (no readable text or symbols)IS710-01
Copyright and Disclaimer
Copyright
Any enterprises or individuals cannot extract, copy and spread in any form of this document without our written permission. In accordance with the law, copying includes translating the document into other languages or conversing into other formats. When this document is transmitted in network media, Escene Communication Co., Ltd allows downloading or printing for private use. Any parts of the document are not allowed to be modified or used for commercial purposes. Escene Communication Co., Ltd will not assume any responsibility for the injuries and losses caused by any unauthorized modification or conversion of the document.
Declaration
Information regarding this guide is subject to change without any notice.
This manual provides accurate statement, information and recommendation to the largest extent, but will not guarantee any express or implies. Users should take full responsibility for the application of products. Escene Communication Co., Ltd will not make any guarantee for this manual, including but not limited to warranties for implies merchantability and particular purposes. Escene Communication Co., Ltd does not assume any responsibility for indirect or consequential loss caused by the misuse of this manual.
About this manual
Thank you for choosing Smart Security IP Intercom IS710. This IP Intercom is specially designed for the user under the public environment with fashionable appearance and complete functions. This manual aims to help you quickly use Smart Security IP Intercom IS710. Before use, please read the packing list and safety notes section of this manual, communicate with the system administrator to confirm if the current network environment can meet the requirements of configuring the Intercom. If this is your first time to use Smart IP Intercom IS710, we recommend that you should read the quick installation guide and product technical manual. The document can be downloaded from the following website: http://www.escene.cn/en.
Summary
Copyright and Disclaimer....2
- Getting Started....5
1.1 Outline 5
1.2 Product Features....5
1.3 Technical Information....6
- Intercom Installation....7
2.1 Embedded 10
2.2 Equipment installation 11
3.Configuration of IP intercom....12
3.1 Remote WEB Management 13
3.2 Phone Status 16
3.3 Network....17
3.3.1 LAN Port Configuration....17
3.3.2 VPN Settings....18
3.3. 3 VLAN Settings....18
3.3. 4 Port management Settings ....19
3.3.5 QoS 19
3.3. 6 Network Packet Mirroring....19
3.3.7 LLDP 19
3.3. 8 Paging Settings....19
3.3.9 Socket5 Proxy Server 20
3.4 SIP Accounts 21
3.5 Programmable Keys....23
3.6 Phone Settings 24
3.6.1 Output....24
3.6.2 Time Settings....25
3.6.3 Ring tone 25
3.6.4 Volume Setting 25
3.7 Features....26
3.7.1 VoIP Call Forward....26
3.7.2 Auto Redial 27
3.7.3 Pickup function....27
3.7.4 Hotline function....27
3.7.5 Auto Answer....27
3.7.6 Remote Control 27
3.7.7 Action URL....28
3.7.8 EP+....28
3.7.9 Other features settings....28
3.8 Advanced....29
3.8.1 Audio....29
3.8.2 Dial Plan 30
3.9 Phone call info....30
3.10 Maintenance....30
3.10.1 HTTP Upgrade 30
3.10.2 FTP Upgrade....31
3.10.3 TFTP Upgrade....31
3.10.4 Factory reset....32
3.10.5 Reboot 32
3.10.6 Log....32
3.10.7 Auto Provision....33
4. Brief pictures for application environment....35
4.1 Door security system application 35
4.2 Fire protection system application....36
1. Getting Started
1.1 Outline
ESCENE IP Intercom Phone IS710 is the newest VoIP intercom which professional designed as the requirements from industry users. The device has the characteristic of well compatibility with different platform, offering users a convenient service.
IS710 is dust proof, water proof and dismantle prevention, having a fashion appearance and high protection. IS710 is a bond of door opening by long-distance DTMF. Its powerful performance, stability and reasonable price make it a perfect choice of industry user.
NOTE: IS710-01, support POE, IS is intercom series, 01 is 1 DSS key.
1.2 Product Features
● Support embedded or wall-mounted installation.
● High-fidelity sound quality, HD codec, Full duplex hands-free calls;
- 2*RJ45 standard Ethernet Ports, integrated PoE;
● Built-in speaker and high sensitive microphone, support hand-free calls and receive emergency broadcast
- User-defined DSS key, which can be set up to Speedy dial, intercom,etc.
● Support Plug-and-Play, auto-provision, remote maintenance and management;
| Intercom features |
| WEB support Multi-Language ;1 SIP account; Hotline;Passive support Call hold, Call waiting, Call forward, Call transfer (blind/busy/ask), Mute, DND, Auto-answer, 3-way conferencing;1 DSS programmable key(Speed dial, Intercom etc.);Volume control; Direct IP call without SIP proxy; Default Ring tone 1 selection/import/delete; Custom Ring tone 2 selection/import/delete; Time setting(SNTP/SIP Server/Manual);Support SIP main/standby server; |
| LED Status |
| Available--OFF; Busy--Steady; registration failed--Flashing |
| Network parameters |
| SIP v1 (RFC2543), v2 (RFC3261);DNS SRV (RFC3263);NAT Traversal: STUN mode; DTMF: In-Band, RFC2833, SIP Info, Auto; HTTP/HTTPS Web Management;IP Assignment: Static/DHCP/PPPoE; Network support Bridge mode;TFTP/DHCP/PPPoE client; DNS client, NAT/DHCP server; |
| Security |
| LLDP, VLAN QoS (802.1pq),VPN(L2TP);Transport Layer Security (TLS);Digest authentication |
| using MD5/MD5-sess;Secure configuration file via AES encryption; Admin/User 2-level configuration mode; |
| Voice features |
| Wideband Codec: G.722;Narrowband codec: G.711μ/A, G.723.1;G.726, G.729a/b, iLBC; VAD, CNG, AEC, AGC; Full-duplex; |
| Physical properties |
| 1 DSS programmable key(Speed dial, Intercom etc.)1 LED light,1 light touch button(Remote factory value)2 RJ45 10/100M Ethernet portsPower adapter: DC 12V/1A; Power over Ethernet ,IEEE 802.3af,class 0;Each motherboard port, check the picture illustration below "Mother Broad Interface". |
| Carton packaging |
| The whole Size: 190x115x41mm |
| Product Certification |
| ISO 9001 |
| Platform Compatibility Test (non-certificate) |
| ZTE/Alcatel-Lucent/Asterisk/Broadsoft/Metaswitch/Yeastar/Avaya/3CX/Elastix/HUAWEI etc. |
1.3 Technical Information
INTERFACE SPECIFICATION:

Expansion Board Connector Diagram

Mother Board Connector Diagram
*This data is for information purposes only and is subject to change without notice.
2. Intercom Installation
Generally system administrator will connect your new IS710 IP Intercom to company LAN network. If not, please refer to below illustration.
Open IS710 packing box, according to the packing list, check the related attachment to make sure to no omitting. Packing list as follows.
IS710 Intercom
- Quick operating guide
8*Screws
- 2*Rubbers
IS710 could be installed to internet according to the below steps.
A) Connect Network
B) Internal/External Electric Lock Connection Driver Option
C) Internal/External Electric Lock Connection
| RJ-45 | |||||
| Pin No. | Marking | Colour | LAN | PC | |
 | 1 | Tx+ | TX1+ | RX2- | |
| 2 | Tx- | TX1- | RX2+ | ||
| 3 | Rx+ | RX1+ | TX2- | ||
| 4 | PoE+ | POE+ | Null | ||
| 5 | PoE+ | ||||
| 6 | Rx- | RX1- | TX2+ | ||
| 7 | PoE- | POE- | Null | ||
| 8 | PoE- | ||||
Connect network
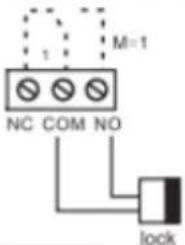
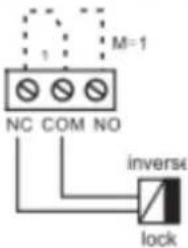
NOTE: When the initial electric current of the lock is less than 500mA/12V, you can access to the internal driven mode and use the POE of the Voice Access System or 12V DC to control the switch of the electric lock; When the initial electric current of the lock is more than 500mA/12V, you need to access to the external driven mode(Use specialized DC power to control the electric lock).
| Electric lock power supply mode | Electric lock | Jumper | Mode of connection | ||
| Internal | External | NO | NC | ||
| √ | √ |  |  | ||
| √ | √ |  |  | ||
| √ | √ |  |  | ||
| √ | √ |  |  | ||
Internal/External Electric Lock Connection Driver Option

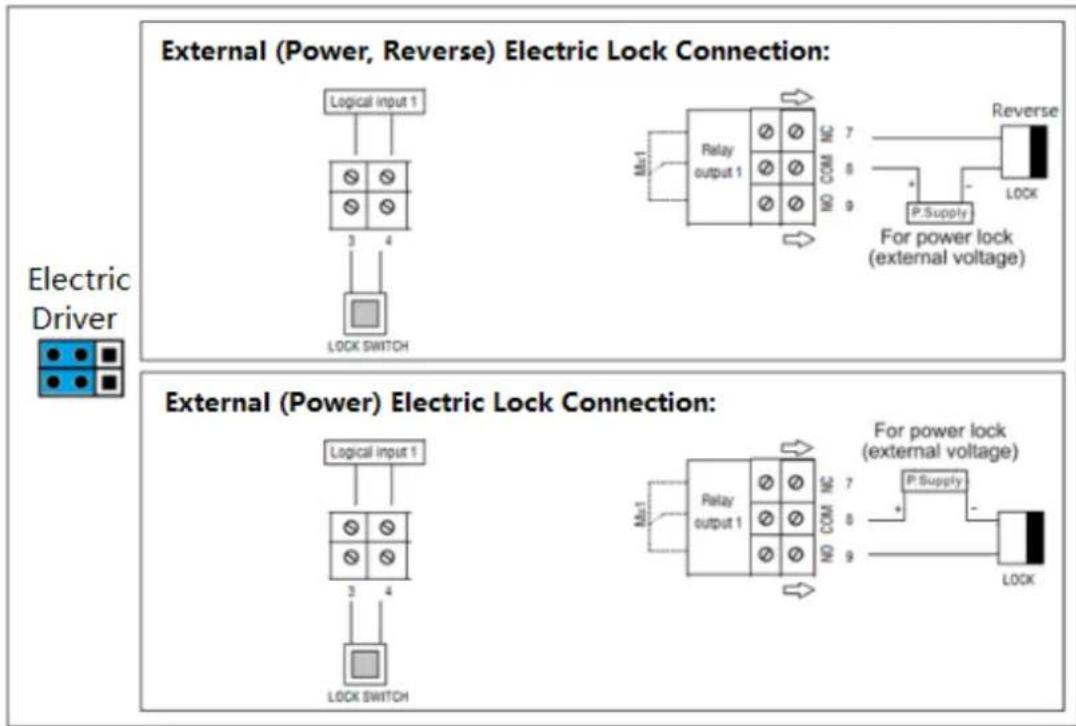
Internal/External Electric Lock Connection
2.1 Embedded
If the product is used for embedding, then the cutting of embedded need to be a little
bigger than the installing hole of standard dimension 190*115*41mm .(41mm means the extra aluminum housing thickness.),as follows. Notice: the embedded value is up to the actual situation.

2.2 Equipment installation
1、Open the aluminum housing.
2、Put the IP intercom into it according to the cutting embedded specification. After that, fix four M3*12 screws on the wall with the screw driver.
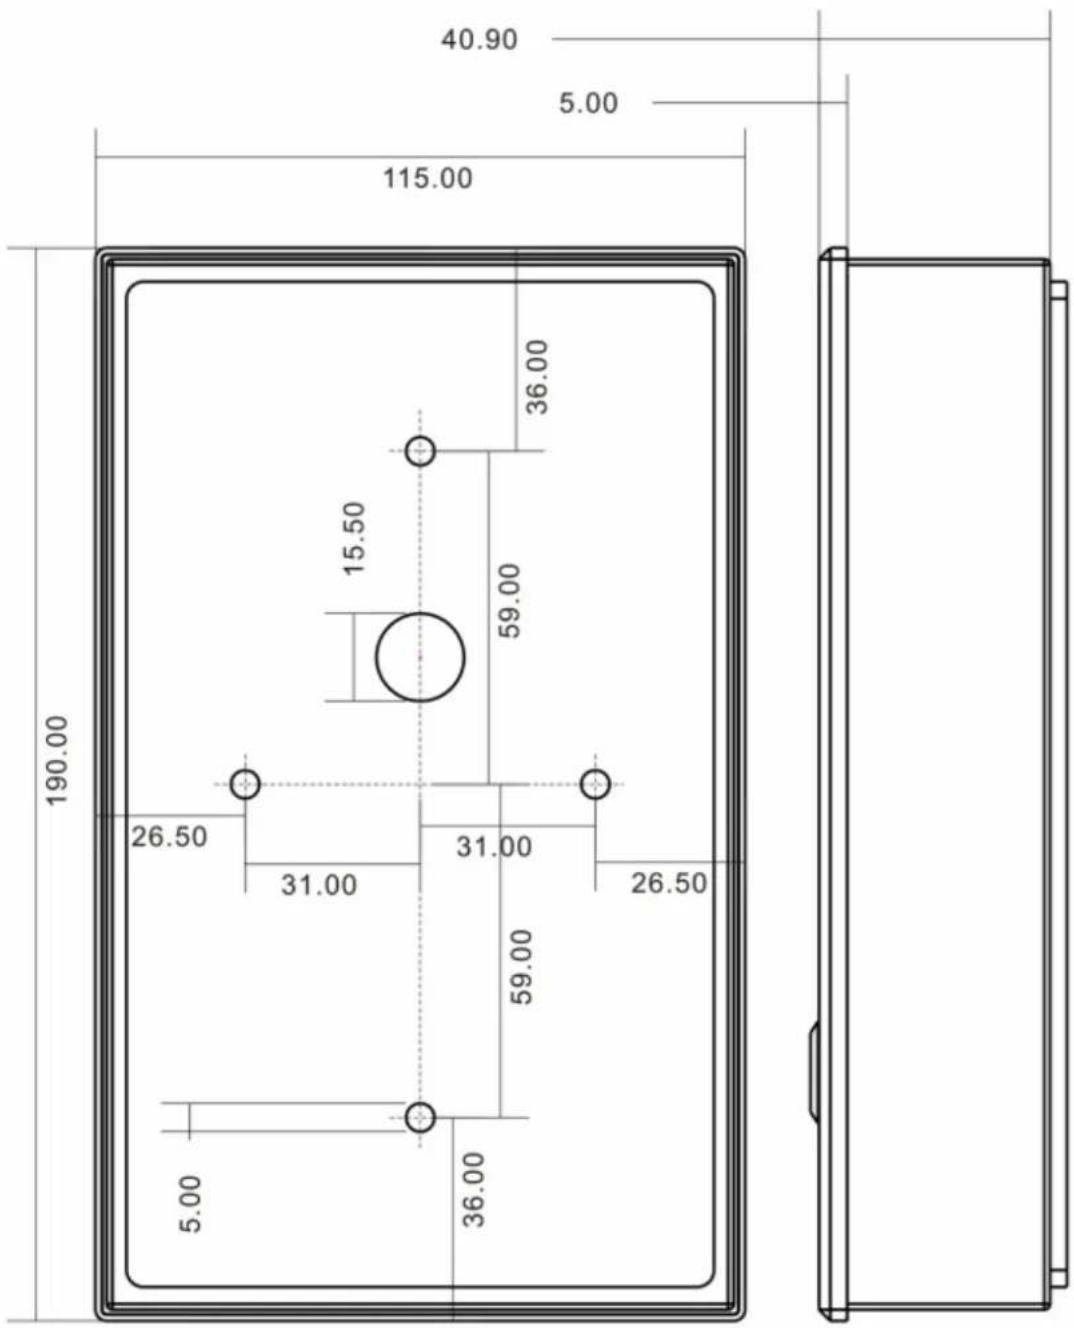
3、After installing inter housing, well-set the related wiring and replace the aluminum housing. Power on and start testing.
3. Configuration of IP intercom
You need to know the IP address of IP Intercom before starting setting. You could learn how to get IP address below. Default IP address is 192.168.1.153.in static status. If getting from DHCP, you need to search the related IP address by the third software scanning equipment MAC. (Getting IP by DHCP is not suggested.)
www.escene.cn/en
3.1 Remote WEB Management
This equipment's factory IP address is using static IP(ip:192.168.1.100, Gateway:192.168.1.1).
http://192.168.1.100/user.asp is easy web management. http://192.168.1.100/home.asp is all-round web management.
Once input the IP address of intercom on the web browser and tap the "enter" on the keyboard. Then a login screen will pop up from the intercom equipment. You need to input user name and password. Both default user name and password of system is case letters "root"
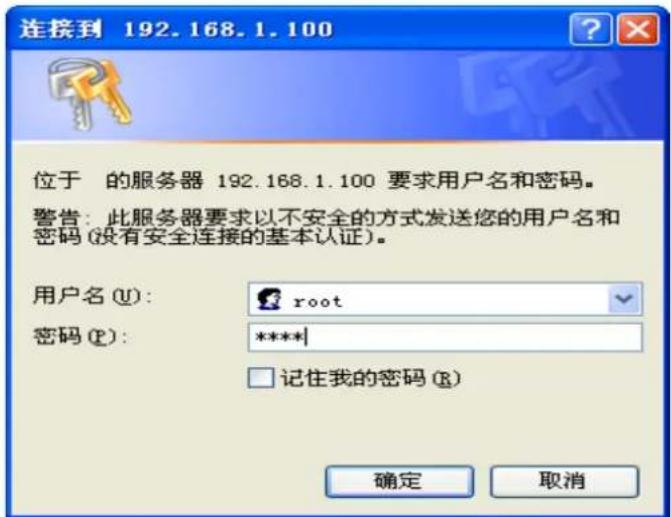
After the log-in, the easy administrate web page of the intercom will pop up. As below is for example.
Intercom Settings
Phone Status
System Run Time
0 Days18 Hours40 Minutes21 Seconds
Register status

Account1
None
Account2
None
Account3
None
Account4
None
Network Status

LAN Port type
Static
MAC
00:26:8b:01:01:01
LAN IP Address
192.168.1.100
Subnet Mask
255.255.255.0
Gateway
192.168.1.1
Primary DNS
192.168.0.1
System Info

Phone Model
IS/IV740-04
Software Version
V0.1.15.0118_Alpha(1305)
Hardware version
V2.x.x
Kernel Version
v1.0.0
Network
○ DHCP ?
Hostname(Option 12)
Manufacturer(Option 60)
User Class Information (Option 77)
Static IP

IP Address
192.168.1.100
Subnet Mask
255.255.255.0
Gateway
192.168.1.1
Static DNS
on off
Primary DNS
192.168.0.1
Secondary DNS
0.0.0.0
HTTP Port
80 (1-65535)
SIP Account
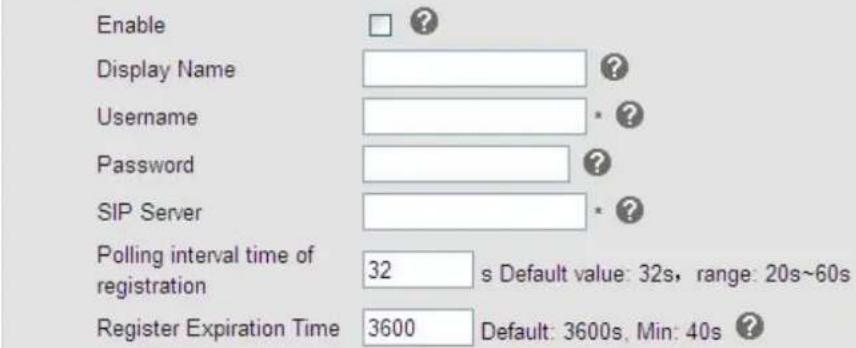
Phone Settings

Phone Maintenance
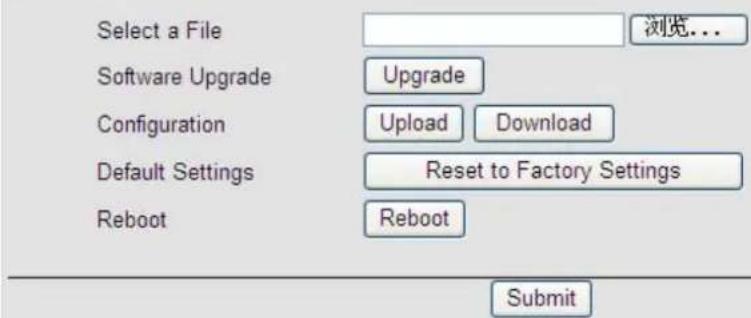
If you want to open the all-round web management, you can enter an URL as follow:
http://192.168.1.100/home.asp
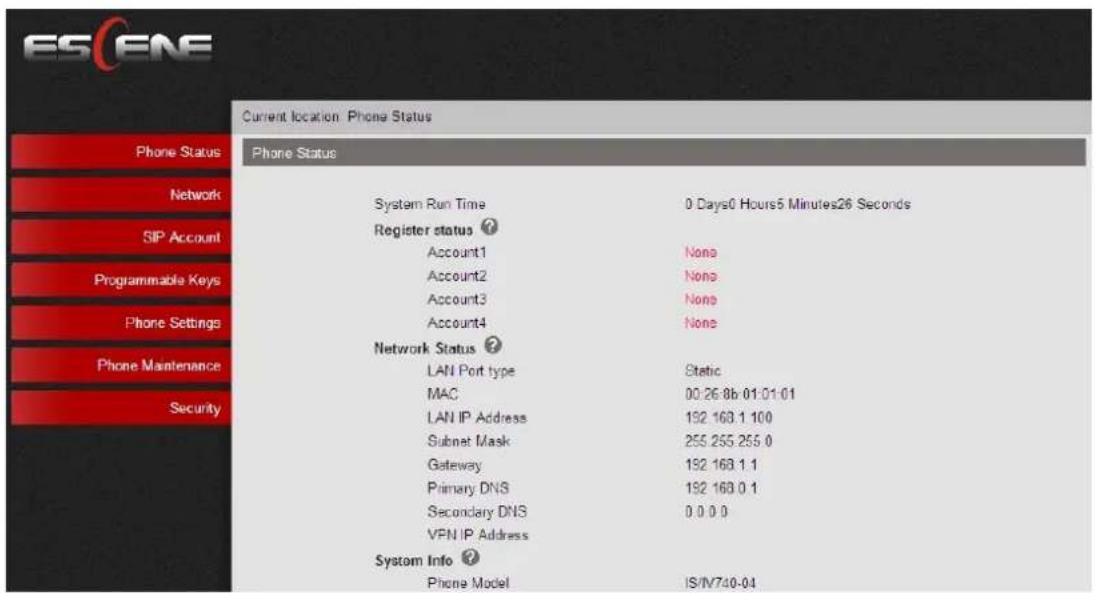
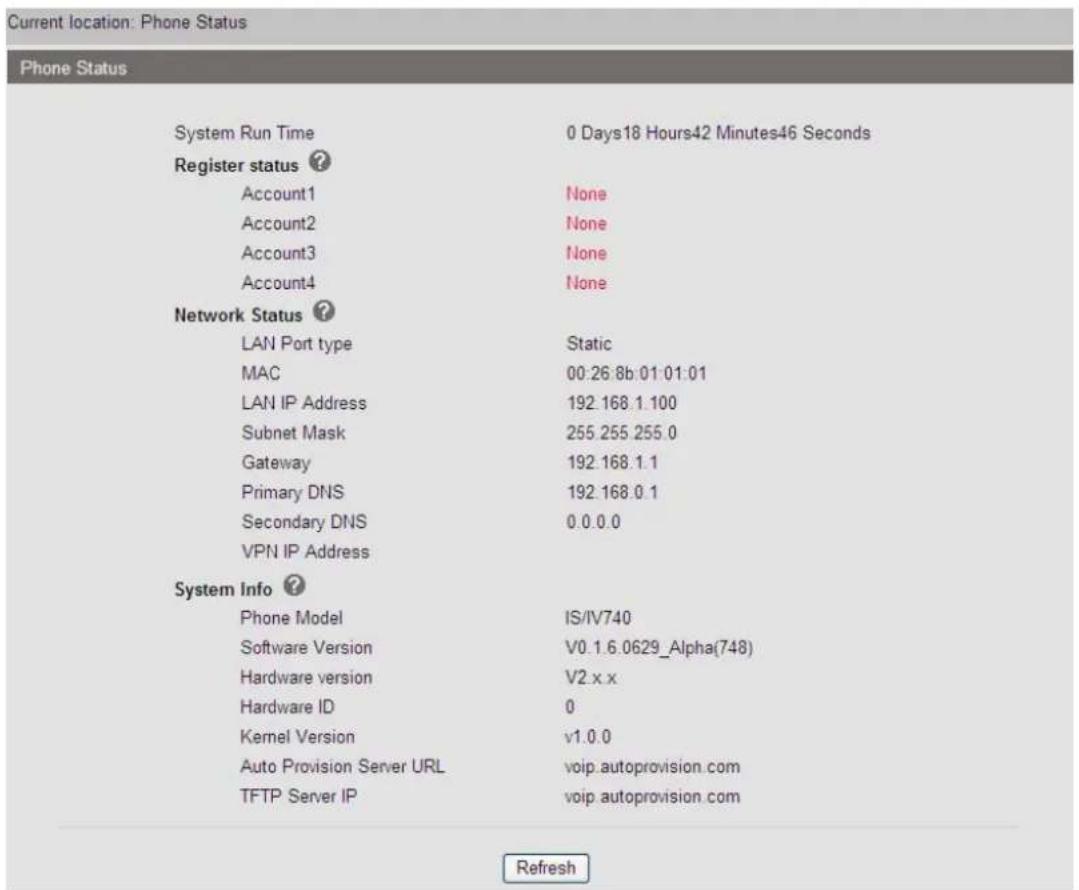
Here you can see as below information: System Run Time, Register Status, Network Status, System Information,
3.2 Phone Status
Here you can see as below information: System Run Time, Register Status, Network Status, System Information,
3.3 Network
3.3.1 LAN Port Conguraon

DHCP

Hostname(Option 12)
Manufacturer(Option 60)
User Class Information(Option 77)

Static IP

IP Address
Subnet Mask
Gateway
Static DNS
Primary DNS
Secondary DNS

PPPoE

Username
Password
MTU

natural_image
Three horizontal gray rectangular boxes arranged horizontally (no text or symbols)192.168.1.100
255.255.255.0
192.168.1.1
on off
192.168.0.1
0.0.0.0

1500
Default: 1500
| ITEM | DESCRIPTION |
| Network Connection Mode | Network Connecon Mode has DHCP, Stac IP, PPPoE. |
| DNS SETTINGS | Select the DNS mode that you want. |
3.3. 2 VPN Sengs
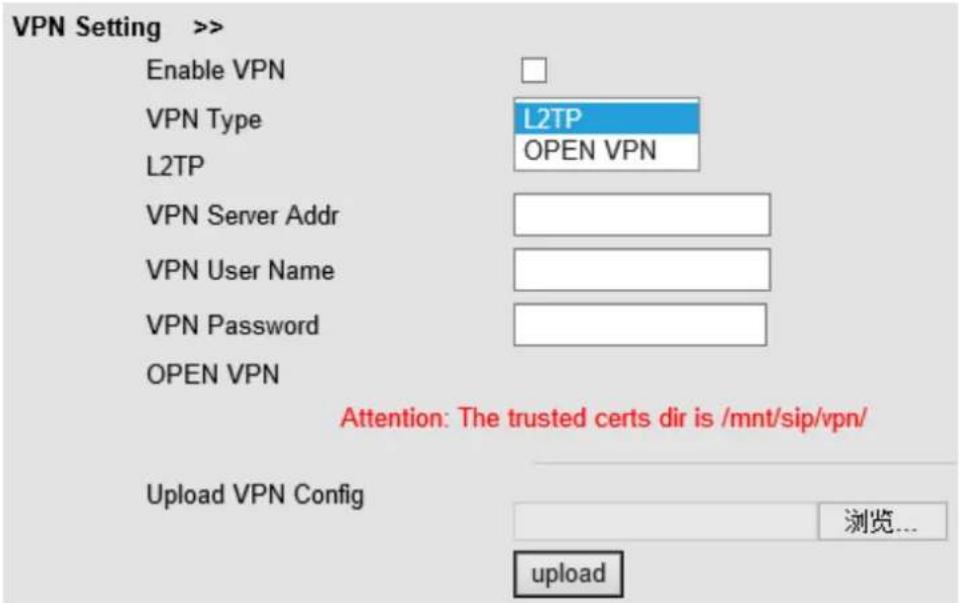
When using VPN Seng opon, you can set several parameters as follow:
| VPN Seng | |
| Enable VPN | You can enable/disable VPN for phone and pc. |
| VPN Type: | Choose the appropriate type of VPN. |
| VPN Server Addr | VPN server's IP. |
| VPN User Name | VPN user's name |
| VPN Password | A password be used for authencaon |
| OPEN VPN | Upload the *.ovpn le to the phone |
3.3. 3 VLAN Sengs

When using VLAN Seng opon, you can set several parameters as follow:
| VLAN Seng | |
| Enable VLAN | You can enable/disable VLAN for phone and pc |
| VID[LAN/PC Port] | The VLAN ID you want the phone or pc to join |
3.3. 4 Port management Sengs

3.3.5 QoS

3.3. 6 Network Packet Mirroring

3.3.7 LLDP

3.3. 8 Paging Sengs
Paging Settings (NOTE: This feature priority is followed the serial number, In other words, "paging1" is the highest priority)

3.3.9 Socket5 Proxy Server

| Socket5 Proxy Server | |
| Socket5 Proxy Server | Enable/Disable Socket5 Proxy Server. |
| Server IP | Socket5 Proxy Server IP address. |
| Port | Socket5 Proxy Server port, default is 1080. |
| Anonymous Login | Enable/Disable Socket5 Proxy Server login username. |
3.4 SIP Accounts
Current location: SIP Account >Account1
Enable
Server type
Display Name
Username
Authenticate Name
Password
Label
SIP Server
Secondary server
Outbound Proxy Server
Secondary Outbound Proxy Server
Polling interval time of registration
NAT Traversal
STUN Server
Register Expiration Time
Auto Answer
SIP Transport
Ring type


3003



192.168.0.7





32
s Default value: 32s, range: 20s\~60s
Disabled



3600
Default: 3600s, Min: 40s

○ off ● on
©
○ TCP ○ TLS ?
None

Choose one Account, you will nd the following parameters:
| ITEM | DECSRIPTION |
| Enable | You can choose on/o to enable/disable the line. |
| Account Mode | You can choose VOIP/PSTN, but this model nonsupport PSTN, If you need, PIs contact us to buy another model that can supports PSTN. |
| Display Name | It is showed as Caller ID when making a phone call |
| Username | It is a username provided by SIP Server |
| Authenticate Name | It is authenticated ID for authentication |
| Password | It is a password provided by SIP Server |
| Label | Label with this account. |
| SIP Server | Server for registration, provided by administrator |
| Secondary server | When the main server can't work, it also can register in this secondary server. |
| Outbound Proxy Server | Put into the address with the outbound proxy server. |
| Secondary Outbound Proxy Server | When the main out bound server can't work, it also can use this secondary server. |
| Poling Interval Time Of Registraon | Poling Interval Time Of Registraon, default is 32 s. |
| NAT Traversal | Denes the STUN server will be acve or not |
| STUN Server | Session traversal ulies for NAT. |
| BLA | Share with the line. |
| BLA Number | BLA Number |
| Subscribe Period | Subscribe expire me. |
| Register Expire Time | IP phone automacally registered every me |
| SIP Transport | There are UDP/TCP/TLS three opons |
| Ring Type | Select this account ringing type. |

| ITEM | DECSRIPTION |
| Call | |
| Do Not Disturb | Enable/Disable Do Not Disturb |
| Anonymous Call | Enable/Disable anonymous call. |
| Anonymous CallRejecon | Enable/Disable anonymous call rejecon. |
| Use Session Timer | Enable/Disable refresh session funcon. The device will send an Invite packet to refresh the session during a call if it enable. |
| Session Timer | The refresh session me interval. |
| Call Method | This method include SIP and TEL. |
| DNS-SRV | Enable/Disable DNS-SRV. |
| Allow-events | Enable/Disable Allow-events. |
| Registered NAT | Enable/Disable Registered to NAT |
| UDP Keep-aliveMessage | The phone periodically sends a UDP packet to keep the port acve and to avoid the server to shut down the port |
| UDP Keep-alive Interval | Default is 30 second. |
| ITEM | DECSRIPTION |
| Security | |
| SIP Encrypon | Enable/Disable SIP encrypon. |
| RTP Encrypon | Enable/Disable RTP encrypon. |
| Encrypon Algorithm | The encrypon algorithm at this me we only have RC4. |
| Encrypon Key | The key with encrypon. |
3.5 Programmable Keys
Memory keys

| ITEMS | DESCRIBES |
| Speed Dial | You can use this key feature to speed up dialing the numbers oen used or hard to remember. |
| Speed Dial Prex | You can use this key feature to speed up dial a call with a specied prex number. |
| DTMF | You can use this key feature to send the specicaon of arbitrary key sequences via DTMF. |
| BLF | You can use the BLF feature to monitor a specic user for status changes on the phone. |
| Paging | You can use mulcast paging to quickly and easily forward time sensitive announcements out to people within the mulcast group. |
| Call Park | You can use call park feature to place a call on hold, and then retrieve the call from another phone in the system (for example, a phone in another oce or conference room). |
| Intercom | You can press the congured intercom key to automacally connect with a remote extension for outgoing intercom calls, and the remote extension will automacally answer the incoming intercom calls |
| BLA | This feature such as the BLF. |
NOTE: ONLY WHEN YOU CHOOSE "SPEED DIAL", THE RIGHT OF "NAME","NUMBER" WILL TAKE EFFECT.
3.6 Phone Settings
3.6.1 Output
Signal output 1&2 is controlled by several variables. Among them, Server control is a custom variable for some specied plaorms. Once custom opon is selected, Output variable will be acvang accordingly.
Note: Both 'signal input' and 'signal output' are on/o switch
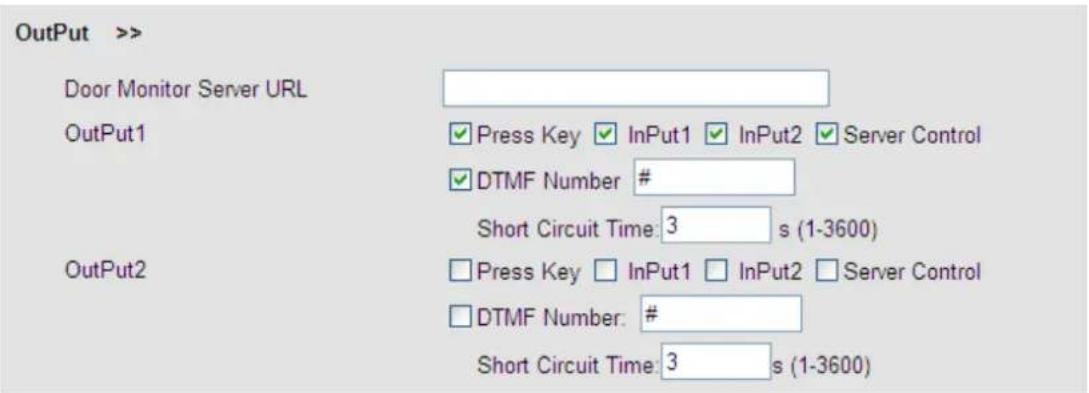
| Output1 | Variables for output1 |
| output2 | Variables for output2 |
| Press key | Press the dial buon to trigger the relay. |
| Input1/2 | Shortcut the input1 logic to trigger the relay.See the diagram |
| Server Control | Use API command to trigger the relay. Ask us for dev manual please. |
| DTMF Number | Pressing DTMF key to trigger the relay when the phone talking. |
| Short Circuit me | The relay circuit mer. |
3.6.2 Time Sengs

| ITEM | DECSRIPTION |
| Time Sengs | |
| Set Time Mode | Include SNTP/SIP Server/PSTN/Manual |
| SNTP Server | You can select in the list or input owner server address. |
| Update Interval | The update interval with SNTP. |
| Day Light Saving Time | Enable/disable the DST for the phone |
| Time Format | You can use 24 hour me format or 12 hour me format |
| Date Format | You can choose the appropriate me format. |
| Time Zone-GMT | You can select dierent me zone for the phone |
| Manual Seng | Seng me manually. |
3.6.3 Ring tone
Ring1 is for the speaker on the panel, Ring2 is for external speaker
Note: Only Support a ring tone with G711A (*.wav) audio coding, maximum is 10 rings and the total size must be less than 150kB.

3.6.4 Volume Seng
You can manage the volume level and mic level as below form.
Note: Normally if the mic is on level 7. Please keep the volume below level 4. Unless the using area is small or you have good ability of noise reducon.
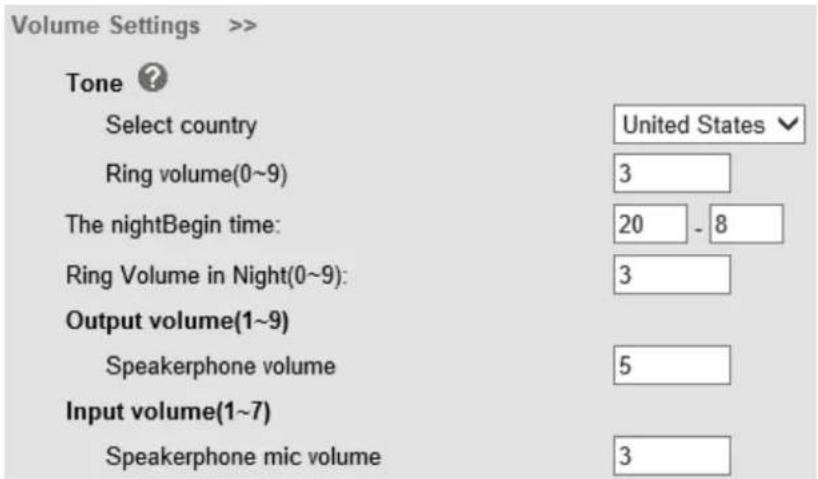
| ITEM | DECSRIPTION |
| Basic | |
| Select Country | Select the country dial tone. Default is United States. |
| Ring Volume | The ring volume default is Lv3, the range is 0~9. |
| Handset Volume | The handset volume default is Lv5, the range is 1~9. |
| Speaker Phone Volume | The speaker volume default is Lv5, the range is 1~9. |
| Headset Volume | The headset volume default is Lv3, the range is 1~9. |
| Handset MIC Volume | The handset MIC volume default is Lv3, the range is 1~7. |
| Speaker Phone MIC Volume | The speaker MIC volume default is Lv3, the range is 1~7 |
| Headset MIC Volume | The headset MIC volume default is Lv3, the range is 1~7 |
3.7 Features
3.7.1 VoIP Call Forward
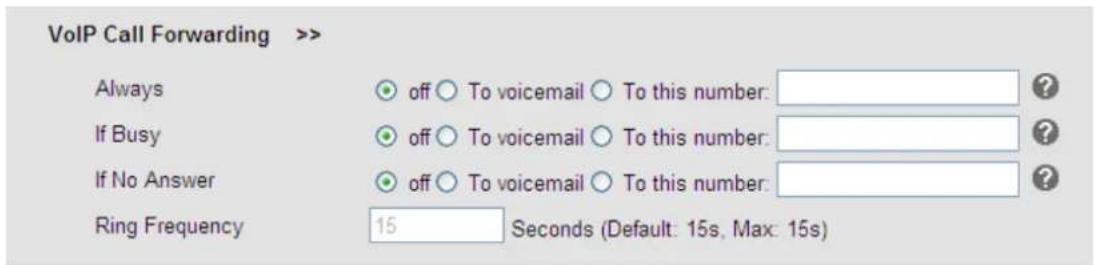
| ITEM | DECSRIPTION |
| Always | All ways transfer the call to others. |
| If Busy | If the phone was busy working, the call will be transfer to others. |
| If No Answer | If the phone was no answer, the call will be transfer to others. |
| Ring Frequency | The ring frequency with the VOIP Call Forward. |
3.7.2 Auto Redial

3.7.3 Pickup funcon
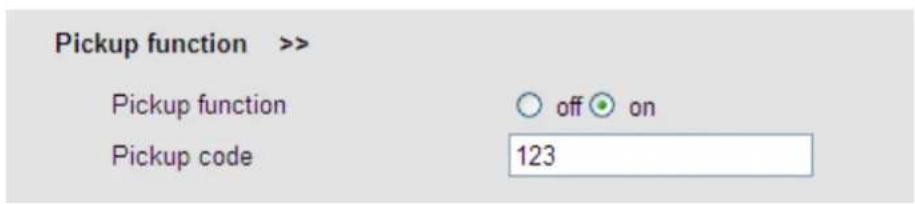
3.7.4 Hotline funcon

3.7.5 Auto Answer
Default value is on, Values can be changed accordingly.

3.7.6 Remote Control
A Third party is permitted to control this device

3.7.7 Acon URL
The device will send orders to action URL initiative.

3.7.8 EP+
EP+ options are for the users who download the EP+ application on mobile phone.
After Completing below settings, EP+ will be activated. For more details, please refer to www.escene.cn/en/en

3.7.9 Other features sengs
For other features such as call waiting, DTMF etc.

3.8 Advanced
3.8.1 Audio
For Audio Codecs setting and Jitter Buffer setting.
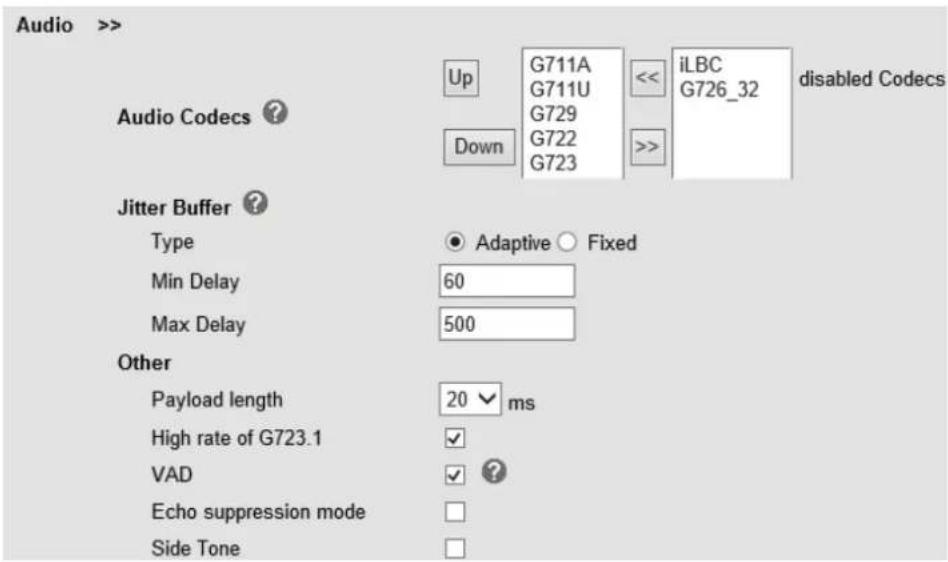
3.8.2 Dial Plan

3.9 Phone call info
To call or hang up the phone via web

3.10 Maintenance
This part mainly introduces some maintenance method. According to the below, you can reconfigure Intercom IP Phone or view Intercom IP Phone log to gain more information about maintenance.
3.10.1 HTTP Upgrade
You can upgrade the soware, kernel and conguraon etc. les by HTTP.

3.10.2 FTP Upgrade
You can upgrade the soware, kernel and congure les by FTP.

When using FTP upgrade, you can set several parameters as follow:
| FTP Upgrade | |
| Server IP | The IP address of the FTP server |
| Filename | Downloading from FTP server |
| Username | Providing by FTP server |
| Password | Providing by FTP server |
| Soware Upgrade | Used for upgrading the soware of the phone |
| Kernel Upgrade | Used for upgrading the kernel of the phone |
| Conguraon | Used for updang/backup to update/backup the congure le of the phone |
| Phone Book | Used for updating/backup to update/backup the phonebook of the phone |
| EXT Module | Used for updating/backup the expansion of the phone[NOTES: The mode doesn't support this feature] |
3.10.3 TFTP Upgrade
You can upgrade the soware, kernel and congure les by TFTP.
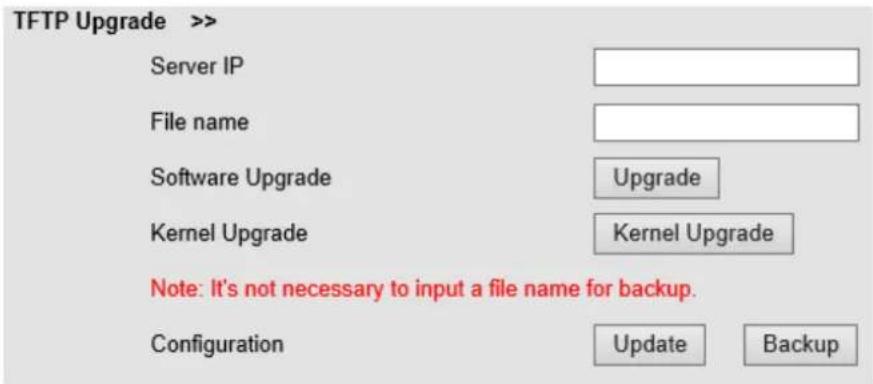
| TFTP Upgrade | |
| Server IP | The IP address of the TFTP server |
| Filename | Downloading from FTP server |
| Soware Upgrade | Used for upgrading the soware of the phone |
| Kernel Upgrade | Used for upgrading the kernel of the phone |
| Conguraon | Used for updang/backup the congure le of the phone |
| Phone Book | Used for updang/backup the phonebook of the phone |
| EXT Module | Used for updang/backup the expansion of the phone[NOTES: The mode doesn't support this feature] |
NOTES: It's not necessary to input lename when doing backup Conguraon, Phone Book, EXT Module.
3.10.4 Factory reset
You can load the phone to the factory default seng in default seng opon.

Press the ‘Reset to Factory Seing’ opon, the phone will load to factory default seing on next reboot.
3.10.5 Reboot
You can use reboot opon to reboot the phone.

3.10.6 Log
This feature is use for the administrator to managing the equipment, like debugging, SIP etc.. If you need to catch a debugging Level, you need to setup on this interface.

3.10.7 Auto Provision
When you open this auto provision feature, the phone will do auto provision aer it detect a dierent soware or kernel (Higher or Lower) which are pued on the TFTP,HTTP,HTTPS,FTP, server. For the detailed informaon about auto provision, you can nd it in the ocial website:
HTTP://www.escene.cn/en
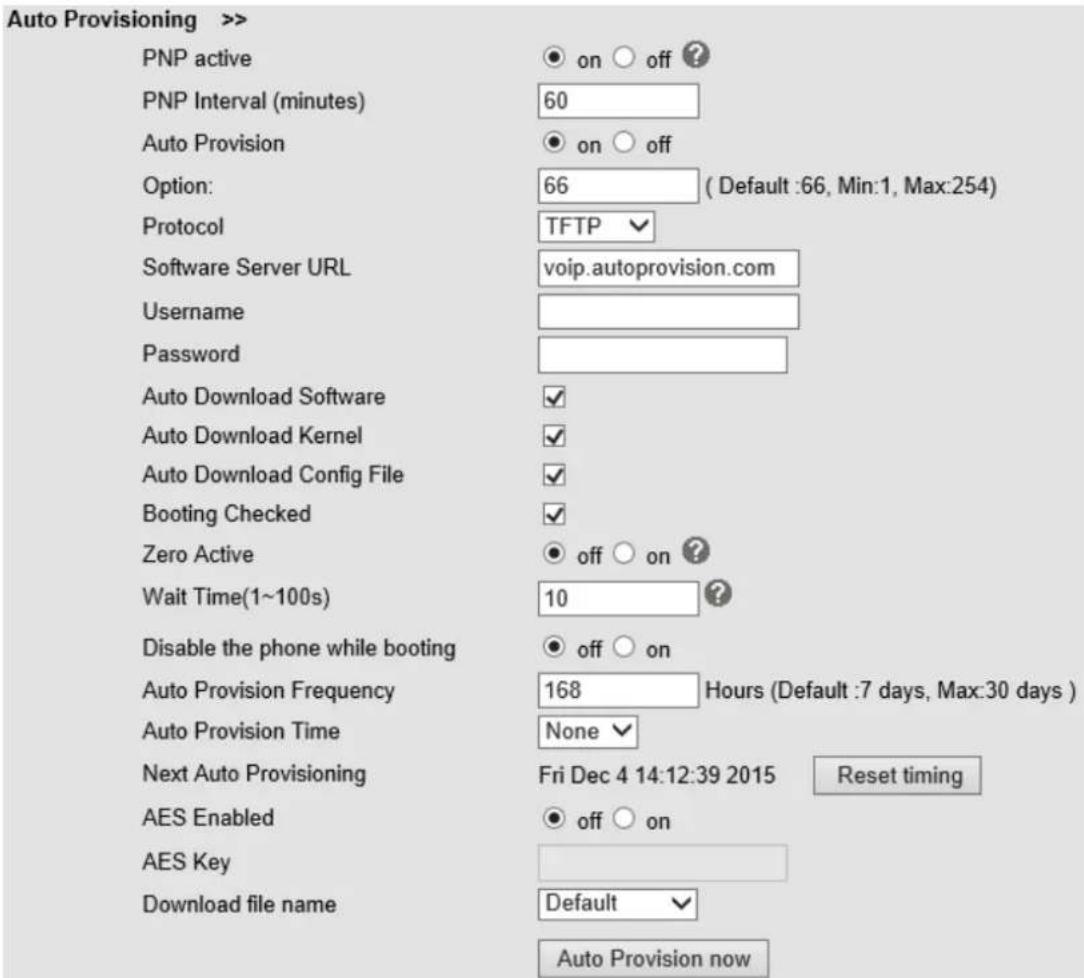
When using auto provision, you can set several parameters as follow:
| Auto Provision | |
| Auto Provision | You can enable/disable auto provision by select on/o |
| Protocol | Used for auto provision, it includes TFTP/HTTP/FTP |
| Soware Server URL | The server address of the auto provision |
| Username | Providing by provision server |
| Password | Providing by provision server |
| Auto Download Soware | Used for auto download soware from server |
| Auto Download Kernel | Used for auto download kernel from server |
| Auto Download Cong File | Used for auto download cong le from server |
| Auto Download Expansion | NOTES: The model doesn't support this feature. |
| Auto Download Enterprise Phonebook | Used for auto download Enterprise Phonebook from server |
| Auto Download Personal Phonebook | Used for auto download personal phonebook from server |
| Boong Checked | Used for checking the auto provision when phone boong |
| Disable the phone while boong checking | Enable/Disable the boong checking feature. |
| Auto Provision Frequency | Used for seng the me interval for auto provision |
| Auto Provision Time | Used for the specific me for auto provision |
| Auto Provision Next Time | Reset the Auto Provision Next Upgrading me. |
| AES Enable | You can enable/disable AES encrypt for auto provision |
| AES Key | The key of the AES |
| Auto Provision Now | Used for doing auto provision immediately |
4. Brief pictures for application environment
The following pictures introduce the practical application of IP intercom. Take door security and fire protection for example. More compatibility application is subject to actual test.
4.1 Door security system applicaon

flowchart
graph TD
    A["以太网交换机 Ethernet Switch"] --> B["紧急按钮 Emergency Button"]
    A --> C["电子门锁 Electronic Locks"]
    D["DC电源 DC Power"] --> E["有源音箱 Speaker"]
    B --> F["接地符号"]
    C --> G["接地符号"]
    E --> H["接地符号"]
4.2 Fire protecon system applicaon

flowchart
graph TD
    A["以太网交换机 Ethernet Switch"] --> B["紧急按钮 Emergency Button"]
    A --> C["有源音箱 Speaker"]
    B --> D["警示灯 Alarm Light"]
    C --> D
    D --> E["DC电源 DC Power"]


- Smart Security IP Intercom
- IS710 User Manual
- Copyright and Disclaimer
- Copyright
- Declaration
- Information regarding this guide is subject to change without any notice.
- About this manual
- Summary
- Getting Started
- Outline
- Product Features
- Technical Information
- Intercom Installation
- Embedded
- Equipment installation
- Configuration of IP intercom
- Remote WEB Management
- Intercom Settings
- Phone Status
- Network
- Phone Status
- Network
- LAN Port Conguraon
- 2 VPN Sengs
- 3 VLAN Sengs
- 4 Port management Sengs
- QoS
- 6 Network Packet Mirroring
- LLDP
- 8 Paging Sengs
- Socket5 Proxy Server
- SIP Accounts
- Programmable Keys
- Phone Settings
- Output
- Time Sengs
- Ring tone
- Volume Seng
- Features
- VoIP Call Forward
- Auto Redial
- Pickup funcon
- Hotline funcon
- Auto Answer
- Remote Control
- Acon URL
- EP+
- Other features sengs
- Advanced
- Audio
- Dial Plan
- Phone call info
- Maintenance
- HTTP Upgrade
- FTP Upgrade
- TFTP Upgrade
- Factory reset
- Reboot
- Log
- Auto Provision
- Brief pictures for application environment
- Door security system applicaon
- Fire protecon system applicaon
Brand : Escene
Model : IS710-01
Category : Telephone