IAN 61553 - Boat CRIVIT - Free user manual and instructions
Find the device manual for free IAN 61553 CRIVIT in PDF.

| Product Type | Inflatable boat (bathing boat) |
| Model | IAN 61553 / Isolate 290 |
| Brand | Crivit |
| Length | Approx. 272 cm |
| Width | Approx. 141.5 cm |
| Height | Approx. 62 cm |
| Weight | Approx. 6 kg |
| Maximum Load | 260 kg (573.3 lbs) |
| Maximum Persons | 2 adults + 2 children (or 2 adults / 2 children according to manual) |
| Maximum Air Pressure | 0.04 bar (0.58 psi) |
| Design Category | D (sheltered waters) |
| Standard | ISO 6185-1, Category I |
| Chambers | Safety chamber (screw valve), garret (plug valve), flotation chamber (screw valve) |
| Included Accessories | 2 paddles with drip rings, 2 cords (600 cm & 200 cm), sea-sack, storage bag, repair kit, control ruler, venting pipes, instructions |
| Material | PVC (as per typical inflatable boats) |
| Power Source | None (manual propulsion) |
| Warranty | 3 years |
| Maintenance | Clean with fresh water and mild soap; dry thoroughly; store in clean, dry area away from sunlight and rodents |
| Repairs | Use provided repair kit for small damages; allow 12 hours drying time after repair |
| Safety Notes | Always wear a certified life vest; avoid over-inflation; do not leave unattended on water; distribute load evenly |
Frequently Asked Questions - IAN 61553 CRIVIT
User questions about IAN 61553 CRIVIT
0 question about this device. Answer the ones you know or ask your own.
Ask a new question about this device
Download the instructions for your Boat in PDF format for free! Find your manual IAN 61553 - CRIVIT and take your electronic device back in hand. On this page are published all the documents necessary for the use of your device. IAN 61553 by CRIVIT.
USER MANUAL IAN 61553 CRIVIT
Instructions for use - 6 - 13
natural_image
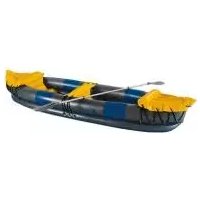
Illustration of an inflatable raft with red and white hull, marked 'Isolate 290' on the hull, resting on a sandy beach with water and ripples in the background (no text or symbols on the raft itself)Conforms with ISO 6185-1, Category I, Design Category D
Code of Conduct / Safety Notice 8
Danger of Injury 8
Minimising Damage 9
Assembly 9
Assembly of the paddles 10
Assembling the Screw Valve 10
Inflating 10
Inflation Sequence 10
Monitoring the Operating Pressure 11
Measuring Strips and Monitoring Ruler 11
Inflating the Air Chambers 11
Cords 11
Dismantling the bathing boat 12
Kit bag 12
Storage bag 12
Transport 12
Care / Maintenance / Storage 12
Repairs 13
Disposal 13
3 Years Warranty 13
FISisällysluettelo
Please read these instructions thoroughly before construction and use of the article and retain for future reference! It contains important information regarding the product, its construction, the company and care of, as well as safety instructions. Because water sports always have a certain risk involved, exact knowledge about the product could prevent possible personal injury or even death.
Technical Data / Symbols used


Length: .... approx. 272 cm
Width: approx. 141,5 cm
Height: .... approx. 62 cm
Weight: approx. 6kg
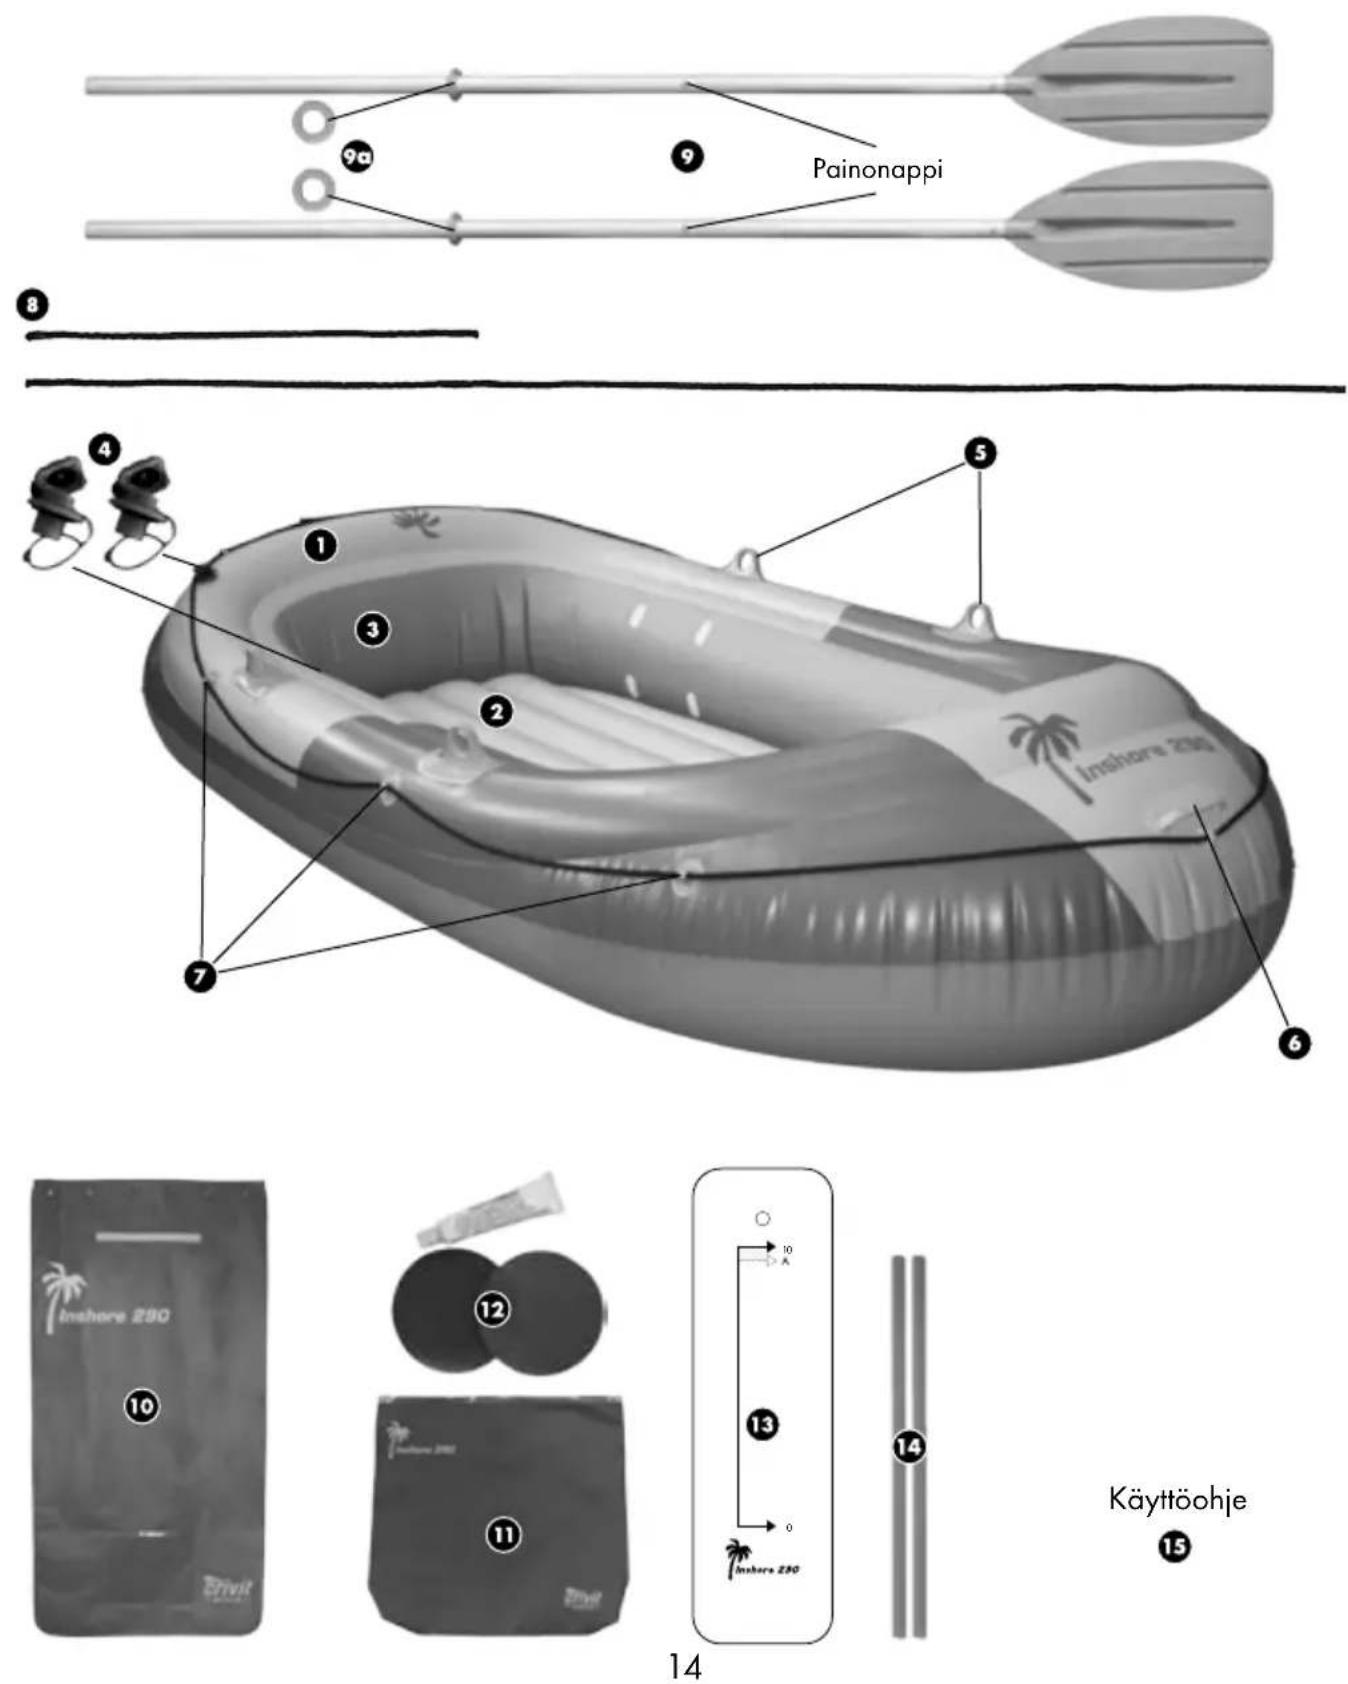
Parts Overview / Contents
① ...... Safety chamber with screw-on-valve ①
2 ...... Garret with plug-valve 2
3 Flotation chamber with screw-on-valve 3
4 Screw-on-valve (2 x)
5 Paddle locks (4 x)
6 ...... Handle (1 x)
⑦ Eyelets for Cords (9 x)
8 Cords (2 x) (1 x 600 cm / 1 x 200 cm)
9 Paddles (2 x)
9a Drip-ring (2 x)
10 Sea-sack (1 x)
⑪ Storage bag (1 x)
12 Repair set (1 x)
13 Control-ruler (1 x)
14 Venting pipes (2 x)
15 Instructions (1 x)
Intended use
This article was developed for private use.
Design category D "sheltered waters": designed for use in protected, near coastal waters.
Designed for voyages on sheltered coastal waters, small bays, small lakes, rivers and canals where conditions up to, and including, wind force 4 and significant wave heights up to, and including, 0.3m may be experienced, with occasional waves of 0.5m maximum height, for example from passing vessels.
Code of Conduct / Safety Notice
The bathing boat is a tested and safe water sports device. However, we strongly request that you adhere to the following rules and regulations:
!WARNING!
Your prudence and self-assessment when on water is highly important. Never overestimate your strength and steering abilities! Always keep close to shores! Take note of the weather situation, storm warnings or possible light signals!
! WARNING!
Please always adhere to the safety regulations and valid legal provisions for lakes and open waters. For your own safety, always wear a certified life vest.
WARNING!
Danger of suffocation for children! Do not let children play with the packaging material or the item itself unsupervised.
WARNING!
Should a person have fallen over board, the re-entry into the boat must take place via the bow or the stern as the risk of capsizing when re-entering on the side (entering from the side) is very high.
Risk of injury!
Caution with offshore winds!
Caution with offshore currents!
- Ensure that persons and cargo are always evenly distributed in the boat; otherwise there is a risk of capsizing.
• Take note of the information on the type plate, the admissible load capacity and number of persons as well as the warning notice.
• Always adhere to the public shipping regulations.
- Do not carry any sharp or pointy items with you.
- The bathing boat should be protected from contact with precarious liquids or acids. Irreparable damages may occur if not adhered to.
- Protect the bathing boat from heat and fire! Take caution with lit cigarettes!
• Take caution not to get in contact with rocky underground surfaces to avoid damaging the boats hull.
- Do not under any circumstances leave the bathing boat if damages to one of the three inner chambers occur while on water. The buoyant force of the four intact inner chambers is sufficient to keep the bathing boat afloat.
- Do not under any circumstances transport the bathing boat in an inflated condition on a vehicle.
- Never leave your bathing boat unoccupied on waters. It will drift off faster than it can be reached through swimming.
- Before use always make sure to take the paddles with you, as otherwise you will not be able to manoeuvre the bathing boat adequately.
- Do not undertake any technical changes to your bathing boat. Changes of all kinds endanger the driving characteristics of the sports device.
- Never use your bathing boat under the influence of alcohol, drugs or medication.
- Never overestimate your strengths and always distribute your muscle strength when paddling in such away, that the distance travelled can be effortlessly paddled back again. Stay within 300m of sheltered shore zones and take note of changing wind and current conditions that can greatly impede forward motion.
Avoiding property damage!
- All inflatable items are cold-sensitive. Therefore never unfold or inflate the item under temperatures of 15^ !
- Should the air pressure increase in direct sunlight, then it must be counterbalanced by letting air out.
- Ensure that the item – especially whilst in an inflated condition – does not come into contact with stones, gravel or pointy objects and that it does not get rubbed or grinded as otherwise damages may occur on the foil.
- Insert only suitable pump adapters into the safety valves. Otherwise the valves may get damaged.
- Do not over-inflate as otherwise there is a risk that the welded joints may tear. Seal the valves thoroughly after inflation.
- Avoid contact with sharp, hot, pointy or dangerous objects.
Assembly
Due to the size of the item, the assembly should always be carried out by two adults. Please adhere to the individual steps of assembly in the stipulated order. This especially applies for the inflating of the three air chambers as otherwise irregular pressure distribution may occur, which will lead to instability of the bathing boat and can lead to impairments of its handling characteristics.
- Choose a flat and clean surface with enough space to unpack and unfold the bathing boat. Make sure that all parts are available and are in good order and condition.
- Spread out the boat hull. Starting with the second assembly of the bathing boat, check for possible damages, holes or tears and seal these as described below. Possible damages cannot be repaired once you are on the water.
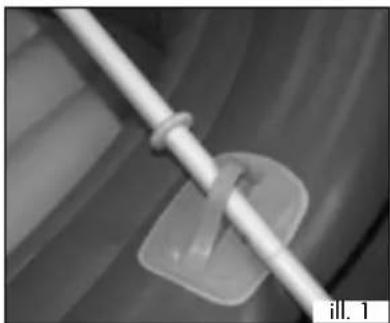
Assembly of the paddles (ill. 1, 2)
Important!
While using the boat on the water, the paddles must not detach from the paddle-locks, but must be secured with paddle-locks to avoid loosening!
- Connect the two paddle pipes whereby the press studs must audibly and visibly snap in properly. Push the end of the pipe through the paddle lock and secure the paddle by sliding on the drip-ring.
natural_image
Close-up of a white rod inserted into a square plastic component, no visible text or symbolsRepeat the procedure for the second paddle for the other side of the boat.

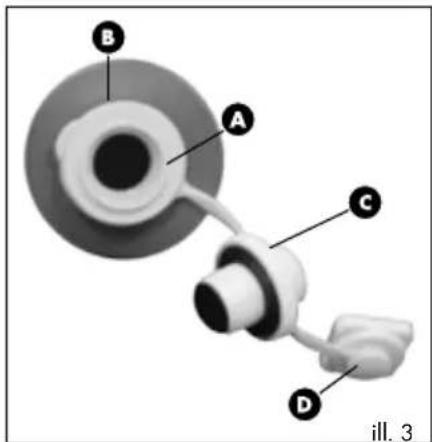
Assembling the Screw Valve:
The chambers the bathing boat are equipped with a threaded opening for the supplied screw-on-valves. Pull the sling A of the vent over the threaded opening B in such a way that they securely lie on the intended groove. This procedure requires a bit of tact and patience, it must however be done diligently so that a later loosening and subsequent opening of the valve is avoided.
Now screw the base Ⓐ clockwise into the threaded opening.
Inflating
CAUTION!
- Adhere to the correct sequence when inflating the air chambers.
• The recommended operating pressure is 0.04 bar (= 40 mbar = 0.58 psi). - Avoid over-inflating the air chambers as otherwise there is a risk that the welded joints may tear or be overstretched.
- Make use of standard foot pumps or piston pumps with corresponding attachments and if necessary a manometer.
- Do not make use of compressors or compressed air bottles for inflating the item.
This can cause damages to the item.
• Always inflate all air chambers completely!
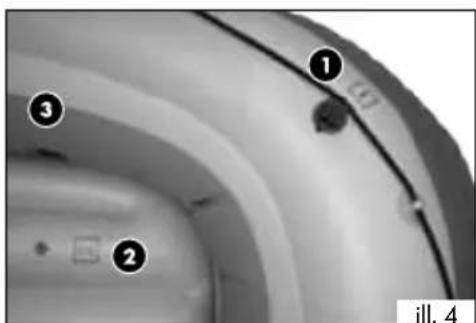
Inflation Sequence (ill. 4)
Always check the air pressure after inflating an air chamber as described on page 11 "checking operating pressure".
Inflate the air chambers in the following sequence:
- ① Safety chamber with screw-on-valve ①
- ②arret with plug-valve ②
- ① lotation chamber with screw-on-valve 3
□ = marking on boat
Monitoring the Operating Pressure
IMPORTANT!
The PVC material stretches after the first inflation of the item a bit further and will not go back into its original state.
Please bear in mind that the information may vary slightly depending on load and outside temperature.
Inflate the air chamber ② until it feels firm and until no wrinkles are visible in the material. The thumb should still sink in somewhat when pressing on the relevant air chamber.
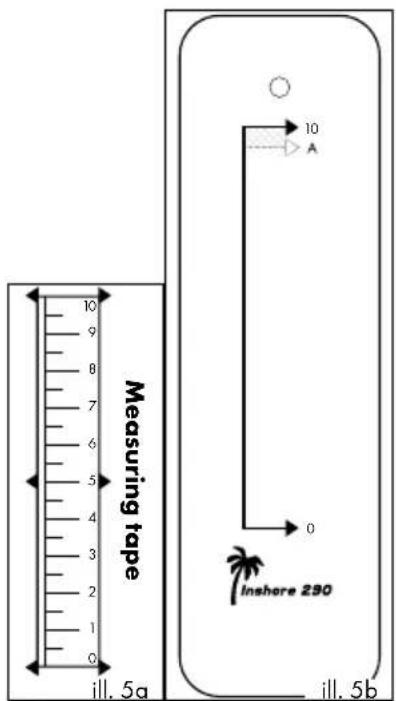
Measuring Strips and Monitoring Ruler (ill. 5a, b)
To check the operating pressure of the air chambers , place the 0 of the control-ruler (ill. 5b) over the 0 of the measuring strip (ill. 5a) on the item.
With the first and initial inflation, the maximum expansion of the measuring strip may NOT exceed position A of the control-ruler.
After first use always inflate so far, that the 10 of the measuring strip is between position A and position 10 of the control-ruler.
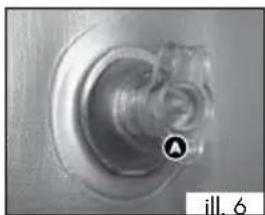
Inflating the Air Chambers (ill. 6)
① Safety chamber with screw-on-valve
3 Flotation chamber with screw-on-valve
- Inflate the chambers ①/② with air and seal it with the cap ③. 3, page 10) in a clockwise direction.
② Garret with plug-valve
- Open the valve closure A.
- Inflate the relevant air chambers.
- Seal the valve closure and countersink the valve with a bit of pressure.
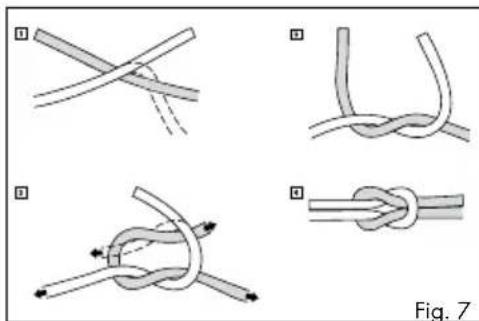
Cords
Affix the cords 600 cm to the eyelets of the boat. Secure the cords with a reef knot (ill. 7).
natural_image
Close-up of a mechanical component with a circular base and a labeled section (no readable text or symbols)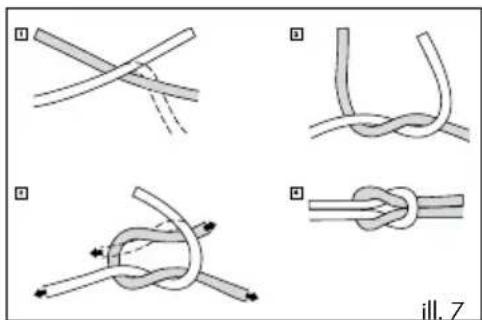
Dismantling the bathing boat
Deflating
Deflate the bathing boat as follows:
- To deflate the garret 2 pull out the plug-valve and slightly push the shaft together or use the venting pipes .10
- To deflate the safety and flotation chamber 1 inscrew the screw-on-valve from the base completely.
Kit bag
A duffle bag is delivered with the item in which the bathing boat can be transported and stored in. Use the cord 200cm to close it.
In addition the duffle bag can be taken on board to protect provisions, cloths etc. from splashes of water. Please take into consideration though that the item is not waterproof.
Therefore do not store sensitive objects such as cameras in it.
To make use of it on board it is recommended to remove the cords, to roll up the top end flat and to close it up with the Velcro closure.
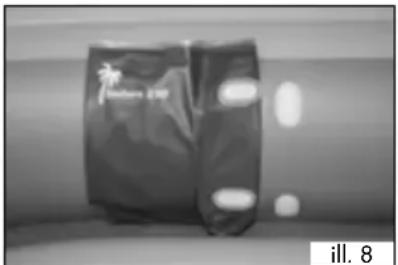
Storage bag (ill. 8)
In addition a splash-proof storage bag is also supplied, which can be attached to the inner wall of the boat with Velcro closures. Smaller items can be stowed in it to keep them dry; this item however is also not entirely waterproof. Therefore, do not place any sensitive items in it either.
natural_image
Black and white photo of a branded bag with 'Newhouse 870' printed on it, against a blurred background (no readable text or symbols)Transport
Always transport the bathing boat with two persons and make use of the cords on the stern as well as the handle bow.
Care / Maintenance / Storage
CAUTION!
Only make use of detergents that do not contain acids or petrol and never make use of products based on silicone.
- Thoroughly clean your bathing boat after every use by rinsing it with fresh water and a mild soap to remove salt crystals, grains of sand and other small impurities. Allow to dry completely afterwards.
- Fold up the boat with care.
- Store the bathing boat in a clean and dry area out of direct sunlight and at which it is not subject to large temperature fluctuations. Make sure that it is not deformed and stored level and out of the reach of rodents.
Repairs WARNING!
You should under no circumstances carry out repairs by yourself with larger damages. You can repair smaller damages with the provided repair kit.
- Completely deflate the bathing boat and clean the relevant area with the solution on alcohol basis. Lightly roughen the area of the tear or the hole with fine sandpaper.
- Now cut out a patch that covers the damaged area and protrudes all sides about 1,25cm.
- Apply the glue on the area of the boat as well as the patch. Allow the glue to dry for approx. 3 minutes.
- Press the patch on firmly with a soft object. Make sure to work on a level surface without wrinkles or folds. Gently remove possible bubbles with a rounded object from the inside outward.
- Wait for at least 12 hours after repairing before re-inflating.
Disposal
Please dispose of the product and packaging in an environmentally friendly manner, separating different materials for recycling as required! Dispose of this item through an authorised disposal company or through your local waste disposal facilities - ask your local authority for information if further guidance is required. Ensure that you comply with all regulations currently in force.
3 Years Warranty
The product was manufactured with the greatest care and regular testing.
This product comes with a 3-year warranty as of the date of purchase. Please keep the receipt.
The warranty only covers material and production errors and will not cover improper or inappropriate handling. Your legal rights, in particular statutory rights are not restricted with this warranty.
In the event of a warranty matter, please contact us free of charge via our Service-Hotline or send us an email. In any case, we will be more than happy to provide you with personal advice. In the event of a warranty matter, defect parts can be shipped cash on delivery to the indicated service-address in coordination with our service-colleagues. Subsequently you will promptly receive a new or repaired part free of charge.
The warranty period will not be extended due to any repairs based on warranty, statutory guarantee or fair dealing. This also applies to replaced and repaired parts.
Any repairs required after the warranty has expired are chargeable.
IAN: 61553
Service-address
Product hotline 00800-88080808 (Mon.-Fri. 10am - 4pm, free phone)
GB PSB LOGISTICS MANAGEMENT LTD • Unit B3 site b
The Bowman Centre Arncott, OX25 1NZ Oxon
gb@nws-service.com
IE SCIMITAR LOGISTICS • WESTBANK ROAD 14-16 • BT 3 95 L BELFAST
ie@nws-service.com
- www.nws-service.com -
TuOTE JA SEn OSAT INSHORE 290

natural_image
Close-up of a white rod inserted into a square component, with no visible text or symbols
natural_image
Close-up of a metallic knob with a labeled point A and text 'kuva 6' (no other visible text or symbols)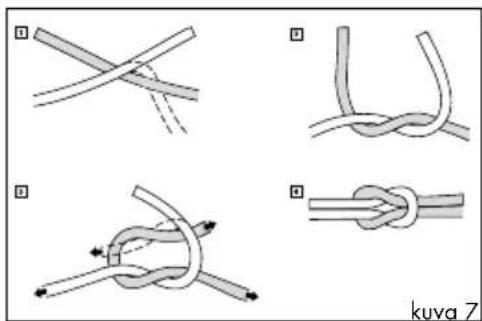
Veneen purkaminen
Ilman poistaminen
natural_image
Black and white photo of a branded bag with 'kuva 8' text, no other visible text or symbolsKantaminen
natural_image
Close-up of a white rod inserted into a square plastic component, labeled 'bild 1' in the corner (no other text or symbols visible)
natural_image
Close-up of a metallic mechanical component with a circular top and flange, labeled 'bild 6' (no other text or symbols visible)Lina
natural_image
Black and white photo of a branded bag with 'Toutabo 202' logo, displayed against a blurred background (no readable text or symbols)Transport
natural_image
Close-up of a white plastic tube attached to a square component, labeled 'Fig. 1' (no text or symbols on the diagram itself)
Montering af skrueventilerne:
natural_image
Close-up of a mechanical component with a labeled point A and Fig. 6 (no readable text or symbols beyond label)