
KD77AG9BU - TV SONY - Free user manual and instructions
Find the device manual for free KD77AG9BU SONY in PDF.

| Product type | OLED 4K TV |
| Brand | Sony |
| Model | KD77AG9BU |
| Screen size | 77 inches (195.6 cm) |
| Resolution | 3840 x 2160 pixels (4K Ultra HD) |
| Display technology | OLED (X1 Ultimate Processor) |
| Operating system | Android TV 9.0 |
| Dimensions (with stand) | 172.2 x 102.2 x 35.6 cm |
| Dimensions (without stand) | 172.2 x 98.2 x 4.5 cm |
| Weight (with stand) | 35.5 kg |
| Weight (without stand) | 33.2 kg |
| Power supply | 220-240 V AC, 50/60 Hz |
| Power consumption (standby) | 0.5 W |
| Power consumption (typical) | 200 W |
| Speakers | Speaker system, 2 x 10 W + subwoofer |
| Connectivity | Wi-Fi 802.11ac, Bluetooth 4.2, Ethernet, 4x HDMI, 3x USB |
| Main features | Smart TV, Google Assistant, built-in Chromecast, Dolby Vision, Dolby Atmos |
| Maintenance and cleaning | Use a soft, dry cloth. Do not use chemical products. |
| Safety | Do not obstruct the ventilation slots. Secure the TV to the wall or furniture. |
| Spare parts and repairability | Repairability index 7.2/10. Available parts: remote control, power cord, stand. |
| Included accessories | Remote control, batteries, table stand, power cord, user manual |
Frequently Asked Questions - KD77AG9BU SONY
User questions about KD77AG9BU SONY
0 question about this device. Answer the ones you know or ask your own.
Ask a new question about this device
Download the instructions for your TV in PDF format for free! Find your manual KD77AG9BU - SONY and take your electronic device back in hand. On this page are published all the documents necessary for the use of your device. KD77AG9BU by SONY.
USER MANUAL KD77AG9BU SONY

For useful information about Sony products Pour obtenir les informations utiles concernant les produits Sony Información de utilidad para productos Sony Voor nuttige informatie over Sony producten Für hilfreiche Informationen zu Sony Produkten Para informação útil sobre os produtos Sony Per informazioni utili sui prodotti Sony For nyttig information om Sony-produkter For mere information om Sony-produkter Hyödyllista tietoa Sony tuotteista For nyttig informasjon om Sony produkter Szczegółowe informacje o produktach Sony Užitečné informace o výrobcích Sony Pre viac informácií o produktoch Sony Sony termékekról hasznos információkat találhat az alábbi weboldalon Pentru informații utile despre produsele Sony За полезна информация относно продуктите на Sony Για χρήσιμες πληροφορίες σχετικά με τα προϊόντα SONY Sony ürünleri için faydali bilgiler
www.sony.eu/support
BRAVIA
OLED

| Reference Guide | GB |
| Guide de référence | FR |
| Guía de referencia | ES |
| Referentiegids | NL |
| Referenzanleitung | DE |
| Guia de referência | PT |
| Guida di riferimento | IT |
| Referensmaterial | SE |
| Referencevejledning | DK |
| Viiteopas | FI |
| Referanseveiledning | NO |
| Przewodnik | PL |
| Referenční příručka | CZ |
| Referenčná príručka | SK |
| Felhasználói útmutató | HU |
| Ghid de referință | RO |
| Информация за продукта | BG |
| Обнýóς αναφοράς | GR |
| Başvuru Kılavuzu | TR |

To attach the Table-Top Stand, refer to the Setup Guide.
Table of Contents
IMPORTANT NOTICE....2
Safety Information .... 3
Protecting the TV Screen (OLED TV) .....4
Parts and Controls .... 5
Controls and Indicators ....5
Using Remote Control 6
Remote Control Parts Description.....6
Connection Diagram 8
Installing the TV to the Wall .....11
Using the optional Wall-Mount Bracket (SU-WL850 or SU-WL450) 11
Troubleshooting....13
Troubles and Solutions....13
Specifications....14
Internet Connection and Data Privacy
This product connects to the internet during initial setup as soon as a network is connected in order to confirm internet
connection, and later to configure the Home screen. Your IP address is used in these and all other internet connections. If you do not want your IP address be used at all, do not set-up the wireless internet function and do not connect an internet cable.
Please refer to the privacy information presented in the set-up screens for further details of internet connections.
Introduction
Thank you for choosing this Sony product.
Before operating the TV, please read this manual thoroughly and retain it for future reference.
Note
- Before operating the TV, please read the "Safety Information" (page 3).
- Read the supplied Safety Information for additional safety information.
- Images and illustrations used in the Setup Guide and this manual are for reference only and may differ from the actual product.
Help
Find more troubleshooting and other useful information directly from your TV. Press HELP on the remote control to display a list of topics, or to search by keyword.
Help Guide (Manual)
For more detailed information, select [Help Guide] from the Help menu on your TV. You can also check the Help Guide from your PC or smartphone (information provided on the back cover of this manual).
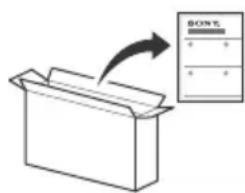
Location of the identification label
Labels for the TV Model No., Production Date (year/month) and Power Supply rating are located on the rear of the TV or package.
They can be found by removing the stand cover CD1
IMPORTANT NOTICE
Notice for Radio Equipment
Hereby, Sony Visual Products Inc. declares that the radio equipment types
KD-77AG9, KD-65AG9, KD-55AG9 are in compliance with Directive 2014/53/EU. The full text of the EU declaration of conformity is available at the following internet address:
http://www.compliance.sony.de/
Notice for customers: the following information is only applicable to equipment sold in countries applying EU directives.
For this radio equipment, the following restrictions on putting into service or of requirements for authorization of use apply in AT, BE, HR, CY, CZ, DK, EE, FI, FR, DE, EL, HU, IE, IT, LV, LT, LU, MT, NL, PL, PT, SK, SI, ES, SE, UK, IS, LI, NO, CH, BG, RO, TR, AL, BA, MK, MD, RS, ME, Kosovo :
5150 - 5350 MHz band is restricted to indoor operations only.

Safety Information
Installation/Set-up
Install and use the TV set in accordance with the instructions below in order to avoid any risk of fire, electric shock or damage and/or injuries.
Installation
- The TV set should be installed near an easily accessible mains socket.
- Place the TV set on a stable, level surface to prevent it from falling over and causing personal injury or property damage.
• Install the TV where it cannot be pulled, pushed, or knocked over. - Install the TV so that the TV's Table-Top Stand does not protrude out from the TV stand (not supplied). If the TV's Table-Top Stand protrudes out from the TV stand, it may cause TV set to topple over, fall down, and cause personal injury or damage to the TV.
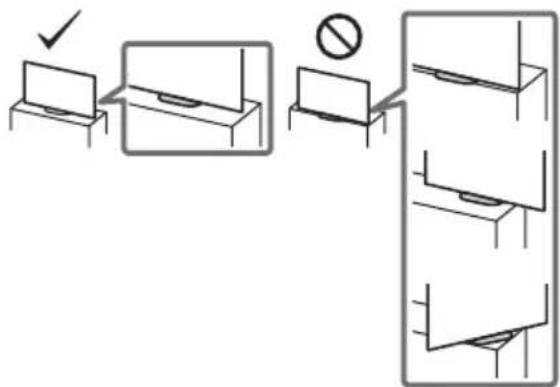
- For safety reasons, be sure to attach the centre covers to the rear of the TV when TV in Table-Top condition.
- Only qualified service personnel should carry out wall-mount installations.
- For safety reasons, it is strongly recommended that you use Sony accessories, including:
— Wall-Mount Bracket SU-WL850 — Wall-Mount Bracket SU-WL450
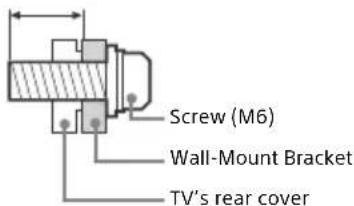
- Be sure to use the screws supplied with the Wall-Mount Bracket when attaching the Wall-Mount Bracket to the TV set. The supplied screws are designed as indicated by illustration when measured from the attaching surface of the Wall-Mount Bracket. The diameter and length of the screws differ depending on the Wall-Mount Bracket model.
Use of screws other than those supplied may result in internal damage to the TV set or cause it to fall, etc.
9 mm - 13 mm
Transporting
- Before transporting the TV set, disconnect all cables.
- Two or three people are needed to transport a large TV set.
- When transporting the TV set by hand, hold it as shown below. Do not put stress on the panel and the frame around the screen.
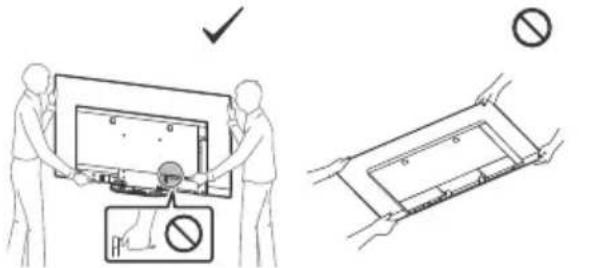
- When handling or mounting the TV set, do not lay down the TV.

natural_image
Technical line drawing of a rectangular electronic component with internal channels and mounting feet, no text or symbols present.- When transporting the TV set, do not subject it to jolts or excessive vibration.
- When transporting the TV set for repairs or when moving, pack it using the original carton and packing material.
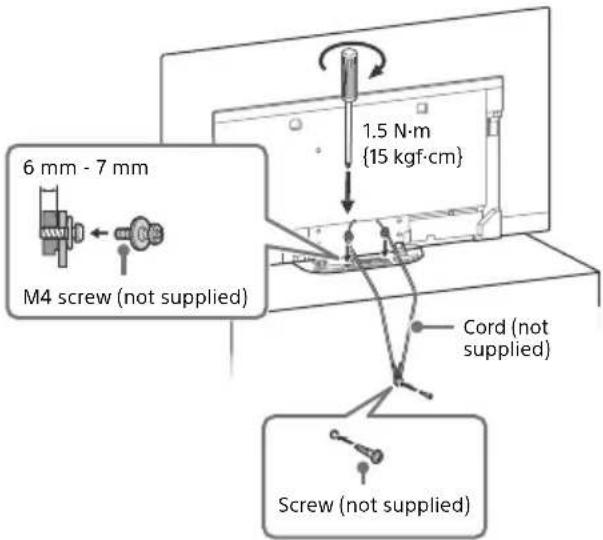
Topple prevention
Ventilation
- Never cover the ventilation holes or insert anything into the cabinet.
- Leave space around the TV set as shown below.
- It is strongly recommended that you use a Sony Wall-Mount Bracket in order to provide adequate air circulation.
Installed on the wall
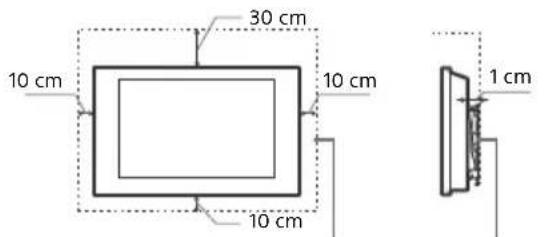
Leave at least this much space around the set.
Installed with stand
Leave at least this space around the set.
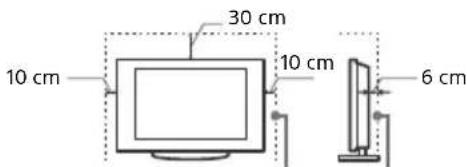
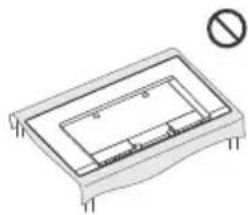
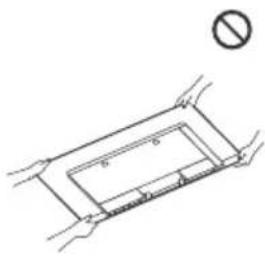
• To ensure proper ventilation and prevent the collection of dirt or dust:
— Do not lay the TV set flat, install upside down, backwards, or sideways.
- ☑ not place the TV set on a shelf, rug, bed or in a closet.
- Do not cover the TV set with a cloth, such as curtains, or items such as newspapers, etc.
— Do not install the TV set as shown below.
Air circulation is blocked.

Do not block the air circulation area.
Protecting the TV Screen (OLED TV)
Precautions to Protect the Screen from Damage
Image retention
OLED TV's are susceptible to image retention (burn-in) due to the characteristics of the materials used. Image retention may occur if images are displayed in the same location on the screen repeatedly or over extended periods of time. This is not a malfunction of the TV. Avoid displaying images that may cause image retention.
The following are examples of images that may cause image retention:
- Content with black bars either on the top and bottom and/or the left and right sides of the screen. (for example, Letterboxed, 4:3 screen, Standard definition)
• Static images such as photos.
• Video games that might have static content in some part of the screen. - On-screen menus, programme guides, channel logos etc.
• Static content from applications. - On-screen tickers, such as those used for news and headlines.
To reduce the risk of image retention:
- Sony recommends that you turn off the TV normally by pressing the power button on the remote control or the TV.
- Fill the screen by changing [Wide mode] to eliminate the black bars. Select [Wide mode] other than [Normal].
- Turn off the OSD (On Screen Display) by pressing the button, and turn off the menus from connected equipment. For details, refer to the instruction manuals for the connected equipment.
- Avoid displaying static images with bright colours (including white), clocks or logos on any portion of the screen.
- Set the picture settings based on the ambient conditions. The Standard Picture is recommended for home use and when viewing content that often displays the station logos, etc.
The TV has following features to help reduce/prevent image retention.
Panel refresh
Panel refresh will automatically run to adjust the uniformity of the TV screen after it has been in use for long periods of time. Panel refresh can also be performed manually and should only be used if image retention is very noticeable or you see the following message: [Panel refresh did not finish...]
Caution:
- The Panel refresh function may affect the panel. As a reference, perform the Panel refresh only once a year, do not perform it more than once a year as it may affect the usable life of the panel.
- Panel refresh takes about one hour to complete.
- A white line may be displayed on the screen during the Panel refresh, this is not a malfunction of the TV.
- Panel refresh will only work when the room temperature is between 10 °C and 40 °C.
Pixel shift
Automatically moves the image on the screen to prevent image retention.
Other feature
The screen brightness is automatically reduced when displaying still images, clocks, bright colours or logos etc.
Parts and Controls
Controls and Indicators
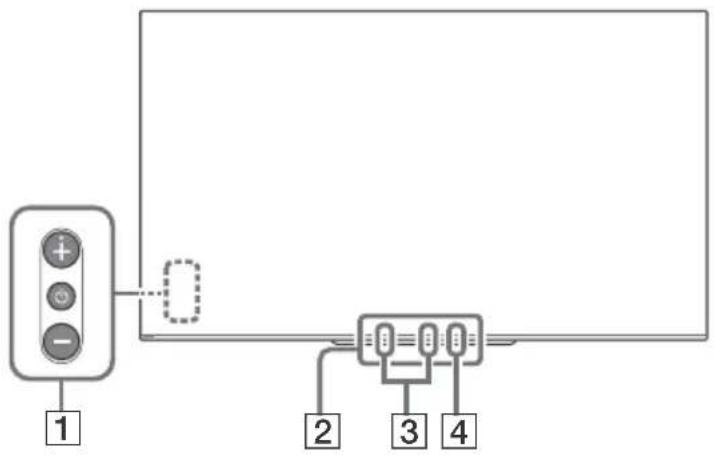
1 ⏻ (Power) / + / -
When the TV is off,
Press ⏻ to power on.
When the TV is on,
Press and hold ⏻ to power off.
Press ⏻ repeatedly to change the function, then press + or - button to:
- Adjust the volume.
- Select the channel.
- Select the input source of TV.
2 Remote Control sensor ^1 / Light sensor ^1 / Illumination LED
The illumination LED lights up or blinks according to the status of the TV.
For more information, refer to the Help Guide.
3 Built-in MIC ^2*3
Use the hands-free built-in microphone for voice search. To enable the built-in MIC, follow the on-screen instructions when you press the button.
4 Built-in MIC LED
The built-in MIC LED lights up in amber when the built-in MIC is enabled. The built-in MIC LED can be disabled.*3
*1 Do not place anything near the sensor.
*2 The voice search requires an Internet connection. The voice search with the built-in MIC is available only on limited region/country/language. Standby power consumption will increase because the built-in MIC is always listening when the voice search with the built-in MIC is enabled.
*3 For more information, see the Online Help Guide (page 2).
Using Remote Control
Remote Control Parts Description
The remote control shape, location, availability and function of remote control buttons may vary depending on your region/country/TV model.
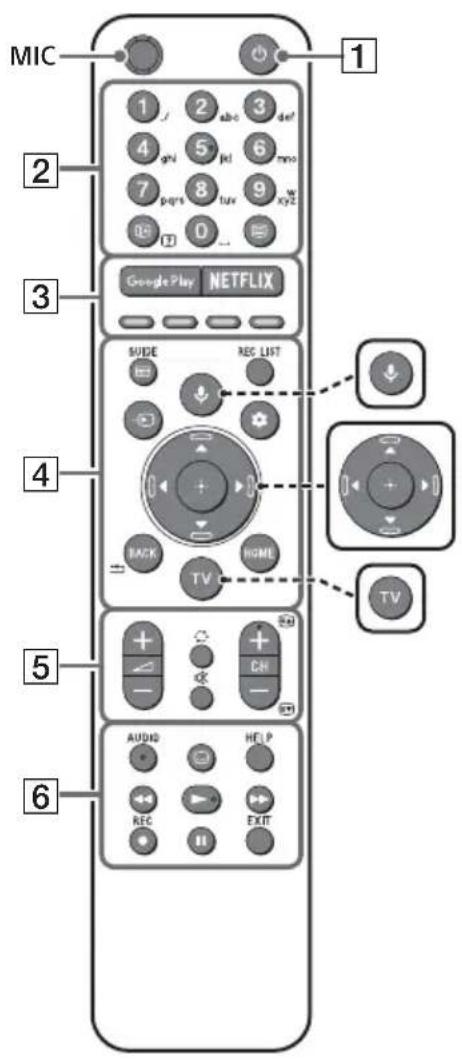

(Microphone)
Use voice search*. (e.g., Search various content by voice.)
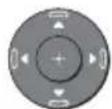
▲/▼/◄/►/⊕ (Navigation D-Pad)
On screen menu navigation and selection.

TV
Switch to a TV channel or input and display the TV menu.
* The voice search requires an Internet connection.
1 ⏻ (TV standby)
Turn on or turn off the TV (standby mode).
2 Number buttons
i+/? ( Info / Text rev
Display information.
Text
Display text information.
3 Google Play
Access the "Google Play" online service.
NETFLIX (Only on limited region/ country/TV model)
Access the "NETFLIX" online service.
Colour buttons
Execute corresponding function at that time.
4 GUIDE/
Display the digital programme guide, or EPG of cable/satellite box after setting [Cable/Satellite box setup] (Set top box control compatible models only).
REC LIST
Display the Rec list of USB HDD, or DVR after setting [Cable/Satellite box setup].
→ (Input select)
Display and select the input source, etc.
(Qquick settings)
Display Quick Settings.
BACK/←
Return to the previous screen.
HOME
Display the TV Home Menu.
5 ∠ +/- (Volume)
Adjust the volume.
(Jump)
Jump back and forth between two channels or inputs. The TV alternates between the current channel or input and the last channel or input that was selected.
Mute
Mute the sound. Press again to restore the sound.
Hint
- The accessibility shortcut service can be turned on or off by pressing and holding ☑.
CH +/−/▲/▼
In TV mode: Select the channel.
In Text mode: Select the next (▲) or previous (▼) page.
6 AUDIO
Select the sound of multilingual source or dual sound for the programme currently being viewed (depend on programme source).
(Subtitle setting)
Turn subtitles on or off (when the feature is available).
HELP
Display the Help menu. Help Guide can be accessed from here.
◀/▶/▶/||
Operate media contents on the TV and connected BRAVIA Sync-compatible device.
● REC
Record the currently viewed programme on the USB HDD, or DVR after setting [Cable/Satellite box setup] (only on limited region/country/TV model).
EXIT
Return to the previous screen or exit from the menu. When an Interactive Application service is available, press to exit from the service.
Note
- For more information about [Cable/Satellite box setup], refer to the Help Guide.
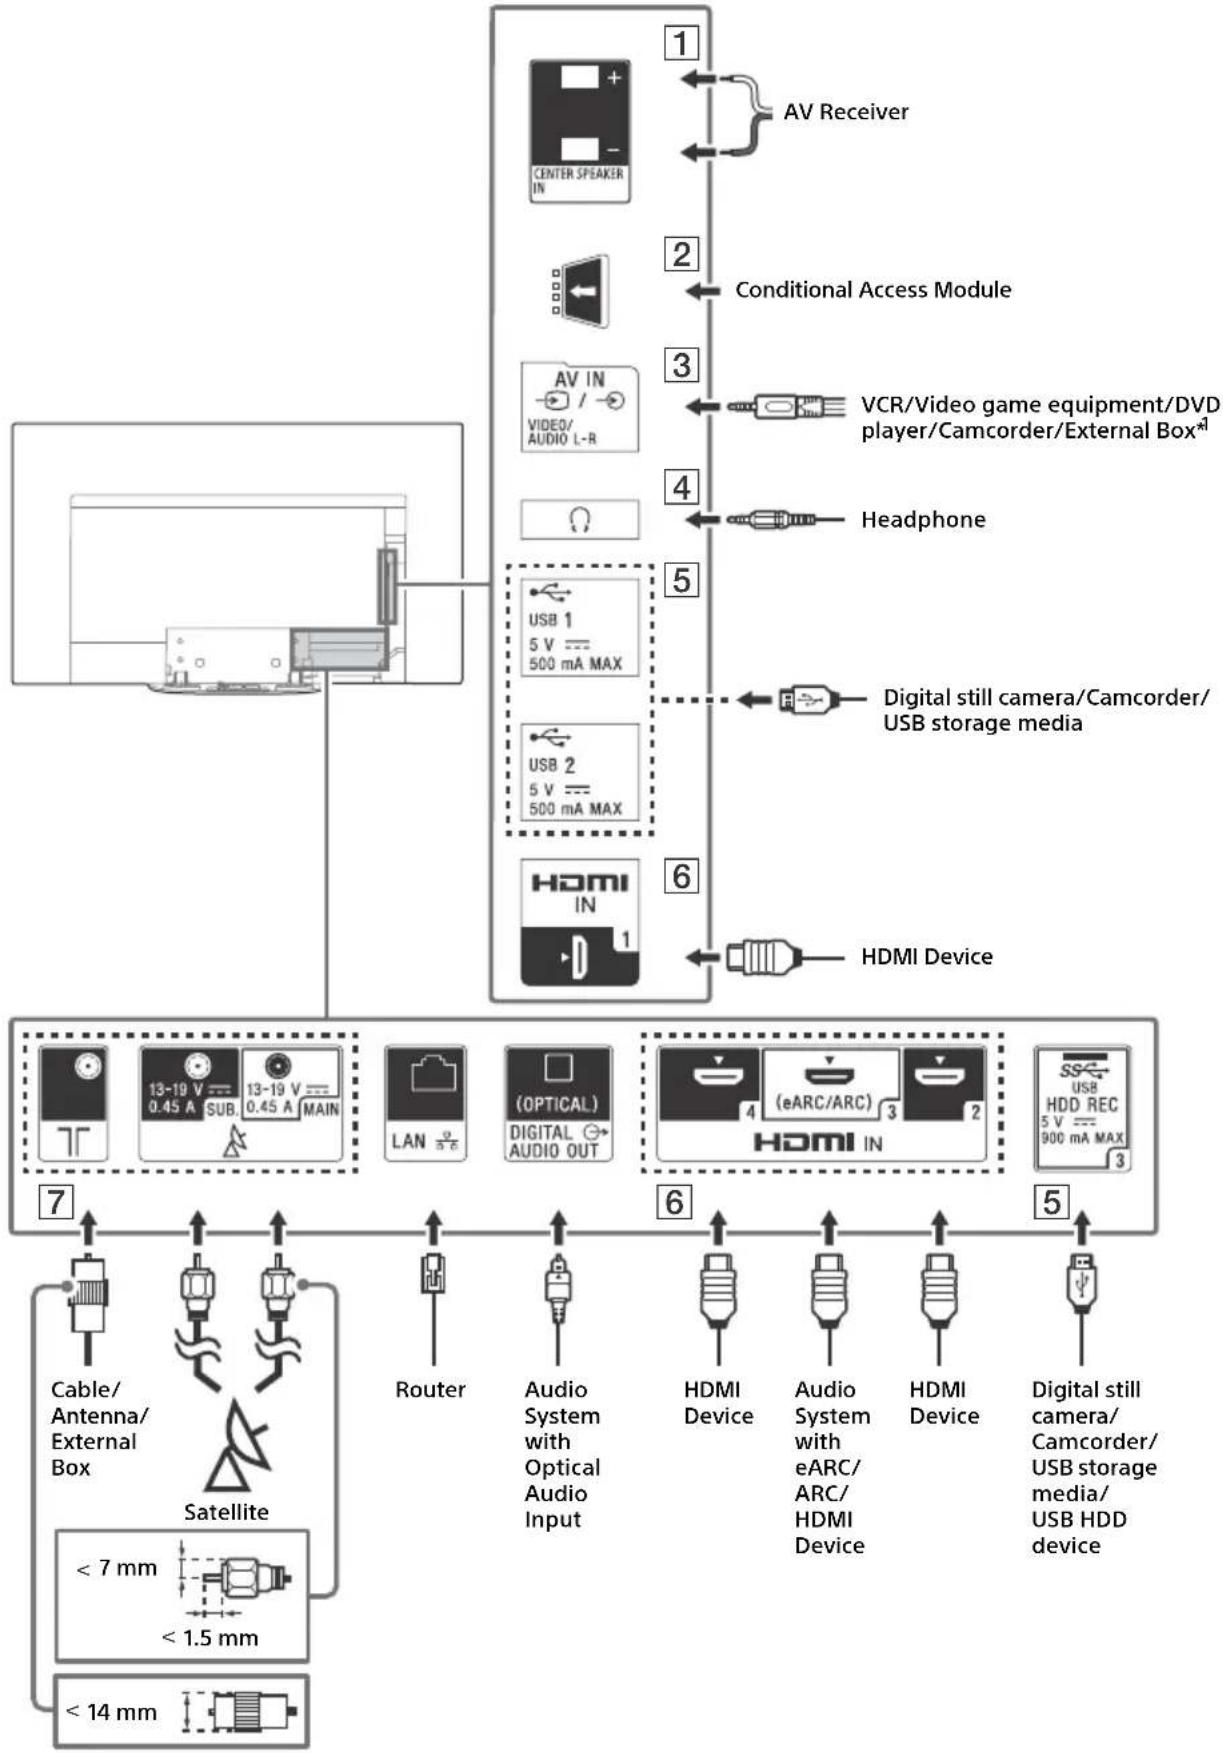
Connection Diagram
For more information on connections, refer to the Help Guide by pressing HELP on the remote control.
flowchart
graph TD
    A["Home Device"] --> B["Central Display"]
    B --> C["AV Receiver"]
    B --> D["Conditional Access Module"]
    B --> E["VCR/Video game equipment/DVD player/Camcorder/External Box"]
    B --> F["Headphone"]
    B --> G["Digital still camera/Camcorder/USB storage media"]
    B --> H["HDMI Device"]
    B --> I["13-19 V SUB 0.45 A MAIN LAN"]
    B --> J["(OPTICAL) DIGITAL AUDIO OUT"]
    B --> K["(eARC/ARC) HDMI IN"]
    B --> L["Cable/Antenna/External Box"]
    B --> M["Satellite"]
    B --> N["Router"]
    B --> O["Audio System with Optical Audio Input"]
    B --> P["HDMI Device"]
    B --> Q["Audio System with eARC/HDMI Device"]
    B --> R["HDMI Device"]
    B --> S["Digital still camera/Camcorder/USB storage media/USB HDD device"]
1 CENTER SPEAKER IN
- To use your TV speakers as the centre speaker, connect the output of your AV receiver to the CENTER SPEAKER IN on your TV.
- Before connecting cables, disconnect the mains lead of both TV and AV receiver.
- Make sure the [Speakers] is set to [Audio system].
To prevent hiss when not connecting the CENTER SPEAKER IN to an AV receiver, disable [TV centre speaker mode]. For details, refer to the Help Guide.
2 CAM (Conditional Access Module)
- Provides access to pay details, refer to the instruction manual supplied with your CAM.
- Do not insert the smart card directly into the TV CAM slot. It must be fitted into the Conditional Access Module provided by your authorised dealer.
- CAM is not supported in some countries/areas. Check with your authorised dealer.
- A CAM message may appear when you switch to a digital programme after using the Internet video.
3 → /→ AV IN
- For a composite connection, use an Analogue Extension Cable (not supplied).
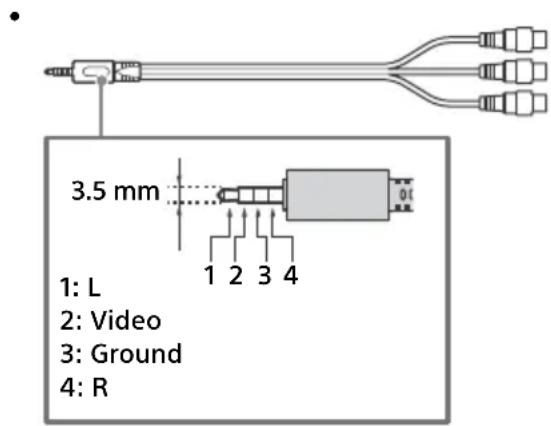
4 (Headphone)
• Supports 3-pole stereo mini jack only.
- You cannot output sound from both the headphone and the TV speakers at the same time.
5 USB 1/2, USB3 (HDD REC)\*
2
- Connecting a large USB device may interfere with other connected devices beside it.
- When connecting a large USB device, connect to the USB 1 port.
- Connect a USB HDD device to the USB 3 port (blue).
6 HDMI IN 1/2/3/4
- HDMI interface can transfer the digital video and audio on a single cable.

- To enjoy high quality 4K 50p/60p contents, connect a Premium High Speed HDMI cable and set the [HDMI signal format] to [Enhanced format]. Do this setting individually for each connected HDMI IN terminal. For details of supported formats, refer to the "Specifications" in this manual (page 14-16).
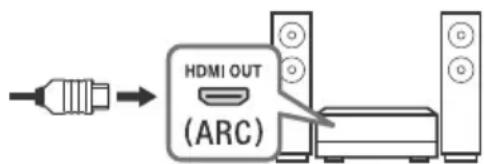
- HD MI IN 3 eARC/ARC (Enhanced Audio Return Channel/Audio Return Channel) Connect your audio system to the HDMI IN 3 to route TV audio to your audio system. An audio system that supports HDMI eARC/ARC can send video to the TV, and receive audio from the TV via the same HDMI cable. If your audio system does not support HDMI eARC/ARC, an additional connection with DIGITAL AUDIO OUT (OPTICAL) is necessary.
- Use the HDMI cable with Ethernet to connect audio system with eARC.
7 (RF input), (Satellite input)
- Connections for terrestrial/cable and satellite. Connection steps: SUB. → MAIN → Antenna
- For SUB. jack, connect only when you are using twin tuner mode except for Single Cable Distribution EN50494.
*1 For an external device which has only SCART AV OUT, use a SCART-RCA adaptor and Analogue Extension Cable.
*2 Only on limited region/country/TV model.
Note
- You cannot attach the side cover ☐ where the cables are connected to side terminal.
- Be sure to store the side cover in a safe place for future use.
Installing the TV to the Wall
Using the optional Wall-Mount Bracket (SU-WL850 or SU-WL450)
To Customers:
For product protection and safety reasons, Sony strongly recommends that installation of your TV be performed by Sony dealers or licensed contractors. Do not attempt to install it yourself.
To Sony Dealers and Contractors:
Provide full attention to safety during the installation, periodic maintenance and examination of this product.
Wall-Mount Bracket Installation Information
This TV's instruction manual only provides the steps to prepare the TV for Wall-Mount installation before it is installed on the wall.
For instructions on Wall-Mount Bracket installation, see the Installation Information (Wall-Mount Bracket) on the product page for your TV model.
www.sony.eu/support/
Preparing for Wall-Mount Installation
Use the Wall-Mount Bracket SU-WL850 (not supplied) or SU-WL450 (not supplied) to install the TV to the wall.
Make sure to attach the Table-Top Stand before installing the TV to the wall by referring to the Setup Guide.
- Prepare the TV for the Wall-Mount Bracket before making cable connections.
- Follow the instruction guide provided with the Wall-Mount Bracket for your model. Sufficient expertise is required in installing this TV, especially to determine the strength of the wall for withstanding the TV's weight.
- Be sure to entrust the attachment of this product to the wall to Sony dealers or licensed contractors and pay adequate attention to safety during the installation. Sony is not liable for any damage or injury caused by mishandling or improper installation.
- The screws for Wall-Mount Bracket are not supplied.
- Be sure to store the unused screws and Table-Top Stand in a safe place until you are ready to attach the Table-Top Stand. Keep the screws away from small children.
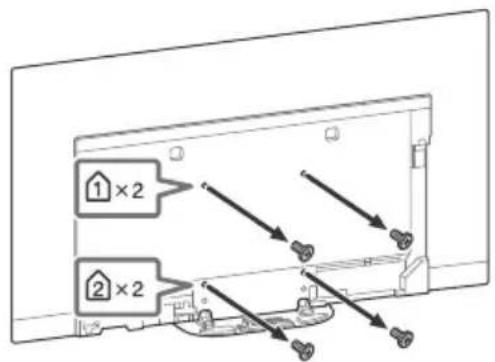
1 Remove the stand cover and terminal covers.

2 Remove the screws from the rear of the TV.
Troubleshooting
General troubleshooting for issues like: black screen, no sound, frozen picture, TV does not respond, or network is lost, do the following steps.
1 Restart your TV by pressing the power button on the remote control until a message appears. The TV will restart. If the TV does not recover, try unplugging the mains lead. Then press the power button on the TV and wait for two minutes, and plug in the mains lead.
2 Refer to the Help menu by pressing HELP on the remote control.
3 Connect your TV to the Internet and perform a software update. Sony recommends you to keep your TV software updated. Software updates provide new features and performance improvements.
4 Visit Sony support website (information provided on the front cover of this manual).
When you plug in the TV, the TV may not be able to turn on for a while even if you press the power button on the remote control or the TV.
It takes time to initialize the system. Wait for about one minute, then operate it again.
Troubles and Solutions
When the illumination LED is flashing in red.
- Count how many times it flashes (interval time is three seconds).
Reboot the TV by disconnecting the mains lead until the illumination LED stopped flashing in red, then turn on the TV.
If the problem persists, disconnect the mains lead, and contact your dealer or Sony service centre with the number of times the illumination LED flashes.
Terrestrial/cable service cannot be received.
- Check the antenna (aerial)/cable connection and booster settings.
- Select terrestrial/cable service by pressing TV on the remote control, and then select [Digital] if the broadcasting service is not displayed.
- Terrestrial signal might be suppressed if there is a strong signal supplied nearby. Set [LNA (CH ---)] to [Off] in digital tuning settings.
- After moving to a new house or trying to receive new services, attempt a service search by selecting [Digital tuning].
Satellite service cannot be received.
- Check the satellite cable connection.
- When [No signal. LNB overload detected...] message is displayed, unplug the mains lead. Then, ensure the satellite cable is not damaged and the satellite signal line is not short-circuited in the satellite connector.
The remote control does not function.
- Replace the batteries.
The parental lock for broadcast password has been forgotten.
- Enter 9999 for the PIN code and select [Change PIN code].
The TV surrounds become warm.
- When the TV is used for an extended period, the TV surrounds become warm. You may feel hot when touching there by the hand.
The screen becomes darker while watching TV.
- If the whole image or part of the image remains still, the screen brightness will be gradually reduced to prevent image retention. This is not a malfunction of the TV.
You are concerned about image retention.
If the same image is displayed repeatedly or for long periods of time, image retention may occur. To reduce image retention, we recommend that you turn off the TV normally by pressing the power button on the remote control or the TV.
Note
- Perform Panel refresh manually only when image retention is particularly noticeable. As a reference, perform it only once a year. Avoid performing it more than once a year because it may affect the usable life of the panel.
- Images that include clocks, logos and bright colours (including white) easily cause image retention. Avoid displaying these types of images for long periods of time, otherwise image retention may occur.
A white line appears on the screen.
- Panel refresh automatically runs after the TV has been used for long periods of time to reduce image retention. Panel refresh starts after the TV is turned off and takes about one hour to complete. A white line may be displayed on the screen during the Panel refresh. This is not a malfunction of the TV.
The message [Panel refresh did not finish...] is displayed.
Panel refresh automatically runs after the TV has been used for long periods of time to reduce image retention. If the TV is turned on, the mains lead is unplugged, or the room temperature falls outside of the range between 10 °C and 40 °C during the Panel refresh, the process will not be completed and this message will appear.
- If Panel refresh started automatically, it will restart when you turn off the TV with the remote control.
- If Panel refresh initiated manually, you must select it again.
Specifications
System
Panel system
OLED (Organic Light Emitting Diode) Panel
TV system
Depending on your country/area selection/TV model
Analogue: B/G, D/K, I
Digital: DVB-T/DVB-C DVB-T2 ^*1
PAL/SECAM/NTSC3.58 (Video only)/NTSC4.43 (Video only)
Channel coverage
Depending on your country/area selection/TV model
Analogue: UHF/VHF/Cable
Digital: UHF/VHF/Cable
Satellite ^* ^1 : IF Frequency 950-2,150 MHz
Sound output
20W + 20W + 10W + 10W
Wireless technology
Protocol IEEE802.11ac/a/b/g/n
(IEEE802.11ac may not be available depending on countries/regions.)
Bluetooth Version 4.2
Frequency band(s)
| Wireless LAN (IEEE802.11ac/a/b/g/n) | |
| Frequency range Output Power | |
| 2400 - 2483.5 MHz < 20 | 0.0 dBm |
| 5150 - 5250 MHz < 23 | 0 dBm |
| 5250 - 5350 MHz < 20 | 0 dBm |
| 5470 - 5725 MHz < 20 | 0 dBm |
| 5725 - 5850 MHz < 13 | 9 dBm |
| Bluetooth | |
| Frequency range Output Power | |
| 2400 - 2483.5 MHz < 10.0 dBm |
RMF-TX600E
| Bluetooth | |
| Frequency range Output Power | |
| 2400 - 2483.5 MHz < 10.0 dBm |
Software version
This radio equipment is intended to be used with the approved version(s) of software that are indicated in the EU Declaration of Conformity. Press HELP on the remote control to know the software version.
Remote control: ____.
Select [Remote control] → [Software version] from [Settings]. For more information, refer to the Help Guide.
The software loaded on this radio equipment is verified to comply with the essential requirements of the Directive 2014/53/EU.
Input/Output jacks
Antenna (aerial)/cable
75 ohm external terminal for VHF/UHF
Satellite antenna ^* 1
Female F Type Connector, 75 ohm.
DiSEqC 1.0, LNB 13 V/18 V & 22 kHz tone, Single
Cable Distribution EN50494.
→/→ AV IN
Video/Audio input (mini jack)
HDMI IN 1/2/3/4 (support 4K resolution, HDCP
2.3-compatible)
Video:
4096 × 2160p (50, 60 Hz)*2*3, 4096 × 2160p
(24 Hz)*2, 3840 × 2160p (50, 60 Hz)*3,
3840 × 2160p (24, 25, 30 Hz), 1080p (30, 50,
60, 100, 120 Hz), 1080/24p, 1080i (50, 60 Hz),
720p (30, 50, 60 Hz), 720/24p, 576p, 480p,
PC Formats*4
Audio:
In eARC (Enhanced Audio Return Channel) mode ^*5
Refer to the Help Guide for details.
Except eARC mode
5.1 channel linear PCM: 32/44.1/48/88.2/96/
176.4/192 kHz 16/20/24 bits, Dolby Digital, Dolby Digital Plus, DTS
eARC/ARC (Enhanced Audio Return Channel/
Audio Return Channel) (HDMI IN 3 only)
In eARC mode*5
Refer to the Help Guide for details.
In ARC mode
Two channel linear PCM: 48 kHz 16 bits, Dolby
Digital, Dolby Digital Plus, DTS
→ DIGITAL AUDIO OUT (OPTICAL)
Digital optical jack (Two channel linear PCM:
48 kHz 16 bits, Dolby Digital, DTS)
(Stereo mini jack)
Headphone
1, 2, 3 (HDD REC)* 6
USB device port (3USB HDD device for REC feature)
USB port 1 and 2 support High Speed USB (USB 2.0)
USB port 3 supports Super Speed USB (USB 3.1 Gen 1)

CAM (Conditional Access Module) slot
LAN
10BASE-T/100BASE-TX connector (Depending on the operating environment of the network, connection speed may differ. The communication rate and quality are not guaranteed.)
CENTER SPEAKER IN
Centre speaker input terminal
Others
Optional accessories
Wall-Mount Bracket: SU-WL850
Wall-Mount Bracket: SU-WL450
Operating temperature
0^ C - 40^ C
Operating humidity
10% - 80% RH (non-condensing)
Power, Product Fiche and others
Power requirements
220 V - 240 V AC, 50 Hz
Energy Efficiency Class
KD-77AG9: A
KD-65AG9: B
KD-55AG9: B
Screen size (measured diagonally) (Approx.)
KD-77AG9: 194.7 cm / 77 inches
KD-65AG9: 163.9 cm / 65 inches
KD-55AG9: 138.8 cm / 55 inches
Power consumption
In [Standard] mode
KD-77AG9: 211 W
KD-65AG9: 169 W
KD-55AG9: 132 W
In [Vivid] mode
KD-77AG9: 674 W
KD-65AG9: 490 W
KD-55AG9: 394 W
Annual energy consumption ^7
KD-77AG9: 293 kWh per year
KD-65AG9: 234 kWh per year
KD-55AG9: 183 kWh per year
Standby power consumption ^89
KD-77AG9: 0.50 W (29 W in software/EPG update mode)
KD-65AG9: 0.50 W (27 W in software/EPG update mode)
KD-55AG9: 0.50 W (27 W in software/EPG update mode)
Display resolution
3,840 dots (horizontal) × 2,160 lines (vertical)
Output Rating
USB 1/2
5 V, 500 mA MAX
USB 3
5 V, 900 mA MAX
Dimensions (Approx.) (w × h × d)
with Table-Top Stand
KD-77AG9: 172.1 × 100.1 × 30.2 cm
KD-65AG9: 144.7 × 83.8 × 25.5 cm
KD-55AG9: 122.6 × 71.4 × 25.5 cm
without Table-Top Stand
KD-77AG9: 172.1 × 99.6 × 4.9 cm
KD-65AG9: 144.7 × 83.4 × 4.0 cm
KD-55AG9: 122.6 × 71.0 × 4.0 cm
Mass (Approx.)
with Table-Top Stand
KD-77AG9: 39.7 kg
KD-65AG9: 24.8 kg
KD-55AG9: 22.3 kg
without Table-Top Stand
KD-77AG9: 35.3 kg
KD-65AG9: 21.2 kg
KD-55AG9: 18.7 kg
*1 Not all the TV sets have DVB-T2 or DVB-S/S2 technology or satellite antenna terminal.
*2 When 4096 × 2160p is input and [Wide mode] is set to [Normal], the resolution is displayed as 3840 × 2160p. To display 4096 × 2160p, set [Wide mode] setting to [Full 1] or [Full 2].
*3 To support 18 Gbps, set [HDMI signal format] to [Enhanced format].
*4 Refer to the Help Guide for details.
*5 eARC mode is active when [eARC mode] is set to [Auto], [Speakers] is set to [Audio system] and eARC compatible audio system is connected.
*6 Only on limited region/country/TV model.
*7 Energy consumption in kWh per year, based on the power consumption of the television operating 4 hours per day for 365 days. The actual energy consumption will depend on how the television is used.
*8 Specified standby power is reached after the TV finishes necessary internal processes.
*9 Standby power consumption will increase when your TV is connected to the network.
Note
- Do not remove the dummy card or cover (availability depends on TV model) from TV CAM (Conditional Access Module) slot other than to insert a smart card fitted in CAM.
- Optional accessories availability depends on countries/region/TV model/stock.
- Design and specifications are subject to change without notice.
Notes on Digital TV function
- Digital TV (DVB terrestrial, satellite and cable), interactive services and network functions may not be available in all countries or areas. Some functions might not be enabled or might not operate correctly with some providers and network environments. Some TV service providers may charge a fee for their services.
- This TV supports digital broadcasting using MPEG-2, H.264/MPEG-4 AVC and H.265/HEVC codecs, but compatibility with all operator/service signals, which may change over time, cannot be guaranteed.
Trademark Information
- The terms HDMI and HDMI High-Definition Multimedia Interface, and the HDMI Logo are trademarks or registered trademarks of HDMI Licensing Administrator, Inc. in the United States and other countries.
- Dolby, Dolby Vision, Dolby Audio, and the double-D symbol are trademarks of Dolby Laboratories. Manufactured under license from Dolby Laboratories. Confidential unpublished works. Copyright ©1992-2015 Dolby Laboratories. All rights reserved.
- "B R A VIBRA" and BRAVIA Sync are trademarks or registered marks of Sony Corporation.
- Gracenote, the Gracenote logo and logotype, "Powered by Gracenote" logo are either registered trademarks or trademarks of Gracenote, Inc. in the United States and/or other countries.
- Vewd® Core. Copyright 1995-2019 Vewd Software AS. All rights reserved.
- Google, Google Play, Chromecast, YouTube, Android TV and other related marks and logos are trademarks of Google LLC.
-
Wi-Fi®, Wi-Fi Alliance® and Wi-Fi Direct® are registered trademarks of Wi-Fi Alliance.
-
The Wi-Fi CERTIFIED™ Logo is a certification mark of Wi-Fi Alliance.
- For DTS patents, see http://patents.dts.com. Manufactured under license from DTS, Inc. DTS, the Symbol, & DTS and the Symbol together are registered trademarks, and DTS Digital Surround is a trademark of DTS, Inc. © DTS, Inc. All Rights Reserved.
- The Bluetooth® word mark and logos are registered trademarks owned by the Bluetooth SIG, Inc. and any use of such marks by Sony Corporation is under license. Other trademarks and trade names are those of their respective owners.
- Netflix is a registered trademark of Netflix, Inc.
- DiSEqC™ is a trademark of EUTELSAT. This TV supports DiSEqC 1.0. This TV is not intended for controlling motorized antennas.
- TUXERA is a registered trademark of Tuxera Inc. in the US and other countries.
- USB-IF SuperSpeed USB Trident logo is a registered trademark of USB Implementers Forum, Inc. SS
- All other trademarks are the property of their respective owners.
- The Wi-Fi CERTIFIED™ Logo is a certification mark of Wi-Fi Alliance.
- For DTS patents, see http://patents.dts.com. Manufactured under license from DTS, Inc. DTS, the Symbol, & DTS and the Symbol together are registered trademarks, and DTS Digital Surround is a trademark of DTS, Inc. © DTS, Inc. All Rights Reserved.
- The Bluetooth® word mark and logos are registered trademarks owned by the Bluetooth SIG, Inc. and any use of such marks by Sony Corporation is under license. Other trademarks and trade names are those of their respective owners.
- Netflix is a registered trademark of Netflix, Inc.
- DiSEqC™ is a trademark of EUTELSAT. This TV supports DiSEqC 1.0. This TV is not intended for controlling motorized antennas.
- TUXERA is a registered trademark of Tuxera Inc. in the US and other countries.
- USB-IF SuperSpeed USB Trident logo is a registered trademark of USB Implementers Forum, Inc. SS
- All other trademarks are the property of their respective owners.
natural_image
Isometric diagram of a rectangular electronic component with internal channels and mounting holes, no text or symbols present.20 W + 20 W + 10 W + 10 W
Technologie sans fil
Protocole IEEE802.11ac/a/b/g/n
3840 × 2160p (24, 25, 30 Hz), 1080p (30, 50,
60, 100, 120 Hz), 1080/24p, 1080i (50, 60 Hz),
720p (30, 50, 60 Hz), 720/24p, 576p, 480p, Formats PC ^*4
Audio :
En mode eARC (Enhanced Audio Return
Channel)*5
eARC/ARC (Enhanced Audio Return Channel/
Audio Return Channel) (HDMI IN 3 uniquement)
En mode eARC*5
→ DIGITAL AUDIO OUT (OPTICAL)
10% - 80% HR (sans condensation)
Dimensions (approx.) (I × h × p)
natural_image
Technical line drawing of a rectangular electronic component with internal channels and mounting holes (no text or symbols)- HDM I IN 3 eARC/ARC (Enhanced Audio Return Channel/Audio Return Channel)
Digital: UHF/VHF/Cable
Satélite ^*1 : Frecuencia IF 950-2 150 MHz
Salida de sonido
20W + 20W + 10W + 10W
(24 Hz)*2, 3840 × 2160p (50, 60 Hz)*3,
3840 × 2160p (24, 25, 30 Hz), 1080p (30, 50,
60, 100, 120 Hz), 1080/24p, 1080i (50, 60 Hz),
720p (30, 50, 60 Hz), 720/24p, 576p, 480p,
Formatos de PC*4
Audio:
En el modo eARC (Enhanced Audio Return
Channel)*5
eARC/ARC (Enhanced Audio Return Channel/
→ DIGITAL AUDIO OUT (OPTICAL)
Toma digital óptica (PCM lineal de dos canales:
48 kHz 16 bits, Dolby Digital, DTS)
Dimensiones (Aprox.) (an × al × prf)
Specifications....14
— Wandmontagesteun SU-WL450
natural_image
Pure technical diagram of a rectangular component with internal channels and mounting holes, no text or symbols present.- HDM I IN 3 eARC/ARC (Enhanced Audio Return Channel/Audio Return Channel)
20 W + 20 W + 10 W + 10 W
Draadloze technologie
Protocol IEEE802.11ac/a/b/g/n
(24 Hz)*2, 3840 × 2160p (50, 60 Hz)*3,
3840 × 2160p (24, 25, 30 Hz), 1080p (30, 50,
60, 100, 120 Hz), 1080/24p, 1080i (50, 60 Hz),
720p (30, 50, 60 Hz), 720/24p, 576p, 480p,
Pc-formaten*4
Audio:
In eARC (Enhanced Audio Return Channel)-modus ^*5
eARC/ARC (Enhanced Audio Return Channel/
Audio Return Channel) (alleen HDMI IN 3) In eARC-modus ^*5
Tweekanaals lineaire PCM: 48 kHz 16 bits, Dolby
Digital, Dolby Digital Plus, DTS
→ DIGITAL AUDIO OUT (OPTICAL)
natural_image
Simple line drawing of a rectangular frame with hands and a prohibition symbol above (no text or labels)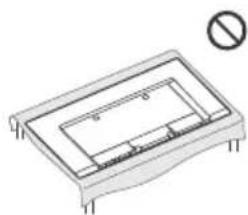
natural_image
Pure technical diagram of a rectangular component with internal channels and mounting holes, no text or symbols present.OLED (Organic Light Emitting Diode)-Panel
Fernsehnorm
(24 Hz)*2, 3840 × 2160p (50, 60 Hz)*3,
3840 × 2160p (24, 25, 30 Hz), 1080p (30, 50,
60, 100, 120 Hz), 1080/24p, 1080i (50, 60 Hz),
720p (30, 50, 60 Hz), 720/24p, 576p, 480p,
Computerformate*4
Audio:
Im eARC (Enhanced Audio Return Channel)-Modus ^4
eARC/ARC (Enhanced Audio Return Channel/
→ DIGITAL AUDIO OUT (OPTICAL)
natural_image
Technical line drawing of a rectangular electronic component with internal channels and mounting holes (no text or symbols)
20 W + 20 W + 10 W + 10 W
Tecnologia sem fios
Protocolo IEEE802.11ac/a/b/g/n
(24 Hz)*2, 3840 × 2160p (50, 60 Hz)*3,
3840 × 2160p (24, 25, 30 Hz), 1080p (30, 50,
60, 100, 120 Hz), 1080/24p, 1080i (50, 60 Hz),
720p (30, 50, 60 Hz), 720/24p, 576p, 480p,
Formatos PC*4
Áudio:
No modo eARC (Enhanced Audio Return
Channel)*5
→ DIGITAL AUDIO OUT (OPTICAL)
natural_image
Isometric diagram of a rectangular electronic component with internal structure and mounting holes, no text or symbols present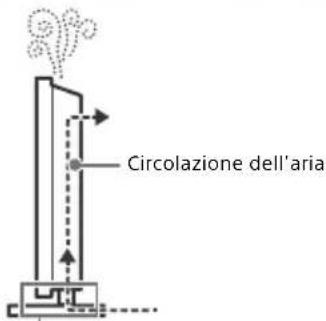
3840 × 2160p (24, 25, 30 Hz), 1080p (30, 50,
60, 100, 120 Hz), 1080/24p, 1080i (50, 60 Hz),
720p (30, 50, 60 Hz), 720/24p, 576p, 480p,
Formati PC* 4
Audio:
eARC/ARC (Enhanced Audio Return Channel/
Audio Return Channel) (Solo HDMI IN 3)
→ DIGITAL AUDIO OUT (OPTICAL)
1, 2, 3 (HDD REC)* 6
20 W + 20 W + 10 W + 10 W
Trådlös teknik
Protokoll IEEE802.11ac/a/b/g/n
(24 Hz)*2, 3840 × 2160p (50, 60 Hz)*3,
3840 × 2160p (24, 25, 30 Hz), 1080p (30, 50,
60, 100, 120 Hz), 1080/24p, 1080i (50, 60 Hz),
720p (30, 50, 60 Hz), 720/24p, 576p, 480p,
PC-format*4
Ljud:
I eARC (Enhanced Audio Return Channel)-läge* 5
eARC/ARC (Enhanced Audio Return Channel/
Audio Return Channel) (Endast HDMI IN 3)
I eARC-läge* 5
→ DIGITAL AUDIO OUT (OPTICAL)
- Vewd® Core. Copyright 1995-2019 Vewd Software AS. All rights reserved.
natural_image
Diagram of a rectangular frame with hands and a prohibition symbol above (no text or labels)natural_image
Technical line drawing of a rectangular electronic component with internal channels and mounting holes (no text or symbols)20 W + 20 W + 10 W + 10 W
Trådløs teknologi
Protokol IEEE802.11ac/a/b/g/n
eARC/ARC (Enhanced Audio Return Channel/
Audio Return Channel) (kun HDMI IN 3)
I eARC-tilstand ^4
→ DIGITAL AUDIO OUT (OPTICAL)
Digitalt optisk stik (to-kanals lineær PCM:
48 kHz 16 bit, Dolby Digital, DTS)
○ (Mini-stereostik)
Hovedtelefoner
1, 2, 3 (HDD REC)\*
6
I [Standard] tilstand
KD-77AG9: 211 W
KD-65AG9: 169 W
KD-55AG9: 132 W
I [Kraftig] tilstand
KD-77AG9: 674 W
KD-65AG9: 490 W
KD-55AG9: 394 W
KD-65AG9: 0,50 W (27 W i software-/
EPGopdateringstilstand)
KD-55AG9: 0,50 W (27 W i software-/
EPGopdateringstilstand)
Skærmopløsning
- Vewd® Core. Copyright 1995-2019 Vewd Software AS. All rights reserved.
natural_image
Technical line drawing of a rectangular electronic component with internal channels and mounting holes (no text or symbols)20 W + 20 W + 10 W + 10 W
Langaton teknologia
Protokolla IEEE802.11ac/a/b/g/n
eARC/ARC (Enhanced Audio Return Channel/
Audio Return Channel) (Vain HDMI IN 3) eARC-tilassa ^4
→ DIGITAL AUDIO OUT (OPTICAL)
1, 2, 3 (HDD REC)* 6
natural_image
Technical line drawing of a rectangular electronic component with internal channels and mounting feet, no text or symbols present.Vis TV-ens home-meny.
5 ∠ +/- (Volum)
Juster lydstyrken.
(Hopp)
(Teksting-innstilling)
20 W + 20 W + 10 W + 10 W
Trådløs teknologi
Protokoll IEEE802.11ac/a/b/g/n
(24 Hz)*2, 3840 × 2160p (50, 60 Hz)*3,
3840 × 2160p (24, 25, 30 Hz), 1080p (30, 50,
60, 100, 120 Hz), 1080/24p, 1080i (50, 60 Hz),
720p (30, 50, 60 Hz), 720/24p, 576p, 480p, PC-formater ^4
Lyd:
I eARC (Enhanced Audio Return Channel)-modus ^4
eARC/ARC (Enhanced Audio Return Channel/
Audio Return Channel) (Kun HDMI IN 3)
I eARC-modus*5
→ DIGITAL AUDIO OUT (OPTICAL)
Digital optisk kontakt (tokanals lineær PCM: 48 kHz 16 biter, Dolby Digital, DTS)
(stereo mini-kontakt)
Hodetelefoner
1, 2, 3 (HOD REC)\* 6
natural_image
Technical line drawing of a rectangular electronic component with internal channels and mounting feet, no text or symbols present.• HDM I IN 3 eARC/ARC (Enhanced Audio Return Channel/Audio Return Channel)
Panel OLED (Organic Light Emitting Diode)
System TV
(24 Hz)*2, 3840 × 2160p (50, 60 Hz)*3,
3840 × 2160p (24, 25, 30 Hz), 1080p (30, 50,
60, 100, 120 Hz), 1080/24p, 1080i (50, 60 Hz),
720p (30, 50, 60 Hz), 720/24p, 576p, 480p,
W trybie eARC (Enhanced Audio Return
Channel)*5
eARC/ARC (Enhanced Audio Return Channel/
Audio Return Channel) (tylko model HDMI IN 3)
W trybie eARC ^*5
→ DIGITAL AUDIO OUT (OPTICAL)
1, 2, 3 (HDD REC)* 6
natural_image
Pure technical diagram of a rectangular component with internal channels and mounting holes, no text or symbols present.20 W + 20 W + 10 W + 10 W
(24 Hz)*2, 3840 × 2160p (50, 60 Hz)*3,
3840 × 2160p (24, 25, 30 Hz), 1080p (30, 50,
60, 100, 120 Hz), 1080/24p, 1080i (50, 60 Hz),
720p (30, 50, 60 Hz), 720/24p, 576p, 480p, PC formáty*4
Audio:
V režimu eARC (Enhanced Audio Return Channel)*5
→ DIGITAL AUDIO OUT (OPTICAL)
natural_image
Technical line drawing of a rectangular electronic component with internal channels and mounting holes (no text or symbols)Panel OLED (Organic Light Emitting Diode)
20 W + 20 W + 10 W + 10 W
eARC/ARC (Enhanced Audio Return Channel/
Audio Return Channel) (Len model HDMI IN 3)
→ DIGITAL AUDIO OUT (OPTICAL)
natural_image
Diagram of a mechanical component with hands and a prohibition symbol (no text or labels)
natural_image
Technical line drawing of a rectangular electronic component with mounting holes and a prohibition symbol (no text or labels)20 W + 20 W + 10 W + 10 W
(24 Hz)*2, 3840 × 2160p (50, 60 Hz)*3,
3840 × 2160p (24, 25, 30 Hz), 1080p (30, 50,
60, 100, 120 Hz), 1080/24p, 1080i (50, 60 Hz),
720p (30, 50, 60 Hz), 720/24p, 576p, 480p,
PC formátumok*4
Hang:
eARC (Enhanced Audio Return Channel)
üzemmodban*5
→ DIGITAL AUDIO OUT (OPTICAL)
INFORMATIE IMPORTANTĂ ....2
INFORMATIE IMPORTANTĂ
Observatie cu privire la echipamentul radio

natural_image
Technical line drawing of a rectangular electronic component with internal channels and mounting holes, no text or symbols present.Analogic: B/G, D/K, I
Digital: DVB-T/DVB-C DVB-T2 ^*1
Analogic: UHF/VHF/Cablu
Digital: UHF/VHF/Cablu
Satelit*1: Frecvență IF 950 - 2.150 MHz
leşire audio
20W + 20W + 10W + 10W
Tehnologie wireless
Protocol IEEE802.11ac/a/b/g/n
eARC/ARC (Enhanced Audio Return Channel/
Audio Return Channel) (Numai HDMI IN 3)
În modul eARC*5
→ DIGITAL AUDIO OUT (OPTICAL)
1, 2, 3 (HDD REC)* 6
natural_image
Technical line drawing of a rectangular electronic component with internal channels and mounting feet (no text or symbols)20 W + 20 W + 10 W + 10 W
Безжична технология
IEEE802.11ac/a/b/g/n протокол
3840 × 2160p (24, 25, 30 Hz), 1080p (30, 50,
60, 100, 120 Hz), 1080/24p, 1080i (50, 60 Hz),
720p (30, 50, 60 Hz), 720/24p, 576p, 480p,
PC формати* 4
Аудио:
В режим eARC (Enhanced Audio Return
Channel)*5
eARC/ARC (Enhanced Audio Return Channel/Audio Return Channel) (camo HDMI IN 3)
В режим eARC*5
→ DIGITAL AUDIO OUT (OPTICAL)
Цифров оптичен жак (Двуканален линеен PCM: 48 kHz 16 бита, Dolby Digital, DTS)
○ (Стерео мини жак)
Слушалки
1, 2, 3 (HDD REC)\* 6
natural_image
Technical line drawing of a rectangular electronic component with internal channels and mounting feet (no text or symbols)20 W + 20 W + 10 W + 10 W
Ασύρματη τεχνολογία
Прωτόκολλο IEEE802.11ac/a/b/g/n
3840 × 2160p (24, 25, 30 Hz), 1080p (30, 50,
60, 100, 120 Hz), 1080/24p, 1080i (50, 60 Hz),
720p (30, 50, 60 Hz), 720/24p, 576p, 480p,
→ DIGITAL AUDIO OUT (OPTICAL)
Sony Visual Products Inc., KD-77AG9,
KD-65AG9, KD-55AG9 radyo ekipmani
natural_image
Technical diagram of a rectangular electronic component with internal channels and mounting holes, no text or symbols present.Dijital: UHF/VHF/Kablolu
20 W + 20 W + 10 W + 10 W
(24 Hz)*2, 3840 × 2160p (50, 60 Hz)*3,
3840 × 2160p (24, 25, 30 Hz), 1080p (30, 50,
60, 100, 120 Hz), 1080/24p, 1080i (50, 60 Hz),
720p (30, 50, 60 Hz), 720/24p, 576p, 480p, PC Formatlari*4
Ses:
eARC (Enhanced Audio Return Channel) modunda ^45
eARC/ARC (Enhanced Audio Return Channel/
Audio Return Channel) (sadece HDMI IN 3) eARC modunda ^*5
→ DIGITAL AUDIO OUT (OPTICAL)
- Vewd® Core. Copyright 1995-2019 Vewd Software AS. All rights reserved.
- BRAVIA
- Table of Contents
- Internet Connection and Data Privacy
- Introduction
- Note
- Help
- Help Guide (Manual)
- Location of the identification label
- IMPORTANT NOTICE
- Notice for Radio Equipment
- Safety Information
- Installation/Set-up
- Installation
- Transporting
- Topple prevention
- Ventilation
- Installed on the wall
- Installed with stand
- Protecting the TV Screen (OLED TV)
- Precautions to Protect the Screen from Damage
- Image retention
- The following are examples of images that may cause image retention:
- To reduce the risk of image retention:
- Panel refresh
- Pixel shift
- Other feature
- Parts and Controls
- Controls and Indicators
- Using Remote Control
- Remote Control Parts Description
- (Microphone)
- ▲/▼/◄/►/⊕ (Navigation D-Pad)
- TV
- GUIDE/
- REC LIST
- → (Input select)
- (Qquick settings)
- BACK/←
- HOME
- ∠ +/- (Volume)
- (Jump)
- Mute
- Hint
- CH +/−/▲/▼
- AUDIO
- (Subtitle setting)
- ◀/▶/▶/||
- ● REC
- EXIT
- Connection Diagram
- CENTER SPEAKER IN
- CAM (Conditional Access Module)
- → /→ AV IN
- (Headphone)
- USB 1/2, USB3 (HDD REC)\*
- HDMI IN 1/2/3/4
- (RF input), (Satellite input)
- Installing the TV to the Wall
- Using the optional Wall-Mount Bracket (SU-WL850 or SU-WL450)
- To Customers:
- To Sony Dealers and Contractors:
- Wall-Mount Bracket Installation Information
- Preparing for Wall-Mount Installation
- Troubleshooting
- Troubles and Solutions
- When the illumination LED is flashing in red.
- Terrestrial/cable service cannot be received.
- Satellite service cannot be received.
- The remote control does not function.
- The parental lock for broadcast password has been forgotten.
- The TV surrounds become warm.
- The screen becomes darker while watching TV.
- You are concerned about image retention.
- A white line appears on the screen.
- The message [Panel refresh did not finish...] is displayed.
- Specifications
- System
- Software version
- Input/Output jacks
- Others
- Power, Product Fiche and others
- Dimensions (Approx.) (w × h × d)
- Mass (Approx.)
- Notes on Digital TV function
- Trademark Information
- → DIGITAL AUDIO OUT (OPTICAL)
- Dimensions (approx.) (I × h × p)
- - HDM I IN 3 eARC/ARC (Enhanced Audio Return Channel/Audio Return Channel)
- Dimensiones (Aprox.) (an × al × prf)
- ○ (Mini-stereostik)
- 1, 2, 3 (HDD REC)\*
- ∠ +/- (Volum)
- (Hopp)
- (Teksting-innstilling)
- eARC/ARC (Enhanced Audio Return Channel/
- Audio Return Channel) (Kun HDMI IN 3)
- (stereo mini-kontakt)
- 1, 2, 3 (HOD REC)\* 6
- • HDM I IN 3 eARC/ARC (Enhanced Audio Return Channel/Audio Return Channel)
- Audio Return Channel) (Len model HDMI IN 3)
- INFORMATIE IMPORTANTĂ
- Observatie cu privire la echipamentul radio
- ○ (Стерео мини жак)
- 1, 2, 3 (HDD REC)\* 6
Brand : SONY
Model : KD77AG9BU
Category : TV