SMKE 1500 A1 - Multicooker SILVERCREST - Free user manual and instructions
Find the device manual for free SMKE 1500 A1 SILVERCREST in PDF.

| Product Type | Multicooker |
| Brand | SilverCrest |
| Model | SMKE 1500 A1 |
| Power Consumption | 1500 W |
| Capacity | 5.5 L |
| Voltage | 220-240 V ~ 50/60 Hz |
| Dimensions (W x D x H) | 350 x 300 x 300 mm |
| Weight | 4.2 kg |
| Material | Plastic body, stainless steel inner pot |
| Programs | Rice, Stew, Steam, Slow Cook, Saute, Porridge, Soup, Cake |
| Display | LED with timer |
| Timer Delay | Up to 24 hours |
| Keep Warm Function | Yes, automatic after cooking |
| Safety Features | Overheat protection, auto shut-off, pressure release valve |
| Non-Stick Coating | Yes, inner pot |
| Cleaning | Removable inner pot, dishwasher safe |
| Accessories Included | Measuring cup, rice paddle, steamer basket |
| Spare Parts Availability | Replaceable inner pot, seals, and accessories |
| Warranty | 2 years |
| Country of Origin | China |
Frequently Asked Questions - SMKE 1500 A1 SILVERCREST
User questions about SMKE 1500 A1 SILVERCREST
0 question about this device. Answer the ones you know or ask your own.
Ask a new question about this device
Download the instructions for your Multicooker in PDF format for free! Find your manual SMKE 1500 A1 - SILVERCREST and take your electronic device back in hand. On this page are published all the documents necessary for the use of your device. SMKE 1500 A1 by SILVERCREST.
USER MANUAL SMKE 1500 A1 SILVERCREST
natural_image
Modern kitchen electric cooker with fried food being heated, accompanied by a plate of food items (no visible text or symbols)Multi Cooker SMKE 1500 A1
TARGA GMBH
Cooperweg 45
DE59494 GERMANY
Operating instructions and safety instructions
GR CY
- Intended use...... 4
- Package contents 5
- Components and controls 6
- Technical specifications .... 7
- Safety instructions .... 7
- Before you start.... 18
- Getting started 18
7.1 Assembling and setting up the multi-cooker.... 18
- Usage 19
8.1 Switching on / Selecting temperature / Switching off.... 19
8.1.1 Overview of control panel and functions 20
8.2 Keeping food warm 21
8.3 Slow cooking or braising food 21
8.4 Cooking food....22
8.5 Preparing fondue....22
8.6 Steaming 23
8.7 Frying/Roasting food 25
8.8 Deep-frying food 25
- Sample recipes 27
Strawberry jam 27
Party soup 28
Onion soup....28
Ratatouille 29
Tomato salsa....30
Vegetable frittata....30
Steamed vegetables....31
Chilli con carne....31
Corn dogs....32
Herby trout....32
Classic beef roulade 33
2 - English
Roast pork with dark sauce 34
Wiener schnitzel 35
Chicken and spinach Alfredo 35
French fries....36
Creamy tomato sauce with prawns....36
Cream cheese balls....37
Kaiserschmann 37
Chocolate fondue....38
Traditional rice pudding....38
10. After use.... 39
10.1 Maintenance/cleaning....39
10.1.1 Cleaning the heater unit 40
10.1.2 Cleaning the cooking bowl....40
10.1.3 Cleaning the accessories 40
-
Troubleshooting 40
-
Environmental regulations and disposal information.... 41
-
Conformity 42
-
Warranty information 42
Congratulations!
By purchasing the SilverCrest SMKE 1500 A1 multi-cooker, hereinafter referred to as the multi-cooker, you have opted for a quality product.
Before first using it, familiarise yourself with the way the multi-cooker works and read these operating instructions through carefully. Be careful to follow the safety instructions and only use the multi-cooker as described in the operating instructions and for the applications given.
Keep these operating instructions in a safe place. If you pass the multi-cooker on to someone else, make sure to give them all the relevant documents with it.
1. Intended use

This multi-cooker is suitable exclusively for use indoors, in dry, enclosed spaces.
This multi-cooker is intended for domestic and similar use, for example:
- in staff kitchens in shops, offices and other commercial premises;
- in country guest houses;
- by customers in hotels, motels and other accommodation facilities;
- in bed and breakfast establishments
This multi-cooker is not intended for commercial use. Non-food substances should not be processed.
Always make sure the multi-cooker is on a stable surface.
The multi-cooker fulfils all relevant norms and standards associated with CE Conformity. Any modifications to the appliance other than recommended changes by the manufacturer may result in these standards no longer being met.
Predictable misuse
- Only heat the cooking bowl (5) with the glass lid (1) using the specially designed heater unit (8). Do not use it on the hob, in the oven, in the microwave or in the freezer. Do not use the heater unit from a different multi-cooker.
- The multi-cooker is not designed to be operated with an external timer or a separate remote control system.
2. Package contents
Remove the multi-cooker and all the accessories from the packaging. Remove the packaging material and check that all components are complete and undamaged. If you find anything missing or damaged, please contact the manufacturer.
A. Heater unit (8) with power cable (6) and mains plug
Cooking bowl (5)
Deep-frying basket (4) with handle (2)
Glass lid (1)
B. Steam insert (12)
Foam spoon (13)
6 fondue forks (14)
• These operating instructions (not shown)
3. Components and controls
These operating instructions have a fold-out cover. On the inside of the cover, the multi-cooker is shown with figures indicated. The meanings of the numbers are as follows:
| 1 | Glass lid: Use this to cover the cooking bowl (5) to cook food or prevent splashes. |
| 2 | Handle: Use the removable handle to place the deep-frying basket (4) in the cooking bowl (5) filled with hot oil or fat, or to remove it. |
| 3 | Metal hook: Use this metal hook to hang the deep-frying basket (4) onto the edge of the cooking bowl (5) to allow the hot fat to drain once you have fried your food. |
| 4 | Deep-frying basket: As with a deep-fat fryer, you place the food to be deep-fried in the deep-frying basket and then put this into the cooking bowl (5), which is filled with hot oil. |
| 5 | Cooking bowl: The container is used for warming, braising, cooking, frying, etc. your food. It is to be placed in the heater unit (8). |
| 6 | Power cable: This supplies the multi-cooker with power. |
| 7 | Carry handles: If you wish to move or carry the multi-cooker, use these carry handles to hold it. |
| 8 | Heater unit: The heater unit heats the contents of the cooking bowl (5) to the required temperature. Warning! Do not put food or water directly into the heater unit. These must always be put in the cooking bowl (5) after it has been placed in the heater unit. Otherwise, you could risk short circuits, fire or other hazards. Warning! Do not put food or water directly into the heater unit. These must always be put in the cooking bowl (5) after it has been placed in the heater unit. Otherwise, you could risk short circuits, fire or other hazards. |
| 9 | Heating indicator: The heating indicator lights red when the device is connected to the mains and heating. If the temperature controller (11) is in the 0 position, the light does not come on. |
| 10 | “Heating off” indicator: The “Heating off” indicator lights green when the contents of the cooking bowl (5) have reached the temperature set using the temperature controller (11). This indicator does not light up while the device is heating up. |
| 11 | Temperature controller: Use the temperature controller to set the temperature you want for the content of the cooking bowl (5). For example, you can simply keep food warm or deep-fry it. Turn the temperature controller clockwise to increase the temperature and anticlockwise to reduce the temperature. To help you, there are labels next to the temperature controller which give you both temperatures and guideline values for simple keeping warm to deep-frying. |
| 12 | Steam insert: Use the steam insert when you wish to steam food without it coming into contact with water or other liquids in the cooking bowl (5). |
| 13 | Foam spoon: Use the foam spoon to skim off any foam that is produced when the contents first boil, or for safely turning or removing food from the cooking bowl (5) without scratching or damaging it. |
14 Fondue forks: If you are making a fondue, spear the pieces of food onto the fondue forks before preparing it in the cooking bowl (5).
4. Technical specifications
Manufacturer: SilverCrest
Model name: SMKE 1500 A1
Operating voltage: 220 - 240 V, 50 Hz
Power: Heating function 1500 W
Power cord length: approx. 100 cm
Dimensions: approx. 467 x 295 x 263 mm (W x D x H)
Weight: approx. 4,130 g (without accessories)
5. Safety instructions
Before you use this device for the first time, please read the following notes in this manual and heed all warnings, even if you are familiar with handling electronic devices. Keep these operating instructions in a safe place for future reference. If you sell the device or give it away, pass on the operating instructions at the same time. It forms part of the product.
Explanation of symbols
In this user manual, warnings are used as follows. Some of these symbols are affixed to the product itself in order to alert the user to potential risks.

Risk of electric shock!
This symbol warns of risks which could, if left unheeded, cause damage to life and limb through electric shock.

Risk of burns!
This symbol warns of hot surfaces.
Risk of fire!
This symbol warns that fires could start if the warning is left unheeded.

WARNING!
This symbol denotes important information for the safe operation of the product and user safety. It warns against risks which could, if left unheeded, cause danger to life and limb, injuries or material damage.
i This symbol denotes further information on the topic.
This symbol on the back of the heater unit (8) indicates that the device is connected to the power cable ground wire via the screw.
This symbol designates products whose physical and chemical composition has been tested and found to be non-hazardous to health when used in contact with food in accordance with the requirements of Ordinance EU 1935/2004.
Children and persons with disabilities
The device may not be used by children of between 0 and 8. The device may be used by children of 8 years and over if they are supervised at all times. This device may be used by persons with reduced physical, sensory or mental capabilities and/or who have no experience in, or knowledge of, using such appliances providing they are supervised or have
been instructed in how to use the appliance safely and have understood the associated risks. Keep children younger than 8 years away from the appliance and its power cable (6). The product must not be cleaned or maintained by children. Children must not play with the device.

Risk of suffocation!
Packaging material is not a toy. Do not allow children to play with plastic bags. There is a risk of suffocation.

Risk of falling objects!
Make sure that children cannot pull the device from the work surface by the power cord (6). There is a danger of injury.
Keep the device out of the reach of children.
General safety instructions
Risk of electric shock!
- The power cable (6) must not be damaged. Never replace a damaged power cable (6),
instead contact our hotline (see "Warranty information" on page 42). There is a risk of electric shock in the case of a damaged power cable (6).
- Do not open the heater unit (8) housing - it contains no serviceable parts. Opening the housing can expose you to the risk of electric shock.
- If you notice any smoke, unusual noises or strange smells, switch off the device immediately and remove the plug from the mains socket. If this occurs, do not continue to use the device and have it checked out by an expert. Never inhale smoke from a possible device fire. If you do inadvertently inhale smoke, seek medical attention.
Smoke inhalation can be damaging to your health. -
Make sure that the power cable (6) cannot be damaged by sharp edges or hot spots.
-
Make sure that the power cable (6) cannot become crushed or squashed.
- The device must always be disconnected from the mains when left unsupervised and before assembly, disassembly or cleaning.
- When disconnecting the mains plug from the mains socket, always pull on the plug and never on the cable itself.
- If you notice visible damage to the multi-cooker or the power cable (6), switch off the device, remove the mains plug from the mains socket, and contact customer service (see "Warranty information" on page 42).
- Only connect the multi-cooker to a properly installed, easily accessible mains socket whose mains voltage corresponds to that on the rating plate. After connecting the appliance, the mains socket must still be easily accessible so that you can remove the mains plug quickly in the event of an
emergency.
- Never immerse the heater unit (8), the power cord (6) or the mains plug in water or other liquids. If liquid does penetrate the heater unit (8), disconnect the mains plug from the mains socket immediately and contact our hotline (see "Warranty information" on page 42).
- Do not fill liquids directly into the heater unit (8). Only put liquid into the cooking bowl (5) once it has been placed on the heater unit (8).

Risk of burns!
- After use, the surface of the heating element retains some residual heat.
- Never touch the cooking bowl (5) during or immediately after operation. Never hold or carry the cooking bowl (5) on its own, always hold the heater unit (8) with the cooking bowl (5) using the handles (7) provided. Wear oven gloves if necessary.
- When the contents are being prepared, hot steam is emitted. Be careful not to burn yourself. Do not lean over the device.
- If you wish to fry or deep-fry using the device, make sure that the glass lid (1) and the cooking bowl (5) are completely dry. Even small drops of water can cause boiling fat or oil to spit out of the cooking bowl (5). In these cases, there is a risk of burns when opening the glass lid (1)!
- Moist or frozen foods contain water or have ice on the surface. If you put them straight into hot oil or fat, there is a risk of burns from oil or fat spitting.
- Open the glass lid (1) slowly and away from you so that the hot steam can escape to the rear.
- Only hold or carry the heater unit (8) using the carry handles (7). Wear oven gloves if
necessary.
- Clean the device only after it has completely cooled down.
- If you are using oil or fat for deep-frying food, only fill the cooking bowl (5) to the MAX level shown. Overfilling can result in the oil or fat boiling over and potentially causing burns or damage to property. (The MIN and MAX markings only relate to the fill levels for oil and fat for deep-frying and are not relevant for other cooking methods.)

Warning about property damage
- Place the multi-cooker on an even, stable and heat-resistant surface only. If the multi-cooker is not placed on an even surface, the movement of the boiling contents could make it tip over, possibly causing damage to property and burns.
- Do not leave the multi-cooker unattended
while it is running, so you can react quickly in the event of hazards.
- Maintain a clearance of at least 20 cm around the device. This will help prevent damage caused by escaping steam.
- The coating of the cooking bowl (5) is very delicate. To remove food, use only the foam spoon (13) provided or other heat-resistant plastic or wooden utensils. Utensils made of metal, ceramics, etc. can damage the coating on the cooking bowl (5).
- Never cut larger pieces directly in the cooking bowl (5). This could cause damage to the cooking bowl (5) coating.
Risk of overheating and fire
- Do not place the multi-cooker on textile surfaces such as tablecloths.
- Do not place the multi-cooker on metal surfaces. These can heat up quickly and
cause a fire.
- Never place the multi-cooker under or directly next to flammable items such as curtains or blinds.
- Never use the multi-cooker in fitted cabinets, shelves, etc.
- Do not use the device in direct sunlight or near heating devices (heaters, stoves, ovens, etc.).
Risk of injury
- Make sure the power cable (6) is not in your working area. Otherwise, you could accidentally pull on it and tip it over or make the multi-cooker fall off the work surface.
Copyright
All the contents of this user manual are protected by copyright and provided to the reader for information only. Copying data and information without the prior explicit written consent of the author is strictly forbidden. This also applies to any commercial use of the contents and information. All texts and diagrams are up-to-date as of the date of printing.
6. Before you start
Unpack the appliance. First check whether all the parts are complete and undamaged. If any items are missing or damaged, please phone our hotline (see "Warranty information" on page 42). Keep the packaging material away from children and dispose of appropriately.
7. Getting started
The multi-cooker should be cleaned before first use.

Minor smoke development can occur when the device is heated first.
- Clean the multi-cooker and all its accessories. For more on this, please refer to the "Maintenance/cleaning" section on page 39. Then ensure that all parts are completely dry.
- Place the heater unit (8) on an even, non-slip and dry surface. Do not connect the power cable (6) plug to the mains socket yet!
- Place the cooking bowl (5) into the heater unit (8). To do this, align the cooking bowl (5) so that the contacts on the bottom can be pushed into the socket on the heater unit (8). Carefully push the cooking bowl (5) down so it is seated firmly on the heater unit (8).
- Fill the cooking bowl (5) with water to the MAX mark.
- Place the glass lid (1) on the cooking bowl (5).
- Make sure that the temperature controller (11) is in the "0" position.
- Connect the power cable (6) plug to a live mains socket. The green "Heating off" indicator (10) then comes on.
- Turn the control dial (11) to the "3" position. The device then begins to heat up. The green "Heating off" indicator (10) goes out and the red heating indicator (9) comes on.
- Allow the water to boil for 10 minutes. You can then move the temperature controller (11) back to the 'O' position to switch the device off.
- Disconnect the power cable (6) plug from the mains socket.
- Once the device has cooled down completely, clean it again. It is then ready to use.
7.1 Assembling and setting up the multi-cooker

Warning!
• Only use the device in dry, enclosed spaces. Never use it outdoors.
- Place the multi-cooker on an even, stable and heat-resistant surface only. If the multi-cooker is not placed on an even surface, the movement of the boiling contents could make it tip over, possibly causing damage to property and burns.
- Maintain a clearance of at least 20 cm around the device. This will help prevent damage caused by escaping steam.

Risk of fire!
- Do not place the device on textile surfaces such as tablecloths.
- Do not place the device on metal surfaces. These can heat up quickly and cause a fire.
-
Do not place the device under or directly next to flammable objects, e.g. curtains or blinds.
-
Place the heater unit (8) on an even, non-slip and dry surface. Do not connect the power cable (6) plug to the mains socket yet!
- Place the cooking bowl (5) into the heater unit (8). To do this, align the cooking bowl (5) so that the contacts on the bottom can be pushed into the socket on the heater unit (8). Carefully push the cooking bowl (5) down so it is seated firmly on the heater unit (8).

The multi-cooker can only be switched on once the cooking bowl (5) is properly locked into position on the heater unit (8).
- Place the glass lid (1) on the cooking bowl (5).
- Make sure that the temperature controller (11) is in the "0" position.
8. Usage
8.1 Switching on / Selecting temperature / Switching off

The multi-cooker can only be switched on once the cooking bowl (5) is properly locked into position on the heater unit (8).

Warning!
Make sure the power cable (6) is not in your working area. Otherwise, you could accidentally pull on it and tip it over or make the multi-cooker fall off the work surface.
- Connect the power cable (6) plug to a live mains socket. The green "Heating off" indicator (10) then comes on.

Warning!
For deep-frying, first add the fat or oil before starting the heating process. Please also note the minimum and maximum fill levels for oil and fat. See the MIN and MAX markings.
- Twist the temperature controller (11) to the position you want to start the heating process. The green "Heating off" indicator (10) goes out and the red heating indicator (9) comes on.

Risk of burns!
The glass lid (1) and cooking bowl (5) get very hot when the multi-cooker is in use. Be careful not to burn yourself. Wear oven gloves if necessary.
When the selected temperature is reached in the cooking bowl (5), the green "Heating off" indicator (10) lights up and the red heating indicator (9) goes out.
- To switch the multi-cooker off, turn the temperature controller (11) to the 0 position. Then unplug the mains plug from the mains socket.
8.1.1 Overview of control panel and functions

The table below sets out the recommended temperatures for various foods. Please note that these are guidelines only. The actual temperature depends on the quantity and type of food.
| Function/Temperature Level | |
| Warming:50 °C - 80 °C | 1 |
| Slow cooking (braising):80 °C - 120 °C | 2 |
| Cooking/Fondue:120 °C - 150 °C | 3 |
| Steaming:150 °C - 170 °C | 4 |
| Frying/Roasting:170 °C - 190 °C | 5 |
| Deep-frying Red dot next to | level 5 |
8.2 Keeping food warm
- Prepare the multi-cooker as described in the "Assembling and setting up the multi-cooker" section.
- Connect the power cable (6) plug to a live mains socket. The green "Heating off" indicator (10) then comes on.
- Twist the temperature controller (11) to position 1 to start the heating process. The green "Heating off" indicator (10) goes out and the red heating indicator (9) comes on.

Risk of burns!
The glass lid (1) and cooking bowl (5) get very hot when the multi-cooker is in use. Be careful not to burn yourself. Wear oven gloves if necessary.
-
When the selected temperature is reached in the cooking bowl (5), the green "Heating off" indicator (10) lights up and the red heating indicator (9) goes out. You can now put the food you want to keep warm into the cooking bowl (5).
-
Then close the glass lid (1) again.

Warning about property damage
- The coating of the cooking bowl (5) is very delicate. To remove food, use only the foam spoon (13) provided or other heat-resistant plastic or wooden utensils. Utensils made of metal, ceramics, etc. can damage the coating on the cooking bowl (5).
-
If you no longer require the multi-cooker, twist the temperature controller (11) to the 0 position to switch it off.
-
Unplug the mains plug from the mains socket.
8.3 Slow cooking or braising food
- Prepare the multi-cooker as described in the "Assembling and setting up the multi-cooker" section.
- Connect the power cable (6) plug to a live mains socket. The green "Heating off" indicator (10) then comes on.
- Twist the temperature controller (11) to position 2 to start the heating process. The green "Heating off" indicator (10) goes out and the red heating indicator (9) comes on.

Risk of burns!
The glass lid (1) and cooking bowl (5) get very hot when the multi-cooker is in use. Be careful not to burn yourself. Wear oven gloves if necessary.
-
When the selected temperature is reached in the cooking bowl (5), the green "Heating off" indicator (10) lights up and the red heating indicator (9) goes out. You can now put the food you want to braise into the cooking bowl (5).
-
Then close the glass lid (1) again.

Warning about property damage
- The coating of the cooking bowl (5) is very delicate. To remove food, use only the foam spoon (13) provided or other heat-resistant plastic or wooden utensils. Utensils made of metal, ceramics, etc. can damage the coating on the cooking bowl (5).
- If you no longer require the multi-cooker, twist the temperature controller (11) to the 0 position to switch it off.
- Unplug the mains plug from the mains socket.
8.4 Cooking food
- Prepare the multi-cooker as described in the "Assembling and setting up the multi-cooker" section.
- Connect the power cable (6) plug to a live mains socket. The green "Heating off" indicator (10) then comes on.
- Twist the temperature controller (11) to position 3 to start the heating process. The green "Heating off" indicator (10) goes out and the red heating indicator (9) comes on.

Risk of burns!
The glass lid (1) and cooking bowl (5) get very hot when the multi-cooker is in use. Be careful not to burn yourself. Wear oven gloves if necessary.
- When the selected temperature is reached in the cooking bowl (5), the green "Heating off" indicator (10) lights up and the red heating indicator (9) goes out. You can now put the food you want to cook into the cooking bowl (5).
- Then close the glass lid (1) again.

Warning about property damage
- The coating of the cooking bowl (5) is very delicate. To remove food, use only the foam spoon (13) provided or other heat-resistant plastic or wooden utensils. Utensils made of metal, ceramics, etc. can damage the coating on the cooking bowl (5).
- If you no longer require the multi-cooker, twist the temperature controller (11) to the 0 position to switch it off.
- Unplug the mains plug from the mains socket.
8.5 Preparing fondue

This function is used to prepare traditional meat and vegetable fondue which involves cooking at high temperatures. If you wish to prepare a cheese or chocolate fondue, select a lower heat level.
22 - English
- Prepare the multi-cooker as described in the "Assembling and setting up the multi-cooker" section. To do this, place it on the dining table and lay the power cable (6) so that it does not get in anyone's way and nobody can trip over it and accidentally pull the device off the table.
- Connect the power cable (6) plug to a live mains socket. The green "Heating off" indicator (10) then comes on.
- Fill the cooking bowl (5) to the MAX mark with stock or oil, depending on how you wish to prepare your fondue.
- Close the glass lid (1).
- Twist the temperature controller (11) to position 3 to start the heating process. The green "Heating off" indicator (10) goes out and the red heating indicator (9) comes on.

Risk of burns!
The glass lid (1) and cooking bowl (5) get very hot when the multi-cooker is in use. Be careful not to burn yourself. Wear oven gloves if necessary.
-
When the selected temperature is reached in the cooking bowl (5), the green "Heating off" indicator (10) lights up and the red heating indicator (9) goes out. You can now spear the food you have cut into pieces onto the fondue forks (14) and carefully dip them into the cooking bowl (5).
-
If you no longer require the multi-cooker, twist the temperature controller (11) to the 0 position to switch it off.
-
Unplug the mains plug from the mains socket.
-
Once the stock or oil in the cooking bowl (5) has cooled down, you can pour it out through the rim on the cooking bowl (5).

Risk of burns!
Allow the stock or oil to cool down enough that you do not risk burning yourself as you pour it out of the cooking bowl (5).

Old cooking oil or fat must not be disposed of in domestic waste or poured down the sink. Dispose of all old cooking oil and fat in an environmentally friendly manner. You can put it into a container and take it to a public collection point for reuse.
8.6 Steaming

The MIN and MAX markings only relate to the fill levels for oil and fat for deep-frying and are not relevant for steaming.
- Prepare the multi-cooker as described in the "Assembling and setting up the multi-cooker" section.
- Connect the power cable (6) plug to a live mains socket. The green "Heating off" indicator (10) then comes on.
- Add at least 1 litre of water to the cooking bowl (5).

With 1 litre of water, you can steam food for around 30 minutes. With more water, you can steam for longer. But you should not use more than 2.5 litres of water as this could splash onto the food as it boils.
In order to top up the water, open the glass lid (1), pointing it away from you so that the steam does not come towards you and burn you. When you pour in the new water, make sure it does not go onto the food. Then close the glass lid (1) again. It can take a while for the water to boil again and create steam.
- Place the steam insert (12) into the cooking bowl (5). To do it, twist it so that the four catches engage into the recesses on the top edge of the cooking bowl (5).
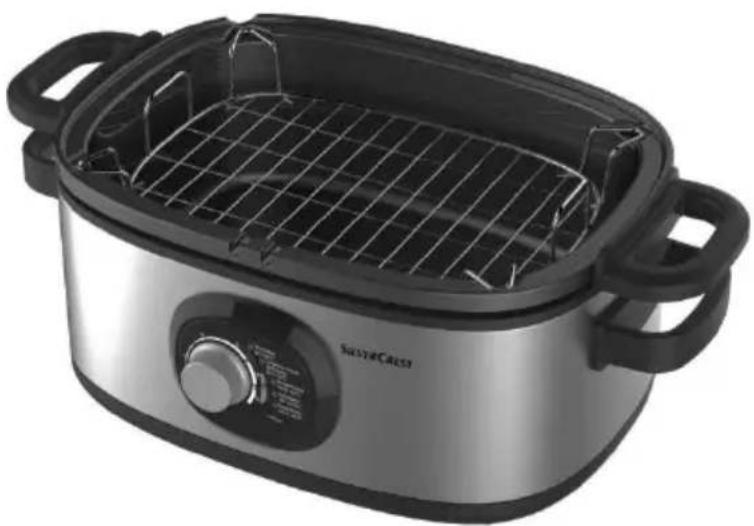
natural_image
Exterior view of a modern stainless steel baking pan with a mesh grating (no text or symbols visible)- Twist the temperature controller (11) to position 4 to start the heating process. The green "Heating off" indicator (10) goes out and the red heating indicator (9) comes on.

Risk of burns!
The glass lid (1), steam insert (12) and cooking bowl (5) get very hot when the multi-cooker is in use. Be careful not to burn yourself. Wear oven gloves if necessary.
-
Wait until sufficient steam is rising (this is not shown on the 'Heating off' indicator (10) in this case). If you have put in 1 litre of water, this takes around 5 minutes.
-
Place the food on the steam insert (12).
-
Close the glass lid (1).

- Where possible, you should keep the glass lid (1) closed throughout the steaming process. Every time you open it, a lot of steam escapes. On the one hand, this increases the cooking time, and it also means that you may have to top up the water before the cooking process is complete.
- Foam can form if you are preparing food containing fat or protein. In this case, adjust the temperature controller (11) down to level 1 to 2. This allows you to continue steaming the food without too much foam forming.
- Once the food is cooked, you can use tongs, for example, to remove it from the steam insert (12).
- If you no longer require the multi-cooker, twist the temperature controller (11) to the 0 position to switch it off.
- Unplug the mains plug from the mains socket.
8.7 Frying/Roasting food
- Prepare the multi-cooker as described in the "Assembling and setting up the multi-cooker" section.
- Connect the power cable (6) plug to a live mains socket. The green "Heating off" indicator (10) then comes on.
- Twist the temperature controller (11) to position 5 to start the heating process. The green "Heating off" indicator (10) goes out and the red heating indicator (9) comes on.

Risk of burns!
The glass lid (1) and cooking bowl (5) get very hot when the multi-cooker is in use. Be careful not to burn yourself. Wear oven gloves if necessary.
-
When the selected temperature is reached in the cooking bowl (5), the green "Heating off" indicator (10) lights up and the red heating indicator (9) goes out. You can now put fat or oil and the food you want to fry or roast into the cooking bowl (5).
-
Close the glass lid (1) if necessary.
-
Turn the contents of the cooking bowl (5) occasionally to fry or roast them evenly.

Warning about property damage
- The coating of the cooking bowl (5) is very delicate. To remove or turn food, use only the foam spoon (13) provided or other heat-resistant plastic or wooden utensils. Utensils made of metal, ceramics, etc. can damage the coating on the cooking bowl (5).
- Remove the fried or roasted food.
- If you no longer require the multi-cooker, twist the temperature controller (11) to the 0 position to switch it off.
- Unplug the mains plug from the mains socket.
8.8 Deep-frying food
You can use the multi-cooker like a deep-fat fryer if you fill the cooking bowl (5) with oil or fat suitable for deep-fat fryers and use the deep-frying basket (4).

You can also prepare pastries (e.g. cheese balls, doughnuts, etc.) without the deep-frying basket (4). To do this, place them directly in the hot oil or fat in the cooking bowl (5). You can then remove them with the foam spoon (13).

Warning!
For deep-frying, first add the fat or oil before starting the heating process. Please also note the minimum and maximum fill levels for oil and fat. See the MIN and MAX markings.
-
Prepare the multi-cooker as described in the "Assembling and setting up the multi-cooker" section.
-
Connect the power cable (6) plug to a live mains socket. The green "Heating off" indicator (10) then comes on.
-
Put oil or fat suitable for deep-fat fryers into the cooking bowl (5). Please note the minimum and maximum fill levels for oil and fat. See the MIN and MAX markings.
-
Close the glass lid (1).
-
Twist the temperature controller (11) to position ● to start the heating process. The green "Heating off" indicator (10) goes out and the red heating indicator (9) comes on.
-
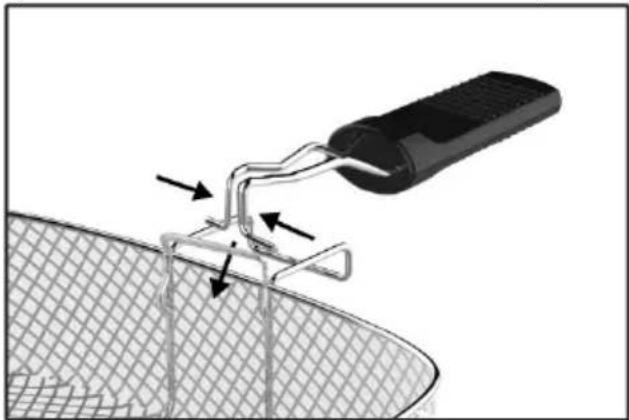
Connect the handle (2) to the deep-frying basket (4). To do this, push the metal catches on the handle (2) together, guide the ends of the catches into the eyelets on the deep-frying basket (4) and then release the metal catches again. The ends of the metal catches must protrude through the eyelets and the handle (2) must be securely connected to the deep-frying basket (4):
natural_image
Diagram of a tool interacting with a mesh surface, showing mechanical components and directional arrows (no text or symbols)
natural_image
Diagram of a mechanical device with a handle and metal frame, showing internal components and directional arrows (no text or symbols)
Risk of burns!
The glass lid (1) and cooking bowl (5) get very hot when the multi-cooker is in use. Be careful not to burn yourself. Wear oven gloves if necessary.
- When the selected temperature is reached in the cooking bowl (5), the green "Heating off" indicator (10) lights up and the red heating indicator (9) goes out. You can now put the food into the deep-frying basket (4).

There is a MAX marking on the deep-frying basket (4). Fill the food to be deep-fried no higher than this mark. Otherwise, the parts above the marking will not be properly cooked.
- Place the deep-frying basket (4) into the hot oil until it sits on the bottom of the cooking bowl (5). The metal catches on the handle (2) should sit in the corresponding recesses in the cooking bowl (5).

Warning!
During deep-frying, the handle (2) must be firmly attached to the deep-frying basket (4).
Otherwise, you cannot safely remove the deep-frying basket (4) from the boiling oil, the food could burn, the cooking bowl (5) could boil over and you could get burnt.

Risk of burns!
If the food is moist or frozen, the fat or oil can spit. Be careful not to burn yourself.
-
Close the glass lid (1) if necessary.
-
Once the food is cooked, lift the deep-frying basket (4) and use the metal hook (3) to hang it on the edge of the cooking bowl (5) so the oil or fat can drain. You can then shake the contents of the deep-frying basket (4) into a suitable container or remove them.
- If you no longer require the multi-cooker, twist the temperature controller (11) to the 0 position to switch it off.
- Unplug the mains plug from the mains socket.
- Once the fat or oil in the cooking bowl (5) has cooled down, you can pour it out through the rim on the cooking bowl (5).

Risk of burns!
Allow the fat or oil to cool down enough that you do not risk burning yourself as you pour it out of the cooking bowl (5).

Old cooking oil or fat must not be disposed of in domestic waste or poured down the sink. Dispose of all old cooking oil and fat in an environmentally friendly manner. You can put it into a container and take it to a public collection point for reuse.
9. Sample recipes
This section contains some versatile recipes that can be altered to suit individual tastes by replacing certain ingredients.
Strawberry jam
Ingredients:
1 kg strawberries
2 vanilla pods
500 grams of jam sugar 2:1
Juice of half a lemon
Method:
Wash, dry and halve the strawberries. Halve the lemon and squeeze out the juice.
Cut the vanilla pods lengthways and carefully scrape out the vanilla essence with a teaspoon or a knife.
Put the strawberries, jam sugar and vanilla essence into the cooking bowl (5).
Set the temperature controller (11) to 3 (Cooking).
Stirring constantly, bring the jam to the boil and boil for around 5 minutes.
Stir in the lemon juice.
Immediately pour the jam into prepared jam jars and screw the lids shut. Turn the jars upside down for 15 minutes and then allow to cool completely.
Party soup
For 4-6 portions
Ingredients:
| 800 grams of pork strips, unseasoned | 2 peppers |
| 1.5 litres meat stock | 200 grams curry ketchup |
| 3 onions | 600 ml cream |
| 2 cloves garlic | A pinch of chilli powder |
| 1 tin chopped mushrooms | Salt, pepper |
| 1 tin of pineapple pieces | 1 tbsp oil |
| 1 jar sauce zingara |
Method:
Peel and slice the onions and garlic. Wash and dry the peppers and cut into small pieces.
Set the temperature controller (11) to 5 (Frying/Roasting). Put the oil in the cooking bowl (5) and quickly fry the meat.
Add the meat stock, onions, garlic, peppers, mushrooms (without the juice), pineapple (with juice), sauce zingara and curry ketchup.
Mix well and cook for around 1.5 hours covered with the glass lid (1) on level 3 (Cooking/Fondue).
Stir occasionally and add a little water if required.
Finally, stir in the cream and season with salt and pepper.
Onion soup
For 4 people
Ingredients:
| 3 medium onions | Salt, ground pepper |
| 1 tablespoon clarified butter | 4 slices of sliced bread |
| 1 tablespoon brown sugar | 4 tablespoons grated Gouda |
| 100 ml brandy | 4 tablespoons grated Parmesan |
| 800 ml vegetable stock |
Method:
Peel the onions and cut into fine rings.
Set the temperature controller (11) to 3 (Cooking). When the cooking bowl (5) is hot, add the clarified butter.
Fry the onions until golden brown, stirring all the time. Add the sugar and allow the onions to caramelise slightly.
Deglaze with the brandy, allow to boil briefly and then add the vegetable stock. Season with salt and pepper.
Simmer for about 30 minutes.
You will need heat-resistant soup bowls for the soup's gratin topping. Preheat the oven to 230^ (Grill / top heat).
Cut the bread to the size of the soup bowl and toast it.
Put the onion soup into the soup bowl, place the toast over the soup and sprinkle with cheese.
Bake quickly in the oven until the cheese has melted.
Ratatouille
For 4 people
Ingredients:
| 1 medium aubergine | 1 teaspoon fresh rosemary (chopped) |
| 2 medium courgettes | 1 teaspoon fresh thyme (chopped) |
| 2 large red peppers | 1 teaspoon fresh sage (chopped) |
| 2 large yellow peppers | 2 tablespoons sugar |
| 1 tin peeled tomatoes | 100 ml olive oil |
| 2 onions | 100 ml tomato purée |
| 4 cloves garlic | Salt, ground pepper |
Method:
Wash, clean and dice the vegetables. Finely chop the garlic. Peel the onions and cut into small pieces.
Salt the diced aubergine and allow to soak in for 10 minutes, then pat dry with kitchen roll.
Set the temperature controller (11) to 5 (Frying/Roasting). When the cooking bowl (5) is hot, add the olive oil.
Then fry the onions and the courgettes, add the pepper and finally the aubergine.
Fry the vegetables on a high heat for about 5 minutes.
Adjust the temperature controller (11) to level 3 (Cooking), then add the tomato purée, garlic and herbs, plus the peeled tomatoes and sugar. Season well.
Close the glass lid (1) and allow the ratatouille to simmer for about 20 minutes. Add a little water if necessary.
Tomato salsa
Serves 4
Ingredients:
| 2 large red peppers | 2 red chillies |
| 2 large yellow peppers | 1-2 teaspoons salt |
| 1 tin peeled tomatoes | 2 tablespoons sugar |
| 2 onions | A little lemon juice |
Method:
Wash, clean and dice the vegetables. Peel the onions and cut into small pieces. Chop and deseed the chillies and cut into fine strips.
Set the temperature controller (11) to 3 (Cooking).
Put all the ingredients in the cooking bowl (5) and allow to simmer for about 30 minutes.
Then adjust the temperature controller (11) to level 1 (Warming) and allow the salsa to simmer for another 60 minutes.
The salsa can be enjoyed warm or cold.
Perfect with: nachos
Vegetable frittata
Serves 4
Ingredients:
| 2 courgettes | 1 bunch of chives |
| 2 peppers | 5 eggs |
| 1 onion | 5 tablespoons milk |
| 1 clove of garlic | Salt, pepper |
| 4 tablespoons olive oil |
Method:
Wash and dice the vegetables. Peel the onions and garlic and chop finely.
Set the temperature controller (11) to 5 (Frying/Roasting).
Add the olive oil to the cooking bowl (5) and fry the vegetables, onion and garlic.
Wash the chives and cut into fine rings. Combine the eggs, milk, salt and pepper with the chives.
Add the chive and egg mixture to the vegetables. Set the temperature controller (11) to level 2 (Slow cooking) and allow the mixture to thicken.
When the bottom is golden brown, turn the frittata over and adjust the temperature controller (11) to level 5 (Frying/Roasting) to allow the top to go golden.
Steamed vegetables
Serves 4
Ingredients:
6 potatoes (waxy)
2 corn cobs
2 onions
2 peppers
approx. 1 litre water
Method:
Adjust the temperature controller (11) to level 4 (Steaming) and put the water into the cooking bowl (5).
Fit the steam insert (12) and close the glass lid (1).
Wash the vegetables and cut them into even-sized pieces. Peel and chop the onions.
As soon as the water in the multi-cooker is hot, spread the vegetables over the steam insert (12).
Depending on the type of vegetable and the size of the pieces, the cooking time is around 10-20 minutes.
Chilli con carne
Serves 4
Ingredients:
800 grams minced beef (tip: vegetarians can use soya mince instead of minced beef. Soak the soya mince in vegetable stock as per the instructions on the pack.)
2 large onions
1 clove of garlic
1 heaped teaspoon cumin
2 teaspoons chilli powder
3 large tins of tomatoes
2 small tins of kidney beans
1 cinnamon stick
Salt and pepper
Oil for frying
Method:
Chop the onions and garlic into small pieces.
Set the multi-cooker to level 5 (Frying/Roasting). When the multi-cooker is hot, put the oil in the cooking bowl (5).
Add the mince and brown. Then add the finely-chopped onions and garlic and fry them too.
Add the tomatoes, cumin, chilli powder and cinnamon.
Reduce the temperature to level 3 (Cooking/Fondue), cover with the glass lid (1) and allow the chill con carne to simmer for about 1.5 hours.
After 1.5 hours, drain the kidney beans and add them to the chill con carne.
Cover with the glass lid (1) and allow the chilli to simmer with the kidney beans for another 30 minutes.
Finally, season with salt and pepper.
Corn dogs
Ingredients:
| 6 Frankfurters | 75 ml oil |
| 200 grams cornflour | 175 ml milk |
| 1 tablespoon sugar | 2 eggs |
| 10g baking powder | Long wooden skewers |
| 1 teaspoon salt | Oil for deep-frying |
| 1 teaspoon chilli powder |
Method:
Put 1 sausage on each wooden skewer.
Set the multi-cooker to the "Deep-frying" ● level and put the oil in the cooking bowl (5).
Combine the eggs, milk and oil. Then add the cornflour, sugar, baking powder, salt and chilli powder. The batter should have a silky consistency and not be too liquid.
Turn the skewered sausages in the batter and then deep-fry them in the pre-heated oil until the batter is golden-brown on the outside. Allow the finished corn dogs to drain on kitchen roll.
Herby trout
Serves 2
Ingredients:
| 2 pieces of trout (fresh or frozen) | 1 bunch of fresh, seasonal herbs (parsley, dill, chives, thyme, rosemary) |
| 1 lemon | |
| 2 cloves garlic | 1 tablespoon flourSalt, pepper |
| For the sauce: | 100 ml water |
| 300 ml white wine (dry) | 1 onion |
Method:
Clean the fish in running water, gut if necessary. Then pat dry with kitchen roll.
Halve the lemon and squeeze a little lemon juice over the fish. Season the fish inside and out.
Wash and finely chop the herbs. Peel the garlic, finely chop and combine with the herbs.
Put the herb and garlic mixture into the fish.
Dust the fish with a little flour.
Set the multi-cooker to 4 (Steaming).
For the sauce, peel the onions and cut into fine rings. Add the water, white wine and onions to the cooking bowl (5).
Fit the steam insert (12) and close the glass lid (1) until the sauce is hot.
When the sauce is hot, open the glass lid (1) and place the herb-stuffed trout onto the steam insert (12).
Close the glass lid (1) and cook the fish for approx. 15-20 minutes, depending on the size.
Classic beef roulade
For 4 people
Ingredients:
| 4 slices of beef roulade | 1 tablespoon flour |
| 4 teaspoons of hot mustard | 4 tablespoons sunflower oil |
| 8 slices of bacon/smoked ham | 2 tablespoons tomato purée |
| 2 cocktail gherkins | 125 ml red wine |
| 2 onions | 400 ml beef stock |
| 1 carrot | Salt, ground pepper |
| 2 sticks of celery | Toothpicks or wooden skewers for fixing |
Method:
Peel and halve one onion and chop into thin slices. Cut the cocktail gherkins lengthways into thin strips.
Spread the roulades out next to one another, add salt and pepper and a thin layer of mustard. Place 2 slices of bacon/ham and a couple of slices of onion and gherkin on each roulade.
Roll up the roulades and fix in place with wooden sticks. Sprinkle a little flour over the roulades.
Clean and dice the carrots, celery and remainder of the onion.
Set the multi-cooker to level 5 (Frying/Roasting). Add the oil and seal the roulades on all sides.
Remove the roulades from the cooking bowl (5) and put to one side. Gently fry the diced vegetables in the meat juices.
Add the tomato purée and the red wine. Allow the sauce to boil vigorously.
Set the temperature controller (11) to level 2 (Slow cooking) and add the beef stock.
Add the roulades to the sauce and close the glass lid (1).
Simmer for about 1 hour.
After 1 hour, remove the roulades from the pan and set the temperature controller (11) to level 3 (Cooking). Allow the sauce to boil down slightly, taste and add salt and pepper as required.
Add the roulades again when the sauce is the consistency you want.
Roast pork with dark sauce
Serves 4
Ingredients:
| 2 kg pork joint | 2 tablespoons soured cream |
| 3 onions | 1 tablespoon flour |
| 2 carrots | Paprika |
| 1/4 celery | Salt and pepper |
| 500 ml dark beer (or malt beer) | Oil for frying |
| 750 ml vegetable stock |
Method:
Wash, clean and roughly dice the vegetables. Peel and quarter the onions.
Rinse the pork joint off in cold water and pat dry with kitchen roll. Then rub in salt, pepper and paprika.
Set the multi-cooker to level 5 (Frying/Roasting).
Put the oil in the cooking bowl (5) and quickly fry the meat on all sides. Then remove the joint from the cooking bowl (5) and put to one side.
Now quickly fry the carrots, celery and onions in the cooking bowl (5).
Add the beer and bring to the boil.
Now return the joint to the cooking bowl (5) and top up with around half of the vegetable stock.
Close the lid and reduce the temperature to level 2-3.
Allow the joint to braise for about 2 hours and top the sauce up with vegetable stock if necessary.
Once the joint is cooked, remove the meat from the cooking bowl and cover with tin foil.
Pour the sauce and the vegetables into a tall glass and mix thoroughly using a blender stick. If you do not want any lumps in the sauce, pass the sauce through a sieve.
Return the sauce to the cooking bowl (5).
Combine the soured cream and flour and gradually combine with the sauce. Season the sauce with salt and pepper.
Slice the meat and serve with the sauce.
Wiener schnitzel
Serves 4
Ingredients:
| 4 pork schnitzels | 1 tablespoon cream |
| 2 eggs | 2 teaspoons pork dripping |
| Flour / Breadcrumbs | Corn oil for frying |
| 2 tablespoons flour | Salt and pepper |
Method:
Rinse the schnitzels off in cold water and pat dry with kitchen roll. Put 1 schnitzel at a time into a freezer bag and flatten it slightly using a meat tenderiser or a small pan.
After tenderising, the schnitzels should be around 3-5 mm thick.
Put the flour and breadcrumbs into a bowl each. Beat the egg with the cream, salt and pepper and put into another bowl.
Preheat the multi-cooker to level 5 (Frying/Roasting) and put the corn oil and pork dripping into the cooking bowl (5). The oil in the cooking bowl (5) should be about 3 cm deep.
Turn the schnitzels in the flour, then coat in the egg mixture then in the breadcrumbs. Then immediately put the schnitzel into the hot oil and fry on both sides until golden brown.
Allow the finished schnitzels to drain briefly on kitchen roll.
Chicken and spinach Alfredo
For 4 people
Ingredients:
| 2 tablespoons olive oil | 400 ml (2 pots) whipping cream |
| 2 chicken breast fillets | 100 grams Parmesan (grated) |
| 3 cloves garlic | Salt, pepper |
| 125 grams diced bacon/ham | Chopped parsley |
| 225 grams spinach | 400 grams cooked pasta (fusilli) |
Method:
Wash the chicken breasts under cold water, pat dry and cut into small pieces.
Set the multi-cooker to level 3 (Cooking) and add the olive oil.
Fry the chicken until it is cooked through.
Add the finely chopped garlic and the bacon/ham to the chicken. Add the spinach and season.
As soon as the spinach has wilted, add the cream and bring to the boil.
Set the temperature controller (11) to level 2 (Slow cooking) and allow to simmer for 10 minutes.
Add the Parmesan, parsley and cooked pasta and stir well.
French fries
Ingredients:
5 large potatoes (waxy)
Salt
Oil for deep-frying
Method:
Peel the potatoes and cut into 1 cm wide strips.
Set the multi-cooker to level 3 (Cooking/Fondue) and put the oil in the cooking bowl (5).
When the oil is hot, put the potatoes into the deep-frying basket (4) and pre-cook for approx. 15 minutes.
After 15 minutes, remove the deep-frying basket from the cooking bowl (5) and place the potatoes on kitchen roll.
Now set the temperature controller (11) to "Deep-frying" ●.
When the temperature is reached, put the pre-cooked potatoes into the deep-frying basket (4) and deep-fry for around 5 minutes until golden brown.
Then season with salt.
Creamy tomato sauce with prawns
For 4 people
Ingredients:
3 tablespoons butter
Salt, pepper and chilli powder
900 grams prawns
240 ml milk
200 grams tomatoes
Chopped parsley
1 bunch of spring onions
We also recommend:
400 grams cooked pasta
Method:
Set the multi-cooker to level 3 (Cooking) and put the butter in the cooking bowl (5).
Wash the prawns off in cold water and pat dry, remove the intestines if necessary.
Put the prawns into the multi-cooker and fry on both sides until they turn pink.
Wash the tomatoes and spring onions, chop finely and add to the prawns in the multi-cooker. Add the salt, pepper and chilli and mix well.
Add the milk and bring to the boil.
Set the temperature controller (11) to level 2 (Slow cooking) and allow the sauce to simmer for 10 minutes.
Finally, sprinkle with the finely chopped parsley.
Cream cheese balls
Ingredients:
| 500 grams wheat flour | 1 sachet vanilla sugar |
| 500 grams cream cheese | 15 g baking powder |
| 4 eggs (medium) | 1 teaspoon salt |
| 250 grams sugar | Oil for deep-frying |
Method:
Beat the eggs, sugar and vanilla sugar until foamy. Mix in the sifted flour, baking powder and salt.
Set the multi-cooker to "Deep-frying" ● and put the oil in the cooking bowl (5). The deep-frying basket (4) is not required here.
Put the batter into an icing bag and squeeze pieces about 3 cm long into the fat. Alternatively, you can put the batter into the fat using 2 teaspoons.
Fry the cream cheese balls until they are golden brown on the outside. Then remove the cream cheese balls from the oil using the foam spoon (13) and allow to drain on kitchen roll.
Kaiserschmarn
Serves 4
Ingredients:
| 100 grams raisins | 250 grams wheat flour |
| 5 tablespoons water | 500 ml milk |
| 6 eggs | 1 sachet vanilla sugar |
| 1 tablespoon sugar | A little icing sugar |
| 1 pinch salt | Butter for frying |
| 50 grams melted butter |
Method:
Soak the raisins for 30 minutes in the water.
Separate the eggs. Beat the egg yolks, sugar and salt until foamy. One spoonful at a time, gradually mix in the flour and the milk, then add the melted butter.
Beat the egg whites until stiff and carefully fold into the batter.
Finally, drain the water from the raisins and mix them into the batter.
Set the multi-cooker to level 3 (Cooking) and add a little butter to the cooking bowl (5). When the butter has melted, fill in the batter to a depth of approx. 1 cm.
Fry the batter until it is golden brown on the bottom. Split into 4 parts and turn over so that the top is golden brown.
Then use a wooden spatula to break the Kaiserschmann up into small pieces and sprinkle over the vanilla sugar.
The Kaiserschmarm is traditionally served on the plate dusted with icing sugar.
Chocolate fondue
For 4 people
Ingredients:
| 2 bars of milk chocolate | 50 ml orange juice |
| 1 bar of dark chocolate | Various fruit, cookies and marshmallows for dipping |
| 100 ml cream | |
| 100 ml full-cream milk |
Method:
Break the chocolate into small pieces and put into the cooking bowl (5) with the cream, milk and orange juice.
Wash the fruit and cut into small pieces.
Allow the mixture to melt at level 2 (Slow cooking).
Stir occasionally until the mixture has an even consistency.
Once the chocolate has melted, adjust the temperature controller (11) to level 1 (Warming).
Traditional rice pudding
For 4 people
Ingredients:
200 grams pudding rice (round grain rice)
400 ml full-cream milk (Tip: Vegans can replace the milk with a mixture of water and coconut milk. Then use 500 ml water and 500 ml coconut milk. A little grated lime rind gives the rice pudding a wonderfully fresh taste.)
400 ml coconut milk
50 grams brown sugar (raw cane sugar)
1 pinch salt
Method:
Add the milk and coconut milk to the cooking bowl (5) with the pinch of salt and set the temperature controller (11) to level 3 (Cooking).
As soon as the liquid is boiling, adjust the temperature controller (11) to level 2 (Slow cooking), add the pudding rice and stir.
Allow the pudding rice to expand for around 40 minutes until the liquid has been absorbed by the rice.
Stir the rice pudding regularly.
Finally, stir in the brown sugar.
10. After use
After use, clean the multi-cooker as described in the "Maintenance/cleaning" section below. Next, store the multi-cooker in a safe, dry place away from dust.
10.1 Maintenance/cleaning
It is recommended that you clean the multi-cooker before first use and immediately after each use so that no remnants of food can set in the cooking bowl (5).

Risk of electric shock!
- Always remove the mains plug from the mains socket before cleaning the heater unit (8). Failure to do so could cause an electric shock.
- Do not pour or spray any liquids onto the heater unit (8) and do not immerse it in water or other liquids. This could cause short circuits which could cause electric shocks or burns.
- The contacts on the bottom of the cooking bowl (5) must not come into contact with water or moisture. This could result in an electric shock.
- Never immerse the cooking bowl (5) in water or other liquids. This could result in an electric shock.

Risk of burns!
Clean the device only after it has completely cooled down.

Warning about property damage
- Do not use abrasive or astringent detergents or tools which could scratch the surface to clean the heater unit (8). This could cause damage to the heater unit (8) housing.
10.1.1 Cleaning the heater unit
Clean the heater unit (8) and the power cable (6) with a dry or damp cloth. For stubborn dirt, add a little detergent to the damp cloth.
Dry the heater unit (8) well.
10.1.2 Cleaning the cooking bowl

Risk of electric shock!
- The contacts on the bottom of the cooking bowl (5) must not come into contact with water or moisture. This could result in an electric shock.
- Never immerse the cooking bowl (5) in water or other liquids. This could result in an electric shock.
Rinse the inside of the cooking bowl (5) out with warm water and washing-up liquid and dry well.
Clean the outside with a dry or slightly damp cloth. For stubborn dirt, add a little detergent to the damp cloth. Make sure that the contacts on the bottom do not get damp or wet. Finally, dry the outside of the cooking bowl (5) off well.
10.1.3 Cleaning the accessories
You can wash up the glass lid (1), the deep-frying basket (4), the handle (2), the steam insert (12), the foam spoon (13) and the fondue forks (14) normally.
The glass lid (1), deep-frying basket (4), handle (2), steam insert (12), foam spoon (13) and fondue forks (14) are also dishwasher-safe.
Dry all parts thoroughly.
11. Troubleshooting
If your multi-cooker does not work as normal, follow the instructions below to try to solve the problem. If working through the tips below does not fix the fault, please contact our hotline (see "Warranty information" on page 42).

Risk of electric shock!
Never try to repair the device yourself.
| Problem | Possible cause | Remed |
| The multi-cooker does not work. | Mains plug not connected Connect the mains plug to a live mains socket. | |
| Cooking bowl (5) is incorrectly fitted on the heater unit (8) | Place the cooking bowl (5) correctly onto the heater unit (8). See “Assembling and setting up the multi-cooker” on page 18. | |
| The “Heating off” indicator (10) lights up, but then goes out and comes back on a bit later. This happens repeatedly. | This is not a malfunction. The multi-cooker needs to keep reheating to maintain the set temperature. The “Heating off” indicator (10) lights green when the contents of the cooking bowl (5) have reached the temperature set using the temperature controller (11). This indicator does not light up while the device is heating up. | - |
| The food is not getting hot. | Incorrect temperature set Turn the temperature controller (11) to a higher position. | |
| No steam is generated for steaming. | Incorrect temperature set Turn the temperature controller (11) to the “4” position. | |
| The water in the cooking bowl (5) has been used up. | Top up the water. | |
12. Environmental regulations and disposal information
natural_image
Simple line drawing of a trash bin with crossed lines indicating no waste or plastic (no text or symbols)A symbol depicting a crossed-out rubbish bin on a product means it is subject to European Directive 2012/19/EU. All electrical and electronic devices must be disposed of separately from household waste at official disposal centres.

Do not dispose of the appliance in household waste or bulky waste collections. Information on collection points and pick-up times can be obtained from your local council or waste disposal company.
Dispose of all packaging in an environmentally friendly manner. Cardboard packaging can be taken to paper recycling centres or public collection points for recycling. Any film or plastic contained in the packaging should be taken to your public collection points for disposal.
13. Conformity

This device complies with the basic and other relevant requirements of the EMC Directive 2014/30/EU, the Low-voltage Directive 2014/35/EU, the ErP Directive 2009/125/EC and the RoHS Directive 2011/65/EU. The complete EU Declaration of Conformity is available for download from this link:
www.targa.de/downloads/conformity/288294.pdf.
14. Warranty information
Dear Customer,
This device is sold with three years warranty from the date of purchase. In the event of product defects, you have legal rights towards the seller. These statutory rights are not restricted by our warranty as described below.
Warranty conditions
The warranty period commences upon the date of purchase. Please keep the original receipt in a safe place as it is required as proof of purchase. If any material or manufacturing faults occur within three years of purchase of this product, we will repair or replace the product free of charge as we deem appropriate.
Warranty period and legal warranty rights
The warranty period is not extended in the event of a warranty claim. This also applies to replaced and repaired parts. Any damage or defects discovered upon purchase must be reported immediately when the product has been unpacked. Any repairs required after the warranty period will be subject to charge.
Scope of warranty
The device was carefully manufactured in compliance with stringent quality guidelines and subjected to thorough testing before it left the works. The warranty applies to material and manufacturing faults. This warranty does not cover product components which are subject to normal wear and which can therefore be regarded as wearing parts, or damage to fragile components such as switches, rechargeable batteries or components made of glass. This warranty is void if the product is damaged, incorrectly used or serviced. To ensure correct use of the product, always comply fully with all instructions contained in the user manual. The warnings and recommendations in the user manual regarding correct and incorrect use and handling of the product must always be observed and complied with. The product is solely designed for private use and is not suitable for commercial applications. The warranty is rendered void in the event of incorrect handling and misuse, if it is subjected to force, and also if any person other than our authorised service technicians interfere with the device. No new warranty period commences if the product is repaired or replaced.
Submitting warranty claims
To ensure speedy handling of your complaint, please note the following:
Before using your product for the first time, please read the enclosed documentation carefully. Should any problems arise which cannot be solved in this way, please call our hotline.
- Always have your receipt, the product article number as well as the serial number (if available) to hand as proof of purchase.
- If it is not possible to solve the problem on the phone, our hotline support staff will initiate further servicing procedures depending on the fault.

Service

Phone: 020 - 70 49 04 03
E-Mail: service.GB@targa-online.com

Phone: 01-4370121
E-Mail: service.IE@targa-online.com

Phone: 027 78 11 03
E-Mail: service.MT@targa-online.com

Phone: 02 - 20 09 025
E-Mail: service.CY@targa-online.com
IAN: 288294

Manufacturer
Please note that the following address is not a service address. First contact the service point stated above.
TARGA
GmbH
Coesterweg 45
DE-59494 Soest
GERMANY
Περιεχόμενα
natural_image
Exterior view of a modern kitchen grater with black handles and mesh grille (no text or symbols visible)natural_image
Mechanical tool interacting with a meshed surface, showing a handle and tool path (no text or symbols)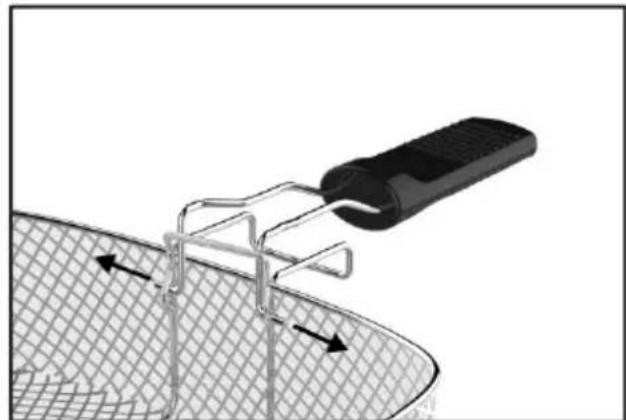
natural_image
Diagram of a tool interacting with a meshed surface, showing directional arrows (no text or symbols)
natural_image
Symbol of a trash bin with no text or labels, crossed by two diagonal lines and a solid black rectangle below (no text or symbols present)natural_image
Exterior view of a modern stainless steel baking pan with a mesh grating (no text or symbols visible)natural_image
Diagram of a tool applying material to a mesh surface, showing mechanical components and directional arrows (no text or symbols)
natural_image
Diagram of a mechanical clamp or bracket assembly with directional arrows indicating movement (no text or symbols present)
natural_image
Symbol of a trash bin with crossed lines indicating no waste or restriction (no text or labels)