
POWPG60140 - Leaf blower PowerPlus - Free user manual and instructions
Find the device manual for free POWPG60140 PowerPlus in PDF.


| Product type | Thermic leaf blower/vacuum |
| Engine power | 0.8 kW |
| Max. air speed | 260 km/h |
| Average air volume | 11.6 m³/min |
| Tank capacity | 400 ml |
| Fuel | E10 unleaded petrol, mixture 40:1 (petrol/2-stroke oil) |
| Max. engine speed | 8300 rpm |
| Collection bag capacity | 55 L |
| Sound pressure level | 94 dB(A) |
| Sound power level | 109 dB(A) |
| Vibrations | 2.1 m/s² (K=1.5 m/s²) |
| Spark plug type | Champion |
| Functions | Blowing, vacuuming, leaf shredding |
| Assembly | Flat/round nozzle for blowing, suction tubes and bag for vacuuming |
| Routine maintenance | Clean air filter every 25 h, drain fuel if storage >30 days, check spark plug |
| Safety | Emergency stop (on/off switch), hearing and eye protection recommended |
| Usage | Private only, not in rain, keep people and animals at 15 m |
| Package contents | Unit, strap, bag, nozzles, tubes, tools (screwdriver, spark plug wrench, hex key) |
Frequently Asked Questions - POWPG60140 PowerPlus
User questions about POWPG60140 PowerPlus
0 question about this device. Answer the ones you know or ask your own.
Ask a new question about this device
Download the instructions for your Leaf blower in PDF format for free! Find your manual POWPG60140 - PowerPlus and take your electronic device back in hand. On this page are published all the documents necessary for the use of your device. POWPG60140 by PowerPlus.
USER MANUAL POWPG60140 PowerPlus
natural_image
Green PRO POWER blower with black and red components, no visible text or symbols on the device itself.
POWERPLUS
NL NEDERLANDS VERTAALDE VERSIE VAN DE ORIGINELE HANDLEIDING
FR FRANÇAIS TRADUCTION DU MODE D'EMPLOI D'ORIGINE
EN ENGLISH ORIGINAL INSTRUCTION MANUAL
Fig. 1

Fig. 2

natural_image
Line drawing of a mechanical device pouring liquid into a container (no text or symbols)Fig. 3

Fig. 4

natural_image
Line drawing of a person in protective gear using a handheld vacuum cleaner (no text or symbols)Fig. 5

natural_image
Illustration of two different hand positions: one with a hairdryer and the other seated in a chair, both without any text or symbols.Fig. 6

natural_image
Technical line drawing of a mechanical component with no visible text or symbolsFig. 7

Fig. 8
natural_image
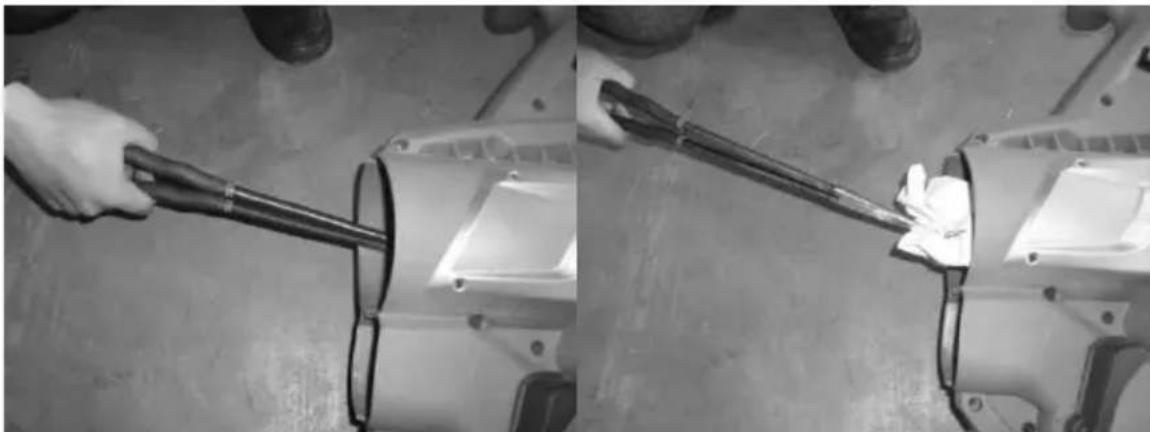
Two black-and-white photos showing a hand holding a tool inside a mechanical component, with no visible text or symbols.Fig. 9
POWERPLUS
POWPG60140 NL
1 TOEPASSINGSGEBIED 3
2 BESCHRIJVING (FIG. A)....3
3 INHOUD VAN DE VERPAKKING....3
4 TOELICHTING VAN DE SYMBOLEN 4
5 ALGEMENE VEILIGHEIDSVOORSCHRIFTEN ....4
6 AANVULLENDE VEILIGHEIDSWAARSCHUWINGEN ....5
7 AANVULLENDE VEILIGHEIDSVOORSCHRIFTEN VOOR BENZINE 6
8 ASSEMBLAGE 6
2 BESCHRIJVING (FIG. A)
11 PROBLEEMOPLOSSING
natural_image
Simple line drawing of a rounded rectangular shape with a small protrusion (no text or symbols)Philippe Vankerkhove
Regelgevings- en compliancemanager
22/02/2019, Lier - Belgium
POWERPLUS
POWPG60140 FR
1 UTILISATION ....3
2 DESCRIPTION (FIG. A) 3
3 LISTE DES PIÈCES CONTENUES DANS L'EMBALLAGE .... 3
4 PICTOGRAMMES 4
5 CONSIGNES DE SÉCURITÉ GÉNÉRALES ......4
6 CONSIGNES DE SÉCURITÉ COMPLÉMENTAIRES ....5
7 AVERTISSEMENTS DE SÉCURITÉ CONCERNANT L'ESSENCE6
8 MONTAGE....6
natural_image
Simple line drawing of a rounded rectangular shape with no text or symbolsPhilippe Vankerkhove
22/02/2019, Lier - Belgium
POWERPLUS
POWPG60140 EN
1 APPLICATION....3
2 DESCRIPTION (FIG. A) 3
3 PACKAGE CONTENT LIST....3
4 SYMBOLS 4
5 GENERAL POWER TOOL SAFETY WARNINGS ....4
6 ADDITIONAL SAFETY INSTRUCTIONS ....5
7 PETROL SAFETY WARNINGS 6
8 ASSEMBLY 6
8.1 Use as a blower (Fig. 1)....6
8.2 Use as a vacuum collector (Fig. 2)....6
9 USE....7
9.1 Fueling....7
9.1.1 Recommended petrol....7
9.2 Use....7
9.2.1 Starting a cold engine (Fig. 4)....7
9.2.2 Starting a warm engine....7
9.2.3 To stop the engine 8
9.2.4 Use as a blower (Fig. 5)....8
9.2.5 Use as a vacuum collector (Fig 6)....8
10 CLEANING AND MAINTENANCE....9
10.1 May be performed by the user :....9
10.1.1 AIR FILTER (Fig. 7) 9
10.1.2 FUEL 9
10.1.3 SPARK PLUG (Fig. 8)....9
10.2 Maintenance to be performed by an authorized service center or qualified person: 10
10.2.1 FUEL FILTER....10
10.2.2 CARBURETTOR....10
10.2.3 SILENCER....10
10.3 How to solve a blockage (Fig. 9):....10
11 TROUBLE SHOOTING 10
POWERPLUS
POWPG60140 EN
11.1 Power loss or sudden stopping of the engine 10
11.2 Clean Fuel Filter (by authorized person only / see 10.2)....10
12 STORAGE 10
13 TECHNICAL DATA 11
14 NOISE....11
15 WARRANTY....11
16 ENVIRONMENT 12
17 DECLARATION OF CONFORMITY 13
POWERPLUS
POWPG60140 EN
BLOWVAC 27.6CC
POWPG60140
1 APPLICATION
The blower/vacuum is designed to blow/vacuum leaves as well as lawn debris such as grass clippings and small twigs. It is not to be used for any other purpose. The device is only to be used on dry surfaces. The device is intended for non-commercial use in private home* and gardens. Under no circumstances is it to be used in public outdoor areas, sports stadiums or in agricultural or forestry settings. It is not designed for commercial use.

WARNING! Read this manual and general safety instructions carefully before using the appliance, for your own safety. Your power tool should only be passed on together with these instructions.
2 DESCRIPTION (FIG. A)
- Flat blower nozzle 9. Throttle trigger
- Round blower nozzle 10. Lock lever
- Upper blower tube 11. Choke lever
- Bended collect bag tube 12. Primer bulb
- Upper vacuum tube 13. Fuel cap
- Lower vacuum tube 14. Fuel tank
- Collect bag 15. Shoulder belt
- On/Off switch 16. Starter rope
3 PACKAGE CONTENT LIST
■ Remove all packing materials
■ Remove remaining packaging and transit supports (if existing)
- Check the completeness of the packing content
- Check the appliance, the power cord, the power plug and all accessories for transportation damages.
- Keep the packaging materials as far as possible till the end of the warranty period. Dispose it into your local waste disposal system afterwards.

WARNING Packing materials are no toys! Children must not play with plastic bags! Danger of suffocation!
1 x Blow/vac 1 x bended collect bag tube
1 x Shoulder belt 1 x bottle for 2-cycle lubricant (empty)
1 x Manual 1 x screw driver
1 x Collect bag 1 x spark plug wrench
2 x blower nozzle 1 x hex wrench
1 x Blower tube
2 x Suction tube

When parts are missing or damaged, please contact your dealer.
4 SYMBOLS
In this manual and/or on the machine the following symbols are used:
 | Denotes risk of personal injury or damage to the tool. |  | Wear noise protection |
 | Read the manual carefully before use. |  | Wear eye protection |
 | In accordance with essential requirements of the European directive(s) |  | Never operate the machine in the rain or in damp or wet conditions. |
 | Blowers and blower vacuums. Rotating impeller blades can cause severe injury |  | Keep bystanders away |
 | Warning! Flying objects |  | Risk of fire |
 | Further Information |  | Wearing of protective shoes advised |
 | Wear gloves | ||
5 GENERAL POWER TOOL SAFETY WARNINGS
WARNING! When using power driven gardening appliances, basic safety precautions should always be followed to reduce the risk of fire, electric shock and personal injury, including the following:
- Be familiar with the controls and proper use of the product.
- Clear the work area before each use. Remove all objects, such as rocks, broken glass, nails, wire or string that can be thrown or become entangled in the cutting line.
- Wear heavy, long trousers, boots and gloves. Do not wear loose fitting clothing, shorts or go bare foot.
- Do not wear jewelry of any kind.
- Secure hair above shoulder level to prevent entanglement in moving parts.
- Do not allow children or untrained individuals to use this product.
- Keep all bystanders, especially children and pets, at least 15 m from the operating area.
- Do not operate this product when you are tired, ill or under the influence of alcohol, drugs or medication.
- Do not operate in poor lighting. Use the unit only in daylight or good artificial light.
- Keep firm footing and balance. Do not overreach.
- Overreaching can result in loss of balance or exposure to hazards.
- Keep all parts of your body away from moving parts.
- Inspect the product before use. Replace any damaged parts before use.
- Do not operate the product in damp or wet locations.
POWERPLUS
POWPG60140 EN
- Do not use the product in the rain.
- Wear safety glasses or goggles when operating this product.
- Use the right product. Use the product for the intended purpose only.
- Do not use the product if the switch does not turn the product on or off. A product that cannot be controlled with the switch is dangerous and must be repaired.
- Avoid accidental starting.
■ Use common sense when using this product. - Stay alert and pay attention to what you are doing.
- Do not force the product. It will do a better job with less likelihood of a risk of injury when you operate it at the rate for which it was designed.
- Pull the plug out immediately if the mains or extension lead is damaged or severed.
- Disconnect the product from the power supply when it is not in use, before servicing and when changing accessories.
- The appliance is not intended for use by young children or infirm persons.
- Young children should be supervised to ensure that they do not play with the appliance.
- Disconnect blower if you notice unusual vibrations.
- Do not blow vegetal pieces towards bystanders.
■ Store the blower in a dry place. - Try to keep exposure to vibrations as low as possible. Exemplary measures to reduce exposure to vibration are wearing gloves during use of the tool and the limitation of working hours.

Warning! Do not work near open windows, etc.
■ It is recommended;
– to operate the machine only at reasonable hours – not early in the morning or late at the evening when others might be disturbed.
- that before blowing/vacuuming you first loosen the debris with a rake or broom.
- that in dusty conditions you lightly moisturize the surface.
- to turn the entire vacuum nozzle so the air stream can work close to the ground.
6 ADDITIONAL SAFETY INSTRUCTIONS
- To prevent damage to your hearing, wear earplugs, helmet with a visor.
- Do not use the machine to pick up humid material, water, liquids, pieces of glass, iron, stones or tin cans; this could damage your machine and chance to be injured.
- Do not use the machine to pick up hot embers or material, which is burning, smoking or smoldering.
- Do not use the machine to pick up material that has been contaminated by inflammable or explosive substance.
- Do not use the machine to pick up lighten cigarettes.
- Do not suck in highly inflammable fumes.
- Always make sure that the material picked up by your machine is not inflammable, toxic, or explosive.
- Do not use without the quick release collect bag in place.
- Do not manually insert objects into the suction nozzle.
- Do not put part of your body such as hands and fingers into the nozzle or exhaust opening.
- Do not switch the machine ON in enclosed or poorly ventilated space or in the presence of inflammable and / or explosive substance such as liquids, gas etc.
POWERPLUS POWPG60140 EN
7 PETROL SAFETY WARNINGS
- WARNING: Use extra care in handling fuels. They are flammable and the vapours are explosive. The following points must be observed.
- Use only an approved container.
- Never remove the fuel cap or add fuel with the power source running. Allow engine exhaust components to cool before refueling.
- Do not smoke.
■ Never refuel the machine indoors. - Never store the machine or fuel containers inside, where is an open flame, such as a water heater.
- If fuel is spilled, do not attempt to start the power source, but move the machine away from the area of spillage before starting.
- Always replace and securely tighten the fuel cap after refueling.
- If the tank is drained, this should be done outdoors.
8 ASSEMBLY
8.1 Use as a blower (Fig. 1)
Align the protrusions of the first blower tube (1) with the air outlet nozzle compartments (2), then push the tube until it is fitting firmly in place.
Align the compartment of the second blower tube (3) with the protrusion (4) of the first tube, push the tube in and rotate it 90 degrees clockwise to one of the two foreseen positions, until it is fitting firmly in place.
NOTE Fit the second tube with a flat or round end depending on the type of work to be accomplished.
To remove the first tube (1), insert the screwdriver included in the kit in the hole (5) and press firmly until you can slide the tube out from the air outlet nozzle.
8.2 Use as a vacuum collector (Fig. 2)
Align the protrusions of the bag coupling tube (1) with the air outlet nozzle compartments (2), then push the tube until it is fitting firmly in place.
Insert the end nozzle of the coupling tube (1) in the bag inlet (3) and close the inlet with the velcro fastener provided (4).
Connect the first vacuum tube (5) to the second (6), aligning the two reference arrows (7) and pushing it as far as possible until the protrusion (6a) of the second tube is firmly inserted in the hole (5a) of the first vacuum tube.
Insert the screwdriver included in the kit in the hole (8) and press to release the catch and open the intake grille (9).
Align the reference plugs (10) with their respective compartments (11) on the first vacuum tube and turn it counter clockwise, until it is fitted firmly in place.
Position the bag over the shoulder and use the adjustable shoulder strap to regulate the height.
NOTE The machine is correctly assembled when the rounded part of the chute is pointed towards the ground.

The vacuum blower needs to be completely mounted before you can use this tool!
9 USE
9.1 Fueling
MOTOR FUEL: mix the petrol and oil at 40:1 only - 2 stroke
- Use fresh unleaded petrol. You must use 100% synthetic oil specifically made for heavily stressed two stroke engines.
- Mix the petrol and oil in an approved container. Never mix fuel directly in the line trimmer fuel tank.
- Place the brush cutter upright on the ground or on a sturdy bench and wipe any debris from around the fuel cap.
- Unscrew the fuel tank cap and pour the mixture into the tank with the aid of a funnel.
- Be careful not to spill any mixture. If this happens, wipe the spill with a clean rag.
- Start the engine at least three metres away from the area where the fuel tank has been filled up in order to avoid any risk of fire.
9.1.1 Recommended petrol
Some standard petrol are enriched with oxygen-containing compounds such as alcohol or ether to comply with regulations on clean air. The motor is designed to work well on any car petrol, including these enriched petrol, on the condition that the above mixing ratios are observed!
9.2 Use
9.2.1 Starting a cold engine (Fig. 4)
A "cold" start of the engine means starting it after at least 5 minutes from when it was switched off or after refueling.
- Move lever (2) to «CHOKE».
- Press the primer device button (3) 7 to 10 times to prime the carburetor.
-
Hold the machine firmly with one hand on the hand grip (6), in order not to lose control of the machine during starting.
-
Pull the starter rope slowly for 10 - 15 cm until you feel some resistance, then tug it hard a few times until you hear the engine turn over.

IMPORTANT To avoid breaking the starter rope, do not pull the whole length of it or let it slide along the edge of the cable guide hole. Release the starter gradually, to avoid letting it fly back uncontrollably.
- Switch the lever (2) to the «RUN» position.
- Pull the starter grip again, and press the throttle trigger all the way (4) until the engine starts as normal.
- When the engine has started, press and release the throttle trigger (4) to allow the engine to run idle.
- Heathen the engine a little using the throttle trigger to warm it up before using the machine.

IMPORTANT If the starter rope is pulled repeatedly with the choke on, it may flood the engine and make starting difficult. If you happen to food the engine, repeat the hot start procedure a few times to eliminate any excess fuel.
9.2.2 Starting a warm engine
If fuel tank was not run dry, pull the starter rope. one to three times and the machine should start.
9.2.3 To stop the engine
- Push the on/off switch to the "O" position and hold it down for a few seconds until the engine stops.

Do not to touch the motor with your hands when the machine is running or has just stopped running, it may hurt you because the surface might be hot.
9.2.4 Use as a blower (Fig. 5)

WARNING: The machine must always be firmly gripped with your right hand on the upper handgrip during work.
Engine speed should be adjusted to the type of material to be removed:
- use the engine at low speed for lightweight material and small bushes on the lawn;
- use the engine at average speed to move grass and lightweight leaves on pavement or solid ground;
- use the engine at high speed for heavier materials like fresh snow or voluminous dirt.

WARNING: Always pay the utmost attention to prevent removed material or dust from injuring people or animals or damaging property. Always assess wind direction and never work against the wind.
9.2.5 Use as a vacuum collector (Fig 6)

IMPORTANT: The machine must always be firmly held with both hands during work. Place your right hand on the upper handgrip and your left hand on the lower handgrip so that the bag is on the left-hand side of the operator.
- When used as a vacuum collector, it is best to use the engine at average/high speed.
-
During collection, keep the rounded end of the tube a few centimeters off the ground. The bag also works as a filter similar to a common home vacuum. For this reason it is best that:
-
it is always free to expand and the support strap not tangled;
- it is not fully filled;
- collected objects that could jeopardize integrity are promptly removed.
To empty the bag:
■ switch the engine of;
- open the zipper (1) and empty the bag without disconnecting it from the fitting tube.

IMPORTANT When used as a vacuum collector, do not collect damp grass or leaves to avoid clogging the rotor and coil.
When using the machine as a vacuum collector, there is a risk of inadvertently suctioning objects which can obstruct the machine and block the rotor. In this case:
- switch the motor off immediately; disassemble the vacuum tube;
- remove the foreign body from inside the vacuum inlet.
Check if nothing is blocking the rotor before using the machine again.
10 CLEANING AND MAINTENANCE

The repair and/or replacement of the critical parts may not be done by the user. It must be performed by a qualified technician (professional person).
10.1 May be performed by the user :
10.1.1 AIR FILTER (Fig. 7)
- Inspect the air filter regularly. Clean it at least every 25 hours or replace with a new one if necessary.
- Open the air filter case. Tap the filter on a stable surface to remove dust. Use high pressure air (max. 3 bar) to remove stubborn dust.
- Apply a small amount of air filter oil on the filter to increase the filter performance. Wring out surplus oil and put the filter into the case.
- Close the air filter case.
10.1.2 FUEL
- Empty the fuel tank when storing the petrol blow vac over 30 days to avoid deterioration of the fuel.
- Open the tank by unscrewing the tank cap and use a proper fuel pump to empty the tank. NOTE: Petrol deteriorates over time. Engine starting may be difficult if you use petrol kept for more than 30 days. Always empty the fuel tank when storing over 30 days.
10.1.3 SPARK PLUG (Fig. 8)
- Inspect the spark plug at least every 25 hours, clean and replace with a new one if necessary.
- Unplug the spark plug connector by pulling.
- Loosen the spark plug with the spark plug wrench and remove it.
- The color of the electrode shall be light brown.
- Remove debris like oil with a brass brush. Do not force the brush to avoid any damage.
- Dry the spark plug with a soft cloth if it is wet.
- Check the spark plug gap. It should be 0.6-0.7mm.
- Replace with a new spark plug if you find damages like cracks or a splintered insulation.
- Screw in the spark plug by hand, and then tighten it with a spark plug wrench.

WARNING! Do not over tighten the spark plug to avoid any damage!
POWERPLUS POWPG60140 EN
10.2 Maintenance to be performed by an authorized service center or qualified person:
10.2.1 FUEL FILTER
The fuel tank of this petrol blowvac is fitted with a filter located at the free end of fuel pipe. Periodically ask an authorised service center or similar qualified person to check and replace it.
10.2.2 CARBURETTOR
The carburettor is preadjusted by the manufacturer. Should it be necessary to make any changes please contact an authorised service center or similar qualified person.

Do not attempt to make adjustments by yourself.
10.2.3 SILENCER
Should it be necessary to make any changes or replacement, please contact an authorized service center or similar qualified person.
10.3 How to solve a blockage (Fig. 9):
Switch off the machine and wait for the motor to stop completely. Disconnect tube from engine housing. Use a tool (pliers) to remove objects that block the shredding fans.
11 TROUBLE SHOOTING
11.1 Power loss or sudden stopping of the engine
- Check whether the fuel tank is empty. Fill with fuel if empty.
■ The mixture does not reach the carburettor. Clean the fuel filter in the fuel tank. (see 11.2) - There is water in the mixture. Drain and rinse the entire fuel system.
■ The air filter is dirty. Clean the air filter. - There are carbon deposits in the cylinder exhaust pipe or the muffler. Clean those or change the muffler.
11.2 Clean Fuel Filter (by authorized person only / see 10.2)
■ The fuel tank is fitted with a filter.
- Filter is situated at the free end of fuel pipe and can be picked out through fuel port with a piece of hooked wire or the like.
- Check the fuel filter periodically. Do not allow dust to enter the fuel tank. Clogged filter will cause difficulty when starting engine
- When the filter is dirty, clean or replace the filter.
- When the inside of the fuel tank is dirty, it can be cleaned by rinsing the tank out with petrol.
12 STORAGE
■ Remove the blower tube and nozzle.
- Drain and clean the fuel tank.
- Run machine until carburettor is dry. This helps to prevent the carburettor diaphragms sticking together.
■ Thoroughly clean the machine.
- Storing the machine in a dry, high or locked location out of the reach of children and other unauthorized persons.
13 TECHNICAL DATA
| Max air speed | 260km/h |
| Engine power | 0,8 kW |
| Fuel tank | 400 ml |
| Fuel type | E10 |
| Fuel mixture | 40:1 |
| Max. engine speed | 8300 rpm |
| Average air volume | 11.6 m^3 /min |
| Collecting bag | 55 L |
| Spark plug type | Champion |
14 NOISE
Noise emission values measured according to relevant standard. (K=3)
| Acoustic pressure level LpA | 94 dB(A) |
| Acoustic power level LwA | 109 dB(A) |

ATTENTION! Wear hearing protection when sound pressure is over 85 dB(A).
aw (Vibration)
Max 2.1m/s²
K = 1,5 ~m / s^2
15 WARRANTY
- This warranty covers all material or production flaws excluding: batteries, chargers, defective parts subject to normal wear & tear such as bearings, brushes, cables, and plugs, or accessories such as drills, drill bits, saw blades, etc. ; damage or defects resulting from maltreatment, accidents or alterations; nor the cost of transportation.
- Damage and/or defects resulting from inappropriate use also do not fall under the warranty provisions.
■ We also disclaim all liability for any bodily injury resulting from inappropriate use of the tool. - Repairs may only be carried out by an authorised customer service centre for Powerplus tools.
- You can always obtain more information at the number 00 32 3 292 92 90.
- Any transportation costs shall always be borne by the customer, unless agreed otherwise in writing.
- At the same time, no claim can be made on the warranty if the damage of the device is the result of negligent maintenance or overload.
- Definitely excluded from the warranty is damage resulting from fluid permeation, excessive dust penetration, intentional damage (on purpose or by gross carelessness), inappropriate usage (use for purposes for which the device is not suitable), incompetent usage (e.g. not following the instructions given in the manual), inexpert assembly, lightning strike, erroneous net voltage. This list is not exhaustive.
- Acceptance of claims under warranty can never lead to the prolongation of the warranty period nor commencement of a new warranty period in case of a device replacement.
■ Devices or parts which are replaced under the warranty therefore remain the property of Varo NV. - We reserve the right to reject a claim whenever the purchase cannot be verified or when it is clear that the product has not been properly maintained. (Clean ventilation slots, carbon brushes serviced regularly, etc.).
- Your purchase receipt must be kept as proof of date of purchase.
POWERPLUS POWPG60140 EN
- Your appliance must be returned undismantled to your dealer in an acceptably clean state, (in its original blow-moulded case if applicable to the unit), accompanied by proof of purchase.
16 ENVIRONMENT
Should your appliance need replacement after extended use, do not discard it with the household rubbish but dispose of it in an environmentally safe way.
Please dispose of used motor oil in a manner that is compatible with the environment. We suggest you take it in a sealed container to your local service station for reclamation. Do not throw it in the trash or pour it on the ground.
VARO – Vic. Van Rompuy N.V. - Joseph Van Instraat 9 - BE2500 Lier - BELGIUM, declares that,
Product: Garden blower: gasoline operated
trade mark: PowerPlus
model: POWPG60140
is in conformity with the essential requirements and other relevant provisions of the applicable European Directives, based on the application of European harmonized standards. Any unauthorized modification of the apparatus voids this declaration.
European Directives (including, if applicable, their amendments up to the date of signature);
2006/42/EC
2014/30/EU
2000/14/EC Annex V LwA
Measured 107dB(A)
Guaranteed 109dB(A)
European harmonized standards (including, if applicable, their amendments up to the date of signature);
EN 15503: 2009 – A2
EN ISO 14982: 2009
Keeper of the Technical Documentation : Philippe Vankerkhove, VARO – Vic. Van Rompuy N.V.
The undersigned acts on behalf of the company CEO,
natural_image
Simple line drawing of a rounded rectangular shape with a small circular mark on the top right corner (no text or symbols)Philippe Vankerkhove
Regulatory Affairs – Compliance Manager
22/02/2019, Lier - Belgium
POWERPLUS
POWPG60140 DE
1 EINSATZBEREICH ....3
9.2.2 Warmstart....8
9.2.3 Motor abstellen 8
10.2.3 AUSPUFF....10
22/02/2019, Lier - Belgium
POWERPLUS
POWPG60140 ES
1 APLICACIÓN....3
22/02/2019, Lier - Belgium
POWERPLUS
POWPG60140 IT
1 APPLICAZIONE 3
22/02/2019, Lier - Belgium
POWERPLUS
POWPG60140 PT
22/02/2019, Lier - Belgium
POWERPLUS
POWPG60140 NO
1 BRUKSOMRÅDE 3
2 BESKRIVELSE (FIG. A) 3
3 PAKKENS INNHOLD 3
4 SYMBOLFORKLARING .... 4
5 GENERELLE SIKKERHETSADVARSLER 4
6 YTTERLIGERE SIKKERHETSINSTRUKSJONER ....5
7 SIKKERHET VED HÄNDTERING AV BENSIN....5
8 MONTASJE 6
10.2.3 LYDDEMPER....9
Regulatory Affairs – Compliance Manager
22/02/2019, Lier - Belgium
POWERPLUS
POWPG60140 DA
1 ANVENDELSE 3
2 BESKRIVELSE (FIG. A) 3
3 MEDF∅LGENDE INDHOLD 3
4 SYMBOLER....4
5 GENERELLE SIKKERHEDSFORSKRIFTER 4
6 SUPPLERENDE SIKKERHEDSFORSKRIFTER 5
7 SIKKERHEDSADVARSLER FOR BENZIN......6
8 MONTERING 6
Regulatory Affairs – Compliance Manager
22/02/2019, Lier - Belgium
POWERPLUS
POWPG60140 CS
1 OBLAST POUŽITÍ....3
2 POPIS (OBR. A)....3
3 SEZNAM OBSAHU BALENÍ....3
4 SYMBOLY 4
5 OBECNÁ BEZPEČNOSTNÍ UPOZORNĚNÍ PRO MOTOROVÉ NÁSTROJE 4
6 DOPLŇKOVÉ BEZPEČNOSTNÍ POKYNY ...... 5
7 BEZPEČNOSTNÍ UPOZORNĚNÍ OHLEDNĚ BENZÍNU......6
8 MONTÁŽ....6
22/02/2019, Lier - Belgium
POWERPLUS
POWPG60140 RO
1 DOMENII DE UTILIZARE....3
2 DESCRIERE (FIG. A)....3
3 CONTINUTUL PACHETULUI .... 3
4 SIMBOLURI....4
5 AVERTISMENTE GENERALE DE SIGURANTĂ PRIVIND APARATUL CU MOTOR 4
6 INSTRUCTIUNI SUPLIMENTARE DE SIGURANTĂ ....5
7 AVERTISMENTE PRIVIND SIGURANȚA LA LUCRUL CU BENZINĂ 6
8 MONTAJ....6
22/02/2019, Lier - Belgium
POWERPLUS
POWPG60140 BG
1 ПРЕДНАЗНАЧЕНИЕ НА ИНСТРУМЕНТА....3
2 ОПИСАНИЕ (ФИГ. А) 3
3 СПИСЪК НА СЪДЪРЖАНИЕТО НА ОПАКОВКАТА....3
4 СИМВОЛИ .... 4
22/02/2019, Lier - Belgium
natural_image
Close-up of a green mechanical device with red and black components, possibly a gun or weapon (no visible text or symbols)
WWW.VARO.COM
DESIGNED AND MARKETED BY VARO
©copyright by varo
VARO - VIC. VAN ROMPUY nv
JOSEPH VAN INSTRAAT 9 - 2500 LIER - BELGIUM
OFFICES:

- POWERPLUS
- POWPG60140 NL
- BESCHRIJVING (FIG. A)
- PROBLEEMOPLOSSING
- POWPG60140 FR
- POWPG60140 EN
- BLOWVAC 27.6CC
- POWPG60140
- APPLICATION
- DESCRIPTION (FIG. A)
- PACKAGE CONTENT LIST
- SYMBOLS
- GENERAL POWER TOOL SAFETY WARNINGS
- Warning! Do not work near open windows, etc.
- ADDITIONAL SAFETY INSTRUCTIONS
- POWERPLUS POWPG60140 EN
- PETROL SAFETY WARNINGS
- ASSEMBLY
- Use as a blower (Fig. 1)
- Use as a vacuum collector (Fig. 2)
- USE
- Fueling
- Recommended petrol
- Use
- Starting a cold engine (Fig. 4)
- Starting a warm engine
- To stop the engine
- Use as a blower (Fig. 5)
- Use as a vacuum collector (Fig 6)
- To empty the bag:
- CLEANING AND MAINTENANCE
- May be performed by the user :
- AIR FILTER (Fig. 7)
- FUEL
- SPARK PLUG (Fig. 8)
- Maintenance to be performed by an authorized service center or qualified person:
- FUEL FILTER
- CARBURETTOR
- Do not attempt to make adjustments by yourself.
- SILENCER
- How to solve a blockage (Fig. 9):
- TROUBLE SHOOTING
- Power loss or sudden stopping of the engine
- Clean Fuel Filter (by authorized person only / see 10.2)
- STORAGE
- NOISE
- ATTENTION! Wear hearing protection when sound pressure is over 85 dB(A).
- WARRANTY
- ENVIRONMENT
- POWPG60140 DE
- POWPG60140 ES
- POWPG60140 IT
- POWPG60140 PT
- POWPG60140 NO
- POWPG60140 DA
- POWPG60140 CS
- POWPG60140 RO
- POWPG60140 BG
Brand : PowerPlus
Model : POWPG60140
Category : Leaf blower