
IAN 282437 - Barbecue FLORABEST - Free user manual and instructions
Find the device manual for free IAN 282437 FLORABEST in PDF.

| Product Type | Round Barbecue |
| Brand | Florabest |
| Model | IAN 282437 |
| Dimensions (W x H x D) | Approx. 48 x 85 x 56 cm |
| Fuel Type | Charcoal |
| Maximum Charcoal Capacity | 1 kg |
| Material | Steel with heat-resistant paint |
| Assembly Required | Yes, with included assembly kit |
| Intended Use | Outdoor cooking only |
| Safety Features | Ventilation discs, lid holder, heat protection handle |
| Cooking Surface | Grill rack with charcoal divider |
| Wheels | 2 wheels for mobility |
| Ash Collection | Removable ash collection tray |
| Warranty | 3 years from date of purchase |
| Included Components | 1 barbecue, assembly material kit, instructions |
| Cleaning Instructions | Cool completely, clean with warm soapy water, avoid abrasives |
| Ignition Method | Use firelighters complying to EN 1860-3 |
| Grilling Methods | Direct and indirect grilling |
| Lid | Yes, with ventilation disc |
| Legs | 3 legs (tripod) + 1 wheel leg |
Frequently Asked Questions - IAN 282437 FLORABEST
User questions about IAN 282437 FLORABEST
0 question about this device. Answer the ones you know or ask your own.
Ask a new question about this device
Download the instructions for your Barbecue in PDF format for free! Find your manual IAN 282437 - FLORABEST and take your electronic device back in hand. On this page are published all the documents necessary for the use of your device. IAN 282437 by FLORABEST.
USER MANUAL IAN 282437 FLORABEST
ROUNDBARBECUE
GB IE NI
ROUND BARBECUE
Assembly, operating and safety instructions
NL BE
KOGELBARBECUE
natural_image
Illustration of a screwdriver tip and its magnified view showing the tip detail (no text or symbols)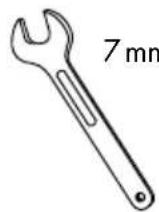
7mm & 10mm
Mounting material · Montagemateriale · Montagemateriaal · Montagematerial:
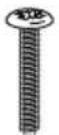 |  |  |  |  |  |  |  |  |  |
| M6x253x | M4x102x | M6x106x | ø4xø122x | ø6xø126x | ø6xø203x | M42x | M66x | M62x | ø6xø122x |
A
natural_image
Two identical photos of a barbecue grill with flames and a side view showing its interior, no text or symbols present.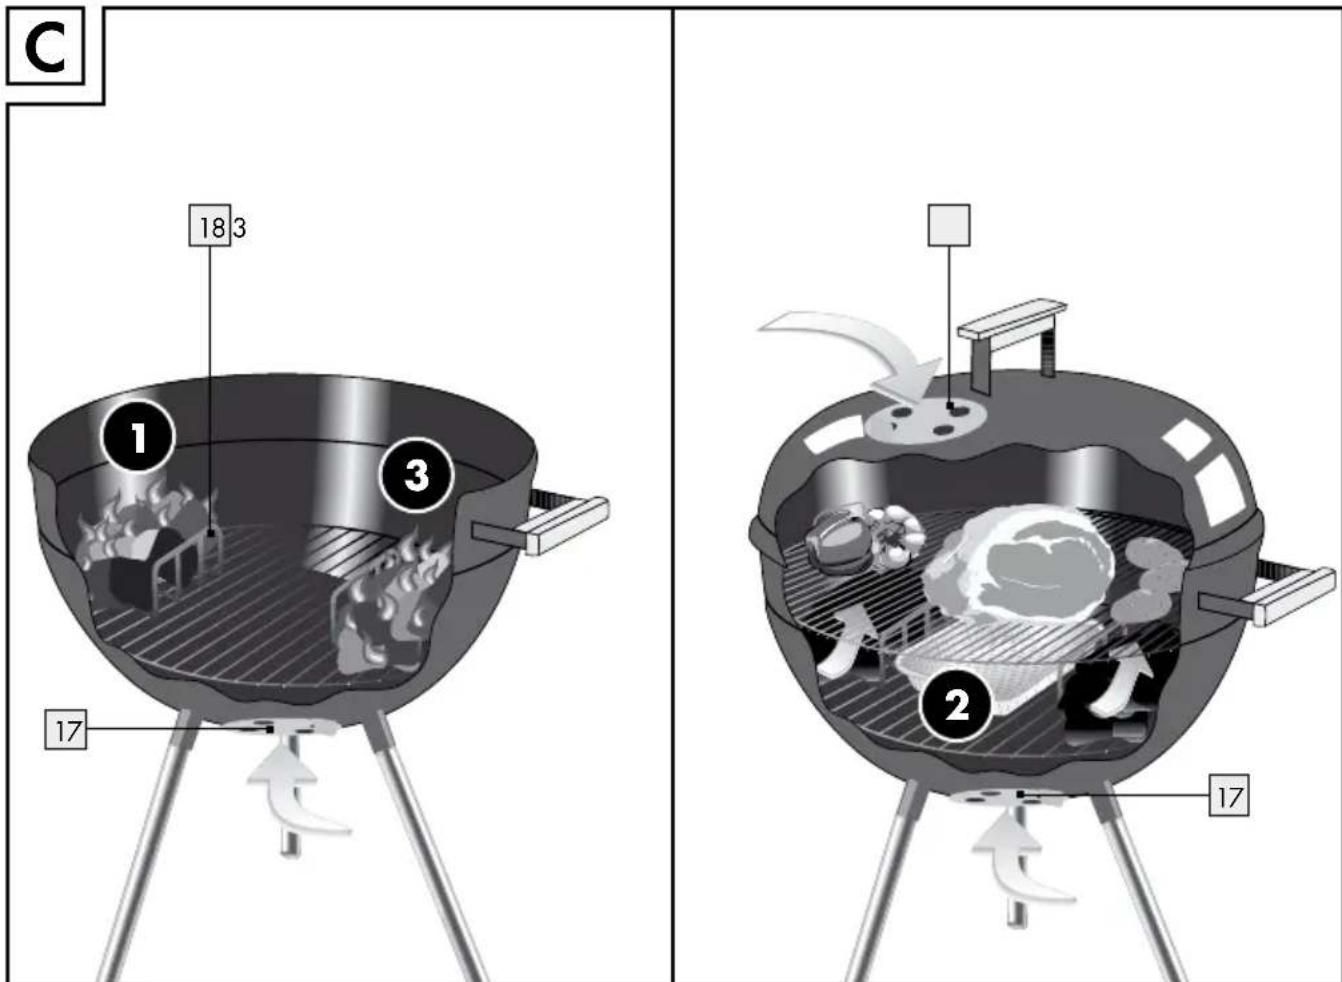
Introduction......Page 6
Intended Use Page 6
Parts Description......Page 6
Technical Data Page 6
Scope of delivery....Page 6
Safety Notices....Page 6
Installation......Page 7
Use Page 8
Direct grilling Page 8
Indirect grilling....Page 8
Igniting the fuel....Page 8
Cleaning and Care Page 9
Disposal Page 9
Warranty Page 9
Round barbecue
- Introduction
We congratulate you on the purchase of your new product. You have chosen a high quality product. Familiarise yourself with the product before using it for the first time. In addition, please carefully refer to the operating instructions and the safety advice below. Only use the product as instructed and only for the indicated field of application. Keep these instructions in a safe place. If you pass the product on to anyone else, please ensure that you also pass on all the documentation with it.
IntendedUse
This product is only suitable for cooking foods suitable for grilling, and is for outdoor use only. This product is not suitable for commercial use or for any other use.
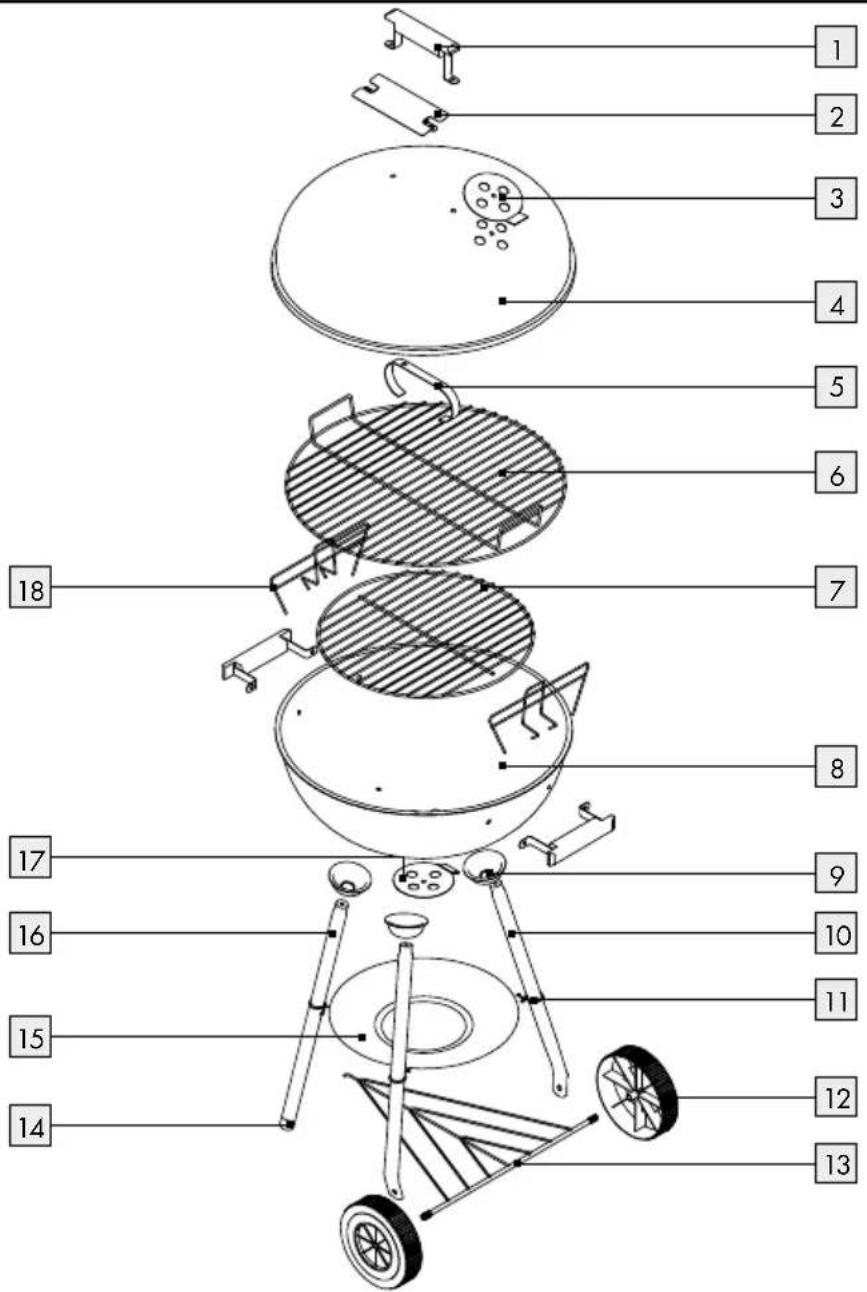
Parts Description
| 1 | Handle |
| 2 | Heat protection |
| 3 | Ventilation disk (curved, cover 4) |
| 4 | Lid |
| 5 | Lid holder |
| 6 | Grill rack |
| 7 | Charcoal rack |
| 8 | Fire bowl |
| 9 | Leg support |
| 10 | Wheel leg |
| 11 | Ash collecting tray support |
| 12 | Wheel |
| 13 | Mesh base |
| 14 | Stand cap (pre-assembled) |
| 15 | Ash collection tray |
| 16 | Tripod leg |
| 17 | Ventilation disc (flat, for fire bowl 8) |
| 18 | Charcoal divider |
- Technical Data
Dimensions: approx. 48 x 85 x 56 cm (w x h x d)
Max. capacity
(Fire bowl): 1 kg
Fuel: charcoal
- Scope of delivery
1 Round barbecue
1 Assembly material kit
1 Set of assembly instructions and instructions for use

Safety Notices
KEEP ALL SAFETY NOTICES AND INSTRUCTIONS FOR FUTURE REFERENCE!
⚠ WARNING! Keep children and pets away.
The product is not a toy - keep out of the reach of children. Children cannot recognise the risks associated with the use of the product.
■ Every effort was made during manufacturing to prevent sharp edges on this product. Handle the individual parts with care to prevent accidents or injuries during assembly and use.
The product includes a variety of screws and other small parts. These may prove life-threatening if swallowed or inhaled.

Prevent danger to life and the risk of injuries
WARNING: Danger of carbon monoxide poisoning. Do not use the barbecue indoors, only operate outdoors!
WARNING! Do not use spirit or petrol for lighting or re-lighting! Use only firelighters complying to EN 1860-3!
Do not use indoors!
- Keep an adequate distance to hot parts, as any contact may result in severe burns.
Hot grease may drip from the fire bowl during use. Keep an adequate distance, as severe burns may result.
■ Always wear barbecue gloves or oven mitts.
■ Always use barbecue tools with long, heat resistant handles.
Pouring flammable liquids into embers will cause spurts of flames or explosions. Never use lighter fluid such as petrol or spirits. Do not add charcoal soaked in lighter fluid to the fire.
■ Remain alert at all times always be aware of what you are doing. Do not use the product if you are unfocused or tired or under the influence of drugs, alcohol or medications. One moment of carelessness whilst using the product can cause serious injuries. Do not leave the product unattended.

Prevent fires
WARNING! This barbecue will become very hot, do not move it during operation.
- Keep a fire extinguisher and a First Aid kit handy to be prepared in the event of an accident or fire.
- Install the barbecue on a secure level base prior to use.
- Set the product at least 1 m from highly flammable materials.
■ Fill the product with max. 1 kg of charcoal.
■ Only light the charcoal in an area protected from the wind.
■ Ensure the charcoal has completely burnt out and cooled down before removing the ashes. - Do not install the product in caravans or on boats.

Avoid the danger o damage to property
The screw joints can gradually loosen from use and affect the stability of the product. Verify the screws are tight before every use. If necessary, tighten all screws to ensure stability.
- Do not use force when assembling the product.
■ Do not overtighten the screws.
■ Do not sit or stand on the product.
- Do not use the product if parts are missing, damaged or worn.
- Installation
⚠️ CAUTION! The screw heads must always face outwards to guarantee your safety, as otherwise there is a risk of injury.
Note: Tighten all screws securely after assembly to prevent undesirable material stresses. When doing so, secure the nuts using the appropriate spanner.
☐ Put an ash collecting tray support 11 and a leg support 9 onto each upper stand end 10, 16.
☐ Attach the legs 10, 16 to the fire bowl 8. To do this, use the M6 x 25 screws and the ∅ 6 x ∅ 20 washers (the screws are already pre-assembled).
☐ Hang the front projection of the mesh base 13 in the lower drill hole of the tripod leg 16.
☐ Guide the ends of the mesh base 13 through the drill holes at the end of the wheel leg 10. Attach the wheels 12 to the end of the mesh base 13 using the ∅ 6 x ∅ 12 plastic washers and M6 flat-headed nuts.
☐ Screw the handle 1 to the fire bowl 8 using the M6 x 10 screws, ∅ 6 x ∅ 12 washers and M6 nuts. Use the M6 x 10 screws, ∅ 6 x ∅ 12 washers and M6 nuts to attach the lid holder 5 to the handle 1 and the heat protection 2 to the inside of the lid 4.
☐ Affix the flat ventilation disk 17 to the fire bowl 8 using the M4 x 10 screws, ∅ 4 x ∅ 12 washers and M4 nuts. Repeat this step with the curved ventilation disc 3 and the lid 4.
☐ Clamp the ash collecting tray 15 to the ash collecting tray support 11 between the legs 10, 16
□ Tighten all the screws.
Place the charcoal rack 7 and the grill rack 6 in the fire bowl 8.
If necessary, place the charcoal divider 18 on the grill rack 7.
Use
Note: Wash the grill rack 6 with warm dishwater before prior to first use.
Note: We recommend heating the grill up prior to first use and allowing the fuel to burn out for at least 30 minutes.
Note: Only place food on the grill when the fuel is covered by a layer of ash!
Place the grill on a sturdy, level surface prior to use.
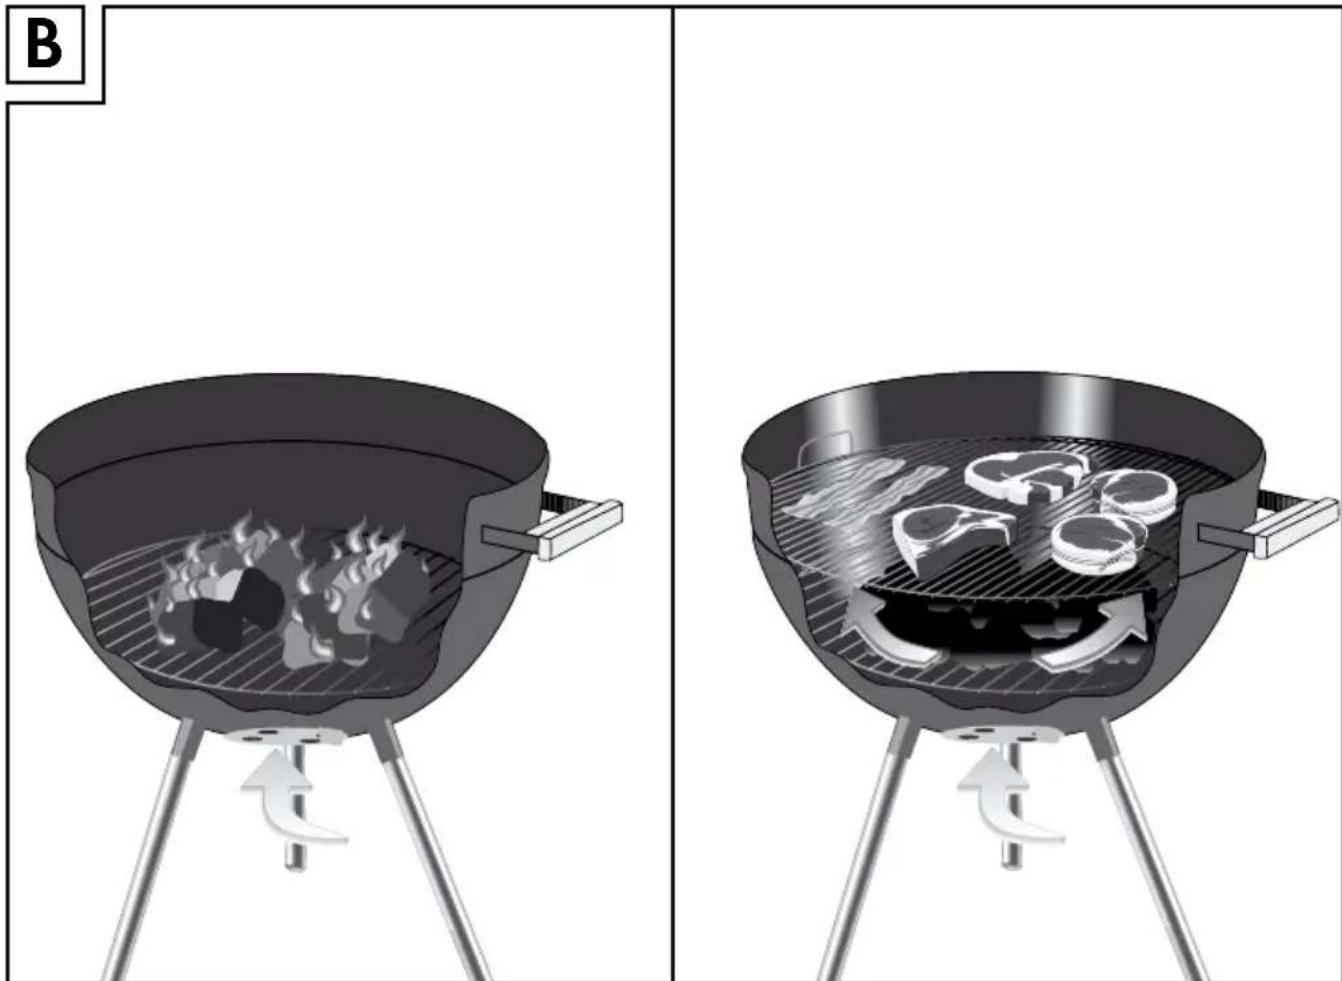
- Direct grilling (see Fig. B)
☐ "Direct grilling" refers to cooking food directly over the heat source (charcoal, gas burner, electric heating element, etc.). Thermal radiation has the strongest effect on the food when this traditional method is used, and this shortens the cooking time (quick cooking).
☐ Kettle barbecues and hooded barbecues also have a hooded cover and ventilation disks in the hood and fire bowl. The cooking time may be reduced further by closing the hood and opening the ventilation disks, the barbecue flavour becomes stronger if both of these options are taken.
☐ However, during exposed direct grilling it is possible that fat or marinade dripping from the food being grilled will fall into the heat source and burn.
☐ Therefore, when grilling very fatty or marinated foods, we recommend using a grill tray made from aluminium, or even better, one made from enamelled steel.
- Indirect grilling (see Fig. C)
To prepare the fire bowl 8 for indirect grilling, place the charcoal dividers 18 (consisting mostly of a wire frame) into the fire bowl supports intended for this purpose 8 or onto the charcoal rack 7. The fire bowl 8 is divided into three sections: Section 1 and 3 are the spaces
between charcoal dividers 18 and the side wall of the fire bowl 8.
☐ Section is the area between the charcoal dividers 18. This area must remain clear. If necessary, a drip tray or an aluminium bowl with some water in it may be placed here to catch any fat which drips down. Section 1 and 3 are filled with fuel and this is ignited according to the instructions. As soon as the correct temperature is reached, you can begin using the indirect grilling method.
☐ The grill rack over the embers is usually designed so that there is enough space over Section ① and ③ to directly grill, so that both methods may be used at the same time. Always use a lid when slowly and gently indirectly grilling your food. This is used to cover the fire bowl and therefore creates an enclosed cooking chamber.
☐ The ventilation disks on the bottom 17 of the fire bowl and on top of the lid 3 must be opened during indirect grilling to guarantee a steady supply of oxygen. In this way, the cooking chamber works in a similar way to a fan oven. The cooking time is of course much longer during indirect grilling than during direct grilling. However, the lid does not have to be opened often to turn over the food being grilled, as it is heated from all sides.
- Igniting the fuel
WARNING! RISK OF BURNS! Igniting using petrol or spirits, which are highly flammable, can cause the uncontrollable build up of heat. Therefore, only use safe burning materials such as firelighters. The grill must be placed on solid, stable ground while it is being used.
Tip: To guarantee perfectly smoldering charcoal, we recommend using a chimney starter (not included in the scope of delivery).
☐ Use quality products with DIN approval, such as DIN approved charcoal, DIN approved briquettes or DIN approved firelighters.
☐ Stack up some of the charcoal or briquettes on the charcoal rack 7. When grilling indirectly,
fill the intermediate space between the charcoal dividers 18 and the wall of the fire bowl 8 with fuel. When grilling indirectly, the intermediate space between the charcoal dividers 18 should remain empty.
Place one or two firelighters on the layer of charcoal or briquettes. Light this / these with a match.
☐ Allow the firelighters to burn for 2 to 4 minutes. Then, refill the fire bowl 8 with wood charcoal or briquettes, bit by bit.
☐ A white layer of ash should form on the fuel after 15 to 20 minutes. This means that the perfect cooking temperature has been achieved. Distribute the fuel equally in the fire bowl 8 using a suitable metal tool.
☐ Mount the greased grill rack 6 and start grilling.
- Cleaning and Care
⚠️ Allow the product to cool all the way down before cleaning it.
Be sure the charcoal is completely burnt out and cooled down before removing the ashes and storing the product away.
- Do not use strong or abrasive solvents or scouring pads, as these will damage the surfaces and leave marks.
■ Never pour cold water directly over the charcoal after grilling to extinguish these. The product may otherwise be damaged. Use old ash, sand or water mist.
☐ Empty the cold ashes and clean the product regularly, preferably after every use.
☐ Remove the grill rack 6 and clean it thoroughly with dishwater. Then dry it off thoroughly.
☐ Remove loose deposits on the product with a wet sponge.
Dry with a soft, clean cloth. Do not scratch the surfaces when drying off.
Generally clean the inside and surfaces with warm soapy water.
- Disposal

The packaging is made entirely of recyclable materials, which you may dispose of at local recycling facilities.
Contact your local refuse disposal authority for more details of how to dispose of your worn-out product.
Warranty
The product has been manufactured to strict quality guidelines and meticulously examined before delivery. In the event of product defects you have legal rights against the retailer of this product. Your legal rights are not limited in any way by our warranty detailed below.
The warranty for this product is 3 years from the date of purchase. Should this product show any fault in materials or manufacture within 3 years from the date of purchase, we will repair or replace it - at our choice - free of charge to you.
The warranty period begins on the date of purchase. Please keep the original sales receipt in a safe location. This document is required as your proof of purchase. This warranty becomes void if the product has been damaged, or used or maintained improperly.
The warranty applies to defects in material or manufacture. This warranty does not cover product parts subject to normal wear, thus possibly considered consumables (e.g. batteries) or for damage to fragile parts, e.g. switches, rechargeable batteries or glass parts.
Indledning ......Side 11
WAARSCHUWING! GEVAAR VOOR
- ROUNDBARBECUE
- ROUND BARBECUE
- KOGELBARBECUE
- A
- Introduction......Page 6
- Safety Notices....Page 6
- Installation......Page 7
- Use Page 8
- Cleaning and Care Page 9
- Disposal Page 9
- Warranty Page 9
- - Introduction
- IntendedUse
- Parts Description
- - Technical Data
- - Scope of delivery
- Safety Notices
- ⚠ WARNING! Keep children and pets away.
- Prevent danger to life and the risk of injuries
- WARNING: Danger of carbon monoxide poisoning. Do not use the barbecue indoors, only operate outdoors!
- WARNING! Do not use spirit or petrol for lighting or re-lighting! Use only firelighters complying to EN 1860-3!
- Prevent fires
- Avoid the danger o damage to property
- - Installation
- Use
- - Direct grilling (see Fig. B)
- - Indirect grilling (see Fig. C)
- - Igniting the fuel
- - Cleaning and Care
- - Disposal
- Warranty
- Indledning ......Side 11
- WAARSCHUWING! GEVAAR VOOR
Brand : FLORABEST
Model : IAN 282437
Category : Barbecue