
Cardio Fit V10 - Vibrating platform TUNTURI - Free user manual and instructions
Find the device manual for free Cardio Fit V10 TUNTURI in PDF.


| Product Type | Vibration Platform |
| Brand | Tunturi |
| Model | Cardio Fit V10 |
| Dimensions (L x W x H) | 58.0 x 33.0 x 34.0 cm |
| Device Weight | 11.3 kg |
| Maximum User Weight | 150 kg |
| Power Supply | 210-240 V AC, 50-60 Hz |
| Vibration Frequency | 8.33 to 13.33 Hz (speed 1-30) |
| Vibration Amplitude | 10 mm (±1) |
| Training Programs | Manual, 3 automatic programs (P, P1, P2, P3), quick buttons 10/15/20 min |
| Remote Control | Infrared, range 2.5 m, AAA batteries (not included) |
| Included Accessories | Additional resistance bands, removable seat |
| Display | LCD: speed and remaining time |
| Mat Material | Non-slip rubber |
| Care and Cleaning | Clean with damp cloth, no corrosive detergents |
| Safety | Automatic shutdown after 10 min, thermal fuse, instructions for at-risk persons |
| Warranty | Manufacturer's warranty on manufacturing defects (see conditions) |
| Standards | EN 957 (HC), 2014/30/EU, CE marking |
Frequently Asked Questions - Cardio Fit V10 TUNTURI
User questions about Cardio Fit V10 TUNTURI
0 question about this device. Answer the ones you know or ask your own.
Ask a new question about this device
Download the instructions for your Vibrating platform in PDF format for free! Find your manual Cardio Fit V10 - TUNTURI and take your electronic device back in hand. On this page are published all the documents necessary for the use of your device. Cardio Fit V10 by TUNTURI.
USER MANUAL Cardio Fit V10 TUNTURI
Attention, Achtung, Attention, Attentie, Attenzione, Atención, Giv akt, Huomio
- Please read this user manual carefully prior to using this product.
- Lesen Sie sich vor dem Gebrauch des Produkts diese Bedienungsanleitung sorgfältig durch.
- Veuillez lire attentivement le présent manuel de l'utilisateur avant d'utiliser ce produit.
- Lees deze gebruikershandleiding zorgvuldig voordat u dit product gaat gebruiken.
- Leggere attentamente questo manuale dell'utente prima di utilizzare il prodotto.
- Antes de utilizar este producto, lea atentamente este manual de usuario.
- Läs den här användarhandboken noggrant före användning av den här produkten.
- Lue tämä käyttöohje huolellisesti ennen tämän tuotteen käyttöä.

A

B

C

D
Index
Welcome....6
Safety Precautions
Environment for use....6
Explanation of illustrations....7
Description illustration A....7
Description illustration B....7
Description illustration C....7
Description illustration D....7
Exercising 7
Posture 7
Additional resistance ropes....7
Attach seat to base frame 7
Console......8
Explanation of buttons....8
Remote control....8
Explanation Display functions....8
Storage and Maintenance....9
Surface cleaning....9
Additional information....9
Troubleshooting....9
Warranty....9
Technical data 10
Declaration of the manufacturer ....10
Disclaimer....10
Welcome
Welcome to the world of Tunturi!
Thank you for purchasing this piece of Tunturi equipment.
Tunturi offers a wide range of home fitness equipment, including crosstrainers, treadmills, exercise bikes, rowers, strength benches and multi stations. The Tunturi equipment is suitable for the entire family, no matter what fitness level. For more information, please visit our website www.tunturi.com
Important Safety Instructions
This manual is an essential part of your training equipment please read all instructions in this manual before you start using this equipment. The following precautions must always be followed:
Safety Precautions Environment for us
- Do not use the vibration plate in humid or dusty environment to avoid electric shock or break down of the mechanical parts.
- Do not use the vibration plate when indoor temperature is over 40°C.
- Do not use the vibration plate in the open air or under the direct sunlight.
- Place the vibration plate on flat floor.
DANGER
- Please wait for one hour before using the vibration plate when it is moved from low to high temperature, to prevent water vapour from condensing on the machine and resulting in any failure.
People with health conditions below are not suggested to use the vibration plate.
- It is strongly advised to consult your doctor before use, especially for patients who are under treatment or do not feel well.
- Patients with malignant tumour.
- Pregnant women or in menstrual period.
- People with heart disease, osteoporosis patients.
- People heart pacemaker or other medical electronic instrument implanted.
- People with artificial limb;
- People who are sensitive to vibration and strenuous exercise.
© Notices during operation
- Before use, please undress watch, bangle, cell phone or other valuable objects, and keys, knife or other incisive objects to avoid damage or body injury.
- Do not smoke while using the vibration plate.
- Do not use the vibration plate together with other medical equipments.
- Do not use the vibration plate for medical treatment purpose.
- Do not use the vibration plate right after a meal or drink.
- During use, please keep children and/or pets away from the vibration plate.
- It is forbidden to put fingers or other foreign bodies into the gap between the middle cover and base cover.
- Supervision is needed for child under 10 years and the aged over 60 years during using the vibration plate.
- The load capability of the vibration plate is 150kg (330lbs), people over this weight are not suggested to use the vibration plate.
- This vibration plate is only limited for one-person use.
WARNING
- Unauthorized dismantle, disassembly or renovation is not allowed to prevent electrical shock or any malfunctions. Please contact manufacturer or local dealer immediately if there is any service work needed.
Stop using the vibration plate and unplug power cord from the power supply immediately under below conditions.
- Water or other liquid is accidentally splashed onto the vibration plate or controller.
- Any accessory is found damaged or internal component is exposed.
- Feel abnormal or severe pain during use.
- Power failure.
- Thundering or lighting weather.
Plug and power cord
- Check if the voltage complies with the one specified for the vibration plate.
- Do not retract the power plug with wet hand to prevent electric shock.
- Hold the plug rather than the power cord to pull out the power cord.
- Turn off the power switch and remove the plug from the power supply in case of electrical failure or if not in use for a long time.
- Stop using the vibration plate if the power cord has any damage, turn off the power switch, pull the plug, and replace the power cord or contact technicians for repair.
- Do not run the mains cable underneath the equipment. Do not run the mains cable underneath a carpet. Do not place any objects on the mains cable.
Explanation of illustrations
Description illustration A
The illustration shows what components and parts you should find when un-boxing your product.

NOTE
- Small parts can be hidden/ packed in hollow spaces in the Styrofoam product protection
- If a part is missing, contact your dealer.
Description illustration B
The illustration shows how to fit the handles onto the seat cushion frame.

NOTE
- The screwdriver required for this assembly is not included in the carton.
Description illustration C
The illustration shows the control panel button overlay and remote control.
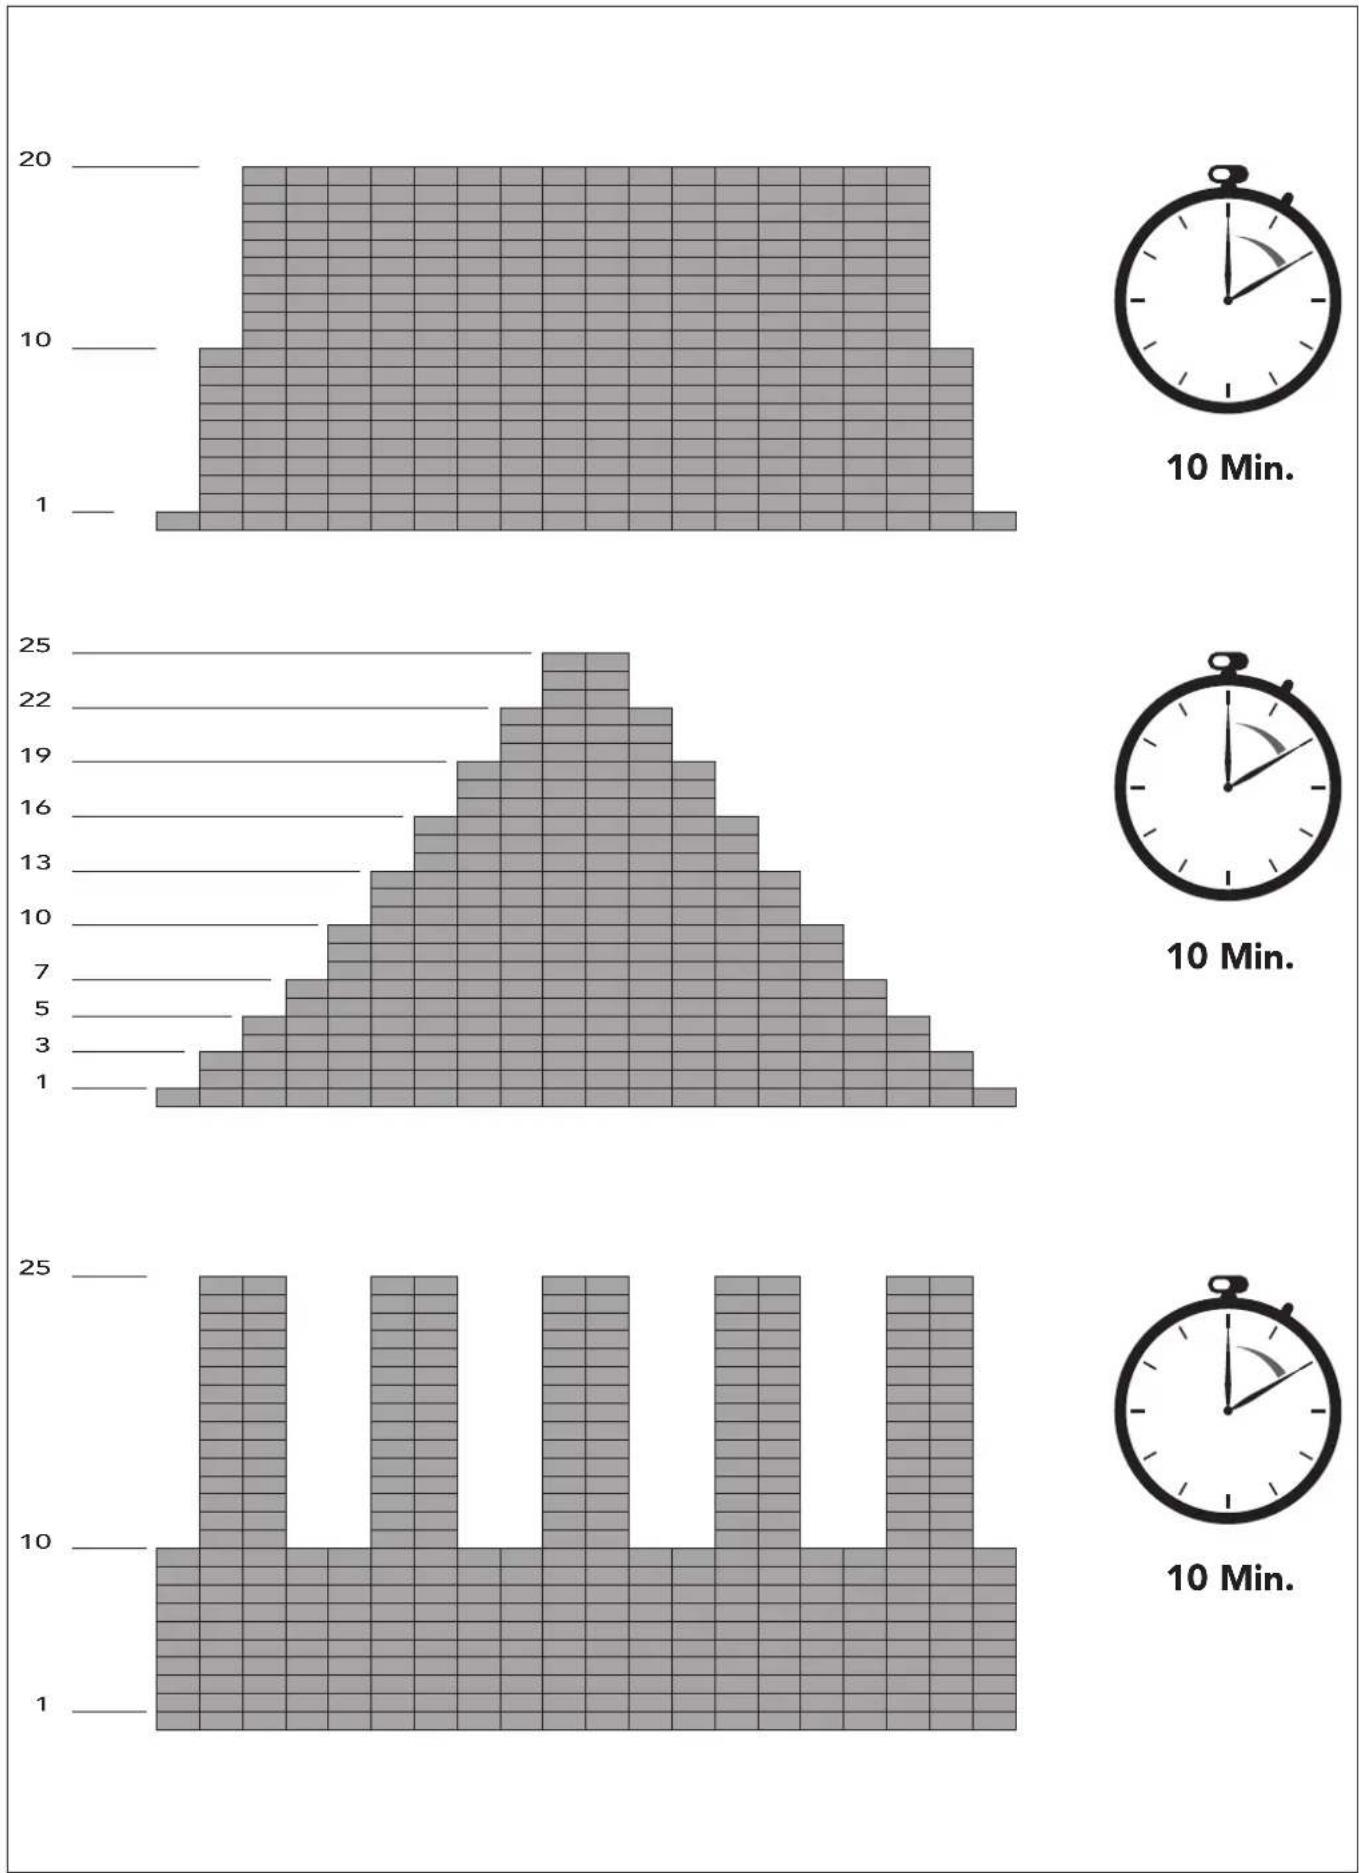
Description illustration D
The illustrations shows the pre programmed program profiles.
Exercising
It is recommended to train 2-3 sessions per week for exercising. As with other (cardiovascular) workouts it is recommended to keep your own pace. Start training according to your own fitness level, and at a low intensity, and increase the intensity of your training according to your personal health.
Posture
- In general, you should feel comfortable doing the exercises.
- Always make sure your back is straight, and try to avoid 'hanging' on the machine.
- All exercises and stretching should be done 'actively', whereas in massaging or relaxing you can release the tension in the muscles.
- Keep your abdominal muscles tensed to make the workout more effective.
- At all exercises you should bend your knees, and not 'lock' any joints or straighten your legs during exercise. The vibration should go through the muscles, not through the joints.

WARNING
- When you feel a very high vibration up to your head, your posture is incorrect.
Additional resistance ropes
Your trainer comes with additional resistance ropes that can be used to intensify or vary your workout as you please.

WARNING
- The additional resistance ropes can only be used when standing on the equipment, this to avoid lifting the complete machine and therewith risking machine damage of the impact when the machine comes down again.
Attach the additional resistance ropes
- Take the loop of the additional resistance rope and guide it through one of the rings/ brackets on the bottom front side of your trainer.
- Guide the handle of the additional resistance band through the loop of the band and pull tight, so you get an easy detachable but secured fixture.
- Only one additional resistance rope can be attached to each of the two available rings.
- Remove the bungee in the reverse following order.
Adjust the resistance ropes length
To adjust the resistance ropes to your body length it is recommended to adjust the length accordingly.
- To adjust the length of the resistance rope, push the rope through the slider on the hand-grip side, and pull it tight again through the handle.
Attach seat to base frame
To attach the seat to the base frame it is required to first open the seat surface caps to free the seat handle fixing pockets. Position the seat over the pockets, and push it in to secure the fixture.
When removing the seat again from the base frame, pull out the seat while preventing the base frame from being lifted.
Make sure the seat handle fixing pockets are closed with the surface caps when seat is not fitted.

NOTE
- The fix will not be a tight fit, therefore the attached seat cannot be used as a product handle to lift the machine.
The seat can be used for different variations in your workout.
Console
Explanation of buttons

Power:
Press the button while power plug in, LCD shows "00" "10", the machine is toggling between "On mode" and "Standby mode".
"P", "P1" "P2" "P3" (Auto program)
- Press auto program button, to start a pre programmed profile quick.

(Start/ Pause)
- Press the button to start the vibration plate.
- In the operation of the machine, press this button to stop working.
S ▲(speed +)
Speed increase: Manual 1-30. (±1)
- Press this button to increase the speed when the machine is operating.
S ▼(speed -)
Speed decrease: Manual 1-30. (±1)
- Press this button to decrease the speed when the machine is operating.
T ▲(time +)
Press this button to Increase time. (±1 min.)
- Range: 1 \~ 10
T ▼(time -)
Press this button to Decrease time. (± 1 min.)
- Range: 1 \~ 10
"10" "15" "20" (Manual quick button)
Press manual quick button to start a manual workout with pre set time fast.

NOTE
- The effective reception range of the remote Control signal is 2.5 meters, the infrared emission indicator of the controller should be aligned with the infrared receiving window on the vibration plate.
Remote control
The remote control comes without batteries, and needs to be purchased and installed prior to use.
The remote control requires 2 pcs. of AAA size batteries.
To fit/ Replace the batteries
- Remove the cover.
Located on the back side. - Remove the old batteries.
Only valid when replacing the batteries for fresh ones. - Insert the new batteries.
Make sure that batteries match the (+) and (-) polarity markings. - Mount the cover.

NOTE
- Empty batteries should always be recycled per your Local legal regulations to save the environment.

WARNING
- Do not expose batteries to big temperature changes to prevent the batteries from leaking.
- To prevent your batteries from leaking, take them out if you plan on not using your device for longer periods of time.
- When inserting multiple batteries into a device, always use the same brand, the same type, and the same energy level.
Button functions
The button functions for the remote control are corresponding with the main unit display buttons, and therefore have the same functionality.
The Remote control works on an infrared protocol.
Therefore it requires an unblocked air space between remote control's transmitter and console receiver for proper functionality.
Explanation Display functions
Speed
- Displays current training vibration frequency setting.
- Range: 1 \~ 30.

NOTE
| Speed level Motor RPM Formula Hz | ||
| Speed 1 500 500/60 8.33 | ||
| Speed 2 510 510/60 8.50 | ||
| Speed 29 790 790/60 13.17 | ||
| Speed 30 800 800/60 13.33 | ||
Time/ Program
- Shows left time when workout.
- Shows the target time when being in programming mode.
- Shows program selection when being in program mode.
Storage and Maintenance
WARNING
- Before cleaning, ensure the power switch is turned off, and the attaching plug is pulled out of the socket.
- The rubber protective top mat and covers can be cleaned with a wet cloth containing detergent, and the detergent should be removed with a cloth notice
- Do not clean the vibration plate with corrosive detergent such as benzene or thinner, as it may cause fading, corrosion or crack on the vibration plate's shell.
- Do not splash water into the vibration plate to avoid short circuit.
CAUTION
- Do not carry this appliance by the power supply cord or use cord as a handle.
Surface cleaning
Clean the remote controller
As wet cloth may cause malfunction of the controller, only dry cloth can be used.
When cleaning the remote controller, it is recommended to take out battery first.
Storage an Maintenance
- Make sure that the power switch is turned off and the plug is removed From the power supply.
- Clean off the dust and dirt on the vibration plate and keep it clean and away From places with high temperature or high humidity.
- If the vibration plate is not in use for along period, a dust proof cover (buy it Yourself) should be applied on the vibration plate to prevent the entry of dust.
Change of fuse: turn the fuse base in the direction of the arrow (counter-clockwise), and replace the fuse with a clockwise screw back.
NOTE
- Please consult after-sales department, if malfunction can not be removed by consumers themselves
Additional information
Packaging disposal
Government guidelines ask that we reduce the amount of waste material disposed of in land fill sites. We therefore ask that you dispose of all packaging waste responsibly at public recycling centres.
End of life disposal
We at Tunturi hope you enjoy many years of enjoyable use from your fitness trainer. However, a time will come when your fitness trainer will come to the end of its useful life. Under 'European WEEE Legislation you are responsible for the appropriate disposal of your fitness trainer to a recognised public collection facility.
Troubleshooting
The vibration plate can not be started
- The plug is not in place, insert the plug to resolve.
- The power switch is in Off mode, Turn the power switch to ON mode.
- Thermal fuse is burn, replace with a new fuse of the same model.
Sound like phew or Da-da is heard during working
- This is normal operational sounds produced by the motor of from the abrasion between mechanical parts.
Operate the controller, but the vibration plate no action.
- The battery power of the remote is low, replace the battery to resolve.
- The remote control is out of the receivers reach, make sure the space in between the sender and receiver is not blocked and not over 2,5 meters.
Sudden stop of the unit
- Default or pre-set working time is up, restart the unit after 10 minutes interval.
Unit does not respond to commands
- Too many commands send to the unit is short time and cannot be processed simultaneously, restart the unit, unplug power cord for at least 5 seconds and start the unit to resolve.
Display show ER01 or ER02
Motor power problem and units stops to protect from damage. Restart the unit, unplug power cord for at least 5 seconds and start the unit to resolve.
Warranty
Tunturi purchaser's warranty
Warranty terms
The consumer is entitled to the applicable legal rights stated in the national legislation concerning the commerce of consumer goods. This warranty does not restrict these rights. The Purchaser's Warranty is only valid if the item is used in an environment approved by Tunturi New Fitness BV, and is maintained as instructed for that particular equipment. The product-specific approved environment and maintenance instructions are stated in the "user manual" of the product. The "user manual" can be downloaded from our website. http://manuals.tunturi.com
Warranty conditions
The warranty conditions commence from the date of purchase. Warranty conditions may vary per country, so please consult your local dealer for the warranty conditions.
Warranty coverage
Under no circumstances shall Tunturi New Fitness BV or the Tunturi Distributor be liable by virtue of this warranty or otherwise for any special, indirect, secondary or consequential damages of any nature arising out of any use or inability to use this equipment.
Warranty limitations
This warranty covers manufacturing defects in the fitness equipment as originally packed by Tunturi New Fitness BV. The warranty shall apply only under conditions of normal, recommended use of the product as described in the Owner's Manual and providing that Tunturi New Fitness BV's instructions for installation, maintenance and use have been complied with. Neither Tunturi New Fitness BV's nor the Tunturi Distributors'
obligations apply to defects due to reasons beyond their control. The warranty applies only to the original purchaser and is valid only in countries where Tunturi New Fitness BV has an authorised importer. The warranty does not extend to fitness equipment or components that have been modified without the consent of Tunturi New Fitness BV. Defects resulting from normal wear, misuse, abuse, corrosion, or damage incurred during loading or transportation are not covered.
The warranty does not cover sounds or noises emitted during use where these do not substantially impede the use of the equipment and where they are not caused by a fault in the equipment.
The warranty does not cover defects arising from the failure to carry periodic maintenance as outlined within the Owner's Manual for the product. Furthermore, the warranty does not cover defects arising from usage and storage within an unsuitable environment as described within the Owner's Manual which should be indoors, dry, dust and grit free and within a temperature range of +15°C to +35°C. The warranty does not cover maintenance activities, such as cleaning, lubricating, and normal part adjustments, nor installation
procedures that customers can accomplish themselves, such as changing uncomplicated meters, pedals and other similar parts not requiring any dismantling/reassembling of the fitness equipment.
Warranty repairs carried out by other than authorised Tunturi representatives are not covered.
Failure to follow the instructions given in the Owner's Manual will invalidate the product's warranty.
Technical data
| Parameter Unit of measurement Value | ||
| Heartrate measurement available via: | hand-grip contact5.3~ 5.4 Khz.Bluetooth (BLE)ANT+ | ☒☒☒ |
| Amplitude mm 10 (±1) | ||
| Force G | ||
| Length cm | inch | 58.022.8 |
| Width cm | inch | 33.013.0 |
| Height cm | inch | 34.013.4 |
| Weight kg | Ibs | 11.324.9 |
| Max. user weight kg | Ibs | 150330 |
| Mains voltage VAC 210~240 | ||
| Mains frequency | HZ | 50~60 |
Declaration of the manufacturer
Tunturi New Fitness BV declares that the product is in conformity with the following standards and directives: EN 957 (HC), 2014/30/EU.
The product therefore carries the CE label.
04-2020
Tunturi New Fitness BV
Purmerweg 1
1311 XE Almere
The Netherlands
Disclaimer
© 2020 Tunturi New Fitness BV
All rights reserved.
- The product and the manual are subject to change.
- Specifications can be changed without further notice.
- Check our website for the latest user manual version.
Deutsch
Tunturi New Fitness BV
Purmerweg 1
1311 XE Almere
The Netherlands
Haftungsausschluss
© 2020 Tunturi New Fitness BV
Tunturi New Fitness BV
Purmerweg 1
1311 XE Almere
Pays-Bas
© 2020 Tunturi New Fitness BV
Tunturi New Fitness BV
Purmerweg 1
1311 XE Almere
The Netherlands
Disclaimer
© 2020 Tunturi New Fitness BV
Tunturi New Fitness BV
Purmerweg 1
1311 XE Almere
Paesi Bassi
© 2020 Tunturi New Fitness BV
"10" "15" "20" (Manual quick button)
Tunturi New Fitness BV
Purmerweg 1
1311 XE Almere
The Netherlands
© 2020 Tunturi New Fitness BV
"10" "15" "20" (manuell snabbknapp)
Tunturi New Fitness BV
Purmerweg 1
1311 XE Almere
Nederländerna
Friskrivning
© 2020 Tunturi New Fitness BV
Tunturi New Fitness BV
Purmerweg 1
1311 XE Almere
Alankomaat
Vastuuvapauslauseke
| 1 Foot | Pedal cover 1 | ||
| 2 Upper cover 1 | |||
| 3 Main plate 1 | |||
| 4 Philip screw ST 4*12 18 | |||
| 5 oscillation motor 1 | |||
| 6 Belt 1 | |||
| 7 Resistance rope 2 | |||
| 8 screw M8*14 2 | |||
| 9 Main frame 1 | |||
| 10 Philip screw ST3*12 4 | |||
| 11 Lower controller board 1 | |||
| 12 4R type clamp | 4 | ||
| 13 Bottom Cover | 4 | ||
| 14 Philip screw ST4*20 2 | |||
| 15 Foot cushion | 4 | ||
| 16 Electrical wire A+B | 1 | ||
| 17 Power socket and switch ( fuse included) | 1 | ||
| 18 Seat cushion | 1 | ||
| 19 screw M6*35 4 | |||
| 20 Power cord | 1 | ||
| 21 sheet iron for ropes | 2 | ||
| 22 Plastic support plug | 2 | ||
| 23 Axle A | ∅8 | 2 | |
| 24 Flat washer | 2 | ||
| 25 Nylon nut | M8 | 4 | |
| 26 Console panel | 1 | ||
| 27 Philip screw ST3*6 | 4 | ||
| 28 Console board | 1 | ||
| 29 handle | 2 | ||
| 30 Remote control | 1 | ||
| 31 Bearing plug | 6201 | 2 | |
| 32 screw M5*25 8 | |||
| 33 Axle of link block | 1 | ||
| 34 Cover of axle bracket | 2 | ||
| 35 Main Axle bracket | 2 | ||
| 36 Bearing | 6201 | 2 | |
| 37 Flywheel | 1 | ||
| 38 Spring washer | ∅8 | 6 | |
| 39 screw M8*20 2 | |||
| 40 Bushing | 1 | ||
| 41 Surface cap | 4 | ||
| 42 nonconductor | 2 | ||
| 43 L type internal hexagonal wrench | M5*31*126 | 1 | |
TUNTURI®
FEEL BETTER EVERY DAY
TUNTURI NEW FITNESS B.V.
Purmerweg 1
1311 XE Almere
The Netherlands
P.O. Box 60001
1320 AA Almere
The Netherlands
info@tunturi.com
www.tunturi.com

/TunturiNLBE
/TunturiFitness

/Tunturi_NLBE
/Tunturi_Fitness

Tunturi
Tunturi Service

- ATTENTION, ACHTUNG, ATTENTION, ATTENTIE, ATTENZIONE, ATENCIÓN, GIV AKT, HUOMIO
- INDEX
- SAFETY PRECAUTIONS
- WELCOME
- IMPORTANT SAFETY INSTRUCTIONS
- SAFETY PRECAUTIONS ENVIRONMENT FOR US
- DANGER
- PEOPLE WITH HEALTH CONDITIONS BELOW ARE NOT SUGGESTED TO USE THE VIBRATION PLATE
- © NOTICES DURING OPERATION
- WARNING
- STOP USING THE VIBRATION PLATE AND UNPLUG POWER CORD FROM THE POWER SUPPLY IMMEDIATELY UNDER BELOW CONDITIONS
- PLUG AND POWER CORD
- EXPLANATION OF ILLUSTRATIONS
- DESCRIPTION ILLUSTRATION A
- NOTE
- DESCRIPTION ILLUSTRATION B
- DESCRIPTION ILLUSTRATION C
- DESCRIPTION ILLUSTRATION D
- EXERCISING
- POSTURE
- ADDITIONAL RESISTANCE ROPES
- ATTACH THE ADDITIONAL RESISTANCE ROPES
- ADJUST THE RESISTANCE ROPES LENGTH
- ATTACH SEAT TO BASE FRAME
- CONSOLE
- EXPLANATION OF BUTTONS
- POWER
- P", "P1" "P2" "P3" (AUTO PROGRAM)
- (START/ PAUSE)
- S ▲(SPEED +)
- S ▼(SPEED -)
- T ▲(TIME +)
- T ▼(TIME -)
- 10" "15" "20" (MANUAL QUICK BUTTON)
- REMOTE CONTROL
- TO FIT/ REPLACE THE BATTERIES
- BUTTON FUNCTIONS
- EXPLANATION DISPLAY FUNCTIONS
- SPEED
- TIME/ PROGRAM
- STORAGE AND MAINTENANCE
- CAUTION
- SURFACE CLEANING
- CLEAN THE REMOTE CONTROLLER
- STORAGE AN MAINTENANCE
- ADDITIONAL INFORMATION
- PACKAGING DISPOSAL
- END OF LIFE DISPOSAL
- TROUBLESHOOTING
- THE VIBRATION PLATE CAN NOT BE STARTED
- SOUND LIKE PHEW OR DA-DA IS HEARD DURING WORKING
- OPERATE THE CONTROLLER, BUT THE VIBRATION PLATE NO ACTION
- SUDDEN STOP OF THE UNIT
- UNIT DOES NOT RESPOND TO COMMANDS
- DISPLAY SHOW ER01 OR ER02
- WARRANTY
- TUNTURI PURCHASER'S WARRANTY
- WARRANTY TERMS
- WARRANTY CONDITIONS
- WARRANTY COVERAGE
- WARRANTY LIMITATIONS
- DECLARATION OF THE MANUFACTURER
- DISCLAIMER
- DEUTSCH
- HAFTUNGSAUSSCHLUSS
- 10" "15" "20" (MANUELL SNABBKNAPP)
- FRISKRIVNING
- VASTUUVAPAUSLAUSEKE
Brand : TUNTURI
Model : Cardio Fit V10
Category : Vibrating platform