
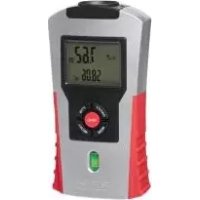
KH 2927-1 - Rangefinder POWERFIX - Free user manual and instructions
Find the device manual for free KH 2927-1 POWERFIX in PDF.


| Type of Product | Ultrasonic Distance Meter (Rangefinder) |
| Brand | Powerfix |
| Model | KH 2927-1 |
| Power Supply | 9V block battery (6LR61) |
| Measurement Range | 0.6 m to 16 m (approx. 2 ft to 53 ft) |
| Measurement Accuracy | ±1% |
| Laser Class | Class 2 |
| Laser Wavelength | 650 nm |
| Laser Output Power (P max.) | <1 mW |
| Measurement Units | Metric (m) and Imperial (ft/in) |
| Functions | Distance, Area, Volume, Addition of measurements, Temperature display, Last measurements recall |
| Display | LCD with measurement values and symbols |
| Spirit Level | Yes, for alignment |
| Automatic Switch-Off | After approx. 60 seconds of inactivity |
| Battery Indicator | Low battery symbol on display |
| Cleaning | Soft dry cloth; no chemical or abrasive cleaners |
| Storage | Dry, frost-free location |
| Items Included | Ultrasonic Distance Meter, 9V battery, Operating Instructions |
| Warranty | 3 years from date of purchase |
| Manufacturer / Importer | Kompernass GmbH, Burgstrasse 21, 44867 Bochum, Germany |
Frequently Asked Questions - KH 2927-1 POWERFIX
User questions about KH 2927-1 POWERFIX
0 question about this device. Answer the ones you know or ask your own.
Ask a new question about this device
Download the instructions for your Rangefinder in PDF format for free! Find your manual KH 2927-1 - POWERFIX and take your electronic device back in hand. On this page are published all the documents necessary for the use of your device. KH 2927-1 by POWERFIX.
USER MANUAL KH 2927-1 POWERFIX
Fig. 3
i Advertencia
III. 3
i Avvertenza
Fig. 3
i Nota
| Intended Usage 38 | |
| Safety instructions 38 | |
| Technical data 39 | |
| Items supplied 40 | |
| Unpacking 40 | |
| Device description 40 | |
| Inserting the battery 40 | |
| Measuring distances | 41 |
| Adding distances together | 43 |
| Measuring areas | 43 |
| Adding areas together | 44 |
| Measuring volumes | 44 |
| Adding volumes together | 45 |
| Displaying the last measurements | 45 |
| Temperature Display | 45 |
| Battery display | 46 |
| Automatic switch-off | 46 |
| Cleaning and storage | 46 |
| Disposal | 46 |
| Warranty & Service | 47 |
| Importer | 48 |
Read these operating instructions carefully before using the appliance for the first time and preserve this booklet for later reference. Also, pass these operating instructions on to whoever might acquire the appliance at a future date.
Intended Usage
This appliance is intended for the measuring of distances and for the calculation of areas and volumes. The appliance is intended for domestic use only. Do not use it for commercial purposes.
Safety instructions
Risk of personal injury!
- Do not use the appliance at locations where there is a risk of fire or explosion, e.g. in the vicinity of inflammable liquids or gases.
- This appliance is not intended for use by individuals (including children) with restricted physical, physiological or intellectual abilities or deficiencies in experience and/or knowledge unless they are supervised by a person responsible for their safety or receive from this person instruction in how the appliance is to be used.
- Children should be supervised to ensure that they do not play with the appliance.
Risk from the laser beam!


This appliance contains a Class 2 laser.
NEVER direct the laser beam at people or animals.
NEVER look directly into the laser beam.
The laser beam can cause serious eye damage.
- Do NOT direct the laser beam at strongly reflective material. Reflected laser beams are also dangerous.
- Any adjustment intended to increase the intensity of the laser beam is forbidden. There is also a risk of personal injury!
- No liability will be accepted for damage resulting from manipulation to the laser equipment as well as from disregarding these safety instructions.

Warning against damage to the appliance!
- NEVER subject the appliance to rain.
Do not use the appliance in wet or moist environments.
Interaction with batteries

Risk of explosion!
Do not throw batteries into a fire.
Do not recharge non rechargeable batteries.
- Never open batteries, never solder or weld batteries. Never short circuit batteries. The risk of explosions and injuries exists!
- If you do not intend to use the appliance for an extended period remove the battery, otherwise it could leak corrosive acids.
- If the batteries have leaked, put on a pair of protective gloves to avoid the risk of injury through chemical burns. Clean the battery compartment and the battery contacts with a dry cloth.
• Always replace the battery with a battery of the same type. - Keep batteries away from children. Children can put batteries into their mouths and swallow them. If a battery is swallowed immediately seek medical assistance.
Technical data
Electricity supply: 9V Block battery, 6LR61
Measurement range: 0.6 16 m
Measurement accuracy: +/ 1%
Laser class: 2
Wavelength (λ): 650 nm
Output level (P max.): <1 mW
Items supplied
• Ultrasonic Distance Meter
- 9V battery
- Operating Instructions
Unpacking
Remove the Ultrasonic Distance Meter from the packaging. Remove all transport restraints and packaging materials. Remove the protective foil from the display ⑫.
Device description
① Laser emission opening
② Ultrasonic sender/receiver
3 Temperature sensor
4 FT/M button
5 RECALL button
6 Measurement point
⑦ Battery compartment
8 Spirit level
⑨ MODE button
10 ON/OFF button
11 READ button
12 Display
Inserting the battery
- Open the battery compartment ⑦ at the rear of the Ultrasonic Distance Meter.
- Place the 9V block battery onto the contacts. Pay heed to the correct polarity.
- Lay the 9V block battery into the battery compartment ⑦.

Warning:
Ensure that the wires are not trapped in any way. This could irreparably damage the appliance.
- Close the battery compartment ⑦. The battery compartment lid must audibly engage.
Measuring distances
- Switch the appliance on by pressing the button ON/OFF ⑩.
- If necessary, press the MODE ⑨ button several times until the indicator (distance measurement) appears in the display.
- To switch between metric (Meter M) and Anglo American (Feet'/Inch'') measurement units, press the button FT/M ④.
- Hold the appliance upright towards the wall to which you wish to measure the distance. The ultrasound sender/receiver ② must be at a right angle to the wall. For this, use the spirit level ⑧:
The bubble in the glass ⑧ must stand between the marking lines (see Fig.1).
- Press the button READ ⑪ briefly. A laser point is projected and an acoustic signal sounds. Hold the appliance in this position until the measured distance appears in the display ⑫.
(i) Note:
Measurements start at the measurement point ⑥! Should the measurement lie outside the measurement range, "Error" or an illogical number appear in the display. The measurement range lies between 0,6 m (ca.2') and 16 m (ca.53').
Take note of the following illustrations:

Fig. 1

Fig. 2
The further you are from the wall, the wider is the area (a) that the Distance Meter must measure by ultrasound (Fig. 2). Therefore, take care to ensure that the Distance Meter is always directed at a right angle towards a level surface (Fig. 1 and 3). Ensure that there are no objects positioned within the measurement area.
False!

Fig. 3
i Notice
Inaccurate measurements can also occur because of a weak battery. If the battery is too weak, the battery symbol appears in the display.
Adding distances together
- Measure an area as described in the chapter "Measuring distances".
- If necessary, press the MODE ⑨ button several times until the indicator (distance measurement) appears in the display ⑫.
- Press the READ 11 button to carry out a distance measurement.
- Press the RECALL ⑤ button. A "+" appears in the display and the measured distance is transferred to the lower line.
- Measure the next distance. The newly measured distance is indicated in the upper line, the sum of the distances is indicated in the lower line.
- Repeat steps 2. to 4. to add further measurement values.
- If you want to exit the addition mode press the MODE ⑨ button. All values will be deleted.
Measuring areas
- Switch the device on by pressing the ON/OFF ⑩ button.
- If necessary, press the MODE ⑨ button several times until the indicator (area measurement) appears in the display ⑫. The bar for the first part of the measurement blinks.
- Press the READ ⑪ button to measure the length. The bar for the second part of the measurement blinks.
- Press the READ 11 button to measure the width. The width is shown in the upper line, the area in square meters ( m^2 ), as the sum of both measurements, is shown in the lower line.
Adding areas together
- Measure an area as described in the section "Measuring areas".
- Press and hold down the MODE ⑨ button. "M+" appears in the display ⑫. The area measured is now saved.
- Press the MODE ⑨ button. The device is now ready for the second measurement.
- Measure the next area.
- Press the RECALL ⑤ button. A "+" appears in the display.
- Press and hold down the RECALL ⑤ button. In the lower line is shown the result of the first measurement.
- Press the RECALL ⑤ button. Both measurements will be added and the result is shown in the lower line.
- Repeat steps 2. to 7. to add further measurement values.
- If you want to exit the addition mode press the MODE ⑨ button. All values will be deleted.
Measuring volumes
- Switch the device on by pressing the ON/OFF ⑩ button.
- If necessary, press the MODE ⑨ button several times until the indicator (volume measurement) appears in the display ⑫. The bar for the first part of the measurement blinks.
- Press the READ ⑪ button to measure the length. The bar for the second part of the measurement blinks.
- Press the READ ⑪ button to measure the width. The bar for the third part of the measurement blinks.
- Press the READ ⑪ button to measure the height. The measured height appears in the upper line. The height is shown in the upper line, the volume in cubic meters ( m^3 ), as the sum of all three measurements, is shown in the lower line.
Adding volumes together
- Measure a volume as described in the section "Measuring volumes".
- Press and hold down the MODE ⑨ button.
"M+" appears in the display ⑫. The volume measured is now saved.
3 Press the MODE ⑨ button. The device is now ready for the second measurement. - Measure the next volume.
- Press the RECALL ⑤ button. A "+" appears in the display.
6 Press and hold down the RECALL 5 button. In the lower line is shown the result of the first measurement. - Press the button RECALL 5. The two measurements will be added together and the result indicated on the lower line.
- Repeat the steps 2 to 7 to add together further measurements.
- Should you wish to depart the addition mode, press the button MODE ⑨. All values will be erased.
Displaying the last measurements
After the measurement of a total distance, an area or a volume, press the button READ ⑪ repeatedly to indicate once again the individual values of the measurements. The beam of the respective measured value blinks and the measurement result is indicated in the upper line of the display ⑫.
Temperature Display
Press and hold down the FT/M ④ button. In the display ⑫ the temperature indicator appears in the lower line. To change between the SI unit system (degrees celcius) and the Angloamerican system (degrees Fahrenheit) press the FT/M ④ button. If you want to exit the temperature indicator press the MODE ⑨ button.
Battery display
A battery symbol appears in the display 12 when the battery is weak resp. almost discharged. Replace the battery as soon as possible (see section "Inserting the battery"). If you do not, the measurements will be false.
Automatic switch-off
If a button is not activated for approx. 60 seconds, the appliance switches itself off automatically.
Cleaning and storage
- Store the appliance at a dry and frost free location.
- If you do not intend to use the appliance for an extended period, remove the battery from the battery compartment.
- Clean the appliance with a soft, dry cloth.
- Do not use chemical or abrasive cleaning agents. These could damage the housing.
Disposal

Do not dispose of the appliance in your normal domestic waste. This product is subject to the provisions of European Directive 2002/96/EC.
Dispose of the appliance through an approved disposal centre or at your community waste facility.
Observe the currently applicable regulations. In case of doubt, please contact your waste disposal centre.
Disposal of batteries/accumulators
Used batteries/rechargeable batteries may not be disposed of in household waste. Every consumer is legally obliged to dispose of batteries at a collection site of his community/city district or at a retail store.
The purpose of this obligation is to ensure that batteries are disposed of in a non polluting manner. Only dispose of batteries when they are fully discharged.

Dispose of the packaging materials in an environmentally responsible manner.
Warranty & Service
The warranty for this appliance is for 3 years from the date of purchase. The appliance has been manufactured with care and meticulously examined before delivery. Please retain your receipt as proof of purchase. In the event of a warranty claim, please make contact by tele phone with our Service Department. Only in this way can a post free despatch for your goods be assured.
The warranty covers only claims for material and maufac turing defects, but not for transport damage, for wearing parts or for damage to fragile components, e.g. buttons or batteries. This product is for private use only and is not intended for commercial use. The warranty is void in the case of abusive and improper handling, use of force and internal tampering not carried out by our authorized service branch. Your statutory rights are not restricted in any way by this warranty.
The warranty period will not be extended by repairs made unter warranty. This applies also to replaced and repaired parts. Any damage and defects extant on purchase must be reported immediately after unpacking the appliance, at the latest, two days after the purchase date. Repairs made after the expiration of the warranty period are subject to payment.
GB DES UK LTD
Tel.: 0871 5000 700 (£ 0.10 / minute)
E Mail: support.uk@kompernass.com
IE Kompernass Service Ireland
Tel.: 1850 930 412 (0,082 EUR/Min.)
Standard call rates apply. Mobile operators may vary.
E Mail: support.ie@kompernass.com
CY Kompernass Service Cyprus
Tel.: 800 9 44 01
E Mail: support.cy@kompernass.com
Importer
KOMPERNASS GMBH
BURGSTRASSE 21
44867 BOCHUM, GERMANY
www.kompernass.com
- i Advertencia
- i Avvertenza
- i Nota
- Intended Usage
- Safety instructions
- Risk of personal injury!
- Risk from the laser beam!
- Warning against damage to the appliance!
- Interaction with batteries
- Risk of explosion!
- Technical data
- Items supplied
- Unpacking
- Device description
- Inserting the battery
- Warning:
- Measuring distances
- Note:
- Take note of the following illustrations:
- i Notice
- Adding distances together
- Measuring areas
- Adding areas together
- Measuring volumes
- Adding volumes together
- Displaying the last measurements
- Temperature Display
- Battery display
- Automatic switch-off
- Cleaning and storage
- Disposal
- Disposal of batteries/accumulators
- Warranty & Service
- GB DES UK LTD
- IE Kompernass Service Ireland
- CY Kompernass Service Cyprus
- Importer
Brand : POWERFIX
Model : KH 2927-1
Category : Rangefinder