EEG8000 - Dishwasher ELECTROLUX - Free user manual and instructions
Find the device manual for free EEG8000 ELECTROLUX in PDF.


| Product type | Built-in dishwasher |
| Brand | Electrolux |
| Model | EEG8000 |
| Dimensions (W x H x D) | 60 x 85 x 60 cm |
| Net weight | 45 kg |
| Capacity | 14 place settings |
| Electrical supply | 220-240 V, 50 Hz, 10 A |
| Energy class | A |
| Water consumption per cycle | 9.5 L |
| Energy consumption per cycle | 0.92 kWh |
| Noise level | 44 dB(A) |
| Wash programs | Auto, Intensive, Eco, Quick, Glass, Rinse |
| Additional functions | Delayed start, Extra drying, Intensive zone |
| Maintenance and cleaning | Weekly cleaning of filters, checking spray arms |
| Safety | Anti-leak, child lock |
| Spare parts and repairability | Available through Electrolux after-sales service |
| Warranty | 2 years |
| Repairability index | 8.5/10 |
Frequently Asked Questions - EEG8000 ELECTROLUX
User questions about EEG8000 ELECTROLUX
0 question about this device. Answer the ones you know or ask your own.
Ask a new question about this device
Download the instructions for your Dishwasher in PDF format for free! Find your manual EEG8000 - ELECTROLUX and take your electronic device back in hand. On this page are published all the documents necessary for the use of your device. EEG8000 by ELECTROLUX.
USER MANUAL EEG8000 ELECTROLUX
natural_image
Line drawing of a kitchen blender with lid and handle (no text or symbols)PAGE
⑤ Bruksanvisning ..... 4
DK Brugsanvisning ..... 10
N Bruksanvisning ..... 16
FIN Käyttöohje. 22
GB Instruction book .....28
D Gebrauchsanweisung ..... 34
F Mode d'emploi ..... 41
NL Gebruiksaanwijzing.....47
① Istruzione per l'uso.....53
E Instrucciones de uso .....60
P Instruções de utilização . . . .66
HR Priručnik....73
RO Instructiuni de utilizare .....79
LT Instrukcija....85
UA Інструкція з експлуатації...91



natural_image
Illustration of a hand pouring liquid into a container with arrows indicating flow direction (no text or symbols)2

natural_image
Line drawing of a hand pressing down on a water dispenser with directional arrows indicating motion (no text or symbols)3

natural_image
Line drawing of a hand pouring liquid into a container with a plate nearby (no text or symbols)4

natural_image
Line drawing of a blender with a handle and lid, showing a small container being inserted (no text or symbols)5

natural_image
Line drawing of a hand mixer with a glass container and lid, no text or symbols present6

natural_image
Illustration of a hand pouring liquid into a container with an upward arrow indicating motion (no text or symbols)7


natural_image
Illustration of hands holding a cylindrical container with an arrow indicating rotation (no text or symbols)8

natural_image
Line drawing of two hands holding a small container with a pointer and a small knob (no text or symbols)9

natural_image
Line drawing of a hand pouring liquid into a container using a stand mixer (no text or symbols)10

natural_image
Technical line drawing of a cylindrical device with internal components and mounting bracket (no text or symbols)1112

natural_image
Hand holding a ceramic pot with a downward arrow indicating compression or disassembly (no text or symbols)


S
S Bästa köpare,
please read these operating instructions through carefully.
Above all please observe the safety instructions on the first few pages of these operating instructions! Please keep these operating instructions for later reference. Pass them on to any subsequent owner of the appliance.
!
Using the warning triangle and/or the key words (Danger!, Caution!, Important!), information that is important for your safety or the correct functioning of the appliance is highlighted. It is essential that this information is observed.
[NO TEXT]
This symbol guides you step by step through the operation of the appliance.
i
Next to this symbol you will find additional information and practical tips on using the appliance.
[NO TEXT]
Tips and information about the economical and environmentally friendly use of the appliance are marked with the clover.
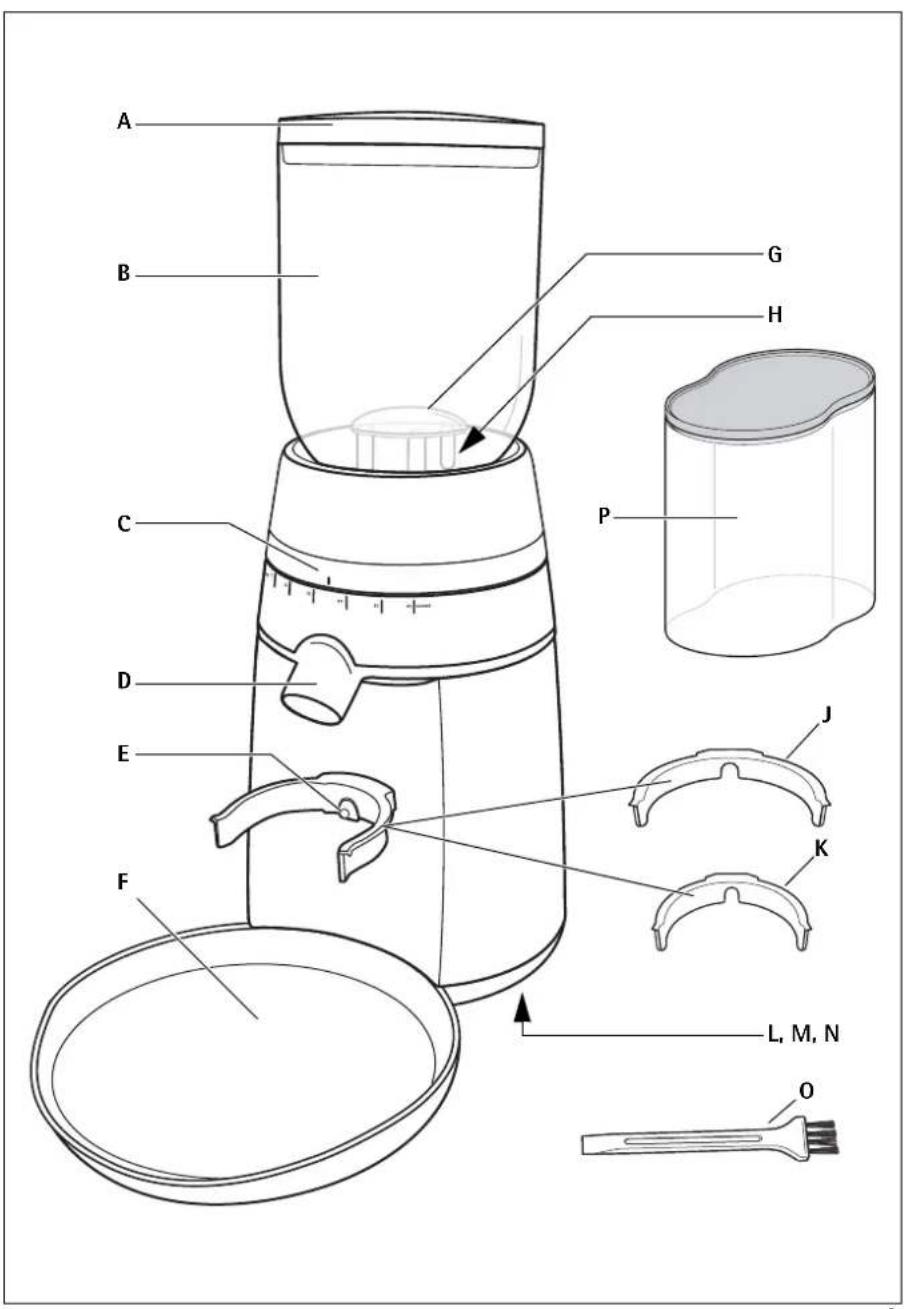
Appliance Description (Fig. 1)
A Bean hopper lid
B Bean hopper (capacity 250 g) with shutter release mechanism
C Grind adjustment collar
D Grinding spout
E Grind on demand button
F Preparation mat (removable)
G Burr shield
H Conical burrs
J Commercial size filter holder loca-
tor
K Domestic size filter holder locator
L Cord stuff (underside of appliance)
M Non-slip rubber feet
N Rating plate (underside of appli-
ance)
- Burr cleaning brush
P Ground coffee container with lid
!
Safety Instructions
This appliance corresponds to accepted technological standards with regards to safety. Nevertheless, as a manufacturer we consider it our obligation to make you aware of the following safety information.
General Safety
- The operating voltage of the appliance and the mains voltage as well as the type of current must match (see the rating plate).
- Only plug into a correctly installed earthed mains socket.
• Always remove the plug when the appliance is not in use. - Never pull the plug from the socket by means of the mains cable!
- Prior to cleaning or in the event of a malfunction, unplug the appliance first!
- Do not use the appliance if the mains cable is damaged or the housing is visibly damaged.
- Do not let the mains cable of an appliance hang over the edge of a table or bench top or touch any hot surface.
- Do not use the appliance with an extension cable unless this cable has been checked and tested by a qualified technician or service person.
- Do not place an appliance on or near a hot gas flame, electric element or on a heated oven. Do not place on top of any other appliance.
-
Repairs to this appliance, including replacement of the mains cable, may only be carried out by qualified service engineers. Considerable danger may result from improper repairs. If repairs become necessary, please contact the Customer Care Department or your authorised dealer.
-
If the appliance is used for purposes other than those intended or used incorrectly, no liability can be accepted for any damage that may be caused.
- This appliance is not intended for use by persons (including children) with reduced physical, sensory or mental capabilities or lack of experience and knowledge unless they have been given initial supervision or instruction concerning use of the appliance by a person responsible for their safety.
Child Safety
- Never leave the appliance unattended while in use.
- Keep children away from electrical appliances.
- Packaging material, e.g. plastic bags, should not be accessible to children.
• Children should be supervised to ensure that they do not play with the appliance.
Safety in operation
- Check the bean hopper (Fig. 1/B) for the presence of foreign objects before using.
- Do not put frozen or caramelised coffee beans in the bean hopper. Use only roasted coffee beans! Remove any foreign objects, such as small stones, from the coffee beans. Blocking or damage caused by foreign objects in the grinder might be excluded from the guarantee.
• Always operate the grinder with the ground coffee container properly inserted in the grinder. - Do not place your hand in or near the burrs while the grinder is in operation.
• Always place the unit on a flat, level surface. - Do not attempt to re-grind ground coffee.
Safety in cleaning and care
- Follow the cleaning instructions.
- Prior to cleaning, unplug the appliance first!
- Do not immerse the appliance in water or any other liquid unless recommended.
- Do not place any parts of the coffee grinder in the dishwasher.
Operating
Before using the coffee grinder, wipe the base exterior with a damp cloth.
Wash the bean hopper (Fig. 1/B), hopper lid (Fig. 1/A) and ground coffee container (Fig. 1/P) in warm soapy water, then rinse and dry.
Do not immerse the burrs in water or any other liquid.
Place the coffee grinder on a dry, level surface.
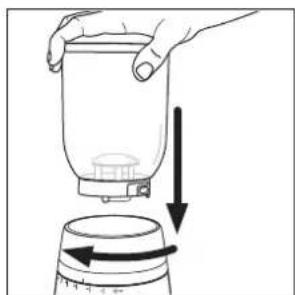
To attach the bean hopper, position bean hopper onto the top of the motor base, push down and turn clockwise (see Fig. 2).
Fill the bean hopper with coffee beans.
Remember to keep the hopper full at all times. Having an even weight bearing down on the burrs is important to ensure a consistent grind.
i This coffee grinder is intended to grind whole coffee beans only.
Place the hopper lid onto the bean hopper.
Plug the power cord into a 220-240 V power outlet and switch the power on.
You can hide unwanted cord in the cord stuff (Fig. 1/L) on the underside of the appliance.
Select the grind by turning the grind adjustment collar to the desired setting (see Fig. 3).
GB
i Refer to the grind setting table in section „Adjusting the Grind Setting“ to assist you in selecting the correct grind level for the desired brewing method.
i You can grind coffee into a filter holder of any espresso coffee maker, or, for other brewing styles, into the ground coffee container (Fig. 1/P).
To grind coffee into a filter holder:
Position the filter holder into the filter holder locator (see Fig. 4).
i There are two filter holder locators provided: a smaller size to fit domestic handles (Fig. 1/K) and a larger size for commercial handles (Fig. 1/J).
To grind coffee, press the filter holder against the button (Fig. 1/E) located in the centre of the filter holder locator (see Fig. 5).
When the basket is full, pull the filter holder off the button. Collapse the coffee in the basket by tapping it on the bench and repeat until the desired amount of coffee has been ground.
To grind coffee into the ground coffee container:
Remove the lid from the ground coffee container (Fig. 1/P).
To grind coffee, press the ground coffee container against the grind on demand button (Fig. 1/E) (see Fig. 6).
When the desired amount of coffee is ground, pull the ground coffee container off the button. Close the container with the lid to preserve freshness of the ground coffee.
Foreign objects like stones or twigs can sometimes be found in whole bean coffee and can cause the coffee grinder to jam. Should this occur refer to the „Care and
Cleaning" section as these objects need to be removed immediately.
Adjusting the Grind Setting
A starting point for grind settings:
SETTING BREWING METHOD
1 - 5 Turkish
10 - 15 Espresso
10 - 15 Stove Top
20 - 25 Drip Filter
20 - 25 Plunger
The settings noted in the table above are a starting guide only. For example the setting for espresso will vary depending on the quality and roast degree of the beans and the type of espresso extraction desired.
The wide-range of 25 grind settings allows for precision adjustment. The coffee maker has complete control of the particle size and ultimately the quality of the resulting brew.
Some things to remember when using the coffee grinder:
- The smaller the particle size the longer it will take to grind.
- When using the finer settings the coffee may become stuck, we recommend tapping on the lid of the bean hopper to dislodge any clumps of coffee blocking the flow.
- After long periods of using the finer settings we recommend removing the upper burr and sweeping away any residual coffee to avoid clogging. See „Care and Cleaning“ for more details.
GB
Tips
- Select the correct grind for the brewing method you are using. 25 grind settings are available to ensure precision adjustment. Setting 1 produces the finest grind, 10 to 15 are medium grinds appropriate for espresso coffee makers, and 25 is the coarsest grind you can achieve. Experiment with the grind settings to achieve the ideal brew that best suits your tastes.
- For drip filter coffee machines, a good starting point is to use 8 grams (1 scoop) of coffee for every 4 cups of brew water as measured with the carafe. Finer grinds usually require less coffee, but using too fine a grind will result in a brew that is bitter in flavour.
- For those that prefer weaker coffee, continue to use the recommended amount of ground coffee and then dilute the resulting brew with fresh hot water. Doing this will maximise flavour and minimise bitterness.
- Coffee that is ground too fine for a particular brewing process will result in over-extraction and the coffee will taste bitter. On the other hand, coffee that is too coarse for a particular brewing method will result in under-extraction and the coffee will be thin and poor in flavour.
- Once coffee is ground it quickly loses its flavour and aroma. For the best results we recommend you grind beans immediately prior to brewing.
- Buy fresh whole coffee beans weekly.
- To retain freshness, store whole coffee beans in an airtight container in a cool, dark, dry place. It is not recommended that you store beans in the grinder's bean hopper for a prolonged period. The bean hopper has a shutter release
mechanism for easy removal and preventing accidental spills. It allows to transfer any un-used beans to an ideal storage unit.
8. To ensure the best results from the coffee grinder clean the bean hopper and conical burrs regularly.
Always Remember
PROBLEM DESCRIPTION RESULT
| OVER-EXTRAC-TION | Over develop-ment of flavour particles(sugars etc.) | Sharp, burnt, bitter |
| UNDER-EXTRAC-TION | Under devel-opment of fla-vour particles | Thin, watery, weak |
Care and Cleaning

Ensure the coffee grinder is switched off and unplugged from the power outlet prior to cleaning. Do not immerse the motor base of the coffee grinder in water.
Do not immerse any part of the burr assembly in water or any other liquid.
Do not place any parts of the coffee grinder in the dishwasher.
Do not use abrasive cleansers or scouring pads.

Spots and marks on the surface of the burrs are part of the hardening process. These marks do not affect the performance of the grinder or the taste of the coffee.
Cleaning the motor base, bean hopper and coffee container

Remove the bean hopper from the motor base: push down and turn anti-clockwise, then lift off (see Fig. 7). Store unused beans in an airtight container to preserve their freshness.
GB
Clean the motor base exterior using a damp soft sponge with mild detergent and wipe dry.
Wash the bean hopper and coffee container in warm soapy water, then rinse and dry.
Cleaning the burrs
If the coffee grinder is used frequently (every day), the burrs need to be cleaned every three weeks to ensure best performance of the coffee grinder. Regular cleaning helps the burrs achieve consistent grinding results, which is especially important when grinding coffee for espresso.
Ensure the coffee grinder is switched off and unplugged from the power outlet. Remove the bean hopper from the motor base (see Fig. 7).
To remove the top burr turn the grind adjustment collar in an anti-clockwise direction until it stops (see Fig. 8).
Press and hold down the 'UNLOCK' button at the rear of the motor base and with the other hand turn the grind adjustment collar anti-clockwise until it stops and the graphic line on the collar is aligned with the line on the motor base (see Fig. 9).
Lift out the top burr from the grind adjustment collar using the handle (see Fig. 10). Clean using the burrcleaning brush.
Lift the grind adjustment collar away from the motor base.
Clean the bottom burr using the burr-cleaning brush (see Fig. 11).
Once both burrs are cleaned, return the grind adjustment collar to its position in the motor base. With the grind adjustment collar in hand align the graphic line on the collar with the line on the rear of the motor base, press down (see Fig. 12).
Replace the top burr back into position in the grind adjustment collar. Ensure the marker on the top burr is aligned with the marker inside the grind adjustment collar and push firmly into place.
Turn grind adjustment collar clockwise to the desired grind setting.
Adjusting the burrs for wear
The conical burrs are made of tool hardened steel for extra long life. However after prolonged use the burrs will require adjustment to compensate for wear. A sign of this is when the grinds are not as fine as they used to be, check by rubbing some of the grinds between two fingers or for espresso the extraction will also show signs that the grind needs adjusting. Please contact the Customer Service Centre.
Replacing the burrs
To inquire about having the burrs replaced contact the Customer Service Centre.
Technical Data
Mains voltage:
220-240V/50-60Hz
Power consumption: 125 – 150 W
CE This appliance conforms with the following EC Directives:
• Low Voltage Directive 2006/95/EC
• EMC Directive 89/336/EEC with amendments 92/31/EEC and 93/68/EEC
Disposal

Packaging material
The packaging materials are environmentally friendly and can be recycled. The plastic components are identified by markings, e.g. >PE<, >PS<, etc. Please dispose of the packaging materials in the appropriate container at the community waste disposal facilities.

Old appliance

The symbol 📄 on the product or on its packaging indicates that this product may not be treated as household waste. Instead it shall be handed over to the applicable collection point for the recycling of electrical and electronic equipment. By ensuring this product is disposed of correctly, you will help prevent potential negative consequences for the environment and human health, which could otherwise be caused by inappropriate waste handling of this product. For more detailed information about recycling of this product, please contact your local city office, your household waste disposal service or the shop where you purchased the product.
D
Share more of our thinking at
www.electrolux.com EEG8000 (822 949 425 - 01 - 0508)


Electrolux


- PAGE
- S
- S Bästa köpare,
- Appliance Description (Fig. 1)
- Safety Instructions
- General Safety
- Child Safety
- Safety in operation
- Safety in cleaning and care
- Operating
- GB
- Adjusting the Grind Setting
- SETTING BREWING METHOD
- Tips
- Always Remember
- Care and Cleaning
- Cleaning the motor base, bean hopper and coffee container
- Cleaning the burrs
- Adjusting the burrs for wear
- Replacing the burrs
- Technical Data
- Disposal
- Packaging material
- Old appliance
Brand : ELECTROLUX
Model : EEG8000
Category : Dishwasher