ZV830SMSS - Range hood Monogram - Free user manual and instructions
Find the device manual for free ZV830SMSS Monogram in PDF.


| Product Type | Range Hood |
| Brand | Monogram |
| Model | ZV830SMSS |
| Power Supply | 120 V, 60 Hz |
| Max Lighting Power | 50 W (halogen MR16 GU10) |
| Fan Speeds | Low, Med, High, Boost (5 min max), Auto |
| Memory Function | Yes, via Memory/Off button |
| Automatic Sensor | Yes, adjusts speed based on temperature |
| Grease Filter | Metal, dishwasher safe |
| Charcoal Filter (optional) | Replaceable, ref. WB02X11342 |
| Filter Panel | Dishwasher safe |
| Exterior Material | Stainless Steel |
| Steel Care | Stainless Steel Magic product (WX10X15) |
| Safety | Auto shut-off on overheating, internal switch |
| Warranty | 1 year parts and labor |
| Customer Service | 800.561.3344 |
Frequently Asked Questions - ZV830SMSS Monogram
User questions about ZV830SMSS Monogram
0 question about this device. Answer the ones you know or ask your own.
Ask a new question about this device
Download the instructions for your Range hood in PDF format for free! Find your manual ZV830SMSS - Monogram and take your electronic device back in hand. On this page are published all the documents necessary for the use of your device. ZV830SMSS by Monogram.
USER MANUAL ZV830SMSS Monogram
| Chimney Hood | ||
| Introduction | Your new Monogram chimney hood makes an eloquent statement of style and design. Whether you chose it for its purity of design, assiduous attention to detail-or for both of these reasons-you'll find that your Monogram chimney hood's superior blend of form and function will delight you for years to come.Your Monogram chimney hood was designed to be elegant, yet provide the venting performance you need when cooking. Its sleek design can be beautifully integrated into the kitchen.The information on the following pages will help you operate and maintain your chimney hood properly. | |
| Contents | Consumer InformationImportant Phone Numbers 15Model and Serial Numbers 2Problem Solver 8,9Product Registration 11-14Safety Instructions 4Warranty 16 | Controls and Features 5Care and CleaningCharcoal Filter 7Filter Panel 6Light Bulbs 7Metal Grease Filter 6Stainless Steel Hood Surfaces 7 |
| Before using your chimney hood | Read this manual carefully. It is intended to help you operate and maintain your new chimney hood properly.Keep it handy for answers to your questions. | If you don't understand something or need more help, there is a list of toll-free consumer service numbers included in the back section of this manual.ORVisit our Website at: monogram.com |
| Write down the model & serial numbers | You'll find them on a label on the hood.These numbers are also on the Consumer Product Ownership Registration Card packed separately with your hood.Visit monogram.com and click on "Register Your Appliance" to register your chimney hood. | Before sending in this card, please write these numbers here:Model NumberSerial NumberUse these numbers in any correspondence or service calls concerning your hood. |
| If you received a damaged hood | Immediately contact the dealer (or builder) that sold you the hood. | |
Consumer Information
| Chimney Hood | ||
| Save time & money | Before you request service, check the Problem Solver in the back of this manual. | It lists causes of minor operating problems that you can correct yourself. |
| If you need service | To obtain service, see the Consumer Services page in the back of this manual.We're proud of our service and want you to be pleased. If for some reason you are not happy with the service you receive, here are some steps to follow for further help.FIRST, contact the people who serviced your appliance. Explain why you are not pleased.In most cases, this will solve the problem. | NEXT, if you are still not pleased, write all the details—including your phone number—to:Manager, Customer RelationsGE AppliancesAppliance ParkLouisville, KY 40225 |
SAFETY PRECAUTIONS
WARNING—TO REDUCE THE RISK OF FIRE, ELECTRIC SHOCK OR INJURY TO PERSONS, OBSERVE THE FOLLOWING:
A. Use this unit only in the manner intended by the manufacturer. If you have questions, contact the manufacturer.
B. Before servicing or cleaning unit, switch power off at service panel and lock the service disconnecting means to prevent power from being switched on accidentally. When the service disconnecting means cannot be locked, securely fasten a prominent warning device, such as a tag, to the service panel.
C. Do not use this unit with any solid-state speed control device.
D. This unit must be grounded.
CAUTION—FOR GENERAL VENTILATING USE ONLY. DO NOT USE TO EXHAUST HAZARDOUS OR EXPLOSIVE MATERIALS AND VAPORS.
WARNING—TO REDUCE THE RISK OF INJURY TO PERSONS IN THE EVENT OF A RANGE TOP GREASE FIRE, OBSERVE THE FOLLOWING\*:
A. SMOTHER FLAMES with a close-fitting lid, cookie sheet or metal tray, then turn off the burner. BE CAREFUL TO PREVENT BURNS. If the flames do not go out immediately, EVACUATE AND CALL THE FIRE DEPARTMENT.
B. NEVER PICK UP A FLAMING PAN—You may be burned.
C. DO NOT USE WATER, including wet dishcloths or towels—a violent steam explosion will result.
D. Use an extinguisher ONLY if:
-
You know you have a Class ABC extinguisher, and you already know how to operate it.
-
The fire is small and contained in the area where it started.
-
The fire department is being called.
-
You can fight the fire with your back to an exit.
*Based on "Kitchen Firesafety Tips" published by NFPA.
READ AND SAVE THESE INSTRUCTIONS.
WARNING—TO REDUCE THE RISK OF A RANGE TOP GREASE FIRE:
A. Never leave surface units unattended at high settings. Boilovers cause smoking and greasy spillovers that may ignite. Heat oils slowly on low or medium settings.
B. Always turn hood ON when cooking at high heat or when flambéing food (i.e. Crepes Suzette, Cherries Jubilee, Peppercorn Beef Flambé).
C. Clean ventilating fans frequently. Grease should not be allowed to accumulate on fan or filter.
D. Use proper pan size. Always use cookware appropriate for the size of the surface element.
WARNING—TO REDUCE THE RISK OF FIRE, ELECTRIC SHOCK OR INJURY TO PERSONS, OBSERVE THE FOLLOWING:
A. Installation work and electrical wiring must be done by qualified person(s) in accordance with all applicable codes and standards, including fire-related construction.
B. Sufficient air is needed for proper combustion and exhausting of gases through the flue (chimney) of fuel burning equipment to prevent back drafting. Follow the heating equipment manufacturer's guidelines and safety standards such as those published by the National Fire Protection Association (NFPA), and the American Society for Heating, Refrigeration and Air Conditioning Engineers (ASHRAE), and the local code authorities.
C. When cutting or drilling into wall or ceiling, do not damage electrical wiring and other hidden utilities.
D. Ducted fans must always be vented to the outdoors.
WARNING—TO REDUCE THE RISK OF FIRE, USE ONLY METAL DUCTWORK.
- Do not attempt to repair or replace any part of your hood unless it is specifically recommended in this manual. All other servicing should be referred to a qualified technician.
CAUTION—AUTOMATICALLY OPERATED DEVICE. TO REDUCE THE RISK OF INJURY, DISCONNECT FROM POWER SUPPLY BEFORE SERVICING. THE UNIT IS EQUIPPED WITH AN INTEGRAL DISCONNECTING SWITCH LOCATED INSIDE THE BLOWER HOUSING.
Controls
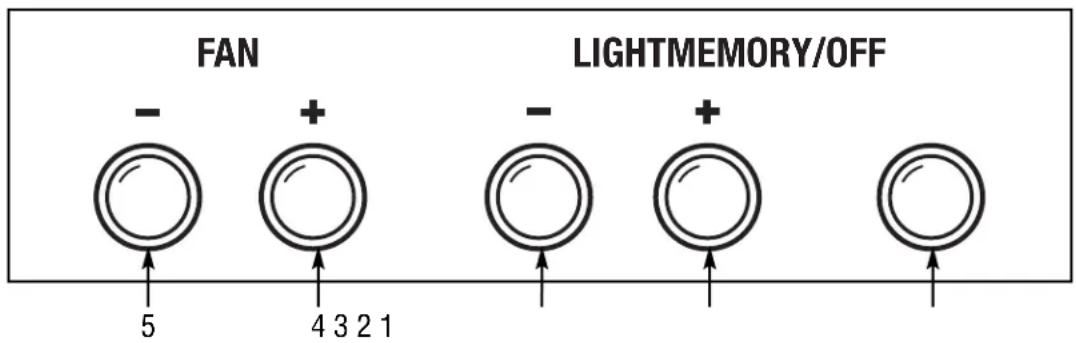
1 MEMORY/OFF Button. Press to recall memorized fan and light settings.
To memorize desired fan and light settings:
- Press the MEMORY/OFF button.
- Select desired settings.
- Press MEMORY/OFF to save.
The hood will now turn off and the settings will be memorized.
NOTES:
- When any button is active (turned on), all outer rings will be illuminated.
- The hood can be turned OFF at any time by pressing the MEMORY/OFF button.
- Always deactivate (turn off) the buttons when the hood is not in use.
2 LIGHT INCREASE ON/OFF Button. Press to turn on or increase light level. The buttons allow you to cycle to the desired setting. (There are four light levels/settings and OFF.)
3 LIGHT DECREASE ON/OFF Button. Press to turn on or decrease light level. The buttons allow you to cycle to the desired setting. (There are four light levels/settings and OFF.)
4 FAN INCREASE ON/OFF Button. Press to turn on or increase fan settings. The buttons allow you to cycle to the desired setting. (Use to set the fan speed to LOW, MED, HIGH, BOOST or OFF.)
5 FAN DECREASE ON/OFF Button. Press to turn on or decrease fan settings. The buttons allow you to cycle to the desired setting. (Use to set the fan speed to LOW, MED, HIGH, BOOST or OFF.)
BOOST—Provides five minutes at the maximum fan setting and then automatically resets fan to HIGH.
NOTE: BOOST can stay on longer than five minutes when activated by the auto sensor.
AUTOMATIC FAN FEATURE—The hood fan will turn on automatically or automatically increase in speed if cooking temperatures become too hot. The fan will turn off automatically or decrease in speed when temperatures cool to an appropriate level.
NOTE: When the automatic feature is on, you can set the fan to a higher setting but not to a lower setting or off.
Care and Cleaning
| Chimney Hood | ||
| For your safety | Before servicing or cleaning the unit, switch power off at the service panel and lock the service panel to prevent power from being switched on accidentally. If the service panel cannot be locked, fasten a tag or prominent warning label to the panel. | |
| Filter panel | Grease will accumulate on the filter panel. The panel is dishwasher-safe and should be cleaned every 6 months or as needed.1. Press in to release and lower the filter cover panel.2. Remove the hinge barrel nuts and screws on both sides. Shift filter panel to the left and remove.3. Stand the filter cover panel in the dishwasher with the drain holes facing the bottom.NOTE: The filter must ALWAYS be in place and the filter panel must ALWAYS be closed when the hood is in use. | 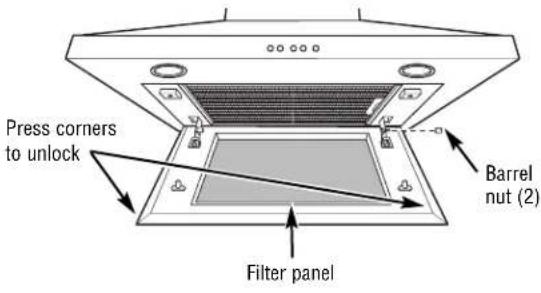 |
| Metal grease filter | The metal filter traps grease released by foods from the cooktop. The filter also helps prevent flames (from food, grease) from damaging the inside of the hood.For this reason, the filter must ALWAYS be in place and the filter panel must ALWAYS be closed when the hood is in use. The grease filter is dishwasher-safe and should be cleaned every 6 months, or as needed.To remove:1. Press up on the front two corners of the filter cover panel to unlock. Lower the panel to access the filter.2. Press the filter latch in to release it. Pull the filter down and out.To replace:1. Place the two tabs on the filter edge into the lower locating slots in the left or right side of the hood opening.2. Push the filter up and snap it into place in the hood.3. Rotate the filter cover panel up into position and press up on its front two corners to lock it into place. To clean, swish the filter in hot soapy water and rinse in clean water or wash it in the dishwasher. Do not use abrasive cleansers.NOTE: Some discoloration will occur in the dishwasher. | 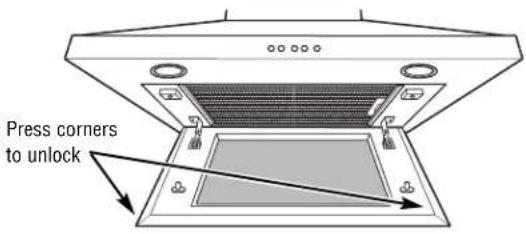 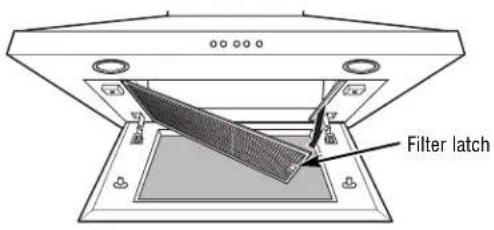 |
Charcoal filter (on some models)
If the model is not vented to the outside, the air will be recirculated through a disposable charcoal filter that helps remove smoke and odors.
The charcoal filter should be replaced when it is noticeably dirty or discolored (usually after 6 to 12 months, depending on hood usage).
NOTE: DO NOT rinse, or put charcoal filter in an automatic dishwasher.
The charcoal filter cannot be cleaned. It must be replaced.
Order Charcoal Filter WB02X11342.
To inquire about purchasing replacement charcoal filters or to find the location of a dealer nearest you, please call our toll-free number:
National Parts Center 800.626.2002
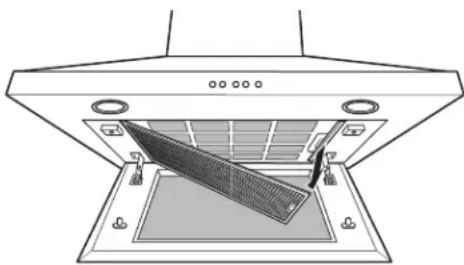
To remove:
- Remove the metal filter—see Metal grease filter section.
- Remove the charcoal filter in the same manner as the metal grease filter by pressing the filter latch in to release it. Pull the filter down and out.
natural_image
Line drawing of a kitchen fan with a grater inside, no text or symbols presentTo replace:
- Insert the black charcoal filter into the opening. Push the latch on both sides toward the center and engage the flange.
- Replace the metal filter—see Metal grease filter section.
Stainless steel hood surfaces
Regularly polish the stainless steel exterior with Stainless Steel Magic ^™ and the Monogram polishing cloth, to preserve and protect the fine finish.
To avoid scratching the fine finish of the stainless steel, wipe in the same direction as the grain when polishing or cleaning any stainless steel surface.
For regular cleaning, use clean water and a soft cloth. If stains persist, wash with mild dish soap using a soft cloth or nonabrasive pad. For more difficult stains, make a solution consisting of 25% vinegar (white or red) and 75% water. Dip a soft cloth into the solution and rub onto the stainless steel to remove the stain. If these methods do not remove the stains, dirt or debris, call 800.GE.CARES.
NOTE: Reapply Stainless Steel Magic with the Monogram polishing cloth after cleaning or if your unit comes in contact with water, to protect the fine finish.
Stainless Steel Magic and the Monogram polishing cloth are available through GE Parts and Accessories, 800.626.2002 or monogram.com.
For Stainless Steel Magic, order part number WX10X15.
Do not use appliance wax or polish on any stainless steel surface.
Do not use scouring pads, powdered cleaners, bleach or cleaners containing bleach because these products can scratch and damage the finish.
Warranty does not cover damage due to improper cleaning methods.
Light bulbs
CAUTION: Allow bulbs to cool before touching.
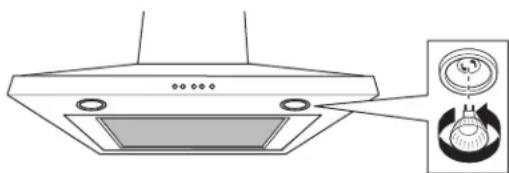
To change the light bulbs:
- Press and turn the light bulb face 1/4 turn.
- The bulb will drop straight out.
- Replace with the same size bulb by placing bulb prongs into the keyhole slots and turning 1/4 turn to lock in place.
These 120 volt, 50 watt, MR16 halogen bulbs with GU10 bases are available at most specialty lighting stores, building centers and large retailers. Ask for MR16 GU10 base bulb.
natural_image
Diagram of a kitchen ventilation system with a magnified inset showing internal components (no text or labels)NOTE: Do not replace with bulbs greater than 120 volts, 50 watts, or the lights will automatically shut off and the rings around the operating buttons will flash to indicate the bulbs have exceeded the acceptable limits.
Chimney Hood
Questions? Use this problem solver!
PROBLEM POSSIBLE CAUSE
| FAN AUTOMATICALLY • The hood fan will turn on automatically or automatically increase in TURNS ON OR INCREASES speed if cooking temperatures become too hot. The fan will turn off IN SPEED AND CAN NOT automatically or decrease in speed when temperatures cool to an BE TURNED OFF OR appropriate level. Fan will also turn on automatically when the hood LOWERED IN SPEED electronics are too hot.NOTE: When the automatic fan feature is on, you can set the fan to a higher setting but not to a lower setting or off. | |
| FAN DOES NOT • A fuse may be blown or a circuit breaker tripped. Replace fuse or OPERATE WHEN reset circuit breaker.TURNED ON | • The power disconnect switch inside the hood may be switched off.Remove the metal grease filter and the charcoal filter (if present) and flip the switch on. |
LOCATE ON/OFF SWITCH.
- Press in to release and lower the filter cover panel at the front.
- Push the filter latch toward the opening and pull downward to remove.
- Remove the charcoal filter, if present.
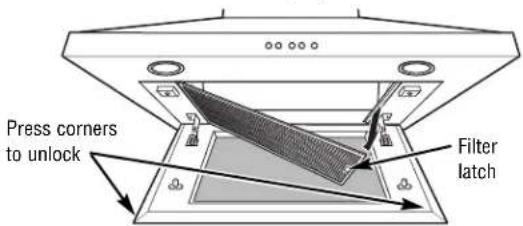
- Reach into the motor compartment and locate the ON/OFF switch at the front of the opening.
- Press switch to ON position.
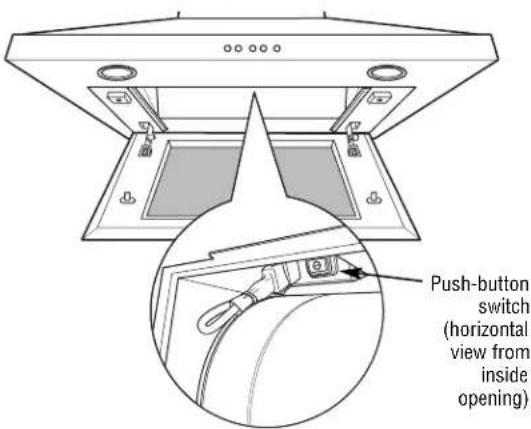
NOTE: If the hood blower needs to be removed for service, use the disconnect switch for your safety. Press the switch to the OFF position.
Chimney Hood
Questions? Use this problem solver!
PROBLEM POSSIBLE CAUSE
| FAN FAILS TO CIRCULATE AIR OR MOVES AIR SLOWER THAN NORMAL | · Check to be sure the metal grease filter and the charcoal filter (if present) are clean. Clean the metal grease filter (see the Metal grease filter section) and, if the hood is recirculated (not vented to the outside), replace the charcoal filter (see the Charcoal filter section). If cleaning and replacing the filters does not correct the problem, call for service. |
| FAN KEEPS GOING • The motor is probably overheating and turning itself off. This can OFF AND ON | motor is probably overheating and turning itself off. This can be harmful to the motor. Check to be sure the filter is clean and check ductwork for blockage. If off and on cycling continues, call for service. |
| LIGHTS WILL NOT WORK AND RINGS AROUND THE Light(s) were replaced with bulbs with greater than the 120 volt, 50 watt limit. Replace with the correct type and size bulb. See the OPERATING BUTTONS Light bulbs section. | |
| LIGHT WILL NOT STAY ON HIGH SETTING | · Use 120 volt, 50 watt, MR16 halogen bulbs with a GU10 base and make sure they are inserted securely. It is important to replace with bulbs that do not exceed the recommended wattage. Higher wattage bulbs will cause the outer rings to blink, and the lights will not function at the highest levels. See the Light bulbs section. |
| THE HOOD CONTROLS ARE NOT OPERATING CORRECTLY | · Disconnect power to the hood by turning the circuit breaker off or by removing the fuse in the home fuse box. Wait 30 seconds to allow the hood controls to reset and then replace the fuse or move the circuit breaker back on. |
| SEQUENTIAL PRESSES OF THE LIGHT OR FAN BUTTONS WILL CHANGE THE SETTING FROM THE LOWEST SETTING TO OFF TO THE HIGHEST SETTING, OR FROM THE HIGHEST SETTING TO OFF TO THE LOWEST SETTING | · So that you can easily set the controls to the desired setting, the hood is designed for the light and fan buttons to cycle through the settings. This is normal. |
| WHEN PRESSING THE MEMORY/OFF BUTTON TO TURN ON THE LIGHT, THE FAN COMES ON INSTEAD | · For your convenience, it is normal for the lights and fan to remember their last setting when you press the Memory/Off button. If you want only the lights on, press the “FAN +” (or the “FAN -”) button to turn the fan off. When you power the hood up next time, only the lights will function. NOTE: You may turn the fan and lights off or on separately, using the “+” or “-” buttons. |
Important Mail Today
Consumer Product Ownership Registration
GE Appliances

Place
1st Class
Letter
Stamp
Here
General Electric Company
Warranty Registration Department
P.O. Box 32150
Louisville, KY 40232-2150
Consumer Product Ownership Registration
Dear Customer:
Thank you for purchasing our product and thank you for placing your confidence in us. We are proud to have you as a customer!
Follow these three steps to protect your new appliance investment:
Complete and mail your Consumer Product Ownership Registration today. Have the peace of mind of knowing we can contact you in the unlikely event of a safety modification.

After completing this registration, write your model and serial numbers in this manual. You will need this information should you require service. Our service number is 800.444.1845.
Read your Owner's Manual carefully. It will help you operate your new appliance properly.
Important: To ensure that your product is registered, mail the separate product registration card. If the separate product registration card is missing, fold and mail the form below. No envelope is needed.
FOLD HERE
Consumer Product Ownership Registration

Product Model Serial Hood

GE Consumer & Industrial
Appliances
General Electric Company
Louisville, KY 40225
monogram.com
* Please provide your e-mail address to receive, via e-mail, discounts, special offers and other important communications from GE Appliances (GEA).
- Check here if you do not want to receive communications from GEA's carefully selected partners.
FAILURE TO COMPLETE AND RETURN THIS CARD DOES NOT DIMINISH YOUR WARRANTY RIGHTS.
For more information about GEA's privacy and data usage policy, go to monogram.com and click on "Privacy Policy" or call 800.626.2224

TAPE CLOSED

GE Consumer & Industrial
Appliances
General Electric Company
Louisville, KY 40225
monogram.com
Please place in envelope and mail to:

For Canadian Customers
CUT ALONG THIS LINE AND RETURN CARD—THANKS
| OWNERSHIP REGISTRATION CERTIFICATE - FICHE D'INSCRIPTION DU PROPRIÉTAIRE | |||||
| Please register your product to enable us to contact you in the remote event a safety notice is issued for this product and to allow for efficient communication under the terms of your warranty, should the need arise. | Veuillez enregistrer votre produit afin de nous permettre de communiquer avec vous si jamais un avis de sécurité concernant ce produit était émis et de communiquer facilement avec vous en vertu de votre garantie, si le besoin s'en fait sentir. | ||||
| REGISTER ON-LINE: www.geappliances.ca ENREGISTREMENT SUR INTERNET À: www.electromenagersge.ca | MAIL TO: P.O. BOX 1780, MISSISSAUGA POSTER À: ONTARIO, L4Y 4G1 | ||||
| ☐ MR./M ☐ MRS./MME.☐ MISS/MLLE. ☐ MS. | FIRST NAME /PRÉNOM | LAST NAME/NOM | |||
| STREET NO /N° RUE | STREET NAME/RUE | APT. NO /APP./RR# | |||
| CITY/VILLE | PROVINCE | POSTAL CODE/POSTAL | |||
| AREA CODE/IND. RÉG. | TELEPHONE | ||||
| DID YOU PURCHASE A SERVICE CONTRACT FOR THIS APPLIANCE? AVEZ-VOUS ACHETE UN CONTRAT DE SERVICE POUR CET APPAREIL ? YES/OUI ☐ Y/A ☐ IF YES/SI OUI : EXPIRATION NO/NON ☐ D/J | |||||
| NAME OF SELLING DEALER/NOM DU MARCHAND | MODEL/MODÈLE | ||||
| INSTALLATION DATE/DATE D'INSTALLATION Y/A ☐ M ☐ D/J | CORRESPONDENCE ☐ ENGLISH CORRESPONDANCE ☐ FRANÇAIS | SERIAL/SÉRIE | |||
| ☐ I do not wish to receive any promotional offers regarding this product.☐ Je ne désire pas recevoir d'offres promotionnelles concernant ce produit. | |||||
With the purchase of your new Monogram appliance, receive the assurance that if you ever need information or assistance from GE, we'll be there. All you have to do is call—toll-free!
GE Answer Center®
800.626.2000
Whatever your question about any Monogram major appliance, GE Answer Center ^® information service is available to help. Your call—and your question—will be answered promptly and courteously. And you can call any time. GE Answer Center ^® service is open 24 hours a day, Monday through Saturday.
OR
Visit our Website at: monogram.com
Monogram Preferred Service
800.444.1845
A GE consumer service professional will provide expert repair service, scheduled at a time that's convenient for you. Many GE Consumer Service company-operated locations offer you service today or tomorrow, or at your convenience (7:00 a.m. to 10:00 p.m. weekdays, 8:00 a.m. to 6:00 p.m. Saturday and Sunday). Our factory-trained technicians know your appliance inside and out—so most repairs can be handled in just one visit.
For Customers With Special Needs...
800.626.2000
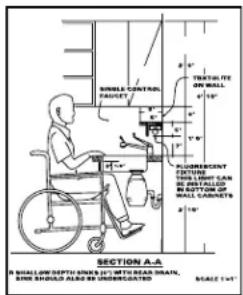
GE offers, free of charge, a brochure to assist in planning a barrier-free kitchen for persons with limited mobility.
Consumers with impaired hearing or speech who have access to a TDD or a conventional teletypewriter may call 800.TDD.GEAC (800.833.4322) to request information or service.
Service Contracts
800.626.2224
You can have the secure feeling that GE Consumer Service will still be there after your warranty expires. Purchase a GE contract while your warranty is still in effect and you'll receive a substantial discount. With a multiple-year contract, you're assured of future service at today's prices.
Parts and Accessories
800.626.2002
Individuals qualified to service their own appliances can have parts or accessories sent directly to their home. The GE parts system provides access to over 47,000 parts...and all GE Genuine Renewal Parts are fully warranted. VISA, MasterCard and Discover cards are accepted.
User maintenance instructions contained in this manual cover procedures intended to be performed by any user. Other servicing generally should be referred to qualified service personnel. Caution must be exercised, since improper servicing may cause unsafe operation.
| YOUR MONOGRAM HOOD WARRANTYStaple sales slip or cancelled check here. Proof of original purchase date is needed to obtain service under warranty. | ||
| WHAT IS COVERED | LIMITED ONE-YEAR WARRANTYFor one year from date of original purchase, we will provide, free of charge, parts and service labor in your home to repair or replace any part of the hood that fails because of a manufacturing defect. | |
| This warranty is extended to the original purchaser and any succeeding owner for products purchased for ordinary home use in the 48 mainland states, Hawaii and Washington, D.C.If the product is located in an area where service by a GE Authorized Servicer is not available, you may be responsible for a trip charge or you may be required to bring the product to an Authorized GE Service Location for service. In Alaska the warranty is the same except that it is LIMITED because you must pay to ship the product to the service shop or for the service technician's travel costs to your home.All warranty service will be provided by our Factory Service Centers or by our authorized Customer Care® servicers during normal working hours.Should your appliance need service, during warranty period or beyond, call 800.444.1845.Please have your serial number and model number available when calling for service. | ||
| WHAT IS NOT COVERED | Service trips to your home to teach you how to use the product.Replacement of house fuses or resetting of circuit breakers.Incidental or consequential damage caused by possible defects with this appliance.Replacement of the replaceable filters.Damage to the product caused by accident, fire, floods or acts of God.Damage caused after delivery. | Failure of the product if it is used for other than its intended purpose or used commercially.Improper installation.If you have an installation problem, contact your dealer or installer. You are responsible for providing adequate electrical, gas, exhausting and other connecting facilities as described in the Installation Instructions provided with the product.Product not accessible to provide required service. |
| EXCLUSION OF IMPLIED WARRANTIES—Your sole and exclusive remedy is product repair as provided in this Limited Warranty. Any implied warranties, including the implied warranties of merchantability or fitness for a particular purpose, are limited to one year or the shortest period allowed by law. | ||
Some states do not allow the exclusion or limitation of incidental or consequential damages, so the above limitation or exclusion may not apply to you. This warranty gives you specific legal rights, and you may also have other rights which vary from state to state.
To know what your legal rights are in your state, consult your local or state consumer affairs office or your state's Attorney General.
Warrantor: General Electric Company. Louisville, KY 40225
Hotte aspirante
Introduction
natural_image
Line drawing of a kitchen appliance with a grater and fan (no text or symbols)Pour le remplacer :
natural_image
Diagram of a kitchen ventilation system with a fan and dial (no text or labels)PROBLÈME CAUSES POSSIBLES
PROBLÈME CAUSES POSSIBLES
Please place in envelope and mail to:

For Canadian Customers
CUT ALONG THIS LINE AND RETURN CARD—THANKS
| OWNERSHIP REGISTRATION CERTIFICATE - FICHE D'INSCRIPTION DU PROPRIÉTAIRE | |||||
| Please register your product to enable us to contact you in the remote event a safety notice is issued for this product and to allow for efficient communication under the terms of your warranty, should the need arise. | Veuillez enregistrer votre produit afin de nous permettre de communiquer avec vous si jamais un avis de sécurité concernant ce produit était émis et de communiquer facilement avec vous en vertu de votre garantie, si le besoin s'en fait sentir. | ||||
| REGISTER ON-LINE: www.geappliances.ca ENREGISTREMENT SUR INTERNET À: www.electromenagersge.ca | MAIL TO: P.O. BOX 1780, MISSISSAUGA POSTER À: ONTARIO, L4Y 4G1 | ||||
| ☐ MR./M ☐ MRS./MME.☐ MISS/MLLE. ☐ MS. | FIRST NAME/PRÉNOM | LAST NAME/NOM | |||
| STREET NO/N° RUE | STREET NAME/RUE | APT. NO/APP./RR# | |||
| CITY/VILLE | PROVINCE | POSTAL CODE/POSTAL | |||
| AREA CODE/IND. RÉG | TELEPHONE | ||||
| DID YOU PURCHASE A SERVICE CONTRACT FOR THIS APPLIANCE? YES/OUI ☐ IF YES/SI OUI: EXPIRATION AVEZ-VOUS ACHETE UN CONTRAT DE SERVICE POUR CET APPAREIL ? NO/NON ☐ | |||||
| NAME OF SELLING DEALER/NOM DU MARCHAND | MODEL/MODÈLE | ||||
| INSTALLATION DATE/DATE D'INSTALLATION Y/A M D/J | CORRESPONDENCE ☐ ENGLISH CORRESPONDANCE ☐ FRANÇAIS | SERIAL/SÉRIE | |||
| ☐ I do not wish to receive any promotional offers regarding this product.☐ Je ne désire pas recevoir d'offres promotionnelles concernant ce produit. | |||||
GARANTIE LIMITÉE D'UN AN
natural_image
Line drawing of a kitchen chimney with a grater inside (no text or symbols)Para reemplazar:
natural_image
Diagram of a kitchen ventilation system with a top-down view showing internal components (no text or labels)PROBLEMA CAUSAS POSIBLES
PROBLEMA CAUSAS POSIBLES
GE Consumer & Industrial Appliances
General Electric Company Louisville, KY 40225
monogram.com
- SAFETY PRECAUTIONS
- WARNING—TO REDUCE THE RISK OF FIRE, ELECTRIC SHOCK OR INJURY TO PERSONS, OBSERVE THE FOLLOWING:
- CAUTION—FOR GENERAL VENTILATING USE ONLY. DO NOT USE TO EXHAUST HAZARDOUS OR EXPLOSIVE MATERIALS AND VAPORS.
- WARNING—TO REDUCE THE RISK OF INJURY TO PERSONS IN THE EVENT OF A RANGE TOP GREASE FIRE, OBSERVE THE FOLLOWING\*:
- READ AND SAVE THESE INSTRUCTIONS.
- WARNING—TO REDUCE THE RISK OF A RANGE TOP GREASE FIRE:
- WARNING—TO REDUCE THE RISK OF FIRE, USE ONLY METAL DUCTWORK.
- CAUTION—AUTOMATICALLY OPERATED DEVICE. TO REDUCE THE RISK OF INJURY, DISCONNECT FROM POWER SUPPLY BEFORE SERVICING. THE UNIT IS EQUIPPED WITH AN INTEGRAL DISCONNECTING SWITCH LOCATED INSIDE THE BLOWER HOUSING.
- Controls
- NOTES:
- Charcoal filter (on some models)
- The charcoal filter cannot be cleaned. It must be replaced.
- To remove:
- To replace:
- Stainless steel hood surfaces
- To avoid scratching the fine finish of the stainless steel, wipe in the same direction as the grain when polishing or cleaning any stainless steel surface.
- Do not use appliance wax or polish on any stainless steel surface.
- Light bulbs
- CAUTION: Allow bulbs to cool before touching.
- To change the light bulbs:
- LOCATE ON/OFF SWITCH.
- Important Mail Today
- Consumer Product Ownership Registration
- GE Consumer & Industrial
- With the purchase of your new Monogram appliance, receive the assurance that if you ever need information or assistance from GE, we'll be there. All you have to do is call—toll-free!
- Introduction
- Pour le remplacer :
- GARANTIE LIMITÉE D'UN AN
- Para reemplazar:
Brand : Monogram
Model : ZV830SMSS
Category : Range hood