
TSM1036 - Vacuum Cleaner Ferm - Free user manual and instructions
Find the device manual for free TSM1036 Ferm in PDF.


| Brand | Ferm |
| Model | TSM1036 |
| Product type | Wet and dry vacuum cleaner |
| Dimensions (L x W x H) | 40 x 40 x 50 cm |
| Weight | Approximately 10 kg |
| Power supply | 230 V ~ 50 Hz |
| Nominal power | 1200 W |
| Tank capacity | 30 L |
| Main functions | Suction of liquids and solids, blowing |
| Filtration | Washable pleated filter |
| Cable length | 4 m |
| Hose diameter | 35 mm |
| Included accessories | Floor nozzle, crevice nozzle, suction hose |
| Noise level | Approximately 75 dB(A) |
| Maintenance and cleaning | Filter and tank washable with water |
| Safety | Double electrical insulation, automatic shut-off when liquid is full |
| Spare parts and repairability | Filters, bags, hose available online |
| General information | Manufacturer's warranty 2 years, domestic and professional use |
Frequently Asked Questions - TSM1036 Ferm
User questions about TSM1036 Ferm
0 question about this device. Answer the ones you know or ask your own.
Ask a new question about this device
Download the instructions for your Vacuum Cleaner in PDF format for free! Find your manual TSM1036 - Ferm and take your electronic device back in hand. On this page are published all the documents necessary for the use of your device. TSM1036 by Ferm.
USER MANUAL TSM1036 Ferm
natural_image
Ferm machine with blue workbench and orange buttons, no visible text or symbols on the equipment bodyTSM1036
EN Original instructions 05
DE Übersetzung der Originalbetriebsanleitung 13
NL Vertaling van de oorspronkelijke gebruiksaanwijzing 22
FR Traduction de la notice originale 31
ES Traducción del manual original 40
IT Traduzione delle istruzioni originali 49
SV Översättning av bruksanvisning i original 57
FI Alkuperäisten ohjeiden käännös 65
DA Oversættelse af den originale brugsanvisning 73
Thank you for buying this Ferm product. By doing so you now have an excellent product, delivered by one of Europe's leading suppliers. All products delivered to you by Ferm are manufactured according to the highest standards of performance and safety. As part of our philosophy we also provide an excellent customer service, backed by our comprehensive Warranty. We hope you will enjoy using this product for many years to come.
1. SAFETY INSTRUCTIONS

Read the enclosed safety warnings, the additional safety warnings and the instructions. Failure to follow the safety
warnings and the instructions may result in electric shock, fire and/or serious injury. Save the safety warnings and the instructions for future reference.
The following symbols are used in the user manual or on the product:

Read the user manual.

Denotes risk of personal injury, loss of life or damage to the tool in case of non-observance of the instructions in this manual.

Risk of electric shock.

Keep bystanders away.


Wear a dust protection.

Wear ear and eye protection.

Keep hands away from the cutting area while the power tool is running. Contact with the saw blade can lead to injuries.

Danger area! Keep hands, fingers or arms away from this area.

Class II machine - Double insulation - You don't need any earthed plug.

The product is in accordance with the applicable safety standards in the European directives.
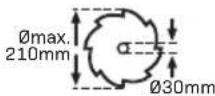
Take note of the dimensions of the saw blade. The hole diameter must fit the tool spindle without play. If it is necessary to use reducers, ensure that the dimensions of the reducer are suitable for the base blade thickness and the saw blade hole diameter, as well as the tool spindle diameter. Wherever possible, use the reducers provided with the saw blade. The saw blade diameter must match the information specified on the symbol.
SPECIFIC SAFETY INSTRUCTIONS
ATTENTION! When using electric tools to protect against electric shock, injury and fire the following basic safety measures must be observed. Make sure to read all of these instructions before you use this power tool, keep the safety booklet and preserve it well for later reference.
- Always keep your workplace clean and tidy.
- An untidy workplace can lead to unwanted accidents.
- Consider environmental influences.
- Do not expose the power tool to rain.
- Do not use the power tool in a damp or wet environment.
• Make sure that your working space has sufficient lighting.
- Do not use the power tool in areas where there is a fire or explosive hazard.
- To protect yourself from an electric shock.
- Avoid body contact with grounded parts (e.g. pipes, radiators, electric stoves, refrigerators etc.).
- Keep other people away
- Keep other people away especially children, do not let them touch your power tool or cable and keep the children away from your working area.
- Store the unused power tools safely.
- Unused power tools should be locked up or stored in a place that is dry and out of reach of children.
- Do not overload your power tool.
- You work better and safer in the specified power range.
-
Use the correct power tool.
-
Do not use low-power machines for heavy work
-
Do not use the power tool for purposes that they are not intended for. For example you cannot cut tree limbs or a log of wood using a hand saw.
-
Wear suitable clothing.
-
Do not wear loose clothing or jewelry; they can be caught in the moving parts.
- When working outdoors non-skid footwear is recommended.
-
For long hair, wear a hairnet.
-
Use protective equipment.
-
Wear protective goggles
-
When doing work that generates dust, use a breathing mask.
-
Connect the vacuum device
- If connection to the vacuum and catcher are available then you know that these are connected and properly used.
- Do not use the cable for purposes that it is not intended for.
- Do not use the cable to the connector to pull it out of the socket. Protect the cable from heat, oil and sharp edges.
- Secure the power tool.
- Use clamps or a vice to hold the power tool. It is safer than holding it with your hand.
- Avoid an abnormal posture.
- It ensures stability and keeps you balanced at all times.
- Keep and maintain tools with care.
- Keep the cutting tools sharp and clean, this ensures that you work better and that it is as safe as possible.
- Follow the lubricating and tool changing instructions.
- Check the connection cable of the power
tool regularly and let a qualified expert repair any damages.
- Check the extension cables regularly and replace them if they are damaged.
-
Keep the handles clean, dry and free of grease and oil.
-
Unplug the power tool from the power outlet.
- When you are not using the power tool, when you conduct maintenance and when you change your tools such as blades, drills and cutters.
- Do not leave the key inside the tool.
- Before switching it on, make sure that keys and setup tools have been cleared
- Avoid unintentionally switching the power tool on.
- Verify that while connecting the plug into the socket that the power is off.
- Use the extension cables while outdoors.
- When using the power tool outdoors make sure to use the appropriate and approved labeled extension cable.
Additional safety instructions
- When using the saw blades with hard metal teeth (Carbon tipped) it is advisable to use blades with a negative or slightly positive cutting angle. Do not use any saw blades with deeply cut teeth. They can grip the protective cap.
- Attention: First carefully assemble all the parts before starting work. Follow the procedure as indicated.
- If you are not familiar with using such a machine, you would be better to be informed first by a professional, an instructor or by a technician.
- Always clamp or press the workpiece firmly against the saw guide, before you carry out the process. The use of all possible clamping set-ups is preferable to using your hands.
- Important: If you are holding the workpiece by hand for the process to be carried out, keep a minimum distance of 100 mm from the saw blade.
- Always press the workpiece against the bench.
- Keep the saw blade sharp and check regularly whether it rotates freely without abnormal vibrations. Replace the saw blade if necessary.
- Allow the machine to rotate freely until it reaches the maximum number of revolutions, before you start the process.
- Maintain the air inlets at the back and the
bottom of the bench saw machine and electric motor for a longer machine life. Dust piles must be removed.
-
Always lock the different degree set-ups before you start processing.
-
Only buy suitable saw blades with a number of revolutions of at least 6000 revolutions per minute.
-
Only use the correct saw blade. Too small or too big saw blades are extremely dangerous.
-
Regularly inspect the saw blade for any faults. Replace the saw blade if necessary.
-
Grease the new saw blade and clean the flanges before you assemble the new blade. Then assemble the blade in the correct direction and pull the flanges firmly using the central bolt.
-
Only use original flanges. All other types are not suitable.
-
Never work without the protective cap of the saw blade.
-
The moving part of the protective cap must also remain assembled.
-
Never grease the saw blade while it is rotating.
-
Always keep your hands removed from the track of the saw blades.
-
Never pick up the workpiece by grasping with your hands along or behind the saw blade.
-
Ensure that the workpiece never touches the saw blade before the machine has been switched on.
-
Never process metal or stone sorts with this machine.
-
Use support aids in order to support long workpieces.
-
Never use the machine in a dangerous environment, where inflammable gases or fluids are present.
-
Never leave the machine unattended without first disconnecting it from the mains voltage.
-
If you hear abnormal noises, try to trace them or take the machine to a recognized fitter, or repair company.
-
If a part is broken or damaged, replace it or repair it immediately.
-
Never stand in the track of the saw blade but stand to the left or the right of the saw bench.
-
Your hands must likewise be placed next to the track of the saw blade.
-
Always use the push stick instead of your hands to push the wood through the saw.
-
Always place the wood at the front of the saw
bench and then push it further back.
-
For mitring only the adjustable guide must be used and the fence must be removed.
-
Never use the fence as a linear measure for cutting off beams.
-
If the saw blade is locked: first switch off the machine before you attend to the fault.
-
Avoid workpieces hitting back in your direction by taking the following measures:
• Always use sharp saw blades.
- Do not saw too small workpieces.
- Never release the workpiece before it has been completely pushed through the saw.
- Always adjust the guide parallel to the saw blade.
- Never remove the saw protection.
-
Before you continue sawing, ensure that you are standing firmly and that your hands are in the required position.
-
Never use thinners to clean the machine. Only use a damp cloth for cleaning.
-
Do not use saw blades which are damaged or deformed.
-
Replace table insert when worn.
-
Only use saw blades specified by the manufacturer that are intended for working with wood or similar materials according to EN847-1.
-
Take care that the selection of the saw blade depends on the material to be cut.
-
Connect labelsaws to a dust-collecting device when sawing.
-
Use and correct adjustment of the riving knife
-
Use and correct adjustment of the upper saw blade quard.
-
Take care when slotting.
Make sure, when changing the saw blade, the blade width is not smaller and the main blade thickness of the saw blade is not greater than the thickness of the riving knife.
Wear personal protective equipment, these could include:
- Hearing protection to reduce the risk of hearing loss
- Eye protection
- Inhale respiratory protection to reduce the risk of harmful dust
- Gloves when handling the blades and rough materials (recommendation, saw blades, are whenever practicable, carried in a container)

Warning! Do not use HSS blades.
- Insert the push stick in its holder when not in use.
- Use a push stick or a push block to guide the workpiece.

Warning! Do not use the saw for rebating or grooving.
- Only use saw blades, whose maximum speed is at least the speed indicated on the saw and is suitable for the material to be cut.
- During the transport, the upper part of the saw blade has to be covered, by the guard.
Switch off the machine immediately when you discover:
• A defective mains plug or mains lead.
• A defective switch.
• Overheating of the machine.
- Smoke or odeur caused by scorched insulation.
Electrical safety
When using electric machines always observe the safety regulations applicable in your country to reduce the risk of fire, electric shock and personal injury. Read the following safety instructions and also the enclosed safety instructions.

Always check that the power supply corresponds to the voltage on the rating plate.
Replacing cables or plugs
Immediately throw away old cables or plugs when they have been replaced by new ones. It is dangerous to insert the plug of a loose cable in the wall outlet.
Using extension cables
- As a supply for this machine always use an unloaded line and/or an extension cable with conductors of at least 1,5 mm ^2 and protected with a 16 A fuse. Be sure that this extension cable is not longer than 20 metres.
- This machine can be switched to the single-phase network (230-240 V/50 Hz). If you are in doubt about the earth of the electricity provisions, consult an electrician first.
2. MACHINE INFORMATION
Intended use
This power tool is intended as a stationary machine for making straight lengthways and crossways cuts in hard and soft wood free from foreign bodies such as nails, screws and mortar.
Technical specifications Model No. TSM1036
| Voltage | 230-240V~ |
| Frequency 50 Hz | |
| Power input 800W | |
| No load speed 2950/min | |
| Bevel angles 0° <> +45° | |
| Sawblade dimensions ∅ 200×2,4 × ∅ 16mm | |
| Number of teeth 24T | |
| Max. workpiece height 90° 43 mm | |
| Max. workpiece height 45° 27 mm | |
| Thickness of the riving knife 2.2 mm | |
| Blade body thickness 1.8 mm | |
| Weight | 13 kg |
| Lpa (sound pressure level) | 99.6 +3 dB(A) |
| Lwa (sound power level) | 112.6 +3 dB(A) |
| Vibration value <2.5 m/s | ^2 |
Vibration level
The vibration emission level stated in this instruction manual has been measured in accordance with a standardised test given in EN 60745; it may be used to compare one tool with another and as a preliminary assessment of exposure to vibration when using the tool for the applications mentioned
- using the tool for different applications, or with different or poorly maintained accessories, may significantly increase the exposure level.
- the times when the tool is switched off or when it is running but not actually doing the job, may significantly reduce the exposure level.
Protect yourself against the effects of vibration by maintaining the tool and its accessories, keeping your hands warm, and organizing your work patterns.
DESCRIPTION
The numbers in the text refer to the diagrams on page 2-6.
- Table surface
- Blade guard
-
Push stick
-
Saw blade
- Riving knife
- Table insert
- Parallel guide
- Front knob for angle adjustment
- Rear knob for angle adjustment
- Anglescale
- On / Off switch
- Knob for parallel guide
- Angle scale indicator
- Mitreguide
- Nut for saw blade
- Vacuum cleaner adapter
17.Countersunkscrew - L-shaped recess in the riving knife
19.Fixingscrew - Mountingholes
- Groove in table surface
22.Ruler - Extension for mitre guide
- Knobs for mitre guide
- Dust extraction port
- Clamping plate for parallel guide
- Washer for parallel guide
- Knob for mitre angle
- Largespanner
- Smallspanner
- Saw blade cover
- Phillips screw for saw blade cover
- Knob for guard
- Nut for guard
- Carriage bolt for guard
36.Wingnut
3. ASSEMBLY

Before carrying out any work on the machine, disconnect the mains plug from the power supply.
Installing / removing saw blade guard
Fig. A, B, C
- Open the knob (33) as far as possible until the knob (33) touches the nut (34), as shown on figure B. Attention: do not adjust the nut (34).
- Push the carriage bolt (35) as far as possible through the saw blade guard (2) so that the square profile of the carriage bolt (35) protrudes from the saw blade guard (2).
- Mount the saw blade guard (2) with the carriage bolt (35) into the L-shaped recess (18)
of the Riving knife (5): first forward and then down, as shown on figure C.
-
Then push the carriage bolt (35) back again, with the square profile into the recess in the saw blade guard (2).
-
Tighten the knob (33) as far as possible.
Attention: the upper saw blade guard must be able to move freely. Disassembly is carried out in reverse order.
Replacing the table insert
Fig. D

A worn or damaged table insert (6) must be replaced immediately.
In the event of wear or damage, the table insert must be replaced. Otherwise there is an increased risk of injury.
- Remove the saw blade guard (2) as explained in aforementioned paragraph.
- Loosen the countersunk screws (17).
- Replace table insert (6). The new table insert is installed in reverse order.
Adjusting the Riving knife
Fig. E, F
- Remove the saw blade guard (2) as explained in aforementioned paragraph.
- Loosen the screws (19) and remove the riving knife (5). The distance between saw blade (4) and Riving knife (5) should be 3-8 mm, as shown on figure F.
- Ensure the riving knife is straight and centered behind the saw blade (4).
Mounting / changing the saw blade
Fig. G, H

When mounting the saw blade, wear protective gloves. Danger of injury when touching the saw blade.

Only use saw blades that correspond with the characteristic data given in the operating instructions. Use only saw blades that are marked with a speed equal or higher than the speed marked on the machine.

Do not under any circumstances use grinding discs as the cutting tool.
- Remove the saw blade cover (31) by loosening the Phillips screws (32).
- Loosen the nut by attaching the large spanner (29) to the nut and using the small spanner (30) on the motor shaft in order to counteract. Attention: turn the nut in the direction of rotation of the saw blade.
- Remove the outer flange and remove the saw blade (4).
- Carefully clean the saw blade flanges before installing the new saw blade. Replace and tighten the new saw blade in reverse order.

The arrow marked on the saw blade, which indicates the direction of rotation, must point in the same direction as the arrow marked on the machine, the saw blade teeth must point downwards on the front of the saw.
- Before you start working with the saw again, the functionality of the protective devices must be checked.
- Warning! After each saw blade change, check that the saw blade guard (2) opens and closes as required. Additionally check whether the saw blade (4) runs freely in the saw blade guard (2).
- Warning! After each saw blade change, check that the saw blade (4) can move freely in the table insert (6), when in vertical position and when tilted to 45^ .
Fixing on a substructure
Fig. A
The mounting holes (20) on the machine frame are used to attach the device on a solid, flat base such as on a workbench. Matching mounting material (screws, etc.) are available at specialist stores.
Dust Extraction
Fig. 1
The saw is equipped with a dust extraction system.
- Insert the vacuum cleaner adapter (16) in the dust extraction port (25).
- It is strongly advised to use a dust extraction system that is suitable for the material wherever possible.
- Regularly check and clean the suction channels.
Storage of loose parts
Fig. A, I
When not in use, the push stick (3), Parallel guide (7) and Mitre guide (14) can be attached. The push stick (3) can be stored in the machine housing, as shown on figure A. The Mitre guide(14) can be fixed to the machine housing with the wing nut (36) as shown in figure I.
4. OPERATION
Switching on/off
Fig A
- Press the switch into position '1' to put your machine into operation.
- To switch off the machine the same switch needs to be pressed to position '0'
- Always keep the mains cable away from moving parts.
Parallel guide
Fig. A, J, K
When slitting wood parts, the Parallel guide (7) must be used.
- Mount the Parallel guide (7) on the table surface (1) with the clamping plate (26); Washers (27) and knobs (12): Outside of the saw table: set screw (12) and washer (27); Inside of the saw table: clamping plate (26).
User modes
The supplied Parallel guide (7) has two different height guide surfaces, one on each side of the guide. Use the lower height side for flat workpieces, the higher stop height for tall workpieces.
- To change the height of the stop, open the knobs (12) on the Parallel guide (7) and remove it from the table.
- Turn the Parallel guide (7) 180° so that the front end points to the rear.
- Tighten the knobs (12) again.
Cutting width
The Parallel guide (7) can be mounted on both sides of the table surface (1).
- Loosen the two knobs (12).
-
With the aid of the ruler (22) on the table surface (1), the Parallel guide (7) can be adjusted to the desired size.
-
Tighten the two knobs (12) to fix the Parallel guide (7).
- In addition to the scale display, measure the cutting width between saw blade and Parallel guide. After a new setting, make a test cut to check the dimensions.
Mitre guide
Fig. L
For cross-cutting of wooden parts, the Mitre guide(14) must be used.
- Fix the Mitre guide extension (23) to the Mitre guide (14) with the knobs for mitre guide (24).
- Push the Mitre guide(14) into the groove (21) of the table surface.
- Loosen the knob for mitre angle (28).
- Turn the Mitre guide extension (23) until the arrow points to the desired angle.
- Tighten the knob for mitre angle (28) again.
- Check the distance between Mitre guide extension (23) and saw blade (4).
Warning! Do not push the Mitre guide extension (23) too far towards the saw blade. The distance between Mitre guide extension (23) and saw blade (4) should be approx. 2 cm. If necessary, loosen the two knobs for mitre guide (24) and adjust the Mitre guide extension (23). Afterwards, retighten the knobs for mitre guide (24).
Angle adjustment
Fig. A, I
- Loosen both the front knob for angle adjustment (8) and the rear knob for angle adjustment (9).
- Adjust the saw blade angle by sliding the two knobs (8, 9) until the indicator (13) matches the desired angle on the angle scale (10).
- Tighten both the front knob for angle adjustment (8) and the rear knob for angle adjustment (9).
Working instructions
There are two types of sawing methods:
• Lengthwise sawing (Fig.K)
Sawing the workpiece in the length of the wood grain
- Cross-cutting or cutting off, use the mitre guide (Fig.L)
Sawing off the workpiece crosswise

For both sawing methods one of the fences must be used. Therefor never saw without a fence!
Attention! Before you start sawing, first check the following:
- Is the saw blade secured?
- Are all the locking handles secured?
- Is the fence parallel to the saw blade?
- Is the protective cap working properly?
- Are you wearing safety goggles?
- Is the saw blade not rubbing against anything?

It is absolutely necessary to take these points into consideration before you start work!
Lengthwise sawing
- Secure the fence to the correct measuring position and remove the cut-off guide from the bench carriage.
- Press the wood lightly towards the bench and let it glide against the cut-off fence.

Remain at least 3 cm. from the front of the saw blade before you switch on the motor. The side of the wood which is against the fence must be completely straight. Keep your hands at least 10 cm away from the saw track to be followed.
- Switch on the motor and wait until the saw blade has reached the maximum number of revolutions before you start sawing.
- While you press the wood against the bench and the fence, you can carefully push the wood through the saw blade without forcing it.
- Never pull the workpiece backwards. If necessary, switch off the motor first without altering the position of the workpiece.
Lengthwise sawing with a (vertical) mitre
This method is practically the same, except that the saw blade is placed at the angle required.

With this type of method the fence may only be along the righthand side of the sawblade.
Lengthwise sawing of narrow workpieces

Assume that this process is extremely dangerous.
Take all the necessary safety measures and continually push the workpiece through (until behind the saw blade) using a push stick instead of by hand.
Crosswise sawing
- Remove the fence and apply the cross-cut fence in the righthand carriage.
- Adjust the height of the saw blade (see lengthwise sawing).
- Press the workpiece against the cross-cut fence and keep at least 2,5 cm distance from the front of the saw blade.
- Switch on the motor and wait until the maximum number of revolutions has been reached.
- Press the workpiece against the fence and the bench. Carefully push the wood through the saw blade. Continue until behind the saw blade. Then switch off the motor and keep this position until the saw blade has stopped completely before you remove the wood.
- Never pull the wood back. If necessary, switch the motor off and keep the position until the saw blade has stopped completely.
Crosswise sawing with a vertical mitre
This method is practically the same, except that the saw blade is placed in the angle required.

Only place the cross-cut fence on the righthand side of the saw blade. Never saw too small pieces of wood. Never use your hands to carry out difficult operations.
Crosswise sawing with a horizontal mitre
With this method the cross-cut fence must be secured at the angle required. Keep the workpiece pressed firmly against the cross-cut fence and the bench before you start cutting off.
5. MAINTENANCE

Make sure that the machine is not live when carrying out maintenance work on the motor.
These machines have been designed to operate over a long period of time with a minimum of maintenance. Continuous satisfactory operation depends upon proper machine care and regular cleaning.
ENVIRONMENT

Damaged and/or disposed of electrical or electronic devices must be dropped off at recycling stations intended for that purpose.
Only for EC countries
Do not dispose of power tools into domestic waste. According to the European Guideline 2012/19/EU for Waste Electrical and Electronic Equipment and its implementation into national right, power tools that are no longer usable must be collected separately and disposed of in an environmentally friendly way.
WARRANTY
Read the warranty conditions on the separately supplied warranty card.
The product and the user manual are subject to change. Specifications can be changed without further notice.
TISCHKREISSÄGE TSM1036
The mounting holes (20) on the machine frame are used to attach the device on a solid, flat base such as on a workbench. Matching mounting material (screws, etc.) are available at specialist stores.
4. OPERATION
it out of the socket. Protect the cable from heat, oil and sharp edges.
Crosswise sawing with a vertical mitre
Adjusting the Riving knife
Fig. E, F
- Remove the saw blade guard (2) as explained in aforementioned paragraph.
- Loosen the screws (19) and remove the riving knife (5). The distance between saw blade (4) and Riving knife (5) should be 3-8 mm, as shown on figure F.
- Ensure the riving knife is straight and centered behind the saw blade (4).
Pokyny pro obsluhu pily
CE
DECLARATION OF CONFORMITY
TSM1036 - TABLE SAW
(EN) We declare under our sole responsibility that this product is in conformity with directive 2011/65/EU of the European parliament and of the council of 8 June on the restriction of the use of certain hazardous substances in electrical and electronic equipment is in conformity and accordance with the following standards and regulations:
(DE) Der Hersteller erklärt eigenverantwortlich, dass dieses Produkt der Direktive 2011/65/EU des Europäischen Parlaments und des Rats vom 8. Juni 2011 über die Einschränkung der Anwendung von bestimmten gefährlichen Stoffen in elektrischen und elektronischen Geräten entspricht. den folgenden Standards und Vorschriften entspricht:
(NL) Wij verklaren onder onze volledige verantwoordelijkheid dat dit product voldoet aan de conform Richtlijn 2011/65/EU van het Europees Parlement en de Raad van 8 juni 2011 betreffende beperking van het gebruik van bepaalde gevaarlijke stoffen in elektrische en elektronische apparatuur en in overeenstem ming is met de volgende standaarden en reguleringen:
(FR) Nous déclarons sous notre seule responsabilité que ce produit est conforme aux standards et directives suivants: est conforme à la Directive 2011/65/EU du Parlement Européen et du Conseil du 8 juin 2011 concernant la limitation d'usage de certaines substances dangereuses dans l'équipement électrique et électronique.
(ES) Declaramos bajo nuestra exclusiva responsabilidad que este producto cumple con las siguientes normas y estándares de funcionamiento: se encuentra conforme con la Directiva 2011/65/UE del Parlamento Europeo y del Consejo de 8 de junio de 2011 sobre la restricción del uso de determinadas sustancias peligrosas en los equipos eléctricos y electrónicos.
(PT) Declaramos por nossa total responsabilidade de que este produto está em conformidade e cumpre as normas e regulamentações que se seguem: está em conformidade com a Directiva 2011/65/EU do Parlamento Europeu e com o Conselho de 8 de Junho de 2011 no que respeita à restrição de utilização de determinadas substâncias perigosas existentes em equipamento eléctrico e electrónico.
(IT) Dichiariamo, sotto la nostra responsabilità, che questo prodotto è conforme alle normative e ai regolamenti seguenti: è conforme alla Direttiva 2011/65/UE del Parlamento Europeo e del Consiglio dell'8 giugno 2011 sulla limitazione dell'uso di determinate sostanze pericolose nelle apparecchiature elettriche ed elettroniche.
(SV) Vi garanterar på eget ansvar att denna produkt uppfyller och följer följande standarder och bestämmelser: uppfyller direktiv 2011/65/EU från Europeiska parlamentet och EG-rådet från den 8 juni 2011 om begränsningen av användning av farliga substanser i elektrisk och elektronisk utrustning.
(FI) Vakuutamme yksinomaan omalla vastuullamme, että tämä tuote täyttää seuraavat standardit ja säädökset: täyttää Euroopan parlamentin ja neuvoston 8. kesäkuuta 2011 päivätyn direktiivin 2011/65/EU vaatimukset koskien vaarallisten aineiden kävtön rajoitusta sähkö- ja elektronisissa laitteissa.
(NO) Vi erklærer under vårt eget ansvar at dette produktet er i samsvar med følgende standarder og regler: er i samsvar med EU-direktivet 2011/65/EU fra Europa-parlamentet og Europa-rådet, pr. 8 juni 2011, om begrensning i bruken av visse farlige stoffer i elektrisk og elektronisk ulstyr.
(DA) Vi erklærer under eget ansvar, at dette produkt er i overensstemmelse med følgende standarder og bestemmelser: er i overensstemmelse med direktiv 2011/65/EU fra Europa-Parlamentet og Rådet af 8. juni 2011 om begrænsning af anvendelsen af visse farlige stoffer i elektrisk og elektronisk udstyr.
(HU) Felelősségünk teljes tudatában kijelentjük, hogy ez a termék teljes mértékben megfelelazalábbiszabványoknakéselőirásoknak:jevsouladusesměmicí 2011/65/EUEvropskéhoparlamentuaRadyEUzedne8.června2011,kterásetýká omezenípoužitiurčitýchnebezpečnýchlátkevelektrickýchaelektronických zařízenich.
(CS) Na naši vlastní zodpovědnost prohlašujeme, že je tento výrobek v souladu s následujícímistandardyanormami: Jevsúladesnormou 2011/65/EÚEurópskeho parlamentua Radyz8.júna 2011týkajúcejsaobmedzeniapoužívaniaurčitých nebezpečnýchlatokvelektrickomaelektronickomvybavení.
(SK) Vyhlasujeme na našu výhradnú zodpovednost, že tento výrobok je v zhode a súlade snasledujúciminormamiapredpismi. Jevsúladesnormou2011/65/EUEurópske hoparlamentalaRadyz8.júna2011tyjúcejsaobmedzeniapoužívaniaurčitých nebezpečnýchlatókvelektrickomalektrickomnyvbavení.
(SL) S polno odgovornostjo izjavljamo, da je ta izdelek v skladu in da odgovarja naslednjim standardom terpredpisom: je v skladu z direktivo 2011/65/EU Evropskega parla- menta in Sveta z dne 8. junij 2011 o omejevanju uporabe določenih nevarnih snovi v električni in elektronski opremi.
(PL) Deklarujemy na własną odpowiedzialność, że ten produkt spełnia wymogi zawarte w następującychnormachiprzepisach:jestzgodnyżDyrektywą2011/65/UEParliamentu Europejskiego i Rady z dnia 8 czerwca 2011 r. w sprawie ograniczenia stosowania niektórych niebezpiecznych substancji w sprzęcie elektrycznym i elektronicznym.
(LT) Prisiimdami visą atakomybę deklaruojame, kad śis gaminys atitinka żemiau paminėtusstandartusarbanuostatus:atitinka2011m.birželio8d.Europos parlamentoirTarybosdirektyvą2011/65/EBdėltamtitrikupavojingųmedžiagų naudoijimoelektrosirelektroninėjeirangojeapriboijimo.
(LV) Ir atbilstoša Eiropas Parlamenta un Padomes 2011. gada 8. jūnija Direktīvai 2011/65/ESpardažubīstamuvieluizmantošanasierobežošanuelektriskāsunelektroniskās iekārtās.
(ET) Apgalvojam ar visu atbildību, ka šis produkts ir saskaņā un atbilst sekojošiem standartiem un nolikumiem: ir atbilstoša Eiropas Parlamenta un Padomes 2011. gada 8. jūnija Direktīvai 2011/65/ES par dažu bīstamu vielu izmantošanas ierobežošanu elektriskās un elektroniskās iekārtās.
(RO) Declarăm prin aceasta cu răspunderea deplină că produsul acesta este în conformitatecuurmătoarelestandaresaudirective: este înconformitatecu Directiva 2011/65/UE a Parlamentului European și a Consiliului din 8 iunie 2011 cu privire la interizicerea utilizării anumitor substanțe periculoase la echipamentele electrice și electronice.
(HR) Izjavljujemo pod vlastitom odgovornol, šu da je strojem ukladan sa slijedešim standardimailistandardiziranimdkumentimaiuskladusaodredbama: usklađenos Direktivom 2011/65/EUeropskogparlamentaivijećaizdanom8.lipnja2011. o ograničenjukorištenjaodređenihopasnihtvarialelektričnojielektroničkojopremi.
(SRL) Pod punom odgovornošću izjavljujemo da je usaglašen sa sledećim standardima ili normama: usaglašen sa direktivom 2011/65/EU Evropskog parlamenta i Saveta od 8.juna.2011. godine za restrikciju upotrebe određenih opasnih materija u električnoj i elektronskoj opremi.
(RU) Под свою ответственность заявляем, что данное изделие соответствует следующим стандартам и нормам: соответствует требованиям Директивы 2011/65/EU Европейского парламента и совета от 8 июня 2011 г. по ограничению использования определенных опасных веществ в электрическом и электронном оборудовании
(UK) На свою впасну відповідальність заявляемо, щр дане обладнання відповідає наступним стандартам і нормативам: задовольняєв вимоги Директиви 2011/65/ЄС Європейського Парламенту та Ради від 8 червня 2011 року на обмеження використання деяких небезпечних речовин в електричному та електронному обладнанні.
(EL) Δηλώνουμε υπεύθυνα ότι το προϊόν αυτό συμφωνεί και τηρεί τους παρακάτω κανονισμούς και τρότυπα: συμμοφώνεται με την Οδηγία 2011/65/ΕΕ του Ευρωπαϊκού Κοινοβουλίου και του Συμβουλίου της 8ης Ιουνίου 2011 για τον περιορισμό της χρήσης ορισμένων επτικίνδυνων συπών σε ηλεκτρικό και ηλεκτρονικό εξοπλισμό.
EN62841-1, EN62841-3-1, EN55014-1, EN55014-2, EN61000-3-2, EN61000-3-3, IEC 62321
2006/42/EC, 2014/30/EU, 2011/65/EU, 2012/19/EU
Zwolle, 01-03-2020
H.G.FRosberg
CEO FERM
FERM - Lingenstraat 6 - 8028 PM - Zwolle - The Netherlands
- TSM1036
- SAFETY INSTRUCTIONS
- SPECIFIC SAFETY INSTRUCTIONS
- Additional safety instructions
- Switch off the machine immediately when you discover:
- Electrical safety
- Replacing cables or plugs
- Using extension cables
- MACHINE INFORMATION
- Intended use
- Vibration level
- DESCRIPTION
- ASSEMBLY
- Installing / removing saw blade guard
- Fig. A, B, C
- Replacing the table insert
- Fig. D
- Adjusting the Riving knife
- Fig. E, F
- Mounting / changing the saw blade
- Fig. G, H
- Fixing on a substructure
- Fig. A
- Dust Extraction
- Fig. 1
- Storage of loose parts
- Fig. A, I
- OPERATION
- Switching on/off
- Fig A
- Parallel guide
- Fig. A, J, K
- User modes
- Cutting width
- Mitre guide
- Fig. L
- Angle adjustment
- Working instructions
- Lengthwise sawing
- Lengthwise sawing with a (vertical) mitre
- Lengthwise sawing of narrow workpieces
- Crosswise sawing
- Crosswise sawing with a vertical mitre
- Crosswise sawing with a horizontal mitre
- MAINTENANCE
- ENVIRONMENT
- Only for EC countries
- WARRANTY
- TISCHKREISSÄGE TSM1036
- Pokyny pro obsluhu pily
- CE
- DECLARATION OF CONFORMITY
- TSM1036 - TABLE SAW
Brand : Ferm
Model : TSM1036
Category : Vacuum Cleaner