FET-200 - Stapler Ferm - Free user manual and instructions
Find the device manual for free FET-200 Ferm in PDF.


| Type de produit | Stapler / Tacker |
| Marque | Ferm |
| Modèle | FET-200 |
| Tension d'alimentation | 230 V~ |
| Fréquence | 50 Hz |
| Classe de protection | II (double isolation) |
| Nombre de cycles par minute | 20 agrafes/min |
| Profondeur d'agrafage max. | 14 mm |
| Poids | env. 0.9 kg |
| Niveau de pression acoustique (Lpa) | 71.5 dB(A) |
| Niveau de puissance acoustique (Lwa) | 84.5 dB(A) |
| Valeur de vibration | 3.63 m/s² |
| Type d'agrafes compatibles | U : 6-14 mm, T : 14 mm, I : 14 mm |
| Marques d'agrafes recommandées | Esco, Rapid, Novus, Wolfcraft |
| Contenu de l'emballage | Tacker, 400 agrafes, 100 pointes, manuel, carte de garantie |
| Dispositif de sécurité | Verrou de sécurité (safety catch) |
| Mécanisme de chargement | Coulisseau amovible avec plaque arrière métallique |
| Nettoyage recommandé | Chiffon doux, eau savonneuse ; pas de solvants |
| Garantie | Selon conditions sur carte de garantie séparée |
| Normes de conformité | EN50144-1, EN50144-2-16, etc. ; directives 98/37/EC, 73/23/EEC, 89/336/EEC |
Frequently Asked Questions - FET-200 Ferm
User questions about FET-200 Ferm
0 question about this device. Answer the ones you know or ask your own.
Ask a new question about this device
Download the instructions for your Stapler in PDF format for free! Find your manual FET-200 - Ferm and take your electronic device back in hand. On this page are published all the documents necessary for the use of your device. FET-200 by Ferm.
USER MANUAL FET-200 Ferm
GB Subject to change
natural_image
Black FERN electric shaver with visible model and body (no text or symbols on body)GB USERS MANUAL 03
D GEBRAUCHSANWEISUNG 09
NL GEBRUIKSAANWIJZING 15
F MODE D'EMPLOI21
E MANUAL DE INSTRUCCIONES 27
P MANUAL DE INSTRUÇÕES 33
I MANUALE UTILIZZATI 39
S BRUKSANVISNING 45
FIN KÄYTTÖOHJE 51
N BRUKSANVISNING 57
DK BRUGERVEJLEDNING 63


Fig. 1


natural_image
Technical diagram showing a mechanical component with an arrow indicating direction (no text or symbols present)Fig. 2 Fig. 3

natural_image
Line drawing of a hand fastening a metal clip into a fin (no text or symbols)
natural_image
Technical line drawing of a mechanical assembly with a bracket and rod (no text or symbols)Fig. 4 Fig. 5
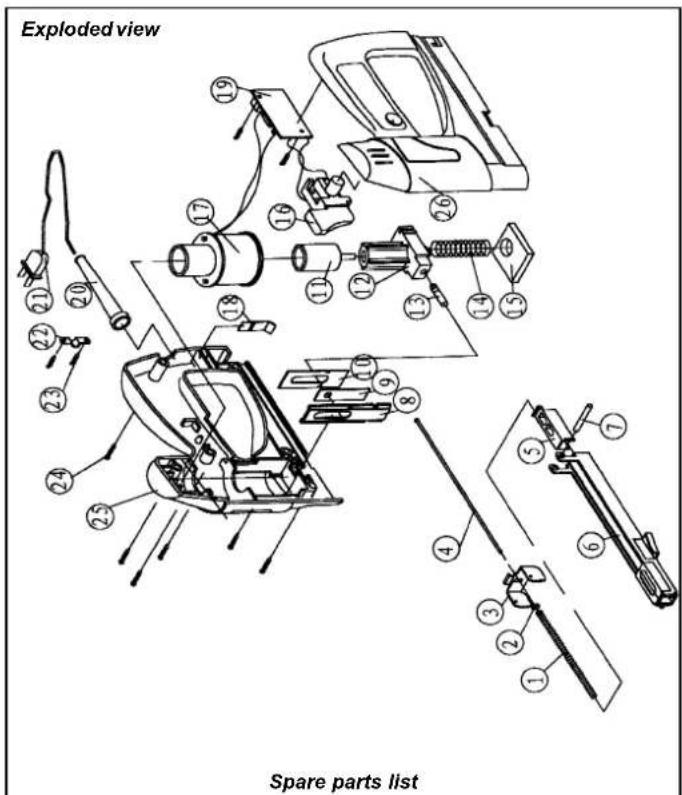
| Position | no. Description Parts no. | |
| 409032 | Column complete | 001 t/m 004 |
| 409033 | Nail-rail | 006 |
| 409034 | Nail-making plate | 009 |
| 409035 | Rack | 014 |
| 409036 | Loop | 017 |
STAPLER/NAILER
The numbers in the following text refer to the picture on page 2

Read the operating instructions carefully before using this device. Familiarise yourself with its functions and basic operation. Service the device as per the instructions to ensure that it always functions properly. The operating instructions and the accompanying documentation must be kept in the vicinity of the device.
Introduction
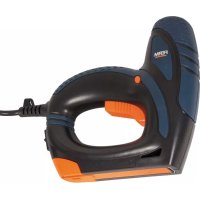
The tacker enables you to fasten various materials, such as fabric, wood, gauze, cardboard and leather. Therefore, the tool is suitable to upholster furniture, to wrap objects or to repair shoes.
Contents
- Machine data
- Safety instructions
- Use
- Maintenance
1. MACHINE DATA
Technical specifications
| Voltage | 230 V~ |
| Frequency | 50 Hz |
| Number of staples | 20/min. |
| Max. staple depth | 14 mm |
| Weight | ca. 0.9 kg |
| Lpa (sound pressure) | 71.5 dB(A) |
| Lwa (sound power) | 84.5 dB(A) |
| Vibration value | 3,63 m/s |
Contents of packing
• Tacker
• 400 staples
• 100 nails
- Manual
• Guarantee card
Features
Fig. 1
1 Safety catch
2 Slide
3 Cartridge haft
4 Switch
Ferm
2. SAFETY INSTRUCTIONS
Explanation of the symbols

Carefully read the instructions.

In accordance with essential applicable safety standards of European directives.

Class II machine – Double insulation – You don't need any earthed plug.

Denotes risk of personal injury, loss of life or damage to the tool in case of non-observance of the instructions in this manual.

Indicates the presence of an electrical voltage.

Immediately unplug the plug from the mains electricity in the case that the cord gets damaged and during maintenance.

Wear eye protection.

Faulty and/or discarded electrical or electronic apparatus have to be collected at the appropriate recycling locations.
Specific safety instructions
Before using the tacker
- Check the following points:
- Do the voltage of the engine and the engine safe-guard, if any, correspond to the mains voltage (appliances for a mains voltage of 230 V);
- Are the mains lead and the mains plug in a good condition: solid, without any loose ends or damage.
• Always wear eye protection when using the tool.
- Maintain the tool with care.
- Check for misalignment or binding of moving parts, breakage of parts, and any other condition that may affect the tools operation. If damaged, have the tool serviced before using.
- Check if the slide cartridge has been fastened properly.
- Do not use the tool in a humid environment.
- Do not use the tool on materials containing asbestos.
Using the tool
- Do not use the tool if the switch does not turn it "ON" or "OFF".
CE KONFORMITETSERKLÆRING (DK)
CEO Ferm BV Quality Manager Ferm Global
• Always hold the tool with two hands while starting.
• Always keep the cord away from the moving parts of the machine.
- Keep your hands away from the work piece.
- In the case of jamming by a nail or staple, switch the machine off immediately and remove the plug from the mains.
- Never aim the tool at people or animals.
- Use only staples or nails fit for this tool.
- Make sure not to damage any leads when using the tool.
Electrical safety
When using electric machines always observe the safety regulations applicable in your country to reduce the risk of fire, electric shock and personal injury. Read the following safety instructions and also the enclosed safety instructions.

Always check that the power supply corresponds to the voltage on the rating plate.

Class II machine. Your machine is double insulated; therefore no earthwire is required.
Replacing cables or plugs
Immediately throw away old cables or plugs when they have been replaced by new ones. It is dangerous to insert the plug of a loose cable in the wall outlet.
Using extension cables
Only use an approved extension cable suitable for the power input of the machine. The minimum conductor size is 1.5 mm^2 . When using a cable reel always unwind the reel completely.
3. USE
Application
Fig. 2
For this tool, use one of the following types staples or nails:
• U: 6, 8, 10, 12, 13 or 14 mm
• T: 14 mm
• I: 14 mm
Suitable staples and nails are provided by Esco, Rapid, Novus and Wolfcraft.
Loading the tacker

Before opening the tool, make sure the tool is disconnected.
To load the tacker
Fig. 3 - 5
Unlocking slide
- Turn the metal rear plate of the slide to unlock the slide.
Placing staples
- Remove the slide from the tool.
- Place the staples or nails in the cartridge
Placing nails
- Replace the slide in the tool.
- Lock the slide by fastening the metal rear plate.
Using the tacker
Fig. 6 - 8
Placing the tool
- Place the tool with point A at the spot where the staple or nail should be located.
- Press the tool down firmly.
Pressing safety catch
- Press the safety catch and hold it in this position.
Stapling
- Press the switch.

The tool will cause a rebound because of the force it operates with. Keep this in mind.
4. MAINTENANCE

Make sure that the machine is not live when carrying out maintenance work on the motor.
This machine has been designed to operate over a long period of time with a minimum of maintenance. Continuous satisfactory operation depends upon proper machine care and regular cleaning.
Malfunction
Should the machine fail to function correctly, a number of possible causes and the appropriate solutions are given below:
4. VEDLIGEHOLDELSE

• In case a staple or nail is jammed in the tool follow the procedure below
- Disconnect the tool. • Carefully remove the
staple or nail from the tool with a thin object (for example a knife).

Repairs and servicing should only be carried out by a qualified technician or service firm.
Cleaning
Regularly clean the device's casing with a soft cloth, preferably after each use. Keep the fan slits free of dust and dirt. Remove stubborn dirt using a soft cloth, dampened with soapy water. Do not use solvents such as benzene, alcohol, ammonia, etc., which might damage the plastic parts.
Defects
If a defect appears due to a part wearing out, please contact the service center on the warranty card. At the end of these instructions there is an exhaustive overview of the parts that can be ordered.
Environment
To prevent damage during transport, the appliance is delivered in a solid packaging which consists largely of reusable material. Therefore please make use of options for recycling the packaging.

Damaged and/or disposed of electrical or electronic devices must be dropped off at recycling stations intended for that purpose.
Warranty
Read the warranty conditions on the separately supplied warranty card.
CE DECLARATION OF CONFORMITY (GB)
Bearing sole responsibility, we declare that this
FET-200
conforms to the following standards or guidelines:
EN50144-1, EN50144-2-16, EN51044-1, EN51044-2, EN61000-3-2, EN61000-3-3
as per the stipulations in guidelines:
98/37/EC, 73/23/EEC, 89/336/EEC, 2002/95/EC, 2002/96/EC
from 01-10-2006
ZWOLLE NL


CEO Ferm BV Quality Manager Ferm Global
Our company policy is aimed at the constant improvement of our products and we reserve the right to change the product specification with prior notification.
Ferm BV • Lingenstraat 6 • 8028 PM Zwolle • The Netherlands
CEO Ferm BV Quality Manager Ferm Global
CEO Ferm BV Quality Manager Ferm Global
For this tool, use one of the following types staples or nails:
• U: 6, 8, 10, 12, 13 or 14 mm
• T: 14 mm
• l: 14 mm
CEO Ferm BV Quality Manager Ferm Global
98/37EC, 73/23EEC, 89/336EEC, 2002/95/EC, 2002/96/EC
vanaf 01-10-2006
ZWOLLE NL


CEO Ferm BV Quality Manager Ferm Global
CEO Ferm BV Quality Manager Ferm Global
CE DÉCLARATION DE CONFORMITÉ (F)
CEO Ferm BV Quality Manager Ferm Global
CEO Ferm BV Quality Manager Ferm Global
98/37EC, 73/23EEC, 89/336EEC, 2002/95/EC, 2002/96/EC
P
de 01-10-2006
ZWOLLE NL

CEO Ferm BV Quality Manager Ferm Global


- STAPLER/NAILER
- Introduction
- Contents
- MACHINE DATA
- Contents of packing
- Features
- Fig. 1
- SAFETY INSTRUCTIONS
- Explanation of the symbols
- Specific safety instructions
- Before using the tacker
- CE KONFORMITETSERKLÆRING (DK)
- Electrical safety
- Replacing cables or plugs
- Using extension cables
- USE
- Application
- Fig. 2
- Loading the tacker
- To load the tacker
- Fig. 3 - 5
- Unlocking slide
- Placing staples
- Placing nails
- Using the tacker
- Fig. 6 - 8
- Placing the tool
- Pressing safety catch
- Stapling
- MAINTENANCE
- Malfunction
- VEDLIGEHOLDELSE
- Cleaning
- Defects
- Environment
- Warranty
- CE DECLARATION OF CONFORMITY (GB)
- CE DÉCLARATION DE CONFORMITÉ (F)
Brand : Ferm
Model : FET-200
Category : Stapler