
CHDS210 - Vacuum Cleaner Champion - Free user manual and instructions
Find the device manual for free CHDS210 Champion in PDF.


| Product Type | Canister vacuum cleaner |
| Brand | Champion |
| Model | CHDS210 |
| Power | 1600 W (typical) |
| Voltage | 220-240 V ~ 50/60 Hz |
| Dust Container Capacity | 2 L (estimated) |
| Filtration System | HEPA premotor filter and outlet filter |
| Suction Control | Electronic power regulator and manual airflow adjustment |
| Cord Length | 6 m (approximate) |
| Cord Rewind | Automatic with foot pedal |
| Telescopic Pipe | Yes, with adjustment button |
| Accessories Included | Combination carpet/floor brush, crevice tool |
| Parking Positions | Vertical and horizontal |
| Weight | 5 kg (estimated) |
| Dimensions (L x W x H) | 40 x 30 x 30 cm (estimated) |
| Safety Feature | Motor protection thermostat |
| Warranty | 2 years (Nordic countries) |
| Intended Use | Household vacuum cleaning |
Frequently Asked Questions - CHDS210 Champion
User questions about CHDS210 Champion
0 question about this device. Answer the ones you know or ask your own.
Ask a new question about this device
Download the instructions for your Vacuum Cleaner in PDF format for free! Find your manual CHDS210 - Champion and take your electronic device back in hand. On this page are published all the documents necessary for the use of your device. CHDS210 by Champion.
USER MANUAL CHDS210 Champion
natural_image
Black and white photo of a vacuum cleaner with coiled hose (no text or symbols visible)EN - English
SV - Svenska
DA - Danske
NO - Norsk
FI - Suomi
Instructions and warnings for safe use
Before using this appliance, carefully read the instructions and in particular the safety warnings. Keep this manual and illustrative guide with the appliance for future consultation. Should you pass the appliance on to another user, make sure to also include this documentation.
EN
NOTE: Should certain parts of this booklet be difficult to understand or should doubts arise, contact Champion before using the product, by the address indicated on the last page.
- After having removed the appliance from its packaging, verify its integrity based on the drawing and any presence of damage caused by transport. If in doubt, do not use the appliance and contact an authorized service center.
- Do not let children play with the packaging! Keep the plastic bag out of the reach of children - risk of suffocation!
- Before connecting the appliance, check that the technical data match the mains supply. The identification technical data is found on the appliance under the lower cover.
- This appliance must be used only for the purpose for which it was designed, namely as a vacuum cleaner for home use. Any other use is considered not compliant and therefore dangerous.
- This appliance is not intended for persons (including children) with reduced physical, sensory or mental capabilities or lack of experience and knowledge, if they have not been given supervision or instruction concerning the use of the appliance in a safe way and understand the risks involved.
- Children must not play with the appliance. The appliance should not be cleaned or serviced by children without adult supervision.
- Do NOT use the vacuum cleaner to vacuum burning ashes, liquids, sharp or hard objects, such as large glass shards or fine powder, such as cement.
- NEVER use the vacuum cleaner without inserting the dust container and filter.
- Do NOT use the appliance with wet hands.
- Do NOT pull the power cable or the appliance itself to remove the plug from the socket.
- Do NOT expose the appliance to humidity or weather conditions (rain, sun, etc.).
- Do not use the vacuum cleaner without dust container or dust filter in place.
- The appliance should only be cleaned with a dry or damp cloth. Never immerse into water. Do not use any solvents for cleaning.
- Always disconnect the appliance from the mains supply before cleaning or performing maintenance and when the appliance is not in use.
- If the appliance is defective, switch it off and do not tamper with it. Any repairs must only be carried out by an authorized technical service center
- If the power cable is damaged it must be replaced by an authorized technical service center, to prevent all risks.
- NEVER pull or lift the appliance by its cable.
- NEVER submerge the appliance in water or other liquids.
- NEVER point the flexible hose, pipe or any other accessory towards another person.
- Always use the appliance with a motor protection filter to prevent damaging the motor and the vacuum cleaner.
- The power cable must always be fully unwound to prevent hazardous overheating.
Operation
- The yellow mark on the power cord shows the ideal cable length. Do not expend the cable beyond the red mark.
- To rewind the power cord, press the "rewind" pedal and guide the cord with the other hand.
- Press the "power" switch to turn the appliance on.
-
Use the electronic speed adjusting to control the suction power of the cleaner.
-
Set the required suction power by the electronic suction regulator. The suction power can also be adjusted with the sliding control on the angled pipe.
NOTE: If the suction flow is interrupted or the dust bag is full, turn off the machine immediately, and clean the inlet filter. Empty the dust bag. After these measures the unit can be turned on again.
NOTE: Pay attention to unusual noises when using the device. This could indicate a malfunction or a blocked suction.
EN
Parts
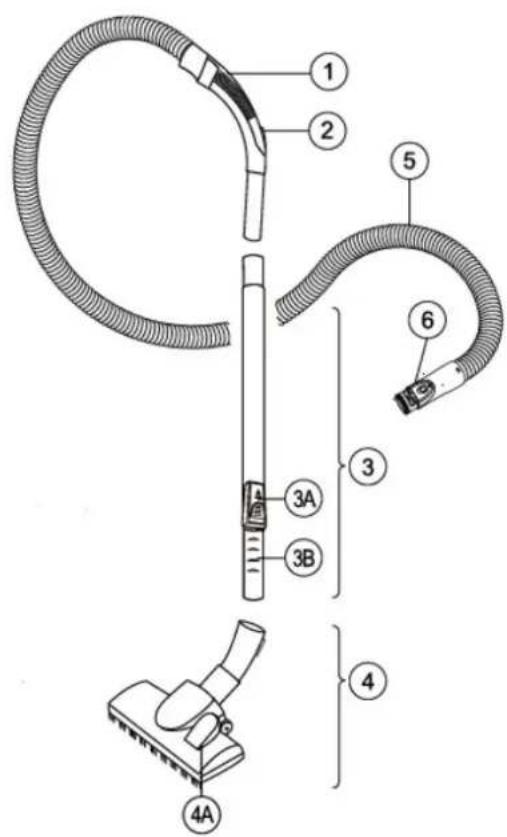
- Handle
- Air flow manual adjustment device
- Telescopic suction pipe
3A Telescopic pipe adjustment button
3B Adjustable telescopic pipe
4 Combination carpet/floor brush
4A Brush position toggle switch
5 Flexible suction pipe
6 Flexible suction pipe locking buttons
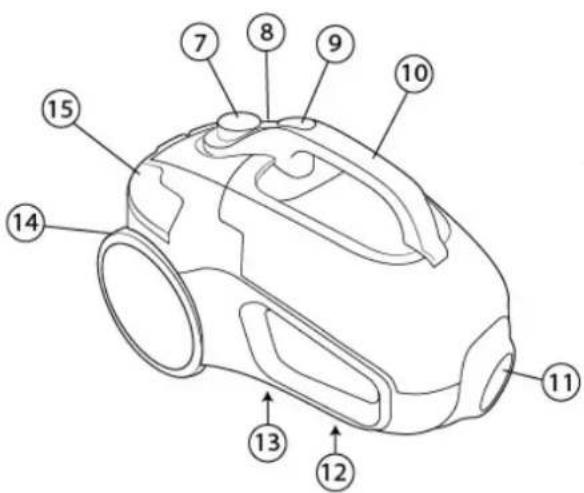
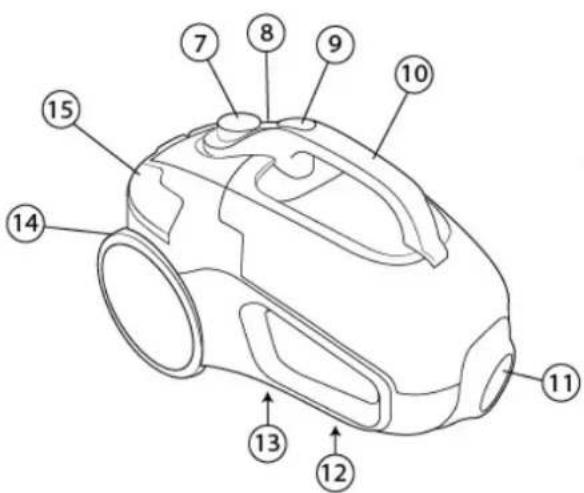
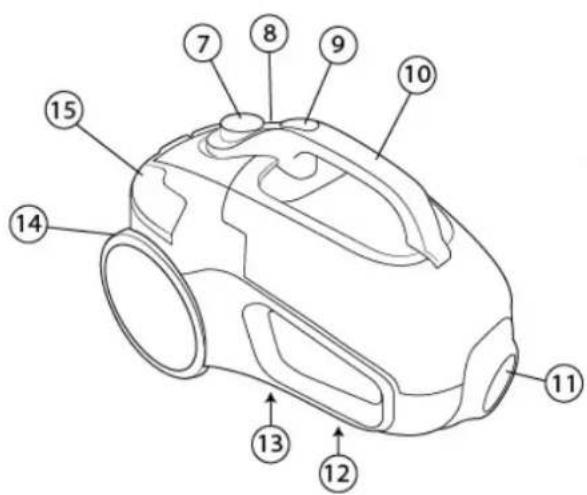
7 Electronic power regulator
8 ON/Off switch
9 Dust collection system release button
10 Carry handle
11 Suction inlet
12 Coupling for vertical parking position
13 Technical data
14 Power cable
15 Automatic cable winding button
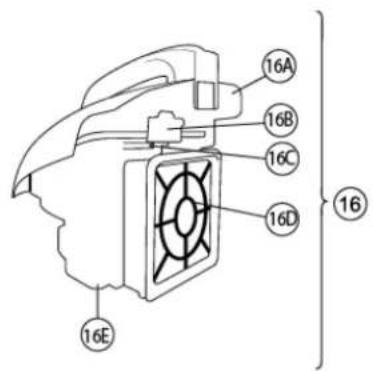
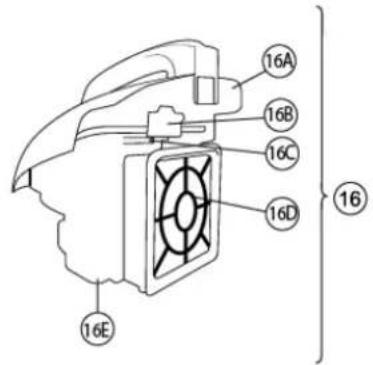
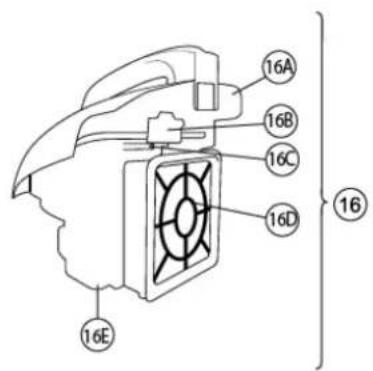
16 Dust collection system
16A Upper cover
16B Upper cover opening/locking button
16C Safety interlock
16D HEPA premotor filter
16E Dust container
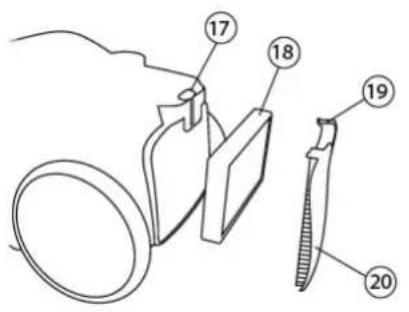
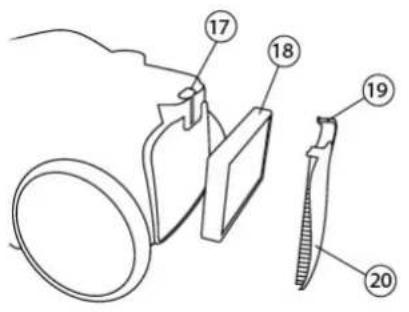
17 Coupling for horizontal parking position
18 Outlet filter
19 Discharge filter grid
20 Release/locking button of the outlet filter grid
21A Crevice tool
Accessories
Combination carpet/floor brush (4):
Adjust the combination brush according to the type of flooring, using the brush position toggle switch (4A).
Brush position toggle switch (4A) set to symbol
for hard flooring. Brush position toggle switch (4A) set to symbol for rugs and carpeting.
Crevice tool (21A):
To clean corners and crevices, such as radiators, skirting, boards, blinds and awnings.


Assembly
- Connect the flexible suction pipe (5) to the suction coupling (11) of the appliance rotating the base until the locking buttons of the flexible suction pipe click in their seat (6) indicating proper-fastening. [FIG. B1].
- Connect the handle (1) of the flexible pipe to the suction pipe (3). Adjust the length of the telescopic pipe by pressing the adjustment button (3A) in the direction of the arrow and removing or retracting the adjustable telescopic pipe (3B) [FIG. C1].
- Select the combination brush (4) or the accessory suited to the surface to be cleaned and connect the part to the telescopic pipe (3).
![[B1]](/content/2026/05/875625/images/787996659e5a7df347a8a256099e3ba8d807534f6ae36f7a77847a9b7a903e28.jpg)
![[C1] 1 2 3A 3B](/content/2026/05/875625/images/a1ea08857264144b10f60a550ae30272159be27712a2a9c85a109665f96ed531.jpg)
![[D1] ④ ④A](/content/2026/05/875625/images/b789fe2fb3636ad8918f9025cf0a4245c2f84073277bca9ab726c824cbed3e52.jpg)
![[E1] 1 ②](/content/2026/05/875625/images/99ec3f8e7d6c8d8413db1f113968b4f6289a715cbf040f5068af4be250c35c8f.jpg)
![[F1] 15 8](/content/2026/05/875625/images/127497a4a23560826ff1b9a3749a05541929cb40ed22fb36835e25ad79fb764b.jpg)
![[F2] 17 P](/content/2026/05/875625/images/a5f9b765360099c114a0f83a66f4fe0c2e81bf5d5e4da74eb52fa91fd4f75598.jpg)
![[F3] ⑫ P](/content/2026/05/875625/images/12089195e0392e9afbfc76d7351a1c728da00c45e54dde01f186fe2be66cfc30.jpg)
![[G1] 9](/content/2026/05/875625/images/c20f580dd70bf2350246500491f6def8b2d68761ee412c73b318eab9179b9119.jpg)
![[G2] 168](/content/2026/05/875625/images/62d6188d6666ba46b73884b10237d53526520bf4e93aa076708eb51536146ff5.jpg)
natural_image
Diagram of a mechanical device with a bracket and handle, showing an arrow indicating direction (no text or symbols present)![[G4] 18 19](/content/2026/05/875625/images/4fa88418643f51a3797c0ad9a58b548a009f5652f045e02d263bdb4b954c553e.jpg)
Use
- Pull the power cable (14) completely up to the yellow mark, and insert the plug into the socket. The yellow mark on the cable is before the end part of the cable marked in red.
NOTE: The accessories can be connected to the suction telescopic pipe (3) or directly to the handle (1).
NOTE: Do not pull the cable out to the red mark.
NOTE: Using the vacuum cleaner with the cable fully or partly wound involves an overheating hazard!
NOTE: A new appliance can develop odors the first few times it is used. These odors are harmless and disappear shortly afterwards. Ventilate the room if needed.
- Press the ON/Off button (8) once to switch the vacuum cleaner on [FIG. F1]. Adjust the suction force with the electronic power regulator (7).
Minimum: for curtains, fine and delicate fabrics.
Average: for standard cleaning, sofas, armchairs, upholstered chairs, rugs and carpets.
Maximum: for smooth floors.
- The suction power can also be changed with the manual adjusting device of the air flow (2) found on the handle (1) [FIG. E1].
Closed: Increases the suction power.
Open: Reduces the suction power.
-
Switch off the vacuum cleaner by pressing the ON/Off button once (8) and unplug the power cord (14) from the power socket.
-
Press the automatic cord winding button (15) to wind the power cable [FIG. F1]. Hold the plug while winding the cable in order to prevent whiplash.
-
Press the locking buttons of the flexible suction pipe (6) and disconnect the flexible suction pipe (5) from the appliance.
-
Press the release button of the dust collection system (9) to extract the dust collection system (16) from the appliance [G1].
-
Press the upper cover opening/locking button (16B) to open the upper cover (16A) [FIG. G2].
-
Empty the container.
-
Fit the upper cover back on (16A) ensuring the couplings with the dust container (16E) are perfectly engaged and the upper cover opening/locking button (16B) is perfectly engaged as well.
-
Fit the dust collection system (16) back onto the vacuum cleaner ensuring the position
ATTENTION! The vacuum cleaner has a motor protection thermostat, which intervenes in the case of overheating (caused by the inlet opening, filters, etc. being clogged). If it is triggered, press the ON/OFF (8) button to switch the appliance off and let it cool down completely for a few hours. Verify whether dust has clogged the filters or the inlet opening before restarting the appliance.
ATTENTION! Switch the appliance off and disconnect the plug from the socket before opening the appliance! Make sure all cleaned parts are completely dry before reusing the appliance.
Maintenance
- When necessary, clean the appliance with a damp cloth.
- Cleaning the combination brush (4): With the motor ON, rub the brush with your hand to remove the dust and fluff, which will be drawn in.
- Cleaning the dust collection system (16): Clean the dust collection system following the instructions below, paying attention to the pictures in the illustrative guide.
Cleaning the appliance
ATTENTION! Do not use solvents or other aggressive or abrasive detergents. otherwise, this may damage the surface.
ATTENTION! Empty the dust container (16E) and clean the HEPA premotor filter (16D) after each use. Lock clicks.
Cleaning or replacing the promotor HEPA filter (16D)
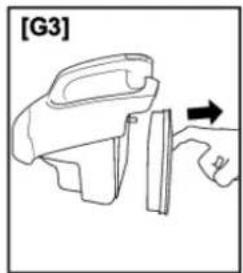
- Press the release button of the dust collection system (9) to extract the dust collection system (16) from the appliance [FIG. G1].
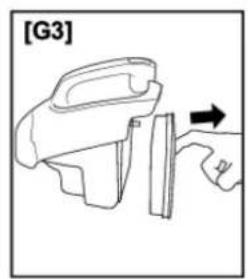
- Remove the HEPA premotor filter (16D) from the dust collection system (16) [FIG. G3].
- If the HEPA premotor filter (16D) is obstructed by dust, remove the dust taking care not to damage it. If the filter is especially dirty, replace it with a new one.
- Fit the HEPA premotor filter (16D) back onto the dust collection system (16) taking care to push the frame until the top appendix closes the safety interlock (16C).
- Fit the dust collection system (16) onto the vacuum cleaner ensuring the position lock clicks.
Cleaning or replacing the outlet filter (16)
- Press the release/locking button of the outlet filter grid (20) to remove the outlet filter grid (19).
- Extract the outlet filter (18) [FIG. G4].
- If the outlet filter (18) is obstructed by dust, remove the dust taking care not to damage it. If the filter is especially dirty, replace it with a new one.
- Refit the outlet filter (18) in the appliance [FIG. G4].
- Fit the outlet filter grid back on (19) and click the coupling/locking button of the outlet filter grid in position (20).
Trouble shooting
Before you contact our service center, please check the following points:
| PROBLEM SOLUTION | |
| The appliance does not start. • Ensure the power cord (14) is connected to the power socket.• Ensure the ON/Off switch (8) has been pressed [FIG. F1]. | |
| The appliance turns off during use and does not turn on again. | • The vacuum cleaner is equipped with a protective motor thermostat that shuts off the appliance in the event of over-heating. (caused by obstructing objects or a clogged dust collection system). In the event of this, press the ON/OFF switch, unplug the power cord (14) from the power socket and let the vacuum cleaner cool down completely. Remove any dust or the obstructing object before restarting the appliance. |
| The vacuum cleaners suction power appears low. | Power regulator (7) at a minimum, raise the suction power.The dust container (16E) is full: clean the container.The filters are clogged: clean or replace the filters. |
| The dust collection system does not close correctly. | The safety interlock (16C) does not allow the dust collection system to be inserted (16) if the HEPA premotor filter (16D) is absent.Make sure the HEPA premotor filter is present (16D) and it is fitted correctly. |
| The vacuum cleaner produces odors the first few times it is used. | Decrease the suction power by the electronic power regulator (7) or on the manual air flow regulation device (2). |
Storing and caring for the product
The flexible suction pipe (5) can be disconnected from the appliance before putting it away. Press the locking buttons of the flexible suction pipe (6) and disconnect the flexible suction pipe (5). The suction pipe (3) with the combined brush (4) may be stored by hooking them to the appliance with the suitable couplings (12 or 17) [FIG. F2, F3].
Warranty
Champion Nordic guarantees that this product is free from manufacturing defects in terms of materials and workmanship during a period of 2 years in Sweden, Norway, Denmark and Finland. This warranty period begins on the day the product is purchased or delivered. Champion Nordic has no obligation to repair or replace products that are not accompanied by a valid proof of purchase. This warranty applies only to products purchased and used for home use and does not cover damage resulting from abuse, failure to comply with the instructions from Champion Nordic, cases in which the product has been modified or subjected to unauthorized repair, improper packaging on the part of the owner, normal wear and tear, or improper handling on the part of a transport company.
Correct Disposal of this product
This marking indicates that this product should not be disposed with other household wastes throughout the EU. To prevent possible harm to the environment or human health from uncontrolled waste disposal, recycle it responsibly to promote the sustainable reuse of material resources.


Champion ® Makadamgatan 14 | 254 64 Helsingborg | Sweden info@championnordic.se



Montering
![[D1] ④ ④A](/content/2026/05/875625/images/73f6d8a6a64871513b664fdae99b157ff24332dd5912f5d7097cc5749a42d695.jpg)
![[E1] ②](/content/2026/05/875625/images/74402a7b00ec45d7ac67945838565a1fcd2301c899845070e6644c06f34072a0.jpg)
![[F1] 15 8](/content/2026/05/875625/images/eb4988ea96d49ed3dd34b817f6f84ef080c60e55b1d8fa49f76824e74cd1553f.jpg)
![[F2] 17 P](/content/2026/05/875625/images/a0f3beac72b7f58cef4cdbcf32a2a79493db356ff31b34952d644ca3919d0ae5.jpg)
![[F3] 12 P](/content/2026/05/875625/images/157978cdbea4d03e8d2a850c19618e6736b3d1478d51f6f16122f9d57af74e70.jpg)
![[G1] 9](/content/2026/05/875625/images/eecb309024e90c146a500b2d4de30fa2e7f54ebf025266ee663ed5d8f834590d.jpg)
![[G2] 168](/content/2026/05/875625/images/cc9e243253bf627643ec1ad715accb38dac167e2480b0105ce474409ab7557d0.jpg)
natural_image
Line drawing of a mechanical component with an arrow indicating direction (no text or symbols)![[G4] 18 19](/content/2026/05/875625/images/588885c5d75ccd6340716e313ab93fbf8982d2d51f40c50c647eabfd99153938.jpg)
Användning

DA


Montering
![[D1] ④ ④A](/content/2026/05/875625/images/4d50a0bf43ea3279612dc5e013c497faa104b308d70a7a6cf2ebdab73569bdf4.jpg)
![[E1] ② 1](/content/2026/05/875625/images/0f5334d88b44380efb02ef14ee536731b43a2c7faa12d587ece22e34ab74987f.jpg)
![[F1] 15 8](/content/2026/05/875625/images/6747421548babdc94267c3cc717d38b05749542f9c40fce67dd2c5b3b27ad988.jpg)
![[F2] 17 P](/content/2026/05/875625/images/6423eb2d89ee8ba2e5835efe0106d63b9433070aed10a2d69498da3a40ab0b8b.jpg)
![[F3] 12 P](/content/2026/05/875625/images/117004e457f24f725a390f651076a774edccc8fc3556025f55dd08e1ba06de8b.jpg)
![[G1] 9](/content/2026/05/875625/images/d1c8eb137178125c8dbca11e8fba2d120d35dc861603da60ea98bb48ec5ecb73.jpg)
![[G2] 168](/content/2026/05/875625/images/8a8bdb295d7151a877e7a8b7f8a56c196e35c6f8425a7bdbfe4caeab138fd813.jpg)

natural_image
Line drawing of a mechanical device with a handle and lever, showing a right-hand rule (no text or symbols)![[G4] 18 19](/content/2026/05/875625/images/00349d22f78cda5fceaa95cef8517282c01454dd1b006a8ceede8922ca35c0f1.jpg)
Anvendelse

Montering
![[D1] ④ ④A](/content/2026/05/875625/images/271d8ca603cfc83ad4a451fcc359f3470ffa8fb7eb0377182641fa19b6adb8c6.jpg)
![[E1] ② 1](/content/2026/05/875625/images/7e5a0dfe2fc6ffb3f69196dea52e9d54b8956cd2b92d3c4a169bd5e2561194b6.jpg)
![[F1] 15 8](/content/2026/05/875625/images/92a11b485a823955895834ed40523c26bcc29e53e2c270093dc03b9868f3b338.jpg)
![[F2] 17 P](/content/2026/05/875625/images/0f633b0d0795296c4319cc451eb3fd4e695a634cb54ab85f36a10adb8ef815ab.jpg)
![[F3] 12 P](/content/2026/05/875625/images/70860a19c7aa006dbc09adb416121a438a896553831ce3564f1255dc00f7ff68.jpg)
![[G1] 9](/content/2026/05/875625/images/39a786ae62c249ef600be140566ea505a2aff9e31a322a2b941436ec49061d8a.jpg)
![[G2] 168](/content/2026/05/875625/images/f8362463a9a92f17f6ada685cc8adce71758f72d659202f4ddcb06f873f3b7f5.jpg)

natural_image
Line drawing of a mechanical device with a bracket and handle, showing a directional arrow (no text or symbols)![[G4] 18 19](/content/2026/05/875625/images/0f0aa457a2f94ee06ffffa094fdab3b696ddef93c6002a77c77780ccd6690346.jpg)
Bruk
9 "Dust Collection Release"-painike
10 Kantokahva
11 Imuaukko


Kokoonpano
![[D1] ④ ④A](/content/2026/05/875625/images/01ef8b3ccdc66220215288be594791e9e7fc2cd7ae7804dfb67cc0a09fae201d.jpg)
![[E1] ②](/content/2026/05/875625/images/835599e8126397deabb962eccb84fbdf1daf9334e5b1ed5bc298f090b39e8d73.jpg)
![[F1] 15 8](/content/2026/05/875625/images/635e1f5d2ab5a682881d97ece4a224009c34c35fcf8e132c8f277116047e8207.jpg)
![[F2] 17 P](/content/2026/05/875625/images/2292f4d84077a2bf39c6b800a0113053cb314e4e3e275a1f708c637e48bd0eca.jpg)
![[F3] 12 P](/content/2026/05/875625/images/4e4c8c7d1578f0f3667d6b7d0c03039c36c27f9311771a9e063b166be0b5a5e5.jpg)
![[G1] 9](/content/2026/05/875625/images/54e366db53ec654273dc81acd340759af284a349c9eaa246e06ed00a3852f671.jpg)
![[G2] 168](/content/2026/05/875625/images/c511e5a96c2b9d75c6083c64f1585d2c94ec6b1ec3f5e4d12e7c5e048def83f8.jpg)

natural_image
Line drawing of a mechanical device with an arrow indicating direction (no text or symbols)![[G4] 18 19](/content/2026/05/875625/images/591858b8890b7f0fc698e564ccfe34350418d6503f8889bb99d6ce21c8f5ee4f.jpg)
Käyttö
- Instructions and warnings for safe use
- EN
- Operation
- Parts
- Accessories
- Combination carpet/floor brush (4):
- Crevice tool (21A):
- Assembly
- Use
- Maintenance
- Cleaning the appliance
- Cleaning or replacing the promotor HEPA filter (16D)
- Cleaning or replacing the outlet filter (16)
- Trouble shooting
- Storing and caring for the product
- Warranty
- Correct Disposal of this product
- Montering
- Användning
- Anvendelse
- Bruk
- Kokoonpano
- Käyttö
Brand : Champion
Model : CHDS210
Category : Vacuum Cleaner