
FW 870 - Multifunction Printer RICOH - Free user manual and instructions
Find the device manual for free FW 870 RICOH in PDF.
| Product type | Large format multifunction printer |
| Brand | RICOH |
| Model | FW 870 |
| Dimensions (W x D x H) | 1200 x 800 x 600 mm |
| Weight | Approximately 100 kg |
| Power supply | 220-240 V, 50/60 Hz |
| Power consumption | Up to 1500 W during operation |
| Main functions | Large format printing, copying, scanning |
| Maximum paper size | A0 (841 x 1189 mm) |
| Printing technology | Thermal inkjet |
| Print resolution | Up to 600 x 600 dpi |
| Print speed | Up to 6 m/min in normal mode |
| Ink type | Black and color ink cartridges |
| Paper tray capacity | 1 paper roll |
| Connectivity interfaces | USB 2.0, Ethernet 10/100/1000 |
| Maintenance and cleaning | Regularly clean the feed rollers and scanner glass with a soft, lint-free cloth |
| Safety | Mandatory grounding; emergency stop in case of malfunction |
| Spare parts and repairability | Spare parts available through RICOH authorized service centers |
| General information | Complies with Class A radio noise standards (NMB-003) |
Frequently Asked Questions - FW 870 RICOH
User questions about FW 870 RICOH
0 question about this device. Answer the ones you know or ask your own.
Ask a new question about this device
Download the instructions for your Multifunction Printer in PDF format for free! Find your manual FW 870 - RICOH and take your electronic device back in hand. On this page are published all the documents necessary for the use of your device. FW 870 by RICOH.
USER MANUAL FW 870 RICOH
Operating Instructions
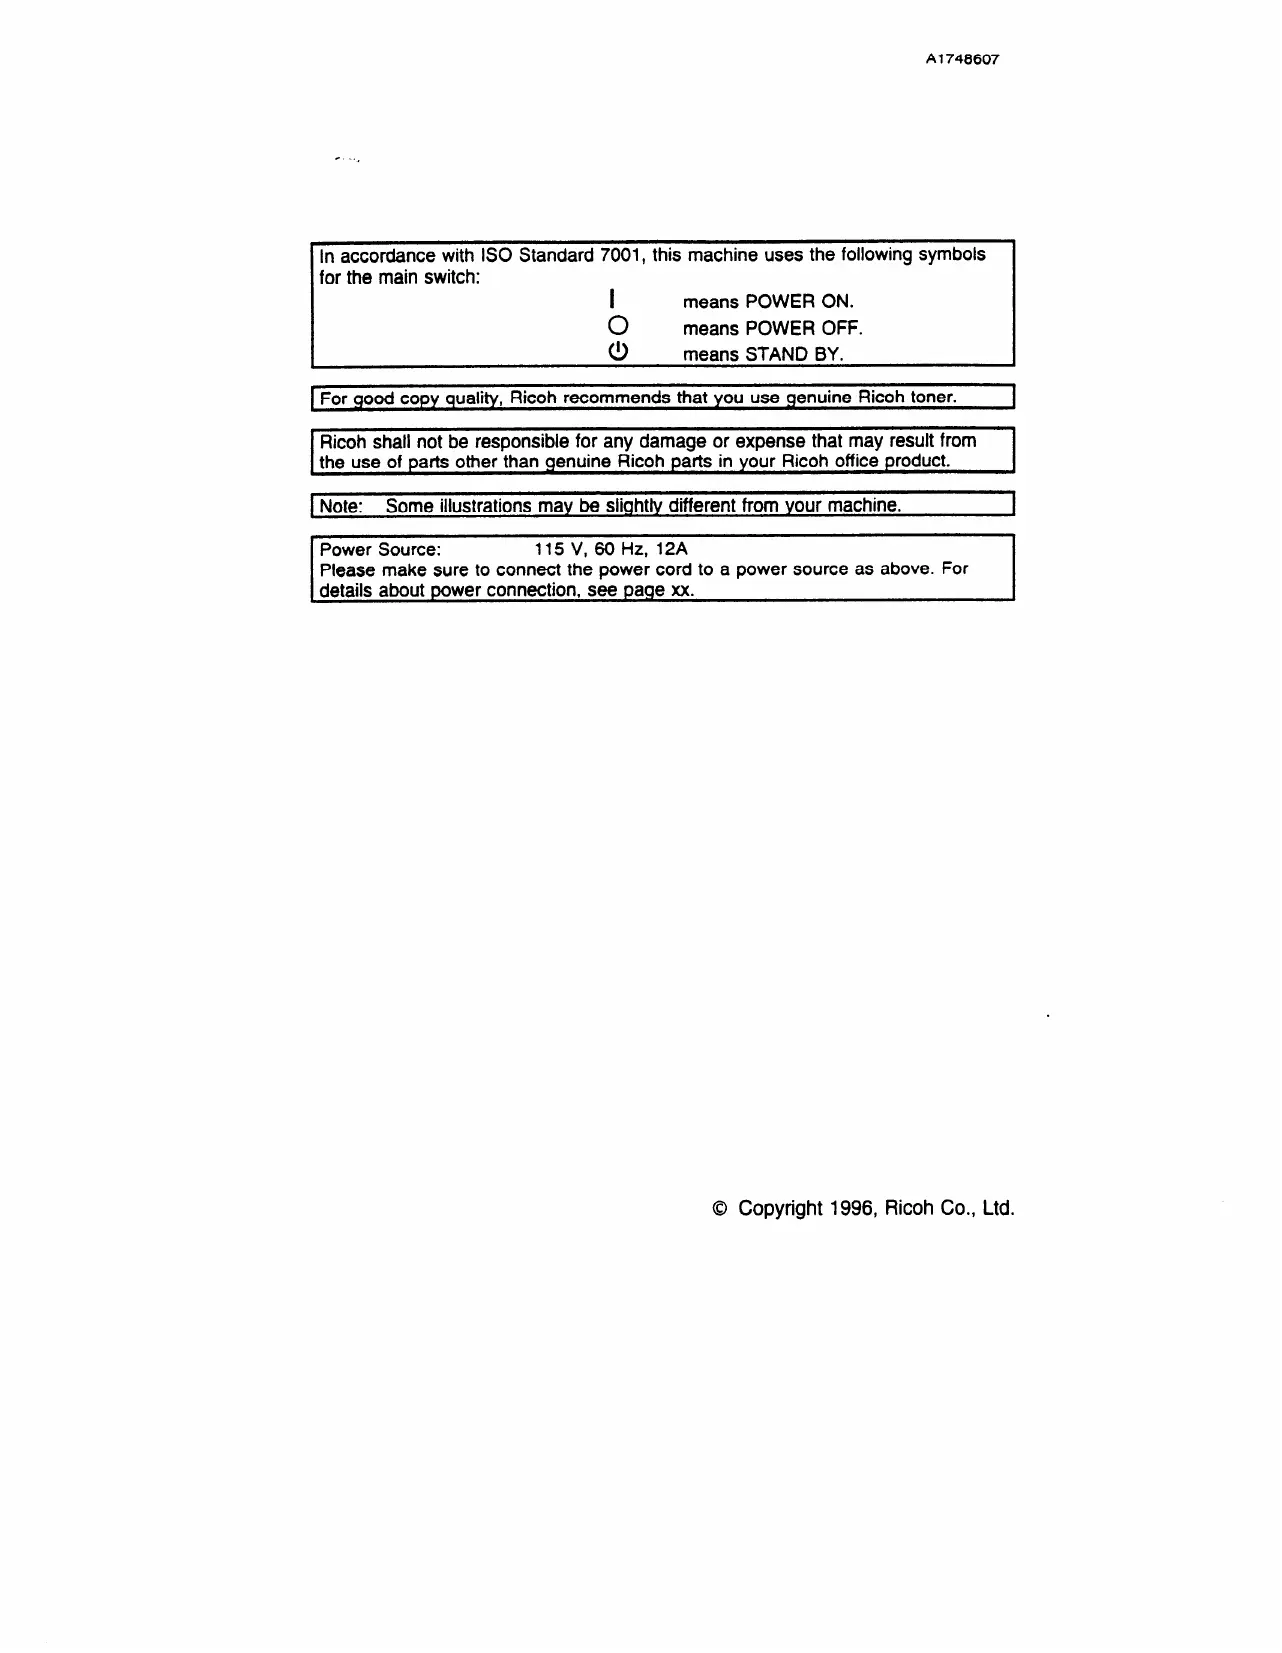
In accordance with ISO Standard 7001, this machine uses the following symbols for the main switch:
means POWER ON.
means POWER OFF.
means STAND BY.
For good copy quality, Ricoh recommends that you use genuine Ricoh toner.
Ricoh shall not be responsible for any damage or expense that may result from the use of parts other than genuine Ricoh parts in your Ricoh office product.
Note: Some illustrations may be slightly different from your machine.
Power Source: 115 V, 60 Hz, 12A
Please make sure to connect the power cord to a power source as above. For details about power connection, see page xx.
Note to users in the United States of America
Warning:
This equipment has been tested and found to comply with the limits for a Class A digital device, pursuant to Part 15 of the FCC Rules. These limits are designed to provide reasonable protection against harmful interference when the equipment is operated in a commercial environment. This equipment generates, uses, and can radiate radio frequency energy and, if not installed and used in accordance with the instruction manual, may cause harmful interference to radio communications. Operation of this equipment in a residential area is likely to cause harmful interference in which case the user will be required to correct the interference at his own expense.
Note to users in Canada
Warning:
This digital apparatus does not exceed the Class A limits for radio noise emissions from digital apparatus as set out in the interference-causing equipment standard entitled "Digital Apparatus", ICES-003 of the Department of Communications.
West Caldwell, New Jersey 07006
(TEL) 201-882-2000
Netherlands
RICOH EUROPE B.V.
Groenelaan 3 P.O. Box 114
1180 AC - Amstelveen Holland
(TEL) 020-5474111
United Kingdom
RICOH U.K. LTD.
Ricoh House
1 Plane Tree Crescent, Feltham,
Middlesex, TW13 7HG
(TEL) 0181-261-4000
Germany
RICOH DEUTSCHLAND GMBH
Mergenthalerallee 38-40
65760 Eschborn
(TEL) (06196) 906-0
France
RICOH FRANCE S.A.
383 Avenue de General de Gaulle,
B.P. 307, 92143 Clamart Cedex
(TEL) 01-4094-3838
Spain
RICOH ESPANA S.A.
Guitard, 45
08014 Barcelona
(TEL) 490-09-60
Italy
RICOH ITALIA S.p.A.
23/F., China Overseas Building,
139, Hennessy Road,
Wan Chai, Hong Kong
(TEL) 862-2888
INTRODUCTION
This copier is a desktop plain paper copier carefully manufactured to exacting standards of high performance. It consistently yields high contrast copies with a superior finish.
This manual contains detailed instructions on the operation and maintenance of this copier. To get maximum versatility from this copier, all operators should carefully read and follow the instructions in this manual. Please keep this manual in a handy place near the copier.
Please read the next section before using this copier. It contains important information related to USER SAFETY and PREVENTING EQUIPMENT PROBLEMS.
SAFETY INFORMATION
When using your copier, the following safety precautions should always be followed.
Safety During Operation
In this manual, the following important symbols are used:

WARNING: Ignoring this warning could cause serious injury or even death.

Caution: Ignoring this caution could cause injury or damage to property.
Examples Of Indications
| ! | Symbols Δ means a situation that requires you take care. |
| Do NOT carry out the operation represented by the symbol Ⓞ. This example means "Do not take apart". | |
| Symbols v means you MUST perform this operation. This example means "You must remove the wall plug". |
WARNING:
| ○ | • Only connect the copier to the power source described on the inside front cover of this manual. Avoid multi-writing as it could cause an electric shock or a fire. • Avoid using an extension cord. Make sure the wall outlet is near the copier and freely accessible so that in event of an emergency it can be unplugged easily. |
| ○ | • Do not damage, break or make any modifications to the power cord. Do not place heavy objects on it, pull it hard or bend it more than necessary. These actions could cause an electric shock or fire. |
| ○ | • Do not remove any covers or screws other than those specified in this manual. Some parts of the copier are at a high voltage and could give you an electric shock. When the copier needs to be checked, adjusted or repaired, contact your service representative. • Do not take apart or attempt any modifications to this copier. There is a risk of fire, electric shock, explosion or loss of sight. |
| ○ | • If the copier looks damaged or breaks down, smoke is coming out, there is a strange smell or anything looks unusual, immediately turn off the main power switch then unplug the power cord from the wall. Do not continue using the copier in this condition. Contact your service representative. |
| ○ | • Do not put any metal objects or containers holding water (e.g. vases, flower pots, glasses) on the copier. If the contents fall inside the copier a fire or electric shock could occur. |
| ○ | • Do not incinerate used toner or toner containers. Toner dust might ignite when exposed to an open flame. Dispose of the used toner containers according to local regulations for plastics. |
| ○ | • If any metal, liquid or foreign matter falls into the copier, turn off the main switch and unplug the main power cord. Contact your service representative. Do not keep using the copier with a fault or defect. |
| ○ | • Do not plug or unplug the power cord with wet hands or an electric shock might occur. |

Cautions:
| ·After you move the copier, lock it in position with the caster fixture. If you do not, the copier might move or fall causing personal injury. | |
| ·Do not lean on the original tray or copy table otherwise they might fall causing personal injury. | |
| ·When you move the copier, unplug the power cord form the wall outlet to avoid fire or electric shock. | |
| ·When you pull out the plug from the socket, grip the plug to avoid damaging the cord and causing fire or electric shock. | |
| ·Keep the copier away from humidity and dust. A fire or an electric shock might occur. ·Do not place the copier on an unstable or tilted surface. If it topples over it could cause injury. | |
| ·When the copier will not be used for a long time, unplug the power cord. | |
| ·If you use this copier in a confined space, make sure there is a continuous air turnover. | |
| ·Do not reuse stapled paper. Do not use aluminum foil, paper containing carbon or other conductive paper. A fire might occur. | |
| ·When removing misfed paper, do not touch the fusing section because it could be very hot. | |
| ·This copier has been tested for safety using this supplier's parts and consumable. We recommend you only use these specified supplies. |
TABLE OF CONTENTS
INTRODUCTION
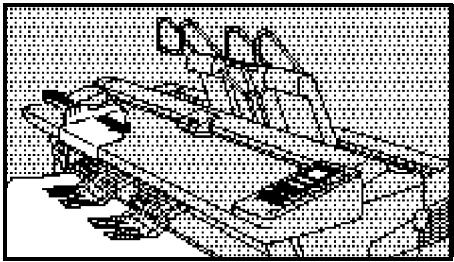
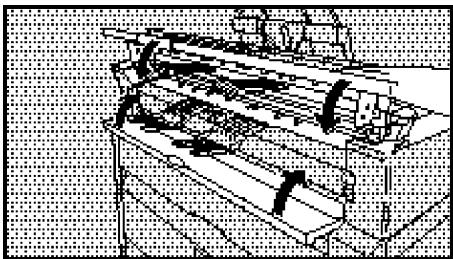
COPIER EXTERIOR 1
Main Unit 1
Operation Panel 2
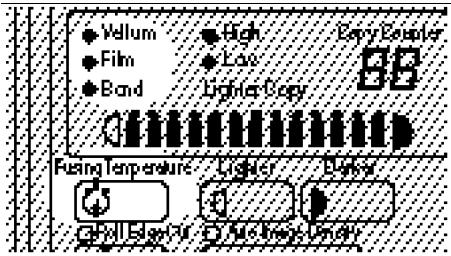
Indicator Panel. 2
COPYING
BASIC. 4
Recommended Originals 4
Recommended Paper 5
Switching the Fusing Temperature 7
Setting the Number of Copies (Repeated Copying) 8
Adjusting Copy Density 9
Switching the Copy Exit. 10
Setting a Leading/Trailing Edge Margin 12
COPYING ONTO ROLL PAPER 14
Synchro Cutting 14
Preset Cutting 15
Variable Cutting 17
PARTIAL COOPYING. 19
SAMPLE COOPYING 21
PAPER TYPE/ROLL WIDTH ENTRY FUNCTION. 22
USING THE PROGRAM FUNCTION 24
Programming a Collection of Copy Settings 24
Recalling Programmed Settings 26
COPYING WITH MANUAL FEED 27
WHAT TO DO IF SOMETHING GOES WRONG
WHEN THE "WAIT" INDICATOR IS LIT 30
IF YOUR COPIER DOES NOT OPERATE AS YOU WANT.... 31
WHEN OR IS LIT. 33
When and Are Lit 34
When 34 and Are Lit 35
When Is Lit. 37
WHEN IS LIT 38
Cutting the Paper Automatically 41
Cutting the Paper Manually 42
WHEN IS LIT OR BLINKING 43
MAINTANING YOUR COPIER
FUNCTIONSTHATCANBERESET 48
COPY MAGNIFICATION/CUT LENGTH ADJUSTMENT 49
DO'S AND DON'TS 51
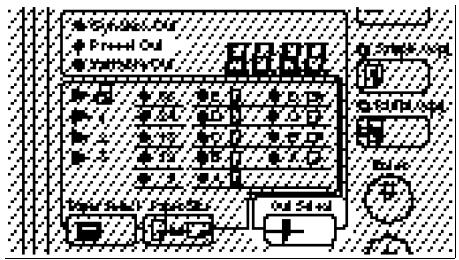
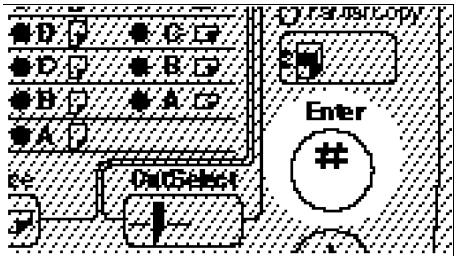
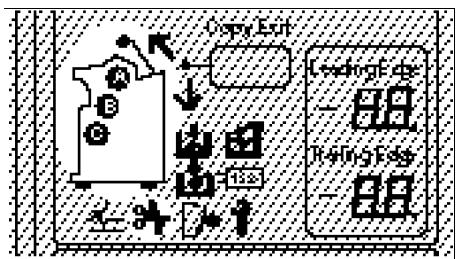
Switches the direction in which copies are delivered.
See page 10.
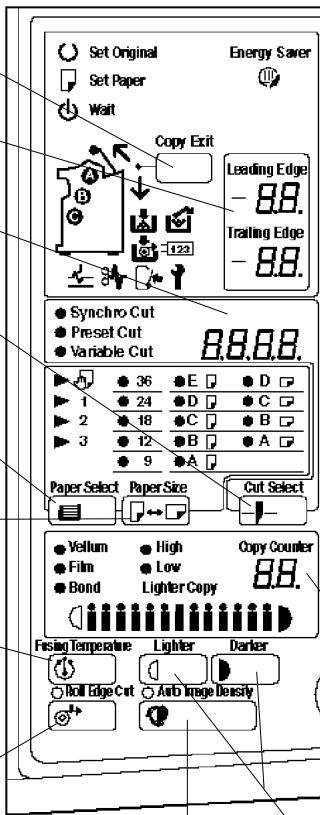
Edge indicators
Displays the margin settings.
Paper Cut Length indicator
Displays the paper cut length.
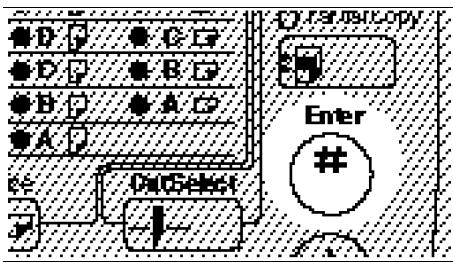
Cut Select key
Switches the paper cut type.
See page 14.
Paper Select key
Selects the paper feed type.
See page 22.
Paper Size key
Switches the paper cut size in the paper feed direction.
See page 22.
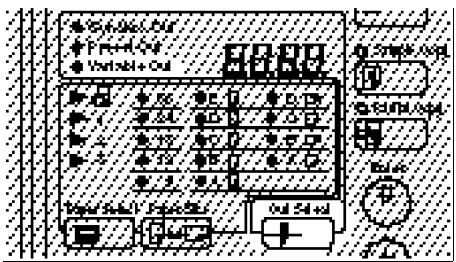
Fusing Temperature key
Switches the fusing unit temperature according to the paper type.
See page 7.
Roll Edge Cut key
Cuts the paper edge when the roll paper is replaced.
See page 41. When you press this key during copying, the paper is cut.
Clear Modes/ Energy Savy

Program

Edge Margin


Sample Copy

Partial Copy

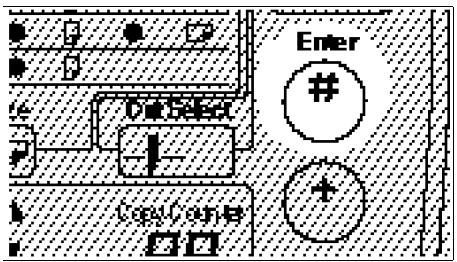
Enter


CleanStop

Auto Image Density key
Adjusts the copy density automatically.
See page 9.
Clear Modes/Energy Saver key
Cancels all of the current settings. When you hold down this key for three seconds or more, the copier enters the Energy Saver mode allowing you to conserve power. When you press the key again, the Energy Saver mode is cleared.
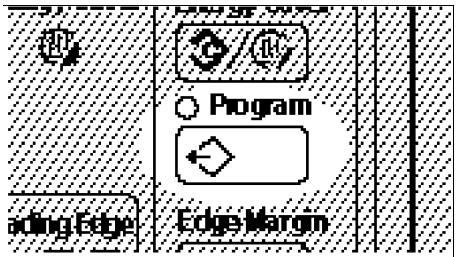
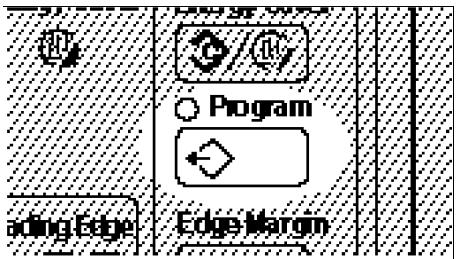
Program key
Allows you to store various copy settings.
See page 24.
Edge Margin key
Press to set a margin.
See page 12.

keys
Specifies a numeric value.
Sample Copy key
Copies an original in 245 mm, 9.6" from its leading edge. See page 21.
Partial Copy key
Copies a specified part of an original.
See page 19.
Enter key
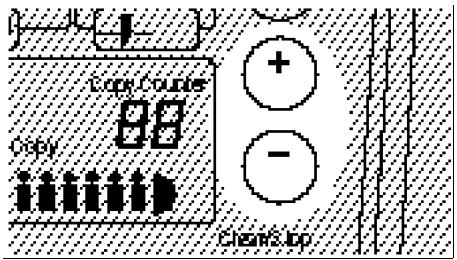
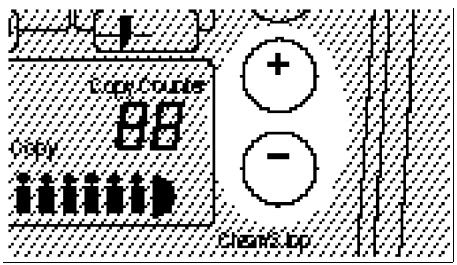
/ keys
Press to specify the number of copies.
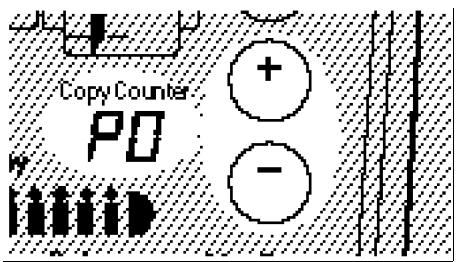
Copy Counter
Displays the number of copies made.
Clear/Stop key
Darker/Lighter keys
Press to adjust the copy density.
See page 9.
Indicator Panel
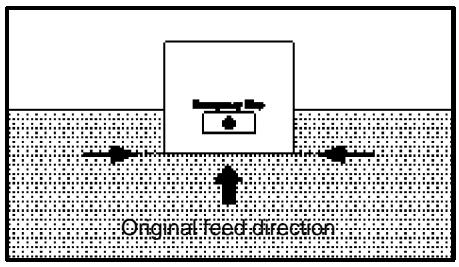
Emergency Stop

Emergency Stop key
Press to stop copying while the paper or original is being fed.
COPYING
BASIC 4
Recommended Originals 4
Recommended Paper 5
Switching the Fusing Temperature 7
Setting the Number of Copies (Repeated Copying) 8
Adjusting Copy Density 9
Switching the Copy Exit. 10
Setting a Leading/Trailing Edge Margin 12
COPYING ONTO ROLL PAPER 14
Synchro Cutting. 14
Preset Cutting 15
Variable Cutting. 17
PARTIAL COPYING 19
SAMPLE COOPYING 21
PAPER TYPE/ROLL WIDTH ENTRY FUNCTION 22
USING THE PROGRAM FUNCTION 24
Programming a Collection of Copy Settings 24
Recalling Programmed Settings 26
COPYING WITH MANUAL FEED 27
BASIC
This section describes how to set the functions and recommended originals and paper.
Recommended Originals
When you copy the following originals, use the carrier sheet (option) to set them:
See page 62, "OTHER OPTIONS"
- Thin originals
- Torn originals
- Folded originals
- Curled originals
- Pasted originals
You can set originals having the thickness of 21g / m^2 , 6 lb to 157g / m^2 , 41 lb in this copier.
When you copy the following originals, set them in the rear table:
- Thick originals (0.19 mm, 35 μ to 1 mm)
- Originals which cannot be folded
To set an original in the rear table, follow the steps below.
When you set an original in the rear table, you cannot use the Synchro Cut function. Select Preset Cutting or Variable Cutting.
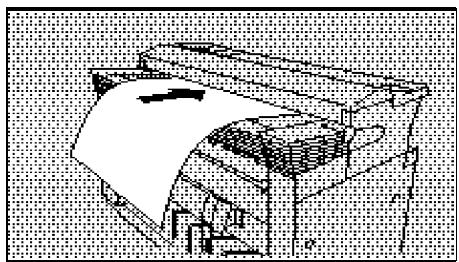
1 Pull down the copy guide holder.
2 Remove the upper copy guide.
3 Insert the original face down into the table along the size indication.
Do not release the original until it is fed into the copier.
Set a leading margin of 5mm , 0.2'' or more when you copy an original whose leading edge has a large solidly-shaded area.
See page 11, "Setting a Leading/Trailing Edge Margin"
Recommended Paper
This section describes recommended paper sizes and types.
Standard paper sizes that can be used in this copier are shown below.
| Metric version | Inch version | Manual feed table | Roll feeder |
| A0 | E (36" × 48") | ☐ | ☐ |
| A1 | D (24" × 36") | ☐ ☐ | ☐ ☐ |
| A2 | C (18" × 24") | ☐ ☐ | ☐ ☐ |
| A3 | B (12" × 18") | ☐ ☐ | ☐ ☐ |
| A4 | A (9" × 12") | ☐ | ☐ |
When you make a copy on a non-standard size of paper, set the paper on the manual feed table.
▶ Paper of about the thickness of 51 to 134g / m^2 , 14 lb to 36 lb is suitable for this copier.
Do not use the following paper. Otherwise, a paper jam might occur.
- Bent, folded, or creased paper
- Torn paper
Perforated paper
Non-smooth paper - Slippery paper
- Thin paper that has low stiffness
Do not make a copy on paper with any kind of coating, such as thermosensitive paper, art paper, aluminum foil, and carbon paper. Otherwise, a fault might occur.
If you make a copy on edged paper, the copy might be creased or a part of the image might not be copied.
If you make a copy on rough paper, the copy image might be blurred.
When you make a copy on translucent paper, the copy might be waved.
When you make copies on film, take out the copies delivered to the copy guide one sheet at a time and place them on a flat surface.
Switching the Fusing Temperature
When you make a copy on translucent paper or transparent film, switch the fusing unit temperature to stabilize toner fusing.
If you make a copy in the condition unsuitable for copy paper, the copy might be creased or a part of the image might not be copied.
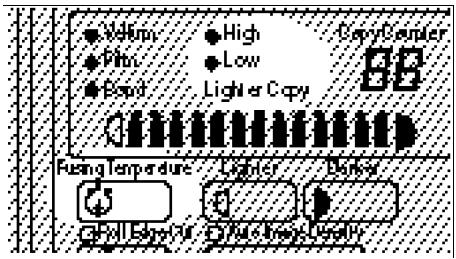
Turn on the "HIGH" indicator for translucent paper and "LOW" for transparent film. The time required for changing the fusing temperature for the standard paper to that for the "HIGH" or "LOW" setting is as follows. This time might vary depending on the copier condition.
- HIGH - About 3 minutes
- LOW - About 5 minutes
The fusing temperature is switched automatically when you change the paper type. When you want to make a copy immediately, press the Fusing Temperature key to return the fusing temperature to the one set before switching.
When you specify a different width of roll paper, the fusing temperature might be switched automatically.
When you set the fusing temperature to "HIGH", the paper curls easily. Uncurl such copies before stocking them.
Press the Fusing Temperature key to turn on the "HIGH" or "LOW" indicator.
The "Wait" indicator goes on and either the "HIGH" or "LOW" indicator is lit.
When the "Wait" indicator goes off and the "Ready" indiator goes on, the copier enters the ready condition.
Setting the Number of Copies (Repeated Copying)
Repeated copying means to make two or more copies of one original. This function allows you to make up to 10 copies in the size of 1,200 × 914 ~mm , 49'' × 36'' to B5.
In repeated copying, the image might be copied slantly depending on the original size, type, and condition (e.g., curl, wave). In such a case, make one copy at a time.
You cannot use the repeated copy function in the following cases:
- When using the carrier sheet (option)
- When setting an original in the rear table
See page 4, "Recommended Originals"
1 Set the original trays with their edges facing down.
Press the and keys to specify the number of copies.
When you press the Clear/ Stop key, the number of copies returns to "1".
Adjusting Copy Density
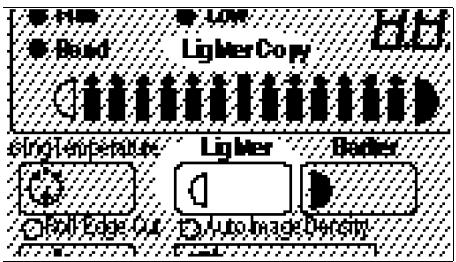
The "Auto Image Density" function means to adjust copy density automatically to mask out dark backgrounds of an original. If you cannot make copies as you want with the Auto Image Density function, adjust the copy density manually.
When you turn on the copier, the "Auto Image Density" indicator lights.
- You can adjust copy density in 26 steps; 13 steps when the "Lighter Copy" indicator is on and 13 when the indicator is off.
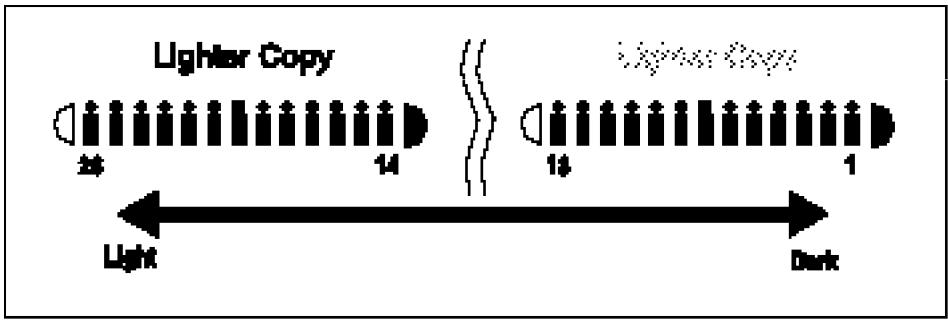
Press the Lighter and Darker keys to adjust copy density.
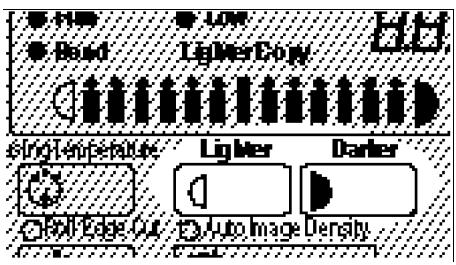
Each time you press the Lighter key, the indicator moves one step to the left. When the indicator reaches the left edge, it returns to the right edge and the "Lighter Copy" indicator lights.
Switching the Copy Exit
This function switches the copy exit direction to the upper or lower according to the copy paper size.
Select the lower copy exit when copying onto A0, 36'' × 48'' or A1, 24'' × 36'' paper. If you use the upper copy exit to copy onto these paper, delivered copies might remain inside the copier causing a paper jam.
Select the upper copy exit when copying onto A4 or 9'' × 12'' paper. If you select the lower copy exit, copies might not be stocked properly.
When you turn on the copier, the message "upper copy exit" lights.
- You can stock the following number of copies by using the upper copy exit. If you stock copies exceeding these numbers, the paper might be jammed or the image might be copied on the underside of the paper.
- A4 ~ A1 , A ~ D - 25 sheets
- Translucent paper - 10 sheets
When you select the lower copy exit and take copies out of the rear side of the copier, you can stock up to 10 copies for A0, 36'' × 48'' or A1, 24'' × 36'' paper.
- When you select the lower copy exit and take copies out of the front side of the copier, you can stock only one copy.
When you copy onto A3, short grain paper, you can stock less copies than those for A3, long grain paper.
Press the Copy Exit key to select the direction in which copies are delivered.
" lights for the upper copy exit and " " for the lower copy exit.
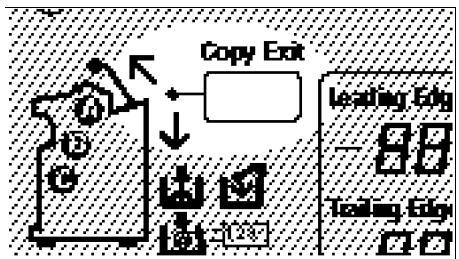
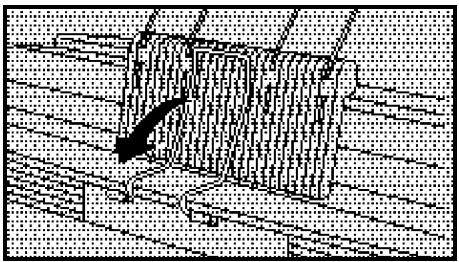
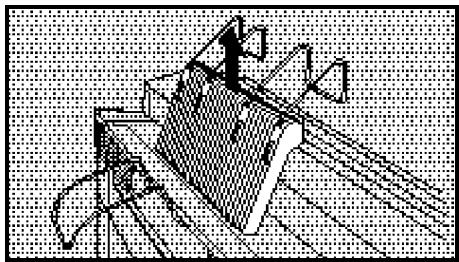
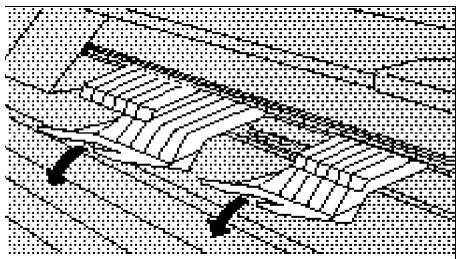
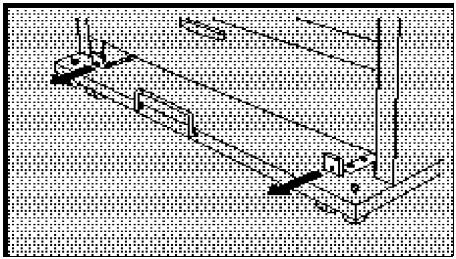
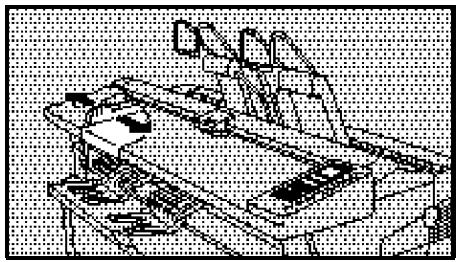
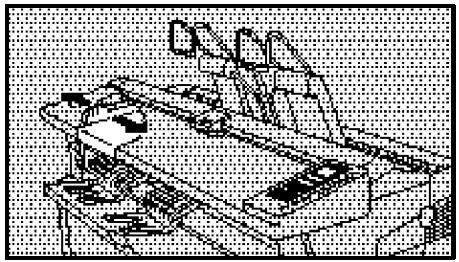
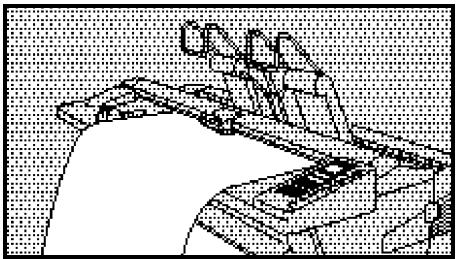
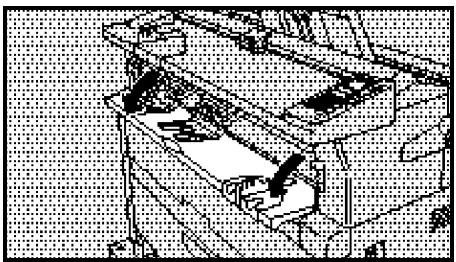
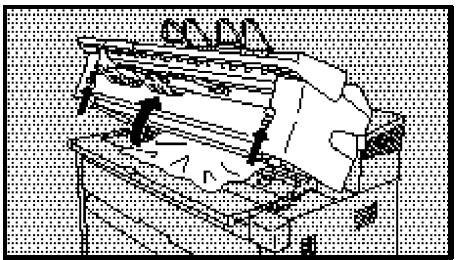
2 When you take copies out of the rear side of the copier in the lower copy exit mode, pull out the delivery switch levers until they stop, as shown in the figure on the right.
You must pull out both levers at the same time.
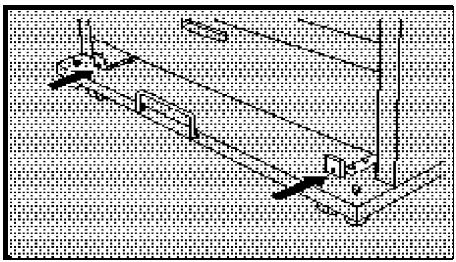
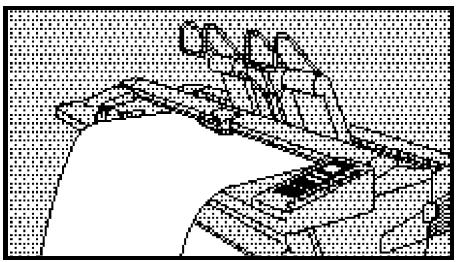
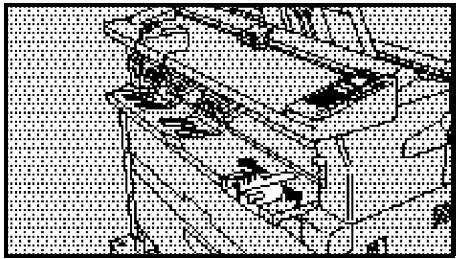
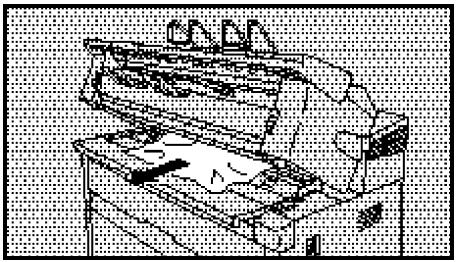
When you take copies out of the front side of the copier in the lower copy exit mode, press the delivery switch levers until they stop, as shown in the figure on the right.
You must press both levers at the same time.
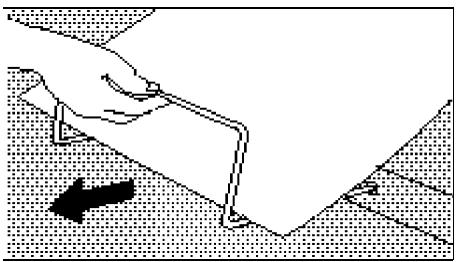
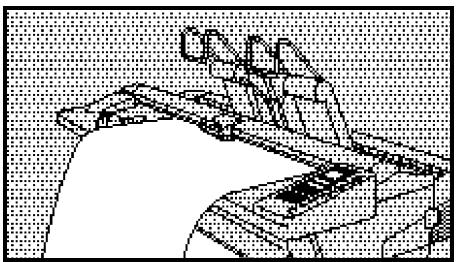
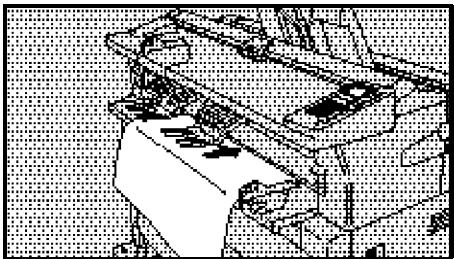
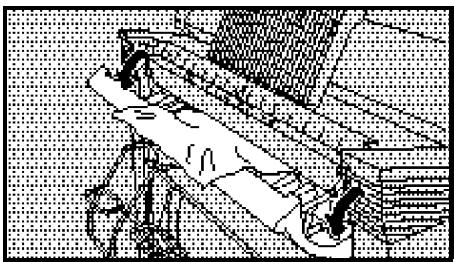
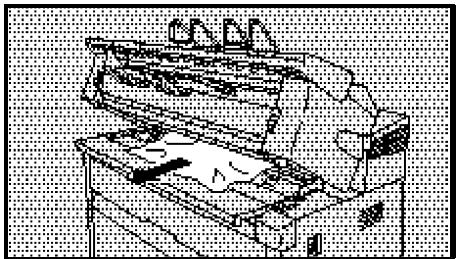
3 When you take copies out of the front side of the copier in the lower copy exit mode, pull the stopper toward you.
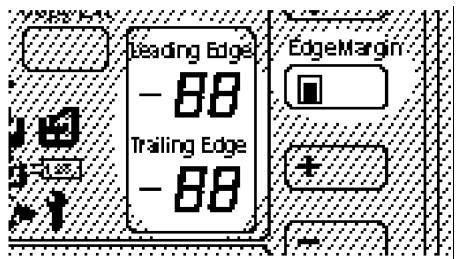
Setting a Leading/Trailing Edge Margin
You can set a margin at the leading or trailing edge of the copy. You can also make a copy using a narrower margin than that on the original.
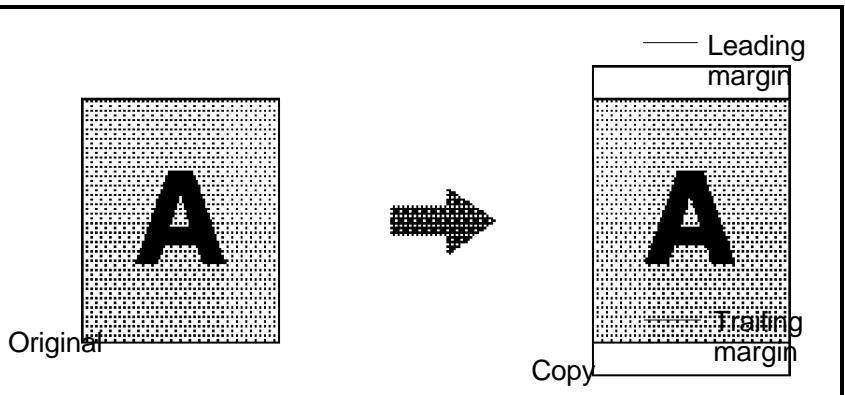
- You can set up to ± 99mm , ± 4.0 " margin in 1mm , 0.1 " steps at either the leading or trailing edge.
You can set a trailing margin only when you select the Synchro Cut function. - When you set a leading margin, the copy image is shifted to the trailing edge for the margin.
When you make a copy in the "Manual Feed," "Preset Cut," or "Variable Cut" mode, the copy image might extend off the paper depending on the leading margin width.
Set a leading margin of 5mm , 0.2'' or more when you copy an original whose leading edge has a large solidly-shaded area.
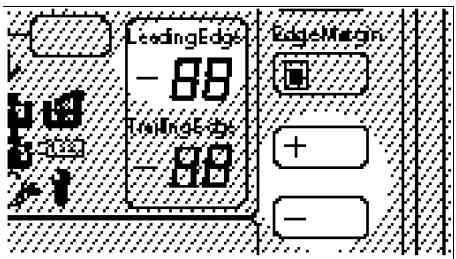
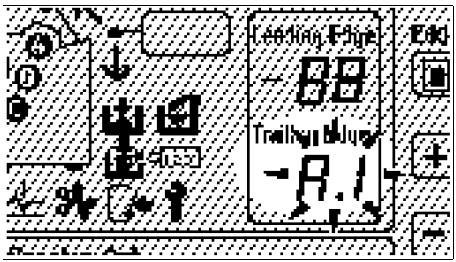
Press the Edge Margin key. The "Leading Edge" indicator flashes.
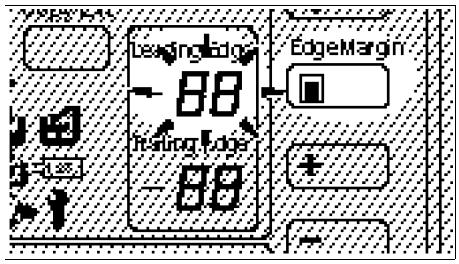
Press the + and - keys to specify a leading edge margin.
Press the + key to increase the margin width and - to decrease the width.
If you enter a wrong value, press the Clear/Stop key and reenter a correct value.
Press the Edge Margin key. The specified value goes on. The "Trailing Edge" indicator flashes when the "Synchro Cut" mode is selected.
You can start copying here when the "Manual Feed," "Preset Cut," or "Variable Cut" mode is selected.
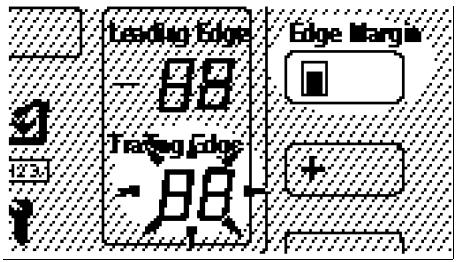
4 Press the + and - keys to specify a trailing edge margin.
If you enter a wrong value, press the Clear/Stop key and reenter a correct value.
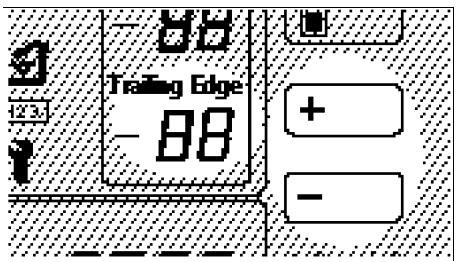
Press the Edge Margin key. The specified value goes on. Both margins are set.
COPYING ONTO ROLL PAPER
You can copy onto roll paper in the following three ways: synchro cutting, preset cutting, and variable cutting.
If roll paper is damp, cut it in about 1,000 ~mm , 39.4" immediately before copying.
See page 41, "Cutting the Paper Automatically/Manually"
Synchro Cutting
This function cuts roll paper automatically according to the original length.
The synchro cut can handle the cut length from 245 to 3,600 ~mm , 9.6" to 142".
- When copying on to A1, 24 × 36 transparencies, you can make up to 20 copies continuously. When you have made 20 copies, wait for 15 minutes until you resume copying.
When you copy an A2, 18'' × 24'' or larger original after making 30 copies continuously from an A3, 12'' × 18'' or smaller original, wait for 10 minutes or more until you start copying the larger original.
Press the Cut Select key to turn on the "Synchro Cut" indicator.
2 Set the original guide to match the original width and direction.
3 Insert the original lightly along the original guide.
The copier starts copying.
Do not release the original until it is fed into the copier.
Preset Cutting
This function cuts roll paper in a selected length. The paper is cut regardless of the original size.
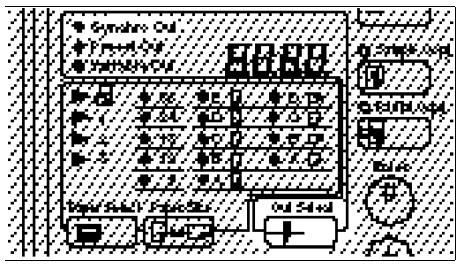
The preset cut length is divided into five types. Depending on the roll width, it is cut in the following standard lengths:
Metric version:
| Roll width | Preset length | Paper size and direction |
| 841 mm | 1,189 mm | A0 ☐ |
| 594 mm | A1 ☐ | |
| 594 mm | 841 mm | A1 ☐ |
| 420 mm | A2 ☐ | |
| 420 mm | 594 mm | A2 ☐ |
| 297 mm | A3 ☐ | |
| 297 mm | 420 mm | A3 ☐ |
| — | — | |
| 210 mm | 297 mm | A4 ☐ |
| — | — |
Inch version:
| Roll width | Preset length | Paper size and direction |
| 36" | 48" | E □ |
| 24" | D □ | |
| 24" | 36" | D □ |
| 18" | C □ | |
| 18" | 24" | C □ |
| 12" | B □ | |
| 12" | 18" | B □ |
| — | — | |
| 9" | 12" | A □ |
| — | — |
Press the Cut Select key to display a length of the "Preset Cut".
2 Set the original guide to match the original width and direction.
3 Insert the original lightly along the original guide.
The copier starts copying.
Do not release the original until it is fed into the copier.
Variable Cutting
This function cuts roll paper in a length you specify.
The variable cut can handle the cut length from 245 to 3,600 ~mm , 9.6" to 142".
Press the Cut Select key to turn on the "Variable Cut" indicator.
Press the + and - keys to specify the length for the variable cut.
You can specify the cut length quickly by displaying the nearest value with the Paper Size key and changing it to the desired one.

3 Set the original guide to match the original width and direction.
4 Insert the original lightly along the original guide. The copier starts copying.
Do not release the original until it is fed into the copier.
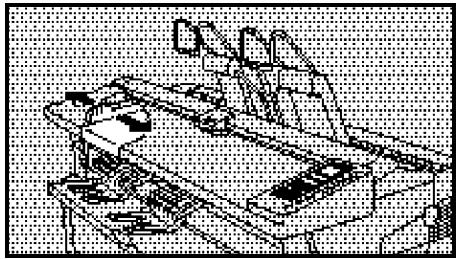
PARTIAL COPYING
The Partial Copy function copies only a part of an original.
This function specifies the start and end points in the original feed direction.
The Partial Copy function cannot apply to originals having a length of less than 245mm , 9.6" in the paper feed direction.
The Partial Copy function cannot be used in the rear table.
The Partial Copy function cannot be used when the Sample Copy function is selected.
The start and end points cannot be set within 162mm , 6.4" from the leading edge of paper.
The spacing between the start and end points is 100 mm , 4.0'' at the minimum.
Roll paper is cut in 250mm 9.9" at the minimum.
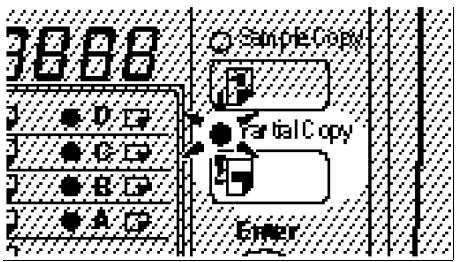
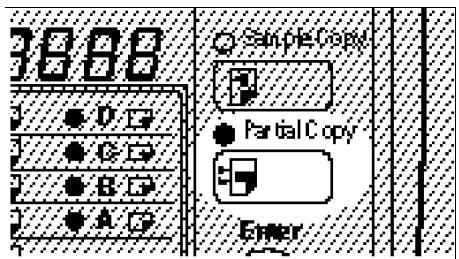
Press the Partial Copy key. The indicator on the Partial Copy key blinks.
When you press the Partial Copy key again, the leading edge of an original becomes the start point for partial copying. When you press the Partial Copy key for the third time, you can cancel partial copying.
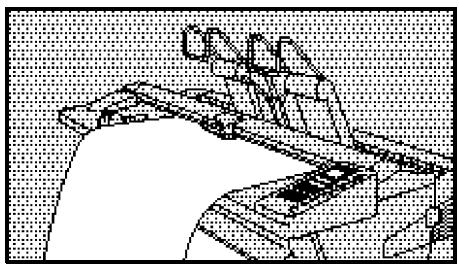
Set your original. The copier starts copying.
Do not release the original until it is fed into the copier.
Press the Partial Copy key when the leading edge of the area to be copied comes to the position where it is covered with the original table cover.
The indicator on the Partial Copy key lights.
If you do not press the Partial Copy key, the original is delivered without partial copying.
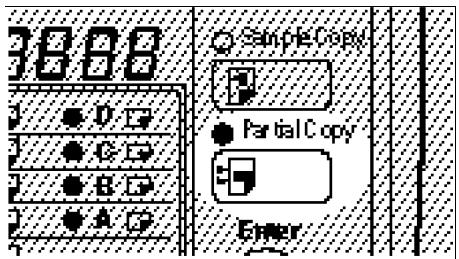
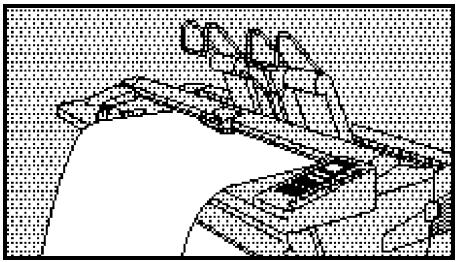
4 Press the Partial Copy key when the trailing edge of the area to be copied comes to the position where it is covered with the original table cover.
The indicator on the Partial Copy key goes off.
If you do not specify the trailing edge, the copier will do the following:
- Cuts the paper automatically according to the original length when the synchro cut function is selected.
- Otherwise, cuts the paper in the specified length.
- The area to be copied might differ slightly from the desired one depending on the timing of pressing the key.

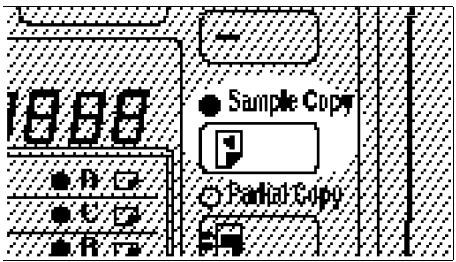
SAMPLE COPYING
The Sample Copy function copies an original in 245 mm, 9.6" from its leading edge in the paper feed direction.
This allows you to check the copy condition of the current settings in advance.
Press the Sample Copy key. The indicator on the Sample Copy key is lit.
When you press the Sample Copy key again, you can cancel sample copying.
2 Set your original.
Do not release the original until it is fed into the copier.
3 The copier starts copying.
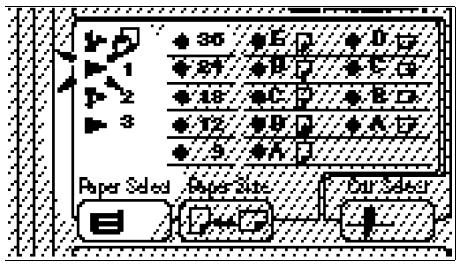
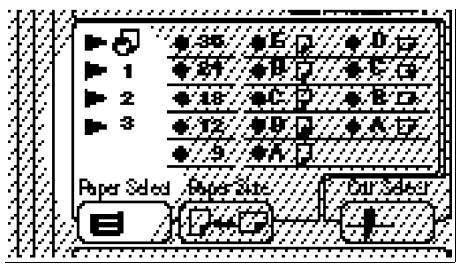
PAPER TYPE/ROLL WIDTH ENTRY FUNCTION
This function allows you to store the paper type and roll width for a selected paper feeder. When you change the paper feeder to the specified one, the paper type and roll width are set to the stored values.
Press the Paper Select key until your desired paper feeder indicator blinks.
The paper feeder indicator blinks. The roll paper width is displayed in the paper cut length indicator.
You can press the Clear Modes key to cancel the indication.
Press the Paper Select key to select the paper feeder.
Press the Paper Size key to select the roll paper width.
When you select "Manual Feed" for the paper feeder, you cannot specify the paper size.
4 To use the New-ABCDE-size paper, select "New size" using the + and 一 keys.
When the paper feeder indicator blinks for "New size", the 24, 18, 12, and 9 indicators are lit.
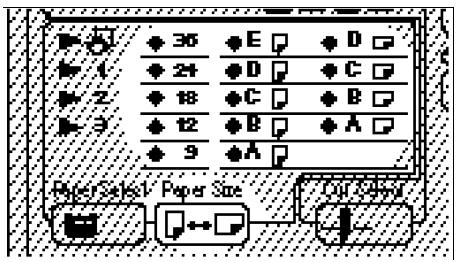
Press the Fusing Temperature key to select the paper type.
6 Press the Enter key. The above settings are stored.
If you do not want to store the settings, press the Clear Modes key.
USING THE PROGRAM FUNCTION
The Program function allows you to store a collection of copy settings as programs 1 to 9 and switch them as needed.
Programming a Collection of Copy Settings
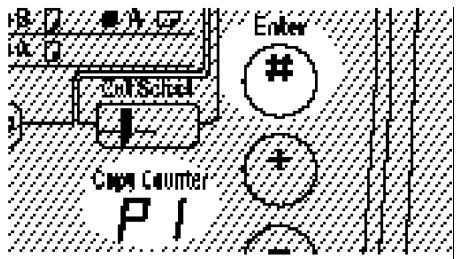
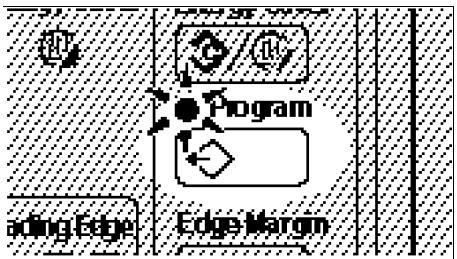
Press the Program key.
The indicator on the Program key blinks.
The copy counter displays the current program number.

Use the and keys to select a program number for which you store copy settings.
You cannot change settings in Program No. 0. Each time you make a copy, the copy settings are stored in Program No. 0.
When you press the Clear/ Stop key, Program No. 0 is selected.
3 Press the Enter key.
The indicator on the Program key blinks.
4 Specify values for each setting.
You can store the following settings with the Program function. For the way to specify values, see the corresponding pages.
- Sample copying See page 21.
- Partial copying (The start and end points cannot be stored) See page 19.
- Paper feeder See page 22.
- Copy exit See page 10.
- Margins See page 12.
- Cut type See page 14.
Number of copies See page 8. - Copy density See page 9.
-
Fusing temperature See page 7.
-
You can also store the paper type and roll width. However, these settings cannot be changed with the Program function. When you specify a paper feeder, the paper type and roll width specified with the Paper Type/Roll Width Entry function (see page 22) are stored.
Press the Enter key. The copy settings are stored.
6 If you store settings for another program number, repeat 2 to 5.
Press the Program key. The lamp on the Program key lights.
The settings are also stored when you press the Program key instead of the Enter key.
Recalling Programmed Settings
Press the Program key. The indicator on the Program key blinks.
Use the and keys to select a program number.
Press the Program key. The Program key lights and the programmed settings are recalled.
When you press the Program key again, you can cancel the program recall.
COPYING WITH MANUAL FEED
When you make a copy with manual feed, you need not replace paper even if the required size or type of paper is not set in the copier.
Set a sheet of paper at a time on the manual feed table.
You cannot use the repeated copying function during manual copying in the default setting. To change the setting, contact your service representative.
- You can set either paper or an original first. When you have set both of them, the copier starts copying automatically.
When you press the Clear/Stop key after setting an original, the original is delivered without copying.
When you remove paper from the manual feed table, pull it out gently by holding its left and right sides.
Press the Paper Select key to turn on the "Manual Feed" indicator.

Pull down the manual feed table.
3 Set the copy paper guide to match the paper width and direction (the copy paper guide is an option).
4 Insert the paper lightly along the copy paper guide (the copy paper guide is an option).
Do not release the paper until it is fed into the copier.
5 Set the original guide to match the original width and direction.
6 Insert the original lightly along the original guide.

7 The copier starts copying.
WHAT TO DO IF SOMETHING GOES WRONG
WHEN THE "WAIT" INDICATOR IS LIT. 30
IF YOUR COPIER DOES NOT OPERATE AS YOU WANT . 31
WHEN OR IS LIT 33
When and Are Lit. 34
When and Are Lit. 35
When Is Lit 37
WHEN IS LIT 38
Cutting the Paper Automatically 41
Cutting the Paper Manually 42
WHEN IS LIT OR BLINKING 43
WHEN THE "WAIT" INDICATOR IS LIT
You cannot start copying while the "Wait" indicator is lit.
Check indicators on the operation panel and take action according to the instructions shown below.
If no indicator is lit on the operation panel, check that the power is on.
| Indication | Corrective action |
| 84 is lit. | Remove the misfed paper. → See page 35. |
| 2 is lit. | Remove the misfed original. → See page 34. |
| 1 is lit. | Load paper in the roll feeder. → See page 38. |
| 2 is lit or blinking. | Add toner. → See page 43. |
| 2 is lit or blinking. | The toner bottle is filled with used toner. Contact your service representative. |
| 1 is lit. | Any cover is open at the roll feeder or other unit of the copier. Close the cover. |
| 1 is lit. | Something goes wrong with the copier. Contact your service representative. The paper cut length indicator displays alphabetical characters or numerals. You should also inform the service representative of these values. |
| 103 is lit. | Set the key counter. |
IF YOUR COPIER DOES NOT OPERATE AS YOU WANT
The following table shows the causes of problems and the corrective actions when your copier does not operate as you want.
If the same problem remains even when you take the corresponding action, contact your service representative.
Dirty Copies
| Cause | Corrective action |
| The copy density is too dark. | Reduce the copy density. → See page 9. |
| The exposure glass is dirty. | Clean the exposure glass. → See page 53. |
Blurred Copies
| Cause | Corrective action |
| The copy density is too light. | Increase the copy density. → See page 9. |
| The toner is running short. | Replace the toner cartridge. → See page 43. |
| Rough, coated, or edged paper is used. | Use only recommended paper.→ See page 5. |
| The copy paper is damp. | When you copy onto roll paper, cut the damp area. → See page 39. |
| The fusing temperature is not appropriate. | Switch the fusing temperature according to the paper type. → See page 7. |
Spotty or Partially Blank Copies
| Cause | Corrective action |
| Inappropriate copy paper is used. | Set paper of the same size as, or larger than the original. |
| The original feed direction does not match the paper feed direction. | Set the original to match the feed direction of the paper to be copied on. |
| The leading margin is not appropriate. | Adjust the leading margin. → See page 12. |
Waved Copies
| Cause | Corrective action |
| The fusing temperature is not appropriate. | Switch the fusing temperature according to the paper type. → See page 7. |
| The paper texture flow direction is not appropriate. | Use paper of the appropriate texture flow direction. |
| Inappropriate copy paper is used. | Use only recommended paper. → See page 5. |
Creased Copies
| Cause | Corrective action |
| The copy paper is damp. | See "Blurred Copies." → See page 30. |
| Inappropriate paper type/roll width is specified. | Set the paper type/roll width suitable for the roll paper to be used. → See page 22. |
| Inappropriate copy paper is used. | Use only recommended paper. → See page 5. |
WHEN OR% IS LIT
A paper jam has occurred. The corrective action varies depending on the location having the misfed paper. Remove the paper according to the corresponding instruction shown below.
Be sure to remove the paper completely without tearing it. If a piece of the paper remains inside the copier, the paper jam might recur or another fault might occur.
WARNING: Do not remove any covers or screws other than those specified in this manual. Some parts of the copier are at a high voltage and could give you an electric shock. When the copier needs to be checked, adjusted or repaired, contact your service representative.
Caution: When removing misfed paper, do not touch the fusing section because it could be very hot.
A location having misfed paper is shown by an indicator on the operation panel.
Several locations might be indicated simultaneously. Remove misfed paper from all of the locations.
When you open the original table, paper path section, or rear cover, the copier turns itself off. However, the copy settings are kept stored.
When you have removed misfed paper, the suspended copy settings are displayed. Resume copying without changing the settings.
If paper jams occur repeatedly, contact your service representative.
When 12 and Are Lit
1 Open the original cover.
2 Remove the original.
If you can remove it, go to 6.
3 If you cannot remove the original, open the original table.
4 Remove the original.
5 Close the original table until it clicks.
When you close the original table, hold its left and right sides.
6 Close the original cover.
When 0.4 ~V and Are Lit
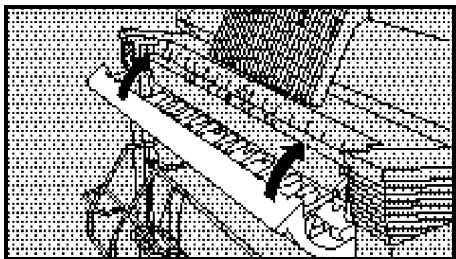
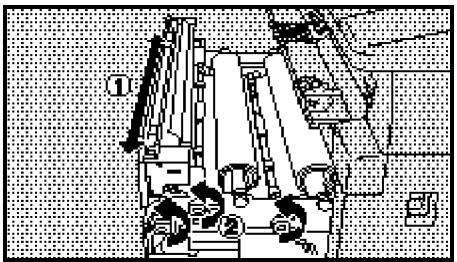
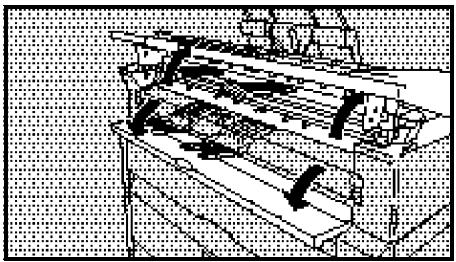
1 Open the image producing unit by pulling up the left and right knobs.
You must open this unit completely.
2 Remove the misfed paper.
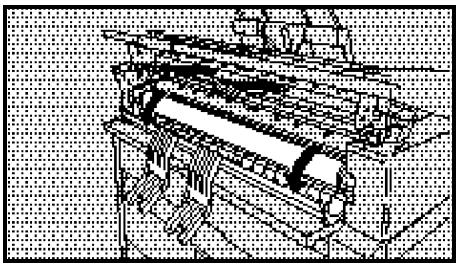
3 If you cannot remove the paper, open the rear cover.
4 Remove the paper.
You should remove it from the front side of the copier.
5 Close the rear cover.
6 Close the image producing unit until it clicks.
Close this unit completely. Otherwise, a paper misfeed might recur.
When Is Lit
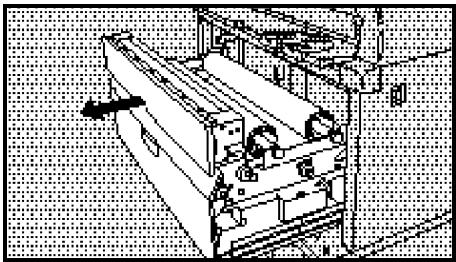
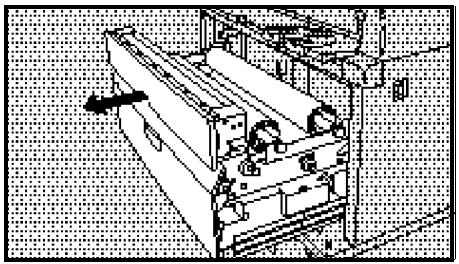
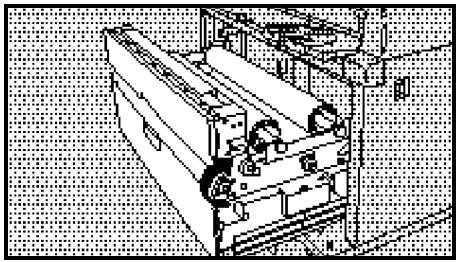
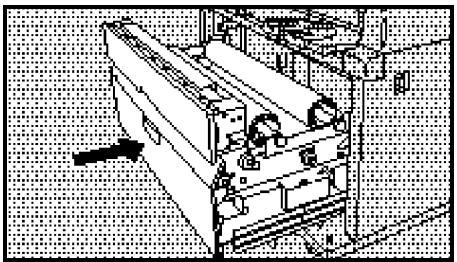
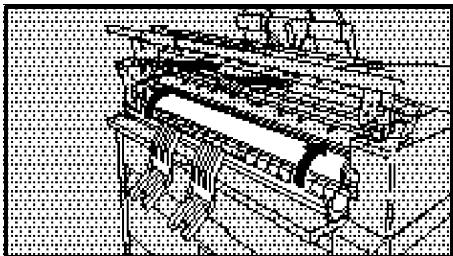
1 Pull out the roll feeder.
Pull out the feeder until it stops.
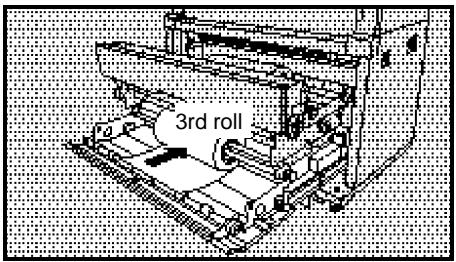
2 If a paper misfeed occurs at the third roll, open the third roll feeder cover.
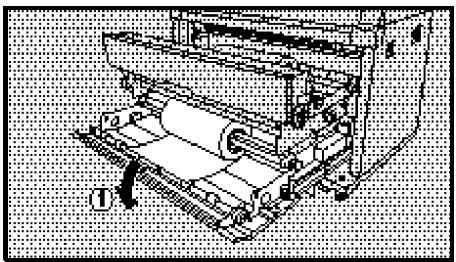
3 Remove the roll paper gently.
When you remove the roll paper, it is recommended to roll back the paper than to pull it out.
If the paper edge is torn or folded, cut it with a scissors or cutter.
4 Follow 7 and later steps shown in "WHEN IS LIT".
See page 40.
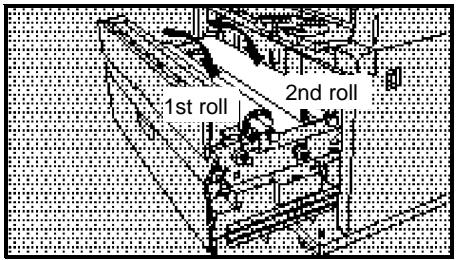
The roll feeder runs out of paper or the roll paper is not set properly.
Set paper in the roll feeder.
Set roll paper for each roll.
When you remove roll paper from a paper spool or set new paper on a spool, place the spool horizontally on a flat surface.
Even if the roll feeder runs out of paper during repeated copying, you can make the rest of the copies after loading paper.
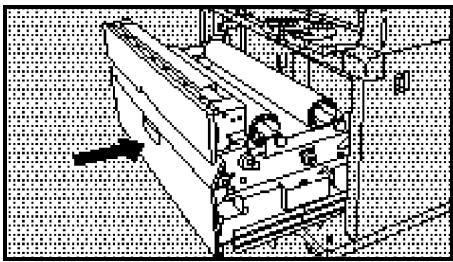
Pull out the roll feeder.
Pull out the feeder until it stops.
2 Remove the roll paper.
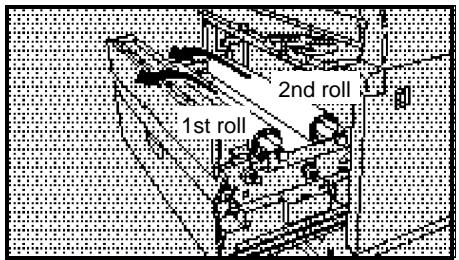
3 If you replace the third roll, open the third roll feeder cover and remove the roll paper.
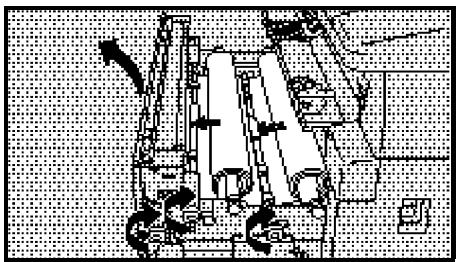
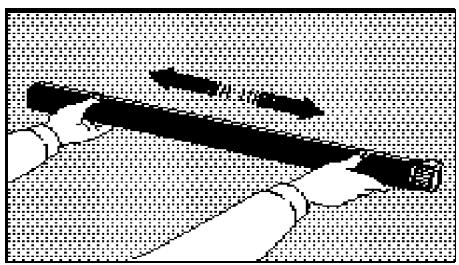
4 Remove the roll paper while pressing the paper release lever on the right edge of the paper spool as shown in the figure on the right.

Set new paper on the paper spool making sure that the paper is rolled in the proper direction.
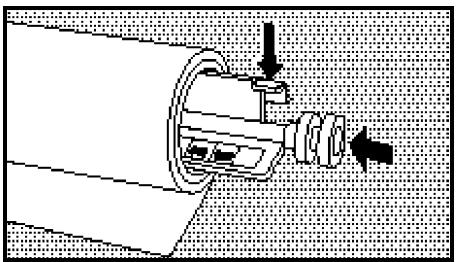
While pressing the paper release lever, align the paper with the size indication on the paper spool.
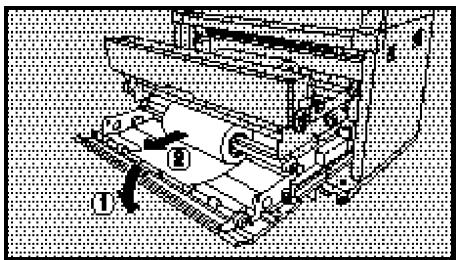
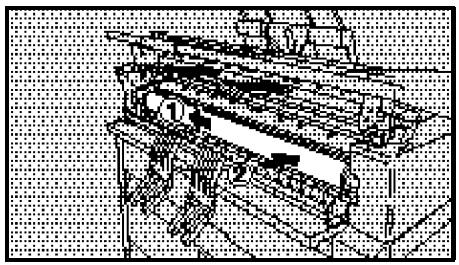
6 Set the roll paper in the roll feeder.
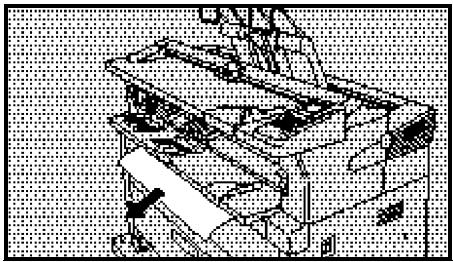
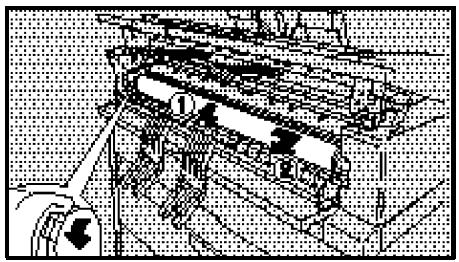
7 Feed the paper under the paper feed roller until it stops. Then turn the knob until the paper edge extrudes from under the cover by about 150 mm, 5.9" (cover closed).
If the roll paper is damp, rotate the knob so that the paper edge extrudes from under the cover by about 1,000 mm, 39.4" (cover closed).
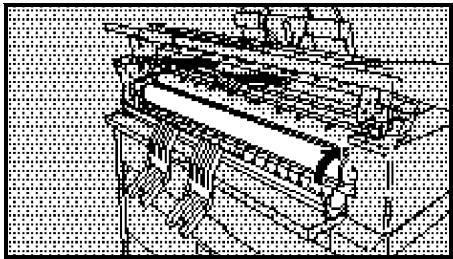
For the third roll, feed the paper under the paper feed roller. Then rotate the knob until the paper edge appears in the center of the paper confirmation window.
Close the third roll feeder cover.

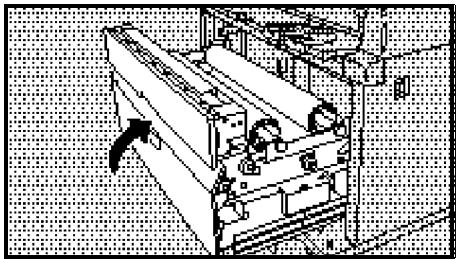
Turn the knob until the paper edge extrudes from the cover by about 150mm , 5.9'' (cover closed).
Cutting the Paper Automatically
You can cut roll paper either manually or automatically.
When removing any jammed paper, cut the paper manually. When loading new paper, you can cut it both manually and automatically.
9 Close the roll feeder gently.
11 Remove the cut paper from the roll feeder.
Cutting the Paper Manually
Cut the roll paper with the paper cutter and rotate the knob to roll back the paper in about 50~mm 2.0".
Move the paper cutter once in either the left or right direction.
When you cut the roll paper with the paper cutter, rotate the knob to roll back the paper slightly.
10 Close the roll feeder gently.
WHEN IS LIT OR BLINKING
The "Add Toner" indicator blinks when toner is running short, and is continuously lit when toner has run out.
Replace the toner cartridge (toner container).
Do not reuse once-used toner because it affects the copy quality.
- You can make some copies even if the "Add Toner" indicator blinks. However, you should replace the toner as soon as possible.
If no toner remains, the "Add Toner" indicator is lit and you cannot make any copy.
WARNING: Do not incinerate toner or toner containers. Toner dust might ignite when exposed to open flames.
Do not store toners where it will be exposed to heat.
- Do not eat or swallow toner, and keep it out of reach of children.
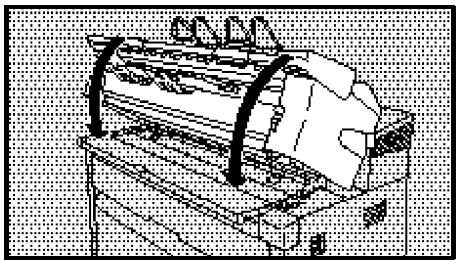
1 Open the original table and manual feed table.
Do not open the image producing unit.
2 Open the toner cartridge cover.
3 Rotate the toner cartridge downward and press it to the right to remove it from the copier.
Dispose of the used toner container according to local regulations.
4 Shake the new toner cartridge lightly five to ten times to remove lumps.
5 Insert the toner cartridge from its left end.
6 Remove the green seal only.

7 Rotate the toner cartridge by pulling up the tab on its right end as shown in the figure on the right.
8 Close the toner cartridge cover.
9 Close the original table and manual feed table.
It takes about a minute to add the toner. A sound might be heard from inside the copier.
MAINTAINING YOUR COPIER
FUNCTIONSTHATCANBERESET. 48
COPY MAGNIFICATION/CUT LENGTH ADJUSTMENT.... 49
DO'S AND DON'TS 51
You can make the copier easier to use by resetting some functions to meet your copying needs. When you want to reset a function, contact your service representative.
You can reset the following functions:
Changing the Auto Reset time
The copier resets itself to the initial settings if it is idle for about 2 minutes during or after copying. This is called "Auto Reset". The auto reset time can be set from 1 to 5 minutes, or it can be turned off.
Copy count up or down
When copying starts, the indicator shows 1 and increments by one each time a copy is made until copying ends. This display can be changed so that it decrements by one (from the set number of copies) to show the number of remaining copies.
Beeper on/off
The beeper heard when the keys are pressed can be disabled.
Disabling the "Auto Image Density" function
By default, the "Auto Image Density" function is used when the copier is turned on. If originals that are not suitable for automatic density adjustment are often copied, the "Auto Image Density" function can be disabled.
Enabling the "lower copy exit"
By default, the "upper copy exit" is selected when the copier is turned on. If paper that is not suitable for the upper copy exit (e.g., A0, 36'' × 48'' / A1, 24'' × 26'' ) is often used, the "lower copy exit" can be enabled.
Enabling the frequently used paper selection
The frequently used paper selection can be enabled to omit the paper selecting operation when the copier is turned on.
Changing the "Auto Image Density"
If copies consistently come out too dark or too light even when the "Auto Image Density" function is selected, the target density of this function can be changed.
COPY MAGNIFICATION/CUT LENGTH ADJUSTMENT
This function adjusts the copy magnification and paper cut length in the paper feed direction.
The copy magnification can be adjusted from -1 to 1% in 0.05% steps and the paper cut length from -10 to 10mm , -0.5 to 0.5'' in 1mm , 0.1" steps.
Press the Enter key until "A.1" appears on the Trailing Edge indicator.
The Trailing Edge indicator blinks. The paper cut length indicator lights.
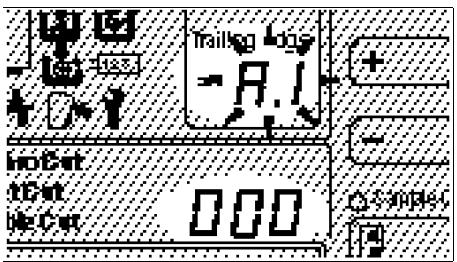
Use the and keys to select an item to be adjusted.
Select "A.1" for the copy magnification adjustment or "A.2" for the paper cut length adjustment.
When you press the Clear/ Stop key, "A.1" is displayed.

Press the Enter key. The Trailing Edge indicator lights. The paper cut length indicator blinks.
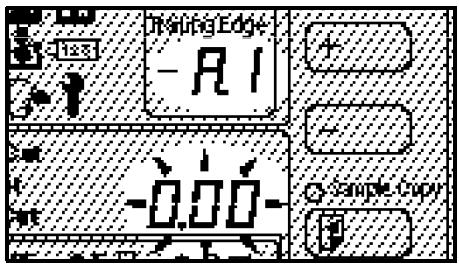
Use the and keys to enter a value to be set.
When you press the Clear/Stop key, "0" is entered for the value to be set.

5 Press the Enter key.
The Trailing Edge indicator blinks. The paper cut length indicator lights.
6 Repeat 2 to 5 for all the settings.
Press the Enter key until "A.1" disappears from the Trailing Edge indicator.
You can also let "A.1" disappear from the Trailing Edge indicator by pressing the Clear Modes key while the indicator is blinking.
DO'S AND DON'TS
Since some parts of the copier are supplied with high electrical voltage, touch only the parts specified in this manual.
While copying, do not turn off the main switch. When you turn off the copier, confirm that all copy runs have finished.
Do not step on or trip on the power cord.
- Do not unplug the power cord even after copying. This copier has the anticondensation heaters to protect the internal parts from dew when the ambient temperature changes. If you unplug the power cord, the anticondensation heaters do not work. However, disconnect the power cord for safety when you will not use the copier for a long period.
- Do not open the original cover, original table, paper path section, and roll feeder during copying. Otherwise, the copier stops a copy run causing a paper jam.
Do not move or slant the copier during copying.
- Do not remove or attach from and to the copier any screws or parts other than those specified in this manual.
Do not allow paper clips, staples, or other small metallic objects to fall inside the machine.
Do not spill water or other liquid on the copier.
Do not lean on the rear cover.
- Do not obstruct the ventilation hole by placing or leaning an object in front of the hole. The ventilation hole protects the temperature from rising inside the copier. If the temperature rises excessively inside the machine, a fault might occur.
To avoid possible build-up ozone, make sure to locate this copier in a large well-ventilated room that has an air turnover of more than 30m^3/hr/person .
- When the main switch is in the Stand-by position, the anticondensation heaters are on. In case of emergency, unplug the machine's power cord. Then contact your service representative.
DAILY MAINTENANCE
If the exposure glass is dirty, you cannot make copies as you want. Clean it if you find it dirty.
When you clean the exposure glass, use the following clothes:
Well-wrung damp cloth
- Dry cloth
For cleaning internal parts other than the exposure glass, contact your service representative.
Do not use any chemical cleaner or organic solvent such as thinner and benzine. If they get into the copier or melt plastic parts, a failure might occur.
1 Wipe the exposure glass with the well-wrung damp cloth.
Do not touch parts other than the exposure glass.
Wipe out moisture on the exposure glass with the dry cloth.
PAPER/TONER
Notes on Paper
Do not set the following paper. Otherwise, a paper jam might occur.
- Bent, folded, or creased paper
- Torn paper
- Perforated paper
- Non-smooth paper
- Slippery paper
- Thin paper that has low stiffness
Do not make a copy on paper with any kind of coating, such as thermosensitive paper, art paper, aluminum foil, and carbon paper. Otherwise, a fault might occur.
If you make a copy on edged paper, the copy might be creased or a part of the image might not be copied.
When you use roll paper, the roll must be black.
When film is delivered from the copier, it is softened due to the fusing heat. Place the film on a flat surface until the remaining heat is removed from the film.
If you make a copy on rough paper, the copy image might be blurred.
- Keep paper away from humidity. Once you unpack the container of paper, store the paper in a polyvinyl bag in the following locations:
- Location free from direct sunlight - Location with the humidity of 70
Flat location % or less
Toner
Store toner cartridges levelly in the following locations:
- Location free from direct sunlight
- Locations the toner could be subjected to temperature of over 35^ C, 95^ F
WARNING: Do not incinerate toner or toner containers. Toner dust might ignite when exposed to open flames.
Dispose of the used toner container according to local regulations.
Do not store toner where it will be exposed to heat.
□ Do not eat or swallow toner, and keep it out of reach of children.
WHERE TO PUT YOUR COPIER
This section shows the precautions you should follow when you move the copier if your office changes the equipment layout or moves to another location.
When you move the copier, contact your service representative.
Installation Conditions
Install the copier in a location with the following range of temperature and humidity. Otherwise, the copier might not operate properly or the main frame might be deformed.
- Temperature: 10 - 30^ C
- Humidity: 15 - 90 %
Even when the temperature and humidity fall within the ranges above, do not install the copier in the following locations:
- Location subject to direct sunlight
- Location near a heater, cooler, or humidifier
For customers using an ultrasonic humidifier
If you use tap or well water for an ultrasonic humidifier, impurities contained in the water become white powder and settle on the internal parts of the copier causing copies to be dirty. In particular, when you use the humidifier continuously for a long time, a humidifier demineralizer is recommended.
Install the copier on a flat, stable floor or base. If the floor or base is slant, you cannot make copies properly. The copier must be level within 5 mm both front to rear and left to right. If the copier is not stabilized, it might cause a fault as well as a danger to users.
- Avoid a location subject to vibrations, such as near a factory. Otherwise, a fault might occur due to the vibrations.
To avoid a possible build-up of ozone, make sure to locate this copier in a large well ventilated room that has air turnover of more than 30m^3/hr/person .
Install the copier in a location free from dust. If dust gets into the copier, a fault might occur.
When you install the copier near another electronic equipment, they might affect each other. In particular, when the copier is placed near a television or radio, their programs might be hampered by noises. In such a case, take the following actions:
- Leave enough space between the copier and the television or radio.
- Reorient the television or radio antenna.
- Use two outlets separately for the copier and the television or radio.
Disposal
When you want to dispose of the copier, contact your local dealer or service representative.
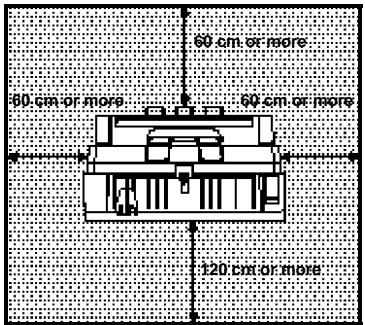
Space Required for Installing the Copier
Leave enough space around the copier. This space is necessary for you to operate the copier or a service representative to work.
Power Connection

WARNING: Only connect the copier to the power source described on the inside front cover of this manual. Avoid multi-wiring as it could cause an electric shock or a fire.
Avoid using an extension cord. Make sure the wall outlet is near the copier and freely accessible so outlet is near the copier and freely accessible so that in event of an emergency it can be unplugged easily.

WARNING: Do not damage, break or ake any modifications to the power cord. Do not place heavy objects on it, pull it hard or bend it more than necessary. These actions could cause an electric shock or fire.

WARNING: Do not plug or unplug the power cord with wet hands or an electric shock might occur.
SPECIFICATIONS
SPECIFICATIONS 60
OTHER OPTIONS 62
SPECIFICATIONS
Spirio 700W
| Configuration | Console | |
| Scanning | Original moving over a fixed fiber optics array | |
| Photosensitivity Type | OPC drum | |
| Copy Process | Dry electrostatic transfer system | |
| Development | Dry two-component magnetic brush system | |
| Fusing | Heating roll system (oilless) | |
| Originals | Sheet | |
| Original Size | Maximum: 914(W) × 3,600(L) mm, 36" × 142"(Maximum width that can be fed: 960 mm, 37.8")Minimum: B5☐ | |
| Copy Size | Maximum: 914(W) × 3,600(L) mm, 36" × 142"Minimum: B5☐ | |
| Warm-up Time | Within 6 minutes | |
| First Copy | Within 18 seconds (A1☐) | |
| Copying Speed | 5.4 meters/minute, 3 cpm/A0, 7.5 cpm/A1 | |
| Reproduction Ratio | Fixed: 1:1 ±0.5% | |
| Paper Feed | 2 roll feeders/manual feed | |
| Multi-copy | A0☐ to B5☐: 1 to 10 | |
| Advanced Functions | Auto Image DensityAuto ClearEdge Margin (leading or trailing edge: up to ±99 mm in 1 mm steps)Energy SaverCopy Density Adjustment (26 steps)Paper Type/Roll Width EntryRepeater systemSwitchback (257 to 1,200 mm, 10.2" to 47.2")Rear Table (for originals with thickness of 1 mm or less)Synchro CutVariable Cut (245 to 3,600 mm, 9.6" to 142")Preset Cut (Metric version: 297, 420, 594, 841, 1,189,3,600 mm, Inch version: 12", 18", 24", 36", 48", 142") | |
| Power Source | See inside this manual's front cover. | |
| Power Consumption | Maximum | 1.41 kW |
| Copy cycle condition | 1.36 kW | |
| Warm up condition | 1.21 kW | |
| Stand by condition | 0.1 ~ 1.2 kW | |
| Noise emission: Sound pressure level (The measurements are made according to ISO 7779 at the operator position.) | Roll feed copying: Less than 76 dB (A) | |
| Noise emission: Sound power level (The measurements are made according to ISO 7779.) | Roll feed copying: Less than 65 dB (A) | |
| Dimensions (W × D × H) | 1,230 × 690 × 1,065 mm, 48.5" × 27.2" × 42.0" (excluding the stocker, upper copy guide, and stopper) | |
| Full System Area (W × D) | 1,230 × 870 mm, 48.4" × 34.3" | |
| Weight | 195 kg, 430 lb (with 2 roll feeders) | |
3rd Roll Feeder
| Number of loaded paper rolls | 1 roll |
| Dimensions (W × D × H) | 1,130 × 120 × 330 mm, 44.5" × 4.7" × 13.0" (contained in the main body) |
| Weight | 6.5 kg, 14.4 lb |
OTHER OPTIONS
This copier has the following options in addition to those shown in this manual. For more information, contact your local dealer.
| Product name | Use |
| Paper Spool | When you use several types of roll paper, you can replace the roll paper quickly by setting one paper roll on the paper spool in advance. |
| Manual table guide | Use the guide to keep the copy paper going straight as you feed them into the copier. |

- Note to users in the United States of America
- Warning:
- Note to users in Canada
- Netherlands
- United Kingdom
- Germany
- France
- Spain
- Italy
- INTRODUCTION
- SAFETY INFORMATION
- Safety During Operation
- Examples Of Indications
- Cautions:
- TABLE OF CONTENTS
- COPYING
- WHAT TO DO IF SOMETHING GOES WRONG
- MAINTANING YOUR COPIER
- Edge indicators
- Paper Cut Length indicator
- Cut Select key
- Paper Select key
- Paper Size key
- Fusing Temperature key
- Roll Edge Cut key
- Auto Image Density key
- Clear Modes/Energy Saver key
- Program key
- Edge Margin key
- keys
- Sample Copy key
- Partial Copy key
- Enter key
- / keys
- Copy Counter
- Clear/Stop key
- Darker/Lighter keys
- Indicator Panel
- Emergency Stop key
- BASIC
- Recommended Originals
- Recommended Paper
- Switching the Fusing Temperature
- Setting the Number of Copies (Repeated Copying)
- Adjusting Copy Density
- Switching the Copy Exit
- Setting a Leading/Trailing Edge Margin
- COPYING ONTO ROLL PAPER
- Synchro Cutting
- Preset Cutting
- Variable Cutting
- PARTIAL COPYING
- SAMPLE COPYING
- PAPER TYPE/ROLL WIDTH ENTRY FUNCTION
- USING THE PROGRAM FUNCTION
- Programming a Collection of Copy Settings
- Press the Program key.
- Use the and keys to select a program number for which you store copy settings.
- Press the Enter key.
- Specify values for each setting.
- Recalling Programmed Settings
- COPYING WITH MANUAL FEED
- WHEN THE "WAIT" INDICATOR IS LIT
- IF YOUR COPIER DOES NOT OPERATE AS YOU WANT
- WHEN OR% IS LIT
- When 12 and Are Lit
- When 0.4 ~V and Are Lit
- When Is Lit
- Cutting the Paper Automatically
- Cutting the Paper Manually
- WHEN IS LIT OR BLINKING
- MAINTAINING YOUR COPIER
- Changing the Auto Reset time
- Copy count up or down
- Beeper on/off
- Disabling the "Auto Image Density" function
- Enabling the "lower copy exit"
- Enabling the frequently used paper selection
- Changing the "Auto Image Density"
- COPY MAGNIFICATION/CUT LENGTH ADJUSTMENT
- DO'S AND DON'TS
- DAILY MAINTENANCE
- PAPER/TONER
- Notes on Paper
- Toner
- WHERE TO PUT YOUR COPIER
- Installation Conditions
- For customers using an ultrasonic humidifier
- Disposal
- Space Required for Installing the Copier
- Power Connection
- SPECIFICATIONS
- OTHER OPTIONS
Brand : RICOH
Model : FW 870
Category : Multifunction Printer