CLM001 - Lawn mower G-TECHNOLOGY - Free user manual and instructions
Find the device manual for free CLM001 G-TECHNOLOGY in PDF.


| Brand | G-Technology |
| Model | CLM001 |
| Product Type | Lawn Mower |
| Power Source | Electric Corded |
| Motor Power | 1400 W |
| Cutting Width | 38 cm (15 inches) |
| Cutting Height Adjustment | Central lever, 5 positions (25-75 mm) |
| Grass Collector Capacity | 50 L |
| Mulching Function | Yes, with plug |
| Dimensions (L x W x H) | 78 x 48 x 36 cm |
| Weight | 13.5 kg |
| Cable Length | 15 m |
| Noise Level (LwA) | 94 dB(A) |
| Vibration Level (ah) | 6.5 m/s² |
| Handle Type | Folding, height adjustable |
| Wheels | 4 wheels, 20 cm rear, 15 cm front |
| Safety Features | Blade brake, safety switch, overload protection |
| Maintenance | Blade sharpening, cleaning after use, motor ventilation |
| Repairability | Replacement blade, grass bag, and wheel available |
| Accessories Included | Grass collector, mulching plug, owner's manual |
| Warranty | 2 years (conditional) |
Frequently Asked Questions - CLM001 G-TECHNOLOGY
User questions about CLM001 G-TECHNOLOGY
0 question about this device. Answer the ones you know or ask your own.
Ask a new question about this device
Download the instructions for your Lawn mower in PDF format for free! Find your manual CLM001 - G-TECHNOLOGY and take your electronic device back in hand. On this page are published all the documents necessary for the use of your device. CLM001 by G-TECHNOLOGY.
USER MANUAL CLM001 G-TECHNOLOGY
Model number: CLM001
Mallinumero: CLM001
Modellnummer: CLM001
Modellnummer: CLM001

DRIFTSVEJLEDNING • OPERATING MANUAL KÄYTTÖOHJE • BRUKSANVISNING • BRUKSANVISNING
ORIGINALE INSTRUKTIONER • ORIGINAL INSTRUCTIONS
ALKUPERÄISET OHJEET • ORIGINAL BRUKSANVISNING
ORIGINALINSTRUKTIONER
VIGTIGE SIKKERHEDSFORANSTALTNINGER:

VIGTIGT: LÆS ALLE INSTRUKTIONERNE F∅R ANVENDELSE. GEM INSTRUKTIONERNE TIL FREMTIDIG REFERENCE.

Nick Grey – Inventor, Owner of Gtech
natural_image
Line drawing of a cylindrical object with a circular opening and labeled parts (no text or symbols beyond numbers)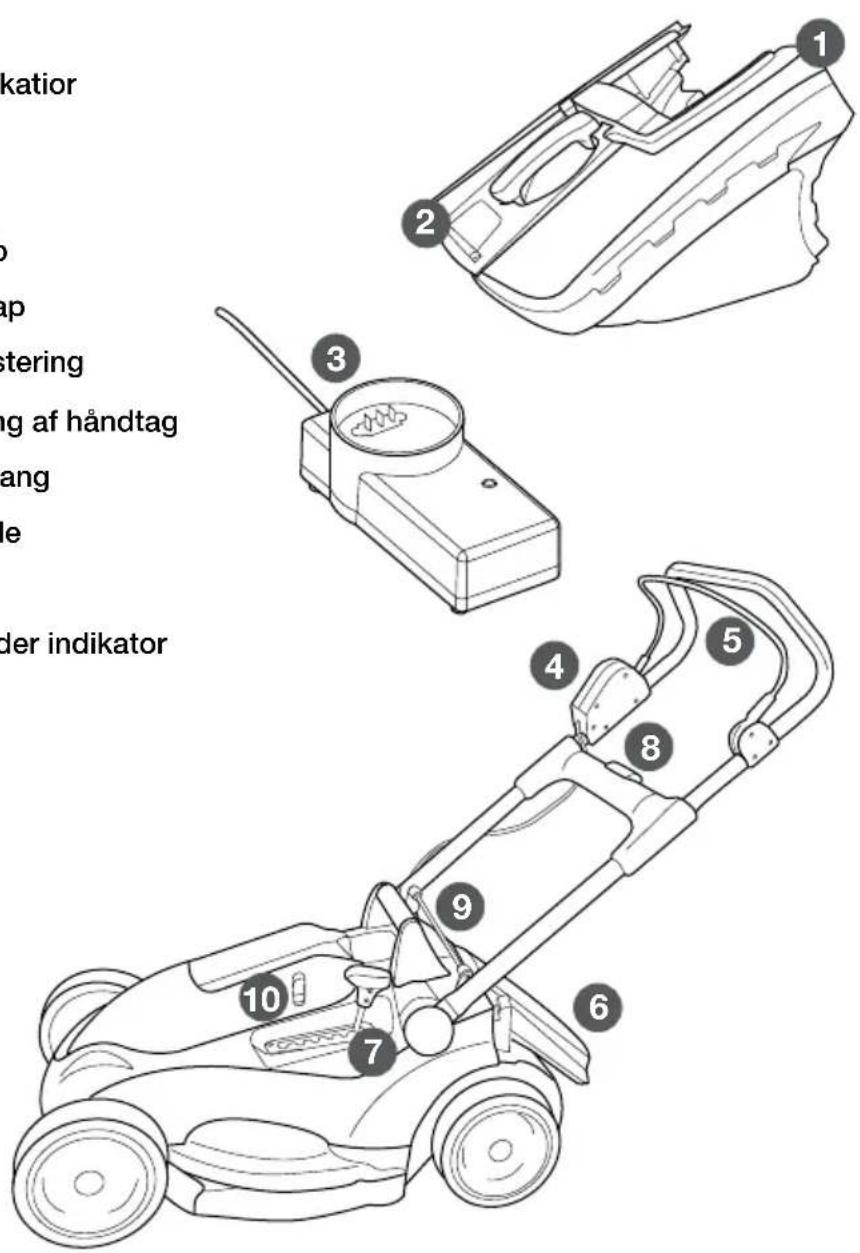
PRODUKT SERIENUMMER:
natural_image
Diagram of a car seatbelt being adjusted for a vehicle, showing the handle and green arrow indicating rotation (no text or symbols present)natural_image
Illustration of a hand using a vacuum cleaner to clean or adjust the device (no text or symbols visible)natural_image
Mechanical component diagram showing a green arrow indicating a directional movement (no text or symbols present)natural_image
Line drawing of a lawn mower with a green directional arrow indicating motion (no text or symbols)natural_image
Diagram of a car interior showing a horizontal bar with green arrows indicating direction (no text or symbols present)natural_image
Line drawing of a lawn mower with a green arrow indicating motion direction (no text or symbols)natural_image
Illustration of hands inserting a green clip into a car seatbelt (no text or symbols)natural_image
Illustration of hands installing or adjusting a device component with a green tab (no text or symbols visible)natural_image
Illustration of a person adjusting a car seatbelt with a green arrow indicating motion (no text or symbols)natural_image
Line drawing of hands using a tool to adjust or install a mechanical component (no text or symbols)natural_image
Line drawing of a hand using a tool to adjust or install a car's seatbelt (no text or symbols present)natural_image
Line drawing of a person using a lawn mower to lift a person's legs (no text or symbols)natural_image
Line drawing of a hand holding a tool over a grid-patterned object on a surface (no text or symbols)natural_image
Illustration of a hand gripping a car seatbelt with green directional arrows indicating movement (no text or symbols)natural_image
Diagram of a hand pressing a green mechanical component on a vehicle (no text or symbols)natural_image
Illustration of a hand placing a green clip into a gray vacuum cleaner's airbag (no text or symbols)natural_image
Illustration of a hand inserting a car seatbelt into a vehicle (no text or symbols)natural_image
Line drawing of a hand using a vacuum cleaner to remove granular material (no text or symbols)natural_image
Illustration of hands inserting a green stripe into a car seatbelt (no text or symbols)For at fjerne batteriet skal du trykke på frigivelsesgrebet på håndtaget, for at åbne for batteriet.

natural_image
Illustration of a hand using a tool to adjust a car seatbelt (no text or symbols visible)natural_image
Line drawing of a handheld device connected to a cable via a plug (no text or symbols)natural_image
Circular mechanical component with green and black segments, no text or symbols visiblenatural_image
Line drawing of a hand pressing down on a car seatbelt, with a green leaf placed on the seat (no text or symbols)natural_image
Illustration of a person using a lawn mower device to adjust the seat area (no text or symbols visible)natural_image
Diagram of a car seatbelt switch mechanism with green directional arrows indicating movement (no text or symbols present)natural_image
Line drawing of a lawn mower with a green arrow indicating clockwise motion (no text or symbols)natural_image
Line drawing of a person using a small cart with a handle, viewed from the side (no text or symbols)natural_image
Line drawing of a hand using a tool to adjust or install a car wheel (no text or symbols present)pie
| Range | Percentage | | ----------- | ---------- | | 100% - 60% | 60% | | 60% - 30% | 30% | | 30% - 10% | 10% | | 10% - 1% | 1% |Spare parts can be purchased from your local distributor (see contact details on the back of this manual).
Fejlfinding
Do not use in rain or leave outdoors whilst raining.

WARNING: Basic safety precautions should always be observed when using an electrical appliance to reduce the risk of fire, electrical shock or serious injury.
Personal Safety:
- Only use the mower on grass and lawns, as described in this manual.
- Keep out of reach of children and animals at all times.
- Only use in daylight or good artificial light.
- Do not use while there are other people, especially children, nearby.
- Stay alert, watch what you are doing and use common sense when operating the mower.
- Do not use the mower while you are tired or under the influence of drugs, alcohol or medication. This may result in serious personal injury.
• Always be aware of your surroundings and stay alert for possible hazards.
- Use protective personal equipment such as safety glasses, non-skid safety shoes, sturdy gloves to reduce the risk of personal injury.
- Do not operate when barefoot or wearing open toed shoes.
- Dress appropriately. Do not wear loose clothing or jewellery and keep hair, clothing and gloves away from moving parts.
- Mow across slopes, not up and down, taking care when changing direction.
• Always be sure of your footing on slopes or in slippery conditions.
- Do not use on excessively steep slopes.
• Take particular care when reversing with the mower or pulling it towards you.
- Never touch the rotating blade.
- Do not stand in front of the protective flap when opened.
- Do not open the protective flap while the motor is running.
- Never operate the mower over gravel, as this risks flicking stones.
- Check the area where the mower is to be used and remove any objects that could jam or be thrown by the mower, such as stones and sticks.
- Avoid operating the mower on wet grass.
- Check the grass box regularly for any wear and deformation.
- Do not use the mower without the grass box or other protective guards in place.
- Never operate the mower with damaged guards or without the guards in place.
- Visually check the cutting tools and their fasteners for any damage before each use.
- To prevent imbalance, any damaged or worn-out parts should be replaced in sets only.
- When operating the mower ensure that both hands are correctly positioned on the handle.
- Only start the mower when your feet are a safe distance from the cutting blade.
- Do not tilt the mower when starting the motor.
- Do not operate the mower if it is incomplete or has unauthorised modifications.
- Keep all body parts, especially hands and feet, away from the blade at all times.
- Warning, the blade will continue to move after the motor is switched off.
- Ensure that the blade has fully stopped and activation key has been removed before :
- leaving the mower
- clearing a blockage
- adjusting the cutting height
- emptying the grass box
- lifting or carrying the mower
- tilting the mower to move
- checking or cleaning the mower
- carrying out any maintenance
- If the mower vibrates intensively, stop the motor fully and identify the cause.
- The operator is responsible for accidents or hazards occurring to other people at their property.
- This appliance is not intended for use by persons (including children) with reduced physical, sensory or mental capabilities or lack of experience or knowledge.
- Never modify the mower in any way.
Electrical safety:
- Do not operate the mower in explosive atmospheres, such as in the presence of flammable liquids, gases or dust. Mowers create sparks, which may ignite the dust and fumes.
- Do not use the mower when a thunderstorm is approaching.
- Avoid body contact with earthed or grounded surfaces, such as pipes. There is an increased risk of electric shock if your body is earthed or grounded.
- Do not expose the mower to rain or wet conditions.
- Do not handle the charger or the mower with wet hands.
- Before charging check the power supply and charger cables for signs of damage or ageing.
- Do not expose the mower to temperatures exceeding 80°C/176°F, or leave the mower in direct sunlight or in the hot boot of a car for prolonged periods.
Battery safety:
- Do not attempt to use the charger with any other product or to charge this product with any other charger.
- Do not use the charger in moist or wet conditions or outdoors.
- Disconnect the cable connectors by pulling the plug only, never the cable.
- Do not use a damaged charger.
- Never cover the ventilation slots.
- Never open the charger. In case of defect, contact Gtech.
- This product contains Li-Ion batteries. Do not incinerate batteries or expose to high temperatures, as they may explode.
- Do not charge the battery when the surrounding air temperature or the battery pack is below 0°C/32°F or above 40°C/104°F.
• After heavy use or in high temperatures the battery may become warm. Allow the product to cool for 30 minutes before charging.
- Use only with the battery pack supplied.
- Leaks from battery cells can occur under extreme conditions. If the liquid gets on your skin wash immediately with soap and water. If the liquid gets into your eyes, flush them immediately with cold water for a minimum of 10 minutes and seek urgent medical attention.
- Protect the battery against excessive temperatures and fire.
- Do not store the battery outside for prolonged periods of time over the winter months.
- Do not dispose of the battery pack into household waste, fire or water. Battery pack should be collected, recycled or disposed of in an environmentally friendly manner. Discharge your battery pack by operating your Cordless Lawn Mower. Remove the battery pack from the housing and cover the battery pack connections with heavy duty ventilation tape to prevent a short circuit and energy discharge. Do not attempt to open or remove any of the components.
Service:
- Do not use the mower if the switch does not turn it on or off. Any power tool that cannot be controlled by the switch is dangerous and must be removed or replaced.
- Before any servicing and cleaning take out the activation key and remove the battery.
- Check all visible fixing screws and nuts, especially on the cutter bar, to ensure they are tightened properly.
- Do not keep the mower in a damp room.
- Before using the the mower and after any impact, check for signs of wear and damage and repair or replace as necessary.
- Use only genuine replacement parts. This will ensure that the safety of the the mower is maintained.
- Do not attempt to repair any damaged parts on the mower unless you are qualified to do so.
Intended Use:
- This product is intended for DOMESTIC USE ONLY.
Warning Label Descriptions
 | Warning/Caution. |  | Remove activation key before servicing and cleaning. |
 | Beware of servering toes or hands.Do not put hands or feet near a rotating blade. | 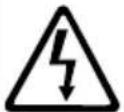 | Dangerous voltage. |
 | Read the instruction manual. | 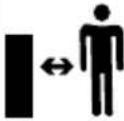 | Keep bystanders at a safe distance (at least 5m). |
 | Caution: Wait until blades stop rotating when stopped. |  | Always keep the lawnmower on the ground when mowing.Tilting or lifting the lawnmower may cause stones to be thrown out. |
 | Do not mow in the rain or leave the lawnmower outdoors while raining. |  | Do not dispose of Li-lon battery with general household waste. |
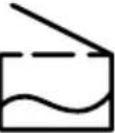 | Grass bin empty. Grass bin full. |  | |
 | Guaranteed Sound Power Level | ||
- Please read this manual carefully. Familiarise yourself thoroughly with the controls and proper use of this machine. You should know how the machine works and how to immediately switch it off.
- Never let children use this mower. Never let adults work with this mower if not properly trained.
- Do not let any persons, especially small children or pets near you while mowing.
• Take care not to slip or fall while mowing.
Thank you for choosing a Gtech Cordless Lawn Mower.
"I started Gtech to create sensible, easy to use products, which do a great job. Your opinion is important to us. Please take the time to write a review of the Cordless Lawn Mower on the website of the store you bought it from. We will use your feedback to improve our products and services and let other people know what it's like to be part of the Gtech family."
Nick Grey – Inventor, Owner of Gtech
What's in the box
1 Grass Box
2 Filling indicator
3 Charger
4 Starter Release Button
5 Activation Lever
6 Protective Flap
7 Cutting Height Adjustment
8 Handle Adjustment Button
9 Handle Latch Bar
10 Activation Key
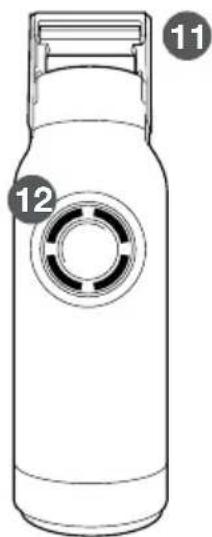
11 Battery
12 State Of Charge Indicator
natural_image
Line drawing of a cylindrical object with a circular opening and labeled parts (no text or symbols beyond numbers)
PRODUCT SERIAL NUMBER:
You can find this on the label in the battery cradle.
Assembly
natural_image
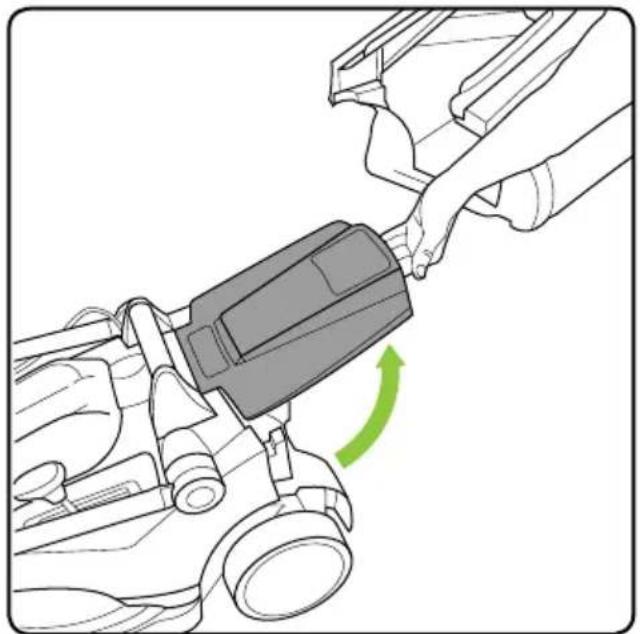
Diagram of a hand inserting a device into a vehicle's seatbelt, showing green motion direction (no text or symbols)Lift the flap at the rear of the mower.

natural_image
Illustration of a hand using a green tool to clean or adjust a mechanical device (no text or symbols visible)Holding the grass box by the green handle, attach it to the back of the mower.
natural_image
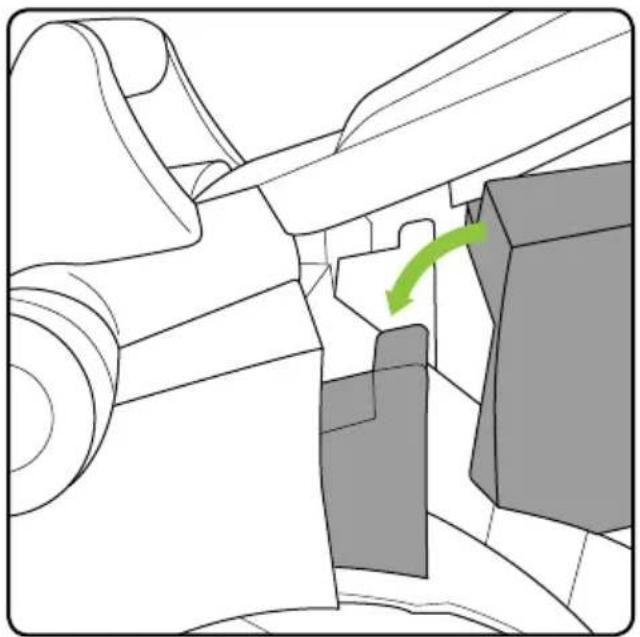
Mechanical component diagram showing a green arrow indicating a directional movement (no text or symbols present)Ensure the front edges of the grass box hook over the points at the back of the mower.

natural_image
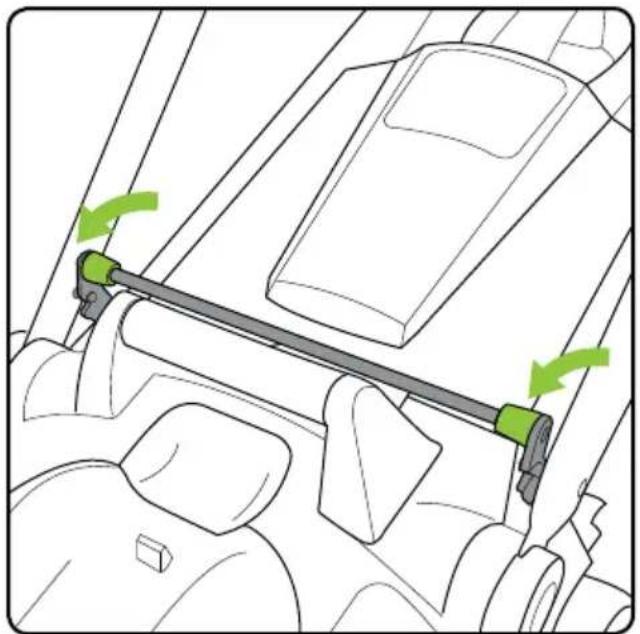
Line drawing of a lawn mower with a green directional arrow indicating rotational motion (no text or symbols)Swing the handle back into the operating position. There is no latch to undo.
Assembly
natural_image
Diagram of a car's seatbelt mechanism with green arrows indicating clockwise motion (no text or symbols)When in the correct position, the handle will click into place.

natural_image
Line drawing of a lawn mower with a green directional arrow indicating motion (no text or symbols)Pull the handle upwards until it clicks into place. The mower will not start unless the handle is fully extended.

natural_image
Illustration of hands installing a green component into a car seat (no text or symbols visible)Place the battery in the cradle on top of the mower, base first.

natural_image
Illustration of hands installing or adjusting a device into a control panel (no text or symbols visible)Push the battery until it clicks into place.
Operating the Cordless Lawn Mower

natural_image
Illustration of hands adjusting a car seatbelt with a green arrow indicating motion (no text or symbols)To operate the mower, press and hold the green saftey button and pull the lever under the handle.

natural_image
Line drawing of a person using a tool to lift a vehicle (no text or symbols)When you press the lever to the handle, the mower will start. When you release the lever, the mower will stop.
Adjusting the cutting height
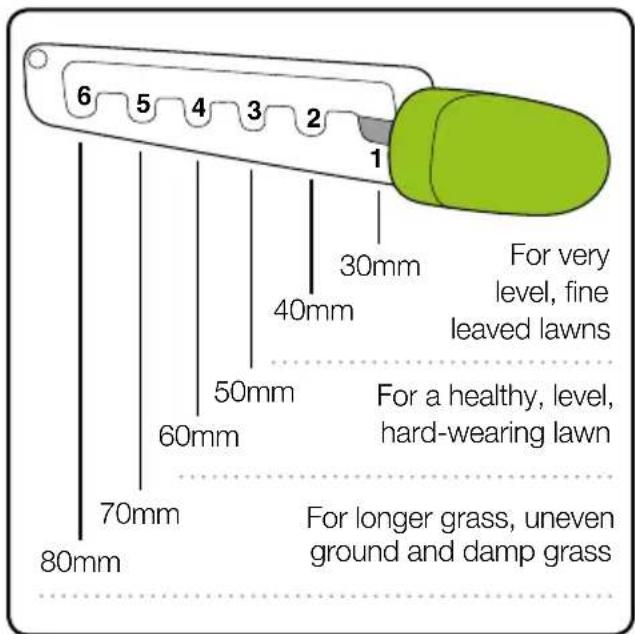
The mower has 6 cutting-height settings between 30mm and 80mm.
Note that the 30mm and 40mm settings will scalp uneven lawns and reduce your lawn's resistance to wear and drought.
natural_image
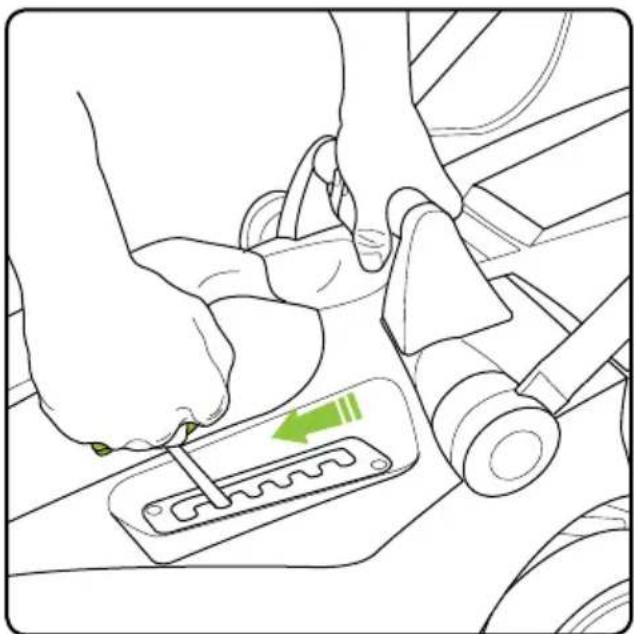
Line drawing of a hand using a tool to press a car's seatbelt, with no text or symbols present.To adjust the height, hold the lever firmly and move it into the notch required. When cutting on uneven ground, it is suggested you test the cutting height on a small patch of grass, to avoid cutting too deep and creating bald patches.
Using the Cordless Lawn Mower
natural_image
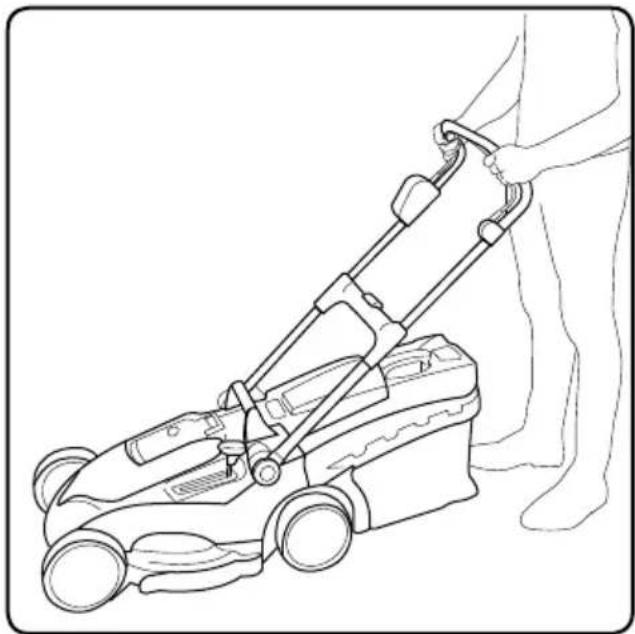
Line drawing of a person using a lawn mower to lift a person's legs (no text or symbols)Push the mower along at a walking pace when mowing.

natural_image
Line drawing of a hand holding a tool over a grid-patterned object on a surface (no text or symbols)When the filling indicator flap opens it is time to empty the bin. Note: If the bin over-fills, the grass chute will clog and the flap will close again. If the grass chute clogs remove the battery and ensure the blade has completely stopped spinning before clearing the grass from the chute.
Removing the activation key

natural_image
Illustration of a hand pressing down on a car seatbelt, with green arrows indicating the grip and seat area (no text or symbols)The mower will not work without the activation key, which is a safety feature. Remove the key before you carry out any maintenance, clear any grass, carry the mower or put your hands near the blade.

natural_image
Diagram of a hand pressing a green mechanical component on a vehicle (no text or symbols)To remove the key, pinch the top parts together and pull the key out.
Removing and emptying the grass box

natural_image
Illustration of a hand placing a green clip into a gray vacuum cleaner's airbag (no text or symbols)Lift the flap at the rear of the mower and hold onto the green handle attached to the grass box.

natural_image
Illustration of a hand inserting a device into a vehicle's seatbelt, with green arrows indicating direction (no text or symbols)Whilst still lifting the flap, pull the grass box towards you to remove it from the mower.
natural_image
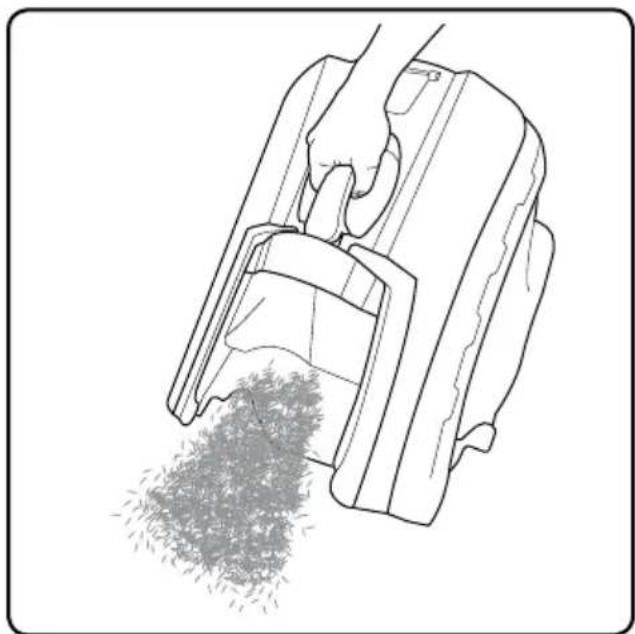
Line drawing of a hand using a vacuum cleaner to remove granular material from a device (no text or symbols)Empty the grass cuttings from the grass box.

WARNING: To reduce risk of personal injury, wait for the blade to stop rotating and remove the activation key before emptying the grass box.
Charging the battery

natural_image
Illustration of hands interacting with a device component, showing a green clip inserted into the handle (no text or symbols visible)To remove the battery push the release lever in the handle to unlock the battery.

natural_image
Illustration of a hand using a tool to adjust a car seatbelt (no text or symbols visible)Then remove the battery from the cradle by the handle.

natural_image
Line drawing of a spray bottle connected to a cable via tubing (no text or symbols)Place the battery onto the charging unit. Plug in the charger and switch it on.

natural_image
Circular mechanical component with green and black segments, no text or symbols visibleWhile charging, the LEDs will progressively pulse until all four are lit. When the battery is fully charged the LEDs will turn off and the charger LED will flash.
This should take up to 5 hours.

WARNING:
Do not store the battery outside for prolonged periods of time over the winter months.
Collapsing the handle for storage
natural_image
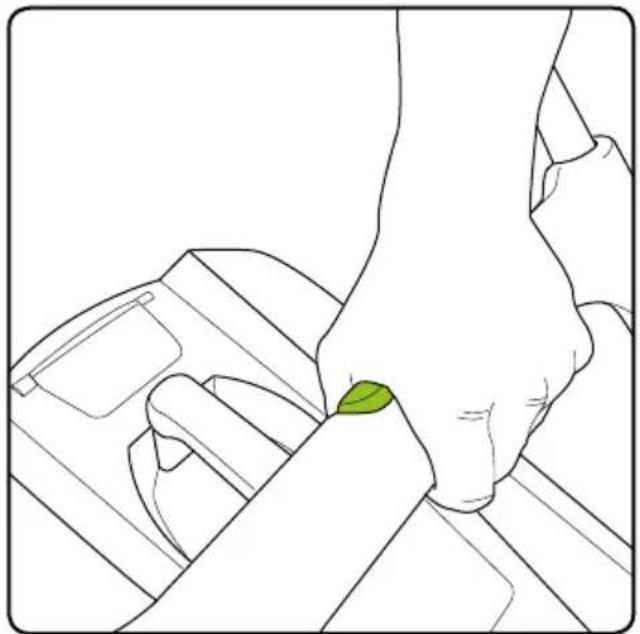
Line drawing of a hand pressing down on a car seatbelt, with a green leaf marking the point of the seat (no text or symbols)To collapse the extended handle, depress the green button on the mid cross-bar.

natural_image
Illustration of a person using a lawn mower device to adjust equipment (no text or symbols visible)Whilst holding the green button down, push the handle in.
Stowing the handle

natural_image
Diagram of a car seatbelt switch mechanism with green directional arrows indicating movement (no text or symbols present)To release the handle, pull back the handle latch bar.
natural_image
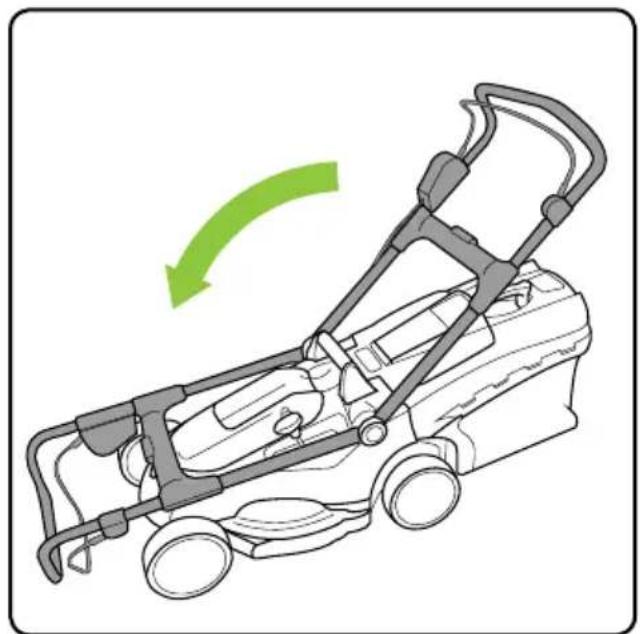
Line drawing of a lawn mower with a green arrow indicating rotational motion (no text or symbols)Fold the handle over the body of the mower.
Carrying the Cordless Lawn Mower

natural_image
Line drawing of a person using a small cart with a handle, no text or symbols presentBefore carrying the mower, make sure the activation key is removed to avoid starting it accidentally. The easiest way to carry the mower is by the middle carry handle and the front of the mower.

natural_image
Line drawing of a hand using a tool to adjust or install a car wheel (no text or symbols present)There is a hand-hold under the front of the mower.
State of charge

pie
| Range | Percentage | | ----------- | ---------- | | 100% - 60% | 60% | | 60% - 30% | 30% | | 30% - 10% | 10% | | 10% - 1% | 1% |To find out how much charge there is in the battery press the button in the centre of the state-of-charge display. The number of lit LEDs shows the charge.

Wear protective gloves when handling, cleaning or replacing the blade.

To reduce the risk of injury ensure that activation key is removed when the mower is not in use, being transported, handled or stored.
To ensure that your Cordless Lawn Mower gives you long and reliable service, carry out the following maintenance regularly:
- Check for obvious defects such as loose, dislodged, worn or damaged blade, loose fixings, and worn, damaged, or loose parts.
- Check that covers and guards are correctly fitted and undamaged.
- Always clean the cutting blade after use and apply a lubricating oil or spray before storage.
- Before use check the condition of the cutting edges of the blade and that the blade fixings are secure.
- Do not use water, solvents, or polishes to clean the mower. Wipe clean with a dry cloth.
- Do not use abrasive materials to clean the product, and do not immerse it in water.
- Store in a secure, dry place, out of reach of children. Do not expose to moisture.
PLEASE NOTE: If the product needs to be repaired or replaced only use replacement parts supplied by the manufacturer.
Spare parts can be purchased from your local distributor (see contact details on the back of this manual).
Troubleshooting
| Motor not running 1. Charge battery | 2. Check activation key is inserted3. Check switch operation4. Check handle is fully extended |
| Irregular running, machine vibrating strongly | 1. Blade may be defective2. Blade may be loose |
| Poor cutting /collection performance 1. | Empty/unblock grass box2. Charge/check battery3. Cutting height may need adjusting4. Blade may be blunt |
| Mower leaves cut grass on lawn 1. Check and clear the grass chute2. Clean the bin fabric | |
| Struggling to cut / jamming 1. Push slower | 2. Increase cut height3. Check for a build up of grass |
| Charger flashing red (slow) Battery too hot. Allow to cool | |
| Charger flashing red (rapid) Battery fault. Call Gtech | |
If this doesn't solve your problem don't worry, we will help. Details for your local distributor are on the back of this manual.
GTECH CORDLESS LAWN MOWER TECHNICAL SPECIFICATION
| Voltage 36V | |
| Battery capacity 4 Ah Li-Ion | |
| Blade speed 3,700 rpm | |
| Grass box capacity 40 litres | |
| Charge time 5 hours | |
| Cutting Width 430mm | |
| Cutting height adjustment 30mm – 80mm | |
| Protection type IP 21 | |
| Measured sound power level | Lwa 91.0 dB(A) *K=2.19 dB(A) |
| Guranteed sound power level | Lwa 96 dB(A) |
| Sound pressure level | L_PA 80.7 dB(A) *K=3 dB(A) |
| Vibration | 0.53 m/s2 *K=1.5m/s2 |
| Weight | 16.95kg |
| Charger INPUT | 100V-240V~50/60 HZ 50W |
| Charger output voltage | 42V DC ---- 1A |
WARRANTY - TERMS AND CONDITIONS
If your Gtech product breaks during the first 2 years, don't worry, we will mend it for you.
Contact your local distributor for assistance.
WHAT ISN'T COVERED SUMMARY
Gtech or its authorised agents does not guarantee the repair or replacement of a product as a result of:
• Normal wear and tear.
- Accidental damage, faults caused by negligent use or care, misuse, neglect, careless operation or handling of the product which is not in accordance with the product operating manual.
- Use of the product for anything other than normal domestic purpose.
- Use of parts and accessories which are not Gtech genuine components.
- Faulty installation (except where installed by Gtech or its authorised agents).
- If it is modified in any way.
- Repairs or alterations carried out by parties other than Gtech or its authorised agents.
- The guarantee becomes effective at the date of purchase (or the date of delivery if this is later).
- You must provide proof of delivery/purchase before any work can be carried out on the product. Without this proof, any work carried out will be chargeable. Please keep your receipt or delivery note.
- All work will be carried out by Gtech or its authorised agents.
- Any parts that are replaced will become the property of Gtech.
- The repair or replacement of your product is under guarantee and will not extend the warranty period.
- The guarantee provides benefits which are additional to and do not affect your statutory rights as a consumer.
Environmental and Product Recycling
The symbol indicates that this product is covered by legislation for waste electrical and electronic products (EN2002/96/EC)
When the product has reached the end of its life please do not dispose of it with general household waste. Consider the environment and take it to a recognised recycling facility.
The product contains a Li-Ion battery which should not be disposed of with general household waste. The battery should be disposed of properly with the product at a recycling facility.
Call your local council, civic amenity site, or recycling centre for information on the disposal and recycling of electrical products.

EC Declaration of Conformity
We, manufacturer/importer
Grey Technology Ltd
1&2 Cupola Court
Spetchley
Worcestershire
WR5 1RL
declare that the product
CLM001 Cordless Lawn Mower
complies with the essential health and safety requirements of the following directives:
2006/42/EC - Machinery Directive
2014/35/EC - Low Voltage Directive LVD
2014/30/EC - Electromagnetic Compatibility Dir ective EMC
2011/65/EU - RoHS Directive
Technical documentation holder:
Grey Technology Ltd, 1&2 Cupola Court, Spetchley, Worcestershire, WR5 1RL
Standards and technical specifications referred to:
EN 60335-1: 2012+A11:2014
EN 60335-2-77: 2010
EN 60335-2-29: 2004 /+A2:2010
EN 62233: 2008
EN 55014-1: 2006/+A1:2009/+A2:2011
EN 55014-2: 1997/+A1:2001+A2:2008
EN 61000-3-2: 2014
EN 61000-3-3: 2013
EN 62321: 2009
2000/14/EC & Annex VI, 2005/88/EC
Measured sound power level Lwa 91.0 dB(A)
*K=2.19 dB(A)
Guaranteed sound power level Lwa 96 dB(A)
Notified body of Noise directive:
natural_image
Line drawing of a cylindrical object with a circular opening and labeled parts (no text or symbols beyond numbers)
natural_image
Diagram of a hand inserting a device into a vehicle's seatbelt, showing green motion direction (no text or symbols)natural_image
Illustration of a hand using a vacuum cleaner to clean the air (no text or symbols present)natural_image
Mechanical component diagram showing a green arrow indicating rotational motion (no text or symbols present)natural_image
Line drawing of a lawn mower with green directional arrow indicating motion (no text or symbols)natural_image
Diagram of a car's seatbelt mechanism with green arrows indicating clockwise motion (no text or symbols)natural_image
Line drawing of a lawn mower with a green arrow indicating motion direction (no text or symbols)natural_image
Illustration of hands inserting a green cable into a device compartment (no text or symbols visible)natural_image
Illustration of hands installing or adjusting a device into a control panel (no text or symbols visible)natural_image
Illustration of a person adjusting a car seatbelt with a green arrow indicating the motion (no text or symbols present)natural_image
Line drawing of a hand gripping a mechanical component (no text or symbols)natural_image
Line drawing of a hand using a screwdriver to adjust a car's seatbelt (no text or symbols)natural_image
Line drawing of a person using a lawn mower to lift a person's legs (no text or symbols)natural_image
Line drawing of a hand holding a tool over a grid-patterned object on a surface (no text or symbols)natural_image
Illustration of a hand pressing down on a car seatbelt, with green arrows indicating the grip and seat area (no text or symbols)natural_image
Diagram of a hand pressing a green mechanical component on a vehicle (no text or symbols)natural_image
Illustration of a hand placing a green clip into a gray vacuum cleaner's airbag (no text or symbols)natural_image
Illustration of a hand inserting a device into a vehicle's seatbelt, with green arrows indicating direction (no text or symbols)natural_image
Line drawing of a hand using a vacuum cleaner to remove granular material (no text or symbols)natural_image
Illustration of hands inserting a green stripe into a car seat (no text or symbols)natural_image
Illustration of a hand using a tool to adjust a component on a vehicle (no text or symbols visible)natural_image
Line drawing of a spray bottle connected to a cable via a plug, with no text or symbols present.natural_image
Circular mechanical component with green and black segments, no text or symbols visiblenatural_image
Line drawing of a hand pressing down on a car seatbelt, with a small green leaf highlighted (no text or symbols)natural_image
Illustration of a person using a lawn mower device to adjust the seat area (no text or symbols visible)natural_image
Diagram of a car's seatbelt mechanism with green directional arrows indicating movement (no text or symbols)natural_image
Line drawing of a lawn mower with a green arrow indicating clockwise motion (no text or symbols)natural_image
Line drawing of a person using a small cart with a handle, no text or symbols presentnatural_image
Line drawing of a hand using a tool to adjust or install a car wheel (no text or symbols present)pie
| Range | Percentage | | ----------- | ---------- | | 100% - 60% | 60% | | 60% - 30% | 30% | | 30% - 10% | 10% | | 10% - 1% | 1% |natural_image
Line drawing of a cylindrical object with a circular opening and labeled parts (no text or symbols beyond numbers)
PRODUKTETS SERIENUMMER:
natural_image
Diagram of a car seatbelt being adjusted for a vehicle, showing the handle and green arrow indicating rotation (no text or symbols present)natural_image
Illustration of a hand using a vacuum cleaner to clean or adjust the device (no text or symbols visible)natural_image
Mechanical component diagram showing a green arrow indicating a directional movement (no text or symbols present)natural_image
Line drawing of a lawn mower with green directional arrow indicating motion (no text or symbols)natural_image
Diagram of a car interior showing a horizontal bar with green arrows indicating direction (no text or symbols present)natural_image
Line drawing of a lawn mower with a green arrow indicating motion direction (no text or symbols)natural_image
Illustration of hands inserting a green stripe into a car seatbelt (no text or symbols)natural_image
Illustration of hands using a handheld device to adjust a component (no text or symbols visible)natural_image
Illustration of a person adjusting a car seatbelt with a green arrow indicating motion (no text or symbols)natural_image
Line drawing of hands operating a mechanical device with a handle (no text or symbols)Når du trekker på spaken mot håndtaket, starter klipperen. Når du slipper spaken, stopper klipperen.
natural_image
Line drawing of a hand using a car brake lever to adjust the wheel (no text or symbols present)natural_image
Line drawing of a person using a lawn mower to lift a person's legs (no text or symbols)natural_image
Line drawing of a hand holding a tool over a grid-patterned object on a surface (no text or symbols)natural_image
Illustration of a hand pressing down on a car seatbelt, with green arrows indicating the grip and seat area (no text or symbols)natural_image
Diagram of a hand pressing a green mechanical component on a vehicle (no text or symbols)natural_image
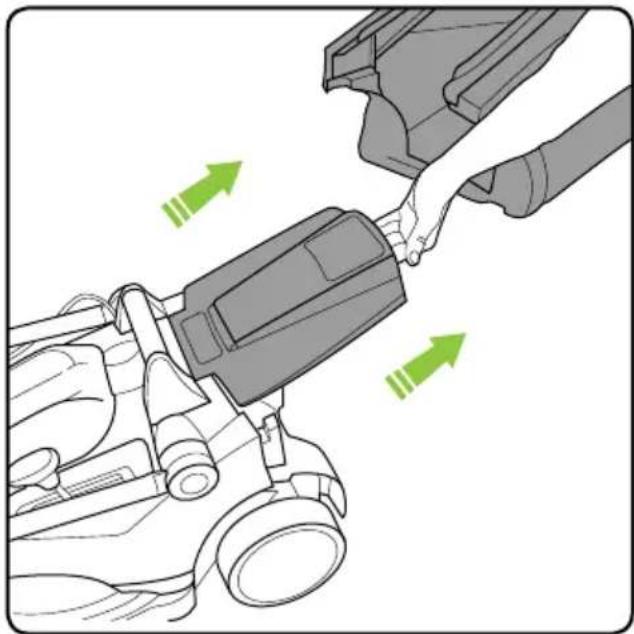
Illustration of a hand placing a green clip into a gray vacuum cleaner's box (no text or symbols)Løft klaffen bak på klipperen og hold i det grønne håndtaket festet til gressbeholderen.
natural_image
Illustration of a hand inserting a car seatbelt into a vehicle (no text or symbols)natural_image
Line drawing of a hand using a vacuum cleaner to clean granular material (no text or symbols)natural_image
Illustration of hands using a tool to adjust a component on a vehicle (no text or symbols visible)natural_image
Illustration of a hand using a tool to adjust or install a component on a vehicle (no text or symbols visible)natural_image
Line drawing of a spray bottle connected to a cable via a plug, with no text or symbols present.natural_image
Circular mechanical component with green and black segments, no text or symbols visiblenatural_image
Line drawing of a hand pressing down on a car seatbelt, with a small green leaf highlighted (no text or symbols)natural_image
Illustration of a person using a lawn mower device with a green directional arrow indicating motion (no text or symbols present)Mens du holder den grønne knappen nede, skyv håndtaket inn.
Stuing av håndtaket

natural_image
Diagram of a car seatbelt switch mechanism with green directional arrows indicating movement (no text or symbols present)håndtaksutlöseren.

natural_image
Line drawing of a lawn mower with a green arrow indicating rotational motion (no text or symbols)natural_image
Line drawing of a person using a small cart with a handle, viewed from the side (no text or symbols)natural_image
Line drawing of a hand using a tool to adjust or install a car wheel (no text or symbols present)Det er et bærehåndtak under fronten av klipperen.
Ladeindikator

pie
| Range | Percentage | | ----------- | ---------- | | 100% - 60% | 60% | | 60% - 30% | 30% | | 30% - 10% | 10% | | 10% - 1% | 1% |natural_image
Line drawing of a cylindrical object with a circular opening and labeled parts (no text or symbols beyond numbers)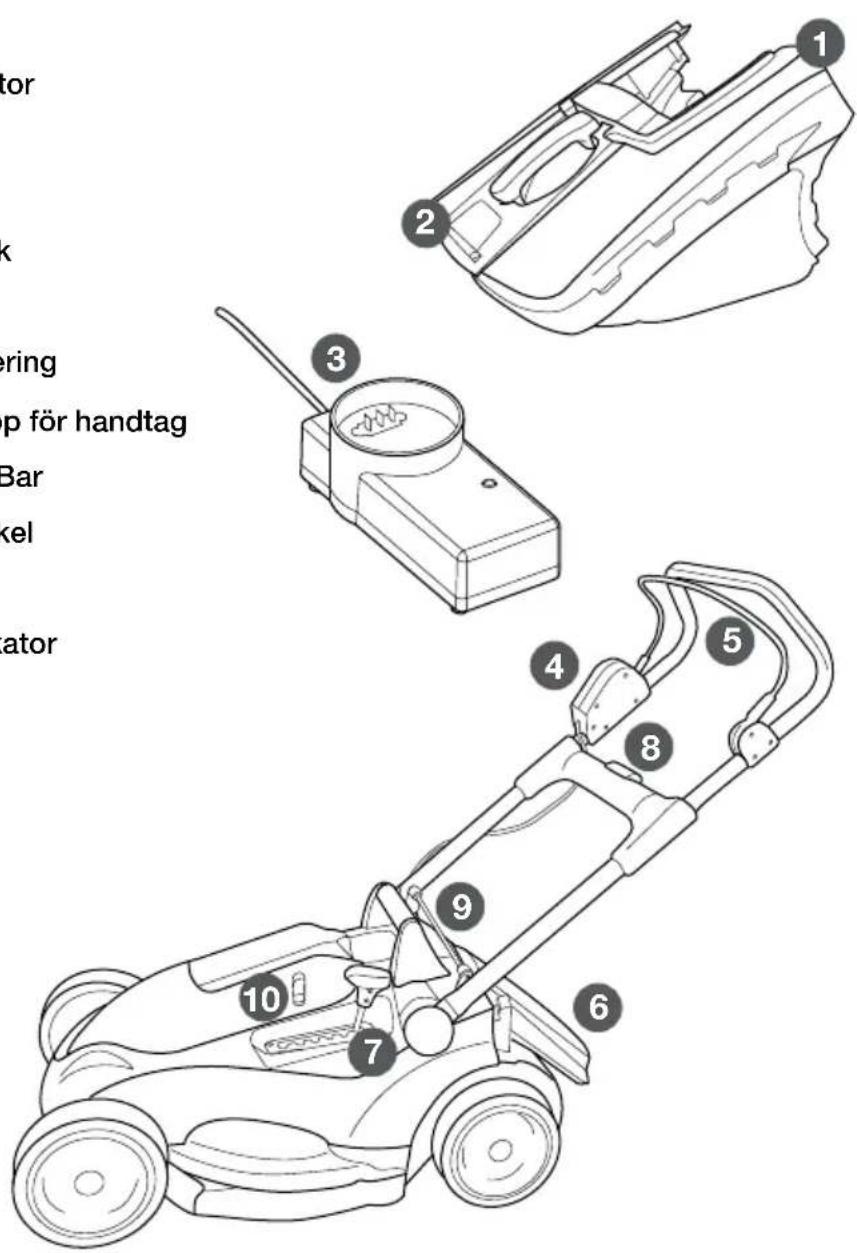
PRODUKTSERIENUMMER:
natural_image
Diagram of a hand inserting a device into a vehicle's seatbelt, showing green motion direction (no text or symbols)natural_image
Illustration of a hand using a green tool to clean or adjust a mechanical device (no text or symbols visible)natural_image
Mechanical component diagram showing a green arrow indicating rotational motion (no text or symbols present)natural_image
Line drawing of a lawn mower with a green directional arrow indicating motion (no text or symbols)natural_image
Diagram of a car's seatbelt mechanism with green arrows indicating clockwise motion (no text or symbols)natural_image
Line drawing of a lawn mower with a green arrow indicating motion direction (no text or symbols)natural_image
Illustration of hands inserting a green cable into a device compartment (no text or symbols visible)natural_image
Illustration of hands installing or adjusting a device into a control panel (no text or symbols visible)natural_image
Illustration of a person adjusting a car seatbelt with a green arrow indicating the motion (no text or symbols present)natural_image
Line drawing of hands operating a mechanical device with a handle (no text or symbols)natural_image
Line drawing of a hand using a tool to adjust a car's seatbelt (no text or symbols present)natural_image
Line drawing of a person using a lawn mower to lift a person's legs (no text or symbols)natural_image
Line drawing of a hand holding a tool over a grid-patterned object on a surface (no text or symbols)natural_image
Illustration of a hand pressing down on a car seatbelt, with green arrows indicating the grip (no text or symbols present)natural_image
Diagram of a hand pressing a green mechanical component on a vehicle (no text or symbols)natural_image
Illustration of a hand placing a green component into a gray device (no text or symbols visible)natural_image
Diagram showing a hand inserting a belt buckle into a vehicle's seatbelt, with green arrows indicating direction (no text or symbols present)natural_image
Line drawing of a hand using a cleaning or dust removal device to remove granular material (no text or symbols)natural_image
Illustration of hands inserting a green stripe into a car seat (no text or symbols)natural_image
Illustration of a hand using a tool to adjust a component on a vehicle (no text or symbols visible)natural_image
Line drawing of a spray bottle connected to a cable via a plug, with no text or symbols present.natural_image
Circular mechanical component with green and black segments, no text or symbols visiblenatural_image
Line drawing of a hand pressing down on a car seatbelt, with a green leaf marking the point (no text or symbols)natural_image
Illustration of a person using a lawn mower device to adjust equipment (no text or symbols visible)natural_image
Diagram of a car's seatbelt mechanism with green directional arrows indicating movement (no text or symbols)handtagsspärren.

natural_image
Line drawing of a lawn mower with a green arrow indicating rotational motion (no text or symbols)natural_image
Line drawing of a person using a small cart with a handle, no text or symbols presentnatural_image
Line drawing of a hand using a tool to adjust or install a car wheel (no text or symbols present)pie
| Range | Percentage | | ----------- | ---------- | | 100% - 60% | 60% | | 60% - 30% | 30% | | 30% - 10% | 10% | | 10% - 1% | 1% |VAD SOM INTE OMFATTAS SAMMANFATTNING


- DRIFTSVEJLEDNING • OPERATING MANUAL KÄYTTÖOHJE • BRUKSANVISNING • BRUKSANVISNING
- VIGTIGE SIKKERHEDSFORANSTALTNINGER:
- VIGTIGT: LÆS ALLE INSTRUKTIONERNE F∅R ANVENDELSE. GEM INSTRUKTIONERNE TIL FREMTIDIG REFERENCE.
- PRODUKT SERIENUMMER:
- Personal Safety:
- Electrical safety:
- Battery safety:
- Service:
- Intended Use:
- Warning Label Descriptions
- Thank you for choosing a Gtech Cordless Lawn Mower.
- What's in the box
- PRODUCT SERIAL NUMBER:
- Assembly
- Operating the Cordless Lawn Mower
- Adjusting the cutting height
- Using the Cordless Lawn Mower
- Removing the activation key
- Removing and emptying the grass box
- Charging the battery
- WARNING:
- Collapsing the handle for storage
- Stowing the handle
- Carrying the Cordless Lawn Mower
- State of charge
- WARRANTY - TERMS AND CONDITIONS
- WHAT ISN'T COVERED SUMMARY
- Environmental and Product Recycling
- EC Declaration of Conformity
- CLM001 Cordless Lawn Mower
- PRODUKTETS SERIENUMMER:
- Stuing av håndtaket
- Ladeindikator
- PRODUKTSERIENUMMER:
- VAD SOM INTE OMFATTAS SAMMANFATTNING
Brand : G-TECHNOLOGY
Model : CLM001
Category : Lawn mower