
RLM50 - Lawn mower G-TECHNOLOGY - Free user manual and instructions
Find the device manual for free RLM50 G-TECHNOLOGY in PDF.


| Product Type | Walk-behind lawn mower |
| Brand | G-Technology |
| Model | RLM50 |
| Cutting Width | 50 cm (20 inches) |
| Power Source | Electric (corded), 230V |
| Motor Power | 1800 W |
| Grass Bag Capacity | 60 L |
| Cutting Height Adjustment | Central lever, 6 positions (25-75 mm) |
| Handle Type | Foldable ergonomic handle |
| Weight | 14.5 kg |
| Dimensions (L x W x H) | 140 x 53 x 105 cm |
| Safety Features | Blade brake, safety switch, overload protection |
| Maintenance | Regular blade sharpening, cleaning under deck, check cables |
| Spare Parts Available | Blades, grass bag, wheels, handle grips |
| Repairability | Modular design, easy access to motor and electronics |
| Warranty | 2 years |
| Noise Level | 82 dB(A) |
| Recommended Lawn Area | Up to 800 m² |
| Certifications | CE, EAC, RoHS |
Frequently Asked Questions - RLM50 G-TECHNOLOGY
User questions about RLM50 G-TECHNOLOGY
0 question about this device. Answer the ones you know or ask your own.
Ask a new question about this device
Download the instructions for your Lawn mower in PDF format for free! Find your manual RLM50 - G-TECHNOLOGY and take your electronic device back in hand. On this page are published all the documents necessary for the use of your device. RLM50 by G-TECHNOLOGY.
USER MANUAL RLM50 G-TECHNOLOGY
natural_image
Line drawing of a robotic vacuum cleaner with labeled parts (no text or symbols beyond 'GEED' and 'STOP')OPERATING MANUAL
IMPORTANT SAFEGUARDS:

IMPORTANT: READ ALL INSTRUCTIONS BEFORE USE. RETAIN INSTRUCTIONS FOR FUTURE REFERENCE.

WARNING: Basic safety precautions should always be observed when using an electrical appliance to reduce the risk of fire, electrical shock or serious injury.
Personal Safety:
- Only use the mower on grass and lawns, as described in this manual.
- Keep out of reach of children and animals at all times.
- Do not use while there are other people, especially children, nearby.
- Stay alert, watch what you are doing and use common sense when operating the mower.
- Do not use the mower while you are tired or under the influence of drugs, alcohol or medication. This may result in serious personal injury.
- Use protective personal equipment such as safety glasses, non-skid safety shoes, sturdy gloves to reduce the risk of personal injury.
- Do not operate when barefoot or wearing open toed shoes.
- Dress appropriately. Do not wear loose clothing or jewellery and keep hair, clothing and gloves away from moving parts.
- Do not use on excessively steep slopes.
- Never touch the rotating blade.
- Never operate the mower over gravel, as this risks flicking stones.
- Check the area where the mower is to be used and remove any objects that could jam or be thrown by the mower, such as stones and sticks.
- Avoid operating the mower on wet grass.
-
Remove any dog mess before mowing.
-
Visually check the cutting tools and their fasteners for any damage before each use.
- To prevent imbalance, any damaged or worn-out parts should be replaced.
- Do not operate the mower if it is incomplete or has unauthorised modifications.
- Keep all body parts, especially hands and feet, away from the blade at all times.
- Warning, the blade will continue to move after the motor is switched off.
- Ensure that the blade has fully stopped before:
-clearing a blockage - adjusting the cutting height
- lifting or carrying the mower
- tilting the mower to move
- checking or cleaning the mower
- carrying out any maintenance
- If the mower vibrates intensively, stop the motor fully and identify the cause.
- The operator is responsible for accidents or hazards occurring to other people at their property.
- This appliance is not intended for use by persons (including children) with reduced physical, sensory or mental capabilities or lack of experience or knowledge.
- Never modify the mower in any way.
- It is recommended to program the product for use during hours when the area is free from activity, e.g. at night. But consider that certain animals, e.g.


hedgehogs and moles are active at night. They can potentially be harmed by the product.
- The product must never be allowed to collide with persons or other living creatures. If a person or other living creature comes in the way of the product, it shall be stopped immediately.
- Do not put anything on top of the product or its charging station.
- Do not allow the product to be used with a defective guard, blade disc or body. Neither should it be used with defective blades, screws, nuts or cables. Never connect a damaged cable, or touch a damaged cable before it is disconnected from the supply.
- Do not use the product if the STOP button does not work.
- Always switch off the product when it is not in use. The product can only start when the correct PIN code has been entered.
- The product must never be used at the same time as a sprinkler. Use the Schedule function so the product and sprinkler never run simultaneously.
- Gtech does not guarantee full compatibility between the product and other types of wireless systems such as remote controls, radio transmitters, hearing loops, underground electric animal fencing or similar.
- Metal objects in the ground (for example buried electrical cables) can result in a stoppage. The metal objects can cause interference with the loop signal which then can lead to a stoppage.
- Be aware that pets may dig or disrupt the perimeter wire, so check regularly.
Electrical safety:
- Do not operate the mower in explosive atmospheres, such as in the presence of flammable liquids, gases or dust. Mowers can sometimes create sparks, which may ignite the dust and fumes.
- Avoid body contact with earthed or grounded surfaces, such as pipes. There is an increased risk of electric shock if your body is earthed or grounded.
- In the event of a thunderstorm: To reduce the risk of damage to electrical components in the product and the charging station, we recommend that all connections to the charging station are disconnected (power supply, boundary wire and guide wire) if there is a risk of a thunderstorm.
- Do not handle the charge station or the mower with wet hands.
- Regularly check the power supply and charge station cables for signs of damage or ageing.
- Do not expose the mower to temperatures exceeding 80°C, for example leaving the mower in direct sunlight or in the hot boot of a car for prolonged periods.
Battery safety:
- This product contains Li-Ion batteries. Do not incinerate batteries or expose to high temperatures, as they may explode.
• After heavy use or in high temperatures the battery may become warm. Allow the product to cool for 30 minutes before charging. -
Operation and storage temperature is 0-50 °C / 32-122 °F. Temperature range for charging is 0-45 °C / 32-113 °F. Too high temperatures might cause damage to the product.
-
Use only with the battery pack supplied.
- Leaks from battery cells can occur under extreme conditions. If the liquid gets on your skin wash immediately with soap and water. If the liquid gets into your eyes, flush them immediately with cold water for a minimum of 10 minutes and seek urgent medical attention.
- Protect the battery against excessive temperatures and fire.
- Do not store the battery outside for prolonged periods of time over the winter months.
- Do not dispose of the battery pack into household waste, fire or water. The battery pack should be collected, recycled or disposed of in an environmentally friendly manner. Discharge your battery pack by operating your Robot Mower. Remove the battery pack from the housing and cover the battery pack connections with heavy duty ventilation tape to prevent a short circuit and energy discharge. Do not attempt to open or remove any of the components.
Service:
- Check all visible fixing screws and nuts, especially on the cutter disc, to ensure they are tightened properly.
- The mower and its charge station should be periodically checked and cleaned and kept free of debris and obstructions. Note that some garden creatures such as spiders, insects, snails and slugs can nest or hibernate within crevices of the mower. These can attract small creatures / rodents that can damage the mower if not deterred.
- Before using the mower and after any impact, check for signs of wear and damage and repair or replace as necessary.
- Use only genuine replacement parts. This will ensure that the safety of the mower is maintained.
- Do not attempt to repair any damaged parts on the mower unless you are qualified to do so.
- Please contact Gtech on 01905 345891 if you have any queries about your product.
Intended Use:
- This product is intended for DOMESTIC USE ONLY.
Warning Label Descriptions
 | Warning/Caution. Guaranteed Sound P | 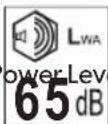 | |
 | Beware of severing toes or hands. Do not put hands or feet near a rotating blade. |  | Dangerous voltage. |
 | Read the instruction manual. |  | Keep bystanders at a safe distance (at least 5m). |
 | Caution: Wait until blades stop rotating when switched off. |  | Always keep the lawnmower on the ground when mowing.Tilting or lifting the lawnmower may cause stones to be thrown out. |
 | Do not ride on the mower or allow children or pets to do so |  | Do not dispose of Li-lon battery with general household waste. |
 | Pick up sticks, stones and foreign objects before using. |
- Please read this manual carefully. Familiarise yourself thoroughly with the controls and proper use of this machine. You should know how the machine works and how to immediately switch it off.
- Never let children use this mower. Never let adults work with this mower if not properly trained.
- Do not let any persons, especially small children, or pets near you while the mower is in operation.

natural_image
Portrait of a smiling man in a polo shirt (no text or symbols visible)Thank you for choosing Gtech
"Welcome to the Gtech family. I started Gtech to create sensible, easy to use products that do a great job, and hope you get many years of trouble-free performance from your new product."

Nick Grey – Inventor, owner of Gtech
Robot mowers work by making regular small cuts of the grass to maintain a set height. To do this they must be able to mow the grass multiple times per day every day. This will keep the grass level constantly in check. As it is cutting small amounts regularly the clipping will fall to the ground and are not collected. Over time these small clippings will compost and add nitrogen to the lawn. Eventually this will leave the lawn looking more green and lush and enhance the general health of the lawn.
What's in the box
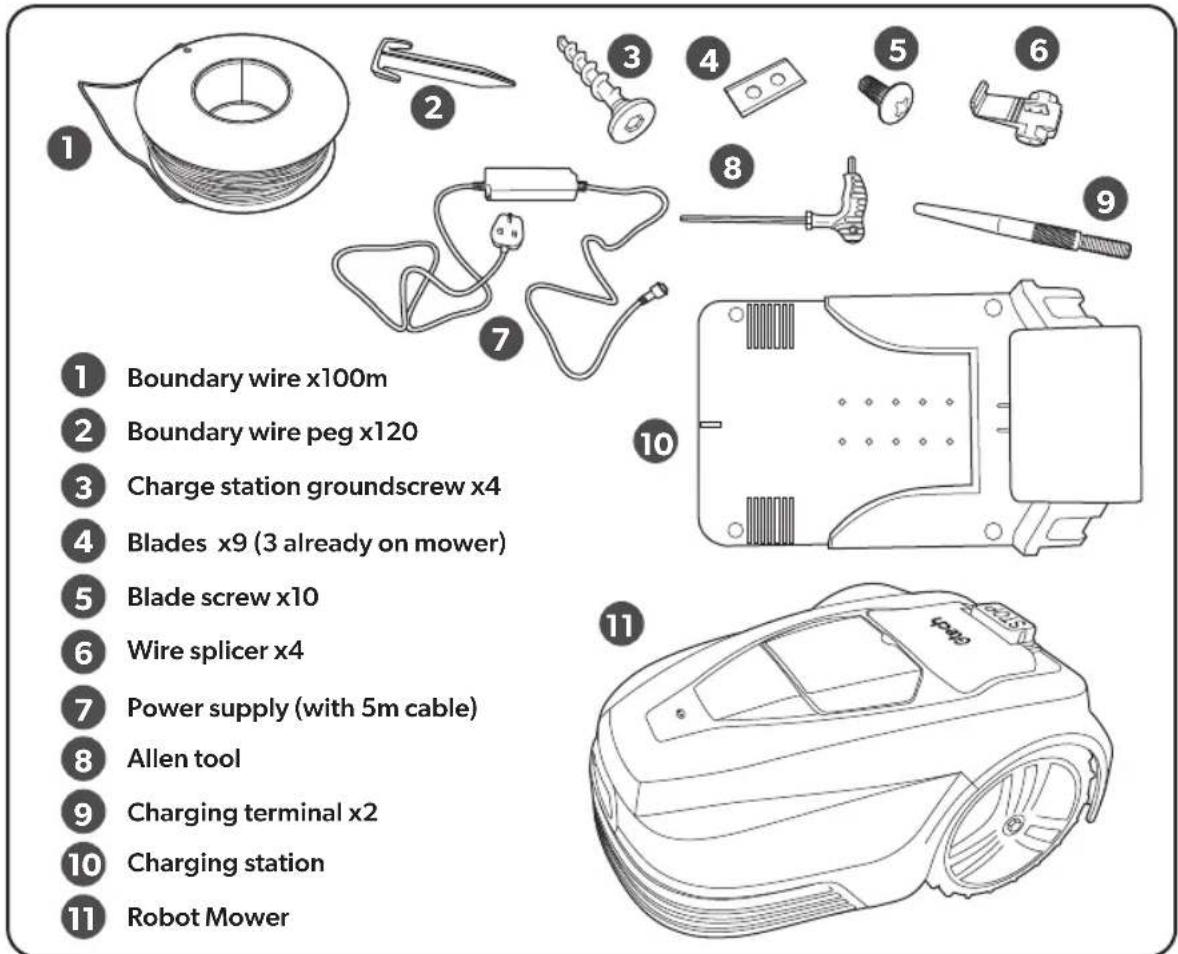
Preparing your lawn for the Robot Mower



natural_image
Simple green line diagram with a checkmark (no text or symbols)
natural_image
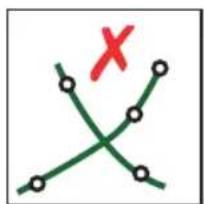
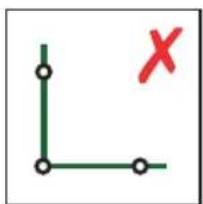
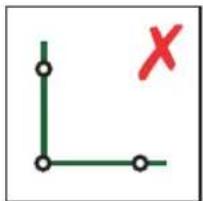
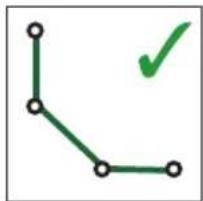
Simple curved line with circular markers and a green checkmark (no text or symbols)Don't cross wires No right angles No acute angles Obtuse angles Curves
There may be parts of your garden which will be challenging or even impossible for your Robot Mower. Your Robot Mower will not stray beyond the boundary wire you must lay around your garden.
It will change direction on making contact with things like:
- Posts and poles (e.g. washing lines)
• Fences and walls around trees
But it will need to be kept away from:
- Dug borders
• Trees with exposed roots - Flower beds
- Ponds and water features
• Excessively uneven terrain.
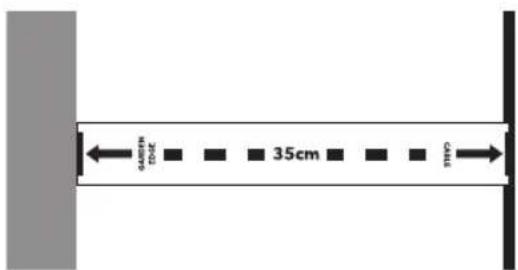
There is a handy ruler you can press out of the carton that will help you measure 35cm all around your garden.


natural_image
Simple geometric diagram with green lines and a red 'X' mark, no text or symbols present
natural_image
Simple green line diagram with a checkmark (no text or symbols)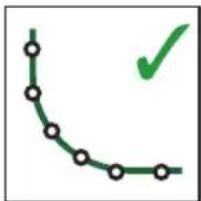
natural_image
Simple curved line with circular markers and a green checkmark (no text or symbols)Don't cross wires No right angles No acute angles Obtuse angles Curves
The cable must be kept taut and never be allowed to loop or cross over itself. Ideally if ground is particularly uneven the wire can be buried up to 15mm deep and pegged down to secure. This can be achieved easily with a manual edging tool. If this is not desired or possible then the wire should be firmly pegged around the garden with pegs at a minimum of 1m intervals, keeping the cable taut to avoid it being cut by the mower, more so at corners and over uneven terrain. The cable should be positioned a minimum of 35cm from the edge of the garden, as the mower will overlap the wire, although it will not stray past it.
On corners the cable should not be laid at a sharp angle or right angle, but curved or a series of obtuse angles. The mower can detect a signal from the wire from as much as 20m away. It should be noted that due to this set up some areas of the lawn will not get mowed such as outside the perimeter edges. These can be maintained using a suitable grass trimmer.
If the ground where the wires are to be laid is particularly dry and the soil hard from lack of rain, it will help to thoroughly water the garden before attempting to lay your perimeter wire.
Rectifying or avoiding problem areas
Obstacles such as tree roots on lawn

natural_image
Illustration of a stylized plant with branching leaves on a brown background, above a green horizontal line with dots (no text or symbols)If a tree root is protruding into the perimeter of your cutting area it would present a problem for the mower.

natural_image
Illustration of a neuron with dendrites and axon above a green surface, no text or symbols presentOne solution is to take the perimeter around the tree root, leaving this area unmowed.

natural_image
Simple diagram showing a sun-like shape above a green rectangle with a black line and checkmark (no text or symbols)Alternatively, cut the tree root back with a saw and fill any resulting uneven surface, then set the perimeter over it.
Excessively uneven areas of lawn

natural_image
Cross-sectional diagram of a soil layer with green vegetation and brown soil (no text or symbols)A deep enough dip in the surface of your lawn will also present problems, possibly causing the mower's wheels to lose their grip and skid.

natural_image
Simple diagram showing a tree line above a soil layer with two green trees, no text or symbols present.If you don't want to avoid mowing this area, it's best to fill it with soil, compact it down and re-seed it with grass.
natural_image
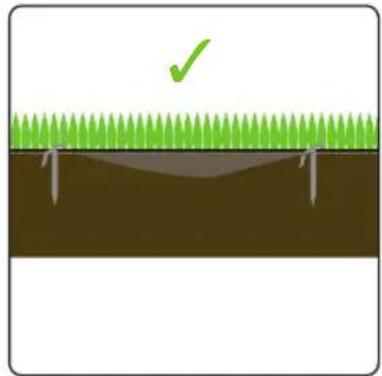
Diagram showing a green checkmark above a soil layer with grass and a triangular trench (no text or symbols)If the area is on the perimeter line this can the be pegged out as normal. If it is within the mowing area it should no longer be a problem.
natural_image
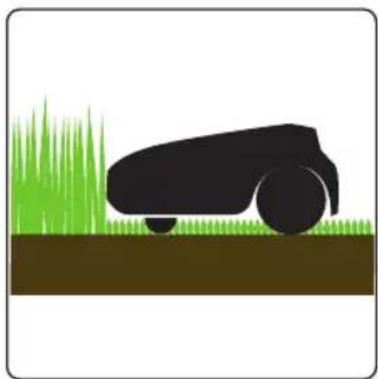
Silhouette of a black vehicle on a grassy field with grass, no text or symbols presentIf your mower encounters particularly long grass it may treat it as an obstacle as it could bump the mower's obstacle sensor. The grass needs to be at a reasonable level before the Robot Mower can function correctly.
Installing the charge station

Find a location with access to power, ensuring the mower can leave the charge station in an anti-clockwise direction. Don't peg the plate down yet.

The location of the charge station should be flat and secure, without risk of movement, if placed next to a border edge that is unstable it can slump and cause the station to be uneven, this will cause problems for the mower when returning to charge.

WARNING: Trailing wires are a trip hazard. Take care when choosing your location.

The boundary wire goes into the front (1) of the charge station and comes out at the back (2).

Push the boundary wire into the tube at the front (1) of the charge station.

natural_image
Diagram of a vehicle hood with a lever and directional arrow, no text or symbols presentIt will emerge at the rear of the unit (2).

natural_image
Diagram showing two cylindrical objects with a green upward arrow emerging from them, no text or symbols presentYou will need to strip the plastic sheath from the end of the wire before connecting. Twisting the exposed wires after exposing helps ensure a good connection.
natural_image
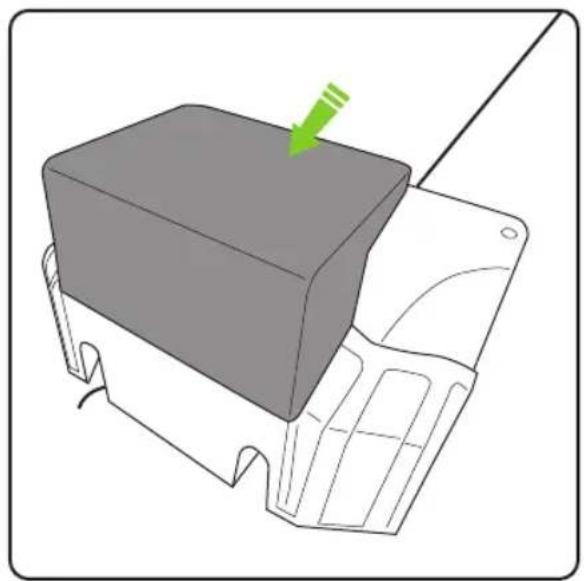
3D diagram of a mechanical component with a green arrow pointing to a top section (no text or symbols)The charge stand has a hood at the back (shown in grey) that hinges forwards.
natural_image
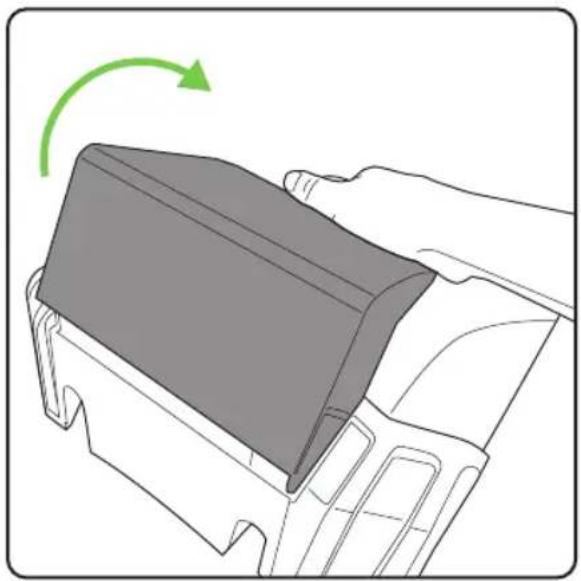
Diagram of a hand pressing a component with a green arrow indicating rotation (no text or symbols present)Push the charge station hood forward to uncover the wiring terminals.

natural_image
Illustration of hands using a tool to adjust or install a mechanical component (no text or symbols visible)The sprung terminal will need lifting to expose the hole, ensure the wire is full inserted before releasing the red terminal clip

natural_image
Technical line drawing of an electrical connector with wires and components (no text or symbols)When you have completed your perimeter cable it must return to the charge station and be fed up through the unit and plugs in at the black terminal.

natural_image
Diagram showing a hand holding a cable with a connector, no text or symbols presentFeed the power lead up through the other side of the base station

natural_image
Technical line drawing of a mechanical component with two circular connectors and mounting holes (no text or symbols)a keyway orientation detail to ensure correct connection.

natural_image
Illustration of a hand connecting a cable to a component, with a green arrow indicating the cable's direction (no text or symbols present)Push the power cable into placePay attention to the cable fitting

natural_image
Illustration of a hand inserting a component into a device with a green arrow indicating rotation (no text or symbols present)Then screw on the outer ring to secure the cable in place and prevent water ingress.

natural_image
Line drawing of a hand using a tool to tighten a bolt on a workbench (no text or symbols)Once the base station has been fully wired it can be secured in place with the four screws provided. Use the allen key provided to screw them in securely ensuring they are fully inserted and flush with the station base. Protruding screws can hinder the mower from locating correctly.
natural_image
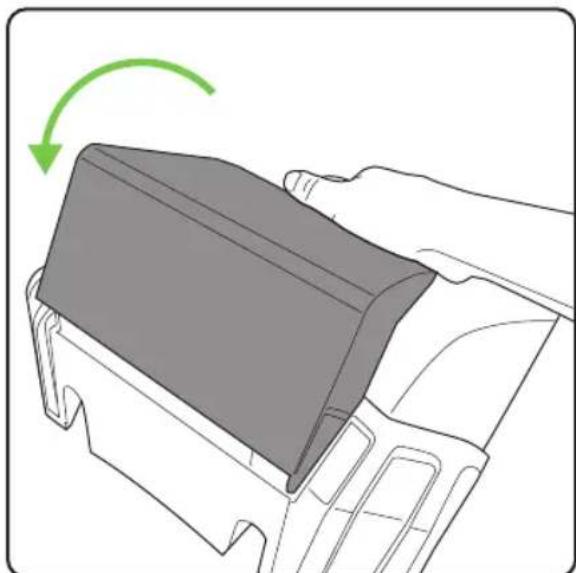
Diagram of a hand pressing a component with a green arrow indicating rotation (no text or symbols present)Push the cover back to it's original position to cover the wires and connections from water ingress.
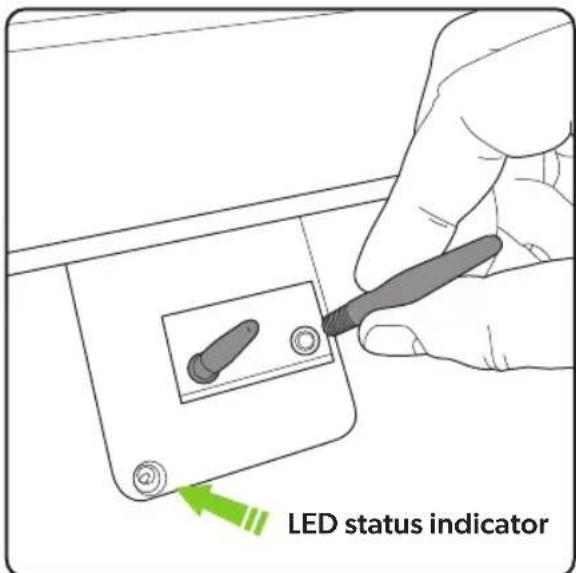
Making sure the power is switched off at the socket, screw the two charging rods into the holes just below the cover of the base station. Note: This is where the LED status indicator is situated. See page 24.
Laying the perimeter cable

Keep the cable straight for at least the first 2m. This is to allow the mower to return to the charging stand with ease.
natural_image
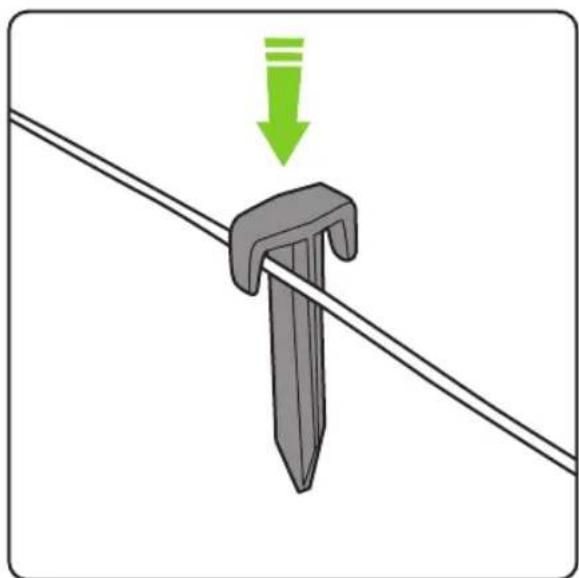
Diagram showing a metal clamp securing a wire with a green downward arrow indicating force or direction (no text or symbols)Place the pegs at intervals of about 1m on straight and even ground, 30cm to 50cm on bends and corners. Uneven ground and obstacles will require more pegs.

natural_image
Two diagrams showing green plant seedling and soil layers with a checkmark indicating a specific section (no text or symbols present)The perimeter wire must be kept tight. If it is loose it may well end up being cut by the mower as it passes over it.
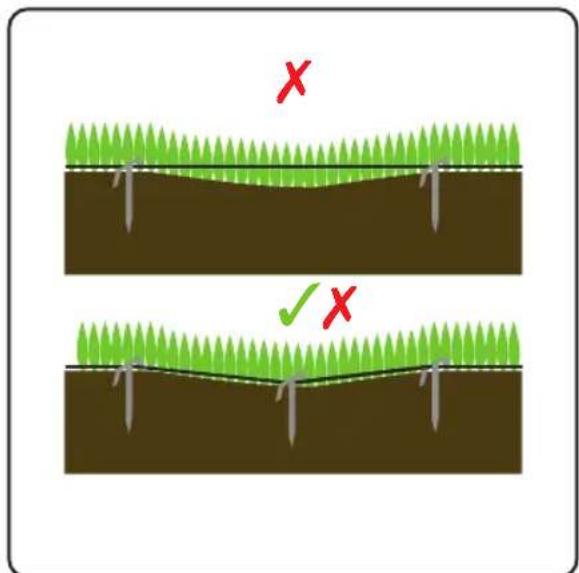
If the wire passes over a moderate dip in the lawn, more pegs will be required to keep the wire firmly pegged at ground level, or it risks being cut.
Operating the mower
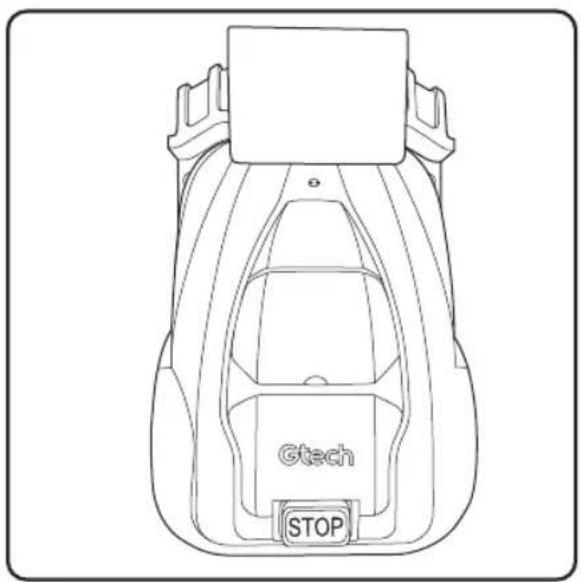
Place the mower on the base station with the wheels on the grips and the two pins engaged into the front of the mower. Note: the mower will require to be charged to at least 70% capacity before it will leave its station.

Press the STOP button
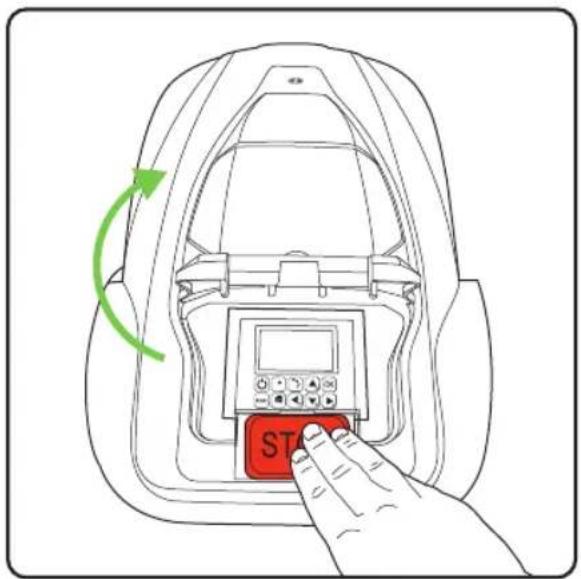
This will flip open the control panel and LCD display cover.

Hold the power button (1) down for three seconds to activate the LCD display.
Control panel

Cutting height adjustment
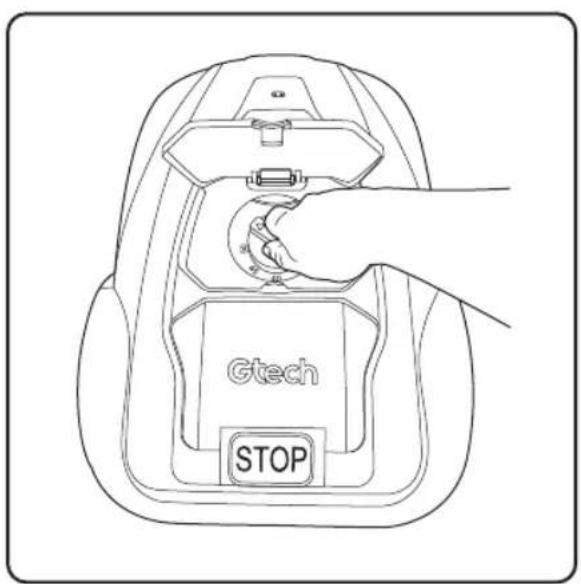
- Open the knob lid.
- Cutting height can be adjusted from 2.5cm to 5.5cm by rotating the adjustment knob.
Getting started:
Set the cutting height
The first cut of the season or long thick wet grass will need the highest setting (5.5cm). Gradually reduce to desired height once all ground has been covered. This may take a few days or a few weeks. If the perimeter wire is pegged to the surface of the garden rather than buried, it is a good idea to let the wire “bed in” to the surface of the lawn, during which time it is advisable to keep the mower on an elevated blade setting. NOTE during first few days of mowing the grass may look stripy or patchy where the mower has covered /not covered. This is normal and will become even after several days once the full lawn area has been mowed.
First time out
The control panel will ask for a pass code. The default PIN is AAAA
Pressing the start button and closing the flap will cause the mower to start a perimeter circuit after which it will begin randomly mowing the lawn.
First time out
The first few mows will appear random and unfinished, this is normal. With the multiple passes the mower makes over time, this will even out, and by using zoning and spiral spot mowing a desirable effect can be achieved in less time. These methods are explained on page 21.
New season mowing
Between mowing seasons when the mower is not operating (during winter months) the grass can become unkempt and thickets emerge. On new season setup review mowing pass and address any problem areas.
| Status Meaning | |
| Standby Mower is ready to work | |
| Mowing Mower is mowing automatically | |
| Spot Mow Mower is mowing spirally | |
| Returning Mower is going back to station | |
| Charging Mower is charging | |
| Charge to work Mower is charging and will continue program when charged | |
| Emergency stop Mower is stopped manually | |
| Error Mower cannot work | |
| Firmware update Firmware is updating |
Power on Power off

- Press the power button for 3 seconds.
- Enter the 4-letter PIN code. The default PIN code is "AAAA".
- The mower will now await further instruction in standby mode.

- Press the power button for 3 seconds.
Start mowing

- Press START button
- Close the cover to start
Note: If the battery is below 70% charge, the mower enters 'charge to work' mode until it reaches 90% charge. If lower than 30% the mower returns to base station to charge.
natural_image
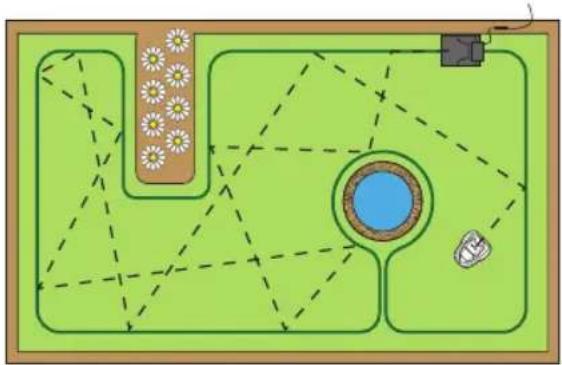
Top-down schematic of a park layout with flower beds, a central pond, and a small boat (no text or symbols)In standard mowing mode the mower will proceed in a random fashion around your garden, changing direction each time it reaches the perimeter wire.
Work time setting
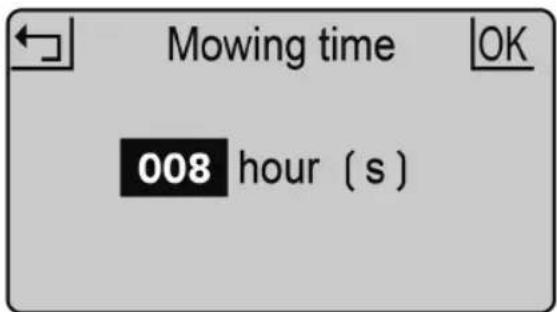
- Press OK button to enter sub-menu 1.
- Select 'setting' to enter sub-menu 2.
- Select 'work time'.
- Set work time by UP and DOWN buttons. (default is 8hrs)
- Press OK button to confirm setting.
This is the amount of time per day the mower will be active. This includes charging time. For example: if set to 8 hours and the mower is set to operate from 8:00pm it will operate until 4:00am. In this time it may mow for 1 hour charge for 2 hours mow again for 1 hour; charge for 2 hours, mow for one hours and return to charge ready for the next cycle.
You may want to stop the mower during its cutting cycle. To do this:
Stop Back to station
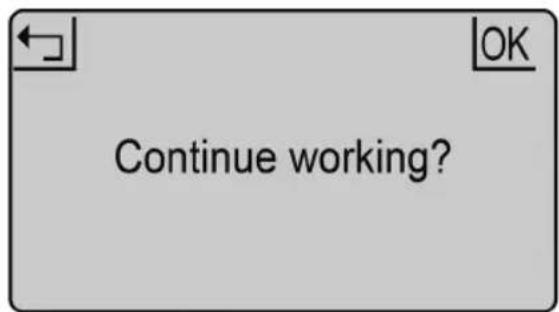
- Press the STOP button.
- The mower stops immediately and the control panel hatch opens.
- The screen shows 'emergency stop'.
- Press OK or RETURN button.
- Enter the PIN code
- If the mower was running when the STOP button was pressed, the screen will show 'continue to work?'. You can then either press OK to continue the task, or press RETURN to cancel it.

- Press HOME button for 3 seconds.
- Close the cover and mower will return to station for charging.
Charging
- Place the mower in the station (or press HOME button for 3 seconds)
- Mower will charge up to 100% and then go into standby.
- Mower will get charged again if battery is lower than 75%.
The mower charges on its station through the two charging pins. These insert into the front of the mower. Ensure the holes are free of debris or obstructions and that the mower aligns when approaching the charge station. Uneven ground on approach can cause the mower to not make a positive connection first time. If this happens consider levelling the ground or moving the station to a more suitable area.
Schedule
- Press OK button to enter sub-menu 1.
- Select 'schedule'.
- Press OK button to select the desired day.
- Press UP, DOWN, LEFT and RIGHT buttons to set the start and end time.
- Press OK button to confirm the daily setting.
- Repeat step 3 to 5 to complete the weekly plan.
- Press OK button to confirm the weekly setting.
This allows you to change mowing schedules for different days of the week, for example if you want to prevent mowing to occur on any given day or if other scheduled activity in the garden would prevent effective mowing during normal daily schedule.
Zone
| zone | dst(m) | pct(%) |
| z_1 | 8 | 100 |
| z_2 | ----- | -- |
| z_3 | ----- | -- |
| z_4 | ----- | -- |
| z_5 | ----- | -- |
- Press OK button to enter sub-menu 1.
- Select 'zone'.
- Press OK button to select the desired zone.
- Press UP, DOWN, LEFT and RIGHT buttons to select the distance and percentage.
- Press OK button to confirm each zone.
- Repeat step 3 to 5.
- Press OK button to confirm the setting of all the zones.

flowchart
graph TD
    A["Zone 1"] --> B["Central Circle"]
    C["Zone 2"] --> B
    D["Zone 3"] --> B
    B --> E["Directional Arrow"]
    style A fill:#f9f,stroke:#333
    style C fill:#f9f,stroke:#333
    style D fill:#f9f,stroke:#333
You can set up to 5 zones in your garden. This enables you to decide areas of your garden that need more or less attention. A zone is set by how far along the boundary wire from the base station that point is. The distance should be 0 to 500m and the percentages should add up to 100% or the setting cannot be completed.

Spot mow

- Place the mower in the garden.
- Press OK button to enter sub-menu 1.
- Select 'spot mode'.
- Close the cover to start.

flowchart
graph TD
    A["Car"] --> B["Drain Garden"]
    B --> C["Mower placed here"]
    C --> D["Drain Garden"]
    D --> E["Drain Garden"]
    E --> F["Drain Garden"]
    F --> G["Drain Garden"]
    G --> H["Drain Garden"]
    H --> I["Drain Garden"]
    I --> J["Drain Garden"]
    J --> K["Drain Garden"]
    K --> L["Drain Garden"]
    L --> M["Drain Garden"]
    M --> N["Drain Garden"]
    N --> O["Drain Garden"]
    O --> P["Drain Garden"]
    P --> Q["Drain Garden"]
    Q --> R["Drain Garden"]
    R --> S["Drain Garden"]
    S --> T["Drain Garden"]
    T --> U["Drain Garden"]
    U --> V["Drain Garden"]
    V --> W["Drain Garden"]
    W --> X["Drain Garden"]
    X --> Y["Drain Garden"]
    Y --> Z["Drain Garden"]
    Z --> AA["Drain Garden"]
    AA --> AB["Drain Garden"]
    AB --> AC["Drain Garden"]
    AC --> AD["Drain Garden"]
    AD --> AE["Drain Garden"]
    AE --> AF["Drain Garden"]
    AF --> AG["Drain Garden"]
    AG --> AH["Drain Garden"]
    AH --> AI["Drain Garden"]
    AI --> AJ["Drain Garden"]
    AJ --> AK["Drain Garden"]
    AK --> AL["Drain Garden"]
    AL --> AM["Drain Garden"]
    AM --> AN["Drain Garden"]
    AN --> AO["Drain Garden"]
    AO --> AP["Drain Garden"]
    AP --> AQ["Drain Garden"]
    AQ --> AR["Drain Garden"]
    AR --> AS["Drain Garden"]
    AS --> AT["Drain Garden"]
    AT --> AU["Drain Garden"]
    AU --> AV["Drain Garden"]
    AV --> AW["Drain Garden"]
    AW --> AX["Drain Garden"]
    AX --> AY["Drain Garden"]
The mower can be placed within the perimeter boundary and that the spot mow function will mow in relatively uniform spiral pattern. This is useful when you want to cover a specific area or clear grass on the first mow more quickly.
Rain mode

- Press OK button to enter sub-menu 1.
- Select 'setting' to enter sub-menu 2.
- Select 'rain mode'.
- Press UP and DOWN buttons to enable the rain mode.
- Press OK button to confirm setting.
Rain mode sets if the mower will go out in rain or not. Disabling this will allow the mower to continue to work in the rain.
WARNING avoid activation during heavy rain and storms. Wet grass will cause additional load for the mower and mowing time may be reduced. In some cases the mower may not return to the charge base in rain.
Language Date and time

- Press OK button to enter sub-menu 1.
- Select 'setting' to enter sub-menu 2.
- Select 'Language'.
- Press UP and DOWN buttons to select the desired language.
- Press OK button to confirm setting.

- Press OK button to enter sub-menu 1.
- Select 'setting' to enter sub-menu 2.
- Select 'date & time'.
- Press UP, DOWN, LEFT and RIGHT buttons to set the date and time.
- Press OK button to confirm setting.
Setting date and time accurately ensures scheduling is accurate.
PIN code Change PIN code

- PIN code should be entered after powering on, pressing STOP button, and before clearing error status and changing PIN code.
- If the PIN code is incorrect, the screen will show "PIN wrong, please retry".
- If the PIN code is entered incorrectly 3 times, the screen will be locked for 15 seconds. The lock time will double for further incorrect entries.

- Press OK button to enter sub-menu 1.
- Select 'setting' to enter sub-menu 2.
- Select 'change PIN'.
- Enter the original PIN code.
- Enter new PIN code.
- Enter the new PIN code again. ('New passwords do not match' will be shown for inconsistent passwords.)
- Press OK button to confirm.
Factory reset

- Press OK button to enter sub-menu 1.
- Select 'setting' to enter sub-menu 2.
- Select 'factory reset'.
- The screen shows 'Reset to factory mode?'
- Press OK button to confirm.
Error log

- Press OK button to enter sub-menu 1.
- Select 'setting' to enter sub-menu 2.
- Select 'information' to enter sub-menu 3.
- Select 'error log'.
- The past 10 records (including date, time and error message) will be shown.
In the event of malfunction the error log will record all actions and can be used for service maintenance and fault finding.
Work log Save power

- Press OK button to enter sub-menu 1.
- Select 'setting' to enter sub-menu 2.
- Select 'information' to enter sub-menu 3.
- Select 'work log'.
- The past 10 records (including date, time and work mode and work time) will be shown.
The backlight will switch off after 2 minutes in the mower will power off after 8 minutes, respectively, without user interference.
LED indicator
The backlight will switch off after 2 minutes and the mower will power off after 8 minutes, respectively, without user interference.
| LED on charge station | Solid red light Breathing | blue light Solid blue light | |
| Status | Broken perimeter wire | Mower charging Loop | signal normal or fully charged |
| Sub-menu 1 Sub-menu 2 Sub-menu 3 | ||
| Spot mode | ||
| Setting | Language | English |
| German | ||
| French | ||
| ... | ||
| Date & Time | ||
| Rain mode | ||
| Work time | ||
| Change PIN | ||
| Factory reset | ||
| Information | About | |
| Error log | ||
| Work log | ||
| Schedule | ||
| Zone | ||
Repairing the perimeter wire

natural_image
Diagram showing two green arrows pointing to a gray cylindrical object, no text or symbols presentIf the perimeter wire gets cut or breaks for any reason (indicated by solid red light on charge station), you need to locate and repair it. You will need to use one of the splicing clips provided. First take up the slack in the wire so there is some overlap.

natural_image
Diagram of a mechanical component with green directional arrows indicating movement or force (no text or symbols)The clip has two channels in it. Push one end into one channel and the other end into the other. The wire needs to go right in, and can even protrude from the other end.

natural_image
Illustration of a hand holding a cable with green directional arrows indicating cable movement (no text or symbols)Taking a pair of pliers, crimp the metal tab onto the inserted wires. This will form a connection between the wires.

natural_image
Illustration of hands holding a small electronic component with a green arrow indicating rotation (no text or symbols)Close the cover of the clip until it clicks securely in place. You will then need to ensure the clip does not protrude on your lawn and risk being cut by the mower, by embedding it in the soil.
When the perimeter wire is repaired the charge station will display a solid blue light. If the light is still red there are more breaks in the loop, which will need locating and repairing.
Replacing the blades

natural_image
Hand holding a tool interacting with a mechanical component, showing a green downward arrow indicating a step (no text or symbols present)- Switch the mower off
- Wear protective gloves
- Turn the mower upside-down
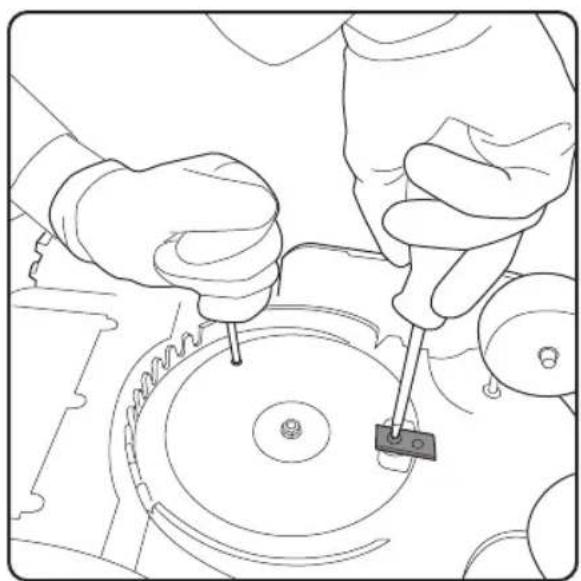
- Place blade over raised screw-hole.
natural_image
Line drawing of hands operating a mechanical tool on a circular component (no text or symbols)- Use a second screwdriver to anchor the blade plate while you attach the blade.
- Using a cross head screwdriver, secure the blade on the blade plate. The blade should be able to rotate freely once fitted.
- Repeat for other blades

Re-orientate the blade (turn it around or turn it upside down) as each corner wears out until all four quarters of the blade have been used. If all four quarters have been used, then replace blade.

natural_image
Line drawing of a person standing with a backpack (no text or symbols)Carry the mower by the handle between the two rear wheels with the blades pointing outwards.
Troubleshooting
| Error message Cause Solution | ||
| Mower outside Mower is outside | the perimeter | Place the mower inside the perimeter. |
| Mower lifted Mower is lifted away | from the ground | Move the mower to a flat part of the lawn. |
| Mower tilted Mower is tilted too much. | Move the mower to a flat part of the lawn. | |
| Mower overturned Mower is upside down | Return the mower to its normal position. | |
| Mower trapped Mower is trapped by obstacles. | Remove the obstacles. | |
| Loop signal lost Power supply or the wire is not connected to the station, or wire is broken. | Check the power supply, station and wire are connected normally. Identify wire break and repair with splice connector | |
| Motor fault Blade motor or drive motor is stuck. The motor current is too high. | Clear the grass or soil in cutting means and driving wheels. Cut the high and thick grass with a conventional lawn mower. | |
| High temp The battery temperature is too high. | Wait until the temperature decreases. | |
| Battery abnormal The battery is damaged. Call for help from service centre. |
Wheel spinning faults where the mower will stop in a single spot and wheel(s) spin is a combination of uneven and/or wet ground. The solution is to add soil to level the ground. Ensure good drainage of the lawn before mowing, and not to mow during heavy rain and water logging.
If the perimeter wires are in the wrong connectors (so the signal is clockwise not counterclockwise) then the mower will attempt to be outside the perimeter, not inside it. If the mower leaves the area constantly then change the wires around at the charge station (moving the wire in red connector to black and vice versa).
Maintenance
- Check and clean mower regularly once a week.
- When you first start using the mower, the blade plate, protections plate and blades should be checked once a month.
- It is important that the blades and blade plate rotate easily.
- Blade edges should not be damaged. Blade life depends on the type of grass, soil, lawn etc.
- Working with dull blades gives a poor mowing result, which needs more power to mow, meaning the mower covers a smaller area at a time.
- Charge the battery fully at the end of the season before winter storage. If storage time is longer than one year you will need to recharge the mower before use.
Winter storage
- Mower must be carefully cleaned before winter storage. Charge the battery fully before storage.
- Store the mower in the station and place in a dry area to protect from frost, preferably stored in the original packaging.
- Boundary wire can be left in the ground. As the charging station is removed you should protect boundary wire end from moisture with electrical tape.
After winter storage
- Check whether the mower, boundary wire and charging electrodes need to be cleaned before use. If the charging strips appear to be rusty, clean them by using an emery cloth or suitable abrasive cloth. Check whether the mower's time and date are correct.
- Check whether the blades need to be changed.
- Check whether the blades and blade plate turn easily.
Product Care

Wear protective gloves when handling, cleaning or replacing the blade.
Product support
If these initial tips do not solve your problem, please visit our support area where you can find troubleshooting help including online manuals, FAQs and how-to-videos, as well as genuine spares and replacement parts compatible with your product.
Visit: www.gtech.co.uk/support



support@gtech.co.ukLive chat supportOnline How to Videos
TECHNICAL SPECIFICATION
| Battery Li-ion 22.2V/2600mAh | |
| Adapter 25.5V/2.0A @ 100~240V | |
| Blade motor speed 3200~3500rpm | |
| Weight 16kg | |
| Working capacity (600m) | ^2) +/- 20% |
| Moving speed 22m/min | |
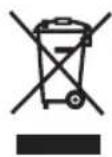
The symbol indicates that this product is covered by legislation for waste electrical and electronic products (2012/19/EU)
When the product has reached the end of its life, it and the Li-lon battery it contains should not be disposed of with general household waste. The battery should be removed from the product and both should be disposed of properly at a recognised recycling facility.
Call your local council, civic amenity site, or recycling centre for information on the disposal and recycling of electrical products. Alternatively visit www.recycle-more.co.uk for advice on recycling and to find your nearest recycling facilities.
CE
WARRANTY – REGISTRATION
Visit www.gtech.co.uk/warrantyregistration to register your product to ensure that we have all the information required to provide you with quick and efficient support.
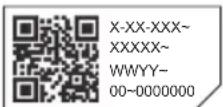
You will need your product's serial code.
You can find this on the underside of the LCD display cover.
If you purchased directly from Gtech, your details are already registered and your 2-year warranty will start automatically.
If you purchased from an authorised Gtech retailer, please register your warranty within 3 months. You will need to provide proof of purchase to support any claim(s) against your warranty.
WARRANTY - TERMS AND CONDITIONS
If your product is within its warranty and has a fault that cannot be resolved from the troubleshooting section or online support, please do the following:
- Contact our Gtech Customer Care Helpline on UK: 08000 308 794, who will go through any troubleshooting with you to identify the fault.
- If your fault can be resolved by a replacement part, this will be sent to you free of charge.
- Following troubleshooting, if your product needs to be replaced, we will arrange collection of your faulty product for inspection, and delivery of a replacement product free of charge.
Your product is guaranteed against material or manufacturing faults for 2 years from the date of purchase (or the delivery date if this is later) subject to the following terms and conditions:
WHAT ISN'T COVERED SUMMARY
The guarantee becomes effective at the date of purchase (or the date of delivery if this is later). If a product is repaired or replaced during the warranty period, the warranty period is not started again.
- You must provide proof of delivery/purchase before any work can be carried out on the product. Without this proof, any work carried out will be chargeable. Please keep your receipt or delivery note.
- All work will be carried out by Gtech or its authorised agents.
- Any parts which are replaced will become the property of Gtech.
- The repair or replacement of your product is under guarantee and will not extend the period of guarantee.
- The guarantee provides benefits which are additional to and do not affect your statutory rights as a consumer.
Gtech does not guarantee the repair or replacement of a product as a result of:
• Normal wear and tear (e.g. batteries).
- Use of consumables
- Accidental damage, faults caused by negligent use or lack of care and maintenance, misuse, neglect, careless operation or handling of the product which is not in accordance with operating manual.
- Use of the product for anything other than the normal domestic household purposes.
- Use of parts and accessories which are not Gtech genuine components.
- Faulty installation (except where installed by Gtech)
- If it is modified in any way.
- Repairs or alterations carried out by parties other than Gtech or its authorised agents.
- Purchasing your product from an unofficial third party (i.e not from Gtech or an official Gtech retailer).
- If you are in doubt as to what is covered by your guarantee, please call the Gtech Customer Care Helpline on UK: 08000 308 794
International orders are subject to a delivery charge for both faulty and non faulty products.
EC Declaration of Conformity
We, the manufacturer/ importer,
Grey Technology Ltd
Brindley Road
Warndon
Worcester
WR4 9FB
declare that the following machine complies with the appropriate health and safety requirements of the following directors based on its design and type.
In case of alteration of the machine, not agreed upon by us, this declaration will lose its validity
Product's name / function: Robot Lawn mower / for cutting grass.
Machine Type: RCLM001
Rated voltage: 22VDC
Measured sound power level: 65 dB(A)
Guaranteed sound power level: 65dB(A)
Notified Body: Conformity assessment method to Directive 2000/14/EC and 2005/88/EC
The EC type-examination certificate is issued by SGS
Notified body of Noise directive:
AV Technology
Unit 2 Easter Court Europa Boulevard Warrington, Cheshire,
WA5 7ZB, United Kingdom.
Notified Body number:1067
Applicable EC Directives: EMC Directive 2014/30/EU
Machinery
Directive
2006/42/EC
Noise Directive 2000/14/EC and 2005/88/EC
RoHs
Directive
2011/65/EU
Applicable Harmonized Standards: EN 60335-1
EN
60335-2-77
EN
55014-1
EN
55014-2
EN
62321
Authorized Signature/Date/ Place:
Title of Signatory: Technical Manager
Name and address of the person authorised to compile the technical file, who must be established in the community:
Andrew
Boddy
Grey
Technology
Ltd
Brindley
Road
Warndon
Worcester
WR4
9FB

Gtech
Grey Technology Limited
Brindley Road, Warndon, Worcester WR4 9FB
email: support@gtech.co.uk
telephone: 08000 308 794
www.gtech.co.uk
CPN4719

- IMPORTANT SAFEGUARDS:
- IMPORTANT: READ ALL INSTRUCTIONS BEFORE USE. RETAIN INSTRUCTIONS FOR FUTURE REFERENCE.
- Personal Safety:
- Electrical safety:
- Battery safety:
- Service:
- Intended Use:
- Warning Label Descriptions
- Thank you for choosing Gtech
- What's in the box
- Rectifying or avoiding problem areas
- Obstacles such as tree roots on lawn
- Excessively uneven areas of lawn
- Installing the charge station
- Getting started:
- Set the cutting height
- First time out
- New season mowing
- Work time setting
- You may want to stop the mower during its cutting cycle. To do this:
- Stop Back to station
- Charging
- Schedule
- Zone
- Spot mow
- Rain mode
- Language Date and time
- PIN code Change PIN code
- Factory reset
- Error log
- Work log Save power
- LED indicator
- Repairing the perimeter wire
- Replacing the blades
- Maintenance
- Winter storage
- After winter storage
- Product Care
- Product support
- WARRANTY – REGISTRATION
- WARRANTY - TERMS AND CONDITIONS
- WHAT ISN'T COVERED SUMMARY
- EC Declaration of Conformity
- Gtech
Brand : G-TECHNOLOGY
Model : RLM50
Category : Lawn mower