PKVS20STS - Vacuum sealer Nutrichef - Free user manual and instructions
Find the device manual for free PKVS20STS Nutrichef in PDF.


| Product Type | Domestic Vacuum Sealer |
| Brand | Nutrichef |
| Model | PKVS20STS |
| Dimensions (L x W x H) | 36.1 x 15.0 x 7.6 cm |
| Power Supply | 110 V, 60 Hz |
| Motor Power | 110 W |
| Airflow Rate | 12 L/min |
| Vacuum Pressure | -0.8 bar |
| Housing Material | Stainless Steel |
| Power Cord Length | 1.16 m (3.8 feet) |
| Vacuum Modes | Normal and Gentle (crumbly foods) |
| Food Types | Dry and Moist |
| Included Accessories | 5 bags (19.8 x 30 cm), 1 roll (19.8 x 200 cm), wine stopper, suction hose |
| Features | Automatic sealing, adjustable suction, LED indicators, touch panel, use with canisters |
| Maintenance and Cleaning | Unplug before cleaning, wipe with a damp cloth, do not immerse |
| Safety | Do not use with an extension cord, allow 40 s cooling between cycles, do not use on wet surfaces |
| Spare Parts and Repairability | Bags, rolls, wine stopper and hose available; cord replacement by authorized personnel |
| General Information | Warranty included (online registration), extended preservation up to 7× |
Frequently Asked Questions - PKVS20STS Nutrichef
User questions about PKVS20STS Nutrichef
0 question about this device. Answer the ones you know or ask your own.
Ask a new question about this device
Download the instructions for your Vacuum sealer in PDF format for free! Find your manual PKVS20STS - Nutrichef and take your electronic device back in hand. On this page are published all the documents necessary for the use of your device. PKVS20STS by Nutrichef.
USER MANUAL PKVS20STS Nutrichef
Questions or Comments?
We are here to help!
Phone: 1.718.535.1800
nutrichefkitchen.com/ContactUs
nutrichef™
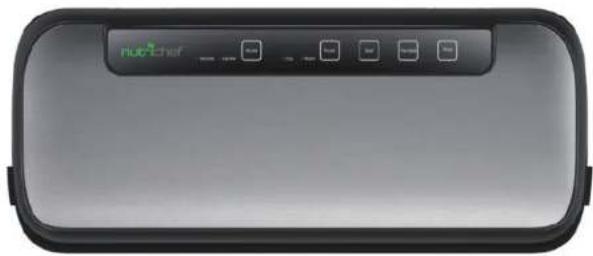
natural_image
Front view of a modern electronic device with a control panel and indicator lights (no visible text or symbols on the device body)


PKVS20STS
Automatic Vacuum Sealer System
USER GUIDE
About NutriChef
A mission born out of need
NutriChef was created on the principle that healthy home cooking should be attainable to all, regardless of skill level and economic status. Starting in 2014, we noticed the disconnect in our lives and in the lives of those around us. We were so busy, always rushing forward, and our health and personal lives suffered. We needed to find some way to slow down and put our health first, all without sacrificing convenience or taste. Could we somehow create healthier versions of our favorite foods, easily in our own kitchens? The answer was a resounding yes, and NutriChef was born.
We create products that make life a little easier and a little healthier
Our brand was created out of a desire to provide an alternative to fast food convenience and reintroduce people to home cooking. A healthy home-cooked meal is what brings families and friends together. We believe strongly in the value of simple pleasures. An evening spent cooking and sharing a meal of wholesome, nourishing foods is a memory in the making.
We believe a moment shared is price- less
Today, we have built upon our original mission and now in addition offer products that make the art of entertaining a simpler one. Entertaining and hosting family and friends are one of the great joys of life. Why waste a moment stuck in the kitchen? We offer products that free you up to socialize, while never sacrificing quality or taste.
natural_image
Line drawings of kitchen utensils including a pan, rolling pin, pot, thermos, and cooking pot (no text or symbols)

natural_image
Simple line drawings of a dining table with cutlery and utensils (no text or symbols)
natural_image
Line drawings of three cooking pots: a lid, a lid with liquid, and a side pot (no text or symbols)TABLE OF CONTENTS
FEATURES AND TECHNICAL SPECS 4
WHY YOU NEED A VACUUM SEALER 5
SAFEGUARDS & TIPS 6
STRUCTURE AND FUNCTIONS 6
OPERATING INSTRUCTIONS 8
SEAL VACUUM BAGS & VACUUM CANISTER SEAL PLASTIC BAGS ---- 9
PRESERVATION WITH VACUUM BAG 9
PRESERVATION WITH VACUUM CANISTERS 10
TIPS ON USING CANISTERS 10
HELPFUL HINTS 11
TIPS ON VACUUM SEALING WITH ACCESSORIES 11
CARE AND CLEANING VACUUM SEALERS 12
TROUBLESHOOTING 12
REGISTER PRODUCT 14
STORAGE GUIDE AND TECHNICAL DATA 15
Initial Use Odor Warning
Your new appliance may produce a burnt plastic-like smell during initial use due to protective coatings. This odor is temporary and will vanish after a few uses. Use in well-ventilated areas.
IMPORTANT SAFETY INSTRUCTIONS
READ CAREFULLY AND KEEP FOR FUTURE REFERENCE
Features:
• Automatic Vacuum Sealing Made Easy
• Save Time & Money with Smart Meal Prep
• Lab Tested to Effectively Increase Food Shelf Life
• Hassle-Free Operation & Simple Electric Plug-in Design
• (2) Food Modes: 'Dry' & 'Moist' Food Settings
- Perfect for Marinating Foods for Savory Results
- Includes Re-Usable & Washable Vacuum Seal Bags
- Also Includes Wine Stopper & Suction Hose
• Vacuum Sealing Bags are Microwaveable Safe
• Adjustable Vacuum Suction Speed
• High-Power Suction Element
• LED Indicator Lights
• Digital Touch Button Control Panel
• Stain-Resistant & Easy-to-Clean Housing
- Safe Placement on Any Kitchen Table/Countertop
- Can Also be Used for Preserving/Waterproofing Non-Food Items
Technical Specs:
• High-Powered Suction Motor: 110 Watt
• Pressure Air-Flow: 12L /min, -0.8 bar
• Construction Material: Stainless Steel Housing
• Power Cord Length: 3.8' ft. / 1.15 m
Power: 110V
- Dimensions (L x W x H): 14.2" x 5.9" x 3.0" -inches (36.0 x 14.9 x 7.62-cm)
WARNING: Cancer and Reproductive Harm - www.P65warnings.ca.gov
What's in the Box:
- Vacuum Sealer
• (5) Vacuum Bags, 7.8" x 11.8" -Inches (19.8 x 29.9-cm)
• Vacuum Bag Roll, 7.8" x 78.7" -Inches (19.8 x 199-cm)
■ Wine Stopper & Vacuum Hose
Why You Need a Vacuum Sealer
Preserves Freshness
Exposure to air causes food to lose flavor, nutrition, and promotes the growth of bacteria, mold, and yeast. The vacuum sealer system removes air, extending the freshness of food up to 7 times longer.
Saves Time and Money
Save Money
Buy in bulk and vacuum seal in portions to avoid waste.
Save Time
Prepare meals ahead and store in vacuum bags for quick use.
Quick Marination
Vacuum sealing enhances marination, reducing time from hours to minutes.
Easy Entertaining
Prepare dishes in advance for hassle-free hosting.
Seasonal Preservation
Keep perishable items fresh longer.
Portion Control
Manage portion sizes for dieting and meal planning.
Protect Non-Food Items
Keep supplies dry and protect silver from tarnishing.
Safeguards & Tips
- Voltage Check: Ensure local power supply voltage matches the appliance.
- Cord Inspection: Do not use with a damaged cord or plug.
Return the appliance to service center if damaged. - Unplug Properly: Disconnect by unplugging the cord, not by pulling it.
- Damaged Cord: Replace by authorized personnel only.
- No Extension Cords: Do not use with extension cords.
- Unplug When Idle: Unplug when not in use or during cleaning.
- Surface Conditions: Do not use on wet or hot surfaces.
- No Immersion: Do not immerse in water or other liquids.
- Use Recommended Accessories: Use only manufacturer-recommended accessories.
- Intended Use: Use only for vacuum sealing food items.
- Child Safety: Supervise children; do not allow them to play with the appliance.
- Cooling Interval: Allow 40 seconds between sealing operations.
Structure and Functions
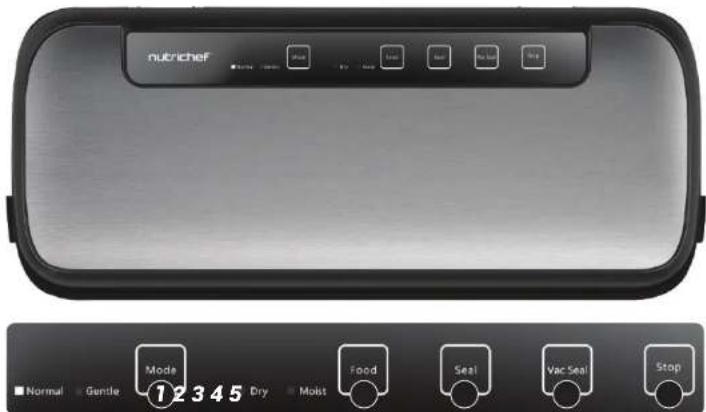
Structure and Functions
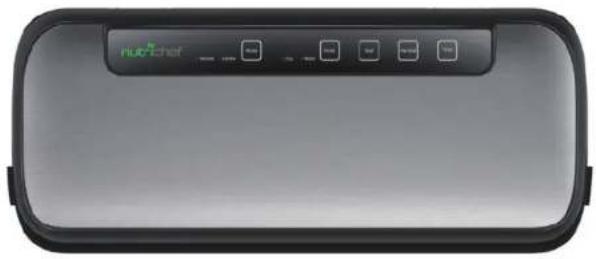
- "Mode" button: It has two setting modes (Normal and Gentle). The default mode is Normal. When the food is crumbly, press the button to change the vacuum mode to Gentle. You can manually control the degree of vacuum by pressing the "Seal" button at any time; the food will be sealed automatically. (Note: If the power is interrupted, this setting will return to the preset standard mode.)
- "Food" button: It has two setting modes (Dry and Moist). The default mode is Dry. When you press the button, it changes to Moist mode. You can choose the mode according to the food type.
- "Seal" button (with LED): Press this button to seal the bag (intervals of 40 seconds are recommended each time).
- "Vac/Seal" button: Press this button to vacuum and seal the bag (intervals of 40 seconds are recommended each time).
- "Stop" button: Allows the user to stop working at any time.
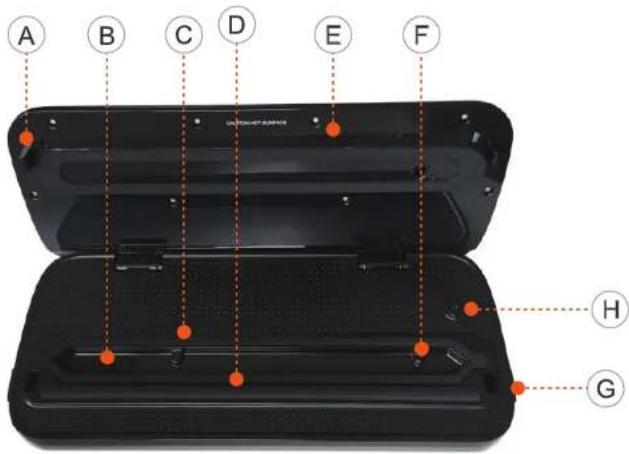
A. Locking Hook: Press the cover down until it clicks to lock the bag into place.
B. Vacuum Chamber: The bag must be placed within the vacuum chamber for the vacuum process.
C. Lower Gasket: Ensures the vacuum area is airtight and prevents leaks during vacuuming.
D. Rubber Lip: Ensures a flat seal.
E. Sealing Bar: The 3 mm (0.12 inch) wide sealing bar creates a strong seal.
F. Vacuum Nozzle: When using external vacuum canisters, wine stoppers, or other accessories, insert the hose into the nozzle. Do not block the nozzle during use.
G. Release Button: Press the release buttons on both sides to open the appliance and remove the sealed food.
H. Canister Button: Press this button to vacuum canister packages until the process is complete.
(Note: This function is specifically for use with the PKVS20STS Canister.)
OPERATING INSTRUCTIONS
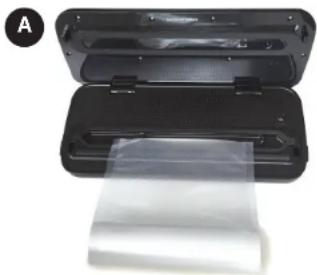
natural_image
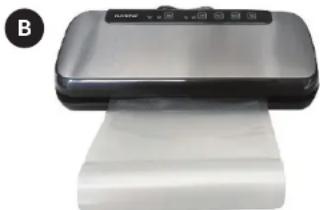
Two open black plastic containers with a transparent sheet of paper, no visible text or symbolsPlace the opening of the bag in the vacuum chamber, ensuring it does not cover the vacuum nozzle.
natural_image
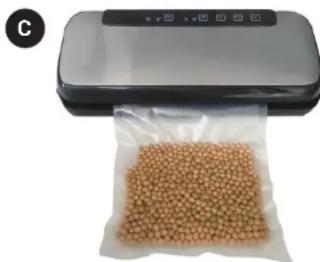
Exterior view of a modern office building (no signage)Press down the cover until you hear a click sound, indicating that the hooks are locked. Proceed to the next step for vacuuming or sealing.
natural_image
Exterior view of a modern office building (no signage)Press the "Release Buttons" to open the appliance and retrieve the sealed food.
SEAL VACUUM BAGS AND VACUUM CANISTER SEAL PLASTIC BAGS
- Plug the appliance in and switch it on.
- Insert the opening of the bag into the vacuum chamber as shown in the pictures.
- Press down the latches on both sides simultaneously until two click sounds are heard.
- Press the "Seal" button and the LED will light up.
- When the LED light turns off, the sealing operation is finished.
- Press the "Release Button" to open the appliance, then take out the sealed bag.
PRESERVATION WITH VACUUM BAG
- Plug the appliance in and switch it on.
- Place the items you want to preserve inside the bag.
- Clean and straighten the opening of the bag, ensuring there are no wrinkles.
- Insert the opening of the bag into the vacuum chamber as shown in the pictures.
- Press down the latches on both sides simultaneously until two click sounds are heard.
- Press the "Vacuum/Seal" button and the LED will light up. The bag will be automatically vacuumed and sealed.
- When the LED light turns off, the process is completed.
- Press the release buttons on both sides, then take out the sealed items.
PRESERVATION WITH VACUUM CANISTERS
- Put the items inside the canister and cover it with the lid. Insert one end of the hose into the Air Suction Hole on the appliance, then insert the other end into the hole on the top of the canister lid.
- Press the "Canister" button to begin drawing the air from the canister and create a tight seal. You can press the "Stop" button to halt the operation at any time. When the vacuum process is completed, the appliance will automatically stop.
- Unplug one end of the hose from the canister first, then unplug the other end from the appliance.
- When the stored items expire or need to be removed from the canister, press down the button in the center of the canister lid to release the air, then open the canister after a few seconds.
TIPS ON USING CANISTERS
- Remove the lid before placing the canister in the microwave oven.
- Place the canister in the refrigerator for better preservation.
natural_image
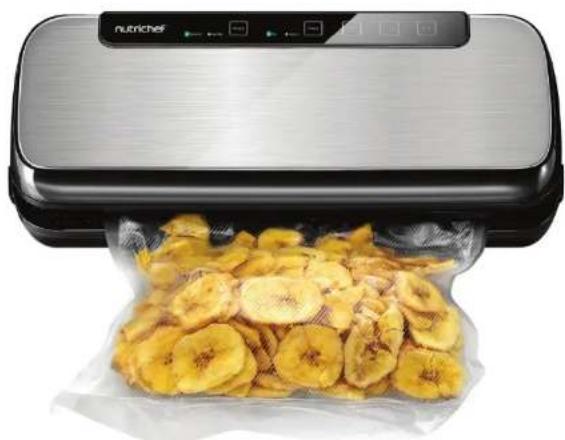
Exterior view of a modern kitchen appliance with a plastic bag filled with dried fruit, no visible text or symbols on the food or background.HELPFUL HINTS
- Do not overfill the bags. Leave enough length at the opening of the bag so that it can be placed in the vacuum chamber easily.
- Ensure that the opening of the bag is dry. A wet bag may be difficult to melt and seal tightly.
- Vacuum sealing cannot completely replace refrigeration and freezing; perishable foods still need to be refrigerated or frozen.
- Make sure the opening of plastic bags is clean and flat, with no foreign objects or folds, to prevent difficulty or leaks during sealing.
- To prevent wrinkles in a seal when vacuum sealing bulky items, gently stretch the bag flat while inserting it into the vacuum chamber and hold it until the pump begins to work.
- When vacuum sealing items with sharp edges (such as dry spaghetti or silverware), protect the bag from punctures by wrapping the item in soft cushioning material, such as tissue paper. You may also use a canister or container instead of a bag.
- When using accessories, remember to leave 1 inch (2.5 cm) of space at the top of the canister or container.
- Pre-freeze fruits and blanch vegetables before vacuum sealing for the best results.
- Allow intervals of 40 seconds after sealing or vacuuming for optimal performance.
- If you are unsure whether your bag was sealed properly, just reseal the bag.
- For best results, please use PKVS20STS brand Bags, Canisters, Containers, and Accessories.
TIPS ON VACUUM SEALING WITH ACCESSORIES
Please pay attention to the following points before using PKVS20STS accessories including canisters, containers, wine stoppers, etc.:
- Make sure to leave at least 1 inch (2.5 cm) of space between objects and the edge.
- Wipe the edge of the jar, container, or bottle to ensure it is clean and dry.
- Put the lid on the canister or container, or insert the wine stopper into the bottle.
- Turn the knob to vacuum the canister/container using the large knob on the lid. When the process is completed, turn the knob to OFF, then remove the hose.
CARE AND CLEANING VACUUM SEALERS
- Always unplug the unit before cleaning.
- Do not immerse the appliance in water or other liquids for cleaning.
- Avoid using abrasive cleaners, as they can scratch the surface of the appliance.
- Wipe the outside of the appliance with a damp cloth or sponge using mild soap if necessary.
- To clean the vacuum chamber, wipe away any food or liquid with tissue paper.
- Dry thoroughly before using again.
- Clean the liquid box regularly.
TROUBLESHOOTING
Nothing happens when you try to vacuum package:
- Check if the power cord is tightly plugged into the electrical outlet.
- Inspect the power cord for any damage.
- Verify if the electrical outlet is functioning by plugging in another appliance.
- Ensure the latches are in the locked position.
- Make sure the bag is correctly placed inside the Vacuum Chamber.
- Allow the appliance to cool for 40 seconds before using it again.
Note: To prevent overheating, keep the appliance cover open and allow it to cool for 40 seconds before reuse.
- Ensure the opening of the bag is fully inside the Vacuum Chamber during operation.
- Check for Leaks: Submerge the sealed bag in water and apply pressure. Bubbles indicate a leak. If bubbles appear, seal the bag again or use a new one.
- If using a custom-sized bag, inspect the seal. A wrinkle along the seal may cause leakage and allow air to re-enter. Trim the bag and reseal if necessary.
- Avoid DIY Seams: Do not attempt to create your own side seams for a bag. Bags are manufactured with specialized side seams that are sealed completely to the outer edge. Creating DIY seams may cause leaks and allow air to re-enter.
AIR WAS REMOVED FROM THE BAG, BUT NOW AIR HAS RE-ENTERED
- Check the seal of the bag. A wrinkle along the seal may cause leakage and allow air to enter. Simply cut the bag and reseal.
- Sometimes, moisture or food material (such as juices, grease, crumbs, powders, etc.) along the seal prevents the bag from sealing properly. Cut the bag, wipe the top inside of the bag, and reseal.
- If you vacuum packaged sharp food items, the bag may have been punctured. Use a new bag if there is a hole. Cover sharp food items with a soft cushioning material, such as tissue paper, and reseal.
- If there is still air in the bag, fermentation or the release of natural gases from inside the foods may have occurred. When this happens, the food may have begun to spoil and should be discarded.
THE BAG MELTS
If the bag melts, the rubber lip may have become too hot.
Always wait at least 40 seconds for the appliance to cool down before vacuum packaging another item.
The Complete PKVS20STS System Accessories
Get the most out of your appliance with easy-to-use Bags, Canisters, and Accessories.
BAGS AND ROLLS
The design of PKVS20STS Bags and Rolls features special channels that ensure efficient and complete air removal. Their multi-ply construction makes them particularly effective barriers against oxygen and moisture, thereby preventing freezer burn. Bags and Rolls are available in a variety of sizes.
IMPORTANT
To prevent potential contamination, do not reuse bags after storing raw meats, raw fish, or greasy foods. Additionally, do not reuse bags that have been microwaved or simmered.
PKVS20STS BOTTLE STOPPER
Use PKVS20STS Bottle Stoppers to vacuum package wine, non-carbonated liquids, and oils to extend their shelf life and preserve flavor.
Note:
Do not use the Bottle Stopper on plastic bottles. Avoid vacuum packaging carbonated or sparkling beverages as gas removal will cause them to lose their fizz.
natural_image
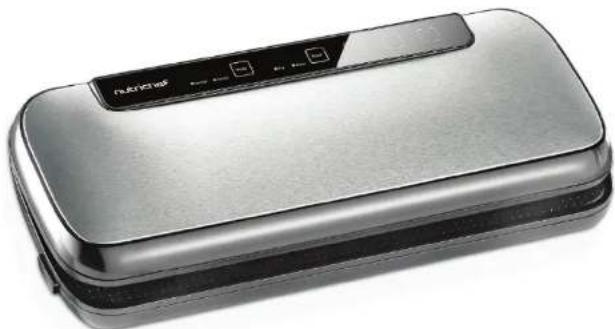
Exterior view of a modern stainless steel box with a digital display (no visible text or symbols)Register Product
Thank you for choosing Nutrichef. By registering your product, you ensure that you receive the full benefits of our exclusive warranty and personalized customer support. Complete the form to access expert support and to keep your Nutrichef purchase in perfect condition.

nutrichefkitchen.com/register
STORAGE GUIDE AND TECHNICAL DATA
| In the fridge (41±35.6°F) | No Vacuum PKVS25BK VPS | |
| Red Meat 3-4 days 8-9 days | ||
| White Meat 2-3 days | 6-8 days | |
| Fish 1-3 days 4-5 days | ||
| Cooked Meat 3-5 days 10-15 days | ||
| Soft Cheese 5-7 days 20 days | ||
| Hard/Semi Hard Cheese 1-5 days | 60 days | |
| Fruits 5-7 days 14-20 days | ||
| Vegetables 1-3 days 7-10 days | ||
| Soup 2-3 days 8-10 days | ||
| Pasta/Rice leftover | 2-3 days | 6-8 days |
| Cream Desserts | 2-3 days | 8 days |
| Room Temperature (77±35.6°F) | No Vacuum PKVS25BK VPS | |
| Fresh Bread | 1-2 days | 8-10 days |
| Biscuits | 4-6 months | 12 months |
| Uncooked Pasta/Rice | 5-6 months | 12 months |
| Flour | 4-6 months | 12 months |
| Dry Fruits | 3-4 months | 12 months |
| Ground Coffee | 2-3 months | 12 months |
| Loose Tea | 5-6 months | 12 months |
| Milk Tea | 1-2 months | 12 months |
| In the Freezer (-64.4±35.6°F) | No Vacuum PKVS25BK VPS | |
| Meat | 4-6 months | 15-20 months |
| Fish 3-4 months | 10-12 months | |
| Vegetables | 8-10 months | 8-24 months |
nutrichef™

nutrichefkitchen.com/ContactUs
nutrichef™
natural_image
Front view of a modern electronic device with a control panel and indicator lights (no readable text or symbols)
SPANISH
Visite nuestro

ESCANEAR
PKVS20STS
natural_image
Two open black plastic containers with a transparent sheet of paper, no visible text or symbolsnatural_image
Exterior view of a silver printer with paper roll, no visible text or symbols on the device itselfnatural_image
Exterior view of a modern office building (no signage)natural_image
Exterior view of a modern kitchen appliance with a plastic bag filled with dried fruit, no visible text or symbols on the food or background.CONSEJOS ÚTILES
natural_image
Exterior view of a modern stainless steel box with a digital display (no visible text or symbols)Registrar Producto

nutrichefkitchen.com/ register
GUÍA DE ALMACENAMIENTO Y DATOS TÉCNICOS
nutrichefkitchen.com/ContactUs
nutrichef™
natural_image
Front view of a modern electronic device with a control panel and indicator lights (no visible text or symbols on the device body)
FRENCH
Visitez notre site

SCANNE MOI
PKVS20STS
STRUCTURE ET FONCTIONS 6
INSTRUCTIONS D'UTILISATION 8
SCELLER DES SACS SOUS VIDE & SCELLER DES SACS
PLASTIQUES SOUS VIDE 9
CONSERVATION AVEC UN SAC SOUS VIDE 9
CONSERVATION AVEC DES BOÎTES SOUS VIDE 10
CONSEILS D'UTILISATION DES BOÎTES 10
CONSEILS UTILES 11
CONSEILS POUR SCELLER SOUS VIDE AVEC DES ACCESSOIRES 11
ENTRETIEN ET NETTOYAGE DES SCELLEUSES SOUS VIDE 12
DÉPANNAGE 12
ENREGISTRER UN PRODUIT 14
GUIDE DE STOCKAGE ET DONNÉES TECHNIQUES 15
natural_image
Two black plastic containers with a transparent sheet of paper placed on top, no visible text or symbols.natural_image
Exterior view of a modern office building (no signage)natural_image
Exterior view of a modern office building (no signage)natural_image
Exterior view of a modern stainless steel food processor with dried fruit being placed into a plastic bag (no text or symbols visible)CONSEILS UTILES
natural_image
Exterior view of a modern stainless steel electronic device with a digital display (no visible text or symbols)
nutrichefkitchen.com/ register
GUIDE DE STOCKAGE ET DONNÉES TECHNIQUES
- About NutriChef
- A mission born out of need
- We create products that make life a little easier and a little healthier
- We believe a moment shared is price- less
- TABLE OF CONTENTS
- Initial Use Odor Warning
- IMPORTANT SAFETY INSTRUCTIONS
- READ CAREFULLY AND KEEP FOR FUTURE REFERENCE
- Features:
- Technical Specs:
- What's in the Box:
- Why You Need a Vacuum Sealer
- Preserves Freshness
- Saves Time and Money
- Save Money
- Save Time
- Quick Marination
- Easy Entertaining
- Seasonal Preservation
- Portion Control
- Protect Non-Food Items
- Safeguards & Tips
- Structure and Functions
- OPERATING INSTRUCTIONS
- SEAL VACUUM BAGS AND VACUUM CANISTER SEAL PLASTIC BAGS
- PRESERVATION WITH VACUUM BAG
- PRESERVATION WITH VACUUM CANISTERS
- TIPS ON USING CANISTERS
- HELPFUL HINTS
- TIPS ON VACUUM SEALING WITH ACCESSORIES
- CARE AND CLEANING VACUUM SEALERS
- TROUBLESHOOTING
- AIR WAS REMOVED FROM THE BAG, BUT NOW AIR HAS RE-ENTERED
- THE BAG MELTS
- BAGS AND ROLLS
- IMPORTANT
- PKVS20STS BOTTLE STOPPER
- Note:
- Register Product
- nutrichef™
- CONSEJOS ÚTILES
- Registrar Producto
- CONSEILS UTILES
Brand : Nutrichef
Model : PKVS20STS
Category : Vacuum sealer