
VCEA23GPLBL - Vacuum Cleaner GORENJE - Free user manual and instructions
Find the device manual for free VCEA23GPLBL GORENJE in PDF.

| Product Type | Canister Vacuum Cleaner |
| Model | VCEA23GPLBL |
| Brand | Gorenje |
| Power Consumption | 800 W |
| Dust Bag Capacity | 2.3 L |
| Filter Type | HEPA 12 washable exhaust filter |
| Cord Length | 6 m |
| Working Radius | 8 m |
| Noise Level | 78 dB(A) |
| Weight | 5.2 kg |
| Dimensions (L x W x H) | 40 x 25 x 28 cm |
| Vacuum Type | Bagged |
| Suction Control | Electronic slider on handle |
| Floor Nozzle | Combination floor nozzle for carpet and hard floors |
| Accessories Included | Crevice tool, dusting brush, upholstery nozzle |
| Dust Bag Type | Gorenje microfresh dust bag (type A) |
| Filter Maintenance | Washable exhaust filter; replace every 6 months |
| Repairability | User-replaceable dust bag and filters; spare parts available |
| Safety Features | Overheat protection, automatic cord rewind |
| Color | Black/Blue |
| Energy Class | A (EU rating) |
Frequently Asked Questions - VCEA23GPLBL GORENJE
User questions about VCEA23GPLBL GORENJE
0 question about this device. Answer the ones you know or ask your own.
Ask a new question about this device
Download the instructions for your Vacuum Cleaner in PDF format for free! Find your manual VCEA23GPLBL - GORENJE and take your electronic device back in hand. On this page are published all the documents necessary for the use of your device. VCEA23GPLBL by GORENJE.
USER MANUAL VCEA23GPLBL GORENJE
natural_image
Blue and green vacuum cleaner with black hose, no visible text or symbolsVCEA23GPLBL
| Navodila za uporabo | SI |
| Upute za uporabu | BIH HR |
| Uputstvo za upotrebu | BIH SRB MNE |
| Упатства за употреба | MK |
| Instruction manual | EN |
| Instrucțiuni de utilizare | RO |
| Návod k obsluze | CZ |
| Návod na obsluhu | SK |
| Instrukcja obsługi | PL |
| Használati útmutató | HU |
| Инструкции за употреба | BG |
| Інструкція з експлуатації | UK |
| Руководство по эксплуатации | RUS |
| Gebrauchsanweisung | DE |
| Instructionsmanual | DK |
| Käyttöuhjeet | FI |
| Bruksanvisning | NO |
| Bruksanvisning | SV |
SI Navodila za uporabo .... 3
DK Instructionsmanual....61
FI Käyttöuhjeet 65
NO Bruksanvisning 69
SV Bruksanvisning 73
DIAGRAM
Opis sesalnika
- Zapiralo pokrova
- Stikalo za vklop/izklop
- Stikalo za nastavitev sesalne moči
- Stikalo za navijanje priključne vrvice
- Upogljiva cev
- Teleskopska cev
- Talna krtača
POMEMBNA OPOZORILA
natural_image
Technical line drawing of a vacuum cleaner's internal components, showing open casing and internal gears (no text or labels)- Vrečko zamenjajte z novo, kadar je polna.
- S pritiskom zaprite pokrov dokler se ne zaklene.
natural_image
Technical line drawing of a mechanical device with internal components and a directional arrow (no text or symbols)Opis usisavača
natural_image
Technical line drawing of a vacuum cleaner's internal components, showing open lid and internal casing (no text or symbols)natural_image
Technical line drawing of a mechanical device with internal components and a directional arrow (no text or symbols)Opis usisivača
- Zatvarač poklopca
- Prekidač za uključivanje/isključivanje
- Dugme za podešavanje snage usisavanja
- Prekidač za namotavanje priključnog kabla
- Elastična cev
- Teleskopska cev
- Podna četka
Važna upozorenja
natural_image
Technical line drawing of a vacuum cleaner's internal components, showing open lid and internal casing with no text or symbols- Kad se kesica napuni prašinom, zamenite je novom.
- Pritiskom zatvorite poklopac da se čujno zabravi.
2. Zamena filtera
- Otvorite zatvarač filtra.
- Otvarajući zatvarač filtra, pomoću dva prsta povucite plastični nosač.
- Odstranite istrošeni filtar i zamijenite ga čistim filtrom.
- Zatvorite zatvarač filtra.
natural_image
Technical line drawing of a mechanical device with internal components and a directional arrow (no text or symbols)Čišćenje i nega aparata
natural_image
Technical line drawing of a car's internal components, showing open lid and internal compartments (no text or symbols)natural_image
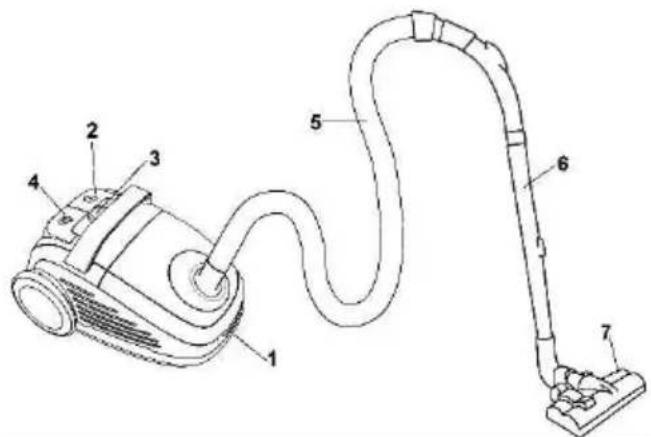
Technical line drawing of a car interior showing structural components and airflow direction (no text or symbols)Description
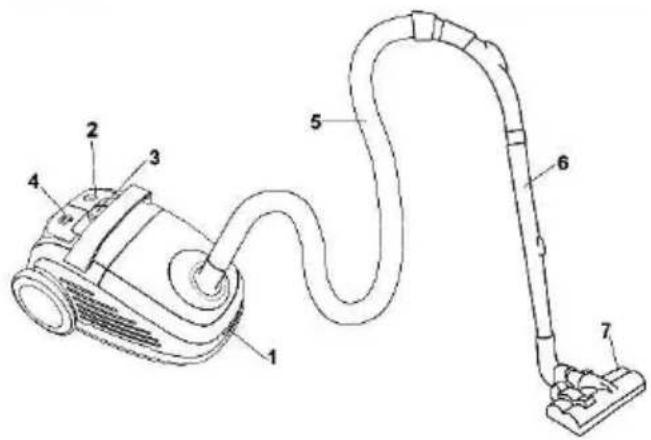
- Snap-on lock for opening cover
- On/Off button
- Power control button
- Cord rewind button
- Hose
- Extension tube
- Floor brush
Important safeguards
Wheniusingithisuappliancekibasici precautionsishouldualwaysiben followed:и
• Tl3hjs3 r3hш tЧ3 снбк3ty CnstruAtCons
Ангзкулly ньш us3 tЧ3 нрpllСъпA3 only
Сп ньAAorшъпA3 ўCtЧ tЧ3s3
CnstruAtCons.
• но пот I3ньt3 tЧЗ нъррІСњпАЗ
ипьтт3нш3ш ширСпО us3.
• льутCon: tss3mKl3 tЧЗ нррлСньпАЗ Аързкуль Кзкогр 3 usCnO Ct.
• но not l3ħt3 tЧ3 нррлСъпАЗ
ипъtt3nw3ш ўЧ3n Ct Cs pluООЗш Сп.
Tull tЧ3 pluO нъkt3r us3 or ўЧ3n
p3rkormCnO тньCnt3нъпАЗ ўork.
- k4Cs нррлСъпА3 Cs not Cnt3нш3ш қөг us3 Ky p3rsons (CnAluшCnO АЧСіwr3n) ăCtЧ r3шуАЗш pЧysСАңл, s3nsory or · m3ntыл АньрнЬКСІтС3s, or ІнЬАк оқ 3хр3rС3пАЗ ньш knoăl3шОЗ, unl3ss tЧЗу Чьт3 КЗ3п ОСт3н sup3rtCsCon · or CnstruAtCon AonA3rnCnO ұс3 оқ tЧЗ нррлСъпА3 Ky нь p3rson r3sponsСКІз қөг tЧЗCr снък3ty. ЛЧСіwr3n sЧoulш КЗ sup3rtCs3ш to 3nsur3 tЧьт tЧЗу шо not ріњу ăCtЧ tЧЗ нррлСъпА3.
CAUTION: Never use the vacuum cleaner without the filters.
Vacuum cleaner use only for home and in the inner rooms!
Do not use a vacuum cleaner in very dirty places, it will immediately obstruct HEPA filter!
163 Connection to the mains supply
Check, please, whether the voltage stated on the data plate comply with the data of your house remains supply.
Supply cord
If the supply cord is damaged, it must be replaced with the suitable cord, or a set for coiling the cable, which you can get in the nearest Gorenje's service outlet.
If the mains cord is damaged, you must have it replaced by Gorenje, a service centre authorised by Gorenje or similarly qualified persons in order to avoid a hazard.
Data on compliance with European standards
Test for this type of appliance confirmed that it complies with the following European directives:
• 2014/35/EU
• 2014/30/EU
• 2009/125/ES
• 2011/65/EU
666/2013/EU
This appliance is marked according to the European directive 2012/19/EU on Waste Electrical and Electronic Equipment (WEEE). This guideline is the frame of a European-wide validity of return and recycling on Waste Electrical and Electronic Equipment.
Elimination of the appliances and environment
If one day you decide to change your appliance, or you just do not need it any more, think about the environmental protection.
Vacuum cleaner assembling
Always remove the plug from the power supply before fitting or removing accessories. Before
putting the appliance into service, please check if all filters are inserted correctly.
ASSEMBLY OF THE SUCTION HOSE
- Insert the flexible suction hose into the connection opening at the top of the housing until you can feel it lock.
HOSE REMOVING
- To remove flexible hose from the vacuum cleaner, press the buttons situated on the flexible hose base, then pull to remove it from the attachment point.
ROLLING THE CABLE OUT AND UP
- Pull out the cable to such a length that easy working is ensured. Now connect the appliance to the main supply. Press the switch to activate the automatic rewinder and hold on the mains plug for safety reason.
FITTING TUBE AND ACCESSORIES
- Extend the tube to the desired length by pressing on button.
- Insert a flexible hose into a tube.
- Fit a nozzle to tube:
- Floor brush is intended for cleaning bare floor and floor coverings.
- 3 pcs. set of nozzles are appropriate for cleaning corners and other small, inaccessible places.
- Carpet brush is appropriate for cleaning carpets, carpetings and other similar surfaces.
Instruction for use
- Before using the appliance, unwind a sufficient length of cord and insert the plug into the power supply.
- Press the On/Off button to switch the unit on. To stop it press the On/Off button again.
- You can adjust the air flow using the air flow regulator on the flexible hose:
- decrease power for cleaning curtains, books, furniture, etc.
- increase power for cleaning bare floor.
To rewind the cord, press the rewind button and guide the cord with hand to ensure that it does not whip causing damage.
Maintenance
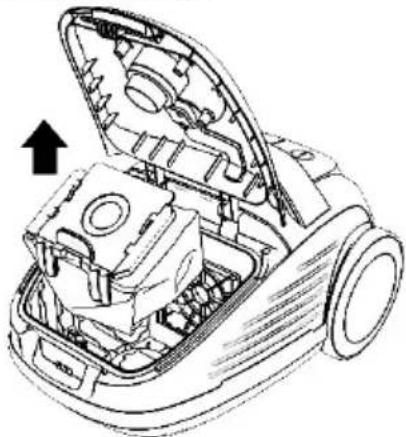
1. Changing of the dust bag
• Always operate the cleaner with dust bag installed.
- If you forget to attach the dust bag or attach it in the wrong manner, the dust cover may not close completely.
- After removing the flexible tube, open the front cover.
- Rotate the support of the bag to the correct position.
- Remove the dust bag.
natural_image
Technical line drawing of a vacuum cleaner's internal components, showing open lid and internal casing (no text or symbols)-
Replace the bag when it is full of dirt and put in a new one.
-
Close the cover by passing down unitil it is locked.
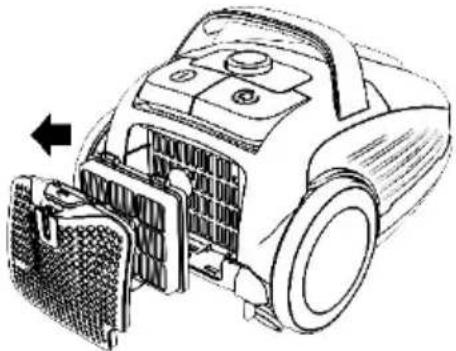
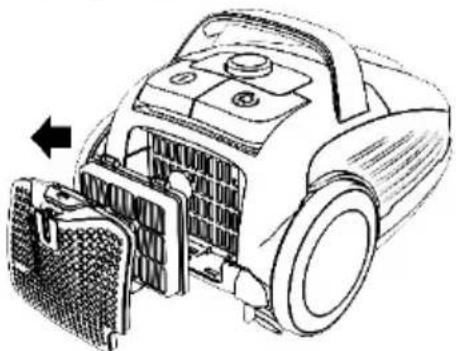
2. Cleaning filter
- Open the cover for HEPA filter.
- When open the cover for HEPA filter, use your two fingers pulling ouch for HEPA, then pulling HEPA up.
- Take the HEPA out and change a clean one.
- Close the cover for HEPA filter.

natural_image
Technical line drawing of a robotic vacuum cleaner with internal components and a directional arrow (no text or symbols)Care and cleaning
Switch off the appliance and pull out the plug from the power supply.
Clean the outside of the appliance with a soft cloth with mild detergent. Harsh or abrasive detergent will damage the outside surface. Never immerse the appliance or cord into water and other liquids.
CAUTION:
When the dust bin full indicator reaches the middle of the window, clean the dust bin. Never use the appliance without filters. Do not use a washing machine to rinse filters. Do not use a hair drier to dry them.
Storage
Parking system serves for parking suction tube/floor nozzle during short-term interruptions. For this purpose, please insert the holder of the floor nozzle into parking rail of the device.
Environment
Do not throw away the appliance with the normal household waste at the end of its life, but hand it in at an official collection point for recycling. By doing this, you help to preserve the environment.
Guarantee & service
If you need information or if you have a problem, please contact the Gorenje Customer Care Centre in your country (you find its phone number in the worldwide guarantee leaflet). If there is no Customer Care Centre in your country, go to your local Gorenje dealer or contact the Service department of Gorenje domestic appliances.
For personal use only!
GORENJE WISHES YOU A LOT OF PLEASURE WHEN USING YOUR APPLIANCE
DIAGRAM

Descriere
natural_image
Technical line drawing of a vacuum cleaner's internal components, showing open casing and internal gears (no text or labels)natural_image
Technical line drawing of a mechanical device with internal components and a directional arrow (no text or symbols)natural_image
Technical line drawing of a vacuum cleaner's internal components, showing open casing and internal compartments (no text or labels)natural_image
Technical line drawing of a car interior showing internal components and a directional arrow (no text or symbols)Údržba a čištění
natural_image
Line drawing of a car's internal components, showing open lid and internal compartments (no text or symbols)- Vymeňte vrecúško na smeti, ked' je plné a založte nové.
- Zatvorte kryt smerom dole, kým nezaklapne.
2. Výmena filtra
- Otvorte kryt filtra.
- Ked' otvoríte kryt filtra, pomocou vašich dvoch prstov chyt'te filter a vytiahnite ho nahor.
- Vyberte filter von a vymeňte ho za nový.
- Zatvorte kryt filtra.
natural_image
Technical line drawing of a mechanical device with internal components and a directional arrow (no text or symbols)Údržba a čistenie
Opis
natural_image
Technical line drawing of a vacuum cleaner's internal components, showing open casing and internal gears (no text or labels)natural_image
Technical line drawing of a vacuum cleaner with internal components and a directional arrow indicating motion (no text or symbols)Ismertetés
natural_image
Technical line drawing of a vacuum cleaner's internal components, showing open casing and internal compartments (no text or labels)natural_image
Technical line drawing of a robotic vacuum cleaner with internal components and fan base (no text or symbols)natural_image
Technical line drawing of a car's internal components, showing open lid and internal parts (no text or symbols)natural_image
Technical line drawing of a mechanical device with internal components and a directional arrow (no text or symbols)Почистване
natural_image
Technical line drawing of a vacuum cleaner's internal components, showing open lid and internal casing (no text or labels)natural_image
Technical line drawing of a car interior showing airflow or ventilation system (no text or symbols)Чищення та догляд
natural_image
Technical line drawing of a vacuum cleaner's internal structure, showing open casing and internal components (no text or labels)natural_image
Technical line drawing of a mechanical device with internal components and a directional arrow (no text or symbols)Уход и чистка
natural_image
Technical line drawing of a vacuum cleaner's internal components, showing open casing and internal wiring (no text or labels)natural_image
Technical line drawing of a car interior showing engine, fan, and exhaust components (no text or symbols)Beskrivelse
natural_image
Technical line drawing of a vacuum cleaner's internal components, showing open casing and internal gears (no text or labels)natural_image
Technical line drawing of a mechanical device with internal components and a directional arrow (no text or symbols)Kuvaus
natural_image
Line drawing of an open industrial vacuum cleaner with internal components and a directional arrow indicating assembly (no text or symbols)natural_image
Technical line drawing of a vacuum cleaner with internal components and fan base (no text or symbols)Hoito ja puhdistus
Beskrivelse
natural_image
Line drawing of a vacuum cleaner's internal structure showing open casing, gears, and housing (no text or symbols)natural_image
Technical line drawing of a vacuum cleaner internal structure (no text or symbols)Stell og rengjøring
GORENJE ∅NSKER DEG LYKKE TIL MED DET NYE APPARATET
DIAGRAM
Beskrivning
RULLA UT OCH IN SLADDEN
natural_image
Technical line drawing of a vacuum cleaner's internal components, showing open casing and internal wiring (no text or labels)natural_image
Technical line drawing of a mechanical device with internal components and a directional arrow (no text or symbols)- DIAGRAM
- Opis sesalnika
- POMEMBNA OPOZORILA
- Opis usisavača
- Opis usisivača
- Važna upozorenja
- Zamena filtera
- Čišćenje i nega aparata
- Description
- Important safeguards
- Wheniusingithisuappliancekibasici precautionsishouldualwaysiben followed:и
- Connection to the mains supply
- Supply cord
- Data on compliance with European standards
- Elimination of the appliances and environment
- Vacuum cleaner assembling
- ASSEMBLY OF THE SUCTION HOSE
- HOSE REMOVING
- ROLLING THE CABLE OUT AND UP
- FITTING TUBE AND ACCESSORIES
- Instruction for use
- Maintenance
- Changing of the dust bag
- Cleaning filter
- Care and cleaning
- CAUTION:
- Storage
- Environment
- Guarantee & service
- GORENJE WISHES YOU A LOT OF PLEASURE WHEN USING YOUR APPLIANCE
- Descriere
- Údržba a čištění
- Výmena filtra
- Údržba a čistenie
- Opis
- Ismertetés
- Почистване
- Чищення та догляд
- Уход и чистка
- Beskrivelse
- Kuvaus
- Hoito ja puhdistus
- Stell og rengjøring
- GORENJE ∅NSKER DEG LYKKE TIL MED DET NYE APPARATET
- Beskrivning
- RULLA UT OCH IN SLADDEN
Brand : GORENJE
Model : VCEA23GPLBL
Category : Vacuum Cleaner