
VC2303RCYIV - Vacuum Cleaner GORENJE - Free user manual and instructions
Find the device manual for free VC2303RCYIV GORENJE in PDF.


| Product Type | Canister Vacuum Cleaner |
| Brand | Gorenje |
| Model | VC2303RCYIV |
| Dimensions (H x W x D) | Approx. 400 x 280 x 220 mm |
| Weight | Approx. 5 kg |
| Power Consumption | 900 W |
| Dust Bag Capacity | 2 L |
| Cord Length | 5 m |
| Operating Radius | 8 m |
| Noise Level | 78 dB(A) |
| Filtration System | HEPA filter |
| Vacuum Type | Bagged |
| Power Control | Electronic slider on handle |
| Accessories Included | Floor nozzle, crevice tool, upholstery brush |
| Maintenance | Replace dust bag when full; clean filter every 3 months |
| Safety Features | Thermal cut-off; automatic cord rewind |
| Repairability | Spare parts available through Gorenje service centers |
| Warranty | 2 years |
| Manual Languages | BG, CS, EN, HU, MK, PL, RO, RU, SK, SL, UK |
Frequently Asked Questions - VC2303RCYIV GORENJE
User questions about VC2303RCYIV GORENJE
0 question about this device. Answer the ones you know or ask your own.
Ask a new question about this device
Download the instructions for your Vacuum Cleaner in PDF format for free! Find your manual VC2303RCYIV - GORENJE and take your electronic device back in hand. On this page are published all the documents necessary for the use of your device. VC2303RCYIV by GORENJE.
USER MANUAL VC2303RCYIV GORENJE
| Navodila za uporabo | SI |
| Upute za uporabu | BIH HR |
| Uputstvo za upotrebu | BIH SRB MNE |
| Упатства за употреба | MK |
| Instruction manual | EN |
| Інструкція з експлуатації | UK |
| Návod na obsluhu | SK |
| Instrukcja obsługi | PL |
| Instrucțiuni de utilizare | RO |
| Használati útmutató | HU |
| Инструкции за употреба | BG |
| Руководство по эксплуатации | RUS |
| Návod k obsluze | CZ |
Vacuum cleaner description
- Dust container and filter
- On/off switch
- Cord rewind switch
- Suction power adjustment button
- Flexible hose
- Telescopic tube
- Floor brush
Important warnings
- Remove the container from the appliance and empty it by pressing the button to open it.

- Empty the container and close it again.
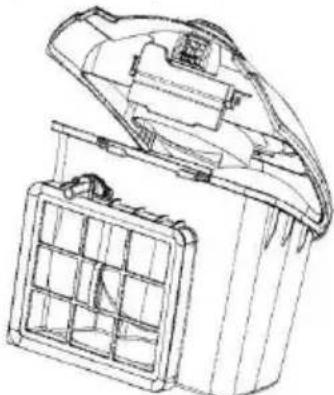
- Insert the container back into the vacuum cleaner.
3. Replacing the EXHAUST filter
The filter is located behind the grille, which you can see on the top side of the vacuum cleaner.
- Open the grille.
- The filter is located on the grille.
- Replace the filter with a new one, placing it in its position.
- Put the grille with the new filter back in its place.

Description of the vacuum cleaner
- Move the container away from the appliance and empty it by pressing the button so that only it opens.

- Empty the container and then close it again.

- Insert the container back into the vacuum cleaner.
3. Changing the filter
The filter is located behind the grille that you see on the top side of the vacuum cleaner.
- Dust container and filter
- On/off switch
- Cable rewind switch
- Suction power adjustment button
- Elastic hose
- Telescopic tube
- Floor brush
Important warnings
- Move the container away from the appliance and empty it by pressing the button so that only it opens.

- Empty the container and then close it again.
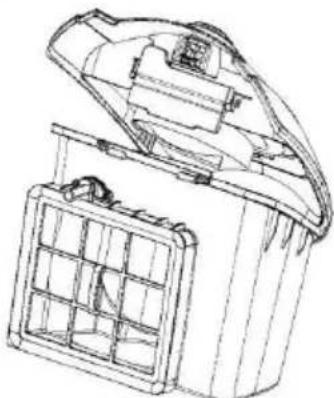
- Insert the container back into the vacuum cleaner.
2. Cleaning and replacing the filter
3. CHANGING THE OUTLET FILTER
The filter is located behind the grille you see on the top side of the vacuum cleaner.
- Open the grille.
- The filter is on the grille.
- Replace the filter with a new one and put it back in place.
- Put the grill with the new filter back in its place.

Cleaning and care of the appliance
- Dust compartment and filter
- On/Off button
- Cord rewind button
- Power control button
- Hose
- Telescopic tube
- Floor brush
IMPORTANT safeguards
When using this appliance, basic precautions should always be followed:
- Please read the safety instructions carefully and use the appliance only in accordance with these instructions.
- Do not leave the appliance unattended during use.
- Caution: Assemble the appliance carefully before using it.
- Do not leave the appliance unattended when it is plugged in. Pull the plug after use or when performing maintenance work.
- This appliance is not intended for use by persons (including children) with reduced physical, sensory or mental capabilities, or lack of experience and knowledge, unless they have been given supervision or instruction concerning use of the appliance by a person responsible for their safety. Children should be supervised to ensure that they do not play with the appliance.
- The appliance is only to be used indoors, in dry rooms. The appliance must not be used for liquids.
- Operate the appliance only with parts recommended by the manufacturer.
- Do not use the device if it has been dropped, damaged, kept outdoors, or has fallen into water.
- Do not pull or carry the appliance by holding the cable only. Protect the cable from hot surfaces or other damages and do not wedge it.
- Do not pull the cable to unplug the appliance.
- Do not operate or touch the appliance or cable with wet hands.
- Do not insert any object into the openings.
- Keep the opening free from dust, hairs or other objects which might reduce the cleaning power.
- Keep your hair, loose clothes, fingers and any other body parts away from openings or moving parts.
- Switch off the device before pulling the plug.
- When cleaning stairs, pay particular attention.
- Do not use the vacuum cleaner for: embers, burning cigarette stubs, matches, etc.; liquid materials (e.g., wet carpet foam); hard, sharp objects (e.g., splinters of glass).
- Do not use the appliance with a non-permissible extension cable.
- Keep the suction hose opening and other openings away from your face and body.
- Do not use the vacuum cleaner without a dust bag, outlet air filter, or motor filter.
- The appliance is to be stored indoors, in dry rooms only. Put the appliance aside after use.
- Hold the plug when using the automatic cable rewind.
- Switch off the device when connecting or changing the suction hose or nozzles.
- The appliance is not to be used for toner dust or similar materials.
- During use, keep the suction tube, suction hose, and nozzles away from your head to prevent injuries.
- For longer use, pull out at least 2/3 of the cable length to avoid overheating and damage.
- The appliance fulfills the applicable German and European electrical standards as well as the radio interference suppression regulations.
- Never use your vacuum cleaner for vacuuming building materials (such as fine sand, lime, cement dust, etc.). Absorbed building material can damage your appliance.
- When using the vacuum cleaner for several hours at a time, pull the connecting cable all the way out.
- Noise level: Lc < 84 dB(A)
CAUTION: Never use the vacuum cleaner without the filters.
The vacuum cleaner is intended for household use only and in indoor rooms!
Connection to the mains supply
Please check that the voltage stated on the data plate complies with the data of your house mains supply.
Supply cord
If the supply cord is damaged, it must be replaced with a suitable cord or a set for coiling the cable, which you can obtain from the nearest Gorenje service outlet.
If the mains cord is damaged, it must be replaced by Gorenje, a service centre authorised by Gorenje, or similarly qualified persons in order to avoid a hazard.
Data on compliance with European standards
Tests for this type of appliance have confirmed that it complies with the following European directives:
• 2006/95/EEC Low Voltage • 93/68/EEC CE Marking - 2004/108/EC Directive on Electromagnetic Compatibility – EMC
This appliance is marked according to the European directive 2002/96/EC on Waste Electrical and Electronic Equipment (WEEE). This guideline is the framework for a European-wide validity of return and recycling of Waste Electrical and Electronic Equipment.
Elimination of the appliances and environment
If one day you decide to change your appliance, or you just do not need it any more, think about the environmental protection.
Vacuum cleaner assembling
Always remove the plug from the power supply before fitting or removing accessories. Before putting the appliance into service, please check if all filters are inserted correctly.
ASSEMBLY OF THE SUCTION HOSE
Insert the flexible suction hose into the connection opening at the top of the housing until you can feel it lock.
HOSE REMOVING
To remove flexible hose from the vacuum cleaner, press the buttons situated on the flexible hose base, then pull to remove it from the attachment point.
ROLLING THE CABLE OUT AND UP
Pull out the cable to such a length that easy working is ensured. Now connect the appliance to the main supply. Press the switch to activate the automatic rewinder and hold on the mains plug for safety reason.
FITTING TUBE AND ACCESSORIES
- Insert a flexible hose into a telescopic tube.
- Insert a flexible hose into a telescopic tube. • Fit a nozzle to telescopic tube:
- Floor brush is intended for cleaning bare floor and floor coverings.
- Crevice/furniture nozzle is for cleaning corners and between cushions. According to the mark rotate the nozzle to brush position to clean curtain or dust on the decorating surfaces.
Instruction for use
- Before using the appliance, unwind a sufficient length of cord and insert the plug into the power supply.
- Press the On/Off button to switch the unit on. To stop it, press the On/Off button again.
- You can adjust the air flow using the air flow regulator on the flexible hose:
- Decrease power for cleaning curtains, books, furniture, etc.
- Increase power for cleaning bare floor.
To rewind the cord, press the rewind button and guide the cord with your hand to ensure that it does not whip and cause damage.
Maintenance
1. Emptying the dust compartment assembly
- Always operate the cleaner with the dust compartment assembly fully installed.
- If you forget to attach a filter or attach it incorrectly, the dust compartment assembly may not rinse properly.
- After removing the flexible hose, press the locking buttons to open the cover.
- Carry the dust compartment subassembly.

- Carry away the dust-glass cap and spill rubbish.

- Spill rubbish and fix the dust compartment subassembly.

- Replace the dust compartment subassembly until it is locked.
2. CLEANING AND CHANGING FILTER
- The filter for air-inlet should be cleaned at least twice a year or when it becomes visibly solid. We suggest cleaning the filter after every long use.
- With regular cleaning and maintenance of the filter, you will achieve good cleaning results, and hence a longer life for the appliance.
- To achieve this, we recommend the following cleaning methods:
- Cleaning with a brush,
- Shaking the dust from the filter,
- Cleaning the dust from the filter with compressed air.
A clean filter provides a smooth air flow and allows optimal suction power.

3. CHANGING THE OUTLET FILTER
- Open the grille for air-outlet.
- When the air-outlet grille is opened, the air-outlet filter is found.
- Remove the filter and replace it with a clean one.
- Close the air-outlet grille.

Care and cleaning
Switch off the appliance and unplug it from the power supply.
Clean the exterior of the appliance with a soft cloth and mild detergent. Harsh or abrasive detergents will damage the exterior surface.
Never immerse the appliance or cord in water or other liquids.
CAUTION:
When the dust bin full indicator reaches the middle of the window, clean the dust bin.
Never use the appliance without filters.
Do not rinse filters in a washing machine. Do not dry them with a hair dryer.
STORAGE
The parking system is used to park the suction tube/floor nozzle during short interruptions.
To do this, insert the holder of the floor nozzle into the parking rail of the device.
Environment
Do not throw away the appliance with the normal household waste at the end of its life, but hand it in at an official collection point for recycling. By doing this, you help to preserve the environment.
Guarantee & service
If you need information or if you have a problem, please contact the Gorenje Customer Care Centre in your country (you find its phone number in the worldwide guarantee leaflet). If there is no Customer Care Centre in your country, go to your local Gorenje dealer or contact the Service department of Gorenje domestic appliances.
For personal use only!
GORENJE WISHES YOU A LOT OF PLEASURE WHEN USING YOUR APPLIANCE
DESCRIPTION

3. REPLACING THE AIR OUTLET FILTER
Cleaning and care
3. REPLACING THE AIR OUTLET FILTER
Maintenance and cleaning
2. CLEANING AND REPLACING THE FILTER
3. REPLACING THE OUTLET FILTER
1. Emptying the dust compartment
3. REPLACING THE FILTER
Cleaning
3. REPLACING THE EXHAUST FILTER.
Care and cleaning
- Put it back.
2. CLEANING AND REPLACING THE FILTER
3. REPLACING THE EXTERNAL FILTER
Maintenance and cleaning
- VACUUM CLEANER DESCRIPTION
- IMPORTANT WARNINGS
- REPLACING THE EXHAUST FILTER
- DESCRIPTION OF THE VACUUM CLEANER
- CHANGING THE FILTER
- CLEANING AND REPLACING THE FILTER
- CHANGING THE OUTLET FILTER
- CLEANING AND CARE OF THE APPLIANCE
- IMPORTANT SAFEGUARDS
- WHEN USING THIS APPLIANCE, BASIC PRECAUTIONS SHOULD ALWAYS BE FOLLOWED
- CONNECTION TO THE MAINS SUPPLY
- SUPPLY CORD
- DATA ON COMPLIANCE WITH EUROPEAN STANDARDS
- ELIMINATION OF THE APPLIANCES AND ENVIRONMENT
- VACUUM CLEANER ASSEMBLING
- ASSEMBLY OF THE SUCTION HOSE
- HOSE REMOVING
- ROLLING THE CABLE OUT AND UP
- FITTING TUBE AND ACCESSORIES
- INSTRUCTION FOR USE
- MAINTENANCE
- EMPTYING THE DUST COMPARTMENT ASSEMBLY
- CLEANING AND CHANGING FILTER
- CARE AND CLEANING
- CAUTION
- STORAGE
- ENVIRONMENT
- GUARANTEE & SERVICE
- GORENJE WISHES YOU A LOT OF PLEASURE WHEN USING YOUR APPLIANCE
- DESCRIPTION
- REPLACING THE AIR OUTLET FILTER
- CLEANING AND CARE
- MAINTENANCE AND CLEANING
- REPLACING THE OUTLET FILTER
- EMPTYING THE DUST COMPARTMENT
- REPLACING THE FILTER
- CLEANING
- REPLACING THE EXTERNAL FILTER
Brand : GORENJE
Model : VC2303RCYIV
Category : Vacuum Cleaner