HWT8A3GT - Tumble drier Hanseatic - Free user manual and instructions
Find the device manual for free HWT8A3GT Hanseatic in PDF.


| Brand | Hanseatic |
| Model | HWT8A3GT |
| Product Type | Heat Pump Tumble Dryer |
| Capacity | 8 kg (cotton) |
| Energy Efficiency Class | A+++ |
| Annual Energy Consumption | 175.5 kWh/year (based on 160 cycles) |
| Standard Cotton Program Energy (full load) | 1.44 kWh |
| Standard Cotton Program Energy (partial load) | 0.80 kWh |
| Condensation Efficiency Class | 3 (on scale A to G) |
| Weighted Condensation Efficiency | 81% |
| Program Time (full load) | 159 min |
| Program Time (partial load) | 96 min |
| Supply Voltage / Frequency | 220-240 V, 50 Hz |
| Rated Power | 750 W |
| Dimensions (H x W x D) | 64 cm x 59.5 cm x 84.5 cm |
| Weight (unloaded) | 54 kg |
| Refrigerant | R290 (eco-friendly, flammable) |
| Programs | Cotton, Delicates, Synthetics, Wool, Jeans, Bed Linen, Sport, Shirts, Customized, Time (Warm/Cool/Airing) |
| Special Features | Delay start (up to 24h), Drying intensity adjustment, Anti-crease (up to 120 min), Interior light, Child lock |
| Condensate Drawer | Removable, must be emptied after each use |
| Filters | Lint filter (clean after each use), Bottom filter (clean every 5 cycles or if cycle extends), Heat exchanger (clean every 2 months) |
| Ventilation | Front and rear grilles must remain unobstructed |
| Noise Level | 65 dB(A) re 1 pW |
| Water Drain Hose | Optional, included; allows direct drainage |
| Safety | Child lock, overheat protection, residual-current device recommended |
| Item Number | 2921 5408 |
Frequently Asked Questions - HWT8A3GT Hanseatic
User questions about HWT8A3GT Hanseatic
0 question about this device. Answer the ones you know or ask your own.
Ask a new question about this device
Download the instructions for your Tumble drier in PDF format for free! Find your manual HWT8A3GT - Hanseatic and take your electronic device back in hand. On this page are published all the documents necessary for the use of your device. HWT8A3GT by Hanseatic.
USER MANUAL HWT8A3GT Hanseatic
natural_image
Line drawing of a washing machine with front panel, side door, and control panel (no text or symbols)Gebrauchsanleitung
Wärmepumpentrockner
Inhaltsverzeichnis
natural_image
Technical line drawing of a washing machine with a hand cleaning the lid (no text or symbols)natural_image
Line drawing of hands installing or adjusting a mechanical component (no text or symbols present)natural_image
Line drawing of a mechanical device with a handle and mounting bracket (no text or symbols)natural_image
Line drawing of a hand inserting a device into a rectangular device with lockers (no text or symbols)natural_image
Line drawings of a washing machine, a hose, and a bracket (no text or symbols)Lieferumfang
natural_image
Diagram of a medical device with a foot-shaped component and attached wires (no text or labels)| Item number | 2921 5408 |
| Model identifier | HWT8A3GT |
| Supply voltage / frequency | 220-240 V, 50 Hz |
| Rated power | 750 W |
| Device measurements (Height × Width × Depth with connections) | 64 cm × 59.5 cm × 84.5 cm |
| Unloaded weight | 54 kg |
HWT8A3GT
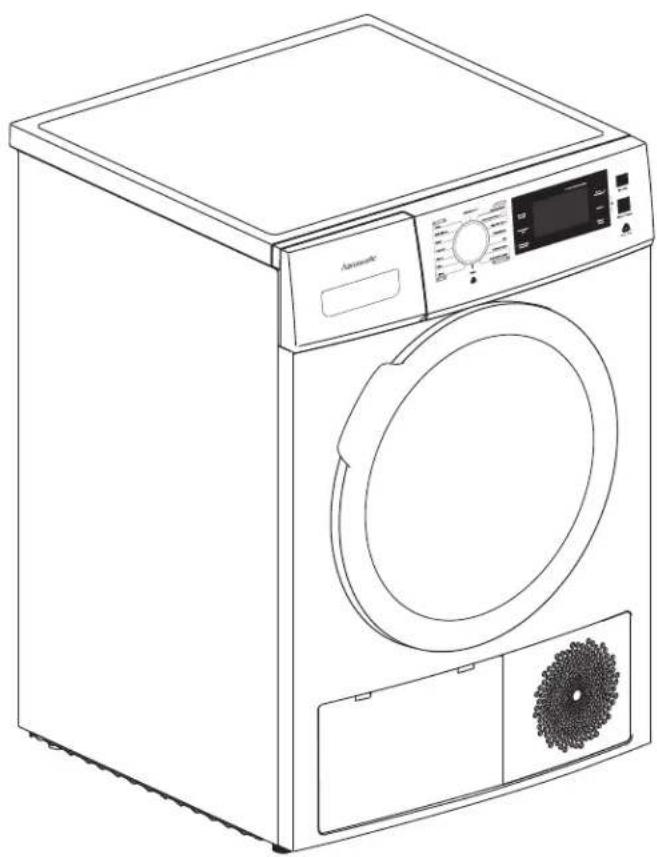
natural_image
Line drawing of a washing machine with front panel, side door, and control panel (no text or symbols)User manual
Heat pump dryer
Table of contents
Explanation of terms and symbols .....EN-3
Explanation of terms .....EN-3
Explanation of symbols....EN-3
Safety .EN-4
Intended use .....EN-4
Safety information....EN-4
Controls and appliance parts ..... EN-10
Button panel....EN-11
Indicators on the display .....EN-11
Cycle selection.... EN-12
Program table EN-13
Drying process EN-14
Before getting started ..... EN-14
Loading laundry . . . . . . . . . . . . . . . . . . EN-14
Starting the cycle ..... EN-14
Interrupting and continuing a cycle .... EN-14
Cancelling or modifying the cycle ..... EN-14
End of cycle ..... EN-15
After the drying process ..... EN-15
Setting options EN-16
Setting the start time ..... EN-16
Setting the drying time ..... EN-16
Setting the drying intensity ..... EN-16
Switching on/off the interior light ..... EN-17
Activating/deactivating sound ..... EN-17
Setting the anti-crease feature ..... EN-17
Activating/deactivating the safety lock..EN-17
Customised settings EN-17
Tips for drying ..... EN-18
Cleaning and maintenance ..... EN-19
Regular checks EN-19
Cleaning the appliance door ..... EN-19
Cleaning the drum ..... EN-19
Emptying the condensate drawer ..... EN-20
Cleaning the lint filter ..... EN-20
Cleaning the bottom filter ..... EN-21
Cleaning the heat exchanger ..... EN-22
Delivery.... EN-23
Package contents EN-23
Checking package contents ..... EN-23
Installation and connection ..... EN-24
Transport...... EN-24
Setting up the appliance ..... EN-24
Aligning the appliance ..... EN-24
Attaching the water drain hose (optional) ..... EN-25
Connecting the appliance to the mains. EN-26
Before first use ...... EN-26
Troubleshooting EN-27
Waste prevention, free return and disposal .... EN-29
Waste prevention EN-29
Free return of old electrical appliances .... EN-29
Disposal.... EN-29
Packaging EN-30
Service EN-31
Advice, order and complaint ..... EN-31
Repairs, replacement parts and accessories.... EN-31
Product fiche in compliance with Regulation (EU) No. 392/2012 ..... EN-32
Technical specifications EN-33

Please read through the safety notices and the user manual carefully before using the appli-
ance. This is the only way you can use all the functions safely and reliably.
Be sure to also observe the national regulations in your country, which are valid in addition to the regulations specified in this user manual.
Keep all safety notices and instructions for future reference. Pass all safety notices and instructions on to the subsequent user of the product

You can find more information on setting up and connecting the appliance from page EN-24.
Explanation of terms and symbols
Explanation of terms
The following signal terms can be found in this user manual.

WARNING
This signal term indicates a hazard which, if not avoided, could result in death or serious injury.

CAUTION
This signal term indicates a hazard which, if not avoided, could result in minor or moderate injury.

NOTICE
This signal term warns against possible damage to property.
Explanation of symbols
The following symbols can be found in this user manual:

This symbol refers to useful additional information.

CAUTION: Hot surface!

WARNING: Fire hazard!

This appliance complies with the relevant European and national guidelines. This is confirmed with the CE label (corresponding explanations are available from the manufacturer).

Protective earthing

The energy-efficiency test program “standard cotton cycle”, which complies with Regulation 392/2012/EU and the EN 61121 standard and is suitable for drying normal cotton fabrics at the nominal capacity.
WOOL CARE
The wool cycle of this tumble dryer has been approved by the Woolmark Company for drying machine-washable wool products, provided that the products are washed and dried in accordance with the care instructions on the sewn-in label and the instructions from the manufacturer of this tumble dryer.
M1716: HWT8A3GT.
Safety
Intended use
This appliance is intended for drying typical amounts of laundry in a domestic setting (maximum of 8 kg). It should be used only for drying laundry that has been washed in water. It was designed exclusively for use in private households and is not designed for commercial use or shared use (e.g. use by several parties in a block of flats).
If the supply cord is damaged, it must be replaced by the manufacturer, its service agent or similarly qualified persons in order to avoid a hazard.
Use the appliance only as described in this user manual. Any other use is deemed improper and may result in damage to property or even personal injury. The manufacturer accepts no liability for damage caused by improper use.
Safety information
Read important safety instructions carefully and store for future use.
In this chapter you will find general safety instructions that you must always observe for your own protection and that of third parties. Please also observe the warnings in the individual chapters on installation, fitting and assembly, etc.
Risks for children and certain groups of people

WARNING
Risk of suffocation!
Children can become entangled in the packaging fi lm or swallow small parts and suffocate.
■ Do not allow children to play with the packaging fi lm.
■ Prevent children from pulling small parts from the device or taking them out of the accessory bag and putting them in their mouths.
Children and pets could lock themselves in the drum when playing and so endanger their lives.
■ Ensure that children have no access to the appliance when unsupervised, regardless of whether the appliance is switched on or off.
- Check the appliance prior to each operation.

WARNING
Risk of injury!
Children and certain groups of people have a higher risk of being injured when handling the appliance.
■ This appliance can be used by children aged from 8 years and above and persons with reduced physical, sensory or mental capabilities or lack of experience and knowledge if they have been given supervision or instruction concerning use of the appliance in a safe way and understand the hazards involved.
■ Children shall not play with the appliance.
■ Cleaning and user maintenance shall not be made by children without supervision.
■ Children of less than 3 years should be kept away unless continuously supervised.
Risk of corrosion!
Detergents cause severe burns of the skin and severe eye damage. They can cause burns in the mouth and throat or lead to suffocation.
■ Prevent children from coming into contact with detergents.
- Keep children away from the open appliance. There may still be remnants of detergents inside. The water inside is not potable drinking water.
■ Consult a doctor immediately if the child has been exposed to detergent in their mouth.
Risk of poisoning!
Washing detergents and fabric-care products can be harmful to health.
- Keep these products out of the reach of children and pets.
Risks in handling household electrical appliances

WARNING
Risk of electric shock!
Touching live parts may result in severe injury or death.
■ Only use the appliance indoors.
■ Never use the appliance in a damp or wet environment.
■ Do not operate or continue to operate the appliance if
- it shows visible signs of damage – for example, the mains cable is defective.
- it starts smoking or gives off a burning smell.
– it makes unfamiliar noises.
In this happens, unplug the appliance from the mains or disable/unscrew the fuse and contact our service department see “Service” on page EN-31).
■ Investigations and repairs to the appliance may only be carried out by authorised specialists, such as our service department see “Service” on page EN-31).
■ Unauthorised repairs to the appliance can cause property damage and personal injury, and invalidate liability and warranty claims. Never try to repair the appliance yourself.
■ Only parts corresponding to the original appliance specifications may be used for repairs.
■ Check whether any stipulations of the responsible energy provider concern the connection of clothes dryers. We recommend using a pulse-sensitive residual-current device (RCD).
■ The appliance corresponds to protection class I and may only be connected to a socket with a protective conductor that has been installed properly. When connecting the appliance, make sure that the voltage is correct. More detailed information about this can be found on the nameplate.
■ Since all poles of the appliance cannot be disconnected from the mains via an accessible disconnecting device, an all-pole disconnecting device in accordance with overvoltage category III must be connected within the house installation with at least 3 mm contact clearance; consult a qualified professional if necessary see "Service" on page EN-31).
■ The appliance must not be supplied through an external switching device, such as a timer, or connected to a circuit that is regularly switched on and off by a utility.
- Keep the appliance, the mains plug and the mains cord away from open flames and hot surfaces.
■ Do not kink or pinch the mains cord or lay it over sharp edges.
If the supply cord is damaged, it must be replaced by the manufacturer, its service agent or similarly qualified persons in order to avoid a hazard.
■ Do not put any objects in or through the housing openings and also make sure that children cannot insert any objects through them.
■ Never pull the mains plug out of the socket by the mains cord; always hold the mains plug itself when doing so.
■ Never touch the mains plug with wet hands.
■ Never immerse the mains cord or mains plug in water or any other liquids.
In the event of malfunction, and before cleaning and maintenance, disconnect the plug and/or disable/un-screw the fuse.
■ Never clean the appliance with a high-pressure cleaner or steam cleaner.
■ Check the appliance regularly for damage.

WARNING
Fire hazard!

Improper handling of the appliance can lead to fire and property damage.
■ The appliance contains the eco-friendly but fl ammable refrigerant R290. Keep open fire and sources of ignition away from the appliance.
■ Connect the appliance only to a properly installed and earthed electric socket. Do not connect to a multi-socket extension cable or a multi-socket plug.
■ Note that the tumble dryer is not to be used if industrial chemicals have been used for cleaning.
■ Note that the lint fi Iter has to be cleaned frequently.
■ Note that lint must not to be allowed to accumulate around the tumble dryer.
■ In the appliance enclosure, keep ventilation openings clear of obstruction.
■ Do not dry unwashed items in the tumble dryer.
■ Items that have been soiled with substances such as cooking oil, acetone, alcohol, petrol, kerosene, spot removers, turpentine, waxes and wax removers should be washed in hot water with an extra amount of detergent before being dried in the tumble dryer.
■ Items such as foam rubber (latex foam), shower caps, waterproof textiles, rubber backed articles and clothes or pillows fitted with foam rubber pads should not be dried in the tumble dryer.
■ Fabric softeners, or similar products, should be used as specified by the fabric softener instructions.
■ Remove all objects from pockets such as lighters and matches.
■ Never stop a tumble dryer before the end of a drying cycle unless all items are quickly removed and spread out so that the heat is dissipated.
■ Note that a carpet must not obstruct the opening.
■ Do not place the appliance on carpeted flooring. Otherwise, it may not be able to properly ventilate, which can result in overheating and damage.

WARNING
Risk of explosion!
Improper handling of the appliance can lead to fire and explosion.
■ Due to the risk of fire, never use the drum dryer to dry fabrics or other objects if
– they have been cleaned using industrial chemicals (e.g. during dry cleaning)
– they consist mostly of foam rubber, rubber or rubber-like materials; Items such as foam rubber (latex foam rubber), shower caps, waterproof fabrics, rubberised objects or clothes, or pillows with shredded foam rubber should not be dried in the drum dryer.
– they contain filling and are damaged (e.g. pillows or jackets); the filling may escape and cause a fire.
■ Do not store any laundry items that have recently been treated with chemical detergents such as white spirit or stain remover in the appliance. Such items should first be left to air and dry.
■ Do not store any combustible or easily flammable liquids near the appliance.
■ Do not place any combustible or easily fl ammable objects near the appliance.
- Keep the area around the appliance clean. Dust from coal or fl our can ignite.
Risk of burns!
Improper handling of the appliance can lead to burns.
■ The glass of the door can get hot during operation. Do not touch the glass when the appliance is running.
■ Do not touch the water drain hose when water is being pumped out.
Risk of injury!
Improper handling of the appliance may result in injury.
■ The appliance is very heavy. Never transport or carry the appliance alone; always with the assistance of another person.
■ Remove all obstacles on the transport route and from the installation location, e.g. open doors and clear away objects lying on the floor.
■ Do not use the open door as a hand-hold.
■ Note that the appliance must not be installed behind a lockable door, a sliding door or a door with a hinge on the opposite side to that of the tumble dryer, in such a way that a full opening of the tumble dryer door is restricted.
Health hazard!
Consuming the condensate may be hazardous to health.
■ Never drink the condensate.
Risk of damage
! NOTICE
Risk of damage to property!
Improper handling of the appliance may result in damage.
■ If a trolley is used to move the appliance, the appliance must be lifted as shown on the packaging. Always transport the appliance vertically.
■ Remove all of the packaging material before first use.
■ If the appliance is in a room susceptible to frost, residual water in the appliance may freeze and cause damage when temperatures fall below zero. Therefore, drain residual water if there is a risk of frost.
■ Do not place the appliance on top of other appliances and do not use it as a base for other appliances (e.g. for washing machines). Do not sit or stand on the appliance.
■ For use on rugs, carpets, parquet or wooden floorboards, place a stable wooden board (measuring at least 60 × 60 cm) underneath the appliance.
■ Do not extend the water drain hose and do not replace it with another hose.
■ The water drain hose must not be kinked or twisted.
■ The bend on the water drain hose must be at least 60 cm and no more than 100 cm above the floor to ensure that water can be drained off properly.
■ The water drain hose must be mounted on the holding clip on the discharge sink. The end of the hose must not be submerged in the water that has been pumped out.
■ Never apply weight/pressure to or lean on the door.
■ Never dry more than 8 kg of laundry at one go.
■ Never attempt to open the door with force during or at the end of a cycle.
■ Do not use any harsh or abrasive cleaning agent to clean the appliance. These could damage the surfaces and render the door seal brittle and fragile.
■ Do not use any pointed, sharp or angular objects to clean the rubber gasket.
■ Never spray the appliance with a water jet or using a high-pressure cleaner.
■ Do not operate the appliance without the bottom fi lter and lint fi lter.
Controls and appliance parts
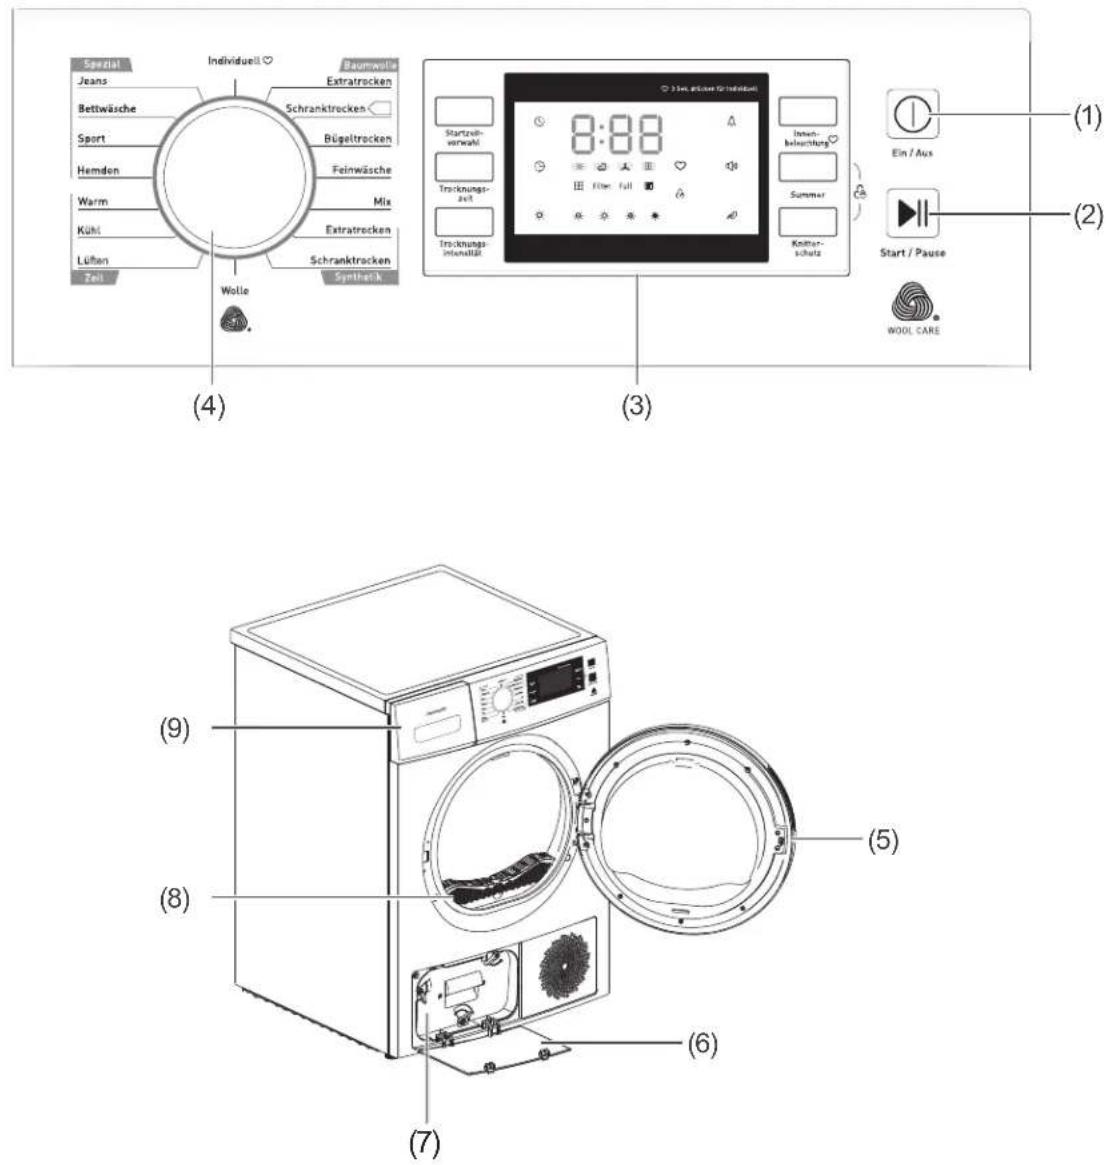
(1) On/Off button
(2) Start/Pause button
(3) Control panel
(4) Cycle selector
(5) Appliance door
(6) Cover for the bottom filter
(7) Bottom filter
(8) Lint filter
(9) Condensate drawer
Button panel
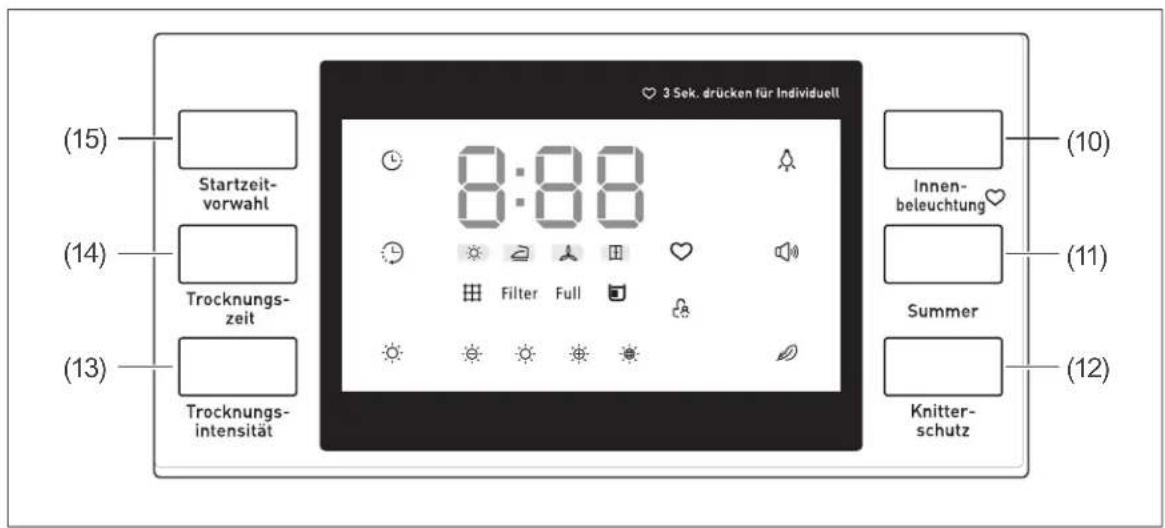
(10) Button for interior light
(11) Button for buzzer
(12) Button for anti-crease feature
(13) Button for drying intensity
(14) Button for drying duration
(15) Button for delay start
Indicators on the display

Start time delay

Drying duration
Interior light

Buzzer

Anti-crease

Safety lock

Customised setting

Drying progress

Drying intensity setting

Drying intensity

Full condensate drawer

Filters require cleaning
Cycle selection
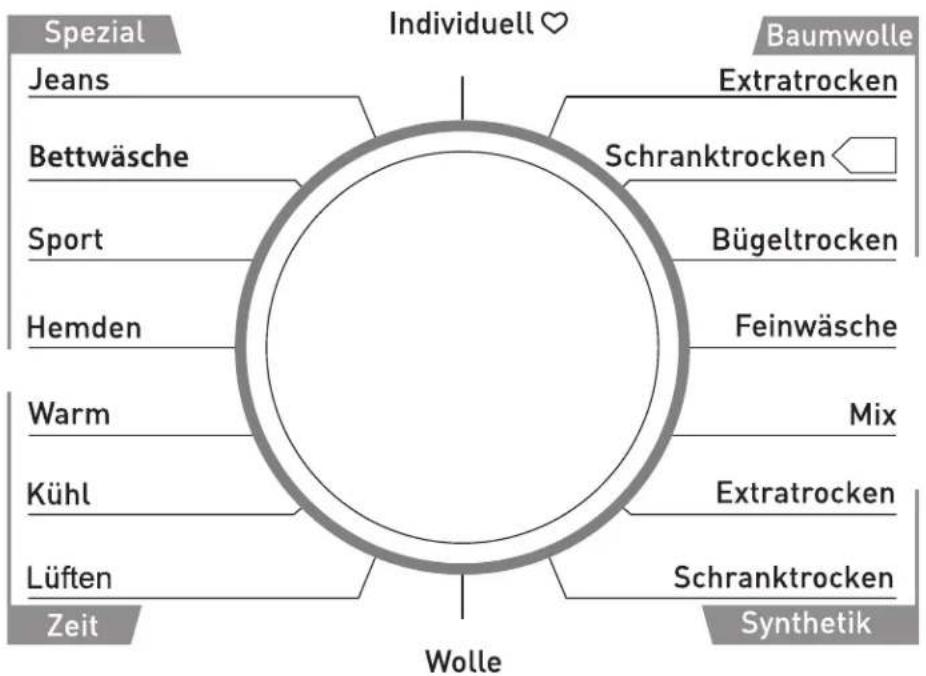
| Cycle | Weight (max. 8 kg) | Use/properties | Delay | Time | |
| Cotton (Baumwolle) | For white and coloured cotton or linen laundry | ||||
| Extra-dry / Cupboard-dry (Extratrocken/Schrank-trocken) | 8 kg | Single and multi-layer cotton laundry: T-shirts, underwear, baby clothes, work clothes, jackets, blankets, aprons, smocks, terry cloth towels/bath towels/bathrobes, flannel/terry cloth bed linens | Yes no | ||
| Iron dry (Bügel-trocken) | Normal single-layer laundry which should be damp after drying and is suitable for ironing or hanging | Yes no | |||
| Delicates (Feinwäsche) | 1 kg | For drying delicate clothes that are recommended to be hand-washed at lower temperatures | Yes no | ||
| Mixed (Mix) 3.5 kg | Mixed load consisting of cotton and synthetic laundry | Yes no | |||
| Synthetics (Synthetik) | For synthetic and mixed fabric laundry or cotton laundry which doesn't need to be ironed | ||||
| Extra-dry (Extratrocken) | 3.5 kg | For drying thick or multi-layer synthetic fabrics | Yes no | ||
| Cupboard-dry (Schrank-trocken) | For drying thin synthetic fabrics that need not be ironed, such as synthetic shirts, tablecloths, baby clothing and socks | ||||
| Wool (Wolle) | For drying wool clothing that can be machine-washed | no | Yes | ||
| Special (Spezial) | Jeans 4 kg | For drying jeans or casual clothes that have been spin-dried at a high speed in a washing machine | Yes no | ||
| Bed linen (Bettwäsche) | 4 kg | For drying bedsheets or other large laundry items | |||
| Sport 3 kg | For drying sportswear, thin fabrics and polyester that cannot be ironed | ||||
| Shirts 1 kg | For easy-care clothing, such as shirts and blouses with anti-crease properties, for minimal ironing effort | ||||
| Customised (Individuelle) | For setting and saving your favourite cycle | ||||
| Time (Zeit) | Warm | Timed drying, warming up clothes. For a minimum of 10 to a maximum of 120 minutes (in steps of 10 minutes) | Yes Yes | ||
| Cool (Kühl) | - | Cooling down the clothing without heat supply. For a minimum of 10 to a maximum of 30 minutes (in steps of 10 minutes) | |||
| Airing (Lüften) | 1 kg | For freshening up clothes that have been kept in enclosed environments. For a minimum of 20 to a maximum of 150 minutes (in steps of 10 minutes) | |||
Drying process
Before getting started
- Read the "Safety" chapter from page EN-4.
- Prepare the appliance as described in chapter "Installation and connection" on page EN-24.
Loading laundry
- Open the appliance door (5) by pulling the handle slightly forward.
- Load the laundry. Pay attention to the tips on page EN-18.
Do not exceed the maximum load weight allowed, and do not jam any clothes in the door opening.
- Close the appliance door by pushing it until you hear it snap shut.
Starting the cycle
- Press the On/Off button (1). The display will illuminate.
- Choose the correct cycle for your laundry from the cycle table on page EN-13 and select it using the cycle selector (4).
- You can further customise the selected cycle according to the nature of your laundry by changing the default settings using the menu buttons on the control panel (3) see "Setting options" on page EN-16).
- Press the Start/Pause button (2) to begin the cycle.
The appliance will start operating. The indicators will flash on the display, and the time remaining will change automatically.

The remaining time indicator changes occasionally based on the residual moisture detected by the sensor.
Interrupting and continuing a cycle
! NOTICE
Risk of fire/damage!
Improper handling of the appliance can lead to fire/faults.
■ Never try to open the appliance door with force whilst a cycle is in progress or once a cycle has ended.
- If you would like to pause an active cycle, e.g. to add laundry, press the Start/Pause button (2).
Press the Start/Pause button to resume the cycle.
Cancelling or modifying the cycle
- To cancel or modify an active cycle, press the On/Off button (1).
The appliance will switch off. - Switch the appliance on again and use the cycle selector (4) to choose a new cycle.
- Press the Start/Pause button (2) to start the new cycle.
End of cycle
Once the drying cycle is complete, the display will show “☐☐☐”, the dryer will sound three times, and the indicator for the corresponding drying progress will flash.
- Open the appliance door (5) and remove the laundry from the drum.

If the laundry is not taken from the drum, the “Anti-crease” function will start after a few seconds. It runs for 30 minutes.
After the drying process
- Switch the appliance off by pressing the On/Off button (1).
- Open the appliance door (5) and remove the dried laundry items.
- Follow the instructions in chapter "Cleaning and maintenance" on page EN-19.
Settingoptions
Setting the start time
This feature allows you to set the start time of the drying process. You can delay the start time by up to 24 hours.
- Load the appliance and close the appliance door (5).
- Press the On/Off button (1). The display will illuminate.
- Select your desired cycle and adjust any additional settings as required.
- Press the button for delayed start (15). Increase the delay time, if needed, by pressing the button several times.
- Press the Start/Pause button (2) to begin the cycle.
The delay start indicator will flash.
The drying cycle will begin as soon as the delay start timer runs out.
- If you want to pause the delay start, press the Start/Pause button.
- If you want to cancel the delay start, press the On/Off button.
Setting the drying time
Additional drying time can be set for the cycles Warm, Cool and Airing.
- To increase the drying time for the three cycles, press the button for drying duration (14).
You can increase the drying duration in steps of 10 minutes by repeatedly pressing the button.
Setting the drying intensity
This setting allows you to further adjust the drying intensity according to your laundry items.
The drying intensity cannot be set for every cycle. The drying intensity indicator will indicate which cycle is supported by this setting.
For this setting, the drying time increases in steps of 5 minutes. The drying intensity must be set before starting a cycle.
- Select your desired cycle.
- To set the drying intensity, press the drying intensity button (13) repeatedly until you arrive at your desired drying intensity.
- Press the Start/Pause button (2) to begin the cycle.
Switching on/off the interior light
- Press the button for interior light (10) to switch the interior light on or off. The drum's interior light will stay on for around 3 minutes after being switched on.
Activating/deactivating sound
By default, the appliance will play sounds, e.g. when the cycle selector is turned, the settings buttons are pressed, or the drying process is complete.
- Press the button for the buzzer (11) to activate or deactivate the sound function.
Setting the anti-crease feature
This feature helps ensure clothes do not crease after the drying process. By default, the anti-crease phase will run for 30 minutes after the drying cycle. The duration can be increased to up to 120 minutes.
The laundry can be removed during the anti-crease phase.
The anti-crease feature can be set for all cycles except for Cool, Airing and Wool.
- Press the button for anti-crease (12) to set the anti-crease feature.
Activating/deactivating the safety lock
The appliance is equipped with a special safety lock that, for example, prevents children from accidentally pressing buttons and interrupting the drying process. The safety lock can be activated only once a cycle is already running.
- To activate the safety lock, press and hold both the button for anti-crease (12) and the button for the buzzer (11) simultaneously for 3 seconds.
The indicator for anti-crease will appear on the display. All buttons and the cycle selector will be disabled, with the exception of the On/Off button (1). - To deactivate the safety lock, press and hold both the button for anti-crease and the button for the buzzer simultaneously for 3 seconds again.
Customised settings
This feature allows you to save a customised cycle that you use often and want quick access to.
- Select your desired cycle and adjust any additional settings as required.
- To save the cycle and settings, press and hold the button for the interior light (10) for 3 seconds.
The indicator for the customised setting will flash on the display. - To select the customised cycle later, turn the cycle selector (4) to the position "Customised".
- To change the customised settings, repeat steps 1 and 2.
Tips for drying
Preparation
Before being dried in the dryer, laundry items must be thoroughly spin-dried in a washing machine. The high spin speed can reduce the drying duration and energy consumption.
For an even drying result, the laundry must be sorted according to fabric type and drying cycle.
Items such as zips, hook-and-eye closures, buttons and belts found on clothing must be closed before the drying process.
Sorting laundry
The drying instructions of the textile manufacturer/the international care symbols on the labels contain precise information about how to handle each piece of laundry.
- Sort the laundry according to the instructions on the respective labels.
Special materials
- Do not dry any items with rubber or other elastic rubber-like materials.
- Thick or multi-layer laundry items (bedclothes, jackets etc.) are difficult to dry. For such items, you should use the “Cotton Extra-Dry” cycle or adjust the drying duration and intensity accordingly.
- Outdoor jackets made of modern synthetic materials must be treated with special care. Before drying such a jacket in the dryer, find out the appropriate dryer settings from its manufacturer.
Additional tips
- Do not dry your clothes excessively, as creases can form easily on overdried clothes.
- If you notice that some of the clothes are still damp after drying, try to dry them separately the next time using another cycle.
The correct quantity
The amount of clothes you can put in the drum depends on the type of clothes you are drying.
Reference weight of dry clothes
Jacket (cotton) approx. 800 g
Jeans approx. 800 g
Towel/blanket (cotton) approx. 900 g
Single bedsheet (cotton) approx. 600 g
Workwear approx. 1120 g
Nightwear approx. 200 g
Long-sleeve shirt (cotton) approx. 300 g
Short-sleeve shirt (cotton) approx. 180 g
Pair of shorts (cotton) approx. 70 g
Pair of socks
(blended fabric)
approx. 50 g
Symbols on clothing
Only clothing with the appropriate care label may be dried in the dryer.

Suitable for the dryer

Dry at normal temperature

Dry at lower temperature

Do not dry using the dryer
Cleaning and maintenance

WARNING
Risk of electric shock!
The appliance operates with dangerous voltages.
■ Before cleaning, always pull the mains plug out of the socket.
■ Never pull the mains plug out of the socket by the mains cord; always hold the mains plug itself.
■ Never spray the appliance with a water jet or a high-pressure cleaner.
Health hazard!
Consuming the condensate may be hazardous to health.
■ Never drink the condensate.

NOTICE
Risk of damage to property!
Improper handling of the appliance may result in damage.
■ Do not clean the appliance with harsh or abrasive cleaners. They can damage the surfaces or make the rubber gasket brittle and fragile.
■ Do not use any pointed, sharp or angular objects to clean the rubber gasket. They can damage the rubber gaskets and make them leaky.
■ Do not operate the appliance without the condensate drawer.
Regular checks
A few simple and regular checks can save you from unpleasant surprises.
- If the drain has been installed directly, please check at regular intervals whether
- the water drain hose is attached securely to the edge of a bath or the siphon;
– the drain hose is brittle, cracked or kinked;
– the drum is free of foreign objects.
Cleaning the appliance door
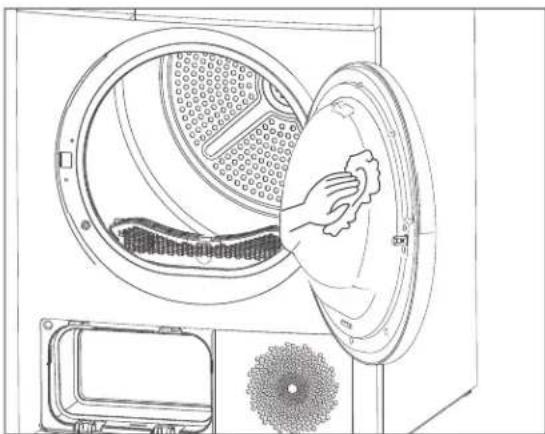
natural_image
Line drawing of a washing machine interior showing the lid, vent, and base (no text or symbols)- Wipe the appliance door (5) and the rubber gasket with a soft, damp cloth on the outside and inside, and then wipe them both dry.
- Clean the moisture sensor behind the lint filter (8) inside the appliance.
Cleaning the drum
- Use a soft, damp cloth to wipe the inside of the drum, and then wipe it dry.
Emptying the condensate drawer
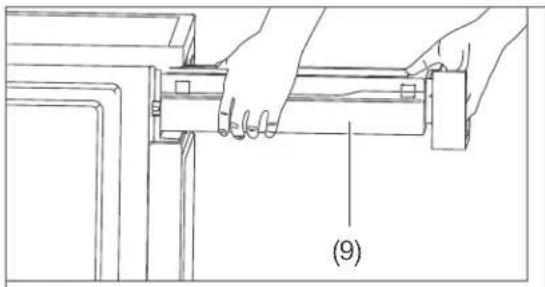
The condensate drawer (9) must be emptied after every use. If the condensate drawer is full, the cycle will stop and the "Condensate drawer full" indicator will appear. After emptying the condensate drawer, you can press the Start/Pause button (2) to resume the cycle.
natural_image
Technical line drawing of hands operating a mechanical component (no text or symbols)- Use both hands to pull out the condensate drawer (9).
natural_image
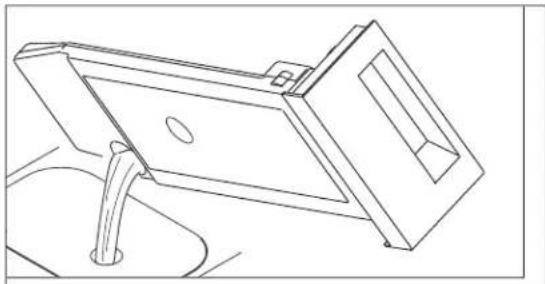
Line drawing of a mechanical device with a handle and mounting bracket (no text or symbols)- Pour the condensate into a basin.
- Slide the condensate drawer (9) back in.
Cleaning the lint filter
The appliance is equipped with a lint filter (8) for the door. This filter must be cleaned after every use.
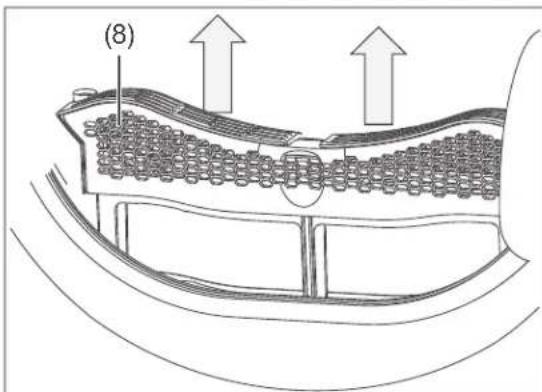
- Switch off the appliance.
- Open the appliance door (5).
- Remove the lint filter (8).
- Open the lint filter and remove the lint. You can also clean the lint filter under running water.
- Dry the lint filter thoroughly afterwards.
- Insert the lint filter back into the appliance. Ensure that the lint filter is inserted in the correct position.
Cleaning the bottom filter
The bottom filter (7) is designed to protect the heat exchanger. Lint accumulated in the filter can block air circulation and increase both the energy consumption and the drying duration required. The bottom filter must be cleaned after every fifth drying cycle or if the cycle is extended.
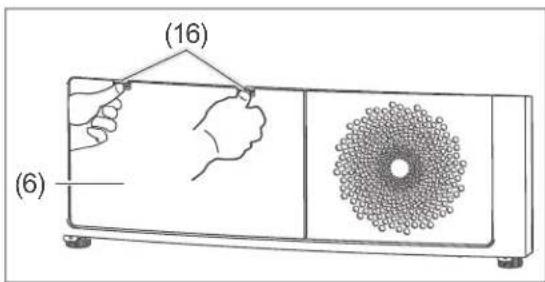
- Disconnect the mains plug from the socket.
- Push down the locking clips (16) and open the cover for the bottom filter (6).
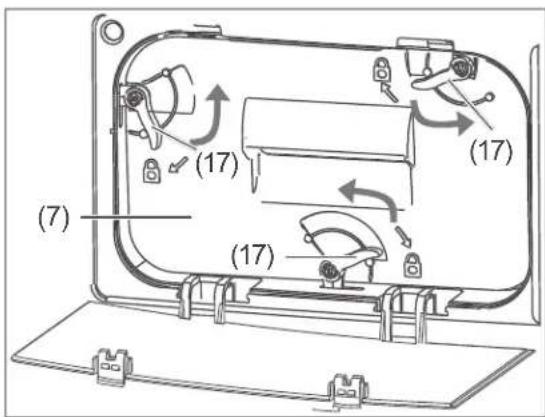
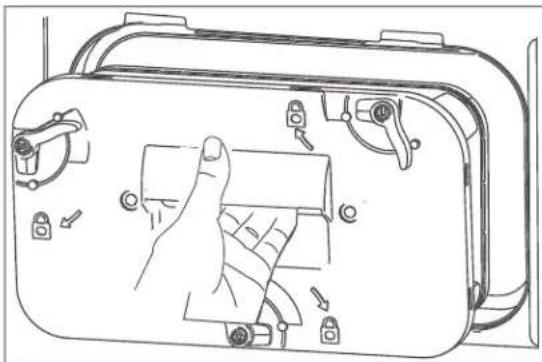
- Open the three locking levers (17).
natural_image
Line drawing of a hand inserting a device into a box, with no visible text or symbols- Remove the bottom filter and remove the accumulated lint.
You can also clean the bottom filter under running water. - Dry the bottom filter thoroughly afterwards.
- Clean the rubber seals on both the bottom filter and the handle.
- Insert the bottom filter back into the appliance.
- Close the three locking levers.
- Close the cover for the bottom filter.
Cleaning the heat exchanger

CAUTION
Risk of injury!
Touching the heat exchanger may lead to injuries.
■ Do not touch the heat exchanger with your bare hands.
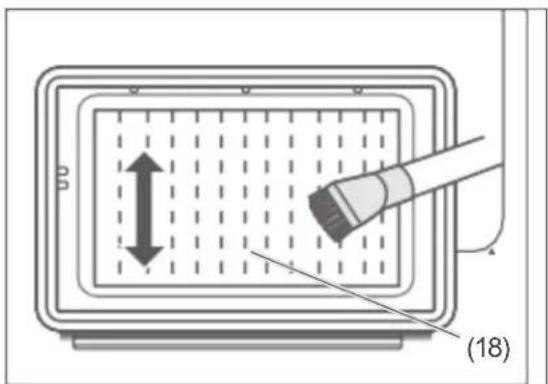
The heat exchanger is located behind the bottom filter (7) and must be cleaned approx. every two months.
- Disconnect the mains plug from the socket.
- Remove the bottom filter (7) as described in section "Cleaning the bottom filter" on page EN-21.
- Use a vacuum cleaner with a brush attachment to clean the heat exchanger (18).
To avoid damaging it, do not exert excessive force on the heat exchanger.
Delivery
natural_image
Line drawings of a washing machine and two separate mechanical components (no text or symbols)Package contents
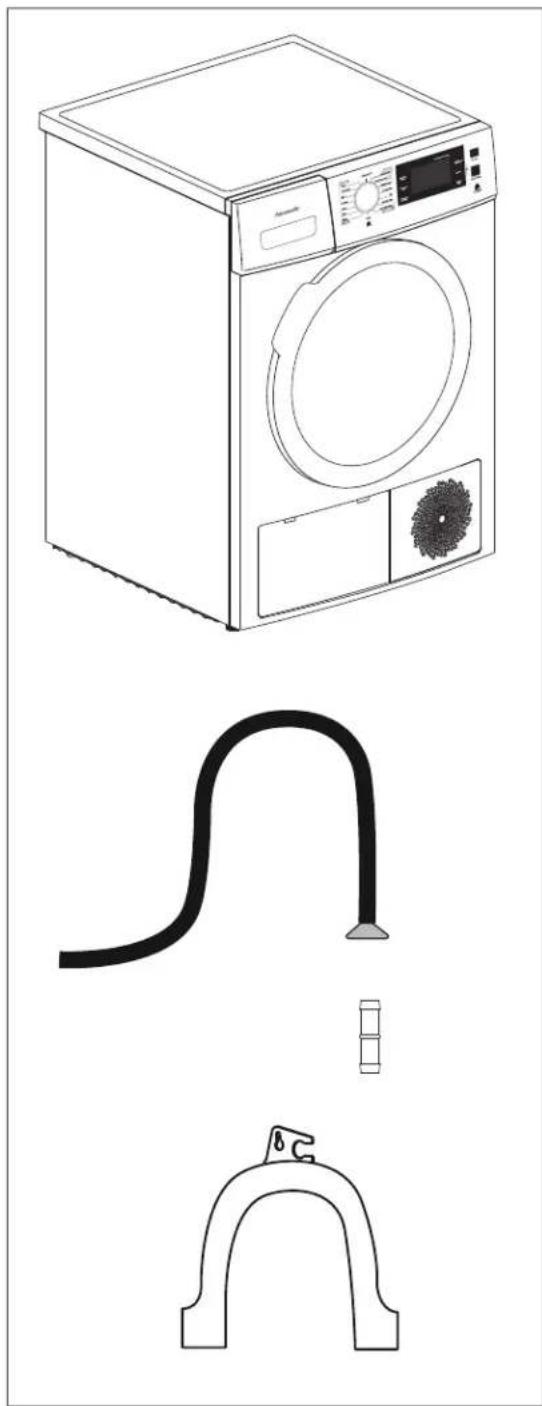
1× Heat pump dryer
1× Water drain hose
1× Connecting piece
1× Bracket
1× User manual
Checking package contents
- Move the appliance to a suitable place and unpack it (see page EN-24).
- Remove all parts of the packaging, plastic profiles, tape and foam padding.
- Check that the delivery is complete.
- Check whether the appliance was damaged during transit.
- If the delivery is incomplete or the appliance has been damaged during transport, please contact our service department (see page EN-31).

WARNING
Risk of electric shock!
Touching live parts may result in severe injury or death.
■ Never use a damaged appliance.
Installation and connection
Transport

CAUTION
Risk of injury!
Improper handling of the appliance may result in injury.
■ The appliance is very heavy. Never transport or carry it alone, rather always with at least two persons.

NOTICE
Risk of damage to property!
Improper handling of the appliance may result in damage.
If a trolley is used to move the appliance, the appliance must be lifted as shown on the packaging. If the appliance cannot be transported upright, ensure that it is not tilted more than 30°.
■ Exercise caution when moving the appliance. Do not lift or pull the appliance by any of its protruding parts. The dryer door must not be used as a carrying handle.
■ Note that the appliance must not be installed behind a lockable door, a sliding door or a door with a hinge on the opposite side to that of the tumble dryer, in such a way that a full opening of the tumble dryer door is restricted.
- Check whether the paths of transport and the installation location are suitable for the weight of the appliance. If in doubt, ask your landlord or property management.
Setting up the appliance
- Install the appliance in a frost-proof location.
Ideally, the appliance should be installed next to your washing machine.
• Install the appliance in a place where there is a siphon or a sink for connecting the drain hose. - Set up the appliance so that the mains plug is easily accessible even after the appliance has been set up.
- Set up the appliance on a firm, flat, clean, and dry surface. Do not set up the appliance on sloping, flexible and uneven ground.
- Position the appliance so that air can circulate freely in its immediate vicinity.
- Position the appliance so that the ventilation grilles at the front and rear of the appliance are unobstructed.
- Do not remove the feet.
- The dryer should not be placed on a carpet or carpeted flooring, otherwise the appliance may overheat due to insufficient ventilation. The floor clearance must not be restricted by objects such as carpets and wood strips.
Aligning the appliance
- Use a spirit level to check whether the appliance is level.
- To level the appliance, use your hand or a spanner to turn the levelling feet inwards or outwards.
To screw the levelling foot outwards, turn it anticlockwise;
To screw the levelling foot inwards, turn it clockwise. - Repeat this for the other levelling feet until the appliance is level and stable.
Attaching the water drain hose (optional)

WARNING
Risk of scalding!
The drain water is very hot. If it comes into contact with skin, it can cause scalding.
■ Securely attach the water drain hose to a drain or bath to prevent it from slipping due to the recoil caused by pumping.
■ When connecting to a drain, ensure that the cross section of the discharge pipe is large enough that the drain does not overflow.

NOTICE
Risk of damage to property! Improper handling of the appliance can lead to property damage.
■ Use only the included water drain hose.
■ Do not extend the water drain hose or replace it with another hose.
■ Do not kink or twist the water drain hose.
■ Make sure that the utility sink is no higher than 90 cm above the floor. This is the only way to ensure proper functioning of the water drainage.
■ Make sure that the distance between the water drain hose and the utility sink does not exceed 100 cm.
■ Make sure that the end of the hose is not submerged in the water that has been pumped out.
If you connect the water drain hose (19), condensate from the appliance will be drained off directly through the hose and will no longer end up in the condensate drawer (9).
It may happen that the “Condensate drawer full” indicator may illuminate even if the water drain hose is connected. In this case, ensure that the water drain hose is installed correctly (not kinked and not more than 120 cm).
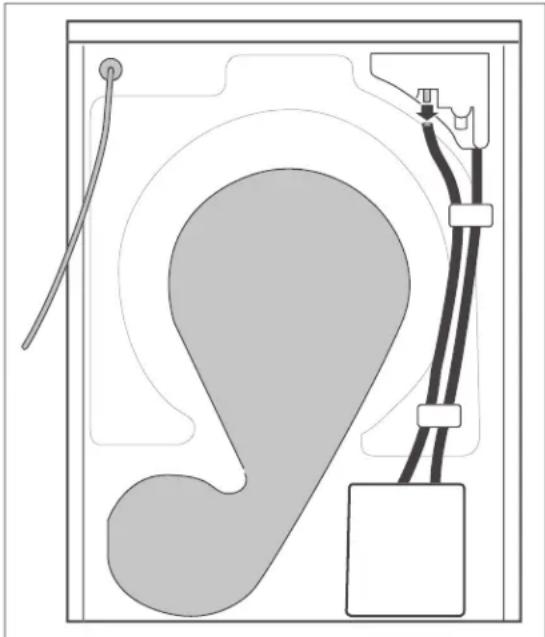
natural_image
Diagram of a medical device with a foot-shaped implant, cable, and connector (no text or labels)- Detach the water hose on the rear of the appliance.
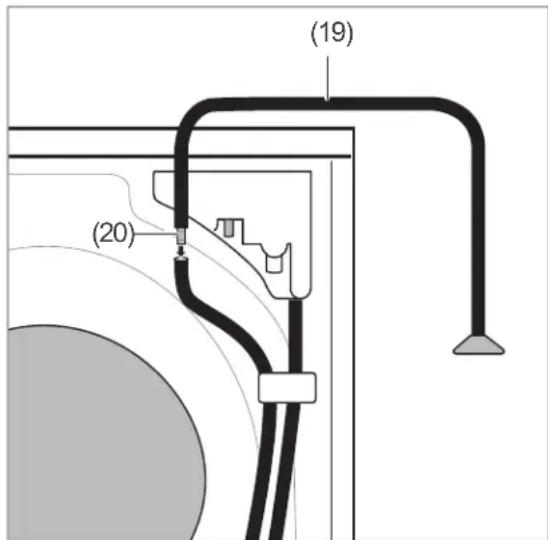
- Connect the water drain hose (19) to the water hose by inserting the connector (20) into the ends on both the hoses.
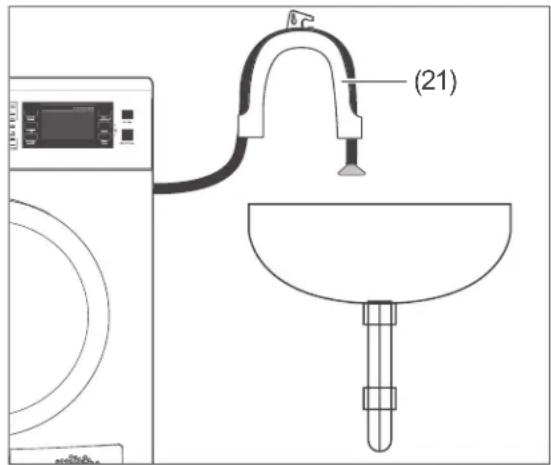
- Place the water drain hose on the bracket (21) and position the bracket on the edge of the utility sink.
Connecting the appliance to the mains

WARNING
Risk of electric shock!
The appliance operates with dangerous voltages.
■ Do not put into operation if the mains cord is faulty or the appliance displays other visible damage.
■ Never connect the appliance via a multi-socket or an extension cord.
- Plug the mains plug into a properly installed and earthed electric socket that has been sufficiently secured (220–240 V\~, 50 Hz, 10 A).
Before first use
- After moving and installation, let the appliance stand upright for 2 hours.
- Then clean the drum's interior using a soft cloth.
- Place a few clean dry cloths into the drum.
- Press the On/Off button (1). The display will illuminate.
- Select the "Airing" cycle using the cycle selector (4).
- Press the Start/Pause button (2) to begin the cycle.
- After the cycle is complete, follow the instructions in chapter "Cleaning and maintenance" on page EN-19.
The compressor will make some noise when it is in operation. This is perfectly normal.
Troubleshooting
Malfunctions can occur in all electrical appliances. This does not necessarily mean there is a defect in the appliance. For this reason, please check the tables to see if you can correct the malfunction.

WARNING
Risk of electric shock!
The appliance operates with dangerous voltages.
- Never attempt to repair the appliance yourself. You can put your own and future users' lives in danger. Only authorised specialists are allowed to carry out this repair work.
| Malfunction | ||
| Problem Possible causes Solutions, tips | ||
| The display does not light up. | The power supply is interrupted. Check whether the power supply is working properly.Check whether the mains plug is inserted.Check the selected cycle.Press the On/Off button (1). | |
| lights up | The condensate drawer (9) is full. Empty the condensate drawer. | |
| The water drain hose (19) is not connected or laid out properly. | Make sure that the water drain hose is installed correctly see “Attaching the water drain hose (optional)” on page EN-25).If the indicator continues to illuminate after that, contact our Service department (see page EN-31). | |
| illuminates | The heat exchanger, lint filter (8) and/or bottom filter (7) are clogged by lint. | Clean the heat exchanger, lint filter and bottom filter. |
| The appliance is not starting. | The power supply is interrupted. Check whether the power supply is working properly. | |
| The appliance door (5) is open. Close the appliance door (5). | ||
| No cycle has been set. Choose a cycle. | ||
| The appliance is not switched on. Press the On/Off button (1).If the appliance still does not start after that, contact our service department (see page EN-31) | ||
| Problem Possible causes | Solutions, tips | |
| The laundry is not dry enough or the drying duration is too long. | The appliance is installed in a space that is too confined. | Check whether the appliance has enough free space to function properly. |
| The heat exchanger, lint filter (8) and/or bottom filter (7) are clogged by lint. | Clean the heat exchanger, lint filter and bottom filter. | |
| The condensate drawer (9) is full. | Empty the condensate drawer. | |
| The water drain hose (19) is not connected properly. | Check the water drain hose. | |
| The ventilation slots are clogged or obstructed. | Clean the moisture sensor behind the lint filter (8) inside the appliance.Ensure that the ventilation grilles are not clogged. | |
| An inappropriate cycle has been selected for your laundry. | Select a cycle with a higher drying intensity or longer drying time. | |
| The display shows an error code. | ||
| Problem Possible causes Solution | ||
| E32 | Moisture sensor error Contact our service department (see page EN-31). | |
| E33 | Temperature sensor error | |
| E64 | BLDC motor communication error | |
| E82 | PCB communication error | |
Waste prevention, free return and disposal
Waste prevention
According to the provisions of Directive 2008/98/EC, waste prevention measures always take priority over waste management.
In the case of electrical and electronic equipment, waste prevention measures include, in particular, prolonging the life of the equipment by repairing defective articles and selling used ones in good working order instead of dispatching them for disposal.
Please help us reduce waste and contact our customer service if your product is faulty.
Further particulars are available as part of the Waste Prevention Programme of the German Government with the Involvement of the Federal Länder.
Free return of old electrical appliances
Upon purchasing a new electrical appliance of the same type with essentially the same function, consumers may return an old electrical appliance to a distributor obliged to take back old appliances, at no extra cost for the consumers. This option also exists for deliveries made to a private household. For distance selling, the option of having old electrical equipment collected for free applies only in the case of purchase of new electrical equipment with heat exchangers (e.g. refrigerators, dehumidifiers), screens and display devices with a screen surface > 100 cm ^2 , and large devices with at least one of its external dimensions measuring more than 50 cm.
In addition, consumers may return up to three old electrical appliances of the same type to a distributor's collection point for free, without having to purchase a new electrical appliance. In this case, however, the old appliances' external dimensions may not exceed 25 cm.
Disposal
Disposing of old electrical devices in an environmentally friendly manner
Electrical appliances contain harmful substances as well as valuable resources.
Every consumer is therefore required by law to dispose of old elec-
trical appliances at an authorised collection or return point. They will thus be made available for environmentally-sound, resource-saving recycling.
You can dispose of old electrical appliances free of charge at your local recycling centre.
Please contact your dealer directly for more information about this topic.
Don't forget to erase data!
If necessary, each consumer is responsible for erasing personal data from electrical and electronic equipment.
Single-use and rechargeable batteries, lamps and bulbs
If necessary, old single-use and rechargeable batteries that are not encased by an old electrical appliance, as well as lamps/bulbs that can be removed from an old electrical appliance without being destroyed, must be removed and disposed of separately before you return the appliance.
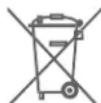
This symbol means that single-use and rechargeable batteries must not be disposed of with other household waste.
Consumers are required by law to bring all single-use and rechargeable batteries, regardless of whether they contain harmful substances*) or not, to a collection point operated by their communal authority
or borough or to a retailer, so that they can be disposed of in an environmentally friendly manner and so that valuable resources (e.g. cobalt, nickel or copper) can be recovered.
Single-use and rechargeable batteries can be returned free of charge.
Some of the possible contents (e.g. mercury, cadmium and lead) are toxic and, if improperly disposed of, can have adverse effects on the environment. Heavy metals, for instance, can have detrimental health effects on humans, animals and plants and accumulate in the environment and food chain, and then enter the body indirectly through the consumption of food.
There is a high risk of fire with old lithium batteries. Special care must therefore be taken to properly dispose of old lithium batteries and rechargeable batteries. Improper disposal can also lead to internal and external short circuits due to thermal effects (heat) or mechanical damage. A short circuit can lead to a fire or an explosion and have serious consequences for people and the environment. It is therefore important to tape off the terminals of lithium batteries and rechargeable batteries before disposing of them to prevent an external short circuit.
Single-use and rechargeable batteries that are not built into the device should be removed before disposal and then disposed of separately.
Please only dispose of single-use and rechargeable batteries in a discharged state!
If possible, use rechargeable batteries in place of disposable batteries.
*) labelled with:
Cd = Cadmium
Hg = Mercury
Pb = Lead
Packaging

Our packaging is made of environmentally friendly, recyclable materials:
– Outer packaging made of cardboard
- Moulded parts made of foamed, CFC-free polystyrene (PS)
– Films and bags made of polyethylene (PE)
– Tension bands made of polypropylene (PP)
- Saving energy also protects against excessive global warming. Your new appliance uses little energy due to its environmentally friendly insulation and technology.

If you have sufficient space, we recommend retaining the packaging, at least during the warranty period. If the appliance needs to be sent out for repairs, only the original packaging will provide sufficient protection. If you would like to dispose of the packaging, please dispose of it in an environmentally friendly way.
Service
Please note!
You are responsible for the condition of the appliance and its proper use in the household.
If you call out for customer service due to an operating error, you will incur charges, even during the guarantee/warranty period.
Damage resulting from non-compliance with this manual unfortunately cannot be recognised.
In order for us to help you quickly, please tell us:
| Name of appliance Colour Model Order number | ||
| hanseatic Heat pump dryer white HWT8A3GT 2921 5408 |
Advice, complaints and orders
Please contact your mail order company's customer service centre if
– the delivery is incomplete,
– the appliance is damaged during transport,
– you have questions about your appli-
ance,
- a malfunction cannot be rectified using the troubleshooting table,
– you would like to order further accessories.
You can find the contact details of your product advisor online on the service pages of your mail order company. The various sections of product advice are listed here.
Please have your appliance invoice ready.
For more information, visit www.hanseatic.de
Repairs and spare parts
You can prevent waste by having your defective appliances repaired. Please contact our Customer Service department.
Please have your appliance invoice ready (date of purchase and item no.).
Spare parts are available for a minimum period of seven years after the final version of the model has been placed on the market. Door seals are available for a period of ten years.
Customers in Germany
Place an order at
by E-mail: otto@operatec.de
Phone +49 (0) 40 36 03 31 50
Customers in Austria
Please contact your mail order company's customer service centre or product advice centre.
Product fiche in compliance with Regulation (EU) No. 392/2012
| Trade mark | hanseatic |
| Model identifier | 2921 5408 / HWT8A3GT |
| Rated capacity in kg of cotton | 8 |
| Household tumble drier type | condenser |
| Energy efficiency class on a scale from A+++ (most efficient) to D (least efficient) | A+++ |
| Energy consumption 175.5 <Wh per year, based on 160 drying cycles of the standard cotton programme at full and partial load, and the consumption of the low-power modes. Actual energy consumption per cycle will depend on how the appliance is used. | |
| Automatic tumble drier | |
| Energy consumption of the standard cotton programme at full load | 1.44 kWh |
| Energy consumption of the standard cotton programme at partial load | 0.80 kWh |
| Power consumption in off-mode | 0.50 W |
| Power consumption eft-on mode | 0.85 W |
| Duration of the left-on mode | 10 min |
| The programme Schranktrocken used at full and partial load is the standard drying programme to which the information in the label and the fiche relates, that this programme is suitable for drying normal wet cotton laundry and that it is the most efficient programme in terms of energy consumption for cotton. | |
| Weighted programme time of the standard cotton programme at full and partial load | 123 min |
| Programme time of the standard cotton programme at full load | 159 min |
| Programme time of the standard cotton programme at partial load | 96 min |
| Condensation efficiency class 3 on a scale from G (least efficient) to A (most efficient) | |
| Weighted condensation efficiency for the standard cotton programme | 81% |
| Average condensation efficiency of the standard cotton programme at full load | 81% |
| Average condensation efficiency of the standard cotton programme at partial load | 81% |
| Sound power level | 65 dB(A) re 1 pW |
| Built-in | No |
Technicalspecifications
| Item number | 2921 5408 |
| Model identifier | HWT8A3GT |
| Supply voltage / frequency | 220-240 V, 50 Hz |
| Rated power | 750 W |
| Device measurements (Height × Width × Depth with connections) | 64 cm × 59.5 cm × 84.5 cm |
| Unloaded weight | 54 kg |

- Inhaltsverzeichnis
- Lieferumfang
- Table of contents
- Explanation of terms and symbols
- Explanation of terms
- WARNING
- CAUTION
- NOTICE
- Explanation of symbols
- Safety
- Intended use
- Safety information
- Risks for children and certain groups of people
- Risk of injury!
- Risk of corrosion!
- Risk of poisoning!
- Risks in handling household electrical appliances
- Risk of electric shock!
- Fire hazard!
- Risk of explosion!
- Risk of burns!
- Health hazard!
- Risk of damage
- ! NOTICE
- Controls and appliance parts
- Button panel
- Indicators on the display
- Cycle selection
- Drying process
- Before getting started
- Loading laundry
- Starting the cycle
- Interrupting and continuing a cycle
- Cancelling or modifying the cycle
- End of cycle
- After the drying process
- Settingoptions
- Setting the start time
- Setting the drying time
- Setting the drying intensity
- Switching on/off the interior light
- Activating/deactivating sound
- Setting the anti-crease feature
- Activating/deactivating the safety lock
- Customised settings
- Tips for drying
- Preparation
- Sorting laundry
- Special materials
- Additional tips
- The correct quantity
- Reference weight of dry clothes
- Symbols on clothing
- Cleaning and maintenance
- Regular checks
- Cleaning the appliance door
- Cleaning the drum
- Emptying the condensate drawer
- Cleaning the lint filter
- Cleaning the bottom filter
- Cleaning the heat exchanger
- Delivery
- Package contents
- Checking package contents
- Installation and connection
- Transport
- Setting up the appliance
- Aligning the appliance
- Attaching the water drain hose (optional)
- Risk of scalding!
- Connecting the appliance to the mains
- Before first use
- Troubleshooting
- Waste prevention, free return and disposal
- Waste prevention
- Free return of old electrical appliances
- Disposal
- Disposing of old electrical devices in an environmentally friendly manner
- Don't forget to erase data!
- Single-use and rechargeable batteries, lamps and bulbs
- Packaging
- Service
- Advice, complaints and orders
- Repairs and spare parts
- Customers in Germany
- Customers in Austria
- Product fiche in compliance with Regulation (EU) No. 392/2012
- Technicalspecifications
Brand : Hanseatic
Model : HWT8A3GT
Category : Tumble drier