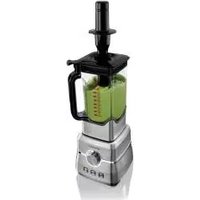
SSMP 2000 A1 - Food processor SILVERCREST - Free user manual and instructions
Find the device manual for free SSMP 2000 A1 SILVERCREST in PDF.


| Product Type | Jug Blender / Food Processor |
| Model | SSMP 2000 A1 |
| Brand | SilverCrest |
| Power Consumption | 2000 W |
| Voltage | 220-240 V ~ 50/60 Hz |
| Protection Class | II |
| Blender Jug Capacity | 2 L (max fill) |
| Measuring Jug | 30, 45, 60 ml markings |
| Speed Control | Continuously variable from 1 (min) to 6 (max), plus M mode for buttons |
| Main Functions | Mixing, chopping, ice crushing, smoothie program |
| Special Buttons | Smoothie (preset), Ice Crush (interval), Pulse (P) |
| Safety Features | Safety bracket on lid, two safety switches, auto shut-off when jug removed |
| Maximum Continuous Operation (High Speed) | 1 minute (speed >3-6) |
| Maximum Continuous Operation (Low Speed) | 3 minutes (speed 1-3) |
| Material (Jug, Lid) | Plastic, BPA-free (food-safe) |
| Blade Material | Stainless steel |
| Dishwasher Safe Parts | All parts except motor block (up to 70°C) |
| Dimensions (approx.) | Height: 40 cm, Width: 18 cm, Depth: 18 cm (estimated) |
| Weight (approx.) | 2.5 kg |
| Warranty | 3 years |
| Accessories Included | Blender jug, lid, measuring jug, food pusher |
Frequently Asked Questions - SSMP 2000 A1 SILVERCREST
User questions about SSMP 2000 A1 SILVERCREST
0 question about this device. Answer the ones you know or ask your own.
Ask a new question about this device
Download the instructions for your Food processor in PDF format for free! Find your manual SSMP 2000 A1 - SILVERCREST and take your electronic device back in hand. On this page are published all the documents necessary for the use of your device. SSMP 2000 A1 by SILVERCREST.
USER MANUAL SSMP 2000 A1 SILVERCREST
natural_image
Silver Crest® blender with fresh fruits and a laptop icon (no text or symbols on the main subject)BATIDORA SSMP 2000 A1 FRULLATORE POWER-MIXER
ES
BATIDORA
Operating instructions
IAN 277056
ES IT MT PT GB DE AT CH
Español....2
Italiano 16
Português 30
English....44
Deutsch....58
Vista general / Panoramica / Visão geral / Overview / Übersicht







Indice
2 banane (sbucciate)
2 banane (sbucciate)
300 g di fragole
2 banane (sbucciate)
- Overview 45
- Intended purpose 46
- Safety instructions 47
- Items supplied 49
- How to use 49
- Installation 49
- Operation 50
7.1 Preparing food 50
7.2 Chopping 50
7.3 Remove food 51
- Cleaning 51
8.1 Instant cleaning of the blender jug.... 51
8.2 Cleaning all parts of the device 52
-
Storage 52
-
Troubleshooting 53
- Recipes 53
- Disposal 55
- Technical specifications 55
- Warranty of the HOYER Handel GmbH 55

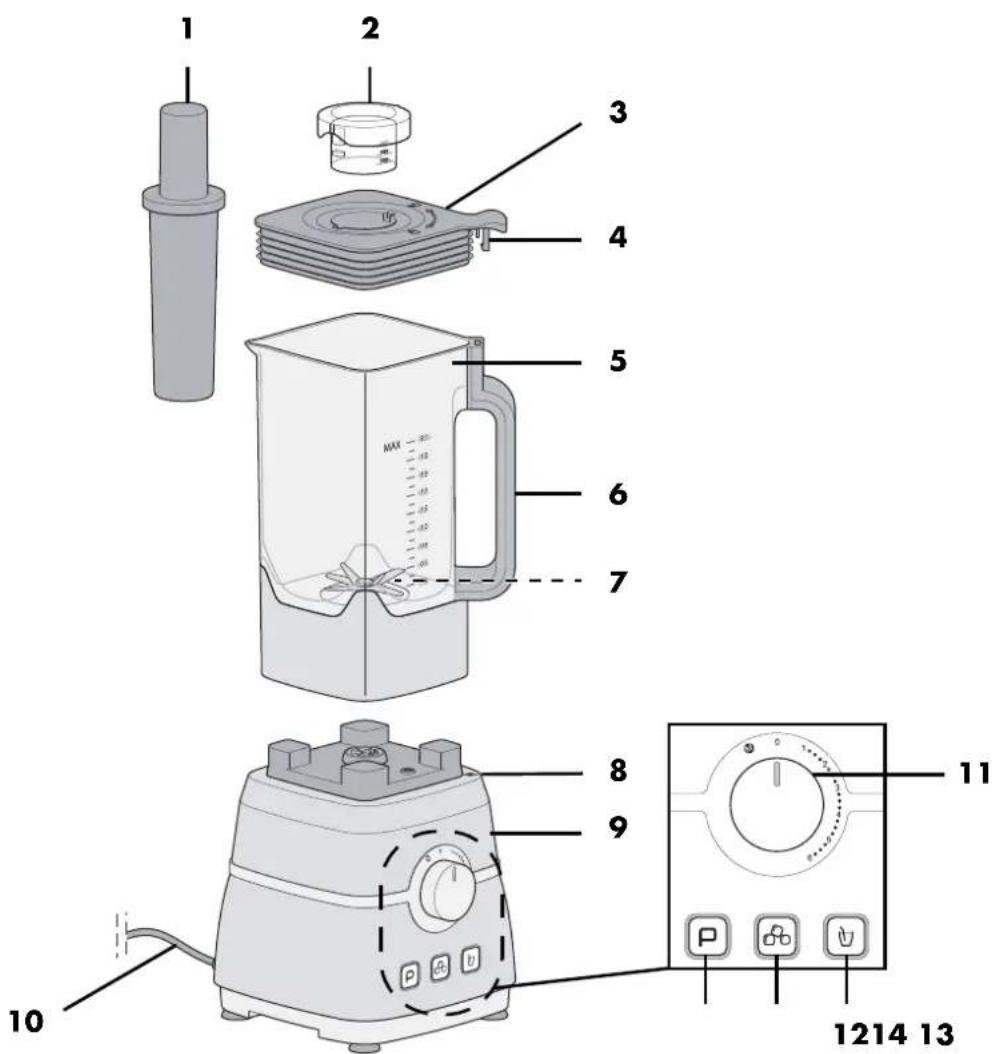
1. Overview
1 Food pusher
2 Measuring jug (30, 45, 60 ml)
3 Lid
4 Safety bracket
5 Blender jug (maximum filling volume 2 litres)
6 Handle
7 Blade insert
8 Position marking for the handle 6 of the blender jug
9 Motor block
10 Power cable with mains plug
11 Control dial, speed continuously adjustable
O: device is switched off
1: minimum speed
6: maximum speed
M: releases the button functions (buttons ☐ 12, ⚙ 13 and P 14 flash blue)
12 Button to mix smoothies (with backlight)
13 Button to crush ice (with backlight)
14 P flashes red when the device is operational Button for pulsed operation (with backlight)



Thank you for your trust!
Congratulations on your new jug blender.
For a safe handling of the device and in order to get to know the entire scope of features:
• Thoroughly read these operating instructions prior to initial use.
- Above all, observe the safety instructions!
• The device should only be used as described in these operating instructions.
- Keep these operating instructions for reference.
- If you pass the device on to someone else, please include these operating instructions.
We hope you enjoy your new jug blender!
2. Intended purpose
The jug blender is designed to mix whole-fruit beverages (smoothies) and to chop food and crush ice.
The device is designed for private, domestic use. The device must only be used indoors. This device must not be used for commercial purposes.
Foreseeable misuse
WARNING! Risk of material damage!
- Do not use the device for processing especially hard foodstuffs, such as frozen foods, bones, nutmeg, cereals or coffee beans.
- Thick or firm peels, (e.g. of citrus fruits, pineapple), stems and pips of stone fruits (e.g. cherries, peaches, apricots) must be removed before blending.
Symbol on your device

The food-safe material of devices with this symbol will not change the taste or smell of food.
3. Safety instructions
Warnings
If necessary, the following warnings will be used in these operating instructions:

DANGER! High risk: failure to observe this warning may result in injury to life and limb.
WARNING! Moderate risk: failure to observe this warning may result in injury or serious material damage.
CAUTION: low risk: failure to observe this warning may result in minor injury or material damage.
NOTE: circumstances and specifics that must be observed when handling the device.
Instructions for safe operation
- This device must not be used by children.
- Children must not play with the device.
- The device and the power cable must be kept away from children.
- This device can be used by people with restricted physical, sensory or intellectual abilities or people without adequate experience and/or understanding if they are supervised or instructed on how to use this device safely and if they are aware of the resulting risks.
- If the mains power cable of this device should become damaged, it must be replaced by the manufacturer, the manufacturer's customer service department or a similarly qualified specialist, in order to avoid any hazards.
- Disconnect the mains plug from the wall socket ...
... when it is not supervised, ... before you assemble or disassemble the device, and ... before you clean the individual parts.
- This device is not intended to be operated using an external timer clock or a separate remote control system.
- Please take note of the chapter on cleaning (see "Cleaning" on page 51).
- The blades of the blade insert are sharp. Please be very careful when handling them.
- Switch off the device and pull the mains plug out of the power socket before replacing accessories or additional parts that move during operation.


DANGER for children
Children must not play with packing material. Do not allow children to play with plastic bags. There is a risk of suffocation.
- Please ensure that children are not able to pull the device down from the work surface with the power cable.
- Keep the device out of the reach of children.

DANGER to and from pets and livestock
Electrical devices can represent a hazard to pets and livestock. In addition, animals can also cause damage to the device. For this reason you should keep animals away from electrical devices at all times.

DANGER! Risk of electric shock due to moisture
The device must never be operated in the vicinity of a bathtub, a shower, a filled hand basin or similar.
The motor block, the power cable and the mains plug must not be immersed in water or any other liquids.
- Protect the motor block against moisture, water drips and splashes.
- If liquid gets into the device (except in the container provided for this purpose), remove the mains plug immediately. Have the device checked before reusing.
- Never touch the device with wet hands.
- If the device falls into water, disconnect the mains plug immediately. Only then is it safe to retrieve the device.

DANGER! Risk of electric shock
- Only plug the mains plug into the wall socket after the device has been completely assembled.
- Only connect the mains plug to a properly installed and easily accessible wall socket whose voltage corresponds to the specifications on the rating plate. The wall socket
must continue to be easily accessible after the device is plugged in.
- Ensure that the power cable cannot be damaged by sharp edges or hot points. Do not wrap the power cable around the device.
The device is not fully disconnected from the power supply, even after it is switched off. In order to fully disconnect it, pull out the mains plug. - When using the device, ensure that the power cable cannot be trapped or crushed.
- When removing the mains plug from the wall socket, always pull the plug and never the cable.
- Disconnect the mains plug from the wall socket ... ... if there is a fault, ... when you do not use the jug blender ... during thunderstorms.
- Do not use the device if there is visible damage to the device or the power cable.
- To avoid any risk, do not make modifications to the device.

DANGER! Risk of injury from cutting
The blades of the blade insert are sharp. Please be very careful when handling them.
Switch off the device and pull the mains plug out of the power socket before replacing accessories or additional parts that move during operation.
WARNING! Risk of material damage
- Thick or firm peels, (e.g. of citrus fruits, pineapple), stems and pips of stone fruits (e.g. cherries, peaches, apricots) must be removed before blending.
- In order to avoid damage to the device, interrupt the blending process immediately if the blades of the blade insert do not turn at all or only with difficulty. Pull

out the mains plug and investigate whether there is an obstruction in the blender jug or whether the contents are too tough. Also check whether the device is assembled correctly.
- Never mix food on an oil basis such as poppy seed or nuts (for instance for poppy seed or nut butter) for more than 60 seconds, since otherwise the motor may overheat and can be damaged.
Do not operate the device when it is empty, as this causes the motor to overheat and may result in it being damaged.
The device is designed for continuous operation of ...
... no more than 1 minute without interruption at high speed (control dial >3 - 6) and
... no more than 3 minutes without interruption at low speed (control dial 1 - 3).
After this, the device must remain switched off until it has cooled down to room temperature.
-Only use the original accessories.
- All parts except for the motor block are dishwasher-safe up to 70 °C.
- Do not use any astringent or abrasive cleaning agents.
The device is fitted with non-slip plastic bases. As furniture is coated with a wide array of varnishes and synthetics, and is also treated with different care products, it cannot be fully ruled out that some of these materials contain ingredients that could attack and soften the non-slip plastic bases. If necessary, place a non-slip mat under the device.
4. Items supplied
1 Blender jug 5 (maximum filling volume 2 litres)
1 Motor block 9
1 Lid 3
1 Measuring jug (30, 45, 60 ml) 2
1 Food pusher 1
1 Operating instructions
5. How to use
- Remove all packing material.
- Check to ensure that all parts are present and undamaged.
- Clean the device prior to its first use! (see "Cleaning" on page 51)
- Place the device on a dry, level and non-slip surface.
6. Installation

DANGER! Risk of injury from cutting!
- The blade insert 7 is sharp. Handle it with care.
- Do not insert the mains plug 10 into a wall socket until the jug blender is completely assembled.
NOTES:
- The device is equipped with two safety switches. The device can only be operated with the blender jug 5 in place and the lid 3 closed and locked with its safety brackets 4. Should it be possible to switch on the device also without the blender jug 5 in place, do not operate the device any longer. Contact our Service Centre by telephone or email (see "Warranty of the HOYER Handel GmbH" on page 55).
-
If the blender jug 5 is removed during operation, the device will switch off automatically. Set the control dial 11 to 0 before placing the blender jug 5 on the motor block 9.
-
Figure A: position the blender jug 5 on the motor block 9 so that the handle 6 points to the right above the position marking 8.
- Fill the prepared foodstuffs into the blender jug 5.
- Close the blender jug 5 with the lid 3 such that the safety bracket 4 engages audibly at the handle 6.


-
If necessary, turn the control dial 11 to position O (Off).
-
Figure B: insert the measuring jug 2 into the lid 3 and lock it by turning it clockwise.
-
Insert the mains plug 10 into a wall socket corresponding to the technical data. Button P 14 flashes red.
7. Operation
WARNING!
In order to avoid damage to the device, interrupt the blending process immediately if the blades of the blade insert 7 do not turn at all or only with difficulty. If this happens, pull out the mains plug 10 and check whether there is something in the blender jug 5 blocking movement or whether the food is too tough. Also check whether the device is assembled correctly.
The device is designed for continuous operation of ... ... no more than 1 minute without interruption at high speed (control dial >3 - 6) and ... no more than 3 minutes without interruption at low speed (control dial 1 - 3). After this, the device must remain switched off until it has cooled down to room temperature.
CAUTION: depending on the hardness and consistency of the food, do not fill the blender jug 5 up to the maximum level, as this can cause the blade insert 7 to become blocked.
Application area
The jug blender is designed to mix whole-fruit beverages (smoothies) and to chop food and crush ice.
7.1 Preparing food
WARNING! Risk of material damage!
- Thick or firm peels, (e.g. of citrus fruits, pineapple), stems and pips of stone fruits (e.g. cherries, peaches, apricots) must be removed before blending.
- Rinse or wash the food.
- Chop the foodstuffs so small that they fit through the refill opening of the lid 3.
• Free herbs from their stems. - For smoothies, use a sufficient amount of liquid (mineral water, juice, milk, yoghurt). We recommend a mixing ratio of 1:1.
7.2 Chopping
- To chop food, turn the infinitely variable control dial 11 to the desired speed between the markings 1 and 6.
- Ingredients and liquids can also be added during operation via the refill opening of the lid 3.
- You can push down the processing food with the food pusher 1 included in the items supplied. Use only this food pusher 1.
Harder food
NOTE: never attempt to shred more than 50 g of nuts.
- Fill food into the blender jug 5.
- Turn the control dial 11 to position M. All 3 buttons ☑ 12, ☑ 13 and P 14 flash blue.
NOTE:
If no button is pressed within the next 30 seconds, the flashing of the buttons ☐ 12, ☐ 13 and P 14 will stop. Then the button P 14 will flash red.
- Turn the control dial 11 first to position O (Off) and then back to position M to reactivate the button functions.
- To chop harder food, press button P 14. Work with pulses (press button P 14 repeatedly). The number and length of the pulses will depend on the quantity and consistency of the food. All 3 buttons ☑ 12, ☒ 13 and P 14 flash blue.
Crushed Ice
- Fill ice cubes into the blender jug 5.
- Turn the control dial 11 to position M. All 3 buttons ☑ 12, ☑ 13 and P 14 flash blue.
- Press the button 13. Now, the device operates with interval function. Button 13 lights up in blue. The device will switch off automatically.
Smoothies
This function is used to prepare smoothies.
- Turn the control dial 11 to position M. All 3 buttons ☑ 12, ☑ 13 and P 14 flash blue.
- Press the button 12. The speed increases and decreases several times during the mixing process. Button 12 lights up in blue. The device will switch off automatically.
7.3 Remove food
NOTE: do not store foodstuffs in the blender jug 5 or in contact with other product parts for longer than 24 hours. This also applies to storage in the refrigerator.
- Turn the control dial 11 to position O (Off).
-
Once the motor has come to a complete standstill, remove the blender jug 5 from the motor block 9. Lift the blender jug 5 vertically upwards.
-
Figure C: remove the safety bracket 4 from the locking device and press the lid 3 upwards.
- Empty the blender jug 5.
- Clean the device as soon as possible after use.
8. Cleaning
Clean the device prior to its first use!
8.1 Instant cleaning of the blender jug
- Position the blender jug 5 on the motor block 9 so that the handle 6 points to the right.
- If necessary, turn the control dial 11 to position O (Off).
- Fill some warm water and detergent into the blender jug 5.
- Close the blender jug 5 with the lid 3 such that the safety bracket 4 engages audibly at the handle 6.
- Connect the mains plug 10 with the wall socket.
- Turn the control dial 11 to position M.
- Press the button P 14 repeatedly.
- Turn the control dial 11 to position O (Off).
- Disconnect the mains plug 10 from the wall socket.
- Once the motor has come to a complete standstill, remove the blender jug 5 from the motor block 9. Lift the blender jug 5 vertically upwards.
- Figure C: remove the safety bracket 4 from the locking device and press the lid 3 upwards.
- Empty the blender jug 5 and rinse it with clean water.
8.2 Cleaning all parts of the device

DANGER! Risk of electric shock!
The motor block 9, the power cable and the mains plug 10 must not be immersed in water or any other liquids.

DANGER! Risk of injury from cutting!
- The blades of the blade insert 7 are sharp. Please be very careful when handling them.
- For manual cleaning, the water should be sufficiently clear so that you can see the blade insert 7 easily.
WARNING! Risk of material damage!
- Do not use any astringent or abrasive cleaning agents.
-
All parts except for the motor block 9 are dishwasher-safe up to 70 °C.
-
If necessary, disconnect the mains plug 10 from the wall socket.
- Remove the blender jug 5 from the motor block 9.
The motor block 9 must not be immersed in water.
- If necessary, wipe down the motor block 9 and the power cable 10 with a damp cloth. Ensure that the motor block 9 is completely dry before the next time it is used.
-
Clean the other parts of the device with detergent and warm water. The following parts are dishwasher-safe up to 70 °C:
-
blenderjug 5
- lid 3
- measuring jug 2
-
food pusher 1
-
Allow all parts to dry completely before you put them away or use the device again.
Some cleaning tips
- Clean the device as soon as possible after use in order to prevent food remnants from drying on.
• After processing very salty or acidic types of food, you should immediately rinse the blender jug 5 thoroughly.
9. Storage

DANGER for children! Keep the device out of the reach of children.

DANGER! In order to avoid accidents, the mains plug 10 must never be connected to a wall socket while in storage.
- Assemble the jug blender for storage purposes.
- Select a location where neither high temperatures nor moisture can affect the device.
10. Troubleshooting
If your device fails to function as required, please try this checklist first. Perhaps there is only a minor problem, and you can solve it yourself.

DANGER! Risk of electric shock!
Do not attempt to repair the device yourself under any circumstances.
| Fault | Possible causes / Action |
| No function | Has the device been connected to the power supply?Check the connection.Has the blender jug 5 been positioned correctly and the lid 3 been locked with the safety bracket 4? |
| Blade insert 7 not turning or turning with difficulty. | Switch off immediately, pull out mains plug 10 and check:- Blockage in the bowl?- Food too tough or too hard? |
11. Recipes
Green Smoothie
Ingredients:
2 handfuls of fresh leaf spinach
1 mango
1 banana (peeled)
2 pineapple slices
Juice from 1 lime
400 ml water
4 ice cubes
- Put all ingredients into the blender jug 5 and start the mixing process (see "Smoothies" on page 51).
Tropical Smoothie
Ingredients:
200 g pineapple
1 banana (peeled)
2 kiwis (peeled)
200 ml orange juice
2 handfuls of spinach
- Put all ingredients into the blender jug 5 and start the mixing process (see "Smoothies" on page 51).
Eye-Openers
Ingredients:
2 bananas (peeled)
1 mango
2 handfuls of leaf spinach
1 tsp oil (e.g. sunflower oil)
200 ml apple juice
200 ml water
- Put all ingredients into the blender jug 5 and start the mixing process (see "Smoothies" on page 51).

Honey Flip
Ingredients:
800 ml milk
8 cl black currant juice
4 tbs honey
4 egg yolks
4 ice cubes
- Put all ingredients into the blender jug 5 and start the mixing process (see "Smoothies" on page 51).
Strawberry Banana Shake
Ingredients:
2 bananas (peeled)
300 g strawberries
2 packets of vanilla sugar
400 ml milk
- Put all ingredients into the blender jug 5 and start the mixing process (see "Smoothies" on page 51).
Berry Dream
Ingredients:
100 g blueberries
150 g raspberries
150 g strawberries
1 banana (peeled)
150 g natural yoghurt
3 tbs oatmeal
150 ml milk
Honey to taste
- Put all ingredients into the blender jug 5 and start the mixing process (see "Smoothies" on page 51).
Good Night Smoothie
Ingredients:
1 banana (peeled)
1 apple
2 tbs lemon juice
2 tbs honey
2 handfuls of spinach
400 ml water
- Put all ingredients into the blender jug 5 and start the mixing process (see "Smoothies" on page 51).
Mango Shake
Ingredients:
500 g mango
500 ml milk
- Put all ingredients into the blender jug 5 and start the mixing process (see "Smoothies" on page 51).
Raspberry Pear Smoothie
Ingredients:
2 ripe pears
300 g raspberries
400 ml water
Honey to taste
- Put all ingredients into the blender jug 5 and start the mixing process (see "Smoothies" on page 51).
Peach Banana Smoothie
Ingredients:
2 bananas (peeled)
4 peaches (peeled and cored)
200 ml grapefruit juice
2 squirts of lemon juice
- Put all ingredients into the blender jug 5 and start the mixing process (see "Smoothies" on page 51).
12. Disposal
The symbol showing a wheelie bin crossed through indicates that the product requires separate refuse collection in the European Union. This applies to the

product and all accessories marked with this symbol. Products identified with this symbol may not be discarded with normal household waste, but must be taken to a collection point for recycling electric and electronic appliances. Recycling helps to reduce the consumption of raw materials and protect the environment.
Packaging
When disposing of the packaging, make sure you comply with the environmental regulations applicable in your country.
13. Technical specifications
| Model: SSMP 2000 A1 | |
| Mains voltage: | 220 – 240 V ~ 50/60 Hz |
| Protection class: | II ☐ |
| Power rating: 2,000 W | |
| Max. Continuous operation (KB): | • 1 minute at high speed (control dial >3 - 6)• 3 minutes at low speed (control dial 1 - 3) |
Subject to technical modification.
CE
14. Warranty of the HOYER Handel GmbH
Dear Customer, your device is provided with a 3 year warranty starting with the purchase date. In the event of product defects, you are entitled to statutory rights against the vendor. These statutory rights are not restricted by our warranty presented in the following.
Warranty conditions
The warranty period starts with the purchase date. Please keep the original purchase receipt in a safe place. This document is required to verify the purchase.
If within three years from the purchase date of this product a material or factory defect occurs, the product will be repaired or replaced by us – at our discretion – free of charge to you. This warranty implies that within the period of three years the defective device and the purchase receipt are presented, including a brief written description of the defect and the time it occurred.
If the defect is covered by our warranty, the repaired or a new product will be returned to you. No new warranty period starts with a repair or replacement of the product.
Warranty period and statutory claims for defects
The warranty period is not extended when the warranty has been claimed. This also applies to replaced and repaired parts. Any damages and defects already existing at the time of purchase must be reported immediately upon unpacking. Repairs arising after the expiration of the warranty period are subject to a charge.
Warranty coverage
The device was produced carefully according to strict quality guidelines and tested diligently prior to delivery.
The warranty applies to material or factory defects.
Excluded from the warranty are wear parts subject to normal wear and damages to fragile parts, e.g. switches, batteries, lamps or other parts manufactured from glass.
This warranty expires if the product is damaged, not used as intended or not serviced. For the proper operation of the product, all instructions listed in the operating instructions must be observed carefully. Any form of use and handling that is advised against in the operating instructions or warned against must always be avoided.
The product is only intended for private and not for commercial use. In the case of incorrect and improper treatment, use of force and interventions not performed by our authorised Service Centre, the warranty shall cease.
Handling in case of a warranty claim
In order to ensure prompt processing of your matter, please observe the following notes:
- Please keep the article number
IAN: 277056 and the purchase receipt as a purchase verification for all inquiries. - If faulty operation or other defects occur, first contact the Service Centre listed in the following by telephone or email.
- Then, you are able to send a product reported as defective free of charge to the service address specified to you, including the purchase receipt and the information on the defect and when it occurred.

Please visit www.lidl-service.com to download this and many other manuals, product videos and software.

Service Centre
GB Service Great Britain
Tel.: 0871 5000 720 (£ 0.10/Min.)
E-Mail: hoyer@lidl.co.uk
MT Service Malta
Tel.: 80062230
E-Mail: hoyer@lidl.com.mt
IAN: 277056
Supplier
Please note that the following address is no service address. First contact the aforementioned Service Centre.
HOYER Handel GmbH
Tasköprüstraße 3
22761 Hamburg
Germany




- BATIDORA SSMP 2000 A1 FRULLATORE POWER-MIXER
- BATIDORA
- Indice
- Overview
- Thank you for your trust!
- Intended purpose
- Foreseeable misuse
- WARNING! Risk of material damage!
- Symbol on your device
- Safety instructions
- Warnings
- Instructions for safe operation
- DANGER for children
- DANGER to and from pets and livestock
- DANGER! Risk of electric shock due to moisture
- DANGER! Risk of electric shock
- DANGER! Risk of injury from cutting
- WARNING! Risk of material damage
- Items supplied
- How to use
- Installation
- DANGER! Risk of injury from cutting!
- NOTES:
- Operation
- WARNING!
- Application area
- Preparing food
- Chopping
- Harder food
- NOTE:
- Crushed Ice
- Smoothies
- Remove food
- Cleaning
- Instant cleaning of the blender jug
- Cleaning all parts of the device
- DANGER! Risk of electric shock!
- The motor block 9 must not be immersed in water.
- Some cleaning tips
- Storage
- Troubleshooting
- Recipes
- Green Smoothie
- Tropical Smoothie
- Eye-Openers
- Honey Flip
- Strawberry Banana Shake
- Berry Dream
- Good Night Smoothie
- Mango Shake
- Raspberry Pear Smoothie
- Peach Banana Smoothie
- Disposal
- Packaging
- Technical specifications
- Warranty of the HOYER Handel GmbH
- Warranty conditions
- Warranty period and statutory claims for defects
- Warranty coverage
- Excluded from the warranty are wear parts subject to normal wear and damages to fragile parts, e.g. switches, batteries, lamps or other parts manufactured from glass.
- Handling in case of a warranty claim
- Service Centre
- IAN: 277056
- Supplier
Brand : SILVERCREST
Model : SSMP 2000 A1
Category : Food processor