
SUP 128 A1 - Turntable SILVERCREST - Free user manual and instructions
Find the device manual for free SUP 128 A1 SILVERCREST in PDF.

| Product Type | Turntable (Vinyl Record Player) |
| Brand | SilverCrest |
| Model | SUP 128 A1 |
| Dimensions (Record Player) | Approx. 42.8 x 37.6 x 12.5 cm |
| Weight (Record Player) | Approx. 3.5 kg |
| Weight (Remote Control with Battery) | Approx. 80 g |
| Power Supply | 230 V ~, 50 Hz, max 14 W, Protection Class II |
| Speeds | 33 1/3 rpm, 45 rpm |
| Playable Formats | Vinyl records, MP3 (from USB/SD/MMC), AUX input |
| Recording Format | MP3 (128 kbps, 33 kHz) |
| Storage Media Support | USB 2.0 (max 100 mA), SD/MMC card (max 32 GB) |
| Remote Control | Included with 2 x AAA batteries |
| Output | LINE OUT (RCA cinch) for external amplifier |
| Operating Temperature | +5 to +35 °C |
| Humidity | ≤ 75% (no condensation) |
| Automatic Switch-off | After 15 minutes of inactivity |
| Warranty | 3 years from purchase date |
| Cleaning | Soft damp cloth for housing; special brush for stylus |
| Safety Features | Do not open; avoid moisture; correct tracking force required; anti-skating adjustment |
Frequently Asked Questions - SUP 128 A1 SILVERCREST
User questions about SUP 128 A1 SILVERCREST
0 question about this device. Answer the ones you know or ask your own.
Ask a new question about this device
Download the instructions for your Turntable in PDF format for free! Find your manual SUP 128 A1 - SILVERCREST and take your electronic device back in hand. On this page are published all the documents necessary for the use of your device. SUP 128 A1 by SILVERCREST.
USER MANUAL SUP 128 A1 SILVERCREST
Operating instructions
DE AT CH
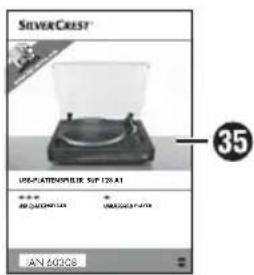
USB-PLATTENSPIELER
Bedienungsanleitung
IAN 60308

GB IE
Before reading, unfold the page containing the illustrations and familiarise yourself with all functions of the device.
DE AT CH
GB/IE Operating instructions Page 1
natural_image
Top view of a vintage flattex machine with visible control knobs and speaker grille (no text or symbols)

Contents
Introduction 2
Foreword 2
Copyright 2
Limitation of liability 2
Warnings 3
Intended use 4
Safety....5
Risks from electric current ..... 5
Basic safety instructions ..... 6
Handling batteries....7
Start-up 8
Check the package contents ..... 8
Disposal of packaging ..... 9
Set-up location requirements ..... 9
General description ..... 10
Remote control .....10
Overview of the device .....11
Before initial start-up ..... 12
Setting the tracking pressure .....12
Electrical connection .....13
Inserting/changing the remote control battery....13
Connection to an external amplifier .13
Handling and operation .... 14
Switching the device on and off ...14
Automatic switch-off .....14
Vinyl record operation .....14
Fine adjustment of the rotation speed .15
USB and card operation .....16
AUX-IN operation .....19
Recording function .....20
Cleaning 21
Troubleshooting .....21
Fault causes and rectifi cation .....22
Storage / Disposal ..... 23
Storage 23
Disposal of the device .....23
Disposal of batteries .....23
Appendix 23
Notes on the Declaration of
Conformity....23
Technical details.....24
Warranty 25
Service 25
Importer....25
GB IE
Introduction
Foreword
Congratulations on the purchase of your new device.
You have selected a high-quality product.
The operating instructions are a part of this product. They contain important information about safety, use and disposal. Before using the product, familiarise yourself with all operating and safety instructions. Use this product only as described and only for the specified areas of application. Please also pass these operating instructions on to any future owner(s).
Copyright
This documentation is subject to copyright protection.
Any copying or reproduction, including extracts thereof, and the reproduction of images (even in a modified state), is permitted only with the written authorisation of the manufacturer.
Limitation of liability
All the technical information, data and instructions regarding installation, connection and operation contained in these operating instructions correspond to the latest information available to us at the time of printing and take into account our previous experience and know-how.
No claims can be derived from the details, illustrations and descriptions in these instructions.
The manufacturer assumes no responsibility for damage caused by failure to observe these instructions, improper use, incompetent repairs, unauthorised modifications or for the use of non-approved replacement parts.
Warnings
The following warnings are used in these operating instructions:

DANGER
A warning at this risk level indicates an imminently hazardous situation.
If the hazardous situation is not avoided, it could lead to death or serious physical injury.
▶ Follow the instructions in this warning to avoid a fatality or serious personal injury.

WARNING
A warning of this risk level indicates a potentially hazardous situation.
Failure to avoid this hazardous situation could result in physical injury or serious damage to property.
▶ Follow the instructions in this warning to prevent physical injury or serious damage to property.
CAUTION
A warning of this risk level indicates potential damage to property.
Failure to avoid this situation could result in damage to property.
▶ Follow the instructions in this warning to prevent damage to property.
NOTE
▶ A note indicates additional information that will assist you in handling the device.
Intended use
This is a consumer electronics device.
This device is exclusively intended for playing vinyl records, playing back MP3 files from USB data media and SD/MMC memory cards and also audio signals from external audio devices.
This device can also be used to record audio signals from vinyl records and external audio devices as MP3 files onto USB data media and SD/MMC memory cards.
It is not intended for any other use.
WARNING
Danger if not used for correct purpose
Failure to use the device for its intended purpose and/or other type of use can be hazardous.
▶ Use the device only for its intended purpose.
▶ Observe the procedures described in these operating instructions.
Claims of any kind for damage arising as a result of incorrect use will not be accepted.
The user is the sole bearer of the risk.
Safety
This section provides you with important safety information regarding handling of the device.
The device complies with the statutory safety regulations.
Incorrect usage can lead to personal injury and damage to property.
Risks from electric current

DANGER
Risk of electrocution!
Contact with live cables or components can result in fatal injury!
Observe the following safety instructions to avoid risks from electrical current:
▶ Do not operate the device if the power cable or the plug is damaged.
Before using the device again, have a new mains power cable installed by an authorised specialist.
▶ Connect the device only to a freely accessible, properly installed 230 V-50 Hz mains power socket.
The device housing must not be opened under any circumstances. There is a risk of electric shock if live connections are touched or electrical and/or mechanical components are modified.
CAUTION
Notice regarding power disconnection
The device consumes power in standby mode. The ON/OFF switch does not completely disconnect the device from the mains power. To completely disconnect the device from mains power, the power plug must be removed from the mains power socket. The device should be positioned so that you have unrestricted access to the mains power socket at all times, enabling the plug to be removed immediately in an emergency situation.
▶ To prevent the risk of fi re, you should completely disconnect the plug from the mains power socket if the device is not going to be used for extended periods such as holidays.
GB IE
Basic safety instructions
Follow the safety instructions below to use the device safely:
- Check the device for any visible external damage before use. Do not use a device that has been damaged or dropped.
If the cables or connections are damaged, have them replaced by an authorised specialist or customer service.
This device is not intended for use by persons (including children) with limited physical, physiological or intellectual abilities or lack of experience and/or knowledge unless they are supervised by a person who is responsible for their safety, or receive instructions from this person on how to use the device.
■ Children should be supervised to ensure that they do not play with the device.
Packaging material must not be used as a plaything. Risk of suffocation!
All repairs must be carried out by authorised specialist companies or the Customer Service department. Improper repairs can pose significant risks to the user. Warranty claims also become void.
■ Repairs to the device during the warranty period may only be carried out by a customer service department authorised by the manufacturer. Otherwise no additional warranty claims can be considered for subsequent damage.
■ Defective components must always be replaced with original replacement parts. Compliance with the safety requirements can only be guaranteed by using these replacement parts.
■ Protect the device from penetration by moisture and liquids.
Do not expose the device to spray and/or dripping water and do not place any objects filled with liquid, such as vases or open drink containers, on or near the device.
■ Always take hold of the mains plug when disconnecting the cable from the mains power socket. Never pull on the power cable itself and never touch it with wet hands. Risk of electrocution!
■ Do not carry the device by the power cable.
- Do not allow the power cable to hang down. There is a risk of the device being pulled down by the cable.
Do not place the device itself or other heavy items such as furniture on the power cable, and ensure that the cable cannot become jammed or trapped in any way.
■ Never tie knots in the power cable, and do not bind it together with other cables.
Route the power cable so that it cannot be stepped on or stumbled over.
■ To avoid overheating during operation, do not cover the device.
- Do not insert metal or fl ammable objects into the device.
■ When a cold device is taken into a warm environment, condensation can occur. Do not connect the device to the mains: let the device acclimatise at room temperature for about one hour.
■ Avoid direct sunlight and strong artificial light.
■ Do not operate the device in the vicinity of naked flames (e.g. candles).
In the event of malfunctions and during thunderstorms, remove the mains plug from the mains power socket.
Handling batteries
WARNING
Danger from improper use!
In order to handle batteries safely, please observe the following safety instructions:
▶ Do not throw the batteries into a fire and do not subject them to high temperatures.
▶ Do not open, deform or short-circuit batteries, since this can lead to chemical leakage.
▶ Do not attempt to recharge batteries.
▶ Check the condition of the batteries at regular intervals. Leaking chemicals can cause permanent damage to the device. Take particular care when handling damaged or leaking batteries. Risk of chemical burns!
Wear protective gloves.
The chemicals that leak from a battery can cause skin irritation. In event of contact with the skin, rinse with copious amounts of water. If the chemicals come into contact with your eyes, rinse thoroughly with water, do not rub and consult a doctor immediately.
▶ Keep batteries out of the reach of children. Children can put batteries into their mouth and swallow them. If a battery has been swallowed, seek medical assistance IMMEDIATELY.
▶ Do not mix different types of batteries.
▶ Always insert the batteries the right way round (observe correct polarity) otherwise there is a danger that they could explode.
▶ Remove the batteries from the remote control if you do not intend to use the device for extended periods of time.
Start-up
Check the package contents
See illustrations on the fold-out page.
NOTE
▶ Check the delivery for completeness and for signs of visible damage.
▶ If the delivery is incomplete, or has been damaged due to defective packaging or during transportation, contact the Service Hotline (see chapter Service).
This device is supplied with the following components:
- Record player
- Turntable mat
- Pickup arm counterweigh ^3
- Adapter for singles (45's)
- Remote contro ^33
- 2 x 1.5 V Batteries type AAA/micro ^34
• These operating instructions 35
◆ Remove all packaging material.
Remove all adhesive tape from the turntable and place the turntable mat on the turntable.
◆ Remove the wire securing the pickup arm to the arm rest.
CAUTION
The protective cap for the stylus is not part of the packaging material and must not be discarded.
The protective cap should only be pulled forwards off the pickup arm. To protect the stylus, the protective cap should be replaced whenever the record player is not in use.

natural_image
Technical line drawing of a mechanical component with bidirectional arrows indicating movement (no text or symbols)DANGER
Packaging material must not be used as a plaything. Risk of suffocation!
Disposal of packaging
The packaging protects the device from transport damage. The packaging materials have been selected for their environmental friendliness and disposal attributes, and are therefore recyclable.

Returning the packaging to the material cycle conserves raw materials and reduces the amount of waste that is generated. Dispose of packaging material which is no longer needed in accordance with applicable local regulations.
NOTE
If possible, keep the original packaging of the device during the warranty period, so that the device can be packed properly for returning in the event of a warranty claim.
Set-up location requirements
For safe and trouble-free operation of the device, the set-up location must fulfil the following requirements:
■ The device must be placed on a fi rm, fl at and level surface.
- Do not place the device in a hot, wet or extremely moist environment or in the vicinity of flammable materials.
Do not remove the feet of the device. Otherwise there may be insufficient air circulation.
■ The mains power socket must always be easily accessible so that the mains plug can be quickly removed from the mains power socket in the case of an emergency.
The surfaces of furniture and also furniture care products/polishes may possibly contain substances that could attack the rubber feet of the device and soften them. Put something beneath the feet of the device if necessary.
This device is not intended for use in areas where special conditions may exist, such as a corrosive or potentially explosive atmosphere (dust, vapour or gas).
■ Operating temperature range: +5 to +35 °C
■ Humidity (no condensation): ≤ 75 %
General description
Remote control
15—14—13—12—11—10—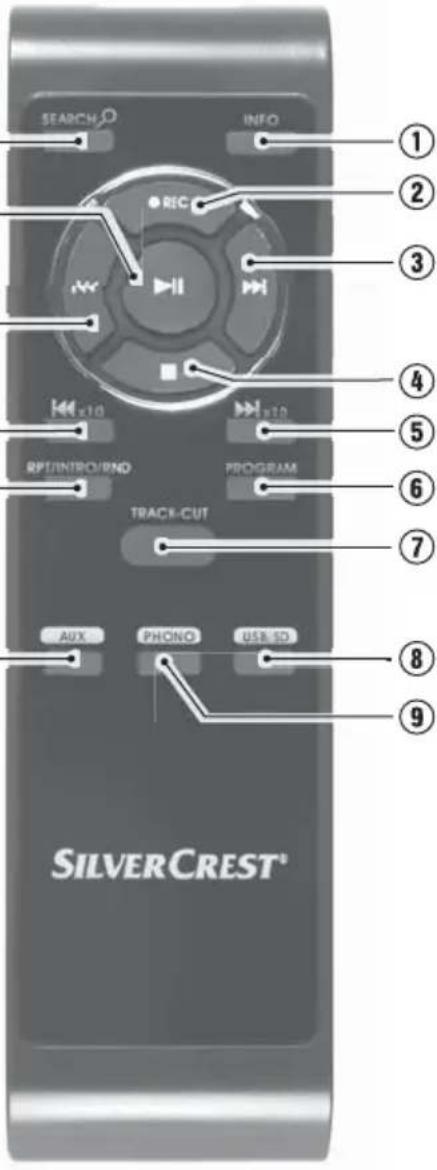 | 1 | INFO: Display/hide ID3 tags in MP3 mode |
| 2 | ●REC: Start recording | |
| 3 | ▶▶I: Skip to next track/fast forward | |
| 4 | ■: Stop playback | |
| 5 | ▶▶I x10: Skip 10 tracks forward in MP3 mode | |
| 6 | PROGRAM: Activate track programming | |
| 7 | TRACK-CUT: Carry out track cutting during recording | |
| 8 | USB/SD: Switch to USB or SD mode | |
| 9 | PHONO: Switch to PHONO mode | |
| 10 | AUX: Switch to AUX mode | |
| 11 | RPT/INTRO/RND: Repeat track or medium/intro function/random playback | |
| 12 | I◀◀ x10: Skip 10 tracks back in MP3 mode | |
| 13 | I◀◀: Skip to previous track/rewind | |
| 14 | ▶II: Start/pause playback | |
| 15 | SEARCH : Start the search for tracks or directories in MP3 mode |
NOTE
▶ Operation using the remote control is shown in the following text using positive numbers (①) and operation at the device using negative numbers (①)
Overview of the device
See illustrations on the fold-out page.
① Dust cover
② Turntable
3 Counterweight for the pickup arm
4 Anti-skating control
⑤ Pickup arm elevator
6 Arm rest for pickup arm
⑦ Pickup arm
8 Turntable speed selection switch
9 Adjustment control PITCH ADJ.: fi ne adjustment of the rotation speed
10 Stylus
⑪ EJECT button: Stop vinyl record playback
⑫ ON/OFF button Switch the device on/off
13 PHONO button: Switch to PHONO mode
14 AUX button: Switch to AUX mode
15 ▶II/■ button: Start/pause/stop playback (for USB and SD operation only)
16 USB/SD button: Switch to USB or SD mode
17 ▶▶I button: Fast forward, skip to next track
18 ▶▶I x10 button: Skip 10 tracks forward in MP3 mode
19 I◄◄ button: Rewind, skip to previous track
20 RPT/INTRO/RND button: Repeat track or medium/intro function/random playback
21 • REC button: Record vinyl record onto USD stick or SD/MMC card
22 PROG button: Activate track programming
23 Display
24 POWER "On" lamp
25 Sensor for remote control
26 AUX IN: 3.5 mm stereo input socket for connecting an external audio device
27 USB port
28 Card slot for SD/MMC cards
29 Stroboscope: Scanning light for rotation speed
30 Adapter for singles (45's)
31 Power cable
32 LINE OUT: Audio cinch output
L/R for amplifier
33 Remote control
34 Batteries
35 Operating instructions
Before initial start-up
Setting the tracking pressure
The supplied counterweight ③ must be fitted to the pickup arm ⑦. This is used to set the correct weight so that the stylus ⑩ moves over the records without jumping or pressing too firmly into the groove.
CAUTION
Possible stylus damage.
Hold the pickup arm firmly so that the stylus is not touching the turntable 2.
◆ Remove the protective cap from the stylus.
◆ Release the arm rest clip from the pickup arm.
◆ Set the anti-skating control 4 to "0".
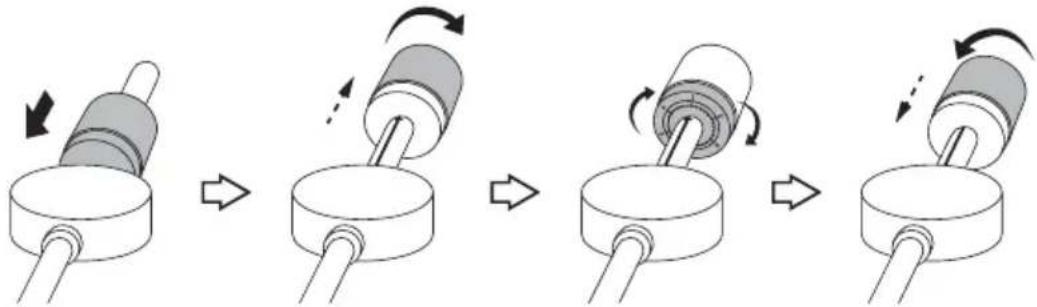
◆ Slide the counterweight (with the scale at the front) onto the pickup arm from the rear all the way to the front (see Fig. A).
♦ Rotate the counterweight clockwise on the pickup arm until you reach the white stop mark (T) on the pickup arm (see Fig. B).
Set the scale ring to "1" without changing the weight. To do this, hold the silver part of the counterweight firmly and rotate the front black scale ring only (see Fig C).
Now set the tracking pressure by rotating the counterweight anticlockwise. We recommend a value between 4–6 (see Fig. D).
flowchart
graph LR
    A["Roller Pin"] --> B["Rotating Column"]
    B --> C["Rotating Cylinder"]
    C --> D["Rotating Shaft"]
    D --> E["Rotating Column"]
If in doubt, start by selecting a lower weight for the stylus. If the stylus still jumps, increase the weight in small increments. Too much weight will make the needle cut into the groove, causing excessive wear.
Setting the anti-skating force
Due to the friction between the rotating disc and the stylus 10, the pickup arm 7 is pulled inwards and the stylus presses more heavily on the inner fl ank of the groove on the record. This is compensated for by the anti-skating setting. The anti-skating force should be set to the same value as the tracking pressure, e.g. a value between 4–6.
Set the anti-skating control 4 to the same value as the pickup arm counterweight 3.
Electrical connection
Before connecting the device, compare the connection data (voltage and frequency) on the rating plate with that of your mains power supply. This data must correspond in order to avoid damaging the product.
■ Make sure that the power cable is not damaged and is not routed over hot surfaces and/or sharp edges.
■ Ensure that the power cable is not taut or kinked.
The mains power socket must be easily accessible so that the power cable can be quickly disconnected in an emergency.
Inserting/changing the remote control battery
Open the battery compartment on the rear of the remote control 33.
◆ Insert 2 new type AAA batteries into the battery compartment.
◆ Close and secure the battery compartment.
Connection to an external amplifier
NOTE
The record player is equipped with a LINE OUT output 32. The record player must be connected to a sound output device with speakers and volume control, e.g. an amplifier.
Connect a stereo cinch cable to the LINE OUT connectors on the record player and connect these to the AUX IN connectors of your external amplifier. Follow the operating instructions for the external amplifier when doing this.
CAUTION
Potential damage to external amplifier!
Do not connect the LINE OUT output 32 of the record player to the PHONO input of your amplifier. Due to the internal amplification of this special input, it can be destroyed by connecting the record player
Handling and operation
This section provides you with important information on handling and using the device.
Switching the device on and off
To switch the device on, press the ON/OFF button 12.
The POWER 24 "On" lamp comes on and PHONO operating mode appears on the display 23.
To switch off the device press the ON/OFF button again.
Automatic switch-off
The device has an automatic switch-off function and will turn itself off after 15 minutes of inactivity.
To switch the device back on, press the ON/OFF button twice.
Vinyl record operation
Starting playback of vinyl records
Use the PHONO 13 or 9 button to select the operating mode for vinyl record playback. The display will read PHONO.
Open the dust cover①
◆ Place the record onto the turntable②
NOTE
▶ Make sure that the record is clean and free of dust. Appropriate record-cleaning brushes and cloths in are available from specialist retailers.
▶ Use the adapter30 to play records with a large centre hole (singles).
Use the turntable speed selection switch 8 to set the required rotation speed.
NOTE
On most records, the rotation speed is printed on the record label.
◆ Remove the protective cap from the stylus ^10
Release the arm rest clip 6 from the pickup arm 7.
Move the pickup arm lever 5 to the rear position ↓ to raise the pickup arm.
♦ Swing the pickup arm to the desired position on the record. The turntable 2 starts to rotate.
◆ Move the pickup arm lever to the forward position ▼ no lower the pickup arm and to place the stylus 10 onto the record.
◆ Control the volume on the connected amplifier.
If you want to pause the playback, use the lever to raise the pickup arm.
Press the EJECT ⑪ button to stop playback and return the pickup arm automatically to the arm rest.
NOTE
At the end of the record, the pickup arm automatically returns to its starting position and the turntable switches off.
Fine adjustment of the rotation speed
The stroboscope 25 beams a blue flashing light onto the edge of the turntable. While the turntable 2 is turning, this light will be reflected and you can see a dashed line on the edge of the turntable. Use the PITCH ADJ. controller 9 to fi ne-tune the rotation speed:
- The upper dashed line on the edge of the turntable is used for setting the rotation speed to 33 13 rpm.
- The middle dashed line on the edge of the turntable is used for setting the rotation speed to 45 rpm.
- The rotational speed is correctly set when the dashed line can be seen firmly in one position.
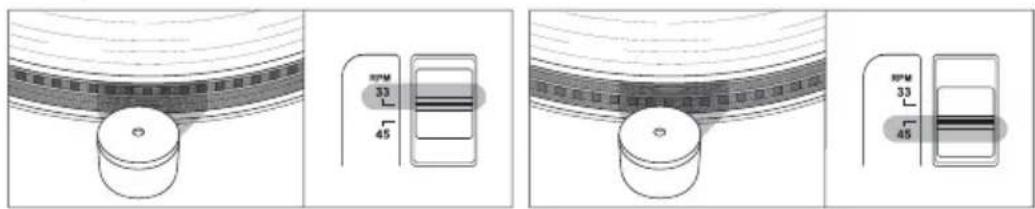
If the dashes move towards the left the rotational speed is too high. Slide the PITCH ADJ. control to the rear in the direction "-"
If the lines move towards the right, push the PITCH ADJ. control forwards in the direction "+".
GB IE
Adjusting the movement radius of the pickup arm
On some records, the pickup arm ⑦ may return before playback has completely ended. Sometimes the pickup arm may not return all the way to the arm rest ⑥. The movement radius of the pick-up arm can be adjusted with a setting screw. It is located beneath the rubber cover next to the pickup arm axis.
◆ Remove the rubber cover.
To increase the pickup arm movement inwards, turn the screw with a small Phillips-head screwdriver a little to the right.
To increase the pickup arm movement outwards, turn the screw a little to the left.
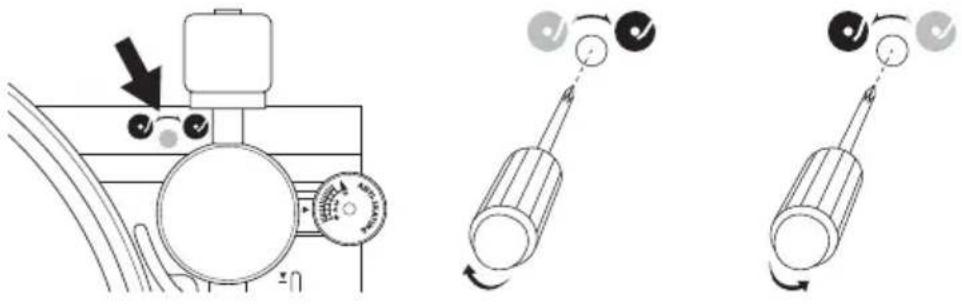
NOTE
The record player is set to the most common record settings by default. Do not turn the setting screw unnecessarily or too often.
USB and card operation
There are connections for a USB stick or another USB device (MP3 player), and an SD/MMC card on the front of the device.
CAUTION
The USB connection 27 is only designed for USB memory sticks. Other external storage media such as external hard drives cannot be operated via the USB port.
▶ To avoid damaging the device, do not use a USB extension cable and do not connect the record player directly to the USB port of a computer.
▶ Storage media can only be inserted in one direction. Do not use force to connect them as this may damage the storage medium and the device.
Connecting a USB data medium
◆ Slide the cover of the USB connection 27 upwards and insert your USB device.
Connecting a memory card
Slide a memory card into the memory card slot 28 with the labelling facing upwards.
Activating the operating mode
Press the USB/SD 16 or 8 button repeatedly until USB or CARD and the corresponding icon (↔ / 📋) appears in the display .23e device searches for MP3 fi les on the data medium. After reading the data, play-back starts automatically.
NOTE
If no data medium is connected or if the data medium is empty, NO USB or NO CARD is shown on the display.
Pausing or stopping playback
◆ Press the ▶II/■ 15 or ▶II 14 button to pause playback.
To resume playback press the ▶II/■ or ▶II button again.
To stop playback, hold the ▶II/■ button down for for approximately 2 seconds or press the ■④ button once.
Skip title
◆ Press the ▶▶1 ⑰ or ③ button to select the next track.
◆ Press the ◀◀◀ 19 or ⑬ button to select the previous track.
Fast forward/rewind
During playback press and hold the ◄◀ or ▶▶I buttons to fast forward or rewind. The sound will be muted.
Skip 10 tracks
Press the ▶▶1x10 ⑱ button or ⑤ to skip forward ten tracks.
Press the I◄◄x10 ⑫ button to skip backward ten tracks.
Show additional information
During playback you can view additional information about the track (track name, album name, etc.) by pressing the INFO ① button.
◆ Press the INFO button again to hide the additional information.
Alphabetic track search
You can search for MP3 tracks alphabetically.
◆ Press the SEARCH 🔒 ⑮ button.
Press ▶▶1 ⑰ or ③ button or the ◀◀◀ ⑲ or ⑬ button until the desired initial letter or number of the track appears on the display ⑳. Then the first track appears, which starts with "A", for example. If the medium does not contain a track that starts with "A", R-MOFILE appears.
Press ▶II/■ 15 or ▶II 14, to start playback of the selected track.
Setting playback mode
Press the RPT/INTRO/RND button 20 or 11 to switch between the following settings:
- REPEAT ONE: The current track is repeated.
_☐ ALL REPEAT ALL: All tracks are repeated.
- INTRO: The first ten seconds of every track are played.
- RANDOM: The tracks are played in random order.
If any of these settings are activated, this will be indicated in the display.
NOTE
▶ If you stop playback, the playback setting will be reset.
Programming the playing order of the tracks
You can program a playback sequence for up to 10 tracks. The programming can only take place with playback stopped.
Creating a list
Press the PROG. 22 or PROGRAM 6 button. The display 23 shows PROG and P01001. P01 is the program slot number, and 001 is the selected track number.
Use 19 or 13 alternatively ▶▶17 or 3 to select the desired track.
Press PROG. 22 or PROGRAM 6 again to store the track in program position PO1. The display shows the next program slot PO2.
Use the buttons ◄◀ or ▶▶I to select the track you want to save in program slot 02 and then press the PROG. or PROGRAM button. The display shows the next program slot P03.
◆ Repeat these steps until your list is complete.
Press the ▶II/■ 15 or ▶II 14 button to finish programming and start playback.
Use the ◄◀◀ or ▶▶◀I buttons to switch between the programmed tracks.
NOTE
▶ After programming 10 tracks, FULL will briefly appear on the display and playback will start automatically.
Deleting a list
To delete the list, hold down the ▶II/■ 15 button for about two seconds or press the ■ 4 button.
Then press the PROG. or PROGRAM button or change the operating mode. PROG no longer appears in the display.
AUX-IN operation
The record player is equipped with an AUX-IN socket 2 which allows you to connect an external audio device (e.g. MP3 player) using a 3.5 mm jack cable and play back your music via the record player.
Connect a 3.5 mm jack cable (available from specialist dealers) to the AUX-IN socket and the audio output of your external audio device.
Press the AUX 14 button or 10 to switch to AUX-IN operation.
◆ Start playback of the external audio device.
- Control the playback volume on the external audio device and the external amplifier.
Recording function
You can use the record player to convert audio signals from vinyl records or an external audio device into MP3 files and save them onto USB or SD/MMC data media. The recording speed is 1:1 (real-time). The bit rate is preset to 128 kbps and the sampling rate to 33 kHz.
Recording from vinyl records or an external audio device
NOTE
If no data medium is connected NO USB or NO CARD is shown on the display.
Place a storage medium into the card slot28 or connect a data medium to the USB port 27.
Connect the external audio device or place a record onto the turntable 2.
Use the PHONO 13 or 9 buttons or the AUX 14 or 10 buttons to select the desired operating mode.
- Start playback of the vinyl record or external audio device.
Press ●REC 21 or ②. If you have connected only one USB data medium or only one memory card, recording will start immediately.
If you have connected both a USB data medium and a memory card, the recording will be saved onto the USB data medium. If the recording is to be made onto a memory card, remove the USB data medium. Recording will start and the Symbol and the symbol of the storage medium being used ( ) flash in the display.
◆ Press ●REC button again to stop recording.
The recordings will be stored in MP3 format under the names rec00000.mp3, rec00001.mp3, etc. in the "audio" directory on the selected data medium. The directory will be created automatically if it does not already exist.
NOTE
If you want to save the individual tracks of the record or the external audio source as individual fi les, you must press TRACK-CUT⑦ after each track. PHONO fl ashes briefl y on the display as confi rmation.
Cleaning

DANGER
Risk of electrocution!
▶ Remove the plug from the mains power socket before starting to clean the device.
CAUTION
Possible damage to the device.
Moisture penetrating the device can cause a short circuit and damage the equipment.
▶ To avoid irreparable damage, ensure that no moisture penetrates the device during cleaning.
■ Clean the housing only with a soft damp cloth and a mild detergent.
If dust has collected on the stylus 10, remove it with a suitable cleaning brush. Cleaning brushes and cleaning cloths for records are available in retail stores.
Troubleshooting
This section contains important information about fault localisation and rectifi cation. Follow the instructions to avoid hazards and damage.

WARNING
To avoid risks and property damage, observe the following safety instructions:
▶ Repairs to electrical devices may only be carried out by specialists trained by the manufacturer. Improper repairs can represent considerable risk to users and can cause damage to the device.
Fault causes and rectifi cation
The following table will help with localising and remedying minor malfunctions:
| Defect Possible cause Remedy | ||
| No indications on the display 23. | The device is not switched on. | Switch the device on. |
| The plug is not connected. | Insert the plug into the mains mains power socket. | |
| The mains socket is not supplying any power. | Check the house fuses. | |
| The turntable 2 does not turn, in spite of the fact that the pickup arm 7 is located in the playback position. | Wrong operating mode selected. | Select the operating mode PHONO. |
| Pickup arm jumps, slides or does not move forward. | The device is not level. Stand the device on a level surface. | |
| Anti-skating incorrectly adjusted. | Check the anti-skating settings. | |
| Tracking force set incorrectly. | Check the tracking force settings. | |
| Music played back at wrong pitch. | Wrong speed selected on the turntable. | Use the dial 8 to set the correct speed (33 1⁄3 or 45 rpm) and perform fi ne adjustment using the PITCH ADJ. 9 controller. |
| NO USB is displayed. | No USB data medium is connected. | Connect a USB data medium to the port 27. |
| Incorrect format. | Check that the data medium is formatted with the FAT32 fi le system. | |
| NO CARD is displayed. | No memory card connected. | Insert a memory card into the card slot 28. |
| Incorrect format. | Check that the data medium is formatted with the FAT32 fi le system. | |
NOTE
If you cannot solve the problem using any of the aforementioned methods, please contact the Customer Service department.
Storage / Disposal
Storage
◆ Disconnect the mains power plug if you do not intend to use the device for an extended period of time.
◆ Store the device in a dry environment.
♦ Protect the stylus 10 with the protective cap.
◆ Close the dust cover 1 after use.
◆ Remove the batteries from the remote control ^33
Disposal of the device

The adjacent symbol of a crossed-out wheelie bin means that this device is subject to Directive 2012/19/EU. This directive states that this device may not be disposed of in normal household waste at the end of its usable life, but must be handed over to specially set-up collection locations, recycling depots or disposal companies.
This disposal is free of charge for the user. Protect the environment and dispose of this device properly.
You can obtain further information from your local disposal company or the city or municipal administration.
Disposal of batteries
Used batteries may not be disposed of in household waste. All consumers are required by law to dispose of batteries at a collection point provided by their local community or at a retail store. The purpose of this obligation is to ensure that batteries are disposed of in a non-polluting manner. Only dispose of batteries when they are fully discharged.
Appendix
Notes on the Declaration of Conformity
This device complies with the essential requirements and other relevant provisions of the European Electromagnetic Compatibility Directive 2004/108/EC, the Low Voltage Directive 2006/95/EC and the Ecodesign Directive 2009/125/EC (Ordinance 1275/2008 Annex II, No. 1) as well as RoHS directive 2011/65/EU.

The full original Declaration of Conformity is available from the importer.
Technical details
| General | |
| Input voltage 230 V | ~ |
| Mains voltage frequency 50 Hz | |
| Power consumption max. 14 W | |
| Protection class II / | 回 |
| Speeds 33 1/3, 45 rpm | |
| Operating temperature +5 to +35 °C | |
| Humidity (no condensation) ≤ 75 % | |
| Dimensions | |
| Record player (L x W x H) approx. | 42.8 x 37.6 x 12.5 cm |
| Remote control (L x W x H) approx. | 16.1 x 4.5 x 2.1 cm |
| Weight | |
| Record player approx. 3.5 kg | |
| Remote control with battery approx. | 80 g |
| USB data medium/memory card | |
| USB 2.0 port 5 V | ---, max. 100 mA |
| Max. storage capacity 32 GB | |
| Playable file formats | MP3 |
| Recording format | MP3 |
| Compression rate when recording | 128 kbps |
Warranty
The warranty provided for this device is 3 years from the date of purchase. This device has been manufactured with care and inspected meticulously prior to delivery. Please retain your receipt as proof of purchase. In the event of a warranty claim, please contact your Customer Service by telephone. This is the only way to guarantee free return of your goods.
NOTE
The warranty only covers claims for material and manufacturing defects, not for transport damage, worn parts or damage to fragile components such as buttons or batteries.
This product is intended solely for private use and not for commercial purposes. The warranty is deemed void if this product has been subjected to improper or inappropriate handling, abuse or modifications which were not carried out by one of our authorised service centres. Your statutory rights are not restricted in any way by this warranty. The warranty period is not prolonged by repairs made under the warranty. This also applies to replaced and repaired parts.
Damage and defects present at the time of purchase must be reported immediately after unpacking, or no later than two days after the date of purchase.
Repairs made after expiry of the warranty period are chargeable.
Service
GB Service Great Britain
Tel.: 0871 5000 720 (£ 0.10/Min.)
E-Mail: kompernass@lidl.co.uk
IAN 60308
IE Service Ireland
Tel.: 1890 930 034
(0,08 EUR/Min., (peak))
(0,06 EUR/Min., (off peak))
E-Mail: kompernass@lidl.ie
IAN 60308
Hotline availability: Monday to Friday 08:00 - 20:00 (CET)
Importer
KOMPERNASS HANDELS GMBH
BURGSTRASSE 21
44867 BOCHUM
GERMANY
www.kompernass.com
Inhaltsverzeichnis
Einführung 28
Einleitung....28
Urheberrecht....28
natural_image
Technical line drawing of a mechanical component with directional arrows indicating movement (no text or symbols)GEFAHR
flowchart
graph LR
    A["Initial cylinder with arrow"] --> B["Rotation arrow"]
    B --> C["Final cylinder with rotational arrow"]
    C --> D["End rotation arrow"]
KOMPERNASS HANDELS GMBH
BURGSTRASSE 21
44867 BOCHUM
DEUTSCHLAND/GERMANY
www.kompernass.com
KOMPERNASS HANDELS GMBH
BURGSTRASSE 21
44867 BOCHUM
DEUTSCHLAND / GERMANY
www.kompernass.com