
HW-N310 - Soundbar SAMSUNG - Free user manual and instructions
Find the device manual for free HW-N310 SAMSUNG in PDF.

| Product Type | 2.1 Channel Soundbar with Wireless Subwoofer |
| Model | Samsung HW-N310 |
| Main Unit Dimensions (W x H x D) | 860 x 60 x 75 mm |
| Subwoofer Dimensions (W x H x D) | 185 x 335 x 305 mm |
| Main Unit Weight | 2.1 kg |
| Subwoofer Weight | 3.5 kg |
| Total Power Output | 160 W |
| Power Supply | AC 100-240V, 50/60Hz |
| Power Consumption (Standby) | 0.5 W |
| Connectivity | Bluetooth 4.0, Optical Input, USB (MP3/WMA) |
| Sound Modes | Standard, Surround, Bass Boost, Adaptive Sound |
| Audio Decoding | Dolby Digital, DTS 2.0 |
| Control | Remote Control, Soundbar Button |
| Wall Mountable | Yes (bracket not included) |
| Cleaning Instructions | Wipe with a soft dry cloth. Do not use abrasive cleaners. |
| Safety Precautions | Do not expose to water or moisture. Avoid heat sources. |
| Spare Parts / Repairability | Contact Samsung service center for remote or power adapter. |
| Compatible Devices | TV, Smartphone, Tablet, PC |
Frequently Asked Questions - HW-N310 SAMSUNG
User questions about HW-N310 SAMSUNG
0 question about this device. Answer the ones you know or ask your own.
Ask a new question about this device
Download the instructions for your Soundbar in PDF format for free! Find your manual HW-N310 - SAMSUNG and take your electronic device back in hand. On this page are published all the documents necessary for the use of your device. HW-N310 by SAMSUNG.
USER MANUAL HW-N310 SAMSUNG
Thank you for purchasing this Samsung product.
To receive more complete service, please register
your product at www.samsung.com/register
SAFETY INFORMATION
SAFETY WARNINGS
TO REDUCE THE RISK OF ELECTRIC SHOCK, DO NOT REMOVE THE COVER (OR BACK). NO USER-SERVICEABLE PARTS ARE INSIDE. REFER SERVICING TO QUALIFIED SERVICE PERSONNEL.
 | CAUTIONRISK OF ELECTRIC SHOCK.DO NOT OPEN. |  |
 | This symbol indicates that high voltage is present inside. It is dangerous to make any kind of contact with any internal part of this product. | |
 | This symbol indicates that this product has included important literature concerning operation and maintenance. | |
 | Class II product: This symbol indicates that it does not require a safety connection to electrical earth (ground). | |
 | AC voltage: This symbol indicates that the rated voltage marked with the symbol is AC voltage. | |
 | DC voltage: This symbol indicates that the rated voltage marked with the symbol is DC voltage. | |
 | Caution, Consult instructions for use: This symbol instructs the user to consult the user manual for further safety related information. | |
WARNING
- To reduce the risk of fire or electric shock, do not expose this appliance to rain or moisture.
CAUTION
- TO PREVENT ELECTRIC SHOCK, MATCH WIDE BLADE OF PLUG TO WIDE SLOT, FULLY INSERT.
- This apparatus shall always be connected to a AC outlet with a protective grounding connection.
- To disconnect the apparatus from the mains, the plug must be pulled out from the mains socket, therefore the mains plug shall be readily operable.
- Do not expose this apparatus to dripping or splashing. Do not put objects filled with liquids, such as vases on the apparatus.
- To turn this apparatus off completely, you must pull the power plug out of the wall socket. Consequently, the power plug must be easily and readily accessible at all times.
PRECAUTIONS
- Ensure that the AC power supply in your house complies with the power requirements listed on the identification sticker located on the bottom of your product. Install your product horizontally, on a suitable base (furniture), with enough space around it for ventilation (7\~10 cm). Make sure the ventilation slots are not covered. Do not place the unit on amplifiers or other equipment which may become hot. This unit is designed for continuous use. To fully turn off the unit, disconnect the AC plug from the wall outlet. Unplug the unit if you intend to leave it unused for a long period of time.
- During thunderstorms, disconnect the AC plug from the wall outlet. Voltage peaks due to lightning could damage the unit.
- Do not expose the unit to direct sunlight or other heat sources. This could lead to overheating and cause the unit to malfunction.
-
Protect the product from moisture (i.e. vases), and excess heat (e.g. a fireplace) or equipment creating strong magnetic or electric fields. Unplug the power cable from the AC wall socket if the unit malfunctions. Your product is not intended for industrial use. It is for personal use only. Condensation may occur if your product has been stored in cold temperatures. If transporting the unit during the winter, wait approximately 2 hours until the unit has reached room temperature before using.
-
The battery used with this product contains chemicals that are harmful to the environment. Do not dispose of the battery in the general household trash. Do not expose the battery to excess heat, direct sunlight, or fire. Do not short circuit, disassemble, or overheat the battery. Danger of explosion if the battery is replaced incorrectly. Replace only with the same or equivalent type.
ABOUT THIS MANUAL
The user manual has two parts: this simple paper USER MANUAL and a detailed FULL MANUAL you can download.

natural_image
Illustration of a person sitting on a sofa using a laptop (no text or symbols)USER MANUAL
See this manual for safety instructions, product installation, components, connections, and product specifications.
natural_image
Illustration of a person sitting on a couch next to a desk with a laptop (no text or symbols)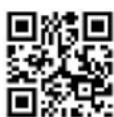
FULL MANUAL
You can access the FULL MANUAL on Samsung's on-line customer support centre by scanning the QR code. To see the manual on your PC or mobile device, download the manual in document format from Samsung's website. (http://www.samsung.com/support)
Design and specifications are subject to change without prior notice.
CONTENTS
01 Checking the Components 6
Inserting battery into the Remote Control 6
02 Product Overview 7
Front / Right Side Panel of the Soundbar 7
Bottom Panel of the Soundbar 8
03 The Remote Control 9
Using the Hidden Buttons (Buttons with more than one function) ____ 10
Adjusting the Soundbar volume with a TV remote control ____ 12
04 Connecting the Soundbar 13
Connecting Electrical Power 13
05 Connecting to a TV 14
Connecting using an Optical Cable 14
Connecting a TV or Bluetooth Device via Bluetooth ____ 16
Using the Samsung Audio Remote App ____ 19
06 Connecting an External Device 20
Connecting using an Optical Cable 20
Connecting using an Analogue Audio (AUX) Cable ____ 21
07 Connecting a USB Storage Device 22
Setting Repeat Play Options 23
08 Installing the Wall Mount (Optional) 24
Installation Precautions ____ 24
Wall mount Components ____ 24
09 Software Update 27
Updating Procedure ____ 27
When update fails ____ 28
10 Troubleshooting 29
11 Licence 30
12 Open Source Licence Notice 30
13 Important Notes About Service 30
14 Specifications and Guide 31
Specifications 31
01 CHECKING THE COMPONENTS

natural_image
Three grayscale product photos: a rectangular remote unit, a cable with a plug, and a remote control with a small device (no text or symbols visible)Soundbar Main Unit Power Cord Remote Control / Battery
(AAA x 1, Not available in some locations)
- User Manual / Warranty Card / Regulatory Guide (Not available in some locations).
- For more information about the power supply and power consumption, refer to the label attached to the product. (Label : Bottom of the Soundbar Main Unit)
- To purchase additional components or optional cables, contact a Samsung Service Centre or Samsung Customer Care.
- The appearance of the accessories may differ slightly from the illustrations above.
Inserting battery into the Remote Control
Match the polarity of the battery to the symbols on the battery compartment.
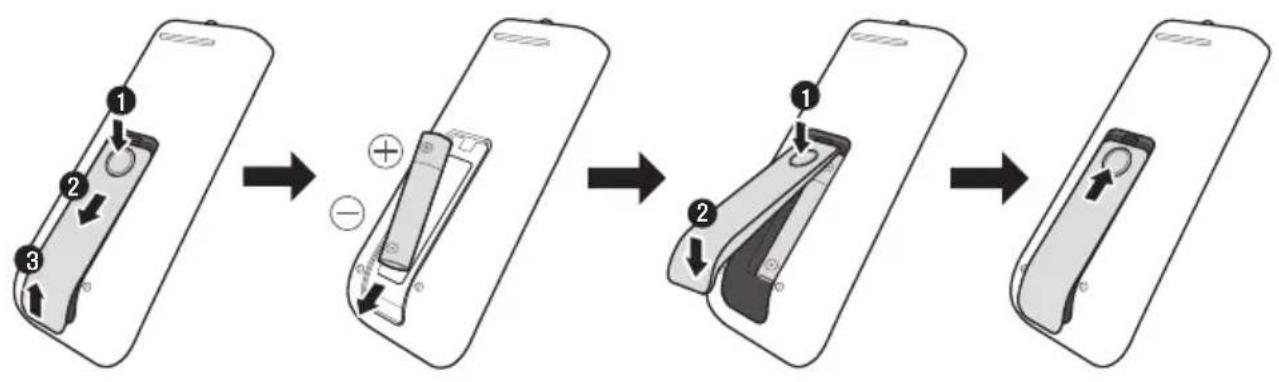
flowchart
graph TD
    A["1: Display with circular button"] --> B["2: Disassembly with plus sign"]
    B --> C["3: Rear assembly with plus sign"]
    C --> D["4: Disassembly with plus sign"]
    D --> E["5: Rear assembly with plus sign"]
02 PRODUCT OVERVIEW
Front / Right Side Panel of the Soundbar
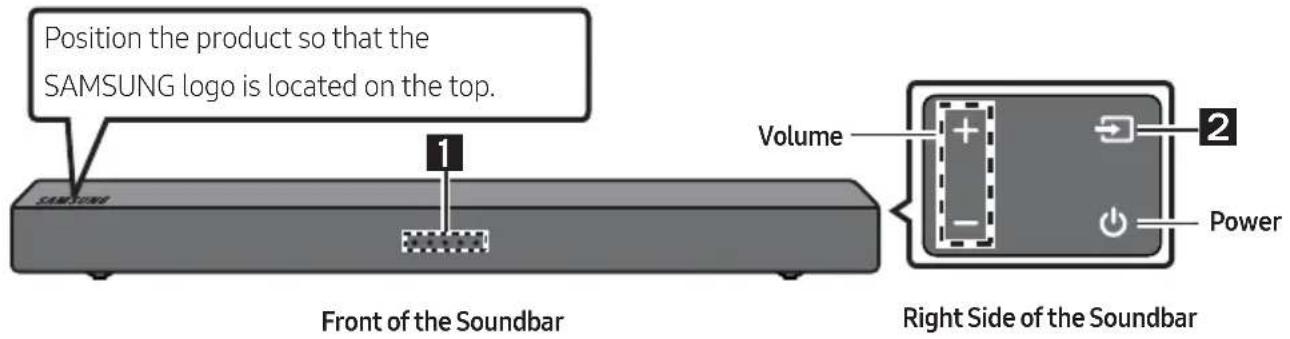
| 1 | LED indicator | The LED Indicator flashes, glows, or changes colour depending on the Soundbar's current mode or status. The colour of the LED indicator and the number of lights indicate the active mode as described below. | ||
| Mode | Remote control Button | LED indicator | ||
| D.IN | 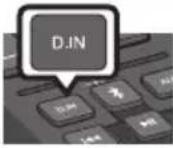 | |||
| Bluetooth | 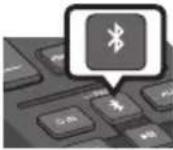 | Connected statusSlow-BlinkingDisconnected status | ||
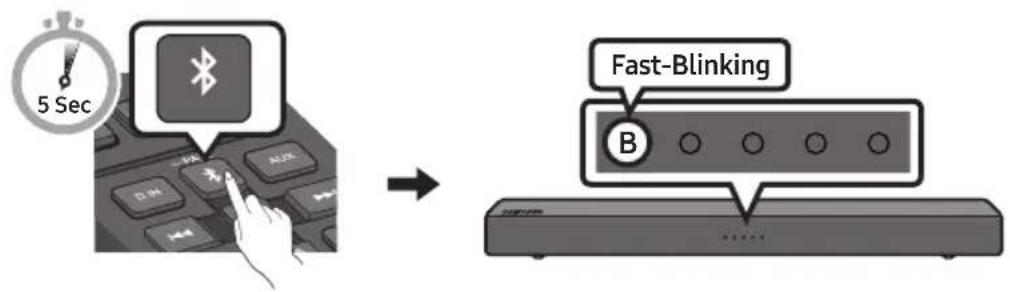
| Bluetooth pairing | 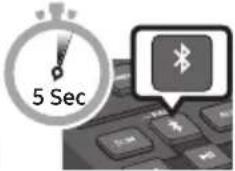 | Fast-Blinking | ||
| AUX |  | |||
| USB | 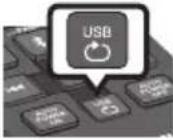 | |||
| 2 | Source | Selects the source input mode. (D.IN / Bluetooth / AUX / USB)To turn on "Bluetooth pairing" mode, change the source to "Bluetooth" mode and then press and hold the button for more than 5 seconds. | ||
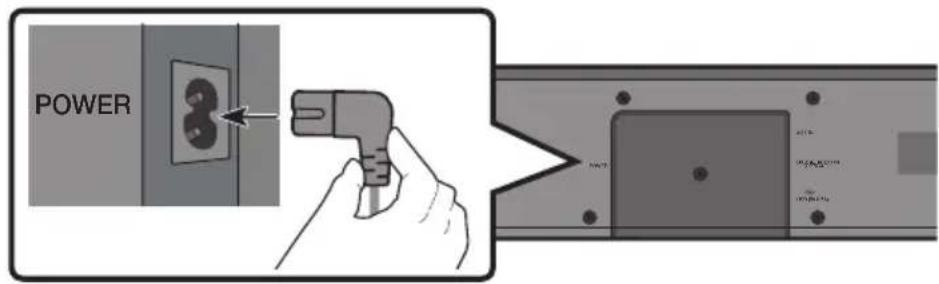
Bottom Panel of the Soundbar
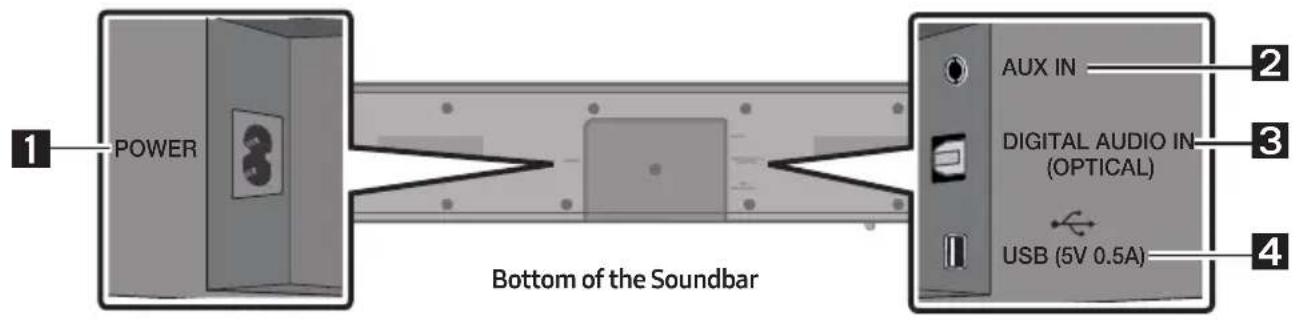
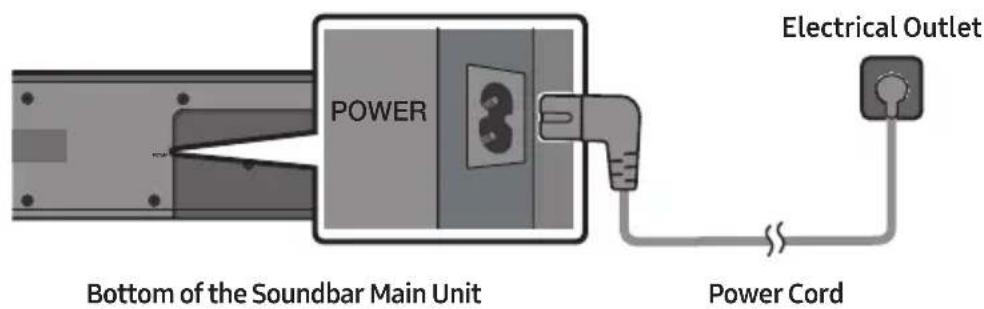
| 1 | POWER Connect the Soundbar's AC power cord. |
| 2 | AUX Connect to the Analogue output of an external device. |
| 3 | D.IN Connect to the digital (optical) output of an external device. |
| 4 | USB Connect a USB device here to play music files on the USB device through the Soundbar. |
- When you plug in the AC cord, the power button will begin working in 4 to 6 seconds.
- When you turn on this unit, there will be a 4 to 5 second delay before it produces sound.
- If you want to enjoy sound only from the Soundbar, you must turn off the TV's speakers in the Audio Setup menu of your TV. Refer to the owner's manual supplied with your TV.
- When disconnecting the power cord from a wall outlet, pull the plug. Do not pull the cable.
- Do not connect this unit or other components to an AC outlet until all connections between components are complete.
03 THE REMOTE CONTROL
- The images, buttons, and functions of the remote control may differ depending on the model.
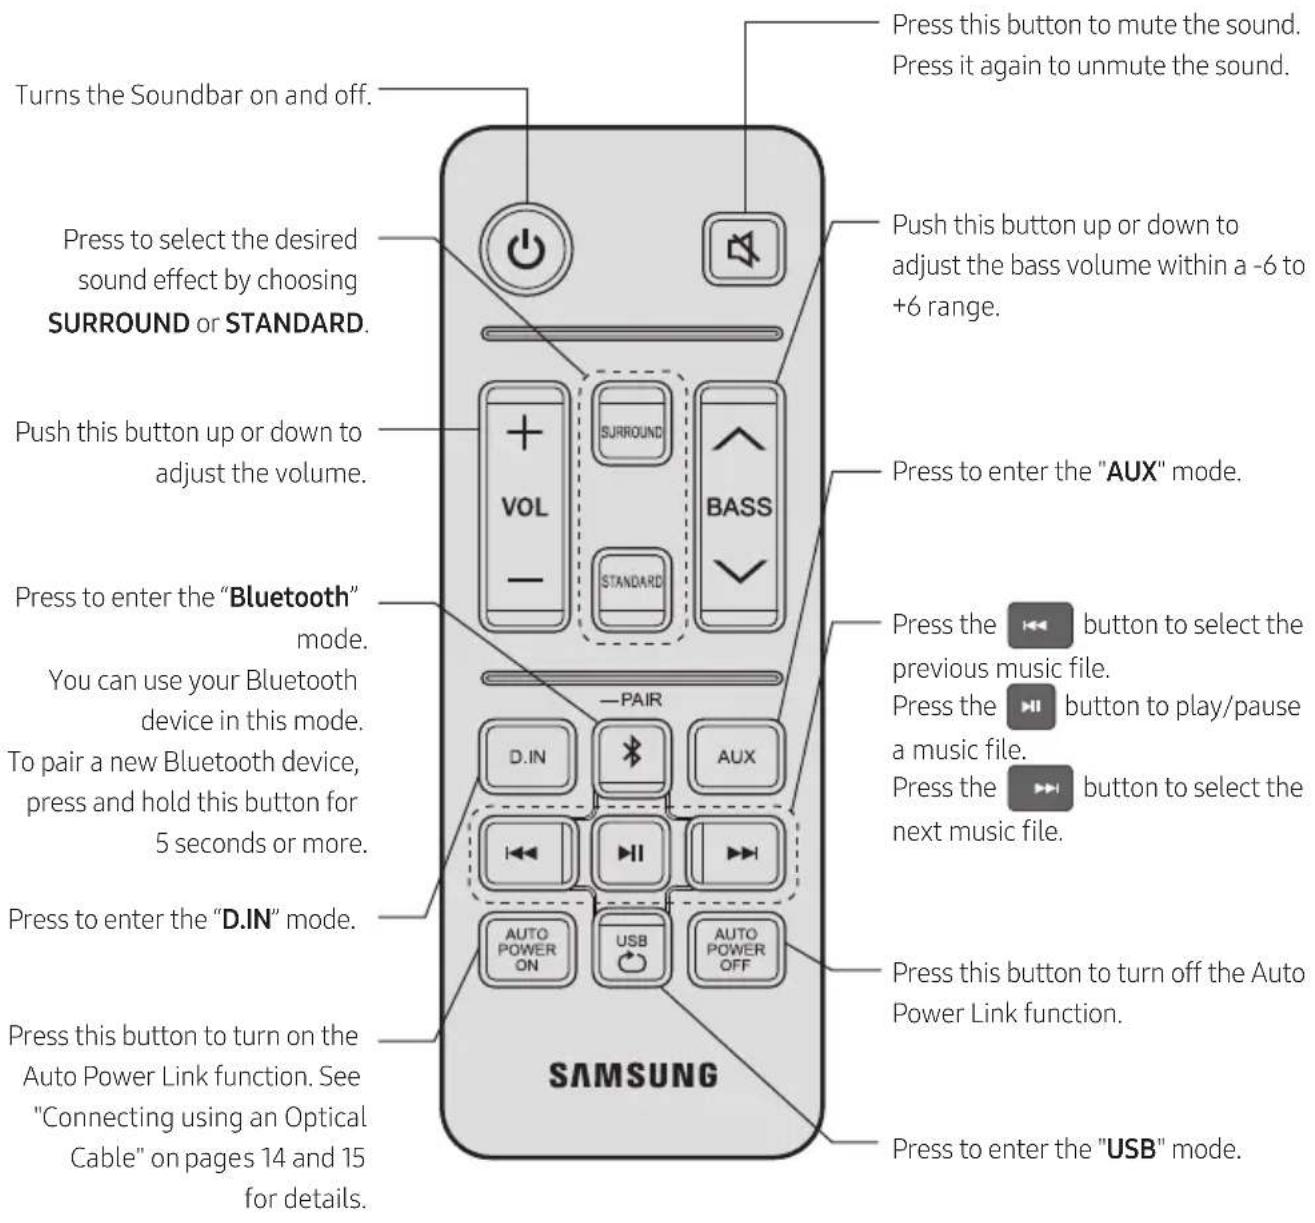
Using the Hidden Buttons (Buttons with more than one function)
| Hidden Button | How to Use the Remote Control | ||
| Remote Control Button | Function | ||
| Auto Power Down On/Off (AUX mode) | At the AUX mode press the button for 5 seconds in the power on station to trigger/shut off the Auto Power Down function.The unit turns off automatically in the following situations.- D.IN / BT / USB Mode: If there is no audio signal for 5 minutes.- AUX Mode:- If the Audio (AUX) Cable is disconnected for 5 minutes.- If there is no KEY input for 8 hours when the Audio (AUX) Cable is connected. (Auto Power Down function can be turned off only in that case.)- To turn off Auto Power Down function, while in “AUX” mode, press and hold the button for 5 seconds. | ||
| LED indicator | |||
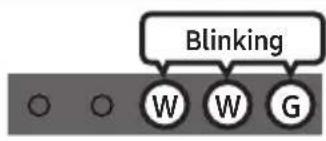 Auto Power Down On Auto Power Down On | 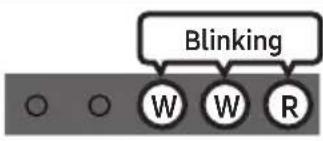 Auto Power Down Off Auto Power Down Off | ||
| TV Connect (Bluetooth mode) | For detailed information about TV Connect, please see "Disconnecting the Soundbar from the TV" on page 17. | ||
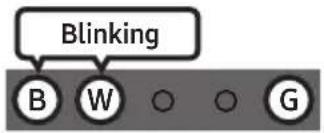
| Initialise (Standby) | Press the button for 5 seconds in the standby power off station to trigger the system initial function. | ||
| LED indicator | |||
| Blinking | |||
 | TV remote control On/Off (Standby) | For detailed information about TV remote control, please see "Adjusting the Soundbar volume with a TV remote control" on page 12. | |
 | Bluetooth Power On/Off | Press the 5 seconds in the power on station to trigger the Bluetooth Power On/Off function. | |
| LED indicator | |||
 Bluetooth Power On Bluetooth Power On | 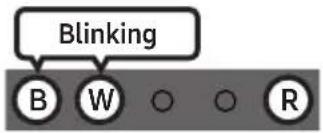 Bluetooth Power Off Bluetooth Power Off | ||
Adjusting the Soundbar volume with a TV remote control
If you have a Samsung TV, you can adjust the Soundbar's volume using the IR remote control that came with your Samsung TV.
First use the TV menu to set the TV audio on your Samsung TV to external speakers, then use your Samsung remote to control the Soundbar's volume. For more information, see the TV's user manual.
The default mode for this function is control by a Samsung TV.
-
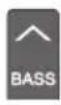
If your TV is not a Samsung TV and you want your TV's remote to control the Soundbar's volume, you can change the settings of this function by pressing and holding the BASS button repeatedly. To have your TV's remote adjust the Soundbar's volume, follow Steps 1 through 3 below.
-
If you want to turn off this function completely, follow Steps 1 and 2.
| Mode Remote control Button LED indicator | |||
| 1. | Turn off | 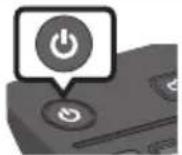 | 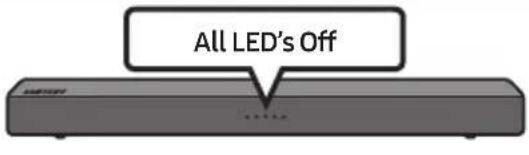 |
| 2. | “Off” mode | 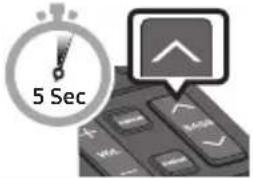 | 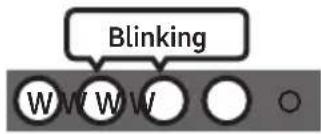 |
| 3. | “All TV” mode | 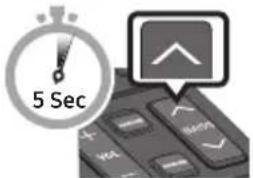 |  |
| 4. | “Samsung TV” mode(Default mode) | 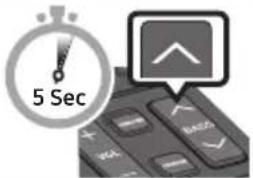 | 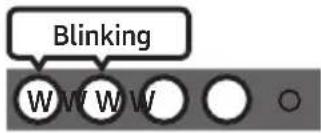 |
- Each time you press the BASS button and hold it for 5 seconds, the mode switches in the following order: "Samsung TV" (Default mode) → "Off" → "All TV".
- The LED's blink for 3\~4 seconds, then return to the standby power off mode.
- This function may not be available, depending on your TV's remote control.
- Manufacturers supporting this function: VIZIO, LG, Sony, Sharp, PHILIPS, PANASONIC, TOSHIBA, GRUNDIG, Hisense, RCA
04 CONNECTING THE SOUNDBAR
Connecting Electrical Power
- For information about the required electrical power and power consumption, refer to the label attached to the product. (Label : Bottom of the Soundbar Main Unit)
05 CONNECTING TO A TV
Hear TV sound from your Soundbar through wired or wireless connections.
- When the Soundbar is connected to selected Samsung TVs, you can control the Soundbar using the TV's remote control.
- This feature is supported by 2017 and later Samsung Smart TVs that support Bluetooth when you connect the Soundbar to the TV using an optical cable.
- This function also allows you to use the TV menu to adjust the sound field and various settings as well as the volume and mute.
Connecting using an Optical Cable
Step 1. Connect an Optical Cable
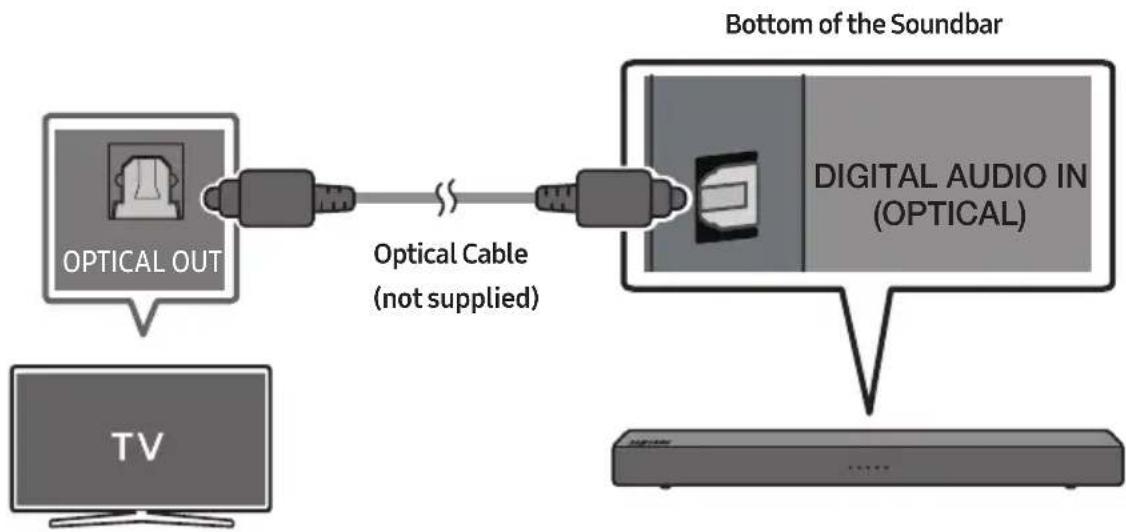
flowchart
graph LR
    A["TV"] --> B["OPTICAL OUT"]
    B --> C["Optical Cable (not supplied)"]
    C --> D["DIGITAL AUDIO IN (OPTICAL)"]
    D --> E["Bottom of the Soundbar"]
NOTE
- When the audio in a broadcast is encoded in Dolby Digital and the "Digital Output Audio Format" on your TV is set to PCM, we recommend that you change the setting to Dolby Digital. When the setting on the TV is changed, you will experience better sound quality. (The TV menu may use different words for Dolby Digital and PCM depending on the TV manufacturer.)
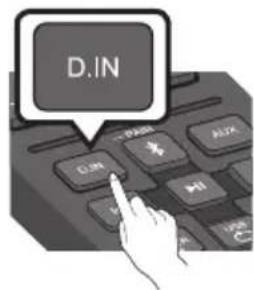
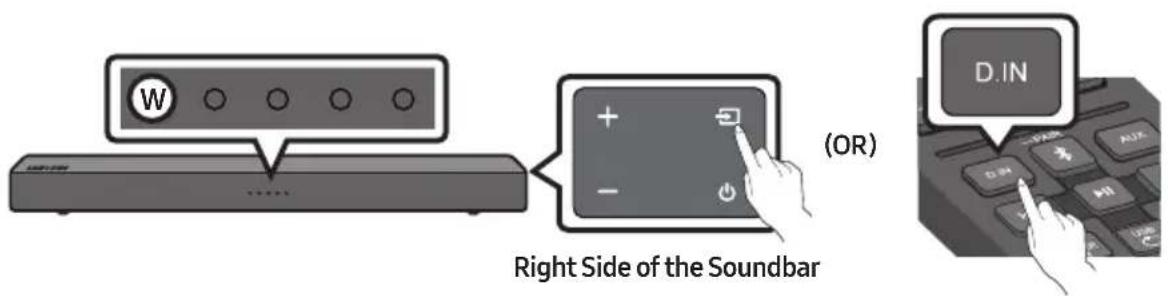
Step 2. Change the Soundbar's mode to D.IN
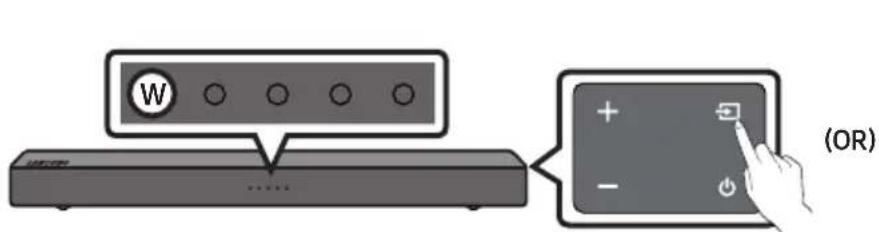
Right Side of the Soundbar
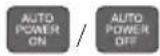
Auto Power Link
This Function automatically turns on the Soundbar when the TV is turned on if the Soundbar is connected to the TV by an Optical Cable (not supplied).
Press the AUTO POWER ON button on the remote control to turn on this function.
- Auto Power Link is set to ON by default. (To turn off this function, press the AUTO POWER OFF button on the remote control.)
- Depending on the connected device, Auto Power Link may not function.
- This function is only available in the "D.IN" mode.
| Mode Remote control Button LED indicator | ||
| OFF |  | 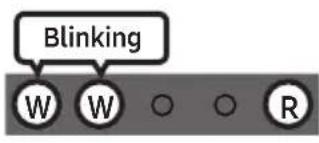 |
| ON |  | 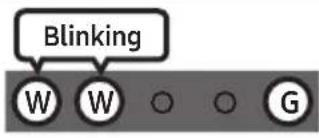 |
Connecting a TV or Bluetooth Device via Bluetooth
Step 1. Change the Soundbar mode to "Bluetooth Pairing"
Step 2. Select the Soundbar in your TV's or Bluetooth device's Menu

flowchart
graph LR
    A["Bluetooth menu"] --> B["TV"]
    B --> C["OR"]
    C --> D["Bluetooth device"]
    D --> E["Select "AV"] Samsung Soundbar Nxxx N-Series"]
NOTE
- You cannot connect more than one TV or Bluetooth device at a time.
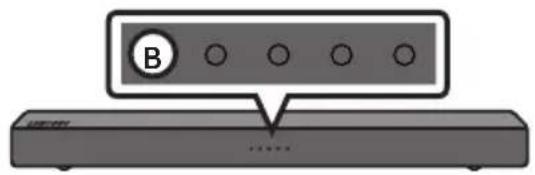
Step 3. Check the Soundbar's status
The blue LED should not be blinking once the Bluetooth connection is complete.
If the TV or device fails to connect
- If a previously connected Soundbar listing appears in the device list of your TV or Bluetooth device, delete it. (e.g. "[AV] Samsung Soundbar Nxxx N-Series")
• Then repeat steps 1 through 3.
Disconnecting the Soundbar from the TV
Press the button on the right side panel or on the remote control and switch to any mode but "Bluetooth".
- Disconnecting takes time because the TV must receive a response from the Soundbar. (The time required may differ, depending on the TV model.)
- To cancel the automatic Bluetooth connection between the Soundbar and TV, press and hold button for 5 seconds in "Bluetooth" mode. TV Connect is turned OFF.
- To turn TV Connect back on, press and hold the 📄 button for 5 seconds with the Soundbar in "Bluetooth" mode.
• TV Connect is set to ON by default.
| Mode Remote control Button LED indicator | ||
| TV Connect-OFF | 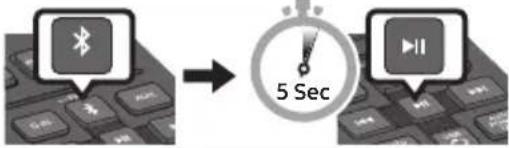 | 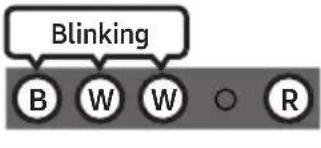 |
| TV Connect-ON |  | 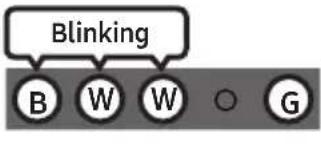 |
NOTES
- If asked for a PIN code when connecting a Bluetooth device, enter <0000>.
- In Bluetooth connection mode, the Bluetooth connection will be lost if the distance between the Soundbar and the Bluetooth device exceeds 10 meters.
- The Soundbar automatically turns off after 5 minutes in the Ready state.
-
The Soundbar may not perform Bluetooth search or connection correctly under the following circumstances:
-
If there is a strong electrical field around the Soundbar.
- If several Bluetooth devices are simultaneously paired with the Soundbar.
- If the Bluetooth device is turned off, not in place, or malfunctions.
- Electronic devices may cause radio interference. Devices that generate electromagnetic waves must be kept away from the Soundbar main unit - e.g., microwaves, wireless LAN devices, etc.
– The Soundbar supports SBC data (44.1kHz, 48kHz).
- Connect only to a Bluetooth device that supports the A2DP (AV) function.
- You cannot connect the Soundbar to a Bluetooth device that supports only the HF (Hands Free) function.
- Once you have paired the Soundbar to a Bluetooth device, selecting “[AV] Samsung Soundbar Nxxx N-Series” from the device’s scanned devices list will automatically change the Soundbar to “BT” mode.
- Available only if the Soundbar is listed among the Bluetooth device's paired devices.
(The Bluetooth device and the Soundbar must have been previously paired at least once.)
- The Soundbar cannot be paired to another Bluetooth device if already in Bluetooth mode and paired to a Bluetooth device.
Bluetooth Power On
If a previously paired Bluetooth device tries to pair with the Soundbar when the Bluetooth Power function is on and the Soundbar is turned off, the Soundbar turns on automatically.
Press and hold the 📄 button for more than 5 seconds on the remote while the Soundbar is turned on.
- Bluetooth Power function is set to On by default.
More About Bluetooth
Bluetooth is a technology that enables Bluetooth-compliant devices to interconnect easily with each other using a short wireless connection.
- A Bluetooth device may cause noise or malfunction, depending on usage, if:
- A part of your body is in contact with the receiving/transmitting system of the Bluetooth device or the Soundbar.
- It is subject to electrical variation from obstructions caused by a wall, corner, or office partition.
- It is exposed to electrical interference from same frequency-band devices including medical equipment, microwave ovens, and wireless LANs.
- Pair the Soundbar with the Bluetooth device while they are close together.
- The further the distance between the Soundbar and Bluetooth device, the worse the quality is. If the distance exceeds the Bluetooth operational range, the connection is lost.
- In poor reception areas, the Bluetooth connection may not work properly.
- The Bluetooth connection only works when it is close to the unit. The connection will be automatically cut off if the Bluetooth device is out of range. Even within range, the sound quality may be degraded by obstacles such as walls or doors.
- This wireless device may cause electric interference during its operation.
Using the Samsung Audio Remote App
Installing the Samsung Audio Remote App
To control the Soundbar with your smart device and the Samsung Audio Remote app, download the Samsung Audio Remote app from the Google Play store.
Market search : Samsung Audio Remote

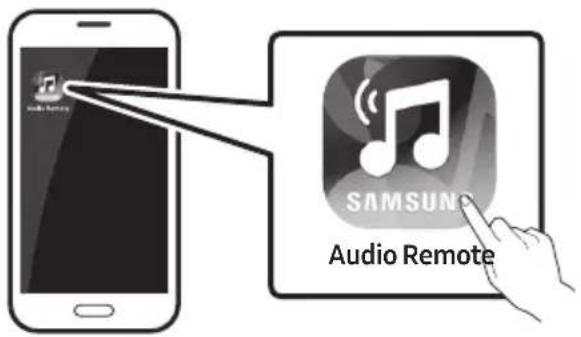
Launching the Samsung Audio Remote App
To launch and use the Samsung Audio Remote app, touch the Audio Remote icon on your smart device, and then follow the directions on the screen.
- The Samsung Audio Remote app is only compatible with Android mobile phones and mobile devices running Android OS 3.0 or later.
06 CONNECTING AN EXTERNAL DEVICE
Connect to an external device via an optical cable or analogue cable to play the external device's sound through the Soundbar.
Connecting using an Optical Cable
Step 1. Connect using an Optical Cable
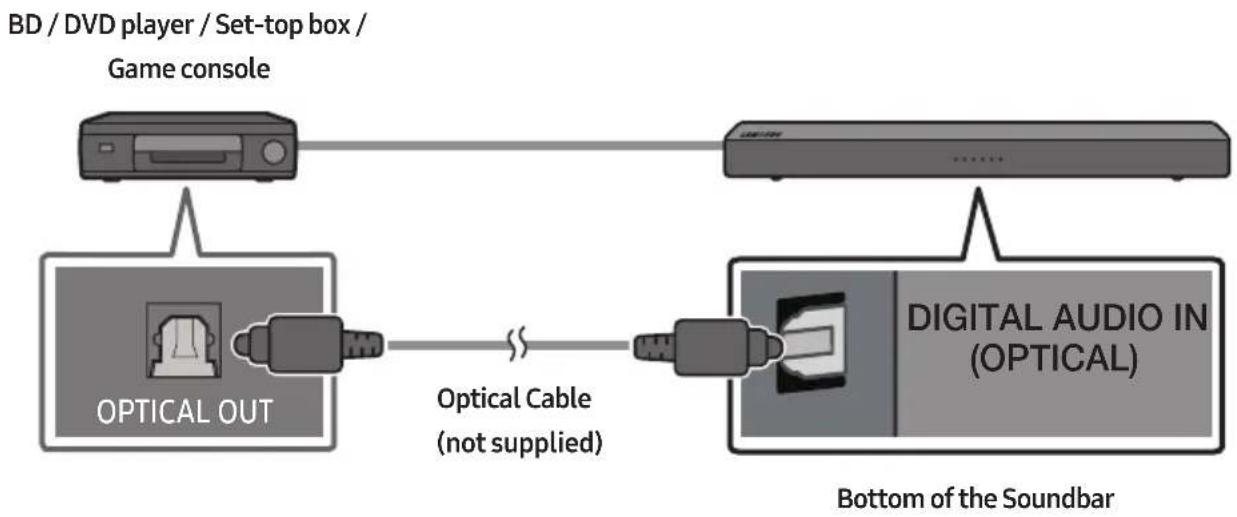
flowchart
graph LR
    A["Game console"] --> B["Optical OUT"]
    B --> C["Optical Cable (not supplied)"]
    C --> D["DIGITAL AUDIO IN (OPTICAL)"]
    D --> E["Bottom of the Soundbar"]
Step 2. Change the Soundbar's mode to D.IN
Connecting using an Analogue Audio (AUX) Cable
Step 1. Connect using an Analogue Audio (AUX) Cable
BD / DVD player / Set-top box /
Game console
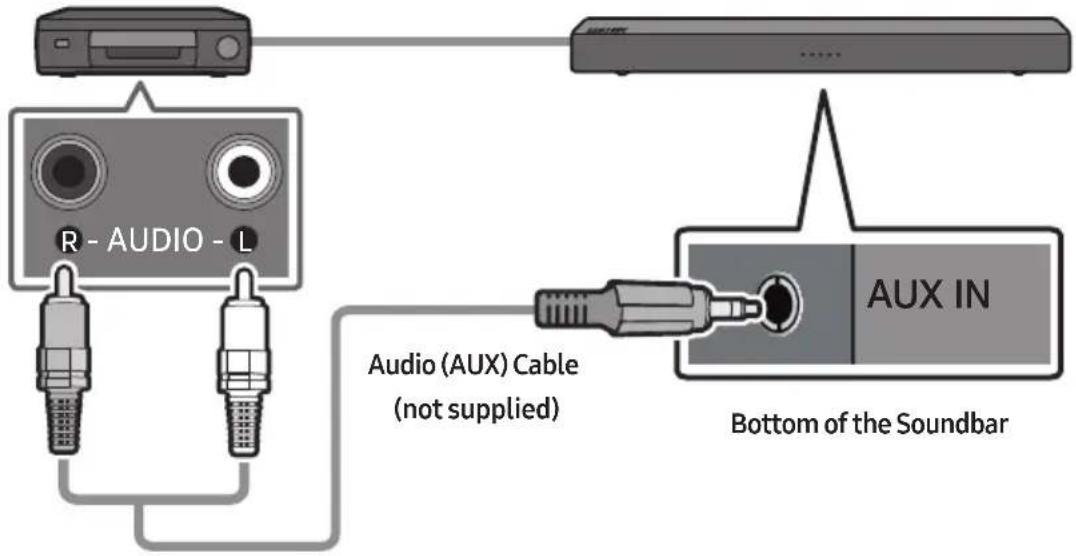
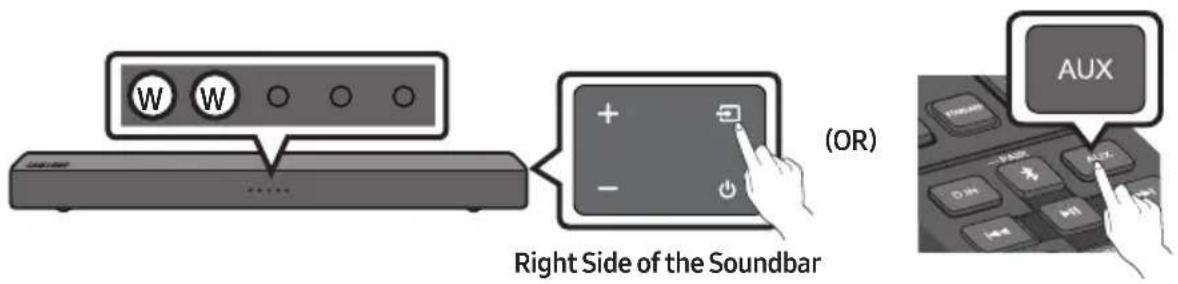
Step 2. Change the Soundbar's mode to AUX
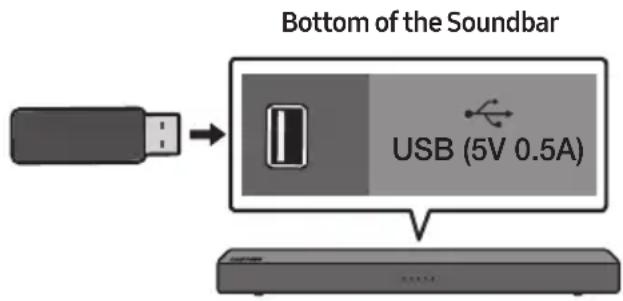
07 CONNECTING A USB STORAGE DEVICE
Step 1. Connect a USB Drive
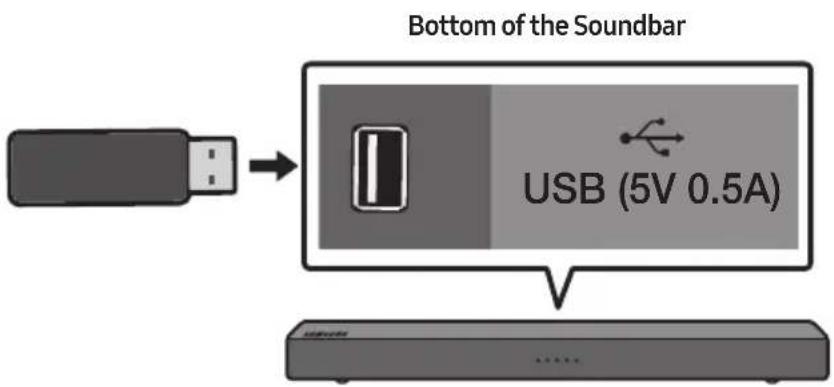
NOTE
- The Soundbar automatically turns off (Auto Power Off) if you do not connect a USB device to the Soundbar within 5 minutes.
Step 2. Change the Soundbar's mode to USB
Right Side of the Soundbar

Setting Repeat Play Options
When the Soundbar is in "USB" mode, each time you press the 📊 button the "USB" mode changes how it plays tracks in the following order: Repeat - Off > Repeat - 1 song > Repeat - All songs >
Repeat - Random. See the table below for details.
| Mode Remote control Button LED indicator | ||
| Repeat - Off | 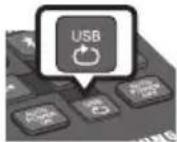 |  |
| Repeat - 1 song | 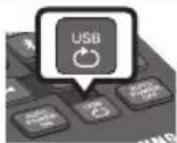 | 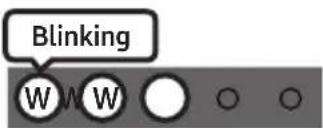 |
| Repeat - All songs | 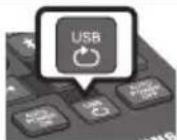 | 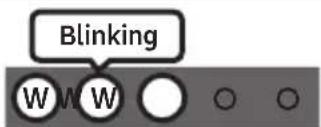 |
| Repeat - Random | 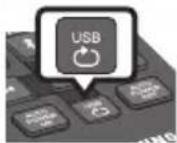 |  |
File Format Type Compatibility list
| Extension Codec Sampling Rate Bitrate | |||
| *.mp3 MPEG 1 Layer2 | 6KHz ~ 48KHz 80kbps~320kbps | ||
| MPEG 1 Layer3 16KHz ~ 48KHz | 80kbps~320kbps | ||
| MPEG 2 Layer3 16KHz ~ 48KHz | 80kbps~320kbps | ||
| MPEG 2.5 Layer3 16KHz ~ 48KHz | 80kbps~320kbps | ||
| *.wma | Wave_Format_MSAudio1 | 16KHz ~ 48KHz | 56kbps~128kbps |
| Wave_Format_MSAudio2 16KHz ~ 48KHz | 56kbps~128kbps | ||
| *.aac | AAC | 16KHz ~ 96KHz | 48kbps~320kbps |
| AAC-LC | 16KHz ~ 96KHz | 128kbps~192kbps5.1ch 320kbps | |
| HE-AAC | 24KHz ~ 96KHz | 48kbps~64kbps5.1ch 160kbps | |
| *.wav | - | 16KHz ~ 48KHz | up to 3000kbps |
| *.flac | FLAC 1.1.0, FLAC 1.2.1 | 16KHz ~ 96KHz | up to 3000kbps |
- If there are too many folders and files stored on the USB device, it may take the Soundbar some time to access and play files.
08 INSTALLING THE WALL MOUNT (OPTIONAL)
Installation Precautions
• Install on a vertical wall only.
- Do not install in a place with high temperature or humidity.
- Verify whether the wall is strong enough to support the product's weight. If not, reinforce the wall or choose another installation point.
- Purchase and use the fixing screws or anchors appropriate for the kind of wall you have (plaster board, iron board, wood, etc.).
If possible, fix the support screws into wall studs.
- Purchase wall mounting screws according to the type and thickness of the wall you want to mount the Soundbar on.
- Diameter: M4
- Length: 35 mm or longer recommended.
- Connect cables from the unit to external devices before you install the Soundbar on the wall.
- Make sure the unit is turned off and unplugged before you install it. Otherwise, it may cause an electric shock.
Wall mount Components
For Installation on Concrete Walls (not supplied)
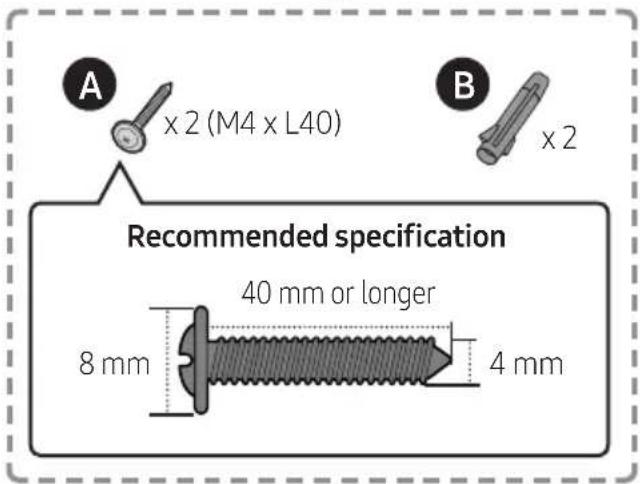
NOTE
- Installations on other types of walls will require different kinds of screws.
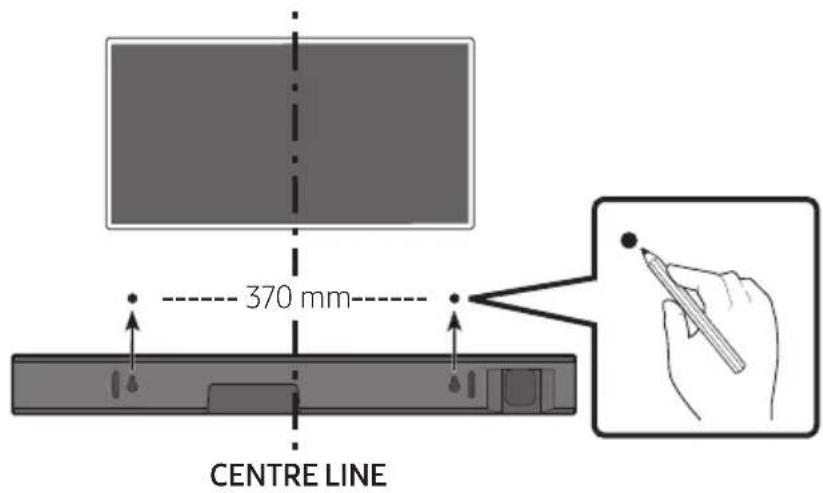
NOTES
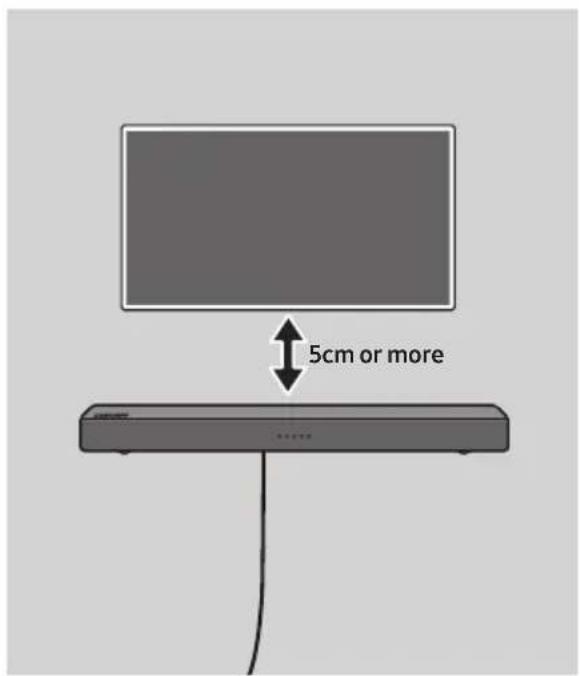
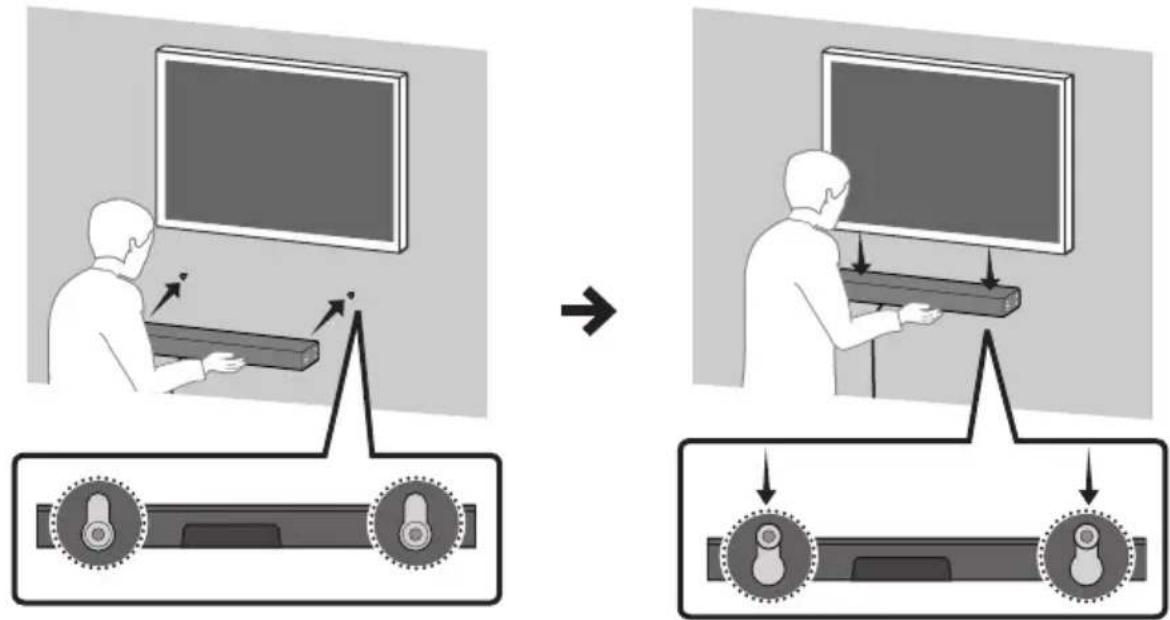
- If your TV is installed on the wall, install the Soundbar 5cm or more below your TV. - Use a pencil to mark the holes' positions.
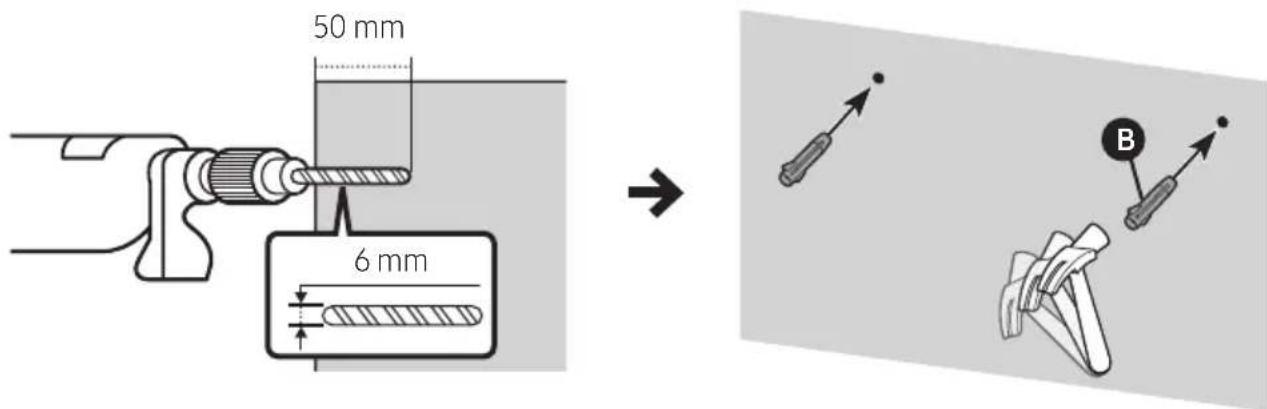
IMPORTANT NOTE
- The installation method shown here is for CONCRETE walls. Installation methods will vary depending on the wall type. For installation on dry wall, we strongly recommend you drill screw support holes into the underlying wood studs.
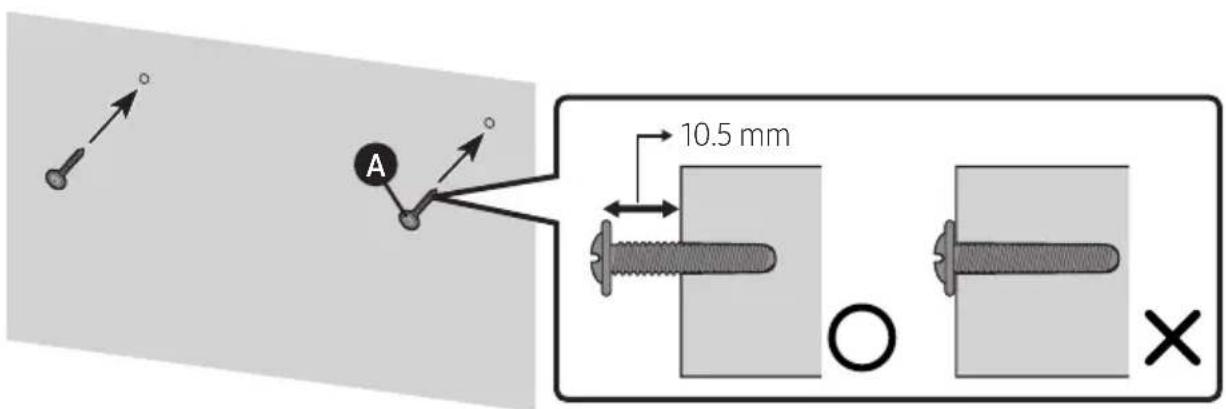
4.
5.
NOTE
- Supports for wall installation are built into the back of the Soundbar.

CAUTION
- Press the Soundbar down with sufficient force to fix it to the wall. If the Soundbar is not firmly fixed to the wall, it could be accidentally detached, resulting in personal injury.
- Do not bump into or strike the Soundbar (especially from the bottom). The impact could detach the Soundbar from the wall, resulting in personal injury.
09 SOFTWARE UPDATE
Samsung may offer updates for the Soundbar's system firmware in the future.
If an update is offered, you can update the firmware by connecting a USB device with the firmware update stored on it to the USB port on your Soundbar. For more information about how to download update files, go to the Samsung Electronics website at (www.samsung.com → Support). Then, enter or select the model number of your Soundbar, select the Software & Apps option, and then Downloads. Note that the option names can vary.
Updating Procedure
- Follow the steps below to download the product software: Go to the Samsung website at (samsung.com) → search for the model name - select the customer support option (the option name is subject to change)
- Save the downloaded software to a USB stick and select "Extract Here" to unzip the folder.
- Turn off the Soundbar and connect the USB stick containing the software update to the USB port.
- Disconnect the power cord, reconnect it, and then turn on the Soundbar.
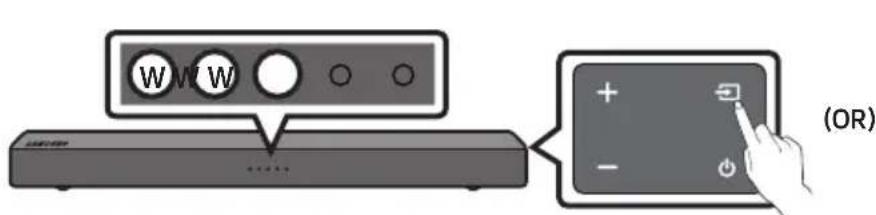
- Turn on the soundbar and select mode to USB. Within 3 minutes, 4 white LEDs on and update begins.
- When the update finishes, the Soundbar turns off. Press the button on the remote control for 5 seconds. All LEDs blink 2 times and then the Soundbar turns off. The update is complete.
- If the firmware fails to update, you can update the firmware again.
When update fails
- Turn off the Soundbar, disconnect and then reconnect the USB storage device that contains the update files to the Soundbar's USB port.
-
Disconnect the Soundbar's power cord, reconnect it, and then turn on the Soundbar.
-
Updating firmware may not work properly if audio files supported by the Soundbar are stored in the USB storage device.
- Do not disconnect the power or remove the USB device while updates are being applied. The main unit will turn off automatically after completing the firmware update.
- After update is completed, the user setup in Soundbar is initialised. We recommend you write down your settings so that you can easily reset them after the update. If the software update fails, check if the USB stick is defective.
• Mac OS users should use MS-DOS (FAT) as the USB format. - Updating via USB may not be available, depending on the USB storage device manufacturer.
10 TROUBLESHOOTING
Before seeking assistance, check the following.
The unit will not turn on.
Is the power cord plugged into an outlet?
→Connect the power plug to an outlet.
A function does not work when the button is pressed.
Is there static electricity in the air?
→ Disconnect the power plug and connect it again.
Sound dropouts occur in Bluetooth mode.
→ See the Bluetooth connection sections on pages 16 and 17.
Sound is not produced.
Is the Mute function on?
→ Press the VOL button to cancel the function.
Is the volume set to minimum?
→Adjust the Volume.
The remote control does not work.
Is the battery drained?
→Replace with new batteries.
Is the distance between the remote control and Soundbar main unit too far?
→ Move the remote control closer to the Soundbar main unit.
11 LICENCE

DOLBY
AUDIO
Manufactured under license from Dolby Laboratories. Dolby, Dolby Audio, Pro Logic, and the double-D symbol are trademarks of Dolby Laboratories.


2.0 Channel
For DTS patents, see http://patents.dts.com. Manufactured under license from DTS Licensing Limited. DTS, the Symbol, DTS in combination with the Symbol, and DTS 2.0 Channel are registered trademarks or trademarks of DTS, Inc. in the United States and/or other countries. © DTS, Inc. All Rights Reserved.
12 OPEN SOURCE LICENCE NOTICE
To send inquiries and requests regarding open sources, contact Samsung via Email (oss.request@samsung.com).
13 IMPORTANT NOTES ABOUT SERVICE
- Figures and illustrations in this User Manual are provided for reference only and may differ from actual product appearance.
- An administration fee may be charged if either
(a) an engineer is called out at your request and there is no defect with the product (i.e. where the user manual has not been read).
(b) you bring the unit to a repair centre and there is no defect with the product (i.e. where the user manual has not been read). - You will be informed of the administration fee amount before a technician visits.
14 SPECIFICATIONS AND GUIDE
Specifications
| Model Name HW-N310 | |
| USB 5V/0.5A | |
| Weight 2.0 kg | |
| Dimensions (W x H x D) 641.0 x 65.0 x 107.0 mm | |
| Operating Temperature Range +5°C to +35°C | |
| Operating Humidity Range 10 % ~ 75 % | |
| Supported play formats(DTS 2.0 sound is played in DTS format.) | LPCM 2ch, Dolby AudioTM(supporting Dolby® Digital), DTS |
| WIRELESS DEVICE OUTPUT POWERBT max transmitter power | 100mW at 2.4GHz – 2.4835GHz |
| Overall Standby Power Consumption (W) 1.0W | |
| Disabling Bluetooth | Press and hold the button for more than 5 seconds to turn off Bluetooth Power function. |
| Enabling Bluetooth | Press and hold the button for more than 5 seconds to turn on Bluetooth Power function. |
NOTES
– Samsung Electronics Co., Ltd reserves the right to change the specifications without notice.
- Weight and dimensions are approximate.
- Hereby, Samsung Electronics, declares that this equipment is in compliance with Directive 2014/53/EU.
The full text of the EU declaration of conformity is available at the following internet address: http://www.samsung.com go to Support > Search Product Support and enter the model name.
This equipment may be operated in all EU countries.
CE
[Correct disposal of batteries in this product]
(Applicable in countries with separate collection systems)
This marking on the battery, manual or packaging indicates that the batteries in this product should not be disposed of with other household waste at the end of their working life. Where marked, the chemical symbols Hg, Cd or Pb indicate that the battery contains mercury, cadmium or lead above the reference levels in EC Directive 2006/66.
If batteries are not properly disposed of, these substances can cause harm to human health or the environment.
To protect natural resources and to promote material reuse, please separate batteries from other types of waste and recycle them through your local, free battery return system.
Correct Disposal of This Product
(Waste Electrical & Electronic Equipment)
(Applicable in countries with separate collection systems)
This marking on the product, accessories or literature indicates that the product and its electronic accessories (e.g. charger, headset, USB cable) should not be disposed of with other household waste at the end of their working life. To prevent possible harm to the environment or human health from uncontrolled waste disposal, please separate these items from other types of waste and recycle them responsibly to promote the sustainable reuse of material resources.
Household users should contact either the retailer where they purchased this product, or their local government office, for details of where and how they can take these items for environmentally safe recycling.
Business users should contact their supplier and check the terms and conditions of the purchase contract. This product and its electronic accessories should not be mixed with other commercial wastes for disposal.
For information on Samsung's environmental commitments and product specific regulatory obligations e.g. REACH, WEEE, Batteries, visit:
http://www.samsung.com/uk/aboutsamsung/samsungelectronics/corporatecitizenship/data_corner.html
SIKKERHEDSINFORMATIONER
SIKKERHEDSINFORMATIONER
FOR AT MINDSKE RISIKO FOR ELEKTRISK ST∅D MÅ BAGBEKLÆDNINGEN IKKE AFTAGES. ENHEDENS INDVENDIGE DELE MÅ KUN EFTERSES AF FAGKYNDIGE. OVERLAD ALT REPARATIONSARBJEDE TIL AUTORISEREDE SERVICEFORHANDLERE.
natural_image
Illustration of a person sitting on a sofa using a laptop (no text or symbols visible)BRUGERVEJLEDNING
natural_image
Illustration of a person sitting on a sofa next to a laptop and a desk (no text or symbols)
KOMPLET BRUGERVEJLEDNING
natural_image
Three grayscale product photos: a rectangular remote control unit, a cable with a handle, and a remote control device (no text or symbols visible)flowchart
graph TD
    A["1: Display with circular button"] --> B["2: Disassembly with plus sign"]
    B --> C["3: Rear assembly with plus sign"]
    C --> D["4: Disassembly with plus sign"]
    D --> E["5: Rear assembly with plus sign"]
02 PRODUKTOVERSIGT
BEMÆRK
Manufactured under license from Dolby Laboratories. Dolby, Dolby Audio, Pro Logic, and the double-D symbol are trademarks of Dolby Laboratories.


2.0 Channel
For DTS patents, see http://patents.dts.com. Manufactured under license from DTS Licensing Limited. DTS, the Symbol, DTS in combination with the Symbol, and DTS 2.0 Channel are registered trademarks or trademarks of DTS, Inc. in the United States and/or other countries. © DTS, Inc. All Rights Reserved.
12 BEMAERKNING VEDR. OPEN SOURCE-LICENS
natural_image
Illustration of a person sitting on a sofa using a laptop (no text or symbols)KÄYTTÖOPAS
natural_image
Illustration of a person sitting on a sofa next to a desk with a laptop (no text or symbols visible)
TÄYDELLINEN KÄYTTÖOPAS
natural_image
Three grayscale product photos: a rectangular remote control unit, a cable with a handle, and a remote control device (no text or symbols visible)flowchart
graph TD
    A["1: Display with circular button"] --> B["2: Disassembly with plus sign"]
    B --> C["3: Rear assembly with plus sign"]
    C --> D["4: Reassembly with plus sign"]
    D --> E["5: Rear assembly with plus sign"]
02 LAITTEEN YLEISKUVAUS
HUOMAUTUS
Manufactured under license from Dolby Laboratories. Dolby, Dolby Audio, Pro Logic, and the double-D symbol are trademarks of Dolby Laboratories.


2.0 Channel
For DTS patents, see http://patents.dts.com. Manufactured under license from DTS Licensing Limited. DTS, the Symbol, DTS in combination with the Symbol, and DTS 2.0 Channel are registered trademarks or trademarks of DTS, Inc. in the United States and/or other countries. © DTS, Inc. All Rights Reserved.
12 AVOIMEN LÄHDEKIELEN LISENSSI- ILMOITUS
natural_image
Illustration of a person sitting on a sofa using a laptop (no text or symbols visible)BRUKERHÅNDBOKEN
natural_image
Illustration of a person sitting on a couch next to a desk with a laptop (no text or symbols visible)
FULLSTENDIG BRUKERHÅNDBOK
flowchart
graph TD
    A["1: Display with circular button"] --> B["2: Disassembly with plus sign"]
    B --> C["3: Rear assembly with plus sign"]
    C --> D["4: Disassembly with plus sign"]
    D --> E["5: Rear assembly with plus sign"]
02 PRODUKOVERSIKT
MERK
Manufactured under license from Dolby Laboratories. Dolby, Dolby Audio, Pro Logic, and the double-D symbol are trademarks of Dolby Laboratories.

dts®
2.0 Channel
For DTS patents, see http://patents.dts.com. Manufactured under license from DTS Licensing Limited. DTS, the Symbol, DTS in combination with the Symbol, and DTS 2.0 Channel are registered trademarks or trademarks of DTS, Inc. in the United States and/or other countries. © DTS, Inc. All Rights Reserved.
12 LISENSMERKNADER OM ÅPEN KILDEKODE
Hvis du har spørsmål eller kommentarer rundt åpen kildekode kan du ta kontakt med Samsung på e-post (oss.request@samsung.com).
13 VIKTIG MERKNAD OM SERVICE
natural_image
Illustration of a person sitting on a sofa using a laptop (no text or symbols visible)ANVÄNDARHANDBOK
natural_image
Illustration of a person sitting on a sofa next to a desk with a computer (no text or symbols visible)
FULLSTÄNDIG HANDBOK
INNEHÅLLSFÖRTECKNING
01 Kontrollera komponenterna 6
flowchart
graph TD
    A["1: Display with circular button"] --> B["2: Disassembly with plus sign"]
    B --> C["3: Rear assembly with plus sign"]
    C --> D["4: Disassembly with plus sign"]
    D --> E["5: Rear assembly with plus sign"]
02 PRODUKTÖVERSIKT
OBS!
Manufactured under license from Dolby Laboratories. Dolby, Dolby Audio, Pro Logic, and the double-D symbol are trademarks of Dolby Laboratories.


2.0 Channel
For DTS patents, see http://patents.dts.com. Manufactured under license from DTS Licensing Limited. DTS, the Symbol, DTS in combination with the Symbol, and DTS 2.0 Channel are registered trademarks or trademarks of DTS, Inc. in the United States and/or other countries. © DTS, Inc. All Rights Reserved.
12 LICENSMEDDELANDE FÖR OPEN SOURCE
© 2018 Samsung Electronics Co., Ltd. All rights reserved.
Contact SAMSUNG WORLD WIDE
If you have any questions or comments relating to Samsung products, please contact the SAMSUNG customer care Centre.
| Country | Contact Centre | Web Site |
| ■Europe | ||
| UK 0330 SAMSUNG (7267864) | www.samsung.com/uk/support | |
| IRELAND (EIRE) 0818 717100 | www.samsung.com/ie/support | |
| GERMANY 06196 77 555 77 | www.samsung.com/de/support | |
| FRANCE 01 48 63 00 00 | www.samsung.com/fr/support | |
| ITALIA 800-SAMSUNG (800.7267864) | www.samsung.com/it/support | |
| SPAIN 0034902172678 | www.samsung.com/es/support | |
| PORTUGAL 808 207 267 | www.samsung.com/pt/support | |
| LUXEMBURG 261 03 710 | www.samsung.com/be_fr/support | |
| NETHERLANDS 088 90 90 100 | www.samsung.com/nl/support | |
| BELGIUM 02-201-24-18 | www.samsung.com/be/support (Dutch)www.samsung.com/be_fr/support (French) | |
| NORWAY 815 56480 | www.samsung.com/no/support | |
| DENMARK 707 019 70 | www.samsung.com/dk/support | |
| FINLAND 030-6227 515 | www.samsung.com/fi/support | |
| SWEDEN | 0771 726 786 | www.samsung.com/se/support |
| POLAND | 801-172-678* lub +48 22 607-93-33** (koszt połączenia według taryfy operatora) | http://www.samsung.com/pl/support/ |
| HUNGARY | 0680SAMSUNG (0680-726-7864) | www.samsung.com/hu/support |
| AUSTRIA | 0800-SAMSUNG (0800-7267864)[Only for Dealers] 0810-112233 | www.samsung.com/at/support |
| Country | Contact Centre | Web Site |
| SWITZERLAND | 0800 726 78 64 (0800-SAMSUNG) | www.samsung.com/ch/support (German)www.samsung.com/ch_fr/support (French) |
| CZECH | 800 - SAMSUNG (800-726786) | www.samsung.com/cz/support |
| SLOVAKIA | 0800 - SAMSUNG (0800-726 786) | www.samsung.com/sk/support |
| CROATIA | 072 726 786 | www.samsung.com/hr/support |
| BOSNIA | 055 233 999 | www.samsung.com/support |
| MONTENEGRO | 020 405 888 | |
| SLOVENIA | 080 697 267 (brezplačna številka) | www.samsung.com/si/support |
| SERBIA | 011 321 6899 | www.samsung.com/rs/support |
| ALBANIA 045 620 202 | www.samsung.com/al/support | |
| BULGARIA | *3000 Цена в мрежата0800 111 31, Безплатна телефонна линия | www.samsung.com/bg/support |
| ROMANIA | *8000 (apel in retea)08008-726-78-64 (08008-SAMSUNG)Apel GRATUIT | www.samsung.com/ro/support |
| CYPRUS | 8009 4000 only from landline, toll free | www.samsung.com/gr/support |
| GREECE | 80111-SAMSUNG (80111 726 7864) only from land line(+30) 210 6897691 from mobile and land line | |
| LITHUANIA 8-800-77777 | www.samsung.com/lt/support | |
| LATVIA | 8000-7267 | www.samsung.com/lv/support |
| ESTONIA | 800-7267 | www.samsung.com/ee/support |