000-110 - Drill Meec Tools - Free user manual and instructions
Find the device manual for free 000-110 Meec Tools in PDF.


| Product Type | Drill |
| Brand | Meec Tools |
| Model | 000-110 |
| Power Supply | Corded electric |
| Input Power | 600 W |
| Voltage | 220-240 V ~ 50/60 Hz |
| No-Load Speed | 0-3000 rpm |
| Variable Speed | Yes |
| Chuck Type | Keyless |
| Chuck Size | 1/2 inch (13 mm) |
| Drilling Capacity (Wood) | 25 mm |
| Drilling Capacity (Steel) | 13 mm |
| Drilling Capacity (Concrete) | 13 mm |
| Weight | 1.6 kg |
| Dimensions (L x W x H) | 260 x 70 x 200 mm |
| Main Functions | Drilling, screwdriving, hammer drilling |
| Forward/Reverse | Yes |
| Speed Control | Variable trigger |
| Cleaning and Maintenance | Keep ventilation slots clean; wipe with dry cloth; lubricate chuck occasionally |
| Safety Features | Double insulation; lock-on button; safety guard for bits |
| Spare Parts | Available: carbon brushes, chuck, switch; contact Meec Tools support |
| Reparability | User-replaceable carbon brushes; professional service for major repairs |
| General Information | Compact design; suitable for DIY and light professional use |
Frequently Asked Questions - 000-110 Meec Tools
User questions about 000-110 Meec Tools
0 question about this device. Answer the ones you know or ask your own.
Ask a new question about this device
Download the instructions for your Drill in PDF format for free! Find your manual 000-110 - Meec Tools and take your electronic device back in hand. On this page are published all the documents necessary for the use of your device. 000-110 by Meec Tools.
USER MANUAL 000-110 Meec Tools
natural_image
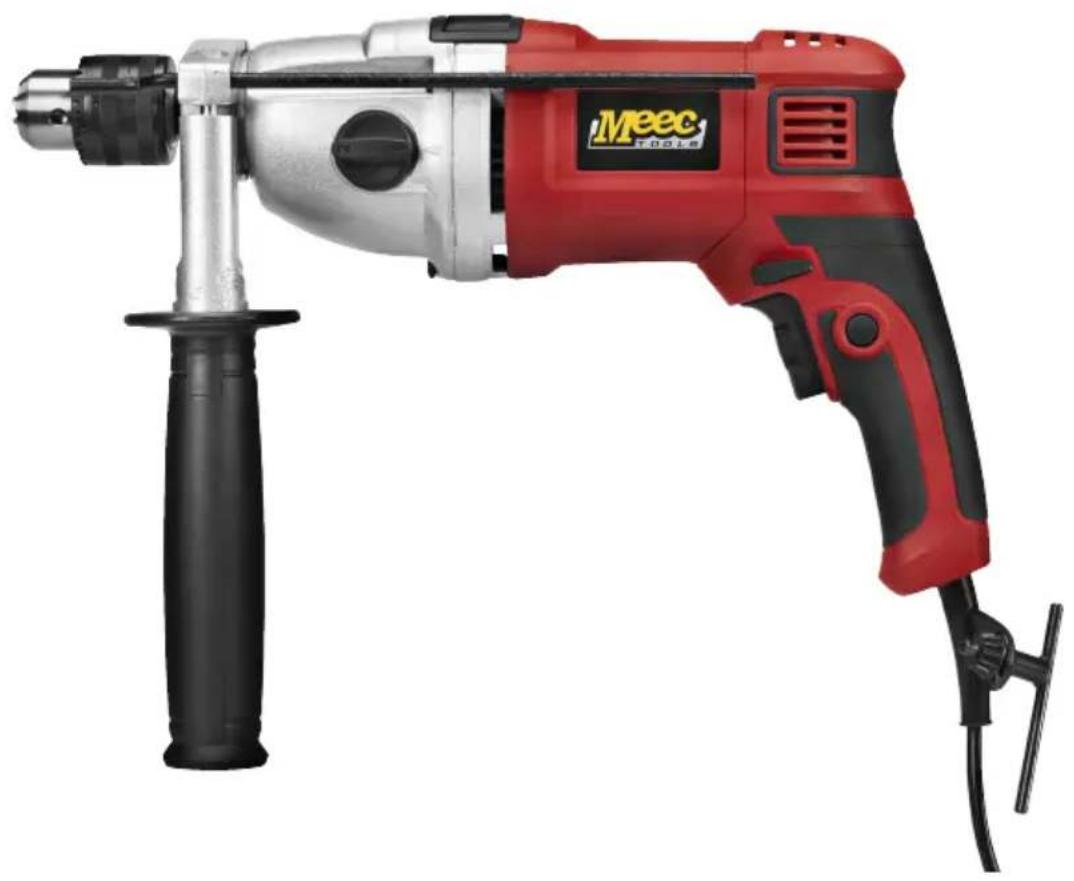
Red and silver Meec No.500 electric drill putter with black handle (no visible text or symbols)SE Bruksanvisning för slagborrmaskin
NO Bruksanvisning for slagboremaskin
PL Instrukcja obsługi wiertarki udarowej
EN User instructions for hammer drill
SE - Bruksanvisning i original
EN - Operating instructions (Translation of the original instructions)
Jula reserves the right to make changes. In the event of problems, please contact our service department.
www.jula.com
Tillverkare/ Produsent / Produenci/ Manufacturer
Jula AB, Box 363, 532 24 SKARA
Importör/ Importør/ Importer/ Importer
Care for the environment!
Must not be discarded with household waste! This product contains electrical or electronic components that should be recycled. Leave the product for recycling at the designated station e.g. the local authority's recycling station.
SVENSKA....7
SÄKERHETSANVISNINGAR....7
Symboler 10
TEKNISKA DATA....10
BESKRIVNING 11
HANDHAVANDE 12
SAFETY INSTRUCTIONS 48
Symbols 51
TECHNICAL DATA....51
DESCRIPTION 52
USE....53
Intended use 53
Replacing drills....53
Support handle 53
depth stop 54
Rotation selector/Power switch lock 54
Power switch med speed control 55
Mode switch....55
Gear selector 56
DRILLING....57
Drilling in wood 57
Drilling in metal 57
Drilling in brickwork 58
MAINTENANCE 58
TROUBLESHOOTING 59
SÄKERHETSANVISNINGAR
natural_image
Close-up of a mechanical tool with a rotating knob and clockwise arrow symbol (no text or labels)STÖDHANDTAG
ROTATIONSOMKOPPLARE
natural_image
Close-up of a mechanical component with a black arrow pointing to a feature (no visible text or symbols)natural_image
Close-up of a handheld electric drill bit with a circular arrow pointing to the left side (no visible text or symbols)natural_image
Close-up of a mechanical component with a circular arrow indicating a specific feature (no text or symbols visible)natural_image
Close-up of a mechanical drill bit with a circular arrow indicating refresh or cycle (no text or symbols)ST∅TTEHÅNDTAK
ROTASJONSOMKOBLER/STR∅MBRYTERSPERRE
natural_image
Close-up of a mechanical tool with a rotating knob and circular arrow symbol (no text or labels)UCHWYT POMOCNICZY
Read the User Instructions carefully before use.
Save them for future reference.
General safety instructions
WARNING:
- Read all warnings, safety instructions and other directives carefully before use. Failure to follow all the instructions and safety instructions can result in the risk of electric shock, fire and/or serious personal injury. Save these instructions and safety instructions for future reference.
- The term "power tool" in all warnings below refers to your mains-powered (corded) power tools.
Work area
- Keep the work area clean and well lit. Dark and cluttered work areas increase the risk of accidents and injuries.
- Do not use power tools in explosive environments, such as in the vicinity of flammable liquids, gases or dust. Power tools produce sparks that can ignite dust and fumes.
- Keep children and onlookers at a safe distance when using power tools. You can easily lose control of the tool if you are distracted.
Electrical safety
- The mains plug on the power tool must match the mains outlet. Never modify the plug in any way. Never use an adapter with earthed power tools. Unmodified plugs and matching outlets reduce the risk of electric shock.
- Avoid body contact with earthed surfaces such as pipes, radiators, cookers and refrigerators. There is an increased risk of electric shock if your body is earthed.
- Do not expose power tools to rain or moisture. There is a greater risk of electric shock if water gets into a power tool.
- Be careful with the power cord. Never use the power cord to carry or pull the tool, or to pull out the plug from the mains socket. Keep the power cord away from heat, oil, sharp edges and moving parts. Damaged or tangled power cords increase the risk of electric shock.
- If using the tool outdoors, only use an extension cord approved for outdoor use. Cords intended for outdoor use reduce the risk of electric shock.
- If it is absolutely necessary to use power tools in damp conditions, use a mains connection protected by an RDC. Using an RCD reduces the risk of electric shock.
Personal safety
- Stay alert. Pay attention to what you are doing, and use your common sense when working with power tools. Never use power tools if you are tired or under the influence of drugs, alcohol or medication. A moment of inattention when using a power tool can result in serious personal injury.
- Use personal safety equipment. Wear safety glasses. Depending on the type of tool and how it is used, safety equipment such as dust masks, non-slip safety shoes, safety helmets and ear protection reduce the risk of personal injury.
- Avoid accidental starting. Check that the power switch is in the OFF position before plugging in the power cord and/or the battery, or lifting/carrying the tool. Carrying a power tool with your finger on the switch, or connecting a tool to the mains supply when the switch is in the ON position, increases the risk of accidents and injuries.
- Remove Allen keys/spanners etc. before starting the tool. Spanners or the like that are left in a rotating part of the tool can cause personal injury.
- Do not overreach. Always maintain a firm footing and good balance. This will ensure you have better control over the tool in unexpected situations.
- Wear suitable clothing. Do not wear loose-fitting clothing or jewellery. Keep your hair, clothing and gloves away from moving parts. Loose-fitting clothing, jewellery and long hair can get caught in moving parts.
- If dust extraction and dust collection equipment is available, this should be connected and used correctly. The use of such devices can reduce the risk of dust-related problems.
Use and care
- Do not force the power tool. Use the correct power tool for the planned work. The tool does the job better and safer when used at the rate for which it was designed.
- Do not use the tool if it cannot be switched on and off with the power switch. Power tools that cannot be controlled with the power switch are dangerous and must be repaired.
- Unplug the power cord and/or remove the battery before making any adjustments, changing accessories or putting the power tool away. These safety precautions reduce the risk of accidentally starting the power tool.
-
Store power tools out of the reach of children when not in use. Never allow children, or anyone who is unfamiliar with the power tool and these instructions, to use the tool. Power tools are dangerous if used by inexperienced persons.
-
Keep the power tool properly maintained. Check that moving parts are properly adjusted and do not jam, and that no parts are incorrectly fitted or damaged. Check for other factors that could affect functionality. If the power tool is damaged, it must be repaired before being used again. Many accidents are caused by poorly maintained power tools.
- Keep cutting tools sharp and clean. Properly maintained cutting tools with sharp cutting edges are less likely to jam and are easier to control.
- Use the power tool, accessories and bits etc., in accordance with these instructions, taking into account the actual working conditions and the work that is to be done. It can be dangerous to use power tools for purposes other than those they are intended to be used for.
Service
- The power tool must only be serviced by qualified personnel using identical spare parts. This will ensure that the power tool remains safe to use.
Special safety instructions
- Wear ear protection. Exposure to loud noise can cause hearing impairments.
- Use the support handle, if the tool is supplied with one. Otherwise, you could lose control of the tool and become injured.
- Hold the power tool by the insulated grips when working in areas where the tool may come into contact with concealed electrical cables or its own power cord. Contact with a live cable will cause the metal parts on the tool to also become live – risk of electric shock.
Vibration
The declared vibration value, which has been measured by a standardised test method, can be used to compare different tools with each other and for a preliminary assessment of exposure.
WARNING: The actual vibration level when using power tools may differ from the specified total value, depending on how the tool is used. It is therefore necessary to determine which safety precautions are required to protect the user, based on an estimate of exposure in actual operating conditions (taking into account all stages of the work cycle, e.g. the time when the tool is switched off and when it is idling, in addition to the start-up time).
SYMBOLS
 | Read the User Instructions carefully before use. |
 | Wear safety glasses. |
 | Wear ear protection. |
 | Wear a dust filter mask. |
 | Safety class II |
TECHNICAL DATA
| Rated voltage 230 V ~ 50 Hz | |
| Rated output 1050 W | |
| Speed (no load) 0–1100 rpm, 0–3000 rpm | |
| Stroke rate 0–16500 spm, 0–45000 spm | |
| Chuck 1.5–13 mm | |
| Max drilling depth Wood: 40 mm | |
| Concrete: 20 mm | |
| Metal: 16 mm | |
| Safety class II | |
| Weight 3.7 kg | |
| Sound pressure level (LpA) 95 dB(A), K= 3 dB | |
| Sound power level, LwA 106 dB(A), K= 3 dB | |
| Max vibration level | 9 m/s ^2 , K= 1.5 m/s ^2 |
Always wear ear protection.
DESCRIPTION
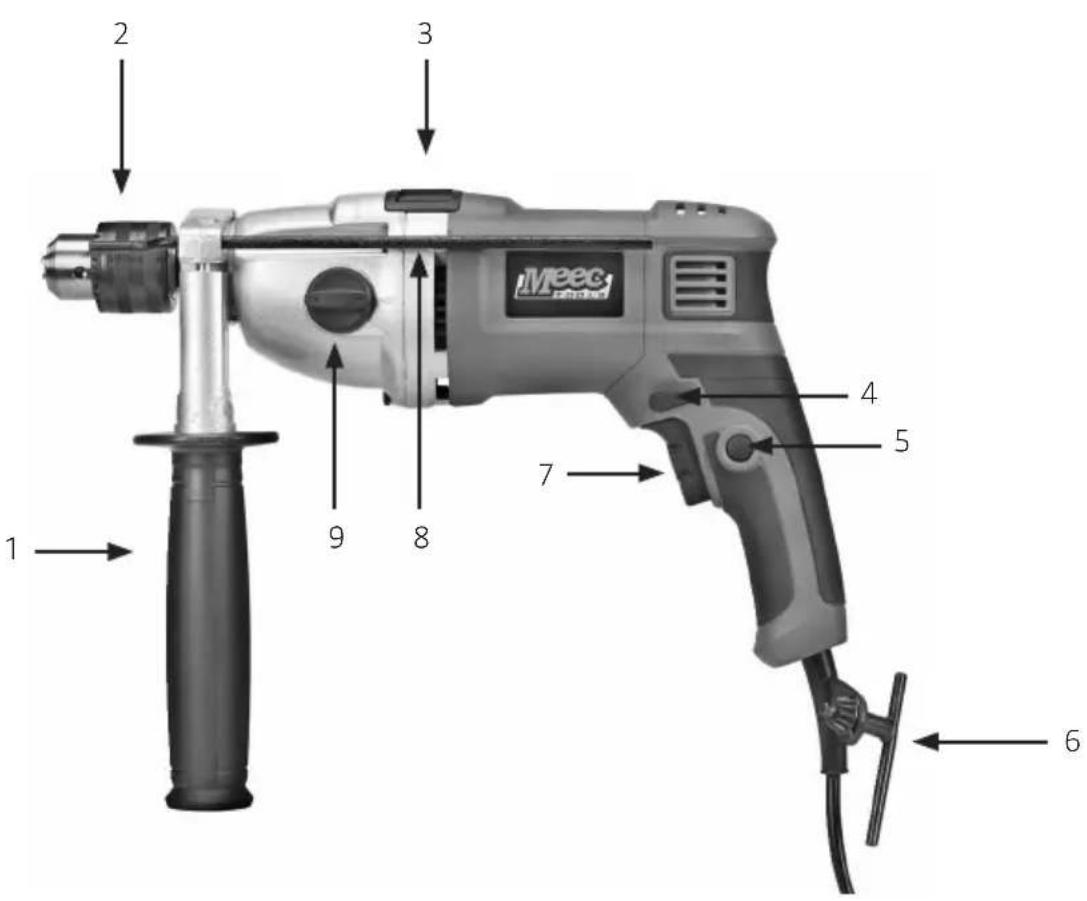
- Support handle
- Chuck
- Mode switch
- Rotation selector/power switch lock
- Lock button for continuous operation
- Chuck key
- Power switch med speed control
- Depth stop
- Gear selector
USE
NOTE: Always switch off the drill and unplug the power cord before making adjustments and fitting drills.
INTENDED USE
- This hammer drill is intended to be used for drilling in wood and other similar materials, e.g. MDF, plywood etc., plastic and metal, and for percussion drilling i masonry.
- To ensure safe use it is very important to read, and follow, all the user instructions before using the hammer drill for the first time.
- The tool and accessories must only be used in the intended manner and in accordance with these instructions.
• This hammer drill is only intended for private home use, not for commercial use. - The hammer drill must not be modified or used for any other purposes than the ones described in these instructions.
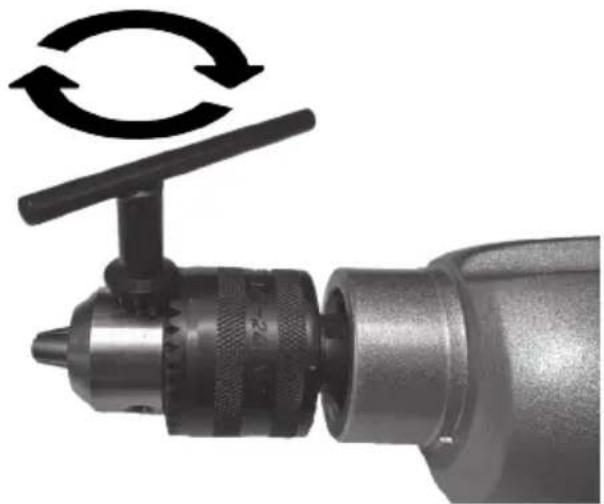
REPLACING DRILLS
NOTE: The drill can be sharp or hot after use. Wear gloves when changing drills.
- Open the chuck by turning the chuck key anticlockwise.
- Insert the drill as far as it will go into the chuck.
- Secure the drill by turning the chuck key clockwise.
natural_image
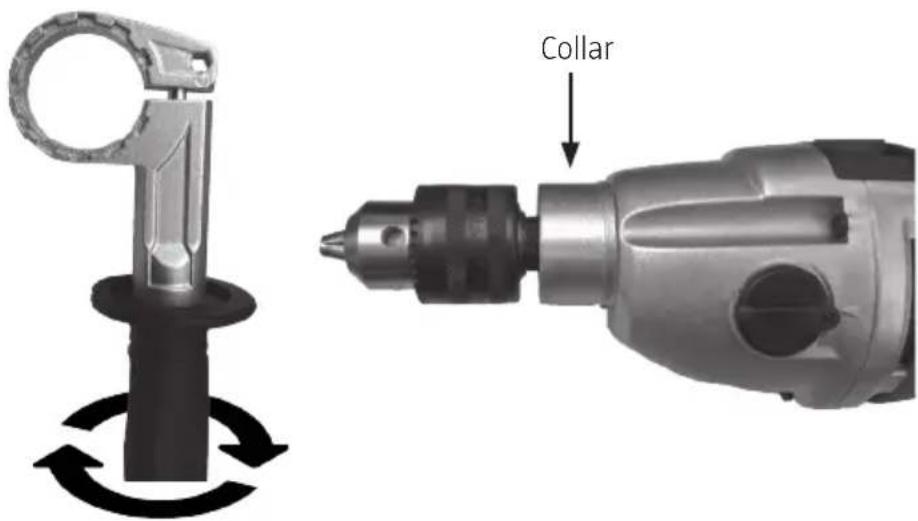
Close-up of a mechanical tool with a rotating knob and curved arrow indicating rotation (no text or symbols)SUPPORT HANDLE
- Enlarge the opening on the support handle by turning the handle anticlockwise.
- Move the support handle over the chuck to the collar.
- Fix in the required position by turning the handle clockwise.
- Check before use that the support handle is fixed.
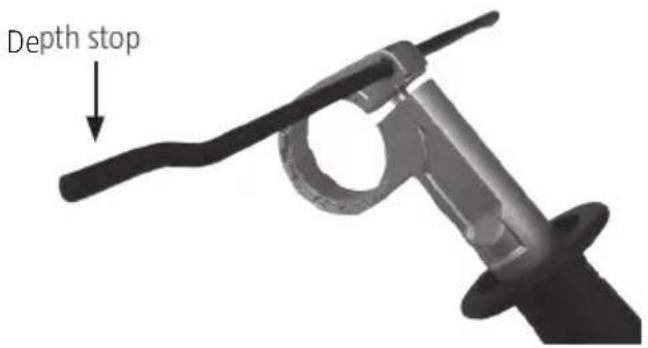
DEPTH STOP
The depth stop is used to drill holes with a preset depth.
- Select a suitable drill and fix it in the chuck as described in the instructions Fitting/removing tools.
- Enlarge the opening on the depth stop by turning the support handle anticlockwise.
- Fit the depth stop with the curved end closest to the workpiece.
- Place the tip of the drill against the workpiece. Move the depth stop to the required depth (measure with ruler if necessary).
- Turn the support handle clockwise to lock the depth stop and support handle in place.
ROTATION SELECTOR/POWER SWITCH LOCK
NOTE: Do not touch the rotation selector/power switch lock when the tool is moving.
The button goes all the way through and can be pressed from either side of the drill.
- Press the button with the forward arrow for right-hand rotation/screwing.
- Press the button with the back arrow for left-hand rotation/unscrewing.
- Pul the button in the middle position to lock the power switch and prevent accidental starting
Rotation selector/power switch lock
natural_image
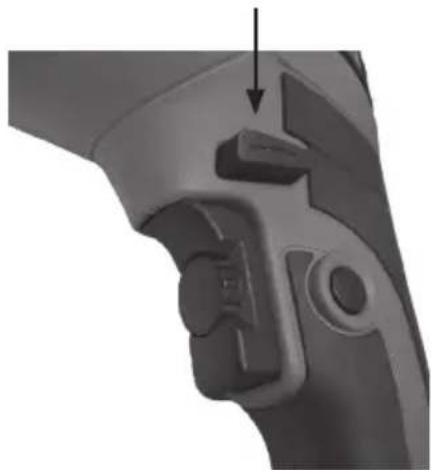
Close-up of a mechanical component with a highlighted section and an arrow pointing to a feature (no text or symbols visible)POWER SWITCH MED SPEED CONTROL
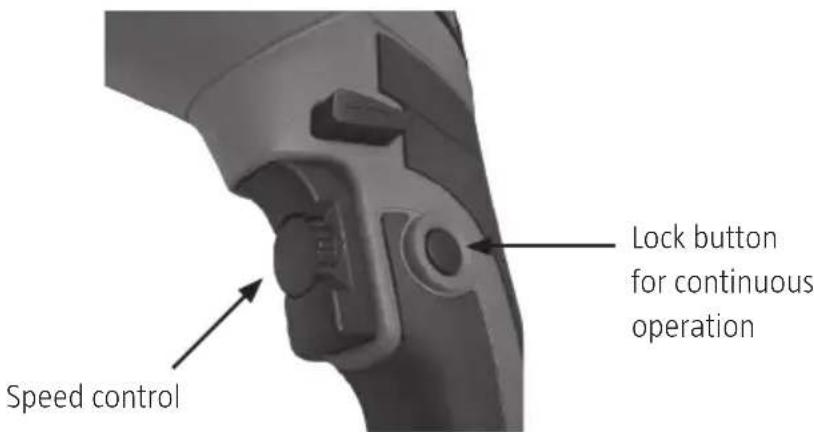
- Start the drill by pressing the power switch.
- Stop the drill by releasing the power switch.
- Turn the speed control clockwise for higher speed and anticlockwise for lower speed. The speed can be controlled when the power switch is locked for continuous operation.
- For continuous operation, press the lock button when the power switch is pressed. To unlock the power switch, press and release.
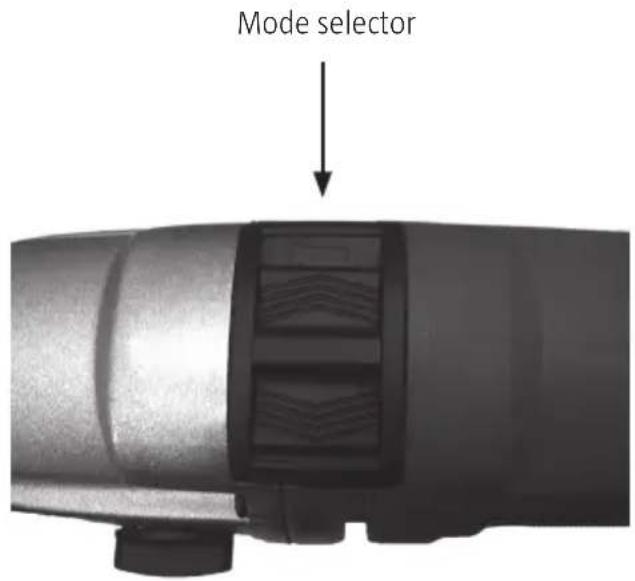
MODE SWITCH
- Push the mode selector to the right for hammer drilling.
- When working with the tool when there is risk of it getting stuck in the material, for example when drilling in concrete, stone and making holes, the hammer function should be disconnected.
- Push the mode selector to the left for drilling.
- Drilling in metal, wood and plastic etc.
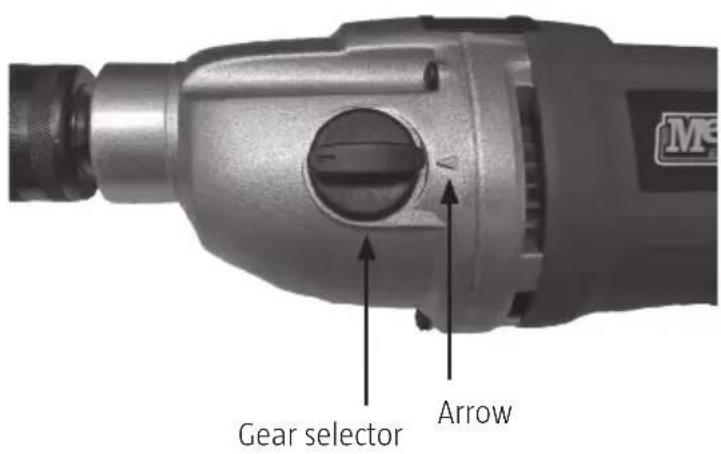
GEAR SELECTOR
NOTE: Do not move the gear selector while the drill is rotating, this could damage the tool.
- Select the speed range by turning the gear selector between position 1 and 2. The arrow marks the selected position.
- Position 1 - low gear: Suitable for drilling in metal, stone and concrete, and for screwdriving. - Position 2 - high gear: Suitable for drilling in soft wood and plastic, and for sanding.
DRILLING
WARNING:
- If the drill stops, release the power switch immediately, pull the drill out of the hole and find out why it stopped. Do not start/stop the drill with the power switch if the drill is jammed; this could damage the motor.
- To minimise the risk of the drill jamming or breaking through and damaging the workpiece, reduce the pressure towards the end of the hole.
• Pull out the drill from the hole before switching off the motor. This reduces the risk of the drill jamming.
NOTE:
- Hold the drill with your forefinger and middle finger on the power switch.
• Always use the support handle. - Only use sharp drills.
- Secure the workpiece so that it cannot move during the work.
- Place a piece of wood behind the workpiece when drilling in thin materials, to avoid splintered edges.
• Always apply pressure in line with the drill. - Press hard enough for the drill to cut, but not hard enough to reduce the speed or damage the drill.
- Hold the drill firmly during the work.
DRILLING IN WOOD
- Use a suitable wood drill for best results.
- Set the mode selector to drilling.
- Secure the workpiece so that it cannot move during the drilling.
- Start drilling at low speed to avoid the drill sliding to the side when you start. Increase the speed when the drill starts to cut into the material.
- Place a piece of wood behind the workpiece when drilling through holes, to avoid splintered edges.
- Never lock the power switch in the On position – risk of personal injury.
DRILLING IN METAL
NOTE: To drill large diameter holes in metal we recommend predrilling with a smaller drill. Lubricate the drill with oil so that it will cut better and last longer.
- Use a suitable metal drill for best results.
- Set the mode selector to drilling.
- Mark the drill hole on the workpiece with a punch to prevent the drill sliding to one side.
- Start drilling at low speed to avoid the drill sliding to the side when you start.
- Always drill at a suitable speed and pressure to avoid overheating the drill. Do not overload the tool to prevent:
– overheating the drill
- bearing wear
- warping the drill
- ovality, displacement
DRILLING IN BRICKWORK
- Use drills with tungsten carbide tips, e.g. concrete drills or tile drills, for best results when drilling in bricks, tiles, clinker, and concrete etc.
- Set the mode selector to percussion drilling.
- Use a light pressure and medium speed to drill in brick.
- Use high pressure and high speed to drill in hard materials like concrete.
MAINTENANCE
NOTE: Always switch off the tool and unplug the power cord before maintenance or cleaning.
- Keep the safety devices on the drill and the ventilation openings and motor casing clean.
- Clean the drill with a clean cloth, or with compressed air at low pressure.
• Always clean the drill after use. - Clean the drill with a cloth moistened with a mild detergent. Do not use strong detergents or solvents, they can damage the plastic parts on the drill. Make sure that water does not get into the drill.
- The drill does not need additional lubrication.
- Store the drill in a dry place.
• Repairs should be carried out by qualified personnel or an authorised service centre. - Allow an authorised electrician to check the carbon brushes in the event of heavy sparking. The carbon brushes must only be replaced by an authorised electrician.
TROUBLESHOOTING
NOTE:
- Switch off the drill and unplug the power cord before making adjustments or replacing accessories.
- The power tool must only be repaired by qualified personnel or an authorised service centre.
| Problem Possible cause Action | ||
| The motor does not start when the power switch is switched on | Fault in power cord, plug and/or mains outlet.Fault in the power switch. | Have the power cord, plug and/or mains outlet checked and repaired.Have the power switch replaced. |
| Abnormal noise and the motor does not start, or runs slowly when the power switch is switched on. | Fault in the power switch contacts.Blocked components.The motor speed drops as a result of overloading. | Have the power switch replaced.Have the tool checked and repaired.Reduce the load. |
| The motor overheats • Foreign object in the motor.Lack of lubricant, or contaminated lubricant.Pressure is too high. | Remove foreign object.Add or change lubricant.Reduce the load. | |
| Heavy sparking from the commutator. | Short-circuited rotor.Worn or blocked carbon brushes.Uneven surface on the commutator. | Have the rotor replaced.Have the carbon brushes checked, and if necessary replaced.Clean or polish the surface of the commutator. |
CE
EC DECLARATION OF CONFORMITY EG FÖRSÄKRAN OM ÖVERENSSTÄMMELSE EF SAMSVARSERKLÆRING DEKLARACJA ZGODNOŚCI WE

Jula AB, Box 363, SE-532 24 SKARA, SWEDEN
RoHS Directive 2011/65/EU EN 62321:2009
This product was CE marked in year -13
- Care for the environment!
- SVENSKA....7
- SÄKERHETSANVISNINGAR....7
- TEKNISKA DATA....10
- BESKRIVNING 11
- HANDHAVANDE 12
- SAFETY INSTRUCTIONS 48
- TECHNICAL DATA....51
- DESCRIPTION 52
- SÄKERHETSANVISNINGAR
- STÖDHANDTAG
- ROTATIONSOMKOPPLARE
- ST∅TTEHÅNDTAK
- ROTASJONSOMKOBLER/STR∅MBRYTERSPERRE
- UCHWYT POMOCNICZY
- Read the User Instructions carefully before use.
- General safety instructions
- WARNING:
- Work area
- Electrical safety
- Personal safety
- Use and care
- Service
- Special safety instructions
- Vibration
- DESCRIPTION
- USE
- INTENDED USE
- REPLACING DRILLS
- SUPPORT HANDLE
- DEPTH STOP
- ROTATION SELECTOR/POWER SWITCH LOCK
- POWER SWITCH MED SPEED CONTROL
- MODE SWITCH
- GEAR SELECTOR
- DRILLING
- NOTE:
- DRILLING IN WOOD
- DRILLING IN METAL
- DRILLING IN BRICKWORK
- MAINTENANCE
- NOTE: Always switch off the tool and unplug the power cord before maintenance or cleaning.
- TROUBLESHOOTING
- CE
- EC DECLARATION OF CONFORMITY EG FÖRSÄKRAN OM ÖVERENSSTÄMMELSE EF SAMSVARSERKLÆRING DEKLARACJA ZGODNOŚCI WE
Brand : Meec Tools
Model : 000-110
Category : Drill