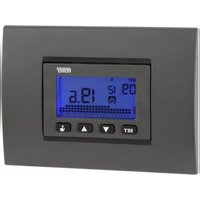
Crono.X - Thermostat Vemer - Free user manual and instructions
Find the device manual for free Crono.X Vemer in PDF.


| Product Type | Electronic programmable thermostat |
| Model | Crono.X |
| Brand | Vemer |
| Power Supply | 2 x 1.5V AA alkaline batteries |
| Battery Autonomy | Approx. 2 years (2500 mAh at 23°C) |
| Output Relay | Bistable relay, changeover contact 8A/250V~ (resistive) |
| Temperature Control Range | Heating: +2°C to +35°C; Air conditioning: +10°C to +35°C |
| Accuracy | ±0.5°C |
| Display | LCD showing day, time, temperature, operation mode icons |
| Operation Modes | Automatic, Manual, Timer-controlled, Off |
| Programmable Profiles | 7 preset daily profiles, user-customizable for each day |
| Temperature Levels | T0, T1, T2 (assignable per hour segment) |
| Settings Guard (Password) | Enabled via password (000-999) to prevent unauthorized changes |
| Automatic Daylight Saving Time | Enabled (last Sunday March/October) or user-configurable |
| External Sensor Option | X.TEMP (VN883500), max distance 40m, range -40°C to +60°C |
| Remote Control | Via phone dialer X.CODE BUS/Wave or general-purpose with clean contact |
| Differential (ON/OFF control) | Adjustable 0.1°C to 1.0°C |
| Proportional Control (Heating) | Band 0.5°C to 5.0°C; period 10, 20, or 30 min |
| Antifreeze Temperature | 1°C to 10°C or disabled (when in Off mode) |
| Dimensions (W x H x D) | 123.0 x 93.5 x 33.5 mm |
| Installation | Wall or 503 box (mounting at 150 cm recommended) |
| Protection Rating | IPXXD |
| Insulation Class | II |
| Operating Environment | 0°C to +50°C, 20% to 90% RH non-condensing |
| Storage Temperature | -10°C to +65°C |
| Battery Replacement | Use alkaline AA only; replace within 1 minute to preserve settings |
| Safety Standards | Complies with EU Directives 2006/95/EEC, 89/336/EEC; harmonized standards EN 60730-2-7, EN 60730-2-9 |
Frequently Asked Questions - Crono.X Vemer
User questions about Crono.X Vemer
0 question about this device. Answer the ones you know or ask your own.
Ask a new question about this device
Download the instructions for your Thermostat in PDF format for free! Find your manual Crono.X - Vemer and take your electronic device back in hand. On this page are published all the documents necessary for the use of your device. Crono.X by Vemer.
USER MANUAL Crono.X Vemer
natural_image
Diagram showing two mechanical or electrical component states with directional arrows indicating motion (no text or symbols)APERTURA SPORTELLINO FRONTALE

natural_image
Line drawing of a portable electronic device with control panel and indicator lights (no text or symbols)DIMENSIONI
(mm)

MESSAGGI DI ERRORE
■ Adjustment of time and date pag. 41
■ Automatic operation pag. 42
- Program selection pag. 42
- Program customizing pag. 43
- Winter temperature profi les pag. 45
- Summer temperature profi les pag. 46
■ Manual operation
- Manual operation selection pag. 47
- Setting the manual temperature pag. 47
■ Device off mode
■ Winter-heating/summer-air conditioning modes
■ Timer-controlled operation
- Timer-controlled off type pag. 49
- Timer-controlled manual type pag. 49
- Timer-controlled automatic type pag. 49
■ Control by telephone dialler
- Configuration for X.CODE BUS pag. 51
- Configuration for X.CODE Wave and general-purpose phone dialer pag. 51
■ Other available functions
- Maximum and minimum daily temperature pag. 54
- On/off or proportional temperature-control method pag. 56
- Aantifreeze temperature pag. 58
- Unit of measurementage pag. 58
- External sensor pag. 59
The CRONO.X thermostat performs 1B-type actions and is aimed for household or similar premises, under a normal pollution degree.
During product installation and operation, it is necessary to observe the following instructions:
1) The instrument must be installed by a qualified person
2) Disconnect power supply while installing the unit
3) Do not power or connect the product if any part of it is damaged
4) Connect the product considering the diagrams described in the following manual and on the instrument
User Manual
ELECTRONIC PROGRAMMABLE THERMOSTAT CRONO.X
Read all the instructions carefully
■ CRONO.X is a weekly programmable thermostat that unites ease of use with some innovational functions not featured by traditional household temperature controllers.
More specifi cally, this device is singled out by 6 features:
1) It displays or controls the temperature in a room situated at a maximum distance of 40m by the use of an optional sensor (mod. X.Temp cod. VN883500)
2) A settings guard function is available in order to avoid unauthorized tampering when the device is used in public premises.
3) The system's on-off status can be remote-switched by landline or cellular GSM phone. This is especially useful when the house is not used permanently or it is a holiday home.
To implement this function it is necessary to install a device that receives calls or SMSs and interfaces with the programmable thermostat (phone dialer mod. VN782900 X.Code Wave for landline phone, VE072500 X.Code Bus for GSM network)
4) Daylight saving time/solar time switching can be automatically enabled or disabled
5) The cut-in differential can be adjusted from 0,1°C to 1,0°C
6) Temperature control can be set to ON/OFF mode or Proportional mode with selectable band and periods, the latter being especially appropriate in very large rooms with a strong thermal drift (sheds, systems including fan-coils, aluminum or cast-iron radiators, etc.)
Also, when in manual mode, CRONO.X works as an ordinary thermostat.
Conversely, when in automatic mode: one of the three user-defined temperature levels can be chosen for each hour segment of the day.
CRONO.X controls both heating and air-conditioning systems.
TECHNICAL SPECIFICATIONS
Code
Model
Description
Power
supply
VE081600 CRONO.X electronic programmable thermostat 2x1,5V (AA) batteries
- 4 available operation modes: Automatic, Manual, timer-controlled, off
- when in automatic mode, 7 temperature profi les can be selected and changed by the user
- when in automatic mode, the user can assign one of three temperature levels (T1, T2, T3) to each hour segment
- The device is suitable for the control of heating and air-conditioning systems
• Automatic solar/daylight saving time switching (can be disabled) - Settings guard function for use in public premises (tampering protection)
- Optional external sensor (X.TEMP code VN883500) for temperature control or reading (max 40 m; -40°C ÷ +60°C)
- Remote control using a dedicated phone dialer by Vemer (X.CODE WAVE and X.CODE BUS) or by general-purpose phone dialer with a potential-free output contact
• Maximum and minimum daily temperature reading - Antifreeze temperature to be selected from 1^ to 10^ (can be disabled)
• Power supply: 2 alkaline batteries 1,5V (AA-size) - Battery autonomy: approximately 2 years (for alkaline batteries 2500mAh at 23^ )
- Standby charge for battery replacement: approximately 1 minute
- Output: bistable relay with changeover contact 8A/250Vca (resistive load) 2000VA (resistive load)
- Termination:
- relay output: 3-pole terminal strip, max. section of cables 1.5 mm ^4
- external sensor input and telephone dialer: 4-pole terminal strip, max. section of cables 1.5 mm ^2
- Installation:
-on wall
- to cover a 503 box
• Temperature-control range:
- HEATING mode Automatic/Manual operation: +2°C ÷ +35°C
- AIR-CONDITIONING mode Automatic/Manual operation: +10°C ÷ +35°C
- ON/OFF control cut-in differential: adjustable from 0,1°C to 1,0°C
- Proportional control with adjustable band and period
- Accuracy: ± 0.5^
- Operating conditions:
- temperature 0^ C ÷ +50°C
- relative humidity 20% ÷ 90%, non-condensing
• Storage temperature: -10^ ÷ +65^
• Protection rating: IPXXD
• Insulation class: II
INSTALLATION AND ASSEMBLY
It is advisable to install the programmable thermostat in a zone in which the temperature is the closest to the room average value.
Do not install it too near doors, windows, sources of heat, direct sunlight or in places in which there is too much or too little air flow.
Installing the programmable thermostat about 150 cm from the floor is recommended.
Mounting can be on a wall or on a 503 box.
PLACEMENT REMOVAL

natural_image
Diagram showing two mechanical or electrical component states with directional arrows indicating rotation or movement (no text or symbols present)FRONT FLAP OPENING

natural_image
Line drawing of a rectangular electronic device with control panel and indicator lights (no text or symbols)DIMENSIONS
(mm)

DEVICE DESCRIPTION
FRONT VIEW
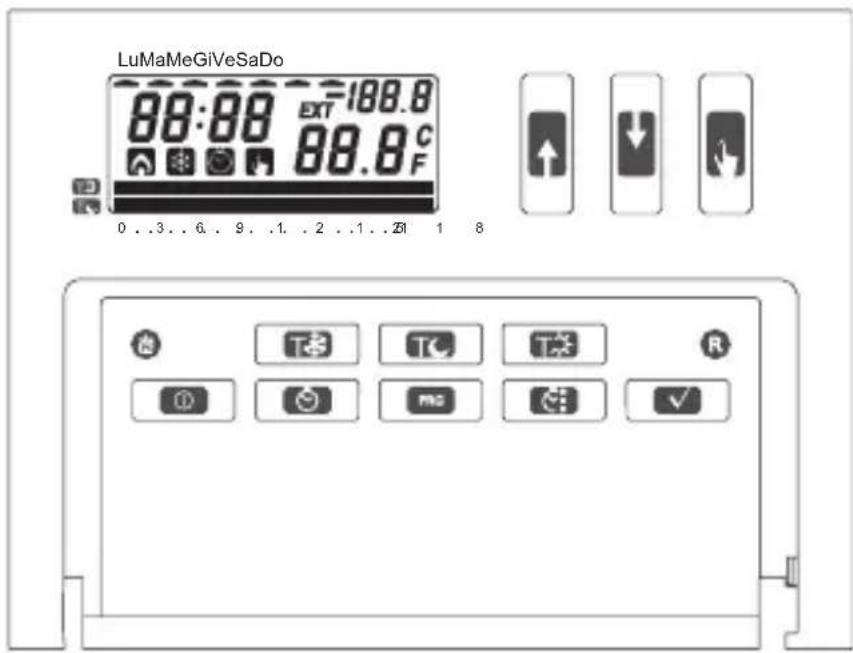
FUNCTIONS OF KEYS

Value up

Value down

Manual operation

WINTER-HEATING mode
SUMMER-AIR CONDITIONING mode (only accessible using a sharp tool)

Reset (only accessible using a sharp tool)

To set T0 for Automatic operation

To set T1 for Automatic operation

To set T2 for Automatic operation

System off

Timer-controlled operation

Hourly programming for automatic operation; hold it down for 3 sec. to enter advanced programming

To set the time and date; hold it down for 3 secs. to enable or change the solar/daylight saving time

To confirm the settings
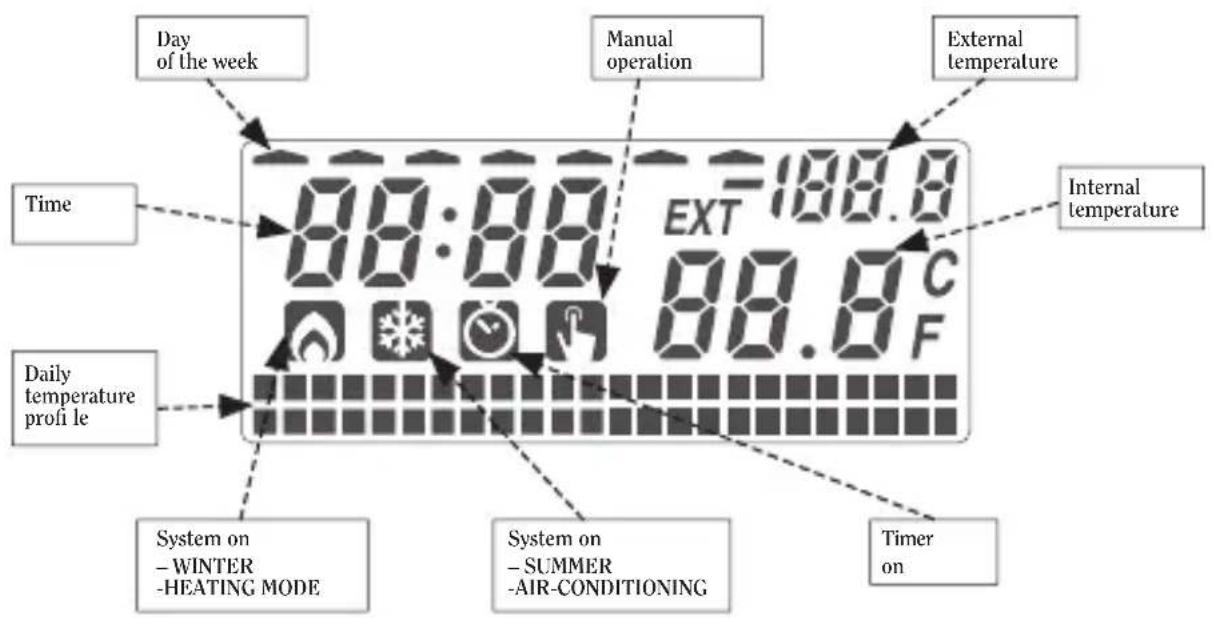
DISPLAY
INITIAL STARTUP - TOTAL RESET
This procedure enables correct operation of the CRONO.X on first startup, or resets factory settings (Default settings).
Revert to factory settings - TOTAL RESET
- Place 2 alkaline batteries 1.5V – AA size, with correct polarity
- Press R: all the segments will appear on the display
- Press √ within 3 secs: the reading “DEF” will appear After a few seconds the reading “12:00” will flash on the display.
- Press Ⓗ: the minutes will flash
- Press Ⓗ: all the segments will be continuously lit, the hour, minutes and the temperature measured will appear as well as a set of small squares indicating daily programming
CRONO.X will operate in automatic mode (cfr. page 42).
- Set the time (cfr. page 41)
Default settings are:
Operation WINTER-HEATING
Mode AUTOMATIC
Hourly schedule MON-FRI PRG1; SAT-SUN PRG2
Temperature T0 5.0°C
Temperature T1 15.0°C
Temperature T2 18.0°C
| Antifreeze temperature 6.0°C | |
| Temperature control method | ON/OFF |
| Cut-in differential 0.3°C | |
| Automatic solar/daylight time switching | YESWinter → Summer: last Sunday in March at 2:00 AMSummer → Winter: last Sunday in October at 3:00 AM |
| External sensor NO | |
| Date 01-May-2005 | |
ADJUSTMENT OF TIME AND DATE
To set time and date
- Press 📂: the seconds will flash
- Press √: the minutes will flash
• To enter the minutes press for - Press √: the hours will flash
- To enter the hours press ↓ or ↑
- Press √: the year will flash
• To enter the current year, press for - Press √: the month will flash
• To enter the current month, press ↓ or ↑ - Press √: the day will flash
• To enter the present day, press ↓ or ↑ - Press √: the seconds will flash again
- Press 📄: the device will resume normal operation
Note
If no key is pressed for 45 seconds when in the time and date programming procedure, the programmable thermostat will store the changes effected and will resume normal operation.
AUTOMATIC OPERATION
When in automatic mode it is possible to assign one of the three available temperatures to each of the 24 hour segments: T0, T1 or T2.
This enables the user to find his/her home comfortably heated in the hour segments of his/her preference; when the user is not in or at night, the device will see to keeping a lower room temperature.
Seven preset daily temperature profiles (Programs) are available for both WINTER-HEATING and SUMMER-AIR CONDITIONING operating modes.
Each of these profi les can be customized following specifi c user requirements.
The display will show the temperature associated to the 24 hours as follows:
- 2 “small squares” on top of each other: to adjust the temperature starting from the set value by pressing key T (temperature T2)
- 1 “small square”: to adjust the temperature from the set-point, by pressing key ☑ (temperature T1)
- no “small square”: to adjust the temperature from the set-point, by pressing key T8 (temperature T0)
Factory settings (Default) feature the temperature profi le corresponding to Program 1 for Monday through Friday; Program 2 for Saturday and Sunday (refer to the profi les on page 45).
PROGRAM SELECTION
This procedure changes operating hours and temperature profiles, choosing among the seven available preset programs, and assigning these to each of the days in the week.
- Press PKG: the following reading will appear
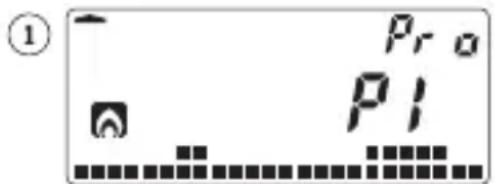
-
Press ↩ or ↗ to select the hourly schedule to be assigned to Monday (cfr. page 45 for Winter-Heating, or page 46 for Summer-Air conditioning)
-
Press √ to confirm; the day of the week will change
-
Repeat steps 2 and 3 to select the hourly schedule to be assigned to the remaining days of the week
-
After the Sunday schedule is confirmed the device exits programming and resumes normal operation
PROGRAM CUSTOMIZING
This procedure changes the temperature profile (hourly schedule) to suit special requirements, assigning the desired temperature to each of the 24 hour segments.
Every hour of the day can be associated 1 of the three available temperatures (T0, T1, T2).
When in SUMMER-AIR CONDITIONING MODE, temperature T0 equals system OFF. A temperature change delay of 15, 30 or 45 minutes can be set for every hour.
Both WINTER-HEATING programs and SUMMER-AIR CONDITIONING programs can be customized independently.
For example, program P1 for WINTER-HEATING, can feature totally different hours and temperatures from the P1 program for SUMMER-AIR CONDITIONING.
- Press PRG: the following reading will appear

- Press for to select the hourly program that best meets the specific requirements
- Press PRO: the current time will appear (minutes will be zeroed) and the associated "small squares" will flash;
- Press ↓ or ↑ to move to the hour segment whose assigned temperature needs to be modified
- If you wish to delay the temperature change by 15, 30 or 45 minutes, press the key below once, twice or three times 📋
- Press T or Tt. select the temperature to be assigned to the hour segment
Temperature T0: no small square
TC Temperature T1: 1 small square
Temperature T2: 2 small squares on top of each other
- Repeat the steps from 4 to 6 for all the hour segments whose associated temperature needs to be changed
- Press PRO to store the changes and make the customized hourly program available.
- If you wish to alter another program, repeat the steps from 2 to 8.
- Press or to select the hourly schedule to be assigned to Monday (cfr. page 45 for Winter-Heating, or page 46 for Summer-Air conditioning)
- Press √ confirm; the day of the week will change
- Repeat steps 10 and 11 to select the hourly schedule to be assigned to the remaining days of the week
- After the Sunday schedule is confirmed the device exits the programming and resumes normal operation
T0, T1 AND T2 temperatures correspond to the values that will be kept when in automatic operation mode, following the selected schedule and program (temperature profile).
- Press to set temperature T0 (no “small square”) for WINTER-HEATING mode min = +2.0°C; max = T1 for SUMMER-AIR CONDITIONING mode system off (the display will read “---”)
- Press to set temperature T1 (one “small square”) for WINTER-HEATING mode min = T0; max = T2 for SUMMER-AIR CONDITIONING mode min = +10°C; max = T2
- Press to set temperature T2 (two “small squares”) for WINTER-HEATING mode min = T1; max = +35.0°C for SUMMER-AIR CONDITIONING mode min = T1; max = +35.0°C
- Press to confirm or else wait for 45 seconds
DEFAULT TEMPERATURE PROFILES (PROGRAMS): WINTER-HEATING MODE
P1
Note: Program 7 keeps temperature T0 all day long; no “small square” will be shown on the display
DEFAULT TEMPERATURE PROFILES (PROGRAMS): SUMMER-AIR CONDITIONING MODE
P1

P2

P3

P4

P5

P6

P7
| T2 | ||||||||||||||||||||||||||||||||
| T1 | ||||||||||||||||||||||||||||||||
| 0 | 1 | 2 | 3 | 4 | 5 | 6 | 7 | 8 | 9 | 1 | 0 | 1 | 1 | 1 | 2 | 1 | 3 | 1 | 4 | 1 | 5 | 1 | 6 | 1 | 7 | 1 | 8 |
Note: Program 7 keeps temperature T0 all day long and the system is permanently off; no “small square” will be shown on the display
Manual operation is enforced when one wishes to temporarily discontinue Automatic operation and set a different temperature.
Then the temperature will not be governed by the program schedule, but by the manually selected temperature: In this case CRONO.X will behave as an ordinary thermostat.
This status is indicated by the symbol 📋 on the display.
1) Press: the reading

will appear, in which the temperature to be set fl ashes (time, day and temperature may differ from the example)
2) Press for to set the desired temperature
3) Press √ confirm or wait for 45 seconds; the display will then read the time, the temperature measured and the icon ☐; the reading "SET" will disappear
SETTING THE MANUAL TEMPERATURE
1) Press ↓ or ↑: the reading "SET" will appear up on the right and the temperature previously set in manual mode will flash
2) Press for to set the desired temperature
3) Press √ to confirm or else wait for 45 seconds: the display will read the temperature measured again
To exit the manual operation mode
Press 📄 for 3 seconds: the device will resume automatic operation mode and the icon 📄 will disappear
DEVICE OFF
When in this status the programmable thermostat is completely disabled or else it keeps the antifreeze temperature (which can be altered by the user).
The antifreeze temperature is determined by the parameter “OFF” in Advanced Programming (cfr. pages 56 and 58).
The Antifreeze default temperature is 6^ C but can be set from 1^ C to 10^ C. To shut down the system set “---”
When in OFF status, the time, day of the week and the temperature will still be read.
To select the off operation status
Press Ⓐ: only the time, day and temperature will be displayed.
To exit the off operation status
Press ☐: the device will resume the previous operation mode (Manual or Automatic).
WINTER-HEATING /SUMMER-AIR CONDITIONING OPERATION MODES
CRONO.X controls both Heating and Air-conditioning systems.
Depending on the selection, the device's control mode is indicated by the flame icon for WINTER – HEATING or by the snowflake icon for SUMMER – AIR-CONDITIONING.
The factory setting is WINTER-HEATING.
To select winter-heating or summer-air conditioning:
1) Press using a sharp tool, the display will read
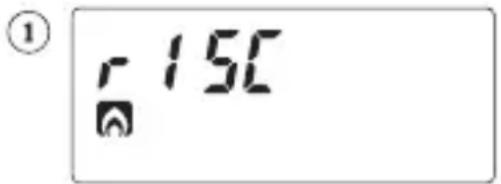
(WINTER-HEATING operation)
2) Press for to select SUMMER-AIR CONDITIONING
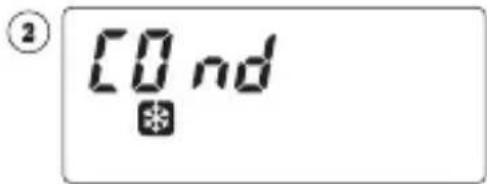
3) Press √ confirm or else wait for 45 seconds
This very useful function makes it possible to temporarily change, for a user-definable term, the normal functioning of the programmable thermostat.
The timing can be selected in hours (max 99) or days (max 99) and is indicated by the symbol 📄
There are three types of timer-controlled operation:
TIMER-CONTROLLED OFF TYPE
The starting operating mode is OFF and it is kept for a determined term (hours or days), after which the device resumes the previous operating mode (Manual or Automatic).
This type of timer-controlled operation can be used during vacations, so that automatic mode is discontinued.
TIMER-CONTROLLED MANUAL TYPE
The Starting operating mode is MANUAL and it is kept for a determined term (hours or days), after which the device resumes Automatic operation.
This type of timer-controlled operation can be used to keep for a few hours (or days) a temperature different from the Automatic set-point.
For example, this can be selected on a very chilly winter evening, to raise the temperature for a couple of hours using the manual operation mode. Then the user will not need to remember to set the CRONO.X back to automatic before going to bed.
TIMER-CONTROLLED AUTOMATIC TYPE
The Starting operating mode is AUTOMATIC and it is kept for a determined term (hours and days), after which the device switches back to the OFF mode.
This is used to switch the CRONO.X off for a certain time or a day when nobody is going to be in.
If the timing is in hours, the timer trips when the hour expires; if it is in days, the timer trips at midnight.
If during a timing term the operation mode is switched – for example from timer-controlled manual to automatic or off, the timing is called off.
The timer count includes the hour in which the programming occurs; similarly, if the timing is in days, the count also includes the current day.
E.g.: if the timer is set at 13:52 and it is set for 1 hour, it will trip when the hour elapses, i.e. at 14:00.
If the clock is adjusted when the timer is set, the latter will not be updated.
To select timer-controlled operation
1) Press the display will read

and “00” will flash
2) To set the timer in hours, pres: the reading
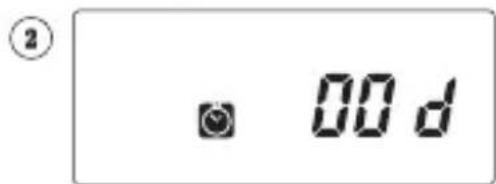
will appear, with "00" flashing
3) To set the timer (in hours or days), press ↓ or ↑
4) Press √ to confirm or wait for 45 seconds; the icon will stay lit on the display until the timing expires
CONTROL BY TELEPHONE DIALLER
The CRONO.X programmable thermostat can be remote-controlled through a telephone.
This feature is especially useful to control the heating in second homes, as this makes it possible to prepare a warm environment.
To implement this function it is necessary to connect up a device or dialer that receives calls or SMSs and interfaces with the programmable thermostat.
Phone dialers are available for landline phones (VN782900 X.Code Wave) or for GSM cellular phones (VE072500 X.Code Bus).
- Using the X.CODE BUS and RS485 serial communication protocol it is possible to change the CRONO.X operation mode (Manual, Automatic or OFF), change the temperature set-point, and receive on a cell phone a message summarizing the settings and the temperature measured in the premises.
- The use of the X.CODE WAVE or X.CODE BUS with the output relay clean contact, makes it possible to switch the operation mode of the CRONO.X from Manual or Automatic to Off and the other way round.
Dialer clean contact OPEN → Operating mode AUTOMATIC or MANUAL Dialer clean contact CLOSED → Operating mode OFF (Antifreeze temperature where enabled)
In this case it is not possible to receive the measured temperature reading.
CONFIGURATION FOR X.CODE BUS (code VE072500) WITH RS485
After connecting the two terminals OUT BUS in the CRONO.X up to those marked BUS on the X.CODE BUS, respecting polarity.
- Go to Advanced Programming (cfr. pages 57-59) and set the “6U5” parameter to Yes
- Confir rm by
- The “Rdr” – memory address – will appear
- Hold down the ON/OFF key in the X.CODE BUS for at least 5 seconds: the ON/OFF led will flash
- Wait for approximately 10-20 seconds: as soon as the ON/OFF led stops blinking: the phone dialer will be configured
- Press √ on the CRONO.X to confirm all the remaining Advanced Programming parameters, or else allow 45 seconds to return to normal operation
As for how to send SMS messages to switch the device on or off, refer to the instructions for the X.CODE BUS.
CONFIGURATION FOR X.CODE WAVE (code VN782900), X.CODE BUS (code VE072500) and for PHONE DIALERS WITH CLEAN OUTPUT CONTACT
After connectig the 2 OUT BUS terminals in the CRONO.X up to those marked as relay output contacts in the X.CODE WAVE, X.CODE BUS or other dialer for landline phone or GSM cell phone with a clean output contact.
- Go to Advanced Programming (cfr. pages 57-59) and set the "6U5" parameter to n0
- Confirm by
- Press √ confirm all the remaining Advanced Programming parameters, or else allow 45 seconds and return to normal operation
As for how to send the commands switching the device on or off, refer to the instructions for the X.CODE WAVE, X.CODE BUS or relevant phone dialer.
OTHER AVAILABLE FUNCTIONS
SETTINGS GUARD (PASSWORD)
When enabled, this function inhibits keyboard operation.
Changing any parameter is only allowed after a special configuration area has been accessed and the correct password has been entered (number from 000 to 999).
The password is selected in parameter “PAS” of the Advanced Programming area (cfr. pages 57 and 59).
The default password is 123.
To enable the settings guard
- From the Automatic, Manual or OFF operating modes: hold down the keys TP and T are ananeously for a few seconds; the display will read

and will resume the previous operation mode (Automatic, Manual or off)
To disable the settings guard
- Hold down the keys T* T* naneously for a few seconds
- To select the password (parameter "PAS" – Advanced Programming), press or
- Press to confirm
AUTOMATIC SOLAR/DAYLIGHT TIME SWITCHING
CRONO.X changes the time from daylight saving to solar on the last Sunday in March at 02:00; from solar to daylight saving on the last Sunday in October at 03:00.
This function too can be disabled, or else the date and hour in which the time switch occurs can be changed.
To alter the solar-daylight saving time switch
Hold down for approximately 3 seconds: the following reading will appear

(If the reading is "CHANGE OFF" press ↓ or ↑ to switch it to "On")
• Daylight saving time solar time switching
1) Press √ to confirm: the following reading will appear

2) Press PRO to change the settings: "L5E" will flash
3) Press or to select the week of the month in which the Daylight saving → Solar time switch is to take place (“1ST” for first, “2ND” for second, “3RD” for third, “4TH” for fourth, “LST” for last)
4) Press √ to confi rm: the Sunday segment will fl ash
5) Press ↓ or ↑ to select a day of the week
6) Press √ to confirm: "03" will flash
7) Press ↓ or ↑ no select a month
8) Press √ to confi rm: "02:00" will fl ash
9) Press ↓ or ↑ to select the time
10) Press √ to confirm: All segments will be continuously lit
• Solar time→ daylight saving time switching
Press √: the following reading will appear

Follow the instructions from step 2) to 9)
Press √ to confirm and exit the settings
MAXIMUM AND MINIMUM DAILY TEMPERATURE
CRONO.X stores the external and internal minimum and maximum values measured over the day (external temperature only if an external sensor is provided).
- To view these values just press (for the minimum temperature) or (for the maximum temperature)
This function is available when in Automatic and off mode, but not when in manual mode.
- To set the minimum or maximum readings to zero, just hold down ▼ or ↑ for at least 3 seconds until the display reads “---”
The maximum value will be identified as “H I”, the minimum as “L0”.
LOW BATTERY LEVEL INDICATOR
When the batteries are about to be dead the display will start to flash.
When in this condition, relay changeover is not guaranteed: it is therefore advisable to replace the batteries (cfr. page 60 “BATTERY REPLACEMENT”).
ADVANCED PROGRAMMING
Advanced programming makes it possible to change some parameters and view some system data.
The user-selectable parameters are:
| PARAMETER READING | DEFAULT PAR | AMETER RANGE | GE NOTES | |
| Temperature control method | rEG 0 | Q = ON/OFF P = PROPORTIONAL | ||
| Control band(ONLY when rEG=P and WINTER-HEATING operating mode) | bnd | 00.5 °C 00.5°C ÷ 05.0°C | ||
| Control period(ONLY when rEG=P and WINTER-HEATING operating mode) | PER | 10 minutes 10 - 20 - 30 minutes | ||
| Differential(ONLY when rEG=O) | d IF | 00.3 °C 00.1°C ÷ 01.0 °C | ||
| Antifreeze temperature(only when in WINTER-HEATING mode) | OFF | 06.0 °C | 01.0 °C ÷ 10.0 °C“---” = disabled | The temperature is kept pressing the OFF key |
| Unit of measurement | dEG | C | C=CelsiusF=Fahrenheit | |
| External sensor | EST n0 | n0 = not providedYES = external sensor is connected | External probeX.TEMPcode VN883500(optional) | |
| Control sensorONLY when ESt=YES) | SnS Int | Int = internalEST = external | ||
| RS485 output enabled(Out Bus) | bus | YES | YES = enabledn0 = disabled | Phone-control output |
| Memory address(ONLY when bUS=YES) | Adr | Upon initial start-up procedure, default parameters are enforced an a new address is generated | ||
| Settings guard password | PAS | 123 000 + 999 | For use in public premises | |
| Total number of hours of output operation | tot | 000 000 + 65535 (7 years) | Total number of hours when output relay in ON status | |
| Battery charge status | bAt | 100% ÷ 0% | The initial value depends on the battery charge | |
| Display brightness adjustment | Cnt | 80 ÷ 15 | ||
To enter advanced programming and change the parameters
1) Hold down for 3 secs until the display reads "rEO"
2) Press for to select the desired value
3) Press √ to confi rm
4) Repeat steps from 2) to 3) to change the remaining Advanced Programming parameters
5) After confirming the parameter “[n]” the device resumes the previous operating status (Automatic, Manual or System Off)
Description of advanced programming parameters
TEMPERATURE-CONTROL METHOD (rEO)
The choice of the temperature-control method depends on the features of the system it is applied to.
In most cases ON/OFF temperature-control is recommended (which is the default choice), but Proportional temperature control is preferable in premises with a high thermal drift (large rooms, fan-coil systems, cast-iron radiators, etc)
The Proportional method can only be selected for the WINTER-HEATING mode.
- On/off temperature control (☐)
It is the common control method with most thermostats and programmable thermostats.
This methods ensures accurate temperature control in nearly all systems.
When in the ON/OFF control method, CRONO.X's behavior depends on a user-definable parameter: The cut-in differential (dIF), also called hysteresis.
- Winter-heating
The system connected to the output of the programmable thermostat will be switched on when the temperature drops below the set-point by a value equaling the cut-in differential (dIF); the system is switched off when the temperature set-point is exceeded.
E.g.: Tset = 20.0°C; dIF = 00.3°C (Tset = Manual or Automatic temperature set-point).
When the temperature drops below 19.7^ C (Tset-dIF), the system switches on and stays on until the temperature exceeds 20.0^ C (Tset).
- Summer-air conditioning
The system connected to the output of the programmable thermostat will be switched on when the temperature exceeds the set-point by a value equaling the cut-in differential (dIF); the system is switched off when the temperature drops below the set-point.
E.g.: Tset = 20.0°C; dIF = 00.3°C (Tset = Manual or Automatic temperature set-point).
When the temperature exceeds 20.3^ C (Tset+dIF), the system switches on and stays on until the temperature drops below 20.0^ C (Tset).
• Proportional temperature control (P)
This temperature-control method improves performance with some particular systems, and helps keep a constant temperature in the premises.
It ONLY applies to WINTER-HEATING operation, whether in Automatic or Manual mode.
It is defined by two parameters:
- Control band (bnd; 0.5^ C ÷ 5.0^ C)
- Control period (Per; 10 min – 20 min – 30 min)
In the interval defined by the Control Period (Per), 10 - 20 - 30 minutes, the output will switch to ON for a time span that is proportional to the difference between the set-point and the temperature measured.
At the end of every Control Period, CRONO.X reads the temperature measured and compares it with the set-point: based on the difference between the 2 values, it then keeps the output ON for a proportional time accordingly.
When the temperature measured is close to the set-point, the output will stay ON for a short time calculated on the total Control Period (Per) (e.g. 2 min for Per = 20 min).
When the temperature measured is far from the set-point, the output will stay ON for nearly all the Control Period (e.g. 19 min for Per = 20 min).
If the temperature measured is lower than the set-point and the difference is greater than the Control band value (bnd), then the output will stay ON for the entire Control Period.
If the temperature measured is higher than the set-point and the difference is greater than the Control band value (bnd), then the output will stay OFF for the entire Control Period.
Notes on the selection of proportional control parameters
Optimized Proportional Control depends on a correct choice of parameters.
Control Period Selection (PEr):
10 min for low thermal-drift systems (fan-coil type)
20 min for medium thermal-drift systems (e.g. aluminum radiators)
30 min for high thermal-drift systems (e.g. cast-iron radiators)
Control Band Selection (bnd):
wide band (5°C) for systems with a high thermal gradient narrow band (0.5°C) for systems with a low thermal gradient
EXAMPLES
fan-coil system bnd = 3.0°C PEr = 10 min radiator system → bnd = 0.5°C PEr = 20 min
ANTIFREEZE TEMPERATURE (OFF)
Enabled ONLY for WINTER-HEATING operation.
Denotes the temperature that is kept when the programmable thermostat is in OFF status (key ①).
It can be set from 1^ C to 10^ C; factory setting is 6.0^ C.
It can be overridden selecting “---”.
UNIT OF MEASUREMENT (dEG)
To select the unit of measurement in degrees Celsius (C) or Fahrenheit (F).
For degrees ^ C, the minimum increase is 0.1 ^ C.
For degrees ^ F, the minimum increase is 0.2^ F.
SONDA ESTERNA (EST)
When enabled, this parameter displays the temperature measured by the external sensor model X.TEMP code VN883500 (optional) connected to the dedicated terminal (EXT NTC).
Temperature range: -40.0^ ÷ +60.0^ .
The external sensor can be installed at a maximum distance of 40 meters.
TEMPERATURE CONTROL SENSOR (5n5)
This parameter can only be viewed if the external sensor is enabled (ESt = YES).
It determines whether temperature control will be based on the temperature measured by the built-in sensor (Int) or by the External sensor (ESt).
ENABLING RS485 OUTPUT (605)
The terminals marked OUT BUS are dedicated to the remote control of CRONO.X through a phone dialer.
Select “YES” if the phone dialer connected is a X.CODE BUS code VE072500 for the GSM network and RS485 serial communication is used.
Select “nO” if the phone dialer connected provides a potential-free contact; (e.g. VN782900 X.CODE WAVE for landline phone and X.CODE BUS for GSM network used with a relay output).
As for operating the CRONO.X with a phone dialer, cfr. page 50.
MEMORY ADDRESS (Adr)
This can only be viewed if (bUS = YES).
It is a numeric value that identifies the device when connected to other devices (e.g. X.CODE BUS) through RS485 communication.
SETTINGS GUARD PASSWORD (PRS)
This is very useful when only authorized users are allowed to alter the settings (e.g.. offi ces, public premises, schools,...).
The selection may range between 000 and 999.
As for the instructions to enable the password-controlled settings, cfr. the description on page 52.
TOTAL OPERATING HOUR COUNT (tot)
The value indicates the number of hours in which the output relay was ON, i.e. when the contact between COM and NA was closed.
BATTERY CHARGE STATUS (BAT)
It indicates the battery charge percentage.
A full battery charge (100%) corresponds to 2.8V battery voltage; 0% corresponds to 1.8V (dead batteries).
DISPLAY BRIGHTNESS ADJUSTMENT (cnt)
It is meant to improve the CRONO.X display view by adapting it to the light existing in the premises in which it is installed.
Brightness ranges from 0 (light) and 15 (dark).
Default value is 8.
A brighter display uses more power and therefore causes battery autonomy to be shorter.
BATTERY REPLACEMENT
Use alkaline batteries only 2 x 1.5V (LR6 - AA size)
After removing the old batteries, place the new ones within one minute to avoid erasing the time and date settings (all the other settings will stay stored).

ERROR MESSAGES
When there is a fault that prevents correct operation, e.g. failure of the temperature-control sensor, the display reads “---” in place of the relevant temperature reading (from internal or external sensor).
- In case of sensor failure when CRONO.X is in WINTER-HEATING mode, the relay will go on for 10 minutes every 4 hours to prevent the system from freezing
- In case of sensor failure when CRONO.X is in SUMMER/AIR-CONDITIONING mode, the relay will stay permanently off
CONNECTION

Relay output
The system control must be connected between the relay output contacts COM and NA.
The relay contact is potential free (clean contact).
The maximum contact capacity is 8A/250Vca
External sensor (EXT NTC)
An optional NTC temperature sensor model X.TEMP (code VN883500) can be connected between terminals EXT NTC
This sensor can be placed at a maximum distance of 40 m (use a shielded cable).
The X.TEMP sensor can be used to read the temperature in another room or to control the temperature (only when SNS=YES and REG=EST).
Input for telephone dialer (OUT BUS)
The CRONO.X can be remote-switched on and off through a phone dialer. It is possible to connect a landline dialer (X.CODE WAVE code VN782900) or GSM dialer (X.CODE BUS code VE072500) or other dialer with a clean output contact, between the OUT BUS terminals. When connecting up a X.CODE BUS code VE072500 that uses the RS485 output, it is necessary to observe the correct connection polarity.
HARMONISED REFERENCE STANDARDS
Conformity with EU Directives:
2006/95/EEC amended by 93/68/EEC (Low Voltage Electrical Equipment) 89/336/EEC amended by 92/31/EEC and 93/68/EEC (EMC)
is declared with reference to the following harmonized standards:
Safety:
EN 60730-2-7: “Automatic electrical controls for household and similar use. Part 2: Particular requirements for timers and time switches” EN 60730-2-9: “Automatic electrical controls for household and similar use. Part 2: Particular requirements for temperature sensing controls”
Electromagnetic compatibility:
EN 61000-6-1: “Electromagnetic compatibility (EMC) - Part 6-1: Generic standards - Immunity for residential, commercial and light-industrial environments” EN 61000-6-3: “Electromagnetic compatibility (EMC). Part 6-3: Generic standards - Emission standard for residential, commercial and light-industrial environments”

Vemer S.p.A.
I - 32032 Feltre (BL)
Via Camp Lonc, 16
Tel +39 0439 80638
Fax +39 0439 80619
e-mail: info@vemer.it - web site: www.vemer.it
- APERTURA SPORTELLINO FRONTALE
- MESSAGGI DI ERRORE
- User Manual
- ELECTRONIC PROGRAMMABLE THERMOSTAT CRONO.X
- Read all the instructions carefully
- TECHNICAL SPECIFICATIONS
- INSTALLATION AND ASSEMBLY
- PLACEMENT REMOVAL
- FRONT FLAP OPENING
- DIMENSIONS
- DEVICE DESCRIPTION
- FRONT VIEW
- FUNCTIONS OF KEYS
- DISPLAY
- INITIAL STARTUP - TOTAL RESET
- Revert to factory settings - TOTAL RESET
- ADJUSTMENT OF TIME AND DATE
- To set time and date
- Note
- AUTOMATIC OPERATION
- PROGRAM SELECTION
- PROGRAM CUSTOMIZING
- DEFAULT TEMPERATURE PROFILES (PROGRAMS): WINTER-HEATING MODE
- DEFAULT TEMPERATURE PROFILES (PROGRAMS): SUMMER-AIR CONDITIONING MODE
- SETTING THE MANUAL TEMPERATURE
- To exit the manual operation mode
- DEVICE OFF
- To select the off operation status
- To exit the off operation status
- WINTER-HEATING /SUMMER-AIR CONDITIONING OPERATION MODES
- CRONO.X controls both Heating and Air-conditioning systems.
- TIMER-CONTROLLED OFF TYPE
- TIMER-CONTROLLED MANUAL TYPE
- TIMER-CONTROLLED AUTOMATIC TYPE
- To select timer-controlled operation
- CONTROL BY TELEPHONE DIALLER
- The CRONO.X programmable thermostat can be remote-controlled through a telephone.
- CONFIGURATION FOR X.CODE BUS (code VE072500) WITH RS485
- CONFIGURATION FOR X.CODE WAVE (code VN782900), X.CODE BUS (code VE072500) and for PHONE DIALERS WITH CLEAN OUTPUT CONTACT
- OTHER AVAILABLE FUNCTIONS
- SETTINGS GUARD (PASSWORD)
- To enable the settings guard
- To disable the settings guard
- AUTOMATIC SOLAR/DAYLIGHT TIME SWITCHING
- To alter the solar-daylight saving time switch
- • Daylight saving time solar time switching
- • Solar time→ daylight saving time switching
- MAXIMUM AND MINIMUM DAILY TEMPERATURE
- LOW BATTERY LEVEL INDICATOR
- ADVANCED PROGRAMMING
- To enter advanced programming and change the parameters
- Description of advanced programming parameters
- TEMPERATURE-CONTROL METHOD (rEO)
- - On/off temperature control (☐)
- - Winter-heating
- - Summer-air conditioning
- • Proportional temperature control (P)
- Notes on the selection of proportional control parameters
- Control Period Selection (PEr):
- Control Band Selection (bnd):
- ANTIFREEZE TEMPERATURE (OFF)
- UNIT OF MEASUREMENT (dEG)
- SONDA ESTERNA (EST)
- TEMPERATURE CONTROL SENSOR (5n5)
- ENABLING RS485 OUTPUT (605)
- MEMORY ADDRESS (Adr)
- SETTINGS GUARD PASSWORD (PRS)
- TOTAL OPERATING HOUR COUNT (tot)
- BATTERY CHARGE STATUS (BAT)
- DISPLAY BRIGHTNESS ADJUSTMENT (cnt)
- BATTERY REPLACEMENT
- Use alkaline batteries only 2 x 1.5V (LR6 - AA size)
- ERROR MESSAGES
- CONNECTION
- Relay output
- External sensor (EXT NTC)
- Input for telephone dialer (OUT BUS)
- HARMONISED REFERENCE STANDARDS
- Conformity with EU Directives:
- Safety:
- Electromagnetic compatibility:
- Vemer S.p.A.
Brand : Vemer
Model : Crono.X
Category : Thermostat