
CR-20 - Kitchen appliance FAGOR - Free user manual and instructions
Find the device manual for free CR-20 FAGOR in PDF.

| Product type | Espresso and cappuccino machine |
| Brand | FAGOR |
| Model | CR-20 |
| Power supply | 230 V ~ 50 Hz (check rating plate) |
| Rated power | Approximately 1000 W (estimate) |
| Pump pressure | 15 bars |
| Water tank capacity | 1.5 liters (removable) |
| Heating system | Aluminum thermoblock |
| Main functions | Espresso, cappuccino, hot water, steam |
| Cup warming tray | Yes, integrated |
| Drip tray | Removable, with grid |
| Filter holder | With double spout, for 1 or 2 cups |
| Included filters | Filter for short coffee and filter for long coffee |
| Steam wand | With integrated anti-foam device |
| Safety | Thermal protection device against overheating (dry thermoblock) |
| Cleaning and maintenance | Wash removable parts with soapy water; do not immerse the appliance |
| Weight | Approximately 3.5 kg (estimate) |
| Dimensions | Approximately 25 x 30 x 35 cm (estimate) |
| Included accessories | Measuring spoon, filters, steam wand |
| Repairability | Spare parts available through authorized service |
Frequently Asked Questions - CR-20 FAGOR
User questions about CR-20 FAGOR
0 question about this device. Answer the ones you know or ask your own.
Ask a new question about this device
Download the instructions for your Kitchen appliance in PDF format for free! Find your manual CR-20 - FAGOR and take your electronic device back in hand. On this page are published all the documents necessary for the use of your device. CR-20 by FAGOR.
USER MANUAL CR-20 FAGOR
The manufacturer reserves the right to modify the models described in this User's Manual.
natural_image
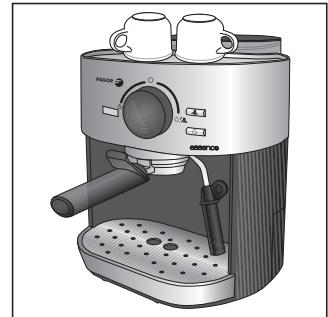
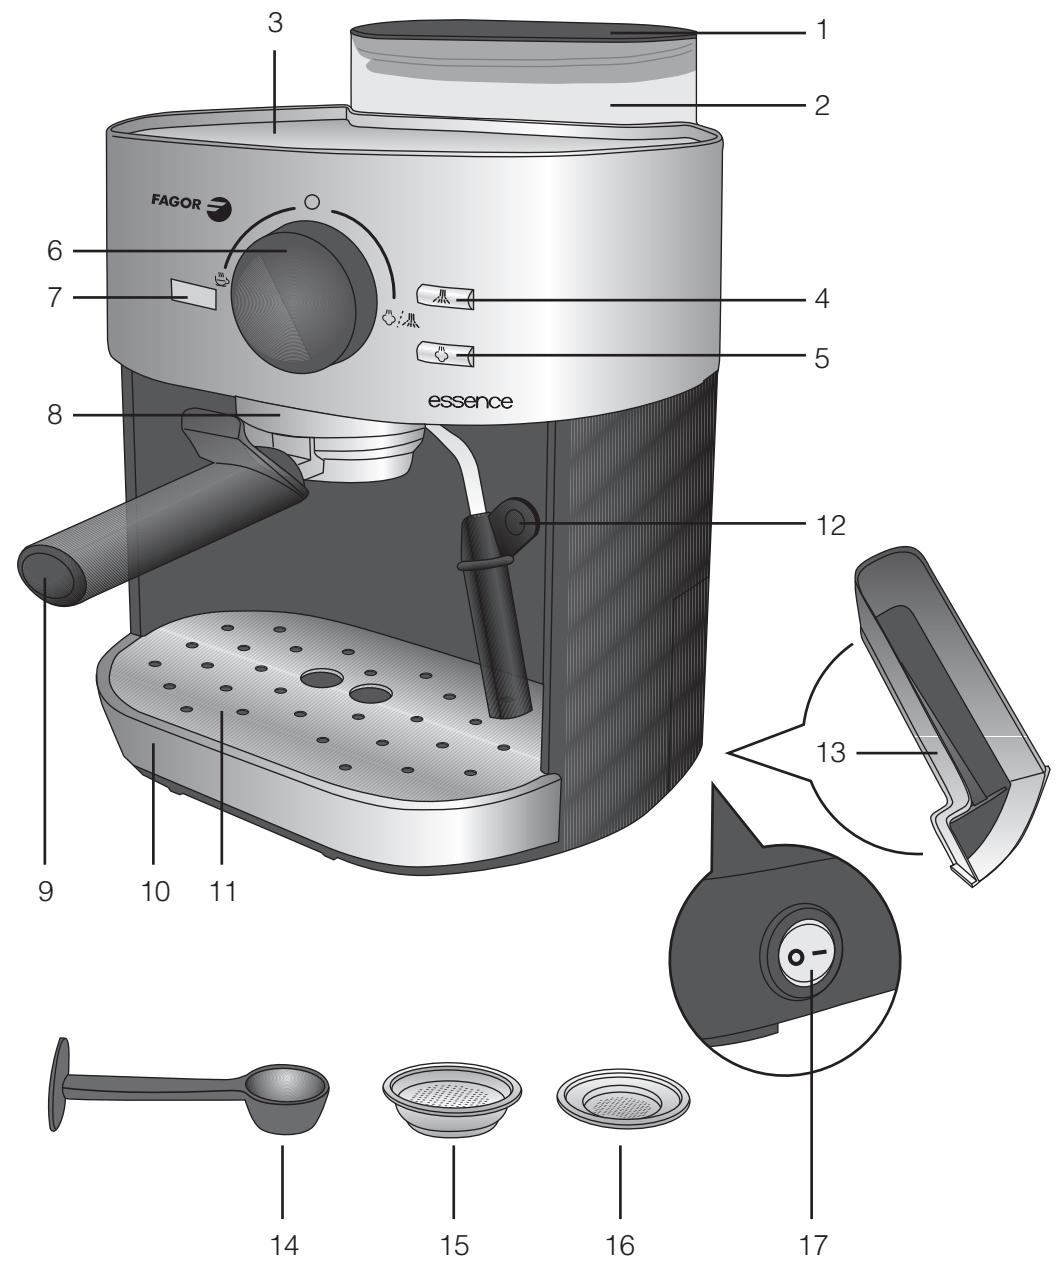
Illustration of a FAGOR espresso machine with control panel and baseplate (no text or symbols on the device itself)CAFETERA EXPRES / CAFETEIRA EXPRESSO /
ESPRESSO COFFEE MACHINE / CAFETIÈRE EXPRESSO
MOD.:
CR-20
natural_image
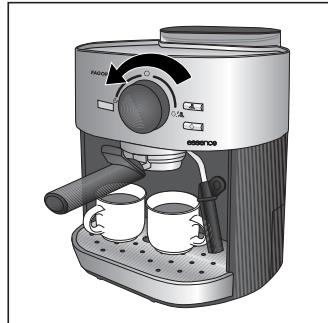
Illustration of a coffee maker with control panel and side dish (no text or symbols visible)Fig. C
natural_image
Illustration of a semi-lassical coffee machine with control panel and side ports (no text or symbols)Fig. D
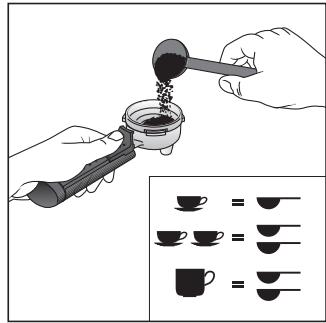
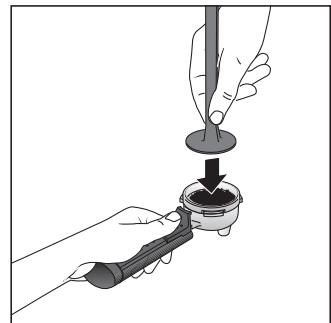
Fig. E
natural_image
Illustration of a hand using a tool to apply liquid to a container (no text or symbols present)Fig. F
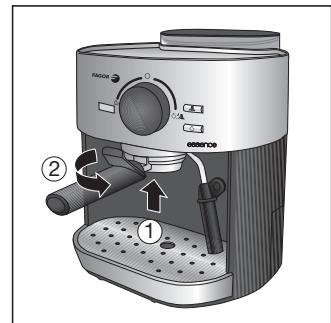
Fig. G
natural_image
Illustration of a coffee maker with two cups and a side arm, no visible text or symbolsFig. H
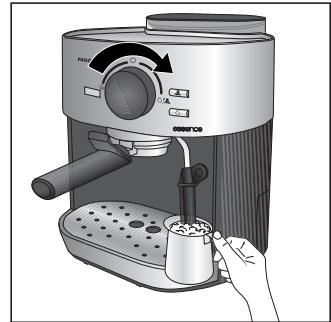
Fig. I
natural_image
Illustration of a coffee maker with a glass cup and control panel (no text or symbols)Fig. A
ES
Aquecer as chávenas:
- Water reservoir lid
- Water reservoir
- Cup warming plate
- Steam button
- Hot water button
- Function selector
- Pilot light
- Upper filter head
- Filter holder
- Drip tray
- Drip grille
- Steam nozzle
- Accessory box
- Measuring spoon
- Filter for large coffee
- Filter for small coffee
- I/O switch
Interference suppression: The interference of this appliance has been suppressed in accordance with interference suppression standards.
Electromagnetic compatibility: This appliance complies with the CEM standards of electromagnetic compatibility.
2. TECHNICAL CHARACTERISTICS
See characteristics plate.
This product complies with the European Directives on Electromagnetic Compatibility and Low Voltage.
3. SAFETY PRECAUTIONS
- Before using this appliance for the first time, read the following instructions carefully and keep them for future reference.
- Make sure that the mains voltage in your home corresponds to that indicated on the appliance.
- In the event of incompatibility between the mains socket and the appliance plug, replace the socket with a suitable
one, using a qualified professional.
- The electrical safety of the appliance is only guaranteed if it is connected to an efficient earth installation, as foreseen in applicable electrical safety regulations. If in doubt, contact a qualified professional.
- The use of adaptors, multiple sockets and or extension cables is not recommended. Where it is not possible to avoid their use, only adaptors or extensions that comply with applicable safety regulations should be used, and ensuring that the indicated voltage limit is not exceeded.
- After removing the packaging, check that the appliance is in perfect condition, if in doubt, contact the nearest Technical Support Service.
- Packaging elements (plastic bags, polystyrene foam, etc.), should not be left within the reach of children because they can be dangerous.
- The appliance is for domestic use only. Any other use is considered unsuitable or dangerous.
- The manufacturer shall not be responsible for any damages that may arise from improper or inadequate use, or for repairs conducted by non-qualified personnel.
- Do not touch the appliance with wet or damp hands or feet.
- Keep the appliance separate from water or other liquids, to avoid electric shock; do not connect the appliance to the mains if it is on a damp surface.
- Place the appliance on a dry, firm and stable surface.
- Do not allow children or the disabled to handle the appliance unsupervised.
- This appliance should not be used by physically, sensorially or mentally handicapped people or people without experience or knowledge of it (including children), unless they are supervised or instructed in the use of the appliance by a person responsible for their safety.
- Children should be watched to ensure they do not play with the appliance.
- For greater protection, we recommend installing a residual current device
(RCD) with an operational residual current not exceeding 30 mA. Ask your installer for advice.
- Do not leave the appliance unattended when it is turned on because it can be dangerous.
- When removing the plug never pull on the cable.
- Unplug the appliance before cleaning or maintenance.
- In the event of fault or malfunction where the appliance is not to be used, turn off the appliance and do not attempt to repair. If a repair is required, contact a Technical Assistance Service authorised by the manufacturer and request the use of original spare parts.
- If the cable for this appliance is damaged, contact an authorised Technical Assistance Service for it to be replaced.
- Do not leave the appliance exposed to the elements (rain, sun, ice, etc.).
- Do not use or let any part of the appliance come into contact or near hot surfaces (kitchen gas or electric hobs or ovens).
- Do not use detergents or abrasive sponges to clean the appliance.
- Do not touch the hot surfaces. Use the handles.
- Do not let the cable come into contact with the hot parts of the appliance.
- Do not use the coffee maker with an empty tank.
- Be careful not to burn yourself with the steam nozzle, hot water tube and filter holder, which become hot during use.
- Be careful not to burn yourself when using the coffee maker, which operates under pressure.
- Do not heat inflammable liquids with the steamer.
- Do not remove the filter holder when the appliance is operating or under pressure.
- Unplug the coffee maker before cleaning.
- Do not leave the coffee maker unattended while operating.
4. DESCRIPTION OF SPECIFICATIONS
- Pump pressure: The unit has pump with 15 bars of pressure for making excellent espresso coffee or cappuccino.
- Aluminium heating system: The aluminium heater in the appliance heats up quickly and has excellent hot water and steam capacity.
- To get the best froth: The steamer has a built-in frothing device. There is no need to learn the perfect frothing “technique” to enjoy plenty of creamy frothed milk in minutes.
- Removable drip tray: The drip tray can be removed for easy cleaning.
- Removable water reservoir: The 1.5 litre water reservoir with handle, is removable and easy to clean. It can also be filled at the top of the machine.
- Safety system: The thermoblock-heater element features a thermal device which protects and prevents burning if the thermoblock becomes dry.
5. BEFORE FIRST USE
- Before using the coffee machine for the first time, wash the filters (15 and 16) the measuring spoon (14), the water reservoir (2) and the steam nozzle (12) with soapy water. Rinse all components well.
- The inside of the machine must also be cleaned. To do this, fill the reservoir with water and operate the machine without coffee several times (following the steps in section 6. "Preparing espresso coffee").
- Once the coffee machine is clean, set the machine on a dry, firm, stable surface.
- Remove the water reservoir (2) pulling upwards (Fig. B). Open the water reservoir lid (1) and fill with fresh, clean water up to the MAX mark. Replace it in the bottom of the coffee maker.
- Ensure that the I/O switch (17) is in the "0" position, the function selector (6) is in the ○ position and the machine is plugged in.
- Press the I/O switch (17) to position "I" to switch on the coffee machine. The
pilot light (7) will start flashing until the machine has warmed up.
- When the pilot light (7) stops flashing, the machine is at the correct temperature and is ready to make coffee.
Warm the cups:
Place the cups upside down on the cup warming plate (3). When the machine is hot, the plate (3) will heat the cups (fig. C). Warm cups help form and maintain the cream.
6. MAKING ESPRESSO COFFEE
- Once the coffee machine is ready, select one of the filters (15 or 16), place it in the filter holder (9) and measure the desired quantity of coffee into it (fig. D):
- One small coffee: Place one spoon of ground coffee into the filter for small coffee (16)
- One large coffee: Place two spoons of ground coffee in the filter for two cups of coffee (15).
- Two cups of coffee: Place two spoons of ground coffee in the filter for two cups of coffee (15).
We recommend you use the measuring spoon (14) to obtain the correct measure for one cup. Press down the coffee with the back of the spoon (fig. E) and always remove any excess coffee from around the edges of the filter.
Never overload the coffee above the level of the edge of the filter to ensure the filter holder closes correctly without force to avoid leaks.
- Place the filter holder (9) in the upper filter head (8) and turn it firmly from left to right as shown in figure H.
- Place one or two preheated cups on the drip grille (11), under the filter holder outlets (9).
- When the machine has warmed up and the indicator light (7) has stopped flashing, turn the function selector (6) to the ⏻ position and the coffee will begin to emerge (fig. 1).
- When the cups are filled to the desired
level, turn the function selector (6) to the ○ position and the flow of coffee will stop. Do not remove the cups until the coffee has completely stopped flowing.
WARNING: Do not leave the coffee maker unattended while operating. The filtering process must be stopped manually. The unit must be manually switched off to avoid overflowing, splashing and possible danger or injuries.
- When you have finished using the coffee maker, place the I/O switch (17) in the "0" position to switch off the machine, then unplug the appliance from the power point.
• Make sure that the coffee maker is cold before doing any cleaning or maintenance. - When the unit is cold, remove the filter holder (9) from the upper filter head (8) and holding the closed part of the filter forwards, empty the used coffee.
- To make another cup of coffee, repeat the process.
7. MAKING CAPPUCCINO
A cappuccino is an espresso coffee, topped with frothed milk. Follow these steps to make a cappuccino:
- Make an espresso coffee as described above.
• Half fill a small metal jug with cold milk. - Before frothing the milk, ensure that the pilot light (7) is on.
- Press the steam button (5). The steam button light will start flashing.
- When the steam button light (5) stops flashing, the machine is at the optimal temperature to generate steam.
- Lightly insert the steam nozzle (12) into the metal jug and turn the function selector (6) to the 🔊 position. Steam will start emerging from the steam nozzle (fig. J). Lightly move the jug in circles around the steamer tube to generate the milk froth.
-
To avoid hot splashes of milk, do not lift the steam nozzle above the surface level of the milk.
-
When there is enough froth, push the steam button (5) again and turn the function selector to the ○ position.
- When finished making froth, the steam button (5) and hot water (4) indicator lights will begin to flash. This means that the temperature of the thermoblock system is too high to make coffee and must be cooled down. Leave the machine to cool down for a few minutes.
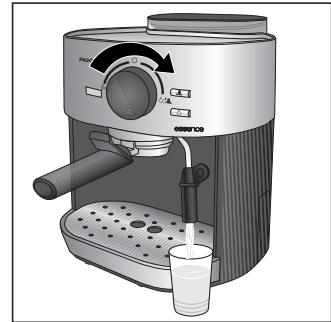
8. HOT WATER
- Follow the steps in section 5. "Preparation for start-up"
- When the indicator light (7) is fixed on, push the hot water button (4). The hot water indicator light will begin to flash.
- When the hot water indicator light (4) stops flashing and remains on, the machine is at the correct temperature to generate hot water.
- Place the steam tube (12) into a container for hot water and turn the function selector (6) to the 🔊 position. Hot water will begin to dispense (fig. K).
- When there is enough hot water, push the hot water button (4) again.
- Move the function selector (6) to the position.
- When finished making froth, the steam button (5) and hot water (4) indicator lights will begin to flash. This means that the temperature of the thermoblock system is too high to make coffee and must be cooled down. Leave the machine to cool down for a few minutes.
9. CLEANING AND MAINTENANCE
Be sure that the machine is unplugged and cold before carrying out any washing or maintenance procedures.
Never submerge the machine in hot water or use abrasive or solvent cleaning products.
- Clean the machine with a soft damp cloth and then dry it.
- Wash the water tank (2), the filter holder (9), the drip tray grille (11), the drip tray
container (19) and the filters (15 and 16) with warm water and mild soap.
- Clean the steam nozzle (12) with a damp cloth.
10. INFORMATION FOR THE CORRECT DISPOSAL OF ELECTRICAL AND ELECTRONIC APPLIANCES
At the end of its working life, the product must not be disposed of as urban waste. It must be taken to a special local authority differentiated waste collection centre or to
a dealer providing this service. Disposing of a household appliance separately avoids possible negative consequences for the environment and health deriving from inappropriate disposal and enables the constituent materials to be recovered to obtain significant savings in energy and resources.
To remind you that you must collaborate with a selective collection scheme, the symbol shown appears on the product warning you not to dispose of it in traditional refuse containers.
For further information, contact your local authority or the shop where you bought the product.
FR
1. DESCRIPTION (Fig. A)
- ES
- Aquecer as chávenas:
- TECHNICAL CHARACTERISTICS
- SAFETY PRECAUTIONS
- DESCRIPTION OF SPECIFICATIONS
- BEFORE FIRST USE
- Warm the cups:
- MAKING ESPRESSO COFFEE
- MAKING CAPPUCCINO
- HOT WATER
- CLEANING AND MAINTENANCE
- INFORMATION FOR THE CORRECT DISPOSAL OF ELECTRICAL AND ELECTRONIC APPLIANCES
- FR
- DESCRIPTION (Fig. A)
Brand : FAGOR
Model : CR-20
Category : Kitchen appliance