802-559 - Vacuum sealer Menuett - Free user manual and instructions
Find the device manual for free 802-559 Menuett in PDF.


| Product Type | Vacuum Food Sealer |
| Brand / Model | Menuett / 802-559 |
| Dimensions (W x D x H) | 340 x 150 x 64 mm |
| Power Supply | 220–240 V AC, 50 Hz, 175 W |
| Vacuum Pressure | -0.6 to -0.8 bar |
| Max Sealing Width | 28 cm |
| Functions | Vacuum, Seal, Pulse, Cancel |
| Seal Type | Wide heat seal strip |
| Bag Compatibility | Vacuum bags and rolls (custom size) |
| Overheating Protection | Auto shut-off, cool 25 min after 20 seals |
| Cooling Time Between Seals | At least 20 seconds |
| Cover Locking | Pressure release via side buttons |
| Construction | Compact design with vacuum chamber |
| Use | Household only |
| Safety | Short power cord; keep away from children under 8 |
| Cleaning | Unplug, wipe with damp cloth; vacuum chamber clean with mild detergent |
| Maintenance | Do not dismantle; service by authorized center |
| Warranty / Manufacturer | Jula AB, Box 363, 532 24 SKARA |
Frequently Asked Questions - 802-559 Menuett
User questions about 802-559 Menuett
0 question about this device. Answer the ones you know or ask your own.
Ask a new question about this device
Download the instructions for your Vacuum sealer in PDF format for free! Find your manual 802-559 - Menuett and take your electronic device back in hand. On this page are published all the documents necessary for the use of your device. 802-559 by Menuett.
USER MANUAL 802-559 Menuett
natural_image
White disposable air conditioner with control panel and buttons (no visible text or symbols)SE Bruksanvisning för vakuumförpackare
NO Bruksanvisning for vakuumpakker
PL Instrukcja obsługi pakowarki próżniowej
EN User Instructions for food sealer
SE - Bruksanvisning i original
EN - Operating instructions (Translation of the original instructions)
Jula reserves the right to make changes. In the event of problems, please contact our service department.
www.jula.com
Tillverkare/ Produsent / Produenci/ Manufacturer
Jula AB, Box 363, 532 24 SKARA
Importör/ Importør/ Importer/ Importer
Care for the environment!
Must not be discarded with household waste! This product contains electrical or electronic components that should be recycled. Leave the product for recycling at the designated station e.g. the local authority's recycling station.
SVENSKA....6
SÄKERHETSANVISNINGAR....6
ANVÄNDNING....7
LIVSMEDELSSÄKERHET 7
BESKRIVNING 8
DELAR....9
PÅSAR AV ANPASSAD STORLEK 11
VAKUUMFÖRSEGLING AV PÅSAR....12
UNDERHÅLL 13
UNDERHÅLL 13
RENGÖRING 13
FELSÖKNING....13
NORSK 15
SIKKERHETSANVISNINGER 15
BRUK....16
MATVARESIKKERHET 16
BESKRIVELSE....17
DELER 18
POSER I TILPASSET ST∅RRELSE 20
VAKUUMFORSEGLING AV POSER....21
VEDLIKEHOLD 22
VEDLIKEHOLD 22
RENGJ∅RING....22
FEILS∅KING....22
POLSKI 24
ZASADY BEZPIECZEŃSTWA .....24
SPOSÓB UŻYCIA .....25
BEZPIECZNE OBCHODZENIE SIĘ Z ARTYKUŁAMI ŻYWNOŚCIOWYMI .....25
OPIS 27
CZEŚCI....28
DOPASOWANY ROZMIAR WORKÓW 30
PRÓŻNIOWE ZAMYKANIE WORKÓW 31
KONSERWACJA 32
KONSERWACJA 32
CZYSZCZENIE....32
WYKRYWANIE USTEREK ....32
ENGLISH 34
SAFETY INSTRUCTIONS 34
USE....35
FOOD SAFETY 35
DESCRIPTION 36
PARTS 37
CUSTOM SIZE BAGS. 39
VACUUM SEALING BAGS 40
MAINTENANCE 41
MAINTENANCE 41
CLEANING 41
TROUBLESHOOTING 41
SÄKERHETSANVISNINGAR
natural_image
Technical line drawing of a device rear panel with arrows indicating downward force or alignment (no text or symbols)natural_image
Line drawing of a mechanical device with a paper sheet being inserted, showing internal components and motion lines (no text or symbols)natural_image
Technical line drawing of a device rear panel with arrows indicating downward force or alignment (no text or symbols)natural_image
Line drawing of a mechanical device with a paper sheet being inserted, showing internal components and motion lines (no text or symbols)natural_image
Technical line drawing of a device rear panel with arrows indicating downward movement (no text or symbols)natural_image
Line drawing of a mechanical device with a paper sheet being inserted, no text or symbols present- Read these instructions carefully before use, and follow all warnings and safety instructions. Failure to follow all the instructions and safety instructions can result in personal injury and/or material damage.
- This appliance can be used by children aged from 8 years and above and persons with reduced physical, sensory or mental capabilities or lack of experience and knowledge if they have been given supervision or instruction concerning use of the appliance in a safe way and understand the hazards involved. Children shall not play with the appliance. Cleaning and user maintenance shall not be made by children unless they are older than 8 and supervised.
- Keep the appliance and its cord out of reach of children less than 8 years.
- Keep children under supervision to make sure they do not play with the appliance.
- Do not use the appliance if the power cord or plug is damaged.
- Do not place the appliance on a wet surface or near hot surfaces.
- Only use the appliance on a stable, level surface.
- Do not expose the appliance, the power cord or the plug to water or any other liquid – risk of electric shock.
- Do not pull the power cord to unplug the plug. Unplug the power cord before cleaning and when the appliance is not in use.
- Do not use the appliance if the power cord or plug is damaged, if the appliance does not work properly, or if the appliance is damaged in any other way. Repairs must only carried out by an authorised service centre or qualified person.
- Keep the appliance under careful observation when there are children near by.
- The appliance is only intended for household use. Wait at least 25 minutes after sealing 20 bags in succession before using the appliance again.
- The appliance is only intended for household use.
• Service must only be carried out by at authorised service centre. - The appliance has a short power cord to prevent it fastening, or someone tripping over it. Do not use an extension cord unless absolutely necessary. The cross section of the extension cord must be dimensioned for the power supply to the appliance. An extension cord should be placed so that it does not hang over the edge of a table or worktop, and so that there is no risk of tripping over it.
USE
Close and lock the cover and press the vacuum button. The appliance extracts the air and seals the bag. Release the cover by pressing the buttons on the sides of the appliance.
FOOD SAFETY
IMPORTANT! Vacuum packaging is not a substitute for refrigerated/frozen storage. Delicate foods must be refrigerated or frozen after vacuum packaging.
Vacuum pack fresh food to extend the shelf life. Vacuum packaging cannot prevent degradation, it only slows it down. Vacuum packaging does not prevent mould growth. Disease-causing microorganisms can also grow in oxygen-poor environments and may require other measures to be eliminated.
TIPS
Cooking, thawing and heating: Allow the food to simmer in water in the vacuum bag (max. 75°C), it preserves the flavours and helps with the washing up.
Always puncture the vacuum bag before heating in a microwave, otherwise the bag may burst.
IMPORTANT! Thaw perishable foods in the refrigerator or microwave, not at room temperature.
Meat and fish
Let meat and fish be in the freezer for 1-2 hours before vacuum packaging. This helps to maintain the juices and shape and makes sealing easier.
If you do not have the possibility to freeze foods, place a piece of paper towel between the food and the opening, below the sealing area. The paper towel remains in the bag to absorb moisture during packaging.
Cheese
Vacuum pack cheese after each meal. Use a bag that is longer than necessary, so you can reseal it several times.
IMPORTANT! Never vacuum pack soft cheeses - risk of growth of anaerobic bacteria.
Vegetables
Blanch vegetables before vacuum packing. This interrupts the enzyme processes that can degrade the flavour, colour and texture. Place the vegetables in boiling water or in a microwave and cook until they are cooked through but not soft.
Examples of blanching times:
Leafy greens and peas: 1-2 minutes
French beans, sliced squash and broccoli: 3–4 minutes.
Carrots: 5 minutes
Corn on the cob: 7-11 minutes Rinse the vegetables with cold water after blanching, to stop the process.
NOTE!
- Vegetables produce gas during storage and should be stored frozen after blanching.
- Place the blanched vegetables in the freezer for 1-2 hours and then separate them into appropriate portions.
• Vacuum pack the vegetables in portions and place them in the freezer again.
IMPORTANT! Never vacuum pack fresh mushrooms, onions or garlic - risk of growth of anaerobic bacteria.
Powder
Powdered foods such as flour should be vacuum packed by placing the entire package in a vacuum bag. Otherwise, the powder can be drawn up into the appliance and cause damage.
Liquid
Soups and other liquid foods must be frozen solid in a suitable container prior to vacuum packing. Take out the frozen liquid from the container and vacuum pack using a suitable vacuum bag. The frozen food can be stacked in the freezer. When cooking, cut off one corner of the bag and heat in a microwave or let the entire vacuum bag simmer in water at most 75^ C.
DESCRIPTION
- Compact design.
- Wide seal prevents air leakage and makes the seal more durable.
- Pulse function that cancels/starts the vacuum function when you wish, ideal for packaging soft foods.
- Easy locking with light pressure.
- Easy unlocking with two buttons on the sides.
- Sealing function without vacuum.
- Seal the bag at any time during the process.
• Max. sealing width 28 cm
PARTS


| A | VACUUM buttonPress to vacuum pack and seal. The appliance switches off automatically. |
| B | CANCEL buttonImmediately stops the active function. |
| C | PULSE buttonUsed for exact control of the process for soft foods. The vacuum pump only works while the button is depressed. |
| D | SEAL button1. Press to create a seal when producing bags from a roll.2. Press immediately to stop the vacuum process and initiate sealing, to prevent perishable foods from becoming mashed.3. Press to seal the foil bags, for example, bags of crisps, to make them airtight. |
| E | SEALING STRIPDo not remove the heat-resistant strip. |
| G | VACUUM CHAMBERPlace the bag's open end downwards in the vacuum chamber for the best seal. |
| H VACUUM CHAMBER SEAL | |
| Dimensions 340 x 150 x 64 mm | |
| Electrical data 220–240 VAC, 50 Hz, 175 W | |
| Vacuum pressure -0.6 to -0.8 bar | |
CUSTOM SIZE BAGS
- Roll out an appropriate length for the food to be packaged + 5 cm. Clip or cut off with a sharp knife. Make sure to cut straight.
- Plug in the power cord.
- Open the cover. Place one end of the bag in the sealing strip. It does not matter if the material comes on the seal.

natural_image
Technical line drawing of a device rear panel with internal ports and directional arrows indicating movement (no text or symbols)- Close the cover by pressing both sides. The cover is closed correctly if it cannot be opened.
- Press the SEAL button to seal the bag. The status lamp lights up during the sealing process.
- The status lamp goes out when the seal is complete. Press the buttons on the sides of the appliance to release the cover and remove the bag.
- The custom bag is ready for the vacuum packing.
IMPORTANT! Make sure you allow the appliance time to cool. Wait at least 20 seconds between seals. The appliance has overheating protection that automatically turns it off if it overheats. Should the overheating protection trip, allow the appliance to cool for 25 minutes.
VACUUM SEALING BAGS
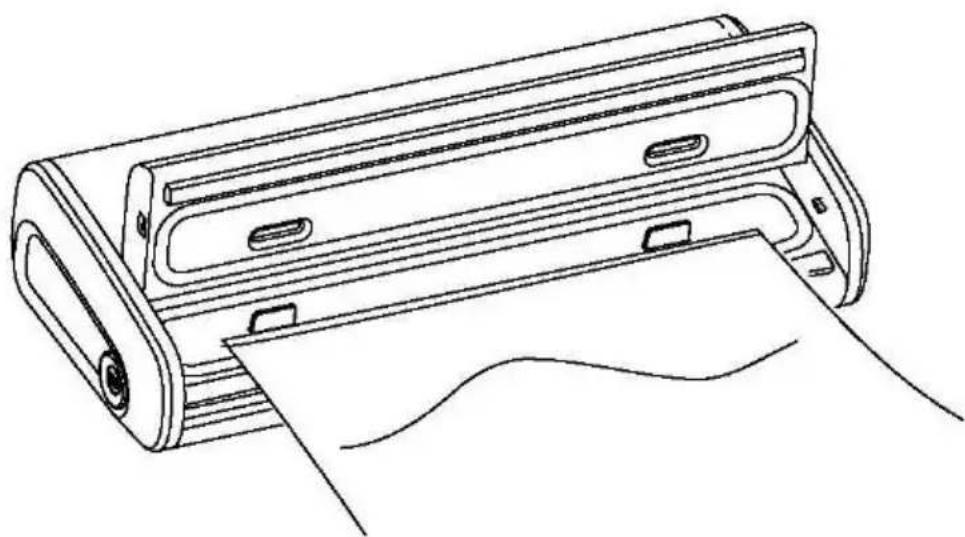
- Place the item to be vacuum packed in a vacuum bag. Leave at least 5 cm between the contents and the edge of the bag.
- Open the cover and place the bag opening downwards in the vacuum chamber.
natural_image
Line drawing of a mechanical device with a paper sheet being inserted (no text or symbols)- Close the cover by pressing both sides. The cover is closed correctly if it cannot be opened.
- Press the VACUUM button. The appliance draws out the air and seals the bag.
- When the status lamp has gone out, press the buttons on the sides of the appliance to release the cover.
MAINTENANCE
MAINTENANCE
- Do not dismantle the appliance, or attempt to modify or repair it.
- Contact your dealer if you have any problems or questions.
CLEANING
- Unplug the power cord before cleaning.
- Do not immerse the appliance in water or any other liquid.
- Do not use abrasive detergents.
- Wipe the surface of the appliance with a soft, damp cloth.
- Wipe away any excess food, liquid, etc. inside the appliance using paper towels.
- Carefully wipe all the parts before using the appliance.
- Liquid that has been drawn out of the bags can collect in the vacuum chamber. Wipe with a cloth moistened with a mild detergent when necessary. Carefully wipe dry.
TROUBLESHOOTING
Nothing happens after pressing the VACUUM button.
- Check that the power cord is plugged in.
- Make sure that the power cord and/or plug are not damaged.
- Use another appliance to check that the power outlet is live. If the power outlet is not live, check the fuses.
- Check that the power switch at the rear of the appliance is in the ON position.
- Check that the vacuum bag is positioned correctly in the vacuum chamber.
- Close the cover by pressing both sides.
- Let the appliance cool for 25 minutes and try again.
Air is not drawn out of the bag.
- Check that the seal is not creased and there are no holes, etc.
- Make sure the upper and lower seals on the vacuum chamber are not loose, cracked or worn.
- Foods with high liquid content can cause the bag not to seal properly. Open the bag, wipe the inside clean and seal again.
- Check that the bag is correctly inserted in the vacuum chamber.
- Check that the bag has been inserted correctly. When sealing bags on a roll, check that the cut end is placed on the sealing strip.
The bag melts.
- The sealing strip gets too hot when sealing. Let the appliance cool for at least 20 seconds between seals. If the bag still melts, let the appliance cool for 25 minutes and try again.
The sealed bag fills with air again.
- Check the seal. There may be holes or creases that result in the seal leaking. Cut open the bag and seal again, or use a new bag.
- Check that there is no liquid in the bag when sealing. Cut open the bag and seal again, or use a new bag. Let food with a high liquid content be in the freezer for 1–2 hours before vacuum packaging.
- Check that the food has no sharp edges or points that may have punctured the bag. If the bag is punctured, use a new bag.
- Make sure the upper and lower seals on the vacuum chamber are not loose, cracked or worn.
- Foods with high liquid content can cause the bag not to seal properly. Open the bag, wipe the inside clean and seal again.
The bag will not seal.
- Check that the seal is not creased and there are no holes, etc.
- Foods with high liquid content can cause the bag not to seal properly. Open the bag, wipe the inside clean and seal again.
- Check that the bag has been inserted correctly. When sealing bags on a roll, check that the cut end is placed on the sealing strip.
- Let the appliance cool for at least 20 seconds between seals.
- Care for the environment!
- SVENSKA....6
- SÄKERHETSANVISNINGAR....6
- ANVÄNDNING....7
- LIVSMEDELSSÄKERHET 7
- BESKRIVNING 8
- DELAR....9
- PÅSAR AV ANPASSAD STORLEK 11
- VAKUUMFÖRSEGLING AV PÅSAR....12
- UNDERHÅLL 13
- RENGÖRING 13
- FELSÖKNING....13
- NORSK 15
- SIKKERHETSANVISNINGER 15
- BRUK....16
- MATVARESIKKERHET 16
- BESKRIVELSE....17
- DELER 18
- POSER I TILPASSET ST∅RRELSE 20
- VAKUUMFORSEGLING AV POSER....21
- VEDLIKEHOLD 22
- RENGJ∅RING....22
- FEILS∅KING....22
- POLSKI 24
- ZASADY BEZPIECZEŃSTWA .....24
- SPOSÓB UŻYCIA .....25
- BEZPIECZNE OBCHODZENIE SIĘ Z ARTYKUŁAMI ŻYWNOŚCIOWYMI .....25
- OPIS 27
- CZEŚCI....28
- DOPASOWANY ROZMIAR WORKÓW 30
- PRÓŻNIOWE ZAMYKANIE WORKÓW 31
- KONSERWACJA 32
- SÄKERHETSANVISNINGAR
- USE
- FOOD SAFETY
- TIPS
- Meat and fish
- Cheese
- Vegetables
- NOTE!
- Powder
- Liquid
- DESCRIPTION
- PARTS
- CUSTOM SIZE BAGS
- VACUUM SEALING BAGS
- MAINTENANCE
- CLEANING
- TROUBLESHOOTING
- Nothing happens after pressing the VACUUM button.
- Air is not drawn out of the bag.
- The bag melts.
- The sealed bag fills with air again.
- The bag will not seal.
Brand : Menuett
Model : 802-559
Category : Vacuum sealer