HA-260SS - Range hood Star-Light - Free user manual and instructions
Find the device manual for free HA-260SS Star-Light in PDF.


| Product Type | Range Hood |
| Brand | Star-Light |
| Model | HA-260SS |
| Width | 60 cm |
| Depth | 50 cm |
| Height | 65-85 cm (adjustable) |
| Weight | 15 kg |
| Power Supply | 220-240 V, 50 Hz |
| Motor Power | 230 W |
| Airflow (Max) | 550 m³/h |
| Noise Level | 60-65 dB(A) |
| Lighting | 2 x 40 W halogen bulbs |
| Extraction Type | Ducted / Recirculation |
| Grease Filters | Aluminum mesh, dishwasher safe |
| Carbon Filter | Optional, replace every 6 months |
| Controls | Electronic push buttons |
| Speed Settings | 3 levels + intensive |
| Annual Energy Consumption | 150 kWh/year |
| Energy Efficiency Class | B |
| Grease Filter Efficiency Class | C |
| Safety Features | Auto-off timer, thermal fuse |
| Maintenance | Clean grease filters monthly; replace carbon filter regularly |
| Repair Spare Parts | Available via Star-Light service centers |
Frequently Asked Questions - HA-260SS Star-Light
User questions about HA-260SS Star-Light
0 question about this device. Answer the ones you know or ask your own.
Ask a new question about this device
Download the instructions for your Range hood in PDF format for free! Find your manual HA-260SS - Star-Light and take your electronic device back in hand. On this page are published all the documents necessary for the use of your device. HA-260SS by Star-Light.
USER MANUAL HA-260SS Star-Light
We are family
Cooker Hood
HA-260SS/HA-260WH

natural_image
Two white industrial air purifiers with ventilation grilles, one open and one closed, against a plain background (no text or symbols visible)1. INTENDED USE
The appliance has been designed as a exhausting version (external exhaust) or as a carbon filter version (internal air recycle) cooker hood.
2. GENERAL SAFETY INSTRUCTION
2.1 Read all instructions carefully before using.
2.2 Make sure use the rated voltage 220-240V\~
2.3 Do not operate this appliance if the cable or plug becomes damaged.
2.4 Ensure a suitably qualified technical person assembles this hood.
2.5 Switch off the power supply when not in use, before maintenance or changing accessories.
2.6 Never let children operate the machine.
2.7 The cooker hood is for home use only and is not suitable for barbecue, and other commercial premises.
2.8 The cooker hood and its filter mesh should be cleaned regularly in order to keep a good suction effect.
2.9 Clean the cooker hood according to the instruction manual and ensure the cooker hood is in no danger of burning.
2.10 The exhaust should not mix the waste gas with gas of other extracting appliance.
2.11 Repair malfunction machine or damaged cable only by authorized service representative. If the supply cord is damaged, it must be replaced by the manufacturer, its service agent or similarly qualified persons in order to avoid a hazard.
2.12 cut the power off and unplug the appliance before you change the accessories or do the cleaning and maintenance.
2.13 This appliance is not intended for use by persons (including children) with reduced physical, sensory or mental capabilities, or lack of experience and knowledge, unless they have been given supervision or instruction concerning use of the appliance by a person responsible for their safety.
2.14 Children should be supervised to ensure that they do not play with the appliance.
2.15 This appliance can be used by children aged from 8 years and above and persons with reduced physical, sensory or mental capabilities or lack of experience and knowledge if they have been given supervision or instruction concerning use of the appliance in a safe way and understand the hazards involved. Children shall not play with the appliance. Cleaning and user maintenance shall not be made by children without supervision
2.16 If the supply cord is damaged, it must be replaced by the manufacturer, its service agent or similarly qualified persons in order to avoid a hazard.
The instructions shall state the substance of the following:
- There shall be adequate ventilation of the room when the range hood is used at the same time as appliances burning gas or other fuels (not applicable to appliances that only discharge the air back into the room);
– The details concerning the method and frequency of cleaning;
- There is a fire risk if cleaning is not carried out in accordance with the instructions
- Do not flambé under the range hood
- CAUTION: Accessible parts may become hot when used with cooking appliances.
2.17 The installation instructions shall include the substance of the following:
– the air must not be discharged into a flue that is used for exhausting fumes from appliances burning gas or other fuels (not applicable to appliances that only discharge the air back into the room);
– the minimum distance between the supporting surface for the cooking vessels on the hob and the lowest part of the range hood. (When the range hood is located above a gas appliance, this distance shall be at least 65 cm.
– regulations concerning the discharge of air have to be fulfilled.
2.18 The installation instructions for range hoods with accessible metallic enclosures of class II construction shall include details that indicate the location and maximum permitted lengths for any fixing or mounting screw or other fixing device that penetrates into the range hood to attach an accessory such as a fascia or duct fitting.
2.19 Where fixing or mounting screws, or other fixing devices are used, that penetrate into the range hood with an accessible metallic enclosure of class II
construction, to attach an accessory, the instructions shall indicate the required location of these screws or fixing devices and include the substance of the following warning.
2.20 Warning: Failure to install the screws or fixing device in accordance with these instructions may result in electrical hazards
3. Installation:
3.1 Finding a suitable location:
The hood should be placed at a distance of 65-75cm from the cooking surface for best effect. (See PIC. 1)

Pic. 1
3.2 Connecting suction or filter hoods:
Connecting suction hoods (air is discharged into the atmosphere):
Turn the lever to ducting mode position (PIC 2A), install the one-way-valve and pipe on the chosen outlet, cover the other outlet with plastic cover, remove charcoal filter, if any.
Connecting filter hoods (air is filtered and re-circulated inside the room):
Turn the lever to the filter mode position (PIC 2B), install the outlet covers, and insert the charcoal filter.
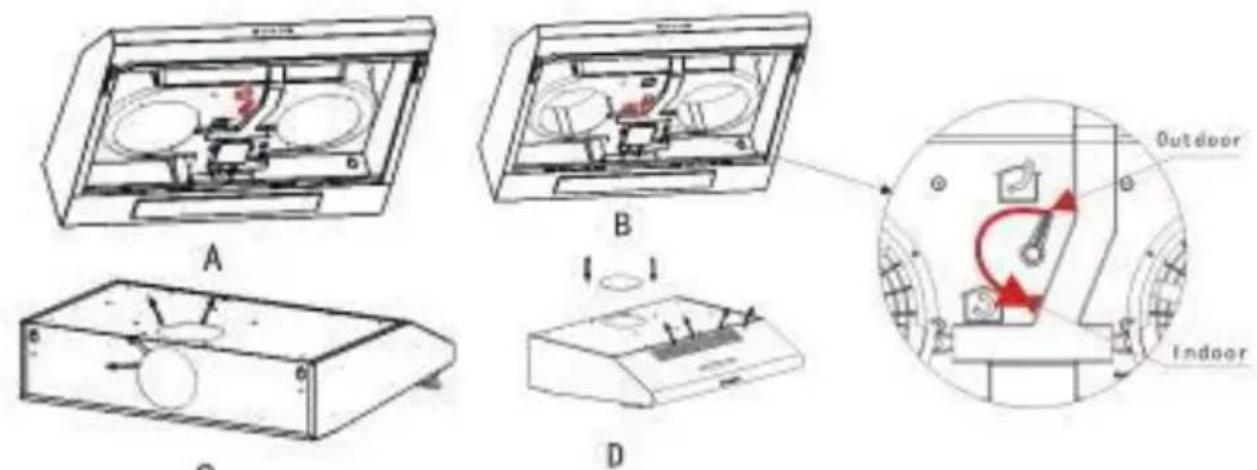
Pic. 2
3.3 Horizontal / vertical suction:
The hood comes with two air outlets, a plastic cover to be fitted in the not-used hole and an one-way-valve to be fitted in the other outlet according to the solution chosen: rear discharge see Pic 3 A; top discharge see Pic 3 B).

Pic. 3
3.4 Wall installation:
- To install the hood onto the wall, drill two holes of 8mm on a suitable place according to the centre distance of hole in back side of the hood. (Detailed dimension see below Pic 4A)
- Insert the anchors into the two holes.
- Insert two ST4*30 screws into anchors and tighten them (please use screws with washers).
- Put up the hood onto the fixed screws.
- Then fix the hood to the wall with the other two anchors and two ST4*30 screws. (see Pic 4B)

Pic. 4A
Pic. 4B
3.5 Cabinet installation:
- Drill 4 holes of 6 ~mm at the bottom of the hanging cupboard. (Detailed dimension see below PIC 5A)

Pic. 5A
- Put the one-way-valve on the hood.
- Then install the hood to the bottom of the cupboard, tighten it with enclosed 4*35mm screws (screws have to be used together with washers and nuts).
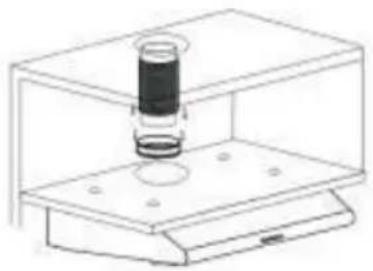
natural_image
Simple line drawing of a laboratory apparatus with a cylindrical container and base (no text or symbols)
natural_image
Diagram of a ceiling structure with brick wall and curved duct (no text or symbols)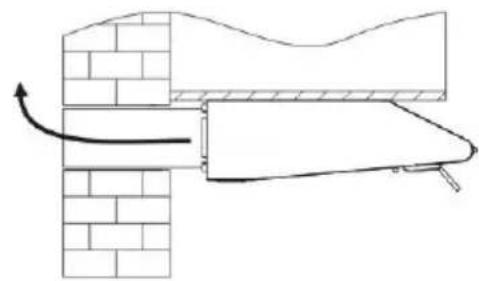
natural_image
Diagram of a mechanical or structural assembly with brick walls and a curved arrow indicating motion (no text or symbols)Pic. 5B
3.6 Electrical connection:
Connect the hood to safety socket.
4. Operation:

Pic. 6
The switch is operated as below (see PIC 6):
- Press the button to “”, “” and “”, the motor will be turned on at “Low”, “Middle” and “High” speed respectively.
- Press "0", then motor will be off.
- Press "💡", the light will be on. Press it again, the light will be off.
5. Maintenance:
Warning:
Always disconnect the hood and leave it completely cool before any maintenance.
- Clean the appearance of hood with a damp cloth and then dry it with a dry cloth. Never immerse the hood in water, nor let water drip into it.

natural_image
Diagram of a device interior with labeled components and directional arrows indicating flow or movement (no text or symbols present)- Cleaning the aluminum filter:
- Put the filter into the water of 40-50°C, put in some detergent, and leave it for 2-3 minutes. Then use a soft brush to clean it with proper strength, in order not to damage it.
- The filter can be cleaned by dish washer. Put it into the dish washer, also put in some detergent, then set the temperature to 60^ C . All the filters are made of metal. Please do not use any corrosive detergent when cleaning.
- Return the filter to its original position after fully dry.
- Changing the charcoal filter (not supplied):
- Remove the aluminum filter from the hood.
- Remove the old charcoal filters and change to new ones.
- Return the filter to its original position.
Note: Replace charcoal filter by each 3-4 months.


natural_image
Technical line drawing of an air duct system with two circular components and internal wiring (no text or symbols)- Changing light bulbs
- Remove the aluminum filter from the hood.
- Change the olive-shaped bulb with new ones.
- Return the filter to its original position.
Information for cooker hood
| Model Star-Light HA-260SS / HA-260WH | Symbol | Value | Unit |
| Annual Energy Consumption | AEC_hood | 101 | kWh/a |
| Time increase factor | f | 1.8 | |
| Fluid Dynamic Efficiency | FDE_hood | 5.9 | |
| Energy Efficiency Index | EEI_hood | 101.3 | |
| Measured airflow rate at the best efficiency | Q_BEP | 191.1 | m^3/h |
| Measured air pressure at best efficiency point | P_BEP | 168 | Pa |
| Maximum airflow | Q_max | 347.4 | m^3/h |
| Measured electric power input at best efficiency point | W_BEP | 151 | W |
| Nominal power of the lighting system | W_L | 2.5 | W |
| Average illumination of the lighting system on the cooking surface | E_middle | 78 | lux |
| Measured power consumption on standby mode | P_S | - | W |
| Measured power consumption on off mode | P_O | 0 | W |
| Sound power level | L_WA | 70 | dB |
The measurement and calculation method of the above table was done in accordance with commission regulation (EU) No 65/2014 & 66/2014.
Note:
The following shows how to reduce total environmental impact (e.g. energy use) of the cooking process).
(1) Install the cooker hood in a proper place where there is efficient ventilation.
(2) Clean the cooker hood regularly so as not to block the airway.
(3) Remember to switch off the cooker hood light after cooking.
(4) Remember to switch off the cooker hood after cooking.
ENVIRONMENTAL PROTECTION

natural_image
Simple line drawing of a trash bin with crossed lines indicating no waste or restriction (no text or symbols)Waste electrical products should not be disposed of with household waste. Please recycle where facilities exist. Check with your Local Authority or retailer for recycling advice.
1. DESTINATIE
Fig. 2
natural_image
Simple line drawing of a laboratory apparatus with a cylindrical container mounted on a base (no text or symbols)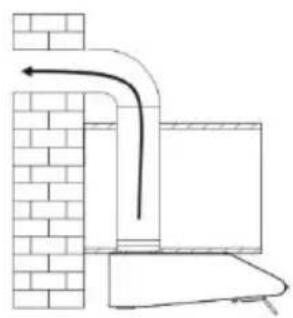
natural_image
Diagram of a building interior with brick walls and ventilation ducts (no text or symbols)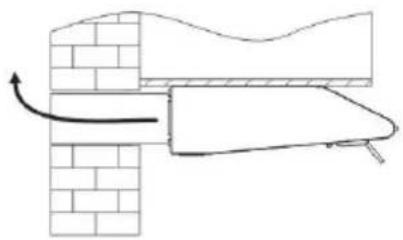
natural_image
Diagram of a mechanical or fluid system with brick wall, pipe, and directional arrow (no text or symbols)Fig. 5B
3.6 Conexiunile electrice:
Stop
Mică
Medie
Mare
Lumină
Fig. 6
natural_image
Technical line drawing of a mechanical assembly with internal components and directional arrows (no text or symbols)natural_image
Technical line drawing of a ceiling-mounted air conditioner unit with two fans and internal circuit (no text or symbols)natural_image
Simple line drawing of a trash bin with crossed lines indicating no waste or restriction (no text or symbols)natural_image
Three technical diagrams showing indoor heating systems: a cylindrical tank, a brick wall with airflow direction arrows, and a curved heating element (no text or symbols)Фиг. 5В
Стоп
Ниска
Средна
Голям
Светлина
Фиг. 6
natural_image
Pure technical diagram of a mechanical or architectural component with internal channels and directional arrows, no text or symbols present.natural_image
Technical line drawing of a mechanical device with two wheels and internal components (no text or symbols)natural_image
Simple line drawing of a laboratory apparatus with a cylindrical component mounted on a base (no text or symbols)
natural_image
Simple line drawing of a brick wall with an attached pipe and container, no text or symbols present.
natural_image
Diagram of a mechanical or fluid system with brick walls, a curved pipe, and a rectangular component (no text or symbols)5B ábra
natural_image
Pure technical line drawing of a mechanical or architectural component without any text, numbers, or symbolsnatural_image
Technical line drawing of a dual air fan assembly (no text or symbols)- Az izzók cseréje:
natural_image
Symbol of a trash bin with crossed lines indicating no waste or discharge (no text or labels)natural_image
Technical line drawing of a device with two internal components labeled A and C (no text or symbols present)
Rys. 2
Fig. 3
natural_image
Simple line drawing of a laboratory setup with a cylindrical container and base (no text or symbols)
natural_image
Diagram of a building interior with brick walls, water tank, and piping (no text or symbols)
natural_image
Diagram of a mechanical or fluid system with a brick wall, pipe, and directional arrow indicating flow (no text or symbols)Rys. 5B
natural_image
Technical line drawing of a mechanical assembly with internal components and directional arrows (no text or symbols)natural_image
Technical line drawing of a ceiling fan with two motors and ventilation unit (no text or symbols)- Wymiana żarówek:
natural_image
Simple line drawing of a trash bin with crossed lines indicating no waste or restriction (no text or symbols)Brand : Star-Light
Model : HA-260SS
Category : Range hood