802-335 - Steam cleaner Menuett - Free user manual and instructions
Find the device manual for free 802-335 Menuett in PDF.


| Product Type | Steam Cleaner |
| Brand | Menuett |
| Model | 802-335 |
| Dimensions (W x H x D) | 250 x 230 x 140 mm |
| Weight | 1.85 kg |
| Rated Voltage | 230 V ~ 50 Hz |
| Power Output | 900 W |
| Water Tank Capacity | 350 ml |
| Steam Pressure | 2.5–4.2 bar |
| Steam Production | 28 g/min |
| Working Temperature | 135°C |
| Overheat Protection | Triggers at 169°C |
| Safety Features | Auto shut-off when empty, pressure relief valve, thermostat |
| Included Accessories | Round brush nozzle, angled nozzle, long nozzle, extension nozzle, universal nozzle, door/window nozzle, cleaning cloth, funnel, measuring jug |
| Heating Time | Approximately 4 minutes |
| Usage | Household use only; disinfection, cleaning floors, windows, doors, clothes |
| Water Fill Method | Use funnel; fill with max 175 ml clean water (reservoir capacity 250 ml) |
| Maintenance | Empty reservoir after use; dry with cloth; do not use chemicals |
| Environmental Disposal | Must not be discarded with household waste; recycle at designated station |
| Warranty / Service | Contact Jula service department; www.jula.com |
Frequently Asked Questions - 802-335 Menuett
User questions about 802-335 Menuett
0 question about this device. Answer the ones you know or ask your own.
Ask a new question about this device
Download the instructions for your Steam cleaner in PDF format for free! Find your manual 802-335 - Menuett and take your electronic device back in hand. On this page are published all the documents necessary for the use of your device. 802-335 by Menuett.
USER MANUAL 802-335 Menuett
natural_image
Yellow and black electric shaver with coiled hose (no text or symbols visible)
Värna om miljön!
Care for the environment!
Must not be discarded with household waste! This product contains electrical or electronic components that should be recycled. Leave the product for recycling at the designated station e.g. the local authority's recycling station.
SE - Bruksanvisning i original
EN - Operating instructions (Translation of the original instructions)
Jula reserves the right to make changes. In the event of problems, please contact our service department. www.jula.com
Tillverkare/ Produsent / Produenci/ Manufacturer
Jula AB, Box 363, 532 24 SKARA
Importör/ Importör/ Importer/ Importer
High level of safety....18
Easy to use 18
USE 18
Disinfection and sterilisation 18
Cleaning clothes 18
Cleaning of windows and doors....18
Cleaning floors 19
Use....19
Fitting the accessories 19
Filling with water during use 20
After use....20
SÄKERHETSANVISNINGAR
natural_image
Two-step illustration of a hand holding a spray gun, showing step 1 and step 2 (no text or symbols)natural_image
Technical line drawing of two mechanical components with no visible text or symbolsnatural_image
Line drawing of a mechanical device with a knob and base mount (no text or symbols)natural_image
Two-step illustration of a hand using a spray gun to adjust the nozzle (no text or symbols present)natural_image
Technical line drawing of two mechanical components labeled 1 and 2, showing internal structure with no visible text or symbols.natural_image
Line drawing of a mechanical device with a knob and base mount (no text or symbols)natural_image
Two-step illustration of a hand holding a spray gun, showing step 1 with a downward arrow and step 2 with a handle (no text or symbols)natural_image
Technical line drawing of two mechanical components with no visible text or symbolsnatural_image
Simple line drawing of a mechanical component with a handle and spout (no text or symbols)Read these instructions carefully before use!
- This appliance can be used by children aged from 8 years and above and persons with reduced physical, sensory or mental capabilities or lack of experience and knowledge if they have been given supervision or instruction concerning use of the appliance in a safe way and understand the hazards involved. Children shall not play with the appliance. Cleaning and user maintenance shall not be made by children unless they are older than 8 and supervised.
- Keep the appliance and its cord out of reach of children less than 8 years.
• The appliance shall not be left unattended while it is connected to the supply mains. - The filling aperture shall not be used if it has been dropped, if there are visible signs of damage or if it is leaking.
- Keep the appliance out of reach of children when it is energized or cooling down.
- Do not expose the power cord or plug to water or other liquids – risk of electric shock.
- Make sure the power cord and plug are in good condition and undamaged. Do not use the appliance if the power cord and/or plug are damaged. A damaged power cord and/or plug must be repaired by an authorised service centre.
• The appliance is designed for household use only. It is not intended for industrial use. - Do not switch on the appliance until the water reservoir is filled.
- Check that the data in the operating instructions for the appliance corresponds to the mains supply voltage at the point of use.
- During operation, the tank opening must be hermetically sealed and the safety cap must be properly tightened.
• The appliance may only be connected to an earthed mains supply. - The appliance must not be tilted more than 45 degrees during use. There is a risk that boiling water sprays out along with the steam.
• Do not point the nozzle at people, animals or electrical equipment. - Unplug the power cord before filling with water. Always unplug the power cord after use and before cleaning and repairs.
- Do not pour rust remover, odour remover, alcohol or detergent in the water reservoir as this could damage it.
IMPORTANT! Never overfill the water reservoir – risk of overpressure.
TECHNICAL DATA
| Rated voltage | 230 V ~ 50 Hz |
| Output | 900 W |
| Water tank volume | 350 ml |
| Steam pressure | 2.5–4.2 bar |
| Steam production | 28 g/min |
| Temperature regulator, working temperature | 135°C |
| Overheat protection, tripping temperature | 169°C |
| Dimensions | 250 x 140 x 230 mm |
| Weight | 1.85 kg |
DESCRIPTION

- Casing
- Nozzle attachment
- Protective cover
- Steam control
- Handle
- Power cord and plug
- Status lamp
- Funnel
- Measuring jug
- Round brush nozzle
- Angled nozzle
- Long nozzle
- Extension nozzle
- Universal nozzle
- Door/window nozzle
- Cleaning cloth
OPERATION
High temperature and high pressure steam helps to clean dirt and stains from floors, doors, windows and clothing. The appliance is environmentally friendly and hygienic and can also be used to remove bacteria and dust. Automatic heat control and continuous steam makes cleaning easy.
Only high-pressure steam from clean water is used. No chemicals are added.
High level of safety
Protection against heating an empty water reservoir. When all the water in the reservoir has evaporated, the power supply is automatically cut to prevent the empty reservoir being heated further. The appliance has a thermostat that ensures that the steam is kept at 135^ C when disinfecting and sterilising.
The pressure relief valve automatically relieves any excess pressure. The valve automatically opens and relieves the overpressure when there is high steam pressure in the reservoir.
Easy to use
Heating starts immediately when the appliance is switched on. When the appliance reaches the right temperature, press the steam control. Steam slowly sprays out. A complete set of accessories is included, and the appliance can be easily assembled and dismantled. The appliance is very versatile and can be used for cleaning doors, windows, floors and clothes.
USE
Disinfection and sterilisation
Fit the long nozzle on the nozzle holder and point the nozzle at the surface to be disinfected. Press the steam control. Steam at high temperatures can kill bacteria.
Cleaning clothes
Fit the brush nozzle on the nozzle holder and push the cleaning cloth on. Aim the nozzle at the hanging garments, press the steam control and move the brush nozzle up and down and side to side to remove stains from the clothes.
Cleaning of windows and doors
Fit the brush nozzle on the nozzle holder and fit the door/window nozzle on the brush nozzle. Aim the nozzle at the door/window, press the steam control and move the nozzle up and down and side to side to remove marks.
Cleaning floors
Fit the extension nozzle, if required, to the nozzle holder. Fit the angled nozzle or the round brush nozzle on the extension nozzle. Point the nozzle at the floor and press the steam control to remove dirt and stains from floors and corners.
Use
- Unpack the appliance, check that all accessories and documents are included. Check the appliance and accessories for damage.
- Read these instructions carefully before use. The appliance is designed for household use only.
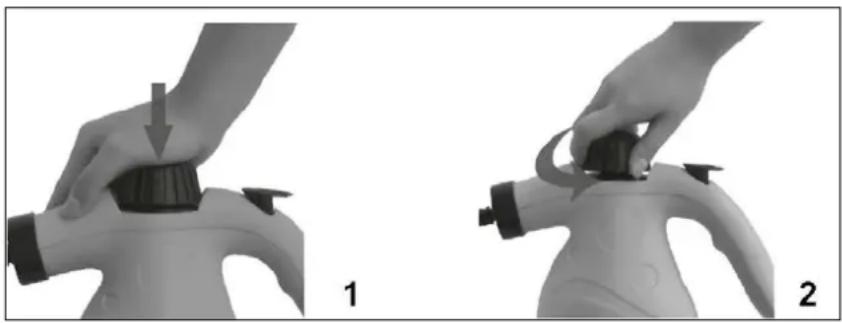
- Place the appliance on a flat surface, push down the safety cap and turn it anti-clockwise. Fit the funnel.
natural_image
Two-step illustration of a hand holding a spray gun, showing step 1 and step 2 (no text or symbols)- Fill the measuring jug with 175 ml of clean water and pour the water in the reservoir. The reservoir holds 250 ml. Do not pour in too much water as there must be some space left in the reservoir. Refit the safety cap and tighten it firmly.
- Check that the data in the operating instructions for the appliance corresponds to the mains supply voltage at the point of use. Insert the power cord and turn on the appliance.
- The appliance is ready for use after four minutes. Gently press the steam control and check that steam is coming from the nozzle. Do not point the nozzle at people or objects.
- If steam comes from the nozzle release the steam control and fit the accessories required.
- Press the steam control and you can start working.
Fitting the accessories
1. Fitting the brush nozzle.
Hold the brush nozzle with the arrow on the nozzle towards the mark on the nozzle holder. Press the nozzle in place. Turn the nozzle clockwise so the arrow on the nozzle is aligned with the double lines on the nozzle holder. Attach the nozzle to the appliance. Remove the nozzle by turning it anti-clockwise (see fig. 2) so that the arrow on the nozzle is in line with the mark on the casing. Pull off the nozzle.

natural_image
Technical line drawing of two mechanical components with no visible text or symbols2. Fit the brush nozzle or angled nozzle.
Push the nozzle you want to use onto the nozzle holder (see fig. 3) and press it in place. The nozzle holder and nozzle can be fitted in the required direction. You can start by fitting the long nozzle and then fit the round brush nozzle or the angled nozzle on top of the long nozzle. Fit the long nozzle in the same way as the brush nozzle. The round brush nozzle and the angled nozzle are fitted in the same way as the nozzle holder.

natural_image
Line drawing of a mechanical device with a handle and spout, labeled '3' (no text or symbols on the diagram itself)3. Fitting the door/window nozzle.
Fit the brush nozzle on the nozzle holder (see fig. 4 and 5). Attach the door/window nozzle's two small hooks on the brush nozzle mounts, fold out the large hook on the door/window nozzle and press the door/window nozzle on the brush nozzle.

natural_image
Two-step diagram showing a mechanical assembly with labeled parts (4 and 5), no text or symbols present.Filling with water during use
- Unplug the power cord.
- Press the steam control until steam no longer comes out.
- Release the safety cap slowly, but let it remain in place until steam no longer comes out. Place the appliance in a cool place for about five minutes to cool down. Then remove the safety cap fully.
- Use the funnel and measuring jug to fill the reservoir with cold or warm water.
- Refit the safety cap and tighten it firmly.
After use
- Unplug from the power outlet when the appliance is not in use.
- Press the steam control until steam no longer comes out.
- Release the safety cap slowly, but let it remain in place until steam no longer comes out. Place the appliance in a cool place for about five minutes to cool down. Then remove the safety cap fully.
- Empty the reservoir and dry the appliance with a dry cloth.
- Refit the safety cap and tighten it firmly.
- Värna om miljön!
- Care for the environment!
- SÄKERHETSANVISNINGAR
- Read these instructions carefully before use!
- DESCRIPTION
- OPERATION
- High level of safety
- Easy to use
- USE
- Disinfection and sterilisation
- Cleaning clothes
- Cleaning of windows and doors
- Cleaning floors
- Fitting the accessories
- Fitting the brush nozzle.
- Fit the brush nozzle or angled nozzle.
- Fitting the door/window nozzle.
- Filling with water during use
- After use
Brand : Menuett
Model : 802-335
Category : Steam cleaner