001-062 - Drill Meec Tools - Free user manual and instructions
Find the device manual for free 001-062 Meec Tools in PDF.


| Product Type | Cordless Drill |
| Brand | Meec Tools |
| Model | 001-062 |
| Battery Voltage | 18V |
| Battery Capacity | 2.0 Ah (typical) |
| Chuck Type | Keyless 10mm (3/8 inch) |
| Max Torque | 30 Nm |
| No-Load Speed | 0-1350 RPM (variable) |
| Drilling Capacity (Steel) | 10 mm |
| Drilling Capacity (Wood) | 25 mm |
| Weight (with battery) | 1.5 kg |
| Dimensions (L x H) | 200 x 200 mm (approx.) |
| Power Source | Rechargeable Li-ion battery |
| Charging Time | 1 hour (approx.) |
| Features | Variable speed trigger, forward/reverse, LED light, belt clip |
| Included Accessories | Battery, charger, screwdriver bits, carrying case |
| Safety Features | Electric brake, lock-on button, overload protection |
| Maintenance | Clean with dry cloth, keep vents clear |
| Spare Parts Availability | Battery, charger, chuck, brushes (if applicable) |
| Warranty | 2 years (typical) |
Frequently Asked Questions - 001-062 Meec Tools
User questions about 001-062 Meec Tools
0 question about this device. Answer the ones you know or ask your own.
Ask a new question about this device
Download the instructions for your Drill in PDF format for free! Find your manual 001-062 - Meec Tools and take your electronic device back in hand. On this page are published all the documents necessary for the use of your device. 001-062 by Meec Tools.
USER MANUAL 001-062 Meec Tools
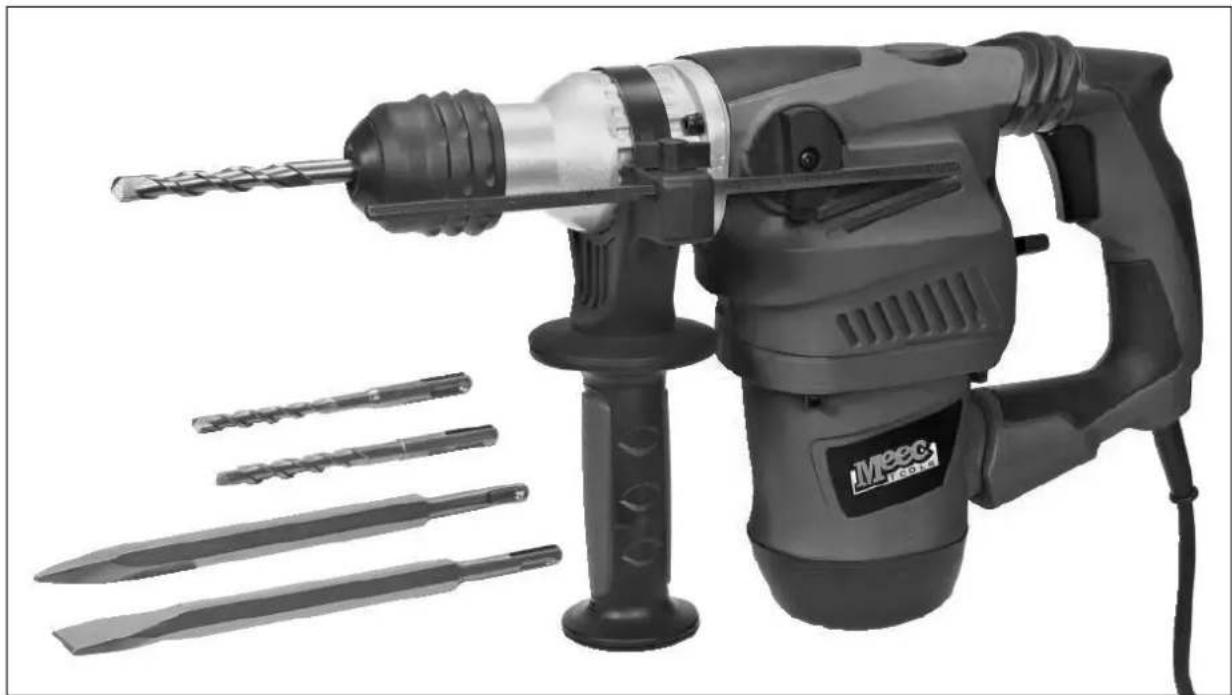
Operating instructions for Drill Hammer 1500 W
001-062
natural_image
Black-and-white photo of a IVMEC drill press tool with multiple drill bits and a head screw, no visible text or symbols.SV Bruksanvisning i original
NO Bruksanvisning i original
EN Operating instructions in original
SVENSKA 4
SÄKERHETSFÖRESKRIFTER 4
SAFETY INSTRUCTIONS....28
Work area 28
Electrical safety 28
Personal safety 28
Power tool use and care 28
Service 29
Special safety instructions 29
TECHNICAL DATA....30
DESCRIPTION 30
OPERATION....31
Uses....31
Disengaging when overloaded 31
Mode selector 32
Percussion drilling 32
Chiselling 32
Drilling 33
Securing the chisel.... 33
Assembly 33
Support handle....34
Depth stop....34
Bit lubrication 34
Changing bits 34
Fitting bits....34
Removing bits 34
MAINTENANCE 35
Replacing carbon brushes 35
SÄKERHETSFÖRESKRIFTER
natural_image
3D rendered mechanical component with threaded shaft and threaded base (no text or symbols visible)HANDHAVANDE
Användningsområden
natural_image
Technical illustration of a mechanical component with textured surfaces and labeled part '6' (no readable text or symbols beyond label)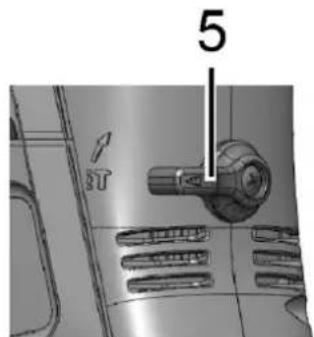
Montering
WARNING!
natural_image
Mechanical assembly diagrams showing two stages of a drill bit with threaded shaft and tool (no text or symbols)UNDERHÅLL
natural_image
3D model of a vehicle's roof structure with ventilation grilles and mounting points (no text or symbols)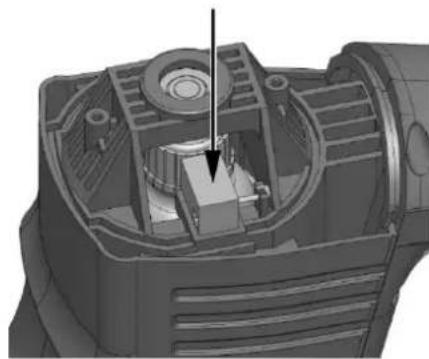
natural_image
3D cutaway view of a mechanical device showing internal components and a central component (no text or symbols visible)natural_image
3D mechanical assembly diagram showing a drill bit mounted on a cylindrical base with a vertical shaft (no text or symbols)BRUK
Bruksområde
natural_image
3D rendered mechanical component with textured surface and numbered label (6), no readable text or symbols beyond the numberOverlastkopling
Montering
ADVARSEL!
Sette inn borspissen
natural_image
Mechanical assembly diagrams showing two stages of a drill bit with threaded shaft and base, no text or symbols presentVEDLIKEHOLD
natural_image
Mechanical component with threaded shaft and threaded base, no visible text or symbolsOBSŁUGA
Zakres użytkowania
natural_image
3D rendered mechanical component with textured surface and labeled part '6' (no text or symbols beyond label)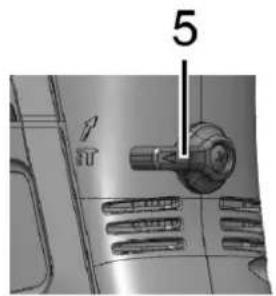
Montaż
OSTRZEŻENIE!
natural_image
Mechanical assembly diagrams showing two stages of a drill bit with threaded shaft and drill bit (no text or symbols)KONSERWACJA
Read the Operating Instructions carefully before use!
Improper use or failure to follow safety instructions in these Operating Instructions can result in serious personal injury.
SAVE THESE INSTRUCTIONS FOR FUTURE REFERENCE.
Work area
- Keep the work area clean and well lit. Dark and cluttered work areas increase the risk of accidents and injuries.
- Do not use power tools in explosive environments, such as in the vicinity of flammable liquids, gases or dust. Power tools produce sparks that can ignite dust and fumes.
- Keep children and onlookers at a safe distance when using power tools. You can easily lose control of the tool if you are distracted.
Electrical safety
- The mains plug on the power tool must match the mains socket. Never modify the plug in any way. Never use an adapter with earthed (grounded) power tools. Unmodified plugs and matching outlets reduce the risk of electric shock.
- Avoid body contact with earthed or grounded surfaces such as pipes, radiators, cookers and refrigerators. There is an increased risk of electric shock if your body is earthed or grounded.
- Do not expose power tools to rain or moisture. There is an increased risk of electric shock if water enters a power tool.
- Be careful with the power cord. Never use the cord to carry or pull the power tool or to pull out the plug from the mains socket. Keep the cord away from heat, oil, sharp edges and moving parts. Damaged or tangled cords increase the risk of electric shock.
- If using the tool outdoors, only use an extension cord approved for outdoor use. Cords intended for outdoor use reduce the risk of electric shock.
Personal safety
- Pay attention to what you are doing. Remember to use all necessary safety precautions and common sense when working with power tools. Never use power tools if you are tired or under the influence of drugs, alcohol or medication. A moment of inattention when using a power tool can result in serious personal injury.
- Use protective equipment. Always wear eye and ear protection. Depending on the type of power tool and how it is used, safety equipment such as dust masks, non-slip safety shoes, protective helmets and ear protection reduce the risk of personal injury.
- Avoid accidental starting. Make sure the power switch is in the OFF position before plugging in the cord. Carrying a power tool with your finger on the switch or connecting a tool to the mains supply when the switch is in the ON position increases the risk of accidents and injuries.
- Remove adjuster keys/spanners and other assembling tools before starting the power tool. Spanners, keys or similar that are left in a rotating part of the power tool can cause personal injury.
- Do not overreach. Always maintain a firm footing and good balance. This will ensure you have better control over the tool in unexpected situations.
- Wear appropriate clothing. Do not wear loose-fitting clothing or jewellery. Keep hair, clothing and gloves away from moving parts. Loose-fitting clothing, jewellery and long hair can get caught in moving parts.
- If dust extraction and dust collection equipment is provided, this should be connected and used correctly. The use of such devices can reduce the risk of dust related hazards.
Power tool use and care
- Do not force the power tool. Always use the correct power tool for the job. The tool does the job better and safer when used at the rate for which it was designed.
-
Do not use the tool if it cannot be switched on and off using the power switch. Power tools that cannot be controlled with the power switch are dangerous and must be repaired.
-
Always disconnect the power cord from the mains power before making any adjustments, changing accessories or putting the power tool away. These safety precautions reduce the risk of accidentally starting the power tool.
- Keep power tools out of the reach of children when not in use. Never allow children, or anyone who is unfamiliar with the power tool and these instructions, to use the tool. Power tools are dangerous if used by inexperienced people.
- Keep the power tool properly maintained. Make sure that moving parts are properly adjusted and do not jam and that no parts are incorrectly fitted or damaged. Check for other factors that could affect the operation of the power tool. If the power tool is damaged, it must be repaired before being used again. Many accidents are caused by poorly maintained power tools.
- Keep cutting tools sharp and clean. Properly maintained cutting tools with sharp cutting edges are less likely to jam and are easier to control.
- Use power tools, accessories, bits, etc. in accordance with these instructions, taking into account actual working conditions and the work that is to be done. It can be dangerous to use power tools for purposes other than those intended.
Service
The power tool may only be serviced by qualified service personnel using identical spare parts. This ensures that the power tool remains safe.
Special safety instructions
- Hold the power tool by the insulated grips when working in areas where the tool may come into contact with concealed electrical cables or its own power cord. In the event of contact with a live cable, the metal parts of the tool also become conductive and the user receives an electric shock.
Do not drill, screw or drive in existing walls or other areas where there may be hidden electrical cables. If this is unavoidable, you must remove/turn off all fuses/circuit breakers for the circuits concerned by the work. - Wear ear protection during prolonged work with the tool. Prolonged exposure to loud noise can cause hearing impairment.
- Use a metal detector to check whether there is hidden gas or water pipes in the work area, or contact your local power company before you start work. If a gas pipe is hit during the work this could lead to an explosion. There is an increased risk of electric shock if water enters a power tool.
- Always use the side handle for maximum control over the reaction forces and kickback. Never use a power tool with one hand. The overload clutch engages if you hold the tool firmly in the event of reaction movement or kickback.
- Always wear protective glasses or other eye protection when working with the tool. Wear a dust mask or respirator during dusty work. Protective glasses or goggles protect the face and eyes from material fragments. Dust or gases released from the material (for example, asbestos-insulated pipes) can cause breathing difficulties.
- Use thick, padded gloves and limit the exposure time by resting frequently. Vibrations caused by the drill hammer movements can injure your hands and arms.
- Position the power cord so that it cannot be damaged by rotating parts. Do not wrap the power cord around your arms or wrists. If the power cord becomes entangled in rotating parts, you can get caught and suffer serious injuries.
- Position yourself so that you cannot get caught between the tool or support handle and a wall or post. If the bit jams the tool can kickback causing crushing injuries.
- If the bit gets stuck in the work surface, you should immediately release the power switch, change the direction of rotation and gently press the power switch to reverse the bit. Be prepared for strong reaction torque. The tool body tries to turn in the opposite direction against the bit's direction of rotation. This feature is only used if the tool has left/right-hand drive.
- Do not hit bits with a hammer or sledge hammer to try loosening jammed bits.
- Metal pieces from the bit can become loose and hit you or bystanders. Never put the tool down until the bit or accessories have stopped rotating. Do not use dull or damaged bits and accessories. Dull or damaged bits jam easier in the workpiece.
- Do not touch the bit with bare skin when removing. Wear suitable protective gloves when holding bits and accessories. Accessories can become very hot after prolonged use.
- Do not start the tool when carrying it by your side. Rotating bits can get caught in clothes and cause personal injury.
WARNING:
Certain types of dust created during sanding, sawing, drilling and other similar work contain chemicals that have been shown to be carcinogenic, harmful to the developing foetus or cause fertility problems. Examples of such chemicals are:
- lead from lead-based paint
- crystalline silica from bricks, cement and other masonry products
- arsenic and chromium from chemically treated wood.
The risk of exposure to these chemicals depends on how often you perform this type of work. You can reduce exposure to these chemicals by keeping the work area well ventilated and using approved safety equipment, such as a breathing mask that filters out microscopic particles.
TECHNICAL DATA
| Rated voltage | 230 V ~ 50 Hz |
| Output power | 1500 W |
| Speed (no load) | 750 rpm |
| Stroke rate | 4000 spm |
| Impact strength | 4 J |
| Safety class | II |
| Chuck | SDS-plus |
| Capacity | |
| - concrete | 32 mm |
| - steel | 13 mm |
| - wood | 40 mm |
| Sound power level, LwA | 106 dB(A), K = 3 dB |
| Sound pressure level, LpA | 95 dB(A), K = 3 dB |
| Vibration | 17.7 m/s ^2 , K = 1.5 m/s ^2 |
| Weight | 6.3 kg |
Wear hearing protection!
The declared vibration value, which has been measured by a standardised test method, can be used to compare different tools with each other and for a preliminary assessment of exposure.
WARNING!
The actual vibration level when using power tools may differ from the specified maximum value, depending on how the tool is used. It is therefore necessary to determine which safety precautions are required to protect the user, based on an estimate of exposure in actual operating conditions (taking into account all stages of the work cycle, e.g. the time when the tool is switched off and when it is idling, in addition to the start-up time).
DESCRIPTION
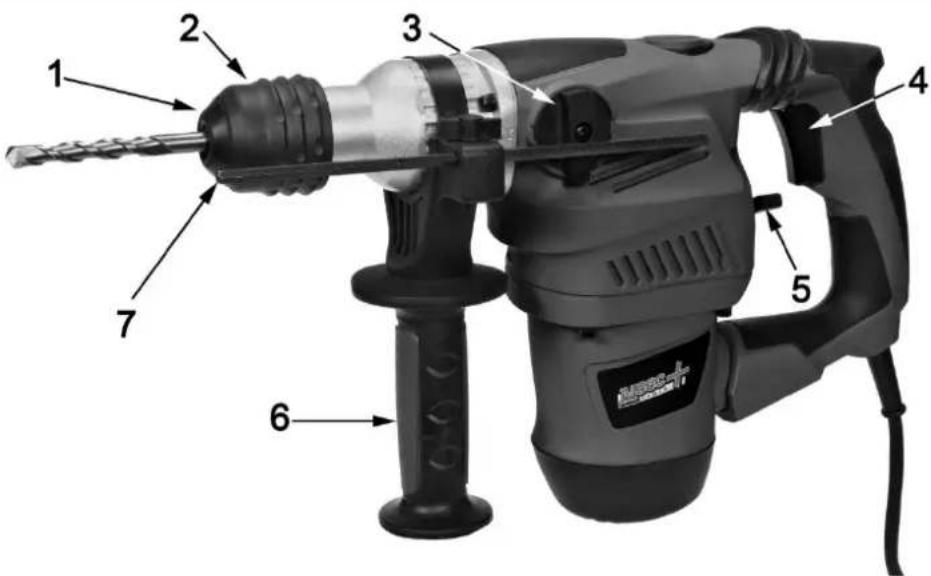
Dust collector
natural_image
3D mechanical component with threaded shaft and threaded base, no visible text or symbolsOPERATION
Uses
The tool is designed for percussion drilling in concrete, brick and stone and for light cutting work. It can also be used without the percussion function for drilling in wood, metal, ceramics and plastics.
Starting/stopping
Before plugging in the power cord, always check that the power switch can be pressed in and that it returns to the off position when released.
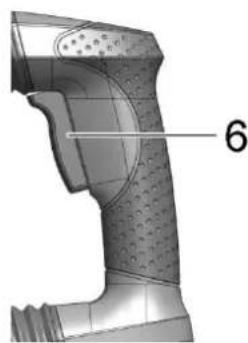
- Start the tool by pressing the power switch (6) and keep it held down.
- Turn off the tool by releasing the power switch (6).
At low temperatures the tool reaches full hammer/percussion capacity only after a period of operation.
You can hit the drill/chisel against the surface once to shorten this start-up time.
natural_image
Technical illustration of a mechanical component with labeled part '6' (no text or symbols beyond label)Disengaging when overloaded
If the tool sticks or jams, the drill spindle is disengaged Stand firmly and hold the power tool firmly with both hands so that you can handle the reaction forces.
If the power tool jams, shut it off and loosen the accessory. If you start the tool when the drill/bits has jammed, you may encounter strong reaction forces!
WARNING:
Turn off the tool immediately if it jams. Otherwise, the tool will wear out prematurely.
Mode selector
Only use the mode selector when the tool is stationary. Otherwise, the tool will wear out prematurely.
Percussion drilling
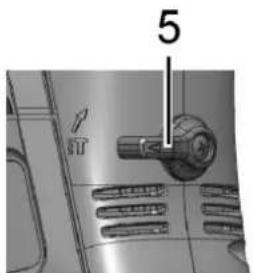
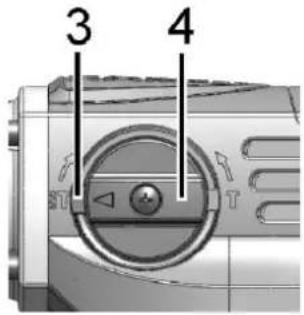
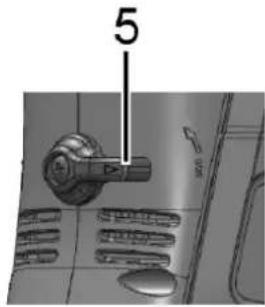
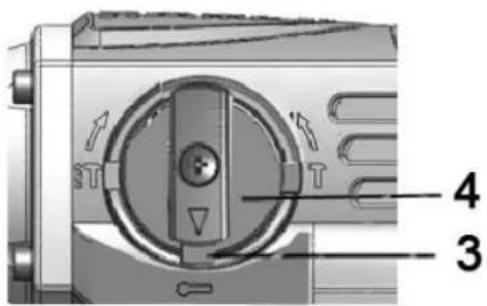
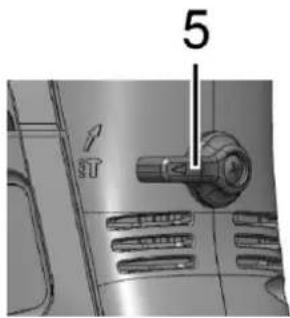
- To drill into concrete, masonry or similar, hold the release button (3) down and turn the mode selector (4) so that the arrow points towards the symbol . Turn the mode selector (5) so that the arrow points towards the symbol Use bits with tungsten carbide tips.
- Place the bit in the required position for the hole and then press the power switch. Do not force the tool. Light pressure produces the best results. Hold the bit in position so that it does not slip away from the hole.
Do not push harder when the hole becomes full of chips or particles. Let the tool idle instead and slightly pull the bit out of the hole. Repeat this several times, until the hole has cleared, and you can continue drilling as usual.
WARNING:
Reaction forces make the tool turn sharply and suddenly when the bit breaks through, if the hole becomes clogged with chips or particles, or if you hit a reinforcement bar in the concrete. Always use the side handle and hold the tool firmly with both hands while working. Otherwise, you can lose control of the tool, which can lead to serious personal injury.
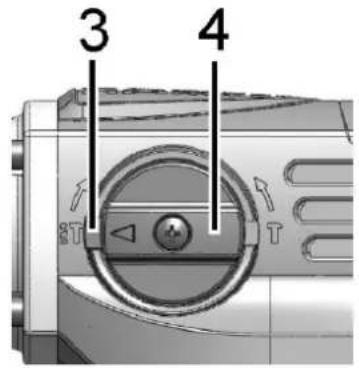
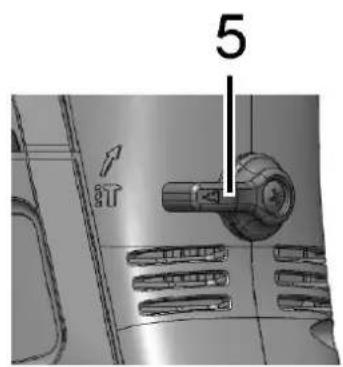
Chiselling
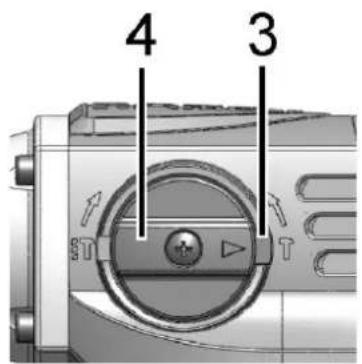
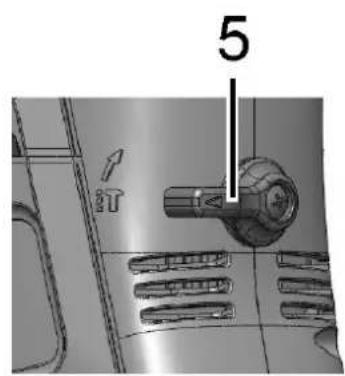
To chisel or tear, hold the release button (3) down and turn the mode selector (4) so that the arrow points towards the symbol ? Turn the mode selector (5) so that the arrow points towards the symbol . Use an appropriate chisel.
Note: Hold the tool firmly with both hands. Start the tool with slight pressure, so that it does not bounce uncontrollably. The work will not go faster if you press hard on the tool.
WARNING:
The mode selector (4) must always be in the chiselling mode when chiselling.
Drilling
To drill in wood, metal or plastic, hold the release button (3) down and turn the mode selector (4) so that the arrow points towards the symbol. Turn the mode selector (5) so that the arrow points towards the symbol Use a twist drill or wood drill.
Securing the chisel
To chisel, hold the release button (3) down and turn the mode selector (4) so that the arrow points towards the symbol ☐. Turn the mode selector (5) so that the arrow points towards the symbol ☑. This fixes the chisel angle.
Assembly
WARNING:
Always turn off the tool and disconnect the power cord from the mains power before doing any work on the tool.
Support handle
WARNING:
- Always use the support handle so that you can work safely with the tool in concrete, masonry, etc. - When the bit starts to break through the concrete, or if it hits a reinforcement bar in the concrete, the reaction force makes the tool move unexpectedly. Make sure you are standing firmly and have good balance. Hold the tool with both hands to prevent dangerous kickback.
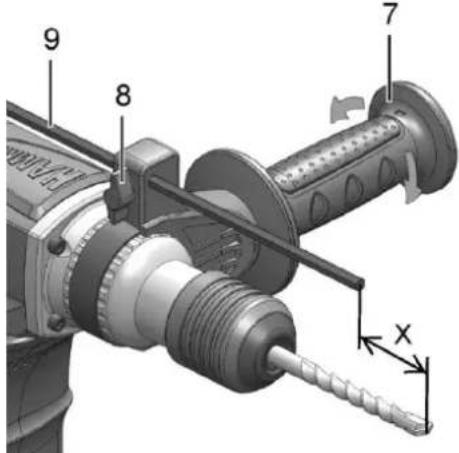
The support handle can be positioned on either side, making it easy to handle the tool in different positions. Move the support handle (7) by turning it anti-clockwise, move it to the required position and then tighten it clockwise.
Depth stop
The depth stop (9) is used when you wish to drill several holes with the same depth. Set the depth stop in the hole at the bottom of the handle. Adjust the depth stop to the appropriate depth and then tighten the clamping screw (8) properly.
Note: The depth stop cannot be used in a position where it catches on the tool body.
Bit lubrication
Coat the shank with a small amount of lubricant (approximately 0.5-1 g) before assembling the bit. This gives smoother operation and a longer life.
Changing bits
Always disconnect the power cord from the mains power before working on the tool.
With the quick chuck SDS-plus, it is easy to change bits without other tools.
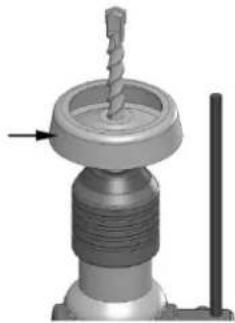
The dust cover (1) protects the quick chuck against drilling dust during use. Be careful with the dust cover (1) when installing the tool. A damaged dust cover must be replaced immediately. We recommend that this is done by an authorised service centre.
Fitting bits
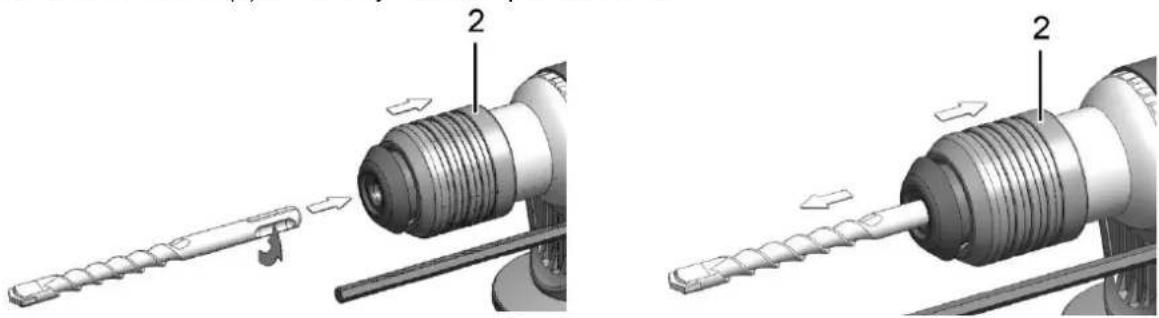
Clean and lubricate the bit shank slightly. Pull back the chuck sleeve (2) and insert the bit with a twisting action into the quick chuck until it locks into position. After installation, check that the bit is secured firmly by trying to pull it out.
Removing bits
Pull the chuck sleeve (2) all the way back and pull out the bit.
natural_image
Mechanical assembly diagrams showing two stages of a drill bit with threaded shaft and base, no text or symbols presentMAINTENANCE
Note: Always turn off the tool and disconnect the power cord from the mains power before inspecting or performing maintenance on the tool.
• Always keep the tool and vents clean to ensure safe and reliable operation.
- The tool is best cleaned with dry compressed air. Always wear protective glasses when cleaning the tool with compressed air.
• Some detergents and solvents, such as petrol, carbon tetrachloride, chlorinated solvents, ammonia and household cleaners containing ammonia, can damage the plastic parts on the tool. - The tool's commutator and carbon brushes are designed for a long life. For the best motor efficiency, we recommend that the carbon brushes are checked at intervals of two to six months.
- A damaged dust cover must be replaced immediately. We recommend that this is done by an authorised service centre.
- Keep tools, Operating Instructions and any accessories in the original packaging. This way, you always have all the information and all parts easily accessible.
Replacing carbon brushes
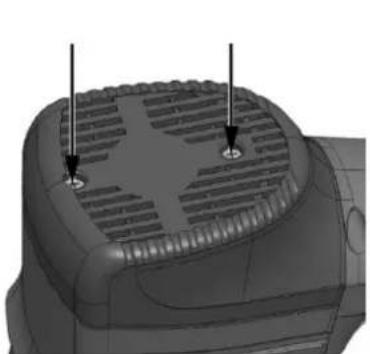
- Loosen the two screws with a screwdriver and remove the rear cover.
- Remove the brush holders and the worn carbon brushes.
- Insert the new carbon brushes in brush holders.
- Replace the brush holder and the rear cover.
natural_image
3D CAD model of a mechanical component with ventilation grilles and mounting holes (no text or symbols)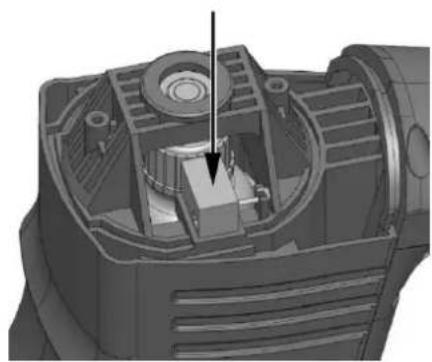
natural_image
3D cutaway view of a mechanical device showing internal components and a central component (no text or symbols visible)Jula reserves the right to make changes. In the event of problems, please contact our service department.www.jula.com
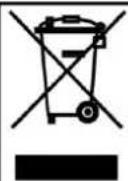
Care for the environment!
Must not be discarded with household waste! This product contains electrical or electronic components that should be recycled. Leave the product for recycling at the designated station e.g. the local authority's recycling station.
CE
EC DECLARATION OF CONFORMITY EG FÖRSÄKRAN OM ÖVERENSSTÄMMELSE EF SAMSVARSERKLÆRING DEKLARACJA ZGODNOŚCI WE

Jula AB, Box 363, SE-532 24 SKARA, SWEDEN
RoHS Directive 2011/65/EU
This product was CE marked in year -10
Name and address of the person authorised to compile the technical file:
Jonas Backstad Box 363, SE-532 37 Skara, Sweden
Skara 2013-02-05
Bo Eriksson PRODUCT MANAGER
- Operating instructions for Drill Hammer 1500 W
- SVENSKA 4
- SÄKERHETSFÖRESKRIFTER 4
- SÄKERHETSFÖRESKRIFTER
- HANDHAVANDE
- Användningsområden
- Montering
- WARNING!
- UNDERHÅLL
- BRUK
- Bruksområde
- Overlastkopling
- ADVARSEL!
- Sette inn borspissen
- VEDLIKEHOLD
- OBSŁUGA
- Zakres użytkowania
- Montaż
- OSTRZEŻENIE!
- KONSERWACJA
- Read the Operating Instructions carefully before use!
- Work area
- Electrical safety
- Personal safety
- Power tool use and care
- Service
- Special safety instructions
- WARNING:
- Wear hearing protection!
- OPERATION
- Uses
- Starting/stopping
- Disengaging when overloaded
- Mode selector
- Percussion drilling
- Chiselling
- Drilling
- Securing the chisel
- Assembly
- Support handle
- Depth stop
- Bit lubrication
- Changing bits
- Fitting bits
- Removing bits
- MAINTENANCE
- Replacing carbon brushes
- Care for the environment!
- CE
- EC DECLARATION OF CONFORMITY EG FÖRSÄKRAN OM ÖVERENSSTÄMMELSE EF SAMSVARSERKLÆRING DEKLARACJA ZGODNOŚCI WE
Brand : Meec Tools
Model : 001-062
Category : Drill