
KA ADH 8 - Air purifier KALORIK - Free user manual and instructions
Find the device manual for free KA ADH 8 KALORIK in PDF.


| Product Type | Air Purifier |
| Brand | Kalorik |
| Model | KA ADH 8 |
| Dimensions (W x H x D) | 8.5 x 12.2 x 8.5 inches |
| Weight | 5.5 lbs |
| Power Supply | 120V, 60Hz |
| Power Consumption | 50W max |
| Coverage Area | Up to 200 sq ft |
| Filter Type | HEPA + Activated Carbon |
| Fan Speeds | 3 speeds (Low, Medium, High) |
| Timer | 2, 4, 8 hours |
| Auto Mode | Yes, with air quality sensor |
| Sleep Mode | Yes, ultra-quiet operation |
| Air Quality Indicator | Color-coded LED (Green, Yellow, Red) |
| CADR Rating | 150 CFM (approx.) |
| Noise Level | 25 - 50 dB |
| Filter Replacement Indicator | Yes, visual alert |
| Pre-Filter | Washable, monthly cleaning |
| Filter Replacement | Every 6-12 months |
| Safety Features | Automatic shut-off when cover opened, tip-over protection |
| Child Lock | Yes, lockable control panel |
Frequently Asked Questions - KA ADH 8 KALORIK
User questions about KA ADH 8 KALORIK
0 question about this device. Answer the ones you know or ask your own.
Ask a new question about this device
Download the instructions for your Air purifier in PDF format for free! Find your manual KA ADH 8 - KALORIK and take your electronic device back in hand. On this page are published all the documents necessary for the use of your device. KA ADH 8 by KALORIK.
USER MANUAL KA ADH 8 KALORIK
Please read these instructions carefully before using the appliance.
Important: People (including children) who are not able to use the appliance in a safe way, due to their physical, sensorial or mental capacity or their lack of experience or knowledge, must never use the appliance except if they are supervised by a person responsible for their safety or if they previously received instructions concerning the safe use of the appliance. Close supervision is necessary to prevent children from using the appliance as a toy.
☐ Check that your mains voltage corresponds to that stated on the appliance.
□ Never leave the appliance unsupervised when in use.
From time to time check the cord for damages. Never use the appliance if cord or appliance shows any signs of damage. Should the cord be damaged, it must be replaced by a competent qualified service ^() . All repairs should be made by a competent qualified service ^() .
☐ Only use the appliance for domestic purposes and in the way indicated in these instructions.
□ Never immerse the appliance in water or any other liquid for any reason whatsoever.
□ Never use the appliance near hot surfaces.
☐ Do not place the power cord under a carpet.
☐ Never lay the unit down when it is working, always keep the appliance in upright position.
☐ Never unplug the unit while it is working, this could damage the electronic circuit of the unit.
□ Never use an extension cord.
☐ Never use the plug to start and stop the unit. Always use switch on the control panel.
Before moving the unit, first switch off, empty the water tank and unplug.
Leave the unit to stand for one hour before connecting to the mains supply after transport or when it has been tilted (e.g. during cleaning).
Before cleaning and when you do not use the appliance, always unplug the appliance from the power supply. Do not attempt to remove the plug from the wall socket with wet hands.
☐ Never use the appliance outside and always place it in a dry environment.
☐ Never use accessories that are not recommended by the producer. They could constitute a danger to the user and risk to damage the appliance.
☐ Never move the appliance by pulling the cord. Make sure the cord cannot get caught in any way. Do not wind the cord around the appliance and do not bend it.
☐ Do not place the appliance under a power socket.
□ Always position the appliance in such a way that inflammable materials such as curtains cannot be ignited. Do not place the appliance against a wall.
☐ Make sure that the air inlet and outlet openings are not obstructed. To avoid any risk of fire, DO NOT COVER THE APPLIANCE (ex. With clothes).
☐ Warning: Do not operate the appliance near baths, showers, washbasins, swimming pools or any other water container. It must be impossible to reach the commands of your appliance when you are in contact with water.
☐ Do not insert any objects through the grille or into the interior of the appliance.
☐ Never sit or place objects on the appliance.
☐ When cleaning the appliance, refer to the instructions in the paragraph "Maintenance" because the water penetration through the openings can be very dangerous for your appliance.
□ Never use the appliance without filter.
☐ The unit is fitted with an auto defrosting operation and starts when the evaporator generates frost. This function ensures continuous running when the temperature is down to 5^ C.
(1) Competent qualified service: after sales department of the producer or importer or any person who is qualified, approved and competent to perform this kind of repairs in order to avoid all danger. In any case you should return the appliance to this service.
TECHNICAL SPECIFICATIONS
| MODEL | KA ADH 8 |
| Power | 220-240V/50Hz |
| Dehumidification capacity | 12 l/day |
| Power / Ampere consumption | 220W/1.1A |
| Working range | 5~35°C |
| Water tank capacity | 4 l |
| Dimensions (WxDxH) | 28 x 32 x 62 cm |
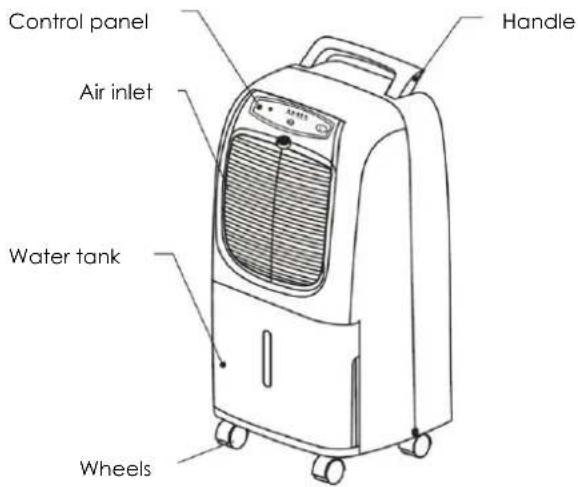
PART DESCRIPTION
FRONT VIEW
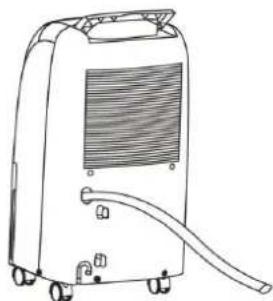
REAR VIEW

CONTROL PANEL

flowchart
graph TD
    A["1"] --> B["POWER"]
    C["2"] --> B
    D["3"] --> E["WET"]
    F["4"] --> G["COZY"]
    H["5"] --> I["DRY"]
    J["6"] --> K["CONT."]
    L["7"] --> M["1/O"]
    N["8"] --> O["MODE"]
    P["WATER FULL"] --> B
    P --> E
    P --> G
    P --> I
    P --> M
    style P fill:#f9f,stroke:#333,stroke-width:2px
1. WATER FULL
When this light illuminates, it indicates that the water tank is full with water or that the installation position of the water tank is not correct. In this case, the water in the tank should be emptied or the water tank should be re-installed to a correct position.
2. POWER
This pilot light will flash for a few seconds when you plug in the appliance. It will stay on once you have pressed the 1/0 button. In case of malfunction of the humidity sensor this pilot light will flash 5 times a second.
3. WET
This light illuminates when the "Wet" mode is set. The compressor will switch on when the humidity is above 70% and switch of when it is lower than 60%.
4. COZY
This light illuminates when the "Cozy" mode is set. The compressor will switch on when the humidity is above 60% and switch of when it is lower than 50%.
5. DRY
This light illuminates when the "Dry" mode is set. The compressor will switch on when the humidity is above 50% and switch of when it is lower than 35%.
5. CONT.
This light illuminates when the "Continuous dehumidification" mode is set. The compressor will be switched on continuously.
6.1/0
Press this button to switch on (or off) the appliance. The POWER pilot light will come on.
7. MODE
Press this button to set the dehumidifying mode. The pilot lights illuminate when the corresponding mode is on.
OPERATION
1. Connect the power
• Firmly plug into the socket to ensure no hazard of electric shock or fire.
- Do not damage the power cord.
- When the power is properly connected, the power indication light will flash for a few seconds.
2. Turn on the appliance
Press the 1/0 button to turn on the appliance.
3. Select a dehumidifying mode
Press the MODE button various times until the pilot light corresponding to the dehumidifying mode desired turns on.
4. Stop operating
During the operational process of the unit, press the 1/0 button. The dehumidifier will stop operating and the POWER pilot light will come out.
Do not try to switch off the unit by pulling out the power plug.
NOTE: This appliance is fitted with an anti frost function that turns on automatically if the temperature of the evaporator is lower than -1^ . During the defrosting process, the compressor will stop working but the POWER light and the pilot light corresponding to the set dehumifying mode will stay on. The unit will start working normally at the end of the defrosting process.
WATER DRAINAGE
A. Emptying the water tank
If the water tank is full (about 4 liters), the indication light "WATER FULL" will be on and the unit will automatically stop operating.
When the water tank is full, please empty the tank.
1. Take out the water tank.
Gently pull the tank out using its handles.
Caution: Do not take off the buoy or the sensor in the water tank, because the buoy or the sensor is used to monitor whether the water tank is full or not. Damage to the buoy or the sensor will make the water in the tank overflow to wet the furniture or to cause electric shocks or short circuit hazard.

natural_image
Line drawing of a portable air conditioner unit with wheels and control panel (no text or symbols)2. Empty the water tank.
Caution: When the water tank is re-installed, push it with force to its original position manually. If the water tank fails to be re-installed to its original position, the indication light for full water will be on and the unit will not operate properly.
3. Re-install the water tank
Caution: If the water tank is taken out during operation, or when the unit has just stopped operating, the condensed water might drop to the base. It is recommended to take out the water tank for emptying when the unit has stopped operating for 30 minutes. (If the water has dropped out already, you may wipe it off).
B. Continuous drainage of water
This unit is equipped with a water outlet for continuous drainage. Use a water tube (bore size 11.5mm) available in the markets, you can make continuous drainage of the condensed water. When you fit the tube for continuous drainage, make sure that the unit is switched off and the power plug is pulled out.
- Remove the cap of the drain hole located on the back of the appliance.
- Insert a water tube into the water outlet opening. Pass the water tube (∅ 11.5mm) through the water outlet opening and firmly push it to the water outlet of the main unit. Do not block the tube so that the condensed water can be drained smoothly.
natural_image
Line drawing of a portable air purifier with cooling fan and scroll handle (no text or symbols)Moving the dehumidifier (by means of the wheels)
Do not tilt the unit to move it. Use one of the handle located on top of the appliance to slide it.
N.B.:
-
If the floor is made of material to be easily scratched, or if the floor is not leveled enough, please lift the unit when it is to be moved. Besides, if the floor is covered with thick carpet, please do not use the wheels so as to avoid damages to the carpet.
-
Take care not to press the power cable under the unit.
MAINTENANCE AND CLEANING
Cleaning of the main unit
Please use a soft and dry cloth to do the cleaning. Do not use gasoline, benzene, diluents, mops treated with chemicals, detergents etc. to clean the unit, that might cause damages to the unit.
Cleaning the filter
The air filter should be cleaned once every two weeks
Fig. 1

natural_image
Line drawing of a portable air conditioner unit with wheels and a vent, no text or symbols present
natural_image
Line drawing of a portable air conditioner unit with control panel and fan (no text or symbols)Take off the air filter.
Open the air inlet grid and take the filter out.
Clean the air filter.
Use a vacuum cleaner to clean off the dust on the surface of the air filter. If the filter is too dirty, you may use lukewarm water or neutral detergent solution to clean it. After cleaning, thoroughly mop the filter dry.
Re-install the air filter
Replace the filter in its original position and properly close the air inlet grid.
Cleaning the water tank
If the water tank is dirty, please cleant it with cold or lukewarm water. Do not use detergents or scrappers or mopping cloth treated with chemicals. Do not clean the water tank with gasoline, benzene, diluents or other solutions so as to avoid scratches or damages to the water tank that will result in leakage.
Storage
When you do not use the unit for a long time, please store it according to the following procedures:
- Unplug the power cord.
- Empty the remaining water in the tank, and use a dry cloth to mop the remaining water drops.
- Clean the air filter.
- Store the unit. Place the unit into the package case to prevent from dust accumulation. Keep the unit in a vertical position, and store it in a cool and dry place.
TROUBLESHOOTING
| PROBLEM | CAUSE | POSSIBLE SOLUTION |
| The unit fails to operate | Is the power cords unplugged? | Plug in the power cable properly. |
| Has the unit been turned on? | Press the 1/0 to turn on the unit. | |
| Is the WATER FULL indication light on? (The water tank is full, or the water tank is not placed in a proper position). | Empty the water tank and place it back to its original position, or replace it to a proper position. | |
| Is the defrosting function on? | During defrosting, the compressor does not work. The unit will start dehumidifying again at the end of the defrosting process. | |
| The dehumidification is not sufficient | Is the air filter blocked | Clean the air filter by the ways stated in the Maintenance and Cleaning section. |
| Is the air inlet or air outlet blocked? | Remove the blocking substance from the air inlet or air outlet. | |
| Are there many windows or doors open? | Close the windows or doors. | |
| The operating noise level is very high. | Is the unit properly installed? Is it tilted or unstable? | Place the unit on a firm and stable surface. |
| Is the air filter blocked | Clean the air filter by the ways stated in the Maintenance and Cleaning section. |
If the above-stated phenomena remain alter the corresponding trouble shooting is made, or there are some other defects or malfunctions of the unit, please contact a qualified technician.
PROTECTION OF THE ENVIRONMENT- DIRECTIVE 2002/96/EC
In order to preserve our environment and protect human health, the waste electrical and electronic equipment should be disposed of in accordance with specific rules with the
implication of both suppliers and users. For this reason, as indicated by the symbol — the rating label or on the packaging, your appliance should not be disposed of as unsorted municipal waste. The user has the right to bring it to a municipal collection point performing waste recovery by means of reuse, recycling or use for other applications in accordance with the directive.

MODO DE EMPREGO
PARA A SUA SEGURANÇA
natural_image
Line drawing of a portable air conditioner unit with wheels and control panel (no text or symbols)2. Esvaziar o depósito
natural_image
Line drawing of a portable air purifier with wheels and ventilation slots (no text or symbols)natural_image
Line drawing of a portable air conditioner unit with wheels and a ventilation grille (no text or symbols)
natural_image
Line drawing of a portable air conditioner unit with control panel and fan (no text or symbols)- PART DESCRIPTION
- CONTROL PANEL
- WATER FULL
- POWER
- WET
- COZY
- DRY
- CONT.
- 6.1/0
- MODE
- OPERATION
- Connect the power
- Turn on the appliance
- Select a dehumidifying mode
- Stop operating
- WATER DRAINAGE
- Emptying the water tank
- Take out the water tank.
- Empty the water tank.
- Re-install the water tank
- Continuous drainage of water
- Moving the dehumidifier (by means of the wheels)
- N.B.:
- MAINTENANCE AND CLEANING
- Cleaning of the main unit
- Cleaning the filter
- Take off the air filter.
- Clean the air filter.
- Re-install the air filter
- Cleaning the water tank
- Storage
- PROTECTION OF THE ENVIRONMENT- DIRECTIVE 2002/96/EC
- MODO DE EMPREGO
- PARA A SUA SEGURANÇA
- Esvaziar o depósito
Brand : KALORIK
Model : KA ADH 8
Category : Air purifier