KF 285 - Fridge Frigor - Free user manual and instructions
Find the device manual for free KF 285 Frigor in PDF.


| Brand | Frigor |
| Model | KF 285 |
| Product Type | Fridge/Freezer Combination |
| Voltage | 230 V |
| Frequency | 50 Hz |
| Power | 90 W |
| Refrigerant | R600a (Isobutane), 0.023 kg |
| Net Volume | 203 L |
| Gross Volume | 205 L |
| Temperature Class | N (optimal 16°C to 32°C) |
| Door Reversible | Yes, right or left hinged |
| Defrost (Fridge) | Automatic |
| Defrost (Freezer) | Manual |
| Interior Light Bulb | Max 15 W (standard) or 10 W halogen |
| Compressor | Single compressor with automatic restart |
| Dimensions (approx.) | Height 180 cm, Width 60 cm, Depth 65 cm |
| Weight (approx.) | 65 kg |
| Accessories Included | Serving boxes, vegetable drawers, bottle shelves, glass shelves |
| Energy Consumption | 0.58 kWh/24h |
| Serial Number Location | Inside cabinet on nameplate |
Frequently Asked Questions - KF 285 Frigor
User questions about KF 285 Frigor
0 question about this device. Answer the ones you know or ask your own.
Ask a new question about this device
Download the instructions for your Fridge in PDF format for free! Find your manual KF 285 - Frigor and take your electronic device back in hand. On this page are published all the documents necessary for the use of your device. KF 285 by Frigor.
USER MANUAL KF 285 Frigor
natural_image
Exterior view of a white double refrigerator with no visible text or symbols on the cabinet surfaceInstructions for use GB 24
Congratulations on your new fridge/ freezer
Please read the sections on setting up and building in, starting up and electrical connection before using your fridge/freezer.
It is also advisable to clean the cabinet interior with lukewarm water containing a little mild detergent. Surfaces should then be dried thoroughly with a soft cloth before placing items in the cabinet. As these instructions apply to several refrigerator models, the equipment may vary from model to model.
On receipt, check to ensure that the fridge/freezer has not become damaged in transport. Transport damage should be reported to the local supplier before the fridge/freezer is put to use.
WARNING
Old refrigerators and freezers are often fitted with complicated latches that can only be opened from the outside. If you have an old appliance like this stored away somewhere, or if you scrap it (through a bulk waste disposal system for example) remember to destroy the lock first to prevent children from being exposed to danger by getting locked inside the cabinet.
Note! Please observe the environmental rules on disposal. See section "Disposal".
Illustrations are found at the back of the instruction booklet to enable you to follow text and pictures at the same time.
Setting up and building in
For safety and operational reasons, do not set up the fridge/freezer outdoors.
The appliance should be placed in a dry room. It is designed for temperature class N in accordance with European standard EN 153. This means that it will run best at a room temperature of +16°C to +32°C.
WARNING
This fridge/freezer contains isobutane R 600a, a flammable gas. During transport and when setting up it is essential to avoid damaging the freezing/ refrigeration circuit. If damage does occur, do not use a naked flame anywhere near the appliance and make sure the room is well aired. A damaged unit must not be connected to mains voltage. If you are in doubt, please contact your supplier.
The surface on which the appliance is placed must be plane. Do not use a frame or similar.
Never place the fridge/freezer close to sources of heat such as cookers or radiators, and avoid placing it in direct sunlight.
It is important that the appliance stands completely level and that there is good air circulation over, under and around it. The appliance can be adjusted by turning the two small feet at the front.
Fit the two distance pieces to the condenser on the rear of the cabinet 1 before pushing the fridge/freezer against the wall.
If two fridge/freezers are placed side by side, there must be at least 2 cm clearance between them.
If the appliance is not built in but positioned with its door hinge side against a wall, there should be at least 5 cm between the appliance and the wall in order to allow the door to open easily.
2
The fridge/freezer must not be laid horizontally while being transported or moved. If the appliance has been tilted more than 40^ , the power supply must not be connected until the appliance has stood upright for at least two hours.
Placement in cold rooms
Placing the appliance in a room where the temperature is lower than +16°C (e.g. in unheated buildings) can pose problems if the appliance has only one compressor and one control system. The temperature sensor will register that it is sufficiently cold and will therefore not start cooling the refrigerator section. This will also lead to insufficient cooling of the freezer and possibly cause the thawing of frozen foods.
Electrical connection
The appliance is intended for connection to alternating current.
3
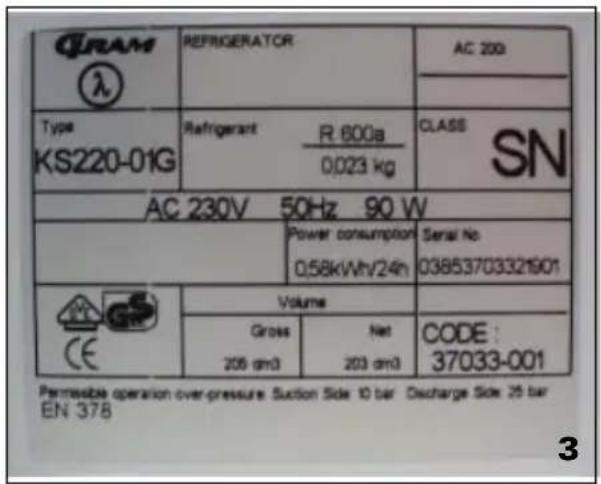
The connection values for voltage (V) and frequency (Hz) are given on the nameplate 3 in the cabinet.
Power must be connected via a wall socket with switch. The wall socket should be easily accessible.
All earthing requirements stipulated by the local electricity authority must be observed. The
appliance plug and wall socket should then give correct earthing. If in doubt, contact your local supplier or an authorised electrician.
WARNING
The flexible cord (mains lead) fitted to this appliance has three cores for use with a 3-pin 13-amp or 3-pin 15-amp plug. If a BS 1363 (13-amp) fused plug is used, it should be fitted with a 13-amp fuse.
IMPORTANT
The cores in this mains lead are coloured in accordance with the following code:
These colours might not correspond with the colour markings identifying the terminals in your plug.
Proceed as follows:
Connect the GREEN-AND-YELLOW core to the plug terminal marked "E" or by an earth symbol, or coloured GREEN or GREEN-AND-YELLOW.
Connect the BLUE core to the plug terminal marked "N" or coloured BLACK. Connect the BROWN core to the plug terminal marked "L" or coloured RED.
You can change the doors from right-hinged to left-hinged or vice versa yourself
Illustration 4 shows how easy it is to change the doors from right-hinged to left-hinged - or vice versa.
Lay the appliance on its back with the doors up. Remove the door handles.
Take off the upper hinge bracket and remove the upper door. Take off the middle hinge and remove the lower door.
Unscrew the adjusting screws from the lower hinge brackets and take the brackets off.
Move the pin on the hinge bracket to the other threaded hole before refitting the hinge brackets on the opposite lower side of the cabinet.
Remember to replace the shim washer on the pin. Refit the adjusting screws.
Replace the lower door.
Refit the middle hinge on the opposite side.
Remember to replace the shim washer on the middle hinge pin.
Replace the upper door.
Refit the upper hinge bracket on the opposite side.
Refit the door handles.
Specifically for Fresh line models 4A
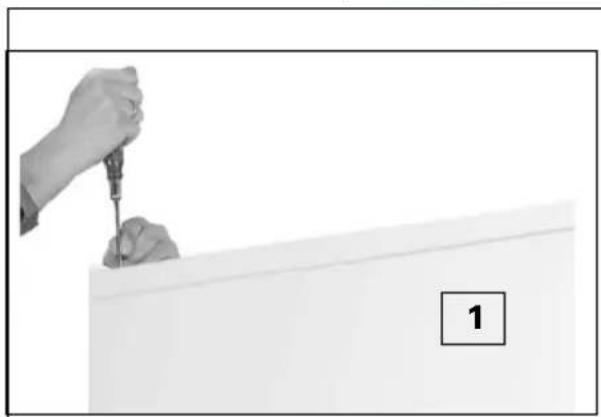
Switch the cabinet off by turning the thermostat knob to "0". Empty the cabinet and begin by removing the door handles. Tilt the cabinet 40° in order to gain access to the lowest hinge. Remove the adjustable feet. Remove the three screws holding the lowest bracket in place using a Phillips screwdriver. (1). Remove the refrigerator door and unscrew the three screws from the bracket on the base on the cabinet (2).
Before refitting these brackets on the opposite side of the cabinet, move the threaded pin on the hinge bracket to the other threaded hole. Remove the two screws holding the middle hinge using a Phillips screwdriver (3). Remove the freezer door. Use the screws from the opposite side to cover the holes. Remove the threaded pin under the control panel using a Phillips screwdriver and move it to the opposite side. (4). Refit the freezer door by pushing it onto the upper threaded pin. Refit the middle hinge on the opposite side and screw it into position using a Phillips screwdriver. Refit the refrigerator door and screw the lowest hinge into position using a Phillips screwdriver. Refit the adjustable feet and, finally, refit the door handles.
Starting up
If during transport the fridge/freezer has been laid down, or if it has been stored in cold surroundings (colder than +5°C) it must be allowed to stabilise for at least two hours before being switched on. Start the fridge/freezer by plugging into a wall socket. Important! If the mains lead has been damaged, it must be replaced with a corresponding type supplied by Gram A/S or one of Gram's service centres.
Changing the temperature
5
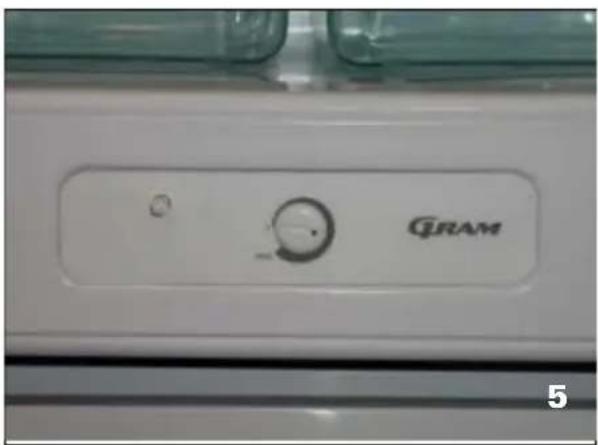
When the appliance is started the thermostat should be in its middle setting. After an hour or two the cabinet temperature will have fallen.
If a lower temperature is required, turn the thermostat knob towards „Max”. If a higher temperature is required, turn the knob towards „0”. Refrigeration is switched off when the thermostat knob setting is „0”.
Freezing down
The temperature in the freezer is closely related to the setting in the refrigerator in cabinets with only one compressor.
If quick freezing down is required the cabinet should be set to run at the lowest temperature, i.e. „Max”. As this setting affects both the refrigerator and the freezer, personal experience should be used to determine how long the quick-freeze (and thus the low refrigerator temperature) should last. After freezing down, the normal temperature setting should again be chosen.
PLEASE NOTE!
Pack your frozen foods in airtight and watertight material in order to avoid drying out. Portions should be as flat as possible to allow rapid freezing down.
Brief temperature variation
Brief temperature variations are normal and occur when:
- the cabinet is filled with fresh items,
- a door is left open for longer periods,
- the refrigerating/freezing element defrosts.
Items of food in the cabinet will not be affected by these variations and the temperature will quickly return to normal.
Cleaning/defrosting
Switch off the compressor by turning the thermostat knob to „0”.
Cleaning the refrigerator
The refrigerator section has automatic defrosting. The cabinet is best cleaned with a weak soap solution and a soft cloth. Never use cleaning agents that scour. Clean the sealing strip around the door regularly to prolong its life. Use only water to clean the sealing strip. Any loose frost on the evaporator can be removed using a plastic or wooden scraper. Never use a knife or a sharp object, as these can damage the evaporator. The plastic parts of the cabinet will not withstand boiling water (max. 85°C).
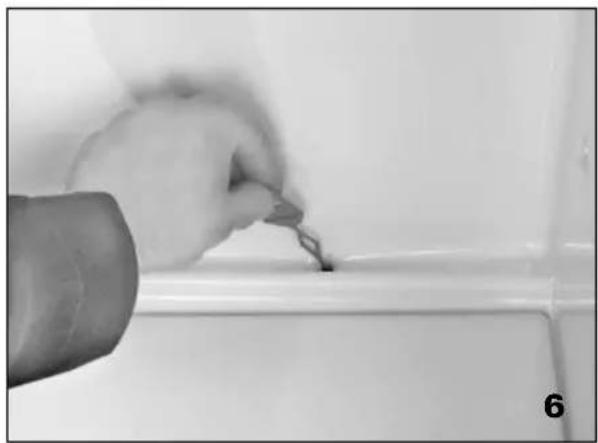
Clean the defrost water drain with the accompanying cleaning implement. 6
It is important to prevent water from getting into the control panel.
Defrosting the freezer section
If more than 4-5 mm of frost and ice has formed in the freezer, it is time for a defrost.
Remove all items from the freezer. To keep them as cold as possible during defrost, they can be placed in the refrigerator section.
Place a bowl containing hot water (not boiling) in the freezer. When the ice has melted, clean out the freezer using water and a little washing-up liquid. Dry the freezer with a soft cloth. Reset the temperature.
Remove dust and threads from the compressor compartment with a vacuum cleaner.
Fridge section - use and accessories
Vegetable drawers
The drawers at the bottom of the fridge/freezer are very suitable for storing fruit and vegetables. The overlying shelf prevents the stored items from drying out.
Serving boxes
The boxes are ideal for all kinds of food. The tight-fitting lids prevent drying out and save much time in tedious wrapping and unwrapping.
The serving boxes are made of material that is not affected by mineral oils, fats, and weak acids.
They withstand temperatures below 0^ C and up to 100^ C. They can be cleaned in the dishwasher, but must not be placed close to a heating element.
Serving boxes can also be purchased as extra equipment.
Bottle shelves in the door
The large bottle shelf at the bottom of the door is suitable for large two-litre bottles.
The height of the small bottle shelf is adjustable.
Glass shelves 7
The distance between shelves can be adjusting by turning them over 1 and 2
Shelves are removed by lifting their left-hand sides.
Begin with the top shelf 3
Freezer section - use and accessories
The Whole freezer section can be used for freezing in and storing of frozen goods.
Useful hints
The door sticks
A vacuum is formed in the cabinet when the door of the freezer section is opened and closed. If repeated opening and closing of the door within a short space of time is necessary, place an object between the sealing strip on the door and the front of the cabinet in order to let air pass.
The appliance is to remain unused for a time
Turn the thermostat knob to „0“ and disconnect the appliance at the wall socket. After defrosting and cleaning the appliance, leave the doors slightly ajar. This will prevent bad smells.
Compressor does not run
- Check the temperature setting.
- Check to ensure power is switched on and that the plug has been properly inserted in the wall socket.
Trickling and gurgling noises
Circulating refrigerant causes these noises. This is quite normal, even when the compressor is not running.
Note also
The compressor starting system often needs a pause before it can be restarted. The compressor will itself automatically decide how long the pause is to be.
Spare parts
When ordering spare parts, please give the type and serial number of the fridge/freezer. This information is given on the nameplate inside the cabinet.
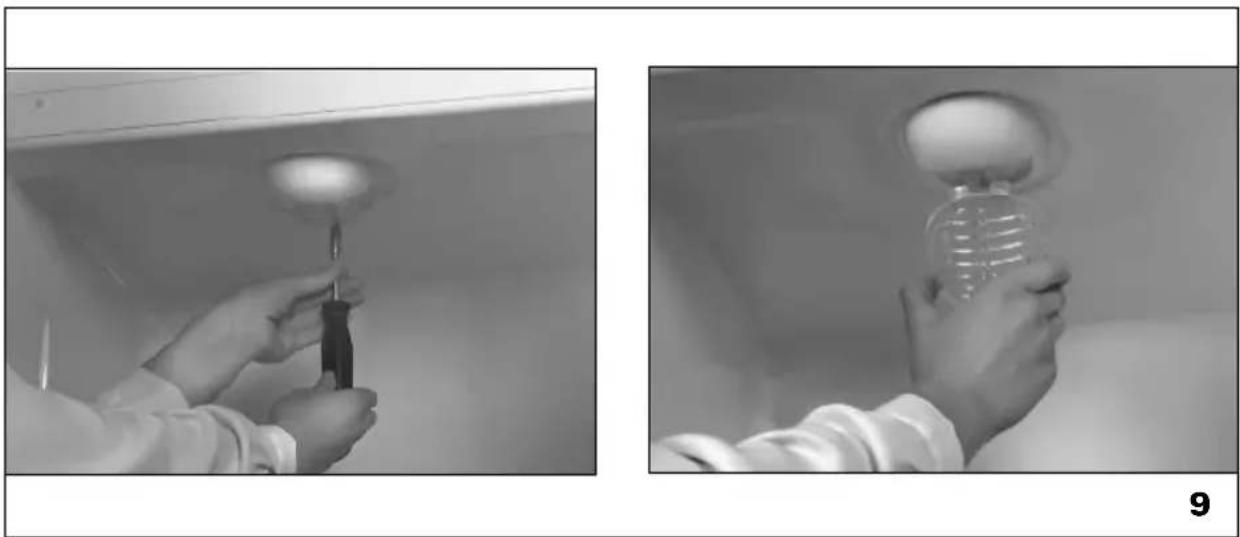
Replacing the bulb
9
Turn the thermostat knob to „0” and disconnect the appliance by unplugging the mains lead from the wall socket. Unscrew the lamp cover with a screwdriver. Replace the bulb with a new one (max. 15 W).
Refit the cover and plug in the mains lead.
Reset the temperature.
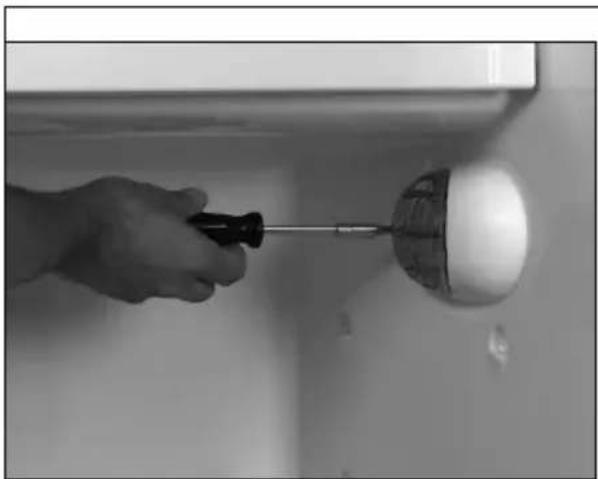
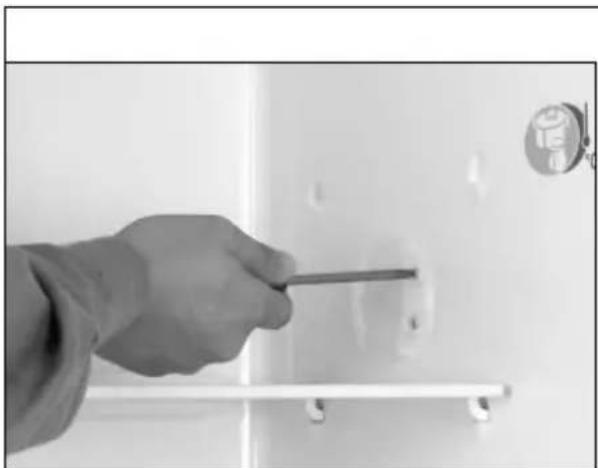
If the refrigerator/freezer has halogen bulb
Replace the bulb with a new one (max. 10W, 12V, halogen base G4). Refit the screen, connect the power supply and restart the refrigerator/freezer.
9A
Disposal
If an appliance for which there is no longer any use is to be disposed of, please make sure this is done in an environmentally correct and justifiable way.
Rules governing the disposal of such items, together with any special requirements that might exist must be observed.
Information as regards disposal can be obtained from:
- GRAM A/S
- Your white-goods supplier
Multi- of tafeldozen
natural_image
Exterior view of a modern office building (no signage)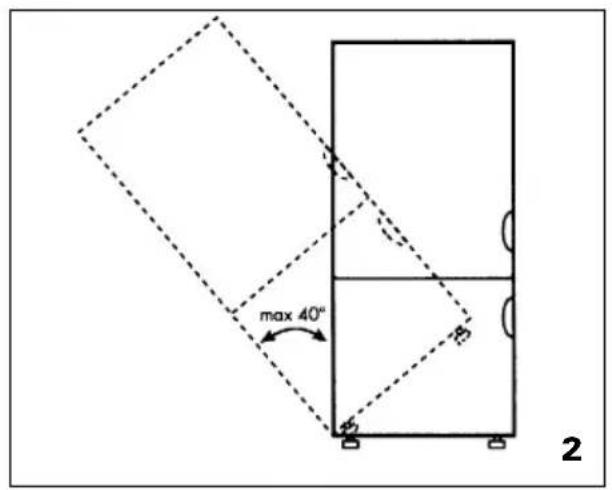
natural_image
Close-up of a hand using a screwdriver to adjust or install a white surface, with a numbered label '1' in the corner (no text on the object itself)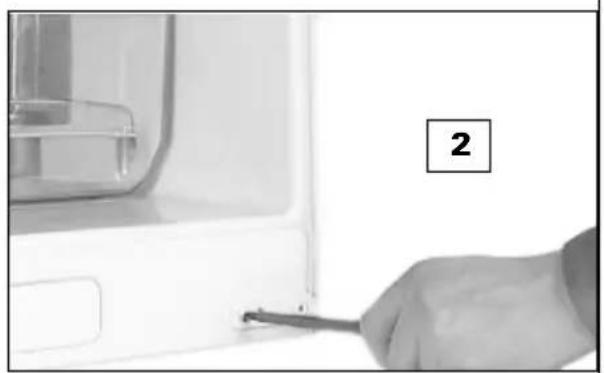
natural_image
Close-up of a hand holding a tool near a window, with no visible text or symbols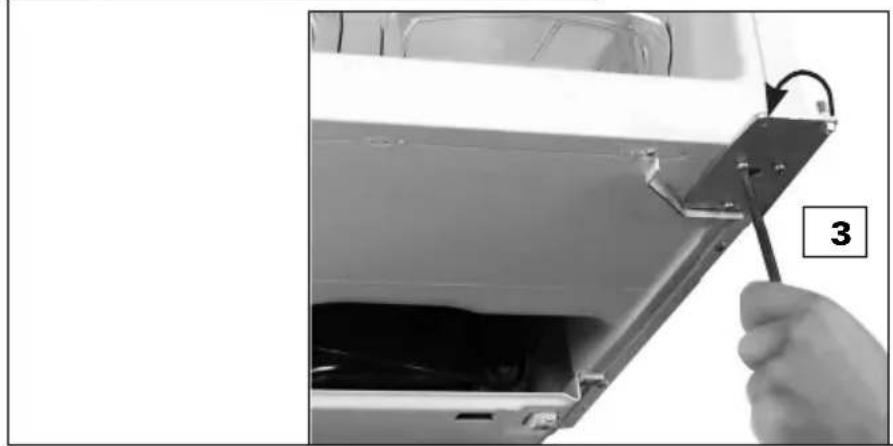
natural_image
Close-up of a hand using a tool to adjust or install a car interior panel (no visible text or symbols)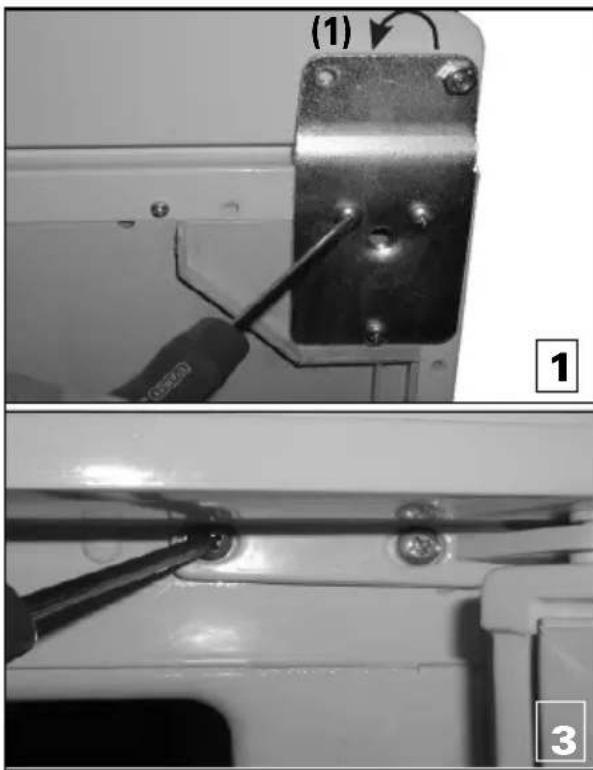
natural_image
Close-up of a metal electrical socket with screw holes being inserted, showing step 1 and step 3 (no text or symbols)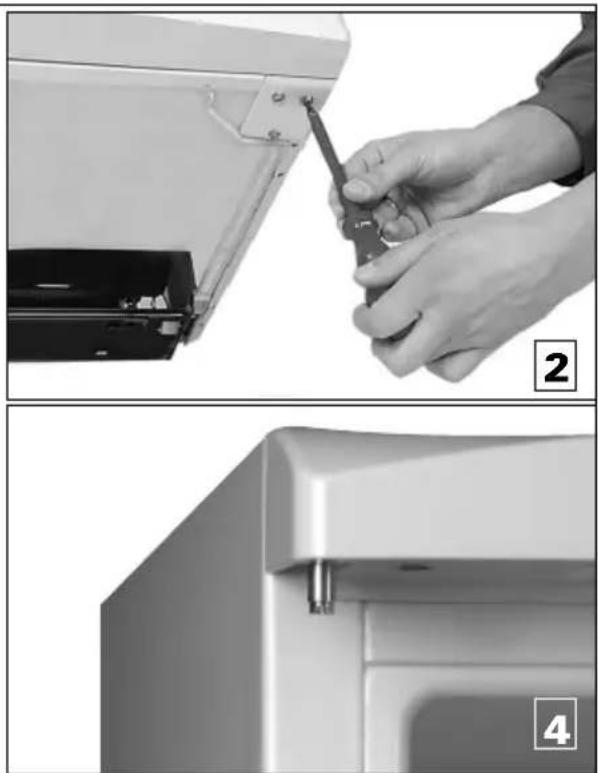
natural_image
Two-step diagram showing a hand using a screwdriver to adjust the door panel, with no visible text or symbols.4A
natural_image
Close-up of a hand holding a small object near a white container (no visible text or symbols)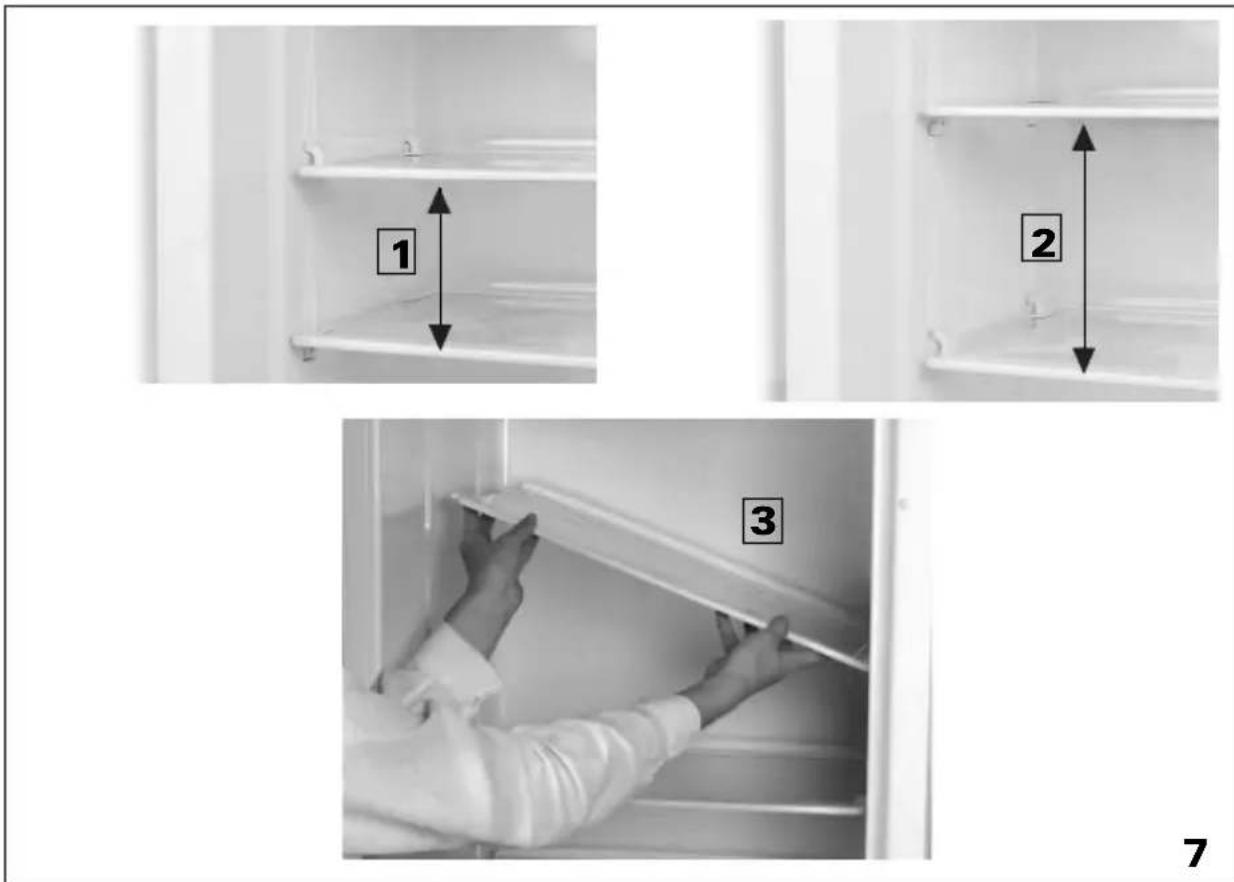
natural_image
Hand using a screwdriver to adjust a white spherical object on a wall (no text or symbols visible)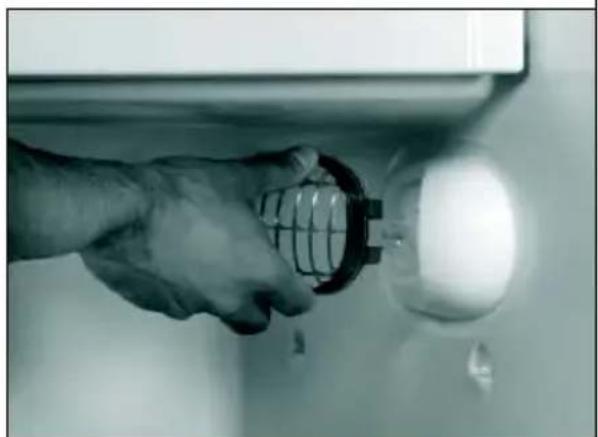
natural_image
Close-up of a hand holding a flashlight next to a white bulb (no text or symbols visible)9
natural_image
Hand holding a tool near a wall-mounted fixture (no visible text or symbols)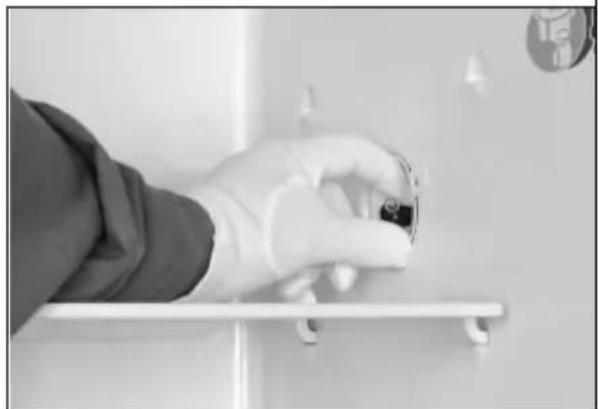
natural_image
Close-up of a gloved hand holding a small object on a white shelf, with no visible text or symbols.9A
- Congratulations on your new fridge/ freezer
- WARNING
- Setting up and building in
- 2
- Placement in cold rooms
- Electrical connection
- 3
- IMPORTANT
- You can change the doors from right-hinged to left-hinged or vice versa yourself
- Specifically for Fresh line models 4A
- Starting up
- Changing the temperature
- 5
- Freezing down
- PLEASE NOTE!
- Brief temperature variation
- Cleaning/defrosting
- Cleaning the refrigerator
- Defrosting the freezer section
- Fridge section - use and accessories
- Vegetable drawers
- Serving boxes
- Bottle shelves in the door
- Glass shelves 7
- Freezer section - use and accessories
- Useful hints
- The door sticks
- The appliance is to remain unused for a time
- Compressor does not run
- Trickling and gurgling noises
- Note also
- Spare parts
- Replacing the bulb
- 9
- If the refrigerator/freezer has halogen bulb
- Disposal
- Multi- of tafeldozen
Brand : Frigor
Model : KF 285
Category : Fridge