
VR110 - VCR PHILIPS - Free user manual and instructions
Find the device manual for free VR110 PHILIPS in PDF.

| Product Type | VCR (Video Cassette Recorder) |
| Brand | Philips |
| Model | VR110 |
| Dimensions (W x H x D) | Approximately 430 x 90 x 270 mm |
| Weight | Approximately 3.5 kg |
| Power Supply | 220-240 V AC, 50 Hz |
| Power Consumption | Approximately 20 W (standby: <5 W) |
| Tape Format | VHS |
| Recording Modes | SP (Standard Play), LP (Long Play) |
| Heads | 4-head drum for improved image quality |
| Inputs | RF antenna input, SCART (RGB/AV) |
| Outputs | RF modulator output, SCART, composite video, stereo audio |
| Timer Recording | Up to 8 events, monthly/yearly programmable |
| Features | Auto head cleaning, auto power off, parental control |
| Maintenance | Clean heads with cleaning cassette; avoid dusty environment |
| Safety | Class II double insulation; do not expose to moisture |
| Spare Parts | Remote control, power cord, SCART cable; contact support |
| Reparability | Serviceable by qualified technician; user replaceable fuse |
Frequently Asked Questions - VR110 PHILIPS
User questions about VR110 PHILIPS
0 question about this device. Answer the ones you know or ask your own.
Ask a new question about this device
Download the instructions for your VCR in PDF format for free! Find your manual VR110 - PHILIPS and take your electronic device back in hand. On this page are published all the documents necessary for the use of your device. VR110 by PHILIPS.
USER MANUAL VR110 PHILIPS
WARNING: TO PREVENT FIRE OR SHOCK HAZARD, DO NOT EXPOSE THIS UNIT TO RAIN OR MOISTURE.
- The STANDBY/ON and VCR POWER buttons do not completely shut off the mains power from the unit, but switches operating current on or off only.
- The rating plate is on the rear of the unit.
Table of Contents
Description of Controls .... 3
Front Panel 3
Remote Control 4
Rear Panel 6
On-Screen Display 6
Display Window 7
Getting Connected Up 8
VCR to TV Connection using the RF Connection....8
VCR to AV TV Connection using the SCART Connection....8
VCR to AV TV Connection using the S-video Connection 9
Setting Up 10
Auto Set Up/Preset Download 10
Setting the Video Channel 15
Menu Operations 16
Power Save Mode 16
Language Setting 16
Preset Download 16
Auto Channel Setting 17
Manual Channel Setting 17
Clock Setting 20
SHOWVIEW®Set Up 20
Basic Operations 21
Selecting Colour Mode 21
Playback 21
Recording 22
Automatic Operations 22
Advanced Operations 23
Special Effect Playbacks 23
Tracking Adjustments 23
Index Search....23
SmartPicture 24
DSPC 24
Digital TBC/NR 25
Digital 3R 25
Receiving/Recording NICAM Stereo And Bilingual Programmes ..... 25
Selecting Monitor Sound 25
Using On-Screen Display 26
One Touch Recording (OTR) 26
Record End Search 26
Selecting Recording Format 27
Selecting AV1 and AV2 Input signal 27
Automatic Satellite Programme Recording 28
S-VHS ET 28
CinemaLink Functions 28
Timer Recording Using SHOWVIEW System 29
Timer Recording 30
Turbo Timer 31
Tape Duplication 33
Audio Dubbing 34
System Connections.... 35
Connection To a Satellite Tuner (Simple Connections).... 35
Connection To a Satellite Tuner (Perfect Connections).... 35
Connection To a Satellite Tuner (Basic Connections) 36
Connection To a Decoder 36
Operating TV 37
Operating Satellite Tuner.... 38
Before Requesting Service 39
Specifications 40
WARNING
Any unauthorized changes or modifications to this equipment void the user's authority to operate it.
SHOWVIEW® SVHS 625
Introduction
Congratulations on purchasing your new VCR.
You can't wait to get it working, but before you do, spare a few moments to read this brief introduction to the world of video recording. It may repay you handsomely in terms of improved results, and avoiding of costly mistakes.
Positioning
Do not place the VCR directly on top of, or underneath, your TV set. Ensure that there is at least 20 cm between the VCR and the TV set, and that air can circulate freely through the ventilation openings of the VCR.
IMPORTANT
Audio-Visual material may consist of copyrighted works which must not be recorded without the authority of the owner of the copyright.
Please refer to relevant laws in your country.
SHOWVIEW is a registered trademark of Gemstar Development Corporation.
The SHOWVIEW system is manufactured under licence from Gemstar
Development Corporation.
This product complies with the requirements of the directive 73/23/EEC+89/336/EEC+93/68/EEC.
Front Panel
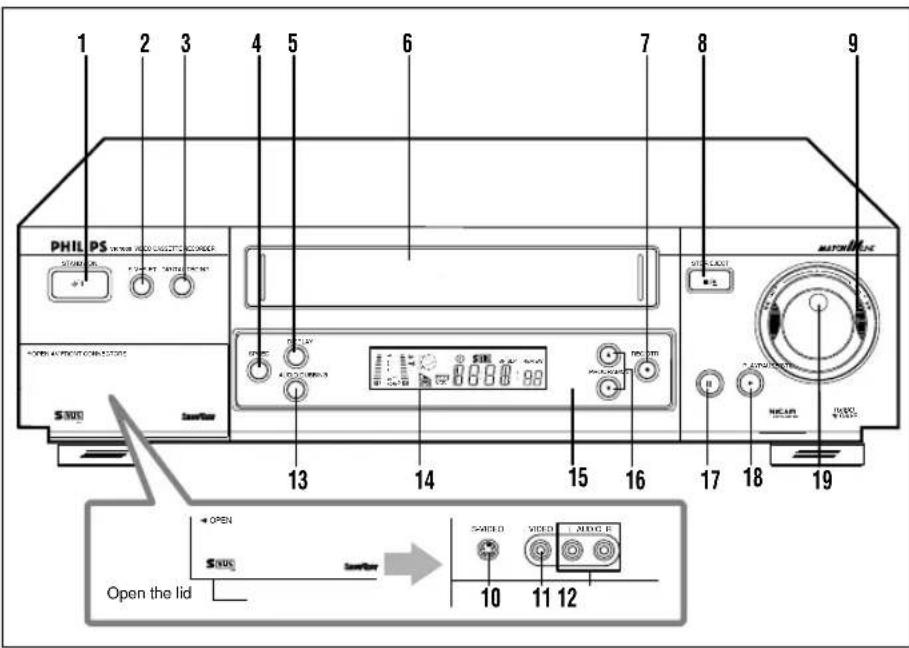
1 STANDBY/ON button
- Turns the VCR on or off.
- Sets the VCR for an unattended recording (timer recording) after timer settings are completed. (P.29) (P.30)
2 S-VHS ET button
Selects S-VHS ET recording mode when pressed. The lamp (the button itself) will lit. (P.28)
3 DIGITAL TBC/NR button
Removes jitter from fluctuating video to deliver a stable picture. (P.25) The lamp (the button itself) will lit. (P.28)
4 SPEED button
Selects the tape speed for recording (SP or LP). During playback, the tape speed is automatically selected (SP, LP or SLP). (P.22, P.29, P.30) SP, LP : For PAL signal SP, SLP : For NTSC signal
5 DISPLAY button
Displays the time counter, present time, channel number, and tape remaining time.
6 Cassette compartment
Where a video cassette is inserted.
7 REC/OTR ● button
• Starts recording when pressed once.
(P.22)
• Starts a recording for 30 minutes to 6 hours long when pressed more than once. The shut-off time increases in 30 minute intervals. (P.26)
8 STOP/EJECT ■ / ▲ button
Stops the tape when the tape is running. (P.21, P.22) Press again to eject the cassette when the tape is not running. (P.21, P.22)
9 SHUTTLE ring
- Rewinds or fast forwards the tape when the tape is not running. (→P.23)
- Starts reverse or forward rapid visual search during playback or still picture mode. (→P. 21, P.23)
10 S-VIDEO input jack
For connecting to the S-Video output jack on another VCR or a portable video camera. (→P.33)
11 VIDEO input jack
For connecting to the video output jack on another VCR or a portable video camera. (→P.33)
12 AUDIO input jacks
For connecting to the audio output jacks on another VCR or a portable video camera. (→P.33)
13 AUDIO DUBBING button
Replaces the normal audio sound of a previously recorded tape with a new soundtrack, using an audio component (→P.34)
14 Display window
See page 7.
15 IR (infrared) remote sensor
Receives the signal from the (IR) remote control.
16 PROGRAMME ▲ / ▼ buttons
• Changes the channels on the VCR. Release at a desired channel.
- Moves the cursor up and down when using the menus. (→P.16)
- Adjusts the tracking during playback, still picture and slow motion picture (→P.23)
17 PAUSE/ STILL II button
Stops the tape during recording (pause) or playback (still picture). (→P.21, P.22) Press again to resume normal recording. Press PLAY ▶ to resume normal playback. Activates slow motion picture when pressed for more than 2 seconds during playback. (→P.23)
18 PLAY ▶ button
Starts normal playback. (→P.21)
19 Jog dial
Advances or reverses the picture frame by frame in the still picture mode (→P.23)
Remote Control
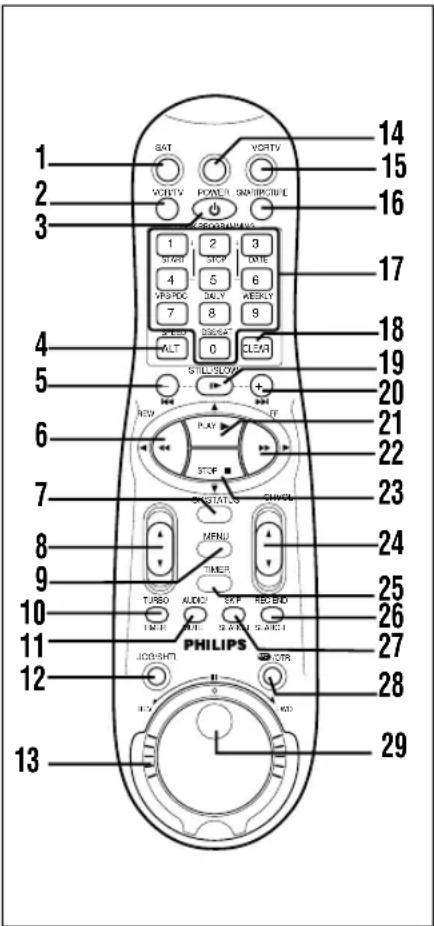
Using this remote control to operate TV or satellite tuner
You can use this remote control to operate your TV or satellite tuner.
To operate satellite tuner, see page 38.
1 SAT button
Makes the remote control ready for operating the satellite tuner.
2 VCR/TV button
Before using this button, press VCR or TV to select your target component.
- After pressing VCR (Only for scart connection users (→P.8)):
- Switches TV's mode between AV and TV. When pressed and VCR indicator on the display window lights, TV mode changes to AV mode.
When pressed and VCR indicator goes off, TV mode changes to TV mode.
• After pressing TV:
- Switches TV's mode between AV and TV.
3 POWER button
Before using this button, press VCR, SAT or TV to select your target component.
• After pressing VCR:
- Turns the VCR on or off.
- Sets the VCR for an unattended recording (timer recording) after timer settings are completed. (→P.30)
• After pressing TV, turns the TV on or off.
• After pressing SAT, turns the satellite tuner on or off.
4 ALT/SPEED button
ALT:
For some PHILIPS TV only:
After pressing TV, press this button to go back to the previously selected channel on TV.
For other manufacturers TVs or for some satellite tuner;
After pressing TV or SAT, it functions as the 1-digit/2-digit entry button for channel switching SPEED:
After pressing VCR, press this button to select the tape speed for recording SP or LP. During playback, the tape speed is automatically selected (SP, LP or SLP). (P.22)
SP, LP : For PAL signal
SP, SLP : For NTSC signal
5 STILL/SLOW / ◀◀◀ button
- During a slow motion picture, adjusts the playback speed in the reverse direction (→P.13)
Press PLAY ▶ to resume normal playback.
- Locates an index marked at the beginning of every recording. (P.23)
◀◀ (Rewind) / ◀ button
Before using this button, press VCR or TV to select your target component.
• After pressing VCR:
– Rewinds the tape. Also, during playback, starts rapid reverse visual search. (→P.23)
- Goes back to the previous menu screen when using the menus. (→P.16)
- For some PHILIPS TVs only: After pressing TV, operates the TV's menus.
OK/STATUS button
Before using this button, press VCR or TV to select your target component.
• After pressing VCR:
- Goes to the next item on the VCR menu.
- Displays the time counter, present time, channel position, and remaining tape length. (→P.26)
• After pressing TV:
For some PHILIPS TV only:
- Displays the TV's on-screen information.
For other manufacturers' TVs or satellite tuner:
Functions as the ENTER button if your TV requires pressing ENTER after selecting a channel position.
8 VOL (volume) ▲ / ▼ buttons
Changes the TV volume.
Release at desired volume.
9 MENU button
Before using this button, press VCR or TV to select your target component.
- After pressing VCR, calls up the main menu. (→P.16)
- Exits the menu screen when using the menus.
- For some PHILIPS TVs only: After pressing TV, calls up the TV's main menu.
10 TURBO TIMER button
Press to engage the Turbo Timer mode (→P.31)
11 AUDIO/MUTE button
Before using this button, press VCR or TV.
- After pressing VCR, selects sound output mode. (P.25)
• After pressing TV, turns off the TV sound.
12 JOG/SHTL (shuttle) button and lamp
Activates the jog dial and shuttle ring on the remote control when the lamp (the button itself) is lit. (→P.23)
13 Shuttle ring
Starts reverse or forward rapid visual search during playback or still picture mode. (→P.23)
14 TV button
Makes the remote control ready for operating the TV.
15 VCR button
Makes the remote control ready for operating the VCR.
16 SMARTPICTURE button
Selects the SmartPicture mode. (→P.24)
17 Number buttons
(0, 1, 2, 3, 4, 5, 6, 7, 8 and 9)
Before using these buttons, press VCR, TV or SAT to select yout target component.
- Press to select a channel on the VCR satellite tuner or TV.
To select channels 1 to 9, press 0 then the channel you want. For example, for channel 4, press 0 th 4.
- Also used to programme the Timer Recordings. (→P.29, P30)
18 CLEAR button
- Erases unwanted timer programmes. (→P.31)
- Resets counter to 0:00:00.
19 STILL/SLOW button
- Stops the tape during recording (pause) or playback (still picture) temporarily. (→P.22, P.23)
Press again to resume normal recording.
Press PLAY ▶ to resume normal playback.
- Activates slow motion picture when pressed for more than 2 seconds during playback. (→P.23)
20 STILL/SLOW / ▶▶ button
- During a slow motion picture, adjusts the playback speed in the forward direction (→P.13)
Press PLAY ▶ to resume normal playback.
- Locates an index marked at the beginning of every recording. (→P.23)
21 PLAY ▶ / ▲ button
Before using this button, press VCR or TV to select your target component.
• After pressing VCR:
- Starts normal playback. (→P.22)
- Moves up the cursor when using the menus. (P.16)
- For some PHILIPS TV only: After pressing TV, operates the TV's menus.
22 ▶▶ (Fast forward) /
▶ button
Before using this button, press VCR or TV to select your target component.
• After pressing VCR:
- Fast forwards the tape. Also during playback, starts rapid forward visual search. (→P.21)
- Changes the setting of a menu item. (→P.16)
- For some PHILIPS TVs only: After pressing TV, operates the TV's menus.
23 STOP ■ / ▼ button
• After pressing VCR:
- Stops the tape. (→P.21)
- Moves down the cursor when using the menus. (P.16)
- For some PHILIPS TVs only: After pressing TV, operates the TV's menus.
24 CH (channel) ▲ / ▼ button
Before using this button, press VCR, TV or SAT.
• After pressing VCR, changes the channels on the VCR. Release at a desired channel.
• After pressing TV, changes the channels on the TV. Release at a desired channel.
• After pressing SAT, changes the channels on the satellite tuner. Release at a desired channel.
25 TIMER button
Displays the Timer Recording menu.
26 REC (ord) END SEARCH button
Press prior to recording a programme to find the end of previously recorded program and the unrecorded portion of a tape. (P.26)
27 SKIP SEARCH button
Press during tape playback to fast forward 30 seconds of a tape. (→P.23)
28 REC (record)/OTR button
- Starts recording when pressed once. (→P.22)
- Starts a recording for 30 minutes to 6 hours long. When pressed more than once, the shut-off time increases in 30-minute intervals. (→P.26)
29 Jog dial
Advances or reverses the picture frame by frame in the still picture mode. (→P.23)
Note:
The following buttons will glow when you use or place the remote control in the dark area.
- PLAY ▶
- STOP
- ▶▶ (Fast forward)
- ◀◀ (Rewind)
• VOL (ume) ▲/ ▼
- CH (annel) ▲/ ▼
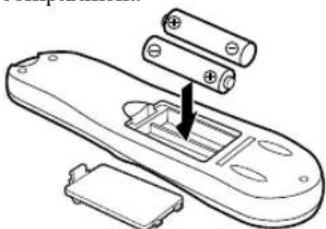
To insert the batteries:
1 Remove the battery compartment lid from the bottom of the remote control.

natural_image
Line drawing of a remote control device with a scroll wheel and handle (no text or symbols)2 Install two AA batteries — R6(SUM-3)/AA — matching polarity indicated inside the battery compartment.
natural_image
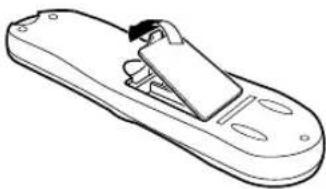
Diagram of a remote control casing with battery and plastic housing (no text or symbols)3 Replace the lid.
natural_image
Line drawing of a remote control device with handle and buttons (no text or symbols)Note:
This remote control and batteries are supplied accessories.
Check to make sure they are included. Also, check "Specifications" to see what other accessories are included.
CAUTION
On Battery Replacement
Do not mix old and new batteries. (Also never mix alkaline batteries with manganese batteries.)
Rear Panel
1 AC (alternating current) power cord
Connect the AC power cord to an AC outlet.
2 S-VIDEO out jack
For connecting to the S-Video input jack on a TV or another VCR. (→P.8, P.9, P.33)
3 AV1 (L-1) IN/OUT connector (SCART)
For connecting to the AV terminal on TV or another VCR. ( P.8, P.33)
4 ANT. (antenna) IN (input) terminal (from Antenna)
Connect your antenna or cable to this terminal. (→P.8)
5 Remote PAUSE connector
Enables connection to second recorder equipped with R.A. Edit connector.
6 AUDIO OUT jacks
For connecting to the audio input jack on a TV or another VCR. (→P.9, P.33)
7 AV2 (L-2) IN/DECODER connector
For connecting to the AV terminal on another VCR, satellite tuner or decoder. (P.33, P.35, P.36)
8 RF OUT (output) terminal (to TV)
Use the supplied RF coaxial cable to connect this terminal to the UHF/VHF input terminal on the TV. (→P.8)
On-Screen Display
The following information (VCR operating status) appears on the TV screen. (→P.26)
- Current time
- Operation mode
- Receiving broadcast
- Tape position indicator
- Colour mode
- Remaining tape length
- Tape speed
- Channel position number
- SmartPicture setting
- Sound output mode
- Index number
- Time counter
Display Window
1 Sound level indicator
Indicates the audio signal level.
2 Programme Time Indicators
→: Start programme time.
← Stop programme time.
3 Operation mode indicators
- Lights up during recording.
▶: Lights up during playback.
☐: Lights up during a pause.
☀️: “▶” lights up and “○” blinks during audio dubbing.
“▶↔↔” lights up and “○” blinks during audio dubbing pause.
4 (Ømer) indicator
Lights up when the VCR is set for an unattended recording (timer recording). (→P.29, P.30)
5 S-VHS indicator
Lights up while playing a tape recorded in S-VHS format or with S-VHS ET function, while recording on an S-VHS tape using S-VHS format and while recording on a VHS tape with S-VHS function.
6 Speed indicator
Indicates the tape speed.
SP - Standard Play
LP - Long Play
SLP - Super Long Play
(For NTSC playback only)
7 Sound output mode indicator
Indicates audio output mode currently selected. (→P.25)
8 Tape Remaining Time indicator
Displays the time remaining on tape after pressing DISPLAY on the front panel (or OK/STATUS on the remote control).
9 (Cassette-in) indicator
Lights up when there is a cassette in the VCR.
10 VCR indicator
Lights up when the VCR/TV button is pressed or when playback is started or when scrambled broadcast is received.
11 VPS/PDC indicator
Blinks while VPS/PDC signal detecting mode is engaged.
12 Digital clock/counter/Channel indicator
• Normally the present time appears.
- When a tape is inserted, the time counter appears (and is reset to 00:00:00).
If you always rewind your tapes completely, you can use this counter reading as an index to find where a programme starts.
- A channel position number selected with the TV tuner built in the VCR appears.
When the external line input is selected, the following display appears:
- “L-F” for the front panel Audio/Video jacks.
- “S-1” for the front panel Audio/S-Video jacks.
- “L-1” for the rear panel AV1 (L-1) IN/OUT connector.
- “L-2” for the rear panel AV2 (L-2) IN/DECODER connector.
- “ U:01” appears when the video heads are dirty.(→P.39)
VCR to TV Connection using the RF connection
Connection Diagram
To connect to a TV with No 21-pin AV input connector.
1 Disconnect the antenna or cable from the TV and the AC power cord of the TV from the AC outlet.
2 Connect the antenna or cable to the VCR.
3 Connect the VCR to the TV using the RF coaxial cable.
4 Plug the AC power cords of the VCR and TV into the AC outlets.
CAUTION
Do not plug the AC power cords until all connections are completed.
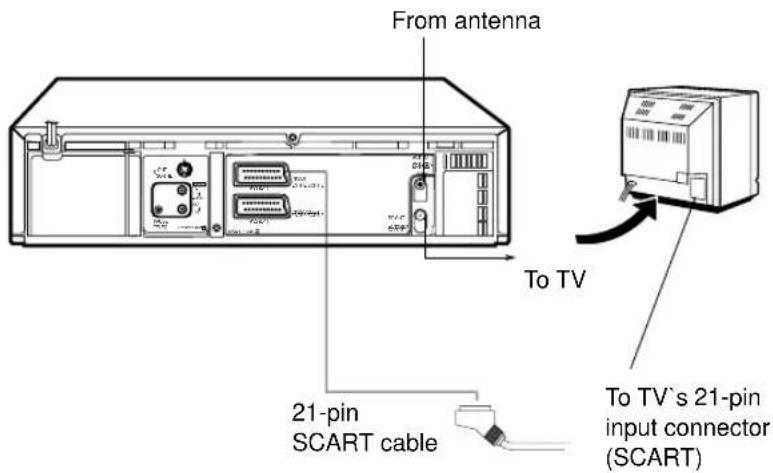
VCR to AV TV Connection Using the SCART Connection
Make this connection if your TV has a 21-pin AV input connector (SCART) in order to reduce the possibility of interference. And if you are using a stereo TV, you will need this cable in order to enjoy stereo playback of videotapes.
- Complete the VCR to TV connection using RF Connection.
- Connect the scart cable between the AV1 (L-1) IN/OUT connector of the VCR and the TV's 21-pin AV input connector (SCART).
ATTENTION
After you perform Auto Set Up or Preset Download (→P.10), you may have to set "A/V1 OUTPUT" to appropriate setting on the Menu Screen. (→P.27)
Or, there may be a loss of colour on the TV.
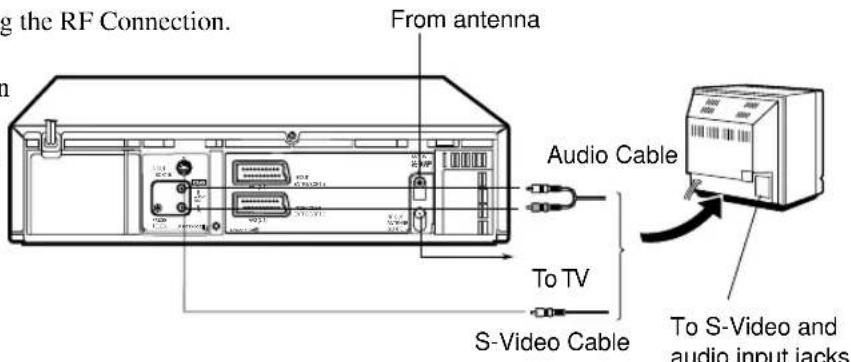
VCR to AV TV Connection Using the S-video Connection
To obtain high-quality S-VHS pictures and Hi-Fi sounds, you can also use the S-VIDEO CONNECTION described below;
1) Complete the VCR to TV connection using the RF Connection.
2) Connect an S-Video/Audio cables between the S-VIDEO OUT/AUDIO OUT jacks on the VCR and an S-Video/Audio input jacks on a TV.
Notes:
- After you plug the AC power cord into a AC outlet, the Country Set display appears on the TV screen and display window on the VCR's display window when the STANDBY/ON (or POWER button on the remote control) is pressed for the first time to power on the VCR. Go to page 10 to perform Auto Set Up or Preset Download.
- If you are using a Decoder and/or Satellite Tuner, see page 35 and 36 also.
Auto Set Up/Preset Download
For the first time you press the STANDBY/ON button on the front panel (or POWER button on the remote control) to turn on the VCR after you plug the AC power cords, the country set display will appear on the TV screen and the VCR's display window.
By simply selecting the country* and type of tuner setting (Auto Set or Preset Download), the tuner channels are set automatically.
*If you live in Belgium (BELGIUM) or Switzerland (SUISSE), you also need to select your language.
If you use Auto Set Up function, the video channel ( P.15), clock** and guide channel numbers** ( P.20) are also set automatically.
If you use Preset Download function, the tuner channels are set by downloading preset data from TV.
Also, the clock** and guide channel numbers** (→P.20) are set automatically. However, you can use this function only when you connect between VCR and TV equipped with T-V Link, EasyLink, Megalogic, SMARTLINK, Q-Link, DATALOGIC or NEXTVIEWLINK function via fully-wired 21-pin SCART cable.
**If you live in Hungary (MAGYARORSZAG), Czech Republic (CESKA REPUBLIKA), Poland (POLSKA) or other countries in Eastern Europe (OTHER EASTERN EUROPE), you have to set them manually.
Preparation
1 Make sure the TV antenna cable is connected correctly and the VCR's AC power cord is connected to the AC outlet.
2 If you want to use the on-screen display, set the TV to AV mode (with SCART or S-VIDEO CONNECTION P.8 or P.9) or UHF channel 36 (with RF connection P.8).
If you live in Hungary (MAGYARORSZAG), Czech Republic (CESKA REPUBLIKA), Poland (POLSKA) or other countries in Eastern Europe (OTHER EASTERN EUROPE), be sure to use the on-screen display.
3 Turn on the VCR by pressing the STANDBY/ON button or POWER.
The Country Set display appears on the TV screen and/or display window.
Display Window

On-screen display

- If you're using an RF connection and the on-screen display looks distorted, perform "Setting the video channel" first. (→P.15)
- If you're using a SCART connection and the on-screen display has no colour, perform "Selecting AV1 and AV2 Output/Input signal" after Auto Set Up or Preset Download. (P.27)
- If you are referring to the on-screen display, press ▲/▼ on the remote control to select your country name.
International Telephone Country Code
In this example, DANMARK is selected.
- If you have selected BELGIUM (32) or SUISSE (41), go to step 5.
- If you have selected MAGYARORSZAG (36), CESKA REPUBLIKA (42), POLSKA (48) or OTHER EASTERN EUROPE (EE), go to step 6.
- If you have selected any other country name (code), press OK/STATUS and then go to step 7.
5 Press OK/STATUS on the remote control. The Language Set display appears on the screen and/or display window.
- If you are referring to the display window, press
▲/▼ to select your language code, then press OK/STATUS.
Skip step 6 and go to step 7.
- If you are referring to the on-screen display, press
▲/▼ to select your language, then press OK/STATUS. Skip step 6 and go to step 7.
In this example, DEUTSCH is selected for SUISSE.
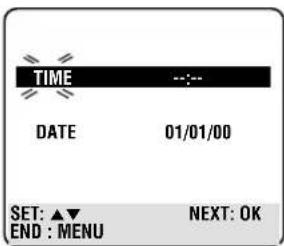
6 Press OK/STATUS. The Clock Set screen will appear. Press ▲/▼ to set the time and then press OK/STATUS. The “date” display begins blinking. Repeat the same procedure to set the date and year. Press MENU when clock setting is finished.
- When you set the time, press and hold ▲/▼ to change the time by 30 minutes.
- When you set the date, press and hold ▲/▼ to change the date by 15 days.
7 The following display appears on the screen and/or display window.
- If you use the Auto Set Up function, go to Auto Set Up on page 12.
- If you use the Preset Download function, go to Preset Download on page 14.

Auto Set Up
1●If you are referring to the display window, press ▲/▼ to select “Auto” and press OK/STATUS.
flowchart
graph TD
    A["Auto"] --> B["Auto"]
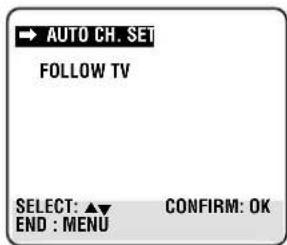
- If you are referring to the on-screen display, press ▲/▼ to select “AUTO CH. SET” and press OK/STATUS.
flowchart
graph LR
    A["→ AUTO CH. SET FOLLOW TV"] --> B["→ AUTO CH. SET PLEASE WAIT"]
    B --> C["0 ---- + +"]
    C --> D["END : MENU"]
    D --> E["Beginning"]
    E --> F["End"]
    G["SELECT: ▲ CONFIRM: OK"] --> H["END : MENU"]
    style A fill:#f9f,stroke:#333
    style B fill:#ccf,stroke:#333
    style C fill:#cfc,stroke:#333
    style D fill:#fcc,stroke:#333
    style E fill:#ffc,stroke:#333
    style F fill:#fcc,stroke:#333
Do NOT press any button on the front panel or remote control until the display window shows either the display as illustrated in step 2 or “--:--.”.
2●If you have connected the VCR to TV via an RF cable only (RF connection), the channel that is shown on the display window is your Video Channel. If you have selected MAGYARORSZAG (36), CESKA REPUBLIKA (42), POLSKA (48) or OTHER EASTERN EUROPE (EE) in Preparation section, “2OUT” appears instead of “1OUT”.

To view picture signals from the VCR, set TV to the Video Channel. Refer to the instructions supplied with TV set for how to do this.
- If you have connected the VCR to TV via both an RF cable and a SCART cable or an S-Video cable (SCART connection or S-Video connection), you do not need the video channel so you have to set the video channel to off. Press ▼ until the video channel changes to “--” (off).

To view picture signals from the VCR, set the TV to its AV mode. Refer to the instructions supplied with the TV set for how to do this.
- If “--:---” appears, both Auto Channel Set and Auto Clock Set have failed. Make sure the TV antenna cable is connected correctly and press OK/STATUS to re-perform the Auto Set Up.
3Press OK/STATUS.
If the correct current time is displayed on the display window, the Auto Channel Set and Clock Set have been completed successfully. Go to step 4.

If “1” (channel position) is displayed on the display window, the Auto Clock Set has not completed (only the Auto Channel Set has). Go to step 4 and then perform “Clock Set” manually. ( P.20)
- You can check if the Guide Channel numbers have been set correctly when you perform SHOWVIEW Timer Recording (→P.29); if the correct channel position number is displayed on SHOWVIEW Programme screen, this confirms that the Guide Channel number for the SHOWVIEW number you enter has been set correctly.
4Press PROGRAMME ▲/▼ on the front panel (or CH ▲/▼ on the remote control) to make sure that all necessary stations have been stored in the VCR's memory.
- If station names (ID P.19) have also been stored in the VCR's memory, the station name will be displayed at the top left corner of the screen for about 5 seconds when the VCR is tuned to a different station.
- If you want to set the tuner manually such as to add or skip channels, to change channel positions, or to set or station names, see pages 17–18.
- If no station is stored in the VCR's memory, make sure the TV antenna cable is connected correctly and turn off the VCR power once, then turn it back on again. Re-perform from Preparation on page 10.
Notes:
● Auto channel set function takes place first; it assigns automatically all receivable stations in your area.
- Auto clock set function sets the clock automatically by reading the clock setting data from a station transmitting a PDC signal while auto channel set is being performed.
- During auto channel set, the VCR recognizes each station name of the detected stations and stores them in the VCR's memory, then automatically sets SHOWVIEW system's assigned Guide Channel number for those stations according to the broadcast area.
- In the area where to TV station transmits a PDC signal, the VCR can perform neither auto clock set nor auto Guide Channel number set.
- For RF connection users: The VCR detects the channels which are not occupied by local stations and selects one channel automatically for your Video Channel that is located in the middle of more than 5 vacant channels.
- If there is a power cut, or if you press STANDBY/ON, POWER or MENU while Auto Set Up is in progress, Auto Set Up will be interrupted; be sure to turn off the VCR power once and try again from step 1.
● Auto clock may not function properly depending on the reception condition.
IMPORTANT
In certain reception conditions, station names may not be stored correctly, and auto Guide Channel Number Set may not work properly. If the Guide Channel numbers are not set properly, when you timer-record a TV programme using the SHOWVIEW system, the VCR will record a TV programme of a different station. When programming the timer using the SHOWVIEW system, be sure to check whether the channel position on which your VCR receives the broadcasting station you wish to record is selected. (→P.29)
- Your VCR memorizes all detected stations even if reception of some of them is poor. In these cases picture quality may be poor. To delete those stations with an unacceptable picture, see page 18.
For RF connection users: In certain reception conditions, the Video Channel may not be set correctly and interference may appear in the TV picture while the VCR's power is on. Set your Video Channel manually. (→P.15)
INFORMATION
■Language for the on-screen display
Language for the on-screen display is automatically set depending on the Country setting you have made in preparation on page 10 (unless you have selected BELGIUM or SUISSE), as shown below.
| SUOMI | SUOMI | DANMARK | DANSK | NEDERLAND | NEDERLANDS |
| PORTUGAL | ENGLISH | OESTERREICH | DEUTSCH | GREECE | ENGLISH |
| DEUTSCHLAND | DEUTSCH | ČESKÁ REPUBLIKA | ENGLISH | OTHER WESTERN EUROPE | ENGLISH |
| POLSKA | ENGLISH | ITALIA | ITALIANO | OTHER EASTERN EUROPE | ENGLISH |
| NORGE | NORSK | MAGYARORSZÁG | ENGLISH | ||
| SVERIGE | SVENSKA | ESPAÑA | CASTELLANO |
If you want to change the language setting manually, see page 16.
■Just Clock
Your VCR is equipped with the Just Clock function which provides accurate time keeping through automatic adjustments at regular intervals, by reading data from a PDC signal. If you want to take advantage of this function, simply set it to “ON”, on the Clock Set screen. (→P.20)
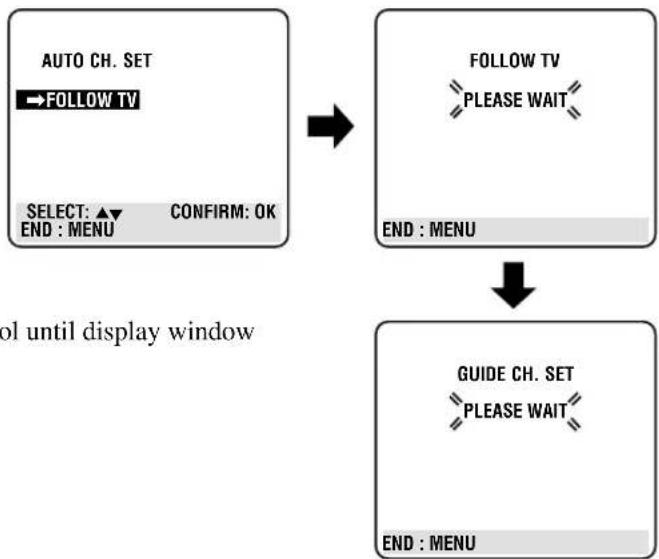
Preset Download
Before performing the following steps, be sure to finish Preparation on pages 10–11.
1●If you are referring to the display window, press ▲/▼ to select "CH --" and press OK/STATUS.
flowchart
graph TD
    A["CH --"] --> B["CH 1"]
Channel position number increases from "CH 1".
- If you are referring to the on-screen display, press ▲/▼ to select “FOLLOW TV” and press OK/STATUS.
flowchart
graph TD
    A["AUTO CH. SET"] --> B["FOLLOW TV"]
    B --> C["SELECT: ▲ CONFIRM: OK"]
    B --> D["END: MENU"]
    E["FOLLOW TV"] --> F["PLEASE WAIT"]
    F --> G["END: MENU"]
    H["GUIDE CH. SET"] --> I["PLEASE WAIT"]
    I --> J["END: MENU"]
Do NOT press any button on the front panel or remote control until display window shows either the display as illustrated in step 2 or “--:---”.
2
If the correct current time is displayed on the display window, the Auto Channel Set and Clock Set have been completed successfully. Go to step 3.

If "1" (channel position) is displayed on the display window, the Auto Clock Set has not completed (only the Auto Channel Set has). Go to step 3 and then perform "Clock Setting" manually. (→P.20)
- You can check if the Guide Channel numbers have been set correctly when you perform S HOWVIEW Timer Recording (→P.29); if the correct channel position number is displayed on SHOWVIEW Programme screen, this confirms that the Guide Channel number for the SHOWVIEW number you enter has been set correctly.
3 Set the Video Channel manually. (→P. 15)
4Press PROGRAMME ▲/▼ on the front panel (or CH ▲/▼ on the remote control) to make sure that all necessary stations have been stored in the VCR's memory.
- If station names (ID P.19) have also been stored in the VCR's memory, the station name will be displayed at the top left corner of the screen for about 5 seconds when the VCR is tuned to a different station.
- If you want to set the tuner manually such as to add or skip channels, to change channel positions, or to set or station names, see pages 17–18.
- If no station is stored in the VCR's memory, make sure the SCART cable is connected correctly and press OK/STATUS to re-perform Preset Download.
Notes:
- In the area where no TV station transmits a PDC signal, the VCR can perform neither auto clock set nor auto Guide Channel number set.
- If there is a power cut, or if you press STANDBY/ON, POWER or MENU while downloading or set up is on progress, it will be interrupted; be sure to turn off the VCR power once and try again from the beginning.
● Auto clock may not function properly depending on the reception condition. - When you perform Preset Download function, be sure to use fullywired 21-pin SCART cable.
- On this VCR, the characters available for station's name (ID) are A-Z, 0-9), -, *, + and — (space). Some downloaded station's name may differ from those of your TV (→P.19).
Important
In certain reception conditions, station names may not be stored correctly, and auto Guide Channel Number Set may not work properly. If the Guide Channel numbers are not set properly, when you timer-record a TV programme using the SHOWVIEW system, the VCR will record a TV programme of a different station. When programming the timer using the SHOWVIEW system, be sure to check whether the channel position on which your VCR receives the broadcasting station you wish to record is selected. (→P.29)
Setting the Video Channel
Video Channel (RF Output Channel) is the channel on which your TV receives picture and sound signals from the VCR through the RF cable.
IMPORTANT
Perform the following steps only if -
- Video Channel Set has not been done correctly by the Auto Set Up function. (→P.12)
- you set up the VCR's tuner by Preset Download (→P.14) instead of using the Auto Set Up function.
- interference appears in the TV picture after you have moved to a different area or a new station has started broadcasting in your area.
- you change the connection between your VCR and TV from RF connection to Scart or S-Video connection, or vice versa.
1 Make sure the VCR is turned off and no cassette is inserted.
2 Turn on the TV, and tune it to any UHF channel (between 22 and 69) you want to use as the video channel on the TV.
- Select a channel not used in your area.
3 Press STOP/EJECT ■ /▲ on the front panel for more than 5 seconds.
The following indication appears on the display.

TV system number starts flashing.
4 Press PROGRAMME▲/▼ on the front panel to select an appropriate TV system number for your area.
- For B/G (other countries).
- For D/K (Magyarorszag, Ceska Republika, Polska, or other Eastern Europe).
5 Press OK/STATUS on the remote control.
The channel number starts flashing on the display.
200136
Channel number starts flashing.
6 Press PROGRAMME▲/▼ on the front panel to select the channel you have tuned on the TV as the video channel in step 2.
A test signal (two vertical white bars) appears on the TV.

natural_image
Simple gray rectangle with three vertical white stripes on the top and bottom (no text or symbols)Test signal
(two vertical white bars)
If you use SCART connection or S-Video connection, you do not need the video channel so you have to set the video channel to off. To turn it off, press
PROGRAMME▼ (or▼ on the remote control) until “--” appears on the channel number position.
7 Press OK/STATUS to finish the video channel setting.
To watch a picture from this VCR on the TV, select the same channel you have selected as the video channel (in step 2 above) on the TV.
Operations hereafter are described using the buttons on the remote control unless mentioned otherwise. The buttons on the front panel having the same (or nearly same) name or same (or nearly same) mark function exactly the same as those on the remote control.
Menu Operations
Before operating the VCR, be familiar with the menu operations first because most of the features built into the VCR can be available only on the menus.
1 Press VCR on the remote control.
2 Press
MENU
to
display
the
main
menu
screen.
3 Press ▲ or ▼ (or PROGRAMME
▲/▼ on the front panel) to select a desired feature on the menu, then press OK/STATUS.
4 When you select a feature, go to the section in this manual and follow the instructions described there.
To go back to the previous menu screen, press REW ◀.
To exit from the menu operations, press MENU.
Note:
Menu operating buttons function only when a menu is on the TV screen. When no menus is on the TV screen, they function differently.
IMPORTANT
The setup and adjustment procedures explained hereafter are written under the following conditions:
- You have turned on the TV and selected the video channel (or external video input).
- You have turned on the VCR.
Power Save Mode
You can reduce the power consumption while the VCR is turned off.
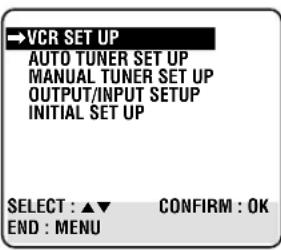
1 Select VCR Set Up Screen
1 Press VCR.
2 Press MENU.
3 Press ▲ or ▼ to select "VCR SET UP", then press OK/STATUS.
2 Set Power Save Mode
Press ▲ or ▼ to select “POWER SAVE” then press ▶ to set to “ON”.

3 Finish Setting
Press MENU.
- During Power Save, the display window will be turned off.
- The Just Clock function ( P. 20 ) does not work while the Power Save mode is engaged.
- While the VCR is in the Power Save mode, the picture may be distorted momentarily when you turn on/off the VCR.
- Power Save does not work when ...
... the VCR is in the Timer mode.
... the VCR's power is turned off after timer-recording (or One Touch Recording).
... the Auto Satellite Prog Recording mode is engaged ( P. 28).
... "A/V2 SELECT" is set to "DECODER" or "SAT" (P. 27).
Language Setting
You can also change the language manually.
1 Select Language Set Screen
1 Press VCR.
2 Press MENU.
3 Press ▲ or ▼ to select “AUTO TUNER SET UP” then press OK/STATUS.
The Country Set menu appears.
4 Press ▲ or ▼ to select your country's name, then press OK/STATUS.
2 Set Language
Press ▲ or ▼ to select the language, then press MENU to exit.
Preset Download
When you want to perform Preset Download after setting channels, perform the following procedure. For the detail of Preset Download, see page 14.
1 Perform Preset Download
1 Press VCR.
2 Press MENU.
3 Press ▲ or ▼ to select “AUTO TUNER SET UP”, then press OK/STATUS.
4 Press ▲ or ▼ to select your country's name, then press OK/STATUS.
5 Press ▲ or ▼ to select your preferred language, then press OK/STATUS.
6 Press ▲ or ▼ to select “FOLLOW TV”, then press OK/STATUS. The Follow TV screen appears and then Guide Channel Set screen appears.
2 Confirm Programmed Channel Information List
Once it is completed, “FOLLOW TV COMPLETED” is displayed on the screen for about 5 seconds.
The following screen will appear after 5 seconds, or if you press MENU;
C: Cable
PR: channel positions
CH: channel numbers
ID: station names (→P.19)
- The blueback screen and the programme currently being broadcasted by the blinking station appear alternately for 8 seconds each
- To view the next page, use the ▲▼ ◀▶ button on the remote control.
The stations located in the selected country appear at the top of the list.
- The Guide Programme numbers will also be set automatically.
3 Finish Setting
Press MENU to exit the menu operations.
Auto Channel Setting
If you move to another place, you may need to tune the VCR tuner again for your new residential area.
1 Perform Auto Channel Set
1 Press VCR.
2 Press MENU.
3 Press ▲ or ▼ to select “AUTO TUNER SET UP”, then press OK/STATUS.
4 Press ▲ or ▼ to select your country's name, then press OK/STATUS.
5 Press ▲ or ▼ to select your preferred language, then press OK/STATUS.
6 Press ▲ or ▼ to select “AUTO CH. SET”, then press OK/STATUS. The Auto Set screen appears as below;
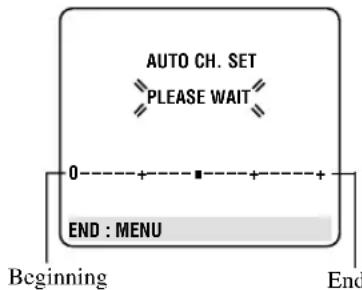
The Auto Set screen appears, and remains on screen while the recorder searches for receivable stations.
As Auto Channel Set progresses, the “■” mark on the screen moves from left to right.
Wait until the screen as shown in step 2 appears.
2 Confirm Programmed Channel Information List
Once it is completed, “AUTO CH. SET COMPLETED” is displayed on the screen for about 5 seconds. The following screen will appear after 5 seconds, or if you press MENU;
C: Cable
PR: channel positions
CH: channel numbers
ID: station names (→P.19)
- The blueback screen and the programme currently being broadcast by the blinking station appear alternately for 8 seconds each.
- To view the next page, use the ▲▼ ◀▶ buttons on the remote control. The stations located in the selected country appear at the top of the list.
- The Guide Program numbers will also be set automatically during Auto Channel Set.
3 Finish Setting
Press MENU to exit the menu operations.
Notes:
- If you perform Auto Channel Set when the aerial cable is not connected properly, "NO TV SIGNALS" appears on the screen in step 2. When this happens, make sure of the aerial connection and press OK/STATUS; Auto Channel Set will take place again.
- Depending on reception conditions, the stations may not be stored in order, and the station names may not be stored correctly.
Manual Channel Setting
When you want to do channel setting manually, perform the following procedures as required.
- If you want to ......
...... add channels (See below)
...... delete unwanted channels (See page 18)
...... change the channel positions (See page 18)
...... perform fine-tuning (See page 18)
...... descramble programmes when receiving scrambled broadcasts (See page 18)
...... change station names (See page 18)
- If you live in Eastern Europe, see INFORMATION on page 18 also.
If you want to add channels
1 Access Programmed Channel Information List
1 Press VCR.
2 Press MENU.
3 Press ▲ or ▼ to select “ MANUAL TUNER SET UP”, then press OK/STATUS.
2 Select Channel Position
1 Press ▲▼◀▶ until a vacant position in which you want to store a channel begins blinking.
(Ex.) To store in position 12.
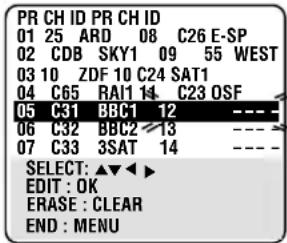
The blueback screen and the programme currently being broadcast by the selected channel appear alternately for 8 seconds each.
2 Press OK/STATUS. The Manual Channel Set screen appears.
3 Set New Channel Information
1 Press ▲ or ▼ to change the band between CH (regular) and CC (cable), then press ▶.
The blueback screen and the programme currently being broadcast by the selected channel appear alternately for 8 seconds each.
2 Press the Number buttons to input the channel you want to store.
- Input "0" before any single number entries.
- To input the registered station name (ID -→P.19), press ▶ until “----” (ID setting) begins blinking, then press ▲ or ▼.
- For fine tuning adjustment, press ▶ until “+/-” begins blinking, then press ▲ or ▼. While tuning, “+” or “-” appears.
- When storing a channel that sends scrambled broadcasts, press ▶ until “OFF” (Decoder setting) blinks, then press ▲ or ▼ to set “DECODER” to “ON” (“OFF” is the default setting).
When “A/V2 SELECT” is set to “A/V” or “SAT”, the “DECODER” setting cannot be changed ( P.27).
If you want to delete unwanted channels
You can delete channels manually.
1 Press VCR.
2 Press MENU.
3 Press ▲ or ▼ to select “MANUAL TUNER SET UP” then press OK/STATUS.
The programmed channel information list appears.
4 Press ▲ or ▼ until the item you want to delete begins blinking.
5 Press CLEAR to delete.
The item directly beneath the cancelled one moves up one line.
6 Press MENU to exit from the menu operations.
If you want to change the channel positions
You can also replace the channel position numbers.
1 Press VCR.
2 Press MENU.
3 Press ▲ or ▼ to select “MANUAL TUNER SET UP” then press OK/STATUS.
4 Press ▲ or ▼ until the item you want to change begins blinking, then press OK/STATUS.
5 Press ▲ or ▼ to move the station to the new channel position then press OK/STATUS.
Example: If you moved the station in position 4 to position 2, the stations originally in positions 2 and 3 each move down one space.
6 Press MENU to exit from the menu operations.
If you want to descramble programmes when receiving scrambled broadcasts
When you can receive a scrambled broadcast, you can descramble the programme by connecting this VCR to an external decoder through the VCR's AV2 (L-2) IN/DECODER connector. Complete the connection described on page 36 and follow the instructions below;
1 Press VCR.
2 Press MENU to access the main menu screen.
3 Press ▲ or ▼ to select “OUTPUT/INPUT SET UP”, then press OK/STATUS.
The output/input set up screen appears.
![OUTPUT/INPUT SET →A/V1 OUTPUT VIDEO A/V1 INPUT VIDEO A/V2 SELECT A/V A/V2 INPUT VIDEO SELECT : ▲▼ CHANGE :► [MENU] : EXIT](/content/2026/05/861477/images/c2166d7b70d7af5b7b6467a1f095d14ff7ee16e401d60dc4ef7b75e056ced480.jpg)
4 Press ▲ or ▼ to select "A/V2 SELECT".
5 Press ▶ to set to “DECODER” then press ◀to return to the main menu screen.
6 Press ▲ or ▼ to select “MANUAL TUNER SET UP”, then press OK/STATUS.
The programmed channel information list appears.
7 Press ▲ or ▼◀▶ to select the channel position broadcasting scrambled programmes, then press OK/STATUS twice. The Manual Channel Set screen appears.
8 Press ▶ until “OFF” (Decoder setting) begins blinking, and set it to “ON” by pressing ▲ or ▼.
9 Press OK/STATUS. The programmed channel information list appears.
10 Press MENU to exit menu operations.
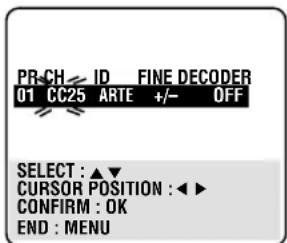
If you want to perform fine-tuning
Fine-tuning is performed automatically during Auto Channel Set, but you can also perform fine-tuning manually.
1 Press VCR.
2 Press MENU.
3 Press ▲ or ▼ to select “MANUAL TUNER SET UP”, then press OK/STATUS.
4 Press ▲▼ ◀▶ until the item you want to tune begins blinking. Press OK/STATUS twice. The Manual Channel Set screen appears.
5 Press ▶ until “+/-” begins blinking, then press ▲ or ▼ until the picture is clearest.
6 Press OK/STATUS. The programmed channel list appears.
7 Press MENU to exit the menu operations.
If you want to change station names
You can also change the station name manually.
1 Press VCR.
2 Press MENU.
3 Press to select "MANUAL TUNER SET UP", then press OK/STATUS.
4 Press ▲▼◀▶ until the item you want begins blinking.
5 Press OK/STATUS twice. The Manual Channel Set screen appears.
6 If you want to change the station name to the registered one (P.19), press ▶ until the station name (ID) begins blinking, then press ▲ or ▼ until the new station name (ID) appears.
If you want to change the station name to another than the registered one, press ▶ until the first letter of the station name (ID) begins blinking, then press ▲ or ▼ to cycle through the characters (A–Z, 0–9, -, *, +, _ (space) and stop when the desired character is indicated, then press ▶ to enter. Enter the remaining characters the same way (maximum of 4).
- If you make a mistake, press ◀ until the incorrect character begins blinking. Then enter the correct character by pressing ▲ or ▼.
7 Press OK/STATUS. The programmed channel list appears.
8 Press MENU to exit menu operations.
INFORMATION
If you live in Eastern Europe, “TV SYSTEM” setting appears instead of “DECODER” setting on the Manual Channel Set screen. When you can see the picture but can hear no audio, select the appropriate TV system (D/K or B/G). Normally, TV programmes are broadcasted as follows.
For Eastern Europe : D/K For Western Europe : B/G
1 Press ▶ until the TV system (D/K or B/G) starts blinking on the Manual Channel Set screen.
2 Press ▲/▼ to select the appropriate TV the System (D/K or B/G).
ATTENTION
- If the channel positions are changed or deleted, the Guide Channel numbers that have been set are reset or changed. If an attempt is made at timer programming with the SHOWVIEW system in this state, the "GUIDE CHANNEL SET UP" screen appears. Input the channel position on which the broadcast for the SHOWVIEW number is received.
- If the channels are added, set the Guide Channel number for that channel (station). (→ “SHOWVIEW® Set Up” on page 20)
TV Station And ID List
| ID* STATION NAME | |
| 1000 TV10003SAT 3SATADLT ADULTANT3 ANTENA3ARD ARDARTE ARTEBBC BBC GROUPBBC1 BBC1BBC2 BBC2BR3 BAYERN3C+ CANAL PLUSC1 PORTUGUSESCAN5 CANALE5CANV KETNET CANVASCH4 CHANNEL4CH5 CHANNEL5CHLD CHILDCINECLUB TELECLUBCMTCNN CNNCSUR ANDALUCIADISCDRDRSDS FDSFETB1 ETB1ETB2 ETB2EURO EURONEWSEUSPFEMMFILM FILMFNET FILMNETFR2FR3GALAHR3 HESSEN3INFOITA1ITA7ITVJSTVKA2KAB1 KABEL1KAN2 KANAL2LOCA LOCALM6MBCMCMMDRMOVEMTVMTV3 MTV3N3 NORD3N-TV N-TVNBCNDR3 NDR3NED1 NED1NED2 NED2NED3 NED3NEWSNICKNRK NRKNRK2 NRK2ODEORF1 | CINEMACMTDISCOVERYDR TVDRSEUROSPORTSFEMMANFrance2France3GALAVISIONINFO-KANALITALIA1ITALIA7ITVJSTVKA2M6MBRMCMMDRMOVIEMTVMNBC SUPERNICKELODEONODEONORF1 |
| ID* STATION NAME | |
| ORF2 | ORF2 |
| ORF3 | ORF3 |
| OWL3 | OWL3 |
| PREM PREMIERE | |
| PRO7 | PRO7 |
| RAI1 | RAI1 |
| RAI2 | RAI2 |
| RAI3 | RAI3 |
| RET4 RETE4 | |
| 21 | TELE21 |
| RTBF RTBF1 or 2 | |
| RTL RTL | |
| RTL2 RTL2 | |
| RTL4 RTL4 | |
| RTL5 RTL5 | |
| RTP RTP | |
| S4 | SCHWEIZ4 |
| SAT1 SAT1 | |
| SBS | SBS |
| SHOW | SHOW |
| SIC SOCIEDADE | |
| SKY SKY CHANNEL | |
| SKYN SKY NEWS | |
| SPRT SPORT | |
| SRTL | SUPER RTL |
| STAR STAR-TV | |
| SVT1 SVT1 | |
| SVT2 SVT2 | |
| SWR | SUEDWEST3 |
| TCC | TCC |
| TELE | TELE |
| TEL5 | TELE5 |
| TF1 | TF1 |
| TM3 TM3 | |
| TMC | TELEMONTECARLO |
| TNT | TNT INT |
| TRT TRT INT | |
| TSI | TSI |
| TSR TSR | |
| TV1 BRTN TV1 | |
| TV2 BRTN TV2 | |
| TV3 TV3 | |
| TV4 TV4 | |
| TV5 TV5 | |
| TV6 TV6 | |
| TVE1 | TVE1 |
| TVE2 | TVE2 |
| TVG | TV GALICIA |
| TVI | TV INDEPENDENT |
| TVN | TV NORGE |
| VCR | VIDEO |
| VERO VERONICA | |
| VH-1 | VH-1 |
| VIVA VIVA | |
| VIV2 | VIVA2 |
| VMTV | VIDEO MUSIC |
| VOX | VOX |
| VT4 | VT4 |
| VTM | VTM |
| WDR1 | West1 |
| WDR3 | West3 |
| YLE1 | YLE1 |
| YLE2 | YLE2 |
| ZDF | ZDF |
| ZTV | ZTV |
* The “ID” abbreviation is what is shown on-screen instead of the station name. The “ID” abbreviation is listed in the Confirmation screen and is displayed on the TV screen when the recorder is tuned to a different station.
Clock Setting
You can also reset or correct the clock manually.
1 Select Clock Set Screen
1 Press VCR.
2 Press MENU.
3 Press ▲ or ▼ to select “INITIAL SET UP” then press OK/STATUS. The Initial Set Up menu appears.
4 Press ▲ or ▼ to select “SET CLOCK” then press OK/STATUS. The clock Set screen appears.
2 Set Clock
1 Press ▲ or ▼ to set the time, then press OK/STATUS.
- Each time you press ▲ or ▼, the set time changes by 1-minute intervals. If you hold the button, the set time changes by 30-minute intervals.
2 Press ▲ or ▼ to set the date, then press OK/STATUS.
- Each time you press ▲ or ▼, the set date changes by 1-day intervals. If you hold the button, the set date changes by 15-day intervals.
3 Press ▲ or ▼ to set the year, then press OK/STATUS.
• Each time you press ▲ or ▼, the set year changes by 1-year intervals. If you hold the button, the set year changes rapidly.
4 Except for MAGYARORSZAG (36), CESKA REPUBLIKA (42), POLSKA (48) or OTHER EASTERN EUROPE (EE) country. Press
▲ or ▼ to set the JUST CLOCK function, then press OK/STATUS.
ON: To get accurate time keeping through automatic adjustments at regular intervals, by reading data from PDC signal.
OFF: If the clock setting data from PDC signal is incorrect, set to "OFF". However, setting to "OFF" reduces the accuracy of the built-in clock, which could adversely affect timer recording.
If you set to “ON”, press ▲ or ▼ to set the channel position to the station that transmits the clock setting data, then press OK/STATUS.
3 Finish Setting
Press MENU to exit. The clock starts to operate.
Notes:
- Just Clock (when set to “ON”) adjusts the VCR’s built-in clock every hour, except for 23:00, 0:00, 1:00 and 2:00.
- Just Clock is not effective when . . .
-
the VCR's power is "ON".
-
the VCR is in the Timer mode.
- a difference of more than 3 minutes exists between the built-in clock's time and the actual time.
- the VCR is in the Auto Satellite Prog Rec mode (→P.28).
-
the VCR is in the Power Save mode ( P.16).
-
If Just Clock is set to “ON”, the VCR's clock is automatically adjusted at the start/end of Summer Time.
- Just Clock may not function properly depending on the reception condition.
- If a power failure occurs, the clock will lose its setting.
SHOWVIEW® Set Up
To ensure that SHOWVIEW Timer Recording operates correctly, it is necessary to set the “Guide Channel (GUIDE CH)” number for each station.
“Guide Channel (GUIDE CH) number” refers to the assigned TV station numbers, according to broadcast area, for SHOWVIEW timer recording. The Guide Programme numbers can be found in most TV listings.
IMPORTANT
Normally, Auto Set Up (→P. 12), Preset Download (→P. 14) or Auto Channel Set (→P. 17) sets the Guide Channel Numbers automatically. You need to set the Guide Channel Numbers manually only in the following cases.
a) When timer-programming with the SHOWVIEW system, the channel position, where the station you wish to record is received on your VCR, is not selected or when you add a channel after Auto Set Up, Preset Download or Auto Channel Set has taken place. In this case, set the Guide Channel Number for that station manually.
b) When you delete a channel or change channel positions manually after Auto Set Up, Preset Download or Auto Channel Set has taken place. In this case, set the Guide Channel Numbers for all the receivable stations manually.
c) When you wish to timer-record a satellite programme with the SHOWVIEW System. In this case, set the Guide Channel Numbers for all satellite broadcasts received on your satellite tuner.
1 Select Initial Set Screen
1 Press MENU.
2 Press ▲ or ▼ to select "INITIAL SET UP" then press OK/STATUS.
2 Set Guide Channel Number
1 Press ▲ or
▼ to select "GUIDE CHANNEL SET UP" then press OK/STATUS.
GUIDE CHANNEL SET UP
GUIDE CH TV PROG 255 -- 01 01 02 02 03 03 04 04
SELECT: ▲▼ OR 0-9 CONFIRM : OK END : MENU
2 Press ▲ or ▼ or Number buttons to enter the guide channel number (GUIDE CH) then press OK/STATUS.
3 Press ▲ or ▼ or Number buttons to enter the number of the VCR's channel position (TV PROG) on which the Guide Channel number's broadcast is received, then press OK/STATUS.
4 Repeat the above procedures until you set the guide channel number for all the receivable stations.
- If the satellite broadcast is received on your VCR's auxiliary channel "L-2", select "A/V2 REAR" for the channel position.
3 Finish Setting
Press MENU.
Selecting Colour Mode
Before using the VCR, you need to set the colour mode both for recording and playback.
You can play PAL, NTSC and MESECAM tapes, or record PAL and SECAM* signals on this VCR. Follow the procedure below to select the appropriate colour system.
* SECAM signals will be recorded as MESECAM on this VCR; MESECAM is the designation for tapes with SECAM signals that have been recorded on a MESECAM-compatible PAL VCR.
1 Select VCR Set Up Screen
1 Press VCR.
2 Press MENU.
3 Press ▲ or ▼ to select "VCR SET UP", then press OK/STATUS.
2 Set Colour System Mode
Press ▲ or ▼ to select “COLOUR SYSTEM”, then press ▶ to select the appropriate colour system.
Each time you press ▶, the setting changes as follows;
a- PAL/NTSC:
To record PAL signals, or playback a PAL or NTSC tape.
b- MESECAM:
To record SECAM signals, or play a MESECAM tape.
3 Finish Setting
Press MENU to exit the menu operation.
Playback
Make sure....
- Your VCR, TV, and antenna are connected correctly.
- Press VCR to operate the VCR using remote control.
- The correct colour mode is selected. (→P.16)
1 On TV
1 Turn on the TV.
2 Select the video channel (or external video input).
2 On VCR
Insert a cassette.
The VCR turns on automatically and the counter is reset to 00:00:00.
- If the record tab on a cassette is removed, playback will start automatically.
- If a cassette is already in the VCR, turn on the VCR.
3 Start Playback
Press PLAY ▶. The counter is reset to 00:00:00.
“DSPC” appears blinking in the VCR’s display panel during automatic tracking. (→P.23)
- Playback picture quality of LP recordings will not be as high as SP recordings.
- Compact VHS camcorder recordings can be played on this VCR. Simply place the recorded cassette into a VHS Cassette Adapter and it can be used just like any full-sized VHS cassette.
- This VCR can play both VHS and Super VHS signals using Super VHS cassettes.
Tape Position Indicator
The tape position indicator appears on screen when, from the Stop mode, you press ◀◀, ▶▶ or perform an Index Search. The position of “■” in relation to “0” (beginning) or “+” (end) shows you where you are on the tape.
“O.S.D.” (P.26) must be set to “ON”, or the indicator will not appear.
Beginning End
Note:
Depending on the type of tape used, there may be times when the indication is not correct.
To rapidly locate a particular scene
Press ▶▶ or ◀◀ during playback. (No sound comes out.)
To resume playback, press PLAY ▶ again.
- If ▶▶ or ◀◀ is held down for more than 2 seconds, simply releasing it will cancel the search.
To stop playback
Press ■ STOP.
To rewind the tape
Press ◀◀ or turn the shuttle ring on the front panel counterclockwise when the tape is not running.
To fast forward the tape
Press ▶▶ or turn the shuttle ring on the front panel clockwise when the tape is not running.
To eject the tape
Press STOP/EJECT ■/▲ on the front panel.
To turn off the VCR
Press POWER or STANDBY/ON.
When playing an NTSC tape;
- Some TVs shrink the picture vertically and place black bars at the top and the bottom of the TV screen.
- The time counter and remaining tape length will not be correct.
- The picture may roll up and down. This can be corrected using the V-HOLD control found on some TVs. (This cannot be corrected if the TV does not have a V-HOLD control).
- During search, still, or frame-by-frame playback, the picture will be distorted, and there may be a loss of colour.
Recording
When using this VCR, an index mark is always marked at the beginning of every recording. These index marks make it easier for you to search for the beginning of the recordings (see “Index Search”). (P.23)
Make sure....
- The record tab on the cassette is not removed.
- Your VCR, TV, and antenna are connected correctly.
- Press VCR to operate the VCR using the remote control.
- The correct colour mode is selected. (→P.16)
1 On TV
1 Turn on the TV.
2 Select the video channel (or external video input).
2 On VCR
Insert a cassette with the record tab in place.
The VCR turns on.
- If a cassette is already in the VCR, turn on the VCR.
To rewind the tape, press ◀◀ or turn the shuttle ring on the front panel counterclockwise.
3 Select Tape Speed
Press ALT/SPEED until the desired tape speed (SP, LP) appears on the display.
4 Select a Channel Position
Press CH ▲/▼ (or PROGRAMME ▲/
▼ on the front panel) or Number buttons to select the channel position to record.
If you use a satellite tuner, select the external line input which is connected to a satellite tuner.
"L-1" for AV1 (L-1) IN/OUT connector. "L-2" for AV2 (L-2) IN/DECODER connector.
5 Start Recording
Press REC/OTR ●.
“DSPC” takes place at the beginning of both the first SP and the first LP recording after inserting the cassette. (P.24)
- If “DIRECT REC” is set to “ON” ( P.28), the programme that appears on the TV screen will be recorded.
• Picture quality of LP recordings will not be high as on SP recordings. - This VCR can record on regular VHS and Super VHS cassettes. By using Super VHS cassettes, you can record both VHS and Super VHS signals. For more details, see “Selecting Recording Format”. (→P.27)
To pause recording
Press STILL/SLOW (or PAUSE/ STILL) on the front panel).
To resume recording, press the button again.
- During the Record Pause mode, you can change the channel position by pressing the CH ▲/▼ or Number buttons (or PROGRAMME ▲/▼ on the front panel).
To stop recording
Press STOP ■.
To watch another TV programme while recording
- If your VCR is connected to the TV using a scart cable, press VCR/TV so that the VCR indicator goes off from the display.
- Select a different channel you want to watch on the TV.
You can watch the programme of the selected channel on the TV, without affecting recording on the VCR.
- If you use a satellite tuner, you cannot watch another programme while recording.
To display the recording time indication
Press OK/STATUS (or DISPLAY on the front panel) until a counter reading appears on the display window.
To display the tape remaining time
Press OK/STATUS (or DISPLAY on the front panel) until the tape remaining time is displayed. The display panel shows the tape remaining time with "D" displayed.
- By pressing the DISPLAY (or OK/STATUS on the remote control) button, you can change the display to show the counter reading, channel position*, clock time or tape remaining time. *Channel position is not displayed during playback.
To reset counter
Press CLEAR on the remote control while the counter reading appears on the display.
Erase protection
Cassettes have the record tab to ensure that recordings are not accidentally
erased.
To prevent accidental erasure:
Break off the record tab with a screwdriver.
To record again:
Cover the opening with adhesive tape.
Adhesive tape
Automatic Operations
Auto playback
When a tape is inserted, the VCR turns on. If the record tab is removed, playback begins.
Auto rewind
When a tape reaches its end during playback, fast forwarding or manual recording, the VCR rewinds the tape and stops.
Repeat playback
When you press and hold PLAY ▶ for more than 5 seconds, you can playback the same tape repeatedly (100 times).
Press STOP ■ at any time to stop playback.
When the tape runs to its end, the VCR automatically rewinds the tape, and starts playback.
Memory rewind power off
When you press POWER within 2 seconds after rewinding starts, the VCR turns off after rewinding is completed.
Eject cassette
You can eject the tape simply by pressing STOP/EJECT ■/▲ on the front panel even while the VCR is turned off.
When you press STOP/EJECT ■/▲ on the front panel, the VCR automatically turns on, ejects the tape, then turns off.
Special Effect Playbacks
Are you familiar with tape playback? If so, you are ready to enjoy the special effect playback features described below.
To skip playback for a certain period
Press SKIP SEARCH during playback to search forward for 30 seconds by the time counter reading.
Each time you press the button, the search time increases as follows:
30→60→90→120 sec.
The VCR automatically resumes normal playback after searching for the specified period.
To view a still picture
Press STILL/SLOW ▶ briefly (or PAUSE/STILL ▶ on the front panel) during playback.
Playback is frozen or stopped and a still picture appears.
Press the STILL/SLOW ▶ button repeatedly to advance the still picture frame by frame.
To advance a still picture:
Press STILL/SLOW ▶ or PAUSE/ STILL ▶ again. Each time a button is pressed, a still picture advance one frame.
To resume playback, press PLAY ▶.
To view a slow motion picture
Press STILL/SLOW ■or PAÜSE/ STILL ■ on the front panel) for more than 2 seconds during playback.
To decrease the slow motion speed (and reverse the slow motion playback), press STILL/SLOW -.
To increase the slow motion speed (and forward the slow motion playback), press STILL/SLOW +.
To resume playback, press PLAY ▶.
Notes:
- No sound comes out during special effect playbacks.
- If you keep viewing slow motion and still pictures for more than 5 minutes, the VCR automatically stops to protect the tape and video heads.
- During special effect playbacks, some noise bars will appear on the TV screen.
To rapidly locate, then freeze, a particular scene
During tape playback or Still mode, follow these steps.
1 Press JOG/SHTL so that the JOG/SHTL button lights.
2 Turn and hold the Shuttle ring clockwise (or counterclockwise) to fast forward (or reverse) a picture. As you turn the ring further, the search speed increases. You may only use the Shuttle ring when the JOG/SHTL button is lit.
3 Releasing the Shuttle ring freezes the picture in still mode.
Notes:
- No sound comes out during special effect playbacks.
- If you keep viewing slow motion and still pictures for 5 minutes, the VCR automatically stops to protect the tape and video heads.
- During special effect playbacks, some noise bars will appear on the TV screen.
- When normal playback resumes from search, still, slow motion or frame-by-frame playback, the picture may jitter vertically momentarily depending on the type of TV being used.
- When using the jog dial or shuttle ring on the front panel, you do not have to press JOG/SHTL on the remote control.
Tracking Adjustments
Auto tracking
Each time a tape is inserted, auto tracking starts working and continuously analyses the signal to adjust for optimum picture quality during playback. So, there is no need for you to minimize noises in most tapes during playback.
Manual tracking
- During normal playback:
If auto tracking cannot eliminate noises well during playback, press CH ▲ /▼ (or PROGRAMME ▲ /▼ on the front panel).
• During a slow motion picture:
Press CH ▲ /▼ (or PROGRAMME ▲/▼ on the front panel) to minimize noises in the slow motion picture.
• During a still picture:
Press CH ▲ /▼ (or PROGRAMME
▲/▼ on the front panel) to reduce jitter in the still picture.
This is available only for MESECAM tape.

natural_image
Two black-and-white diagrams showing a transformation from a bowl with liquid to a flower-like shape, both without any text or symbols.To cancel manual tracking, stop the tape, eject the tape, then re-insert it.
Notes:
If you keep pressing▲ /▼ button, you might get “USE CLEANING CASSETTE” message on the screen (and “U:01” on display window). Please disregard this message and re-adjust the tracking. However, if the message appears automatically (without pressing▲ /▼), this indicates that your video heads are dirty. (→P.39)
Index Search
You can locate an index marked at the beginning of each recording on a tape recorded on this VCR (or an indexed tape).
Press ▶▶| or ◀◀◀ repeatedly until the appropriate number is displayed on the TV screen before starting play.
Rapid forward or reverse search begins. When it finds the designated index, playback starts automatically.
- Locate an index number by pressing the button repeatedly, indicating how many index marks ahead of or behind that recording you want is from the tape's current position.
- Up to the ± 9 th index mark from the current position on the tape can be located.
SmartPicture
You can make the picture softer or sharper or distinct the picture when playing the tape.
SmartPicture is set to AUTO when you receive the VCR.
1 Select SmartPicture Mode
1 Press the
SMARTPICTURE
button. The
current setting will appear on the
AUTO
screen for about 5 seconds.
2 While the current setting appears, press the SMARTPICTURE button repeatedly, the setting changes as follows.
AUTO:
Normally select this mode.
DISTINCT:
Select this mode when you want the distinct picture. The picture detail is emphasized.
SOFT:
Select this mode when you want the soft picture. The signal noise of the picture is softened.
SHARP:
Select this mode when you want the sharp picture. The picture edge is emphasized.
Notes:
- It is recommended that the SmartPicture is set to “SOFT” if playback picture is noisy.
- When “DSPC” is set to “OFF”, “AUTO” is switched to “NATURAL” automatically.
DSPC
The DSPC (Digital Studio Picture Control) system checks the condition of the tape in use during recording and playback, and compensates to provide the highest possible recording and playback pictures. The default setting for both recording and playback is “ON”.
1 Select VCR Set Up Screen
1 Press VCR.
2 Press MENU.
3 Press ▲ or ▼ to select “VCR SET UP” then press OK/STATUS.
2 Set DSPC Mode
Press ▲ or ▼ to select “DSPC”, then press ▶ to set to “ON” or “OFF”.
3 Finish Setting
Press MENU.
Once the “DSPC” mode is set to “ON”, the DSPC system works for both recording & playback, as described below;
For Recording
Press REC/OTR ●.
DURING DSPC
- The VCR spends approximately 7 seconds assessing the condition of the tape, then begins recording.
Notes:
- The DSPC system works for both SP and LP modes only after a tape has been inserted and the Record mode is first initiated. It does not work during recording.
- The DSPC system does not work while Auto Satellite Prog recording is in progress (→ P. 28).
- In the case of timer recording, the DSPC system works before recording is initiated.
- Once the cassette is ejected, the DSPC data is cancelled. The next time the cassette is used for recording, DSPC is re-performed.
- While “DSPC” is displayed, the VCR does not start One Touch Recording (→P. 26).
- Since the DSPC system works before recording actually starts, there is a delay of approximately 7 seconds after REC/OTR ● is pressed. To make sure you record the desired scene or programme in its entirety, first perform the following steps:
1) Press and hold PAUSE/STILL II on the front panel and press REC/OTR● on the front panel to engage the RECORD PAUSE mode.
- The VCR then automatically checks the condition of the tape and, after approximately 7 seconds, re-enters RECORD PAUSE.
2) Press REC/OTR● to start recording.
- If you want to bypass the DSPC system and begin recording immediately, set "DSPC" to "OFF".
For Playback
Press PLAY ▶.
- The VCR adjusts the playback picture quality based on the quality of the tape in use.
- DSPC is active during Auto Tracking. "DSPC" appears blinking on the front panel's display window.
Notes:
- When watching a tape recorded with "DSPC" set to "ON", it is recommended that you leave DSPC to "ON" during playback as well.
- “DSPC” only appears at the beginning of automatic tracking. Even though it doesn't appear after that, the DSPC function is operative.
Digital TBC/NR
Your VCR is equipped with the Digital TBC (Time Base Corrector) that removes jitter from fluctuating video signals to deliver a stable picture even with old tapes and rental cassettes. The on/off of Digital 3-DNR (Noise Reduction) which cuts noise and enables clear picture reproduction is also linked to this function.
*The default setting is "ON".
We recommend that you use the Digital TBC feature when...
... playing a tape recorded on a camcorder.
... playing a tape repeatedly.
... using this VCR as the player for tape duplication.
1 Set Digital TBC/NR Mode
Press DIGITAL TBC/NR on the front panel so that the button lights up.
- Pressing the button again turns off this function. The lights goes off.
- If you playback a tape recorded under poor TV reception condition, there may be cases where the picture becomes more stable with Digital TBC/NR set to off.
When playing back a MESECAM tape, Digital TBC/NR does not function even though the TBC/NR button is lit.
Digital 3R
Digital 3R picture system applies edge correction to the luminance signal to enhance detail.
1 Select VCR Set Up Screen
1 Press VCR.
2 Press MENU.
3 Press ▲ or ▼ to select "VCR SET UP" then press OK/STATUS.
2 Set Digital 3R Mode
1 Press ▲ or
▼ to select "DIGITAL 3R".
2 Press ▶ to select one of the following:
ON: Normally select this mode.
OFF: No picture adjustment will be done.
- It is recommended to keep “DIGITAL 3R” set to “ON”.
- Depending on the type of tape being used, picture quality may be better with “DIGITAL 3R” set to “OFF”.
3 Finish Setting
Press MENU.
Receiving/Recording NICAM Stereo And Bilingual Programmes
This VCR can receive and record stereo and bilingual programmes, including the NICAM (Digital Stereo Sound) and A2 (Sound-Multiplex) broadcasts.
When the recorder is tuned to a different station, the type of broadcast being received will be displayed on the TV screen for a few seconds.
| Type of Broadcast Being Received | On-screen Display |
| A2 Stereo | STEREO |
| A2 Bilingual | BILINGUAL |
| Regular Monaural | (none) |
| NICAM Stereo | NICAM STEREO |
| NICAM Bilingual | NICAM BILINGUAL |
| NICAM Monaural | NICAM |
Notes:
- Stereo programmes (A2) are automatically recorded in stereo on the Hi-Fi audio track (with the normal audio track recording mixed L and R channel sound).
- Bilingual programmes (A2) are automatically recorded in bilingual on the Hi-Fi audio track. The main soundtrack will be recorded on the normal audio track.
- The NICAM audio programme will be recorded on the Hi-Fi audio track, and the Standard audio programme on the normal audio track.
- If the quality of stereo sound being received is poor, the broadcast will be received in monaural with better quality.
- Before playing back a programme recorded in stereo, or a bilingual programme, refer to "Selecting Monitor Sound".
- “O.S.D.” must be set to “ON” or the on screen displays will not appear.
Selecting Monitor Sound
This VCR is capable of recording three soundtracks (Hi-Fi L, Hi-Fi R, and normal) and will play back the one you select. Also, this VCR can receive and record stereo and bilingual programmes and you can select the sound that you want to listen to.
1 Select Monitor Sound
Press AUDIO/MUTE. Each time you pressed the button, the output sound changes as follows.
HIFI (On-screen display)
+ [Display window)
For Hi-Fi stereo tapes
OR
For stereo programme
HIFI L (On-screen display)
(Display window)
For main audio of bilingual tapes
OR
For main audio of bilingual programme
HIFI R (On-screen display)
(Display window)
For sub audio of bilingual tapes
OR
For sub audio of bilingual programme NORMAL MONO (On-screen display)
NORM (Display window)
For audio - dubbed tapes
For standard (regular monaural) audio of NICAM broadcast
HIFI + NORMAL (On-screen display)
☐ + ☐ NORM (Display window)
For audio - dubbed tapes
Notes:
“HIFI” (☐ + ☐) should normally be selected during playback. In this mode, Hi-Fi stereo tapes are played back in stereo, and the normal audio track is played back automatically for tapes with only normal audio.
Using On-Screen Display
You can display the VCR operating status on the TV screen.
For the information about what you can see on the TV screen, see page 6.
1 Select VCR Set Up Screen
1 Press VCR.
2 Press MENU.
3 Press ▲ or ▼ to select “VCR SET UP” then press OK/STATUS.
The VCR Set Up menu appears.
2 Set OSD
1 Press ▲ or ▼ to select "O.S.D."
2 Press ▶.
Each time you press the button, the setting changes as follows:
ON:
The VCR operating status appears on screen (The default setting is "ON").
OFF:
The VCR operating status does not appear on screen.
3 Finish Setting
Press MENU.
Notes:
- When you use this VCR as the player for tape duplication, be sure to set “O.S.D.” to “OFF” before starting.
- During playback, the operation mode indicators may be disturbed depending on the type of tape being used.
One Touch Recording (OTR)
The OTR function lets you quickly specify how long you want a recording to continue. You do not have to programme the timer.
Make sure....
- The record tab on the cassette is not removed.
- Your VCR, TV and antenna are connected correctly.
1 On TV
1 Turn on the TV.
2 Select the video channel (or video input).
2 On VCR
Insert a cassette with the record tab in place.
The VCR turns on.
- If a cassette is already in the VCR, turn on the VCR.
3 Select Channel Position
Press CH ▲/▼ on the remote control (or PROGRAMME ▲/▼ on the front panel) or Number buttons to select the channel position to record.
4 Start OTR
Press REC/OTR ● twice.
Recording starts immediately, and the ○ (Record) indicator lights up and blinks on the display.
5 Select Recording Length
Press REC/OTR ● repeatedly until the desired recording length appears. Each time you press the button, the recording length increases in 30-minute intervals.

To change the recording length during an OTR
Press REC/OTR ● until the desired length appears.
To cancel an OTR
Press STOP ■ to stop recording before the preset recording length is reached. If you want to cancel the OTR mode but continue recording, press REC/OTR ● several times until ○ (Record) indicator stops blinking.
Notes on the indications on the display while an OTR operation
- During recording, the displayed time counts down. When “0:00” is reached, recording stops and the VCR turns off automatically.
- If an OTR is engaged during pause, the displayed time counts down normally, but recording does not begin until you cancel the pause.
Record End Search
This function enables you to search forward to the next unrecorded portion of the tape (or to the point at which recording was stopped).
1 Press the REC END SEARCH button. The VCR begins fast forwarding or rewinding to find the blank portion or the recording end portion on the tape. SEARCHING FOR REC END will appear on the screen during the search.
2 The VCR automatically stop when the blank portion or the recording end portion is reached. REC END SEARCH COMPLETED will appear on the screen briefly. The tape remaining tape time also appears on the display panel.
Selecting Recording Format
When shipped from the factory, this VCR has been set to select automatically S-VHS format for recording on an S-VHS tape and VHS format for recording on a VHS tape. If you want to make a recording using VHS format on an S-VHS tape, follow the procedure below.
1 Select VCR Set Up Screen
1 Press VCR.
2 Press MENU.
3 Press ▲ or ▼ to select “VCR SET UP” then press OK/STATUS.
The VCR Set Up menu appears.
2 Select Recording Format
1 Press ▲ or ▼ to select "S-VHS".
2 Press ▶.
Each time you press the button, the setting changes.
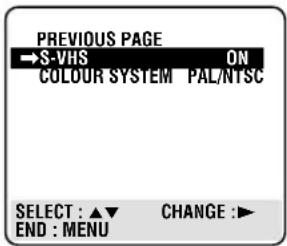
ON:
Normally select this.
OFF:
Select this when you want to make a recording using the VHS format on an S-VHS tape.
3 Finish Setting
Press MENU.
Notes:
- When playing a tape that has been recorded in S-VHS, the S-VHS indicator lights on the display panel regardless of the “S-VHS” mode setting.
Selecting AV1 and AV2 Output/Input signal
This VCR has two AV terminals on the rear panel. You have to correctly set the input or output signal depending on the type of unit connected to these terminals.
1 Select VCR Set Up Screen
1 Press VCR.
2 Press MENU.
3 Press ▲ or ▼ to select “OUTPUT/INPUT SET UP”, then press OK/STATUS.
The Output/Input Set Up menu appears.
2 Select AV1, AV2
If you are connected to the AV1 (L-1) IN/OUT connector and use this VCR as a player:
1 Press ▲ or ▼ to select "A/V1 OUTPUT".
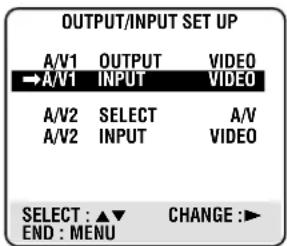
2 Press ▶ to select one of the following:
VIDEO : If a connected device's input is compatible only with regular video signals.
S-VIDEO : If a connected device's input is compatible with Y/C (S-Video) signals. This setting will let you take advantage of higher quality S-VHS pictures.
- If “A/V2 SELECT” is set to “DECODER”, it is impossible to set “A/V1 OUTPUT” to “S-VIDEO”.
3 Press MENU.
If you are connected to the AV1 IN/OUT connector and use this VCR as a recorder:
1 Press ▲ or ▼ to select “A/V1 INPUT”.
2 Press ▶ to select VIDEO or S-VIDEO depending on the connected device output signal.
3 Press MENU to exit the menu operations.
- If the “A/V1 OUTPUT” is set to “S-VIDEO”, it is impossible to set “A/V1 INPUT” to “S-VIDEO”.
If you are connected to the AV2 (L-2) IN/DECODER connector;
1 Press ▲ or ▼ to select “A/V2 SELECT”.
2 Press ▶ to select one of the following:
A/V : To use this recorder as the recording deck, where the player is
connected to the AV2 (L-2) IN/DECODER connector, or to use the satellite tuner connected to the AV2 (L-2) IN/DECODER connector.
DECODER : To use a decoder connected to the AV2 (L-2) IN/DECODER connector.
SAT : To view a satellite programme with the TV set while the recorder is turned off. (→P. 34)
- If the “A/V1 OUTPUT” is set to “S-VIDEO”, it is impossible to set “A/V2 SELECT” to “DECODER”.
- If “A/V2 SELECT” is set to “SAT”, “SAT” appears at channel position display instead of “L-2”.
3 Then, select the video input signal: Press ▲ or ▼ to select “A/V2 INPUT”.
4 Press ▶ to select one of the following:
VIDEO : If a connected device's output is compatible only with regular video signals.
S-VIDEO : If a connected device's output is compatible with Y/C (S-Video) signals. This setting will let you take advantage of higher quality S-VHS pictures.
5 Press MENU to exit the menu operation.
- If you are not connecting a decoder or satellite tuner to the A/V2 (L-2) IN/DECODER connector, leave “A/V2 SELECT” set to “A/V”.
- If “A/V2 SELECT” is set to “DECODER”, it is impossible to set “A/V2 INPUT” to “S-VIDEO”.
- The default setting of "A/V2 SELECT" is "A/V"; if the VCR's memory backup has expired due to a power cut or because the AC was removed from the VCR, "A/V" will be automatically selected when the power is restored to the VCR. If you are using a decoder or satellite tuner, be sure to set "A/V2 SELECT" back to appropriate setting.
Automatic Satellite Programme Recording
This facility allows you to record automatically a satellite programme which is timer-programmed on your external satellite tuner. Connect a satellite tuner to the VCR's AV2 (L-2) IN/DECODER connector ( P.8) and programme the timer on the satellite tuner; the VCR starts recording when it signals input from the satellite tuner to the AV2 (L-2) IN/DECODER connector, and when there is no input signal the VCR stops recording and the power shuts off.
Before performing the following steps:
- Make sure the satellite tuner is connected to the VCR's AV2 (L-2) IN/DECODER connector. (P.8)
- Programme the timer on the satellite tuner.
- Insert a cassette with the safety tab in place.
1 Press VCR.
2 Press MENU.
3 Press ▲ or ▼ to select “VCR SET UP” then press OK/STATUS.
4 Press ▲ or ▼ to select “AUTO SAT RECORD LINK”.
5 Press ▶ to set to "ON".
6 Press MENU.
The following message will appear.
PLEASE FOLLOW THE STEPS BELOW:
1 SET PROGRAM ON SAT 2 TURN SAT OFF 3 TURN VCR OFF
Press POWER to turn off the VCR. If you do not turn off the VCR after 30 seconds, the VCR will turn off automatically.
The VCR will then move to stand-by mode and “L-2” will blink on the display panel.
Notes:
-
Pressing the POWER or STAND/BY button while Automatic Satellite Programme Recording mode or stand-by mode is in progress will cancel the mode and "AUTO SAT RECORD LINK" is set back to "OFF" automatically.
-
Be sure not to turn on the satellite tuner before the program is executed otherwise the VCR will start recording when the satellite tuner's power is turned on.
- Depending on the type of satellite tuner, the VCR may not record a slight portion of the beginning of the programme or may record slightly longer than the actual length of the programme.
- While the VCR is in Automatic Satellite Programme Recording or stand-by mode, normal timer recording will not perform.
- “Err L-2” will appear if you engage the Automatic Satellite Programme Recording while the satellite tuner power is on. Turn off the satellite tuner. However, if “Err” will not disappear even though the satellite tuner is turned off, Automatic Satellite Programme Recording function will not work properly with that satellite tuner.
S-VHS ET
This VCR allows recording in Super VHS ET (Expansion Technology) mode. You can record with S-VHS picture quality on VHS cassettes. However, this function is available only for SP recording.
1 Press the S-VHS ET button on the front panel to select S-VHS ET recording mode before recording. The lamp will lit.
2 Press the button again to cancel S-VHS ET recording mode after recording.
Notes:
- “S-VHS ET” setting cannot be changed during recording, timer recording, or when the VCR’s power is off. Also, this function dows not work with S-VHS tapes.
• To obtain the highest quality recording and playback pictures over a longer period on this model, S-VHS recording on S-VHS tape is recommended. - You can playback S-VHS ET recordings not only on this VCR but also on another VCR equipped with S-VHS ET.
- It is recommended to specifically label S-VHS ET recordings so you can easily distinguish them from regular VHS recordings.
-
S-VHS ET recordings can also be played back on an S-VHS VCR. However, there may be cases where S-VHS ET playback is not possible on a particular VCR.
-
Frequent still, frame-by-frame and slow-motion playback may damage the tape and cause picture degradation.
- With some tapes, better picture quality may not be obtained even with S-VHS ET recording. It is recommended that you do test record beforehand to make sure whether better results can be obtained.
• High Grade tapes are recommended for superior results. - If the playback picture becomes blurred or interrupted, use a cleaning cassette.
EasyLink Functions
When you connect the VCR and TV equipped with T-V Link, EasyLink, MegaLogic, SMARTLINK, Q-Link, DATA LOGIC, or NEXTVIEWLINK via fully-wired 21-pin SCART cable ( P.8), the following functions are available.
- Direct Recording
- NextView Link
• TV Auto Power ON
• VCR Auto Standby
For details, refer to the instructions manual for your TV.
The degree of compatibility and available functions may differ your system.
Direct Recording
You can start recording the programme that you are watching on your TV with simple operation. Follow the procedure below to use this function.
1 Press VCR.
2 Press MENU.
3 Press ▲ or ▼ to select “VCR SET UP” then press OK/STATUS.
4 Press ▲ or ▼ to select “DIRECT REC” then press ▶ to set to “ON”.
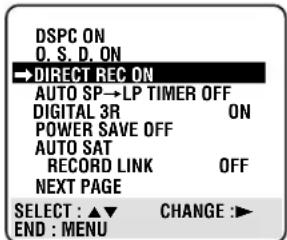
5 Press MENU to exit the menu operation.
6 Press REC/OTR ●. The VCR will record the programme you currently watch.
- If “DIRECT REC” is set to “OFF”, the REC/OTR ● button functions as described in “Recording”. (→P.22)
- During the Direct Recording "CH --" appears on the display panel.
NexTView Link
You can download the EPG (Electronic Programme Guide) information from your TV for timer-programming on the VCR. VCR must be switched on during EPG download.
For details, refer to the instruction manual for your TV.
TV Auto Power ON
You can turn on the TV and set it to video mode automatically whenever you play a tape.
For details, refer to the instruction manual for your TV.
VCR Auto Standby
You can use your TV's remote control to turn off the VCR. For details, refer to the instruction manual for your TV.
Timer Recording Using SHOWVIEW System
You can simplify the programming method of timer recording by using SHOWVIEW system. Whenever you want to record a TV program, all you need to do is to find out the programme's SHOWVIEW number.
You can easily find out this number by checking the TV programme list of your local newspaper or TV guide magazine.
Simply entering the programme's SHOWVIEW number using the remote control will make the VCR programme a timer recording.
Make sure....
- The clock is set to the correct time before setting timer recording.
- A cassette is inserted in the VCR and the record tab of the cassette must not be removed.
1 Select SHOWVIEW Mode
1 Press VCR.
2 Press TIMER.
3 Press ▲ or ▼
to select "SHOW-
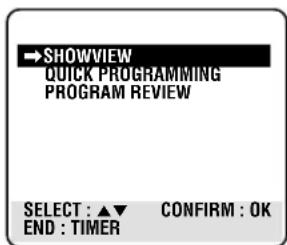
VIEW" then press OK/STATUS.
The SHOWVIEW entry menu appears on the TV screen.
2 Enter SHOWVIEW Number
1 Press Number buttons to enter the SHOWVIEW number assigned to the TV programme you want to record.
2 Press OK/STATUS. The SHOWVIEW Programme screen appears.
- If "ERROR-RE-ENTER CODE" appears on the TV, you have entered an incorrect SHOWVIEW number. If this happens, press CLEAR to erase the number, then enter the correct number.
- If the guide programme number has not yet been set, the GUIDE CHANNEL SET UP screen will appear. Input the number of the channel position on which the broadcast for the SHOWVIEW number is received on the VCR, then press OK/STATUS and the SHOWVIEW programme screen appears.
3 Select Tape Speed
Press ALT/SPEED.
- Each time you press the button, the tape speed alternates between "SP", or "LP".
- To change the stop time, press STOP +/- (number 2 or 5 button).
4 Set VPS/PDC Mode
Press VPS/PDC (Number button 7) to set "VPS/PDC" to "ON" or "OFF".
(→ “VPS/PDC Recording” on page 32)
5 Finish Settings
Press TIMER or OK/STATUS.
"PROGRAM WAS COMPLETED" appears on the TV screen.
After 5 seconds, the above message disappears, and the normal TV picture resumes.
- If "PROGRAM NOT COMPLETED" appears, try again from step 1.
- If “PROGRAM OVERLAPPED” appears, the timer recording you just programmed overlaps another timer recording. The Program Review screen will appear with a magenta line blinking. To change any item on the overlapping programs, see page 31.
If you want to store other programmes, repeat steps 1 to 5.
6 Engage Timer Standby Mode
Press POWER (or STANDBY/ON on the front panel) to turn off the VCR. The (timer) indicator lights up on the display.
The VCR must be turned off for a timer recording to take place. If you forget to turn off the VCR, "PLEASE TURN OFF VCR FOR TIMER
RECORDING" appears on your TV screen two minutes before a timer recording starts. To remove the message, press the CLEAR button.
If you want to record the same programme daily, press DAILY (Number button 8) in step 3. (Press the button again to cancel).
The VCR will record a TV programme every day (Monday through Friday) at the same time and length. (Daily Recording).
If you want to record the same programme weekly, press WEEKLY (Number button 9) in step 3. (Press the button again to cancel).
The VCR will record a TV programme once a week at the same day, time, and length. (Weekly Recording)
If you want to cancel the currently set programme, press CLEAR.
After a timer recording has taken place
Press POWER (or STANDBY/ON on the front panel) to turn on the VCR. You can operate your VCR normally.
To stop a started timer recording Press POWER (or STANDBY/ON on the front panel).
Recording stops and the VCR turns off. If it is a Daily or Weekly Recording, future recordings will be carried out as programmed.
To check or erase the programmes, see page 31.
To timer-record a satellite broadcast using the SHOWVIEW System:
1 Perform steps 1-6.
2 Set the satellite tuner to the appropriate channel before the selected programme begins. Leave the satellite tuner's power on.
Timer Recording
To record while you're away, follow step 1 — 10 below. For each programme you set, the VCR will turn on, start recording, and turn off automatically. You can store up to 8 programmes.
Make sure....
- The clock is set to the correct time before setting timer recording.
- A cassette is inserted in the VCR and the record tab of the cassette must not be removed.
- The remote control operation mode is set correctly for operating your target component.
- Press VCR to operate the VCR.
- Press TV to operate the TV.
FOR EACH STEP BELOW, YOU NEED TO FINISH WITHIN 60 SECONDS; OTHERWISE, PROGRAMMING WILL HAVE TO BE RESTARTED FROM STEP 1.
1 Select Timer Mode
1 Press VCR.
2 Press TIMER. The Timer Recording menu ap- ears.

2 Select Programme mode
1 Press
▲ or ▼ to select "QUICK - PROGRAMMING" then press OK/STATUS
ONE TIME PROGRAM PROGRAM 1 TV PROG +/- - START+/- - -: - STOP +/- - -: - REC SPEED SP VPS/PDC OFF DATE +/- - - /- - /-
DAILY: 8 WEEKLY: 9 CONFIRM: OK END : TIMER
The Quick Programming menu appears.
- If you have already made 8 programmes, “ALL PROGRAMS IN USE” appears and goes back to the Timer Recording menu. If this happens, delete unwanted programmes. (→P.20)
3 Select Channel Position
Press CH ▲
or ▼ to enter the TV channel.
- Holding down CH ▲ or ▼ rapidly scans through the channels.
ONE TIME PROGRAM PROGRAM 1 TV PROG +/- 12 START+/- - - : - STOP +/- - - : - REC SPEED SP VPS/PDC OFF DATE +/- - - / - -
DAILY: 8 WEEKLY: 9 CONFIRM: OK END : TIMER
- To record from external line input, press CH ▲ or ▼ until “A/V1 REAR”, “A/V2 REAR”, “A/V FRONT”, OR “S-2 VIDEO” appears.
4 Select Start Time
Press START
+ or - (Num- ber button 1 or 4).
• Each time you press the button, the set
time changes
ONE TIME PROGRAM PROGRAM 1 TV PROG +/- 12 START+/- 20:00 STOP +/- - - :- REC SPEED SP VPS/PDC OFF DATE +/- - - /- - /- -
DAILY: 8 WEEKLY: 9 CONFIRM: OK END : TIMER
by 1-minute intervals. If you hold the button, the set time changes by 30-minute intervals.
5 Select Stop Time
Press STOP
+ or -
(Number
button 2 or 5).
• Each time you press the button, the set time changes by 1 minute interval the set time intervals.
ONE TIME PROGRAM PROGRAM 1 TV PROG +/- 12 START+/- 20:00 STOP +/- 22:00 REC SPEED SP VPS/PDC OFF DATE +/- - - /- - /-
DAILY: 8 WEEKLY: 9 CONFIRM: OK END : TIMER
6 Select Tape Speed
Press ALT/ SPEED.
• Each time you press the button, the tape speed alternates between “SP” and “I
ONE TIME PROGRAM PROGRAM 1 TV PROG +/- 12 START+/- 20:00 STOP +/- 22:00 REC SPEED LP WPS/PDC OFF DATE +/- - - /- -
DAILY: 8 WEEKLY: 9 CONFIRM: OK END : TIMER
7 Set VPS/PDC Mode
Press VPS/PDC (Number button 7) to set “VPS/PDC” to “ON” or “OFF”. (→“VPS/PDC Recording” on page 32).
8 Select Start Date
Press DATE + or - (Number button 3 or 6).
• The year and day of the week is displayed automatically.
ONE TIME PROGRAM PROGRAM 1 TV PROG +/- 12 START +/- 20:00 STOP +/- 22:00 REC SPEED LP VPS/PDC ON DATE +/- 14/07/00 FRIDAY DAILY: 8 WEEKLY: 9 CONFIRM: OK END : TIMER
9 Confirm Programme
Press OK/STATUS or TIMER.
"PROGRAM WAS COMPLETED" appears on the TV screen.
After 5 seconds, the above message disappears, and the normal TV picture resumes. The Ⓐ (Timer) indicator lights up on the display.
- If "PROGRAM NOT COMPLETED" appears, try again from step 1.
- If “PROGRAM OVERLAPPED” appears, the timer recording you just programmed overlaps another timer recording. The Program Review screen will appear with a magenta line blinking. To change any item on the overlapping programs, see page 31.
If you want to store other programmes, repeat steps 1 to 9.
10 Finish Settings
Press POWER (or STANDBY/ON on the front panel) to turn off the VCR.
The VCR must be turned off for a timer recording to take place. If you forget to turn off the VCR, "PLEASE TURN OFF VCR FOR TIMER RECORDING" flashes on your TV screen two minutes before a timer recording starts. To remove the message, press the CLEAR button.
If you want to record the same programme daily, press DAILY (Number button 8) during step 3 through 8. (Press the button again to cancel).
The VCR will record a TV programme every day (Monday through Friday) at the same time and length (Daily Recording).
If you want to record the same programme weekly, press WEEKLY (Number button 9) during step 3 through 8. (Press the button again to cancel).
The VCR will record a TV programme once a week at the same day, time and length (Weekly Recording).
After a timer recording has taken place
Press POWER (or STANDBY/ON on the front panel) to turn on the VCR. You can operate your VCR normally.
To stop a started timer recording Press POWER (or STANDBY/ON on the front panel).
Recording stops and the VCR turns off. If it is a Daily or Weekly Recording, future recordings will be carried out as programmed.
When two programme overlap
The Program
Review screen will appear with a magenta line blinking on the newly set timer recording, while the other overlapped programme blinking.
1 Press ▲ or ▼ to move
the magenta line among the two overlapping programs.
2 Press OK/STATUS
to view the detail information of the program you want to change.
3 Go to step 4 through 9 on page 30 for Timer Recording to modify the selected program. To cancel any timer recording, press CLEAR.
- If you do not modify the overlapping programs, the VCR will record the earlier program completely. Only the remaining part of the later program will be recorded.
- If the START time for the two programs are the same, the lower program number will be recorded.
Useful function for Timer Recording: Auto Tape Speed
With this function activated, the VCR can change the tape speed and record the programme in LP mode if not enough tape remains for recording in SP mode.
1 Press VCR.
2 Press MENU.
3 Press ▲ or ▼ to select "VCR SET UP", then press OK/STATUS.
4 Press ▲ or ▼ to select “AUTO SP → LP TIMER.”
5 Press ▶.
Each time you press the button, the setting changes.
ON:
Select this to allow the VCR to change the tape speed from SP to LP when there is not enough tape length remaining.
OFF:
Select this not to allow the VCR to change the tape speed.
6 Press MENU to exit from the menu operations.
Notes:
- The Auto SP LP Timer feature is not available during OTR (One Touch Recording) and the feature will not work properly with any tapes longer than E-180 or with some tapes of shorter lengths.
- If you have programmed the recorder to timer-record 2 or more programmes, the second programme and those hereafter may not fit on the tape if you set “AUTO SP→LP TIMER” to “ON”. In this case, make sure the mode is not engaged, then set the tape speed manually during timer programming.
- In order to ensure that the recording fits on the tape, this feature may leave a short non-recorded section at the end of the tape.
- There may be some picture noise and sound disturbance at the point on the tape where the recorder switches from SP to LP mode.
- If you perform timer recording with both VPS/PDC and the Auto SP LP Timer activated, and the programme goes beyond its originally scheduled length, there may be times when the programme cannot be recorded in its entirety.
Turbo Timer
This function allows you to set the timer recording program without going through the regular set up with the on screen. The extent of programming is 24 hours from the current time.
1 Insert a tape into the VCR and press the "TURBO TIMER" button on the remote control. Current time will appear on the display panel.
2 To change the START time, press the ▲ or ▼ (if you press and hold the button, the time changes in 30-minute increments) then press OK/STATUS.
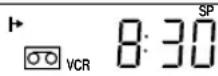
3 To change the STOP time, press the ▲ or ▼ ( if you press and hold a button, the time changes in 30-minute increments) then press OK/STATUS.
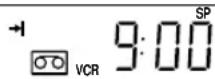
4 To change the CHANNEL position, press the ▲ or ▼, then press OK/STATUS.
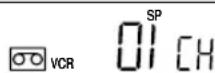
5 The data input will be memorized and the Turbo Timer mode will be finished so that normal display appears.
6 Turn off the VCR.
Notes:
- To exit Turbo Timer mode at any step, press the TURBO TIMER button.
- If “Err” appears on the display panel, all eight programs have been set and Turbo Timer will not proceed. To remove the error message, press the TURBO TIMER button again.
- Settings of Turbo Timer will appear on the display panel only and not on the screen.
- Programs Overlap Warning does not function with Turbo Timer.
• DAILY or WEEKLY programming are not available on Turbo Timer. - Tape speed can be selected anytime during steps 2 through 4.
To check, edit or erase the programmes
1 Press VCR.
2 Turn on the VCR and TV.
3 Press TIMER.
4 Press ▲ or ▼ to select "PROGRAM REVIEW" then press or OK/STATUS. The list of the timer recording programmes appears.
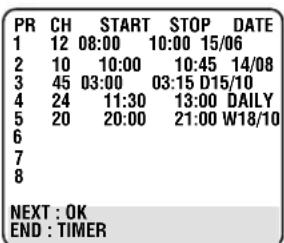
5 Press OK/STATUS repeatedly to view the more detailed programme information.
- When you press the button for the first time, the detailed programme information for Programme 1 appears. By pressing this button repeatedly, you can review the detailed information of all other programmes.
- The display panel shows the programme start time. Pressing DISPLAY changes the display to the programme stop time, then the date and the channel position.
6 If you want to change the programme setting shown on the TV screen, press the following buttons:
START +/-: Changes the start time. STOP +/- : Changes the stop time. SPEED : Changes the tape speed. VPS/PDC : Changes the setting of the video programme system.
DATE +/- : Changes the date.
CH ▲/▼ : Changes the channel.
If you want to erase the programme setting shown on the TV screen, press CLEAR. The detailed information of the next programme appears.
7 Press TIMER to exit from the menu operations, if necessary.
How to see the programme list
①Programme numbers
②Channel position numbers
③Start time
④Stop time
⑤Start date
- If the programme has worked once for the Daily recording, "DAILY" will be shown instead of the start date.
- If the programme has worked once for the Weekly recording, the following week's date will be shown instead of the start date.
VPS/PDC Recording
Now available from some TV stations, PDC (Programme Delivery Control) and VPS (Video Programmes System) are services designed to assure safe, accurate timer recording. With this system, special code signals are transmitted together with the audio/video signals. These code signals control your video recorder and have precedence over the advertised times you may have preset into the timer. This means that your recorder will start and stop recording when the preset TV programmes actually start and end – even if the broadcast time of a preset TV programme is changed.
NOTES:
- When you use Timer Programming, set the start time (VPS or PDC time) exactly as advertised in the TV listing. A different time than advertised will result in no recording.
- VPS/PDC recording is also possible when a satellite tuner or a cable system is connected to AV2 (L-2) IN/DECODER on your recorder.
- VPS/PDC recording is also possible via the AVI (L-1) IN/OUT connector.
How to check if the station being received transmits a VPS/PDC signal
1 Press OK/STATUS or DISPLAY until the channel position appears on the display panel.
2 Hold down SKIP SEARCH for about 5 seconds.
- “VPS/PDC” appears blinking on the display panel. If a VPS/PDC signal is detected from the station, “VPS/PDC” will stop blinking. If no VPS/PDC signal is detected from the station, “VPS/PDC” will blink at a slower rate.
3 Press OK/STATUS, DISPLAY or SKIP SEARCH again to return to normal display.
Tape Duplication
Connection Diagram
1 Connect the recording VCR (this VCR) and the playing VCR.
2 Connect the recording VCR (this VCR) to the TV.
Dubbing from any VCR (or video camera) to another is simple.
Explanations on this page uses this VCR as the recording VCR.
Refer also to the manual supplied with the other VCR (for playback).
Note:
When this VCR is using the recording VCR,
You can also use S-Video or Video/Audio input jacks on the front panel if another VCR has S-Video or Video/Audio output jacks.
When this VCR is using the playing VCR,
You can use the following connector or jacks.
- AV1 (L-1) IN/OUT connector (rear panel): if another VCR has scart input connector.
Be sure to set the A/V1 OUTPUT to the appropriate mode on the "OUTPUT/INPUT SET UP" screen. (→P.27)
- S-Video/Audio output jacks (rear panel): if another VCR has S-Video/Audio input jacks.
1 At VCRs
Insert a source tape in the playing VCR and a blank tape in the recording VCR.
2 At TV
Tune the channel on the TV to your video channel or external line input.
3 Select Line Input
Press Number button “0” and/or PROGRAMME ▲/▼ (or CH ▲/▼ on the remote control) to select the line input.
- L-1: For rear panel AV1 (L-1) IN/OUT connector.
- L-2: For rear panel AV2 (L-2) IN/DECODER connector.
- S-1: For front panel S-Video/Audio input jacks.
- L-F: For front panel Video/Audio input jacks.
If you are using a rear panel AV1 (L-1) IN/OUT or AV2 (L-2) IN/DECODER connector, be sure to set the "A/V1 INPUT" or "A/V2 SELECT" and "A/V2 INPUT" on the OUTPUT/INPUT SET UP screen to appropriate mode. (→P.27)
4 Select Tape Speed
Press ALT/SPEED, until the desired tape speed (SP or LP) appears on the display.
5 Play Back Tape
Press the PLAY ▶ button on the Playing VCR.
6 Record (Copy) Tape
Press REC/OTR ● at this VCR.
Remember: Press the buttons in step 5 and 6 simultaneously to avoid missing any of the recording.
Audio Dubbing
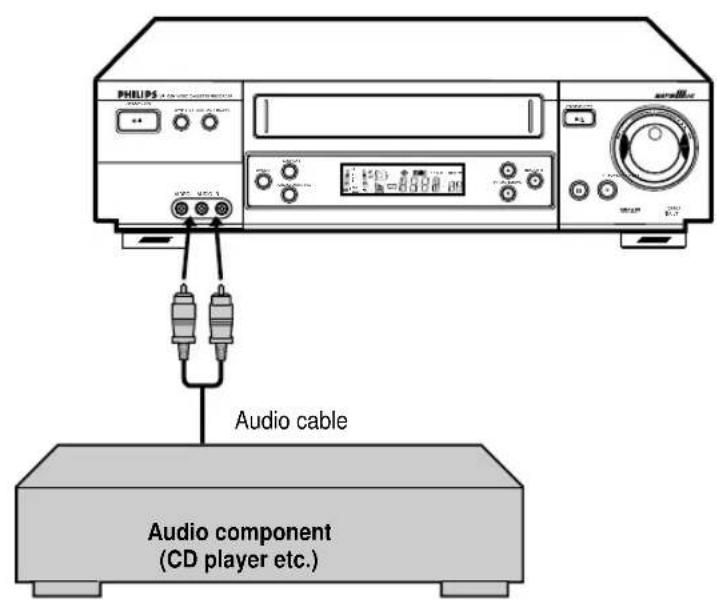
Audio dubbing replaces the normal audio sound of a previously recorded tape with a new soundtrack. Use your VCR as the recorder.
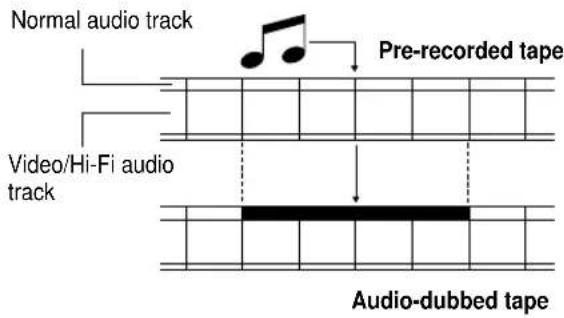
1 Make Connections
Connect an audio component to the AUDIO IN (L and R) connectors on the VCR's front panel.
- When using monaural equipment, use only VCR's AUDIO IN L connector.
2 Set Input Mode
Press Number button “0” and or PROGRAMME ▲/▼ (or CH ▲/▼) on the remote control to select “L-F” or “S-1” on the display window.
3 Locate Start Point
Press PLAY ▶ to start playback of the tape in the VCR, and press PAUSE/ STILL ■ when you find a point where you want to start dubbing. Press AUDIO DUBBING on the front panel.
- Your VCR enters the Audio Dubbing Pause mode. ○ (REC) blinks, ▷□□ (PLAY and PAUSE) lights up on the display window.
4 Start Dubbing
Engage the audio component's PLAY mode, then press PAUSE/ STILL Ⅱ to start the tape in your VCR. Audio Dubbing begins at this point.
• To stop dubbing temporarily, press PAUSE/STILL II. To resume dubbing, press the button again.
5 End Audio Dubbing
Press STOP ■ to stop the tape in the VCR, and engage the audio component's stop mode.
Note:
- When monitoring the sound during Audio Dubbing, the normal soundtrack is automatically selected. If you wish to hear the mixed sound (Hi-Fi + Normal soundtracks), press AUDIO/MUTE on the remote control and select the soundtrack you wish to hear.
- Audio dubbing stops automatically when the counter reaches "0:00:00", and the recorder enters the Play mode. Check the counter reading before dubbing.
- Audio dubbing is also possible using the rear panel AV1 (L-1) IN/OUT or AV2 (L-2) IN/DECODER connector. When using this connector, make sure to select the correct input mode in step 2.
• Audio dubbing cannot be performed on a cassette that has had its record safety tab removed. - When playing back an audio-dubbed tape, press AUDIO/MUTE on the remote control to select the sound-track you wish to hear. (→P.25)
Connection To a Satellite Tuner (Simple Connections)
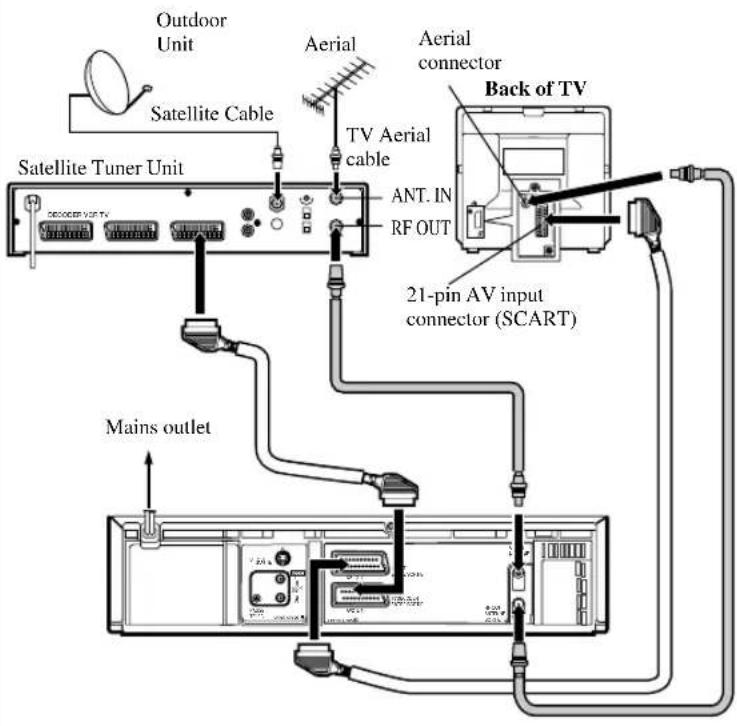
This is an example of simple connection if you don't have a decoder.
Connect the satellite tuner to the VCR's AV2 (L-2)IN/DECODER connector, then connect the VCR's AV1 (L-1)IN/OUT connector to the TV's 21-pin SCART connector.
NOTES:
- Set "A/V2 SELECT" to "A/V".
- You can use Automatic Satellite Programme Recording function (→ P.28) with this connection.
- To record a programme via the satellite tuner, select L-2 mode by pressing Number button "0" and/or CH ▲/▼ so that "L-2" appears on the display window.
- For details, refer to the instruction manual for the satellite tuner.
IMPORTANT
When you set “A/V2 SELECT” to “SAT” (P.27), it is possible to view a satellite broadcast with the TV set to its AV mode even if the VCR is turned off. When the VCR is in Stop mode or recording, press VCR/TV on the remote control to turn off the VCR indicator on the display window. If you turn on the VCR when the satellite tuner’s power is off, nothing appears on the TV. In this case, turn on the satellite tuner, or set the TV to its TV mode, or press VCR/TV to light the VCR indicator.
Connection To a Satellite Tuner (Perfect Connections)
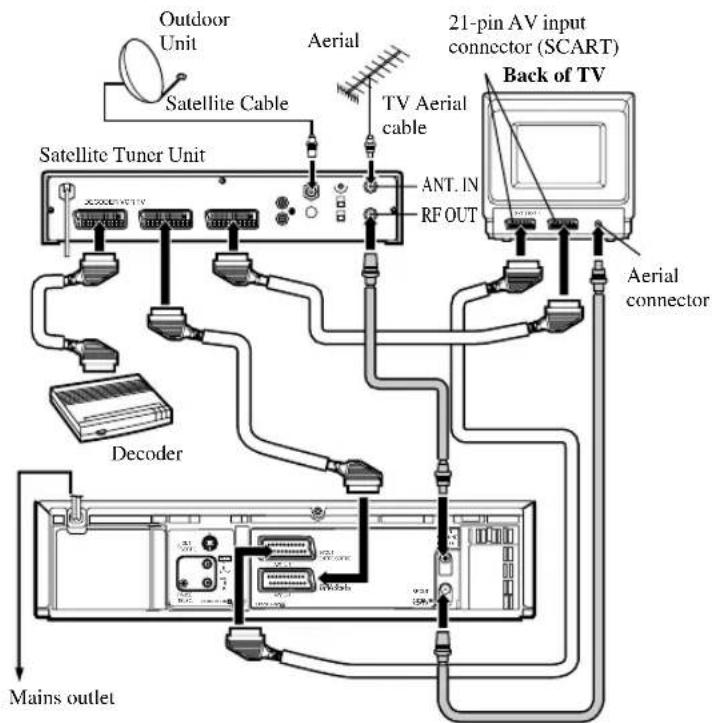
This is an example of recommended connection if you have both satellite tuner and decoder.
Connect the decoder to the satellite tuner's connector, AV1 (L-1) IN/OUT connector to TV's connector, and AV2 (L-2) IN/DECODER connector to the satellite tuner's connector. Then connect the satellite tuner and TV.
NOTES:
- Set "A/V2 SELECT" to "A/V". (→P.27)
- You can use Automatic Satellite Program Recording function (→P.28) with this connection.
- To record a programme via the satellite, select L-2 mode by pressing Number button "0" and/or CH ▲/▼ so that "L-2" appears on the display window.
• To receive a scrambled broadcast, descramble the signal with the satellite tuner. - For details, refer to the instruction manual for the satellite tuner and decoder.
Connection To a Decoder
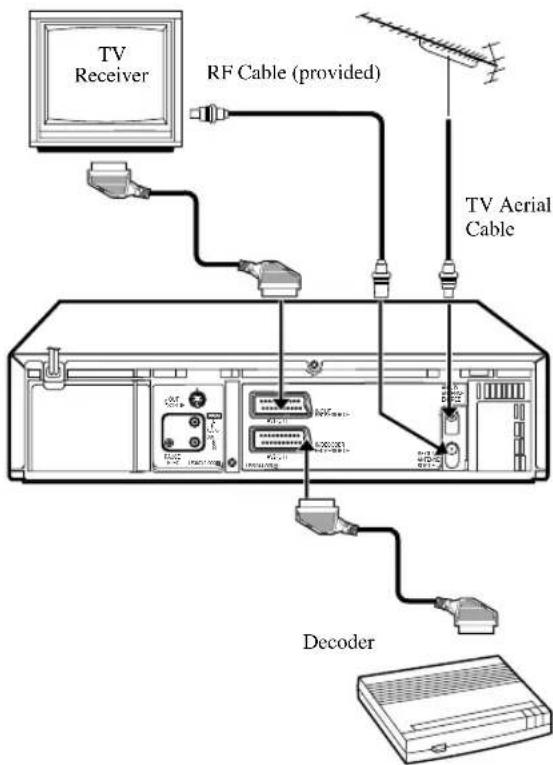
The AV2 (L-2) IN/DECODER connector can be used as an input terminal for an external decoder (descrambler). Simply connect a decoder and you can enjoy the variety of programming that is available through scrambled channels.
Connect your VCR's AV2 IN/DECODER connector to the decoder's Euroconnector using a 21-pin SCART cable.
NOTES:
- Set "A/V2 SELECT" to "DECODER". (→P.27)
- Perform the procedure as described in, "if you want to descramble programme when receiving a scrambled broadcasts" on page 18.
You can use this remote control to operate your TV. To use this remote control for operating the TV, you first need to set the manufacturer's code properly.
You first need to set the manufacturer's code.
Note:
Though this remote control can operate most of the PHILIPS TVs as well as many other manufacturers', some of the TVs will not operate or some functions available on the TVs will not work with this remote control.
1 Set Code
1 Press and hold TV.
2 Press two Number buttons for the manufacturer's code number of your TV, referring to the table to the right.
- For example, for 02, press 0 then 2.
• The remote control can now operate the TV of the selected code.
2 Confirm Setting
Press POWER, pointing the remote control at the TV.
If the TV turns on or off, your setting is completed.
If not, repeat steps above, using another code.
After replacing the batteries
You need to reset the manufacturer's code again.
Note:
The buttons you can use to operate your TV are explained on page 4.
| TV Manufacturers' Codes | |
| PHILIPS 01, 02, 03 | |
| EMERSON 14 | |
| GOLDSTAR 04 | |
| GRUNDIG 24, 25 | |
| HITACHI 12 | |
| JVC 05 | |
| MITSUBISHI 13, 26 | |
| PANASONIC | 07, 17, 19, 20 |
| RCA | 10 |
| SAMSUNG | 18 |
| SANYO | 11 |
| SHARP | 16 |
| SONY | 09 |
| THOMSON | 21, 22, 23 |
| TOSHIBA | 08 |
| ZENITH | 06, 15 |
| FINLUX | 33 |
| NOKIA | 34 |
| BRANDT | 21 |
| SABA | 21 |
| TELEFUNKEN | 21 |
| NORDEMENDE | 21 |
| ITT | 30 |
| LUXOR | 30 |
| SALORA 30 | |
| GRAETZ | 30 |
| SELECO | 30 |
To use this remote control for operating the satellite tuner, you first need to set the manufacturer's code.
Note:
Though this remote control can operate many manufacturers' satellite tuner, some tuners may not operate or some functions available on the tuners may not work with this remote control.
1 Set Code
1 Press and hold SAT.
2 Press two Number buttons for the manufacturer's code number of your satellite tuner, referring to the table to the right.
- For example, for 84, press 8 then 4.
3 Press STOP ■, then release SAT.
- The remote control can now operate the satellite tuner of the selected code.
2 Confirm Setting
Press POWER, pointing the remote control at the satellite tuner. If the satellite tuner turns on or off, your setting is completed. If not, repeat steps above, using another code.
After replacing the batteries
You need to reset the manufacturer's code again.
| SATELLITE TUNER CODES | |
| AMSTRAD....60, 61, 62 | ITT....68 |
| CANAL SATELLITE....81 | KATHREIN....70,71 |
| CANAL +....81 | LUXOR....68 |
| D-BOX....85 | NOKIA....68, 87 |
| ECHOSTAR....78, 79 | PACE....86 |
| ECHOSTAR (VIA DIGITAL)....82 | PHILIPS....66, 84 |
| FINLUX....68 | SALORA....68 |
| GRUNDIG....64 | TPS....83 |
Check the following points once again if you are having some difficulties with your VCR.
| IMPORTANT | |
| Periodic maintenance is required in order to maintain the VCR's continuous excellent performance. After a period of time the video heads will require replacement. If cleaning or replacement of the video heads is required, this service should be performed at an authorized video system service center. | |
| PowerNo power. | CorrectionMake sure the AC power cord is correctly connected to an AC outlet.Make sure the VCR is turned on. |
| Recording & PlaybackTV programme cannot be recorded. | CorrectionCheck the connections between the VCR, the antenna, and the TV.Make sure that the record tab on the back of the cassette is not removed. (→P.22) |
| Timer recording cannot be performed. | Set the timer on-time and timer off-time correctly. (→P.29, P.30)Make sure that the VCR is turned off after setting is made. (→P.29, P.30)Timer recording may not be performed or stopped if a power interruption occurs before or during timer recording. If the power resumes within ten minutes, timer recording will also resume. |
| There is no playback picture, or the playback picture is noisy or contains streaks. | Select your video channel correctly. (→P.15)Adjust the tracking slowly in either direction. (→P.23) |
| During a still or slow motion picture, the picture may contain some vertical jitter when using a TV which has an automatic vertical hold control. | Adjust the vertical hold control manually on the TV, if available. |
| If the top of your playback picture waves back and forth excessively. | Because the VCR playback signal is not as stable as an off-the-air TV signal, the top of your TV screen may be bent or unstable during playback. To solve this problem, slowly turn the horizontal hold control on your TV to correct the wavy picture. If your TV does not have the horizontal hold control or adjusting the control does not help, contact your local TV service center. |
| During playback, “USE CLEANING CASSETTE” appears on the screen and “U:01” appears on the display window. | The video heads are dirty. Use a head cleaner. |
| Remote ControlThe remote control cannot work. | CorrectionAim the remote control directly at the remote sensor on the VCR.Avoid all obstacles which may interfere with the signal path.Inspect or replace the batteries. (→P.5)Make sure the batteries are inserted correctly. (→P.5) |
Miscellaneous
A cassette cannot be inserted.
The cassette does not eject.
The cassette ejects when you press REC/OTR●, or when you press POWER or STANDBY/ON to set timer recording.
Correction
| • Insert the cassette with the window side up and the record tab facing you. |
| • Check that a cassette tape is not already inserted. Press STOP/EJECT ▲. |
| • Make sure the AC power cord is correctly connected to an AC outlet. |
| • If the ⏻ (Timer) indicator is lit on the display, press POWER or STANDBY/ON to cancel timer recording, then press STOP/EJECT ▲. |
| • Make sure the record tab on the back of the cassette is not removed. (→P.22) |
SPECIFICATIONS
General
Mains voltage AC 220 V - 240 V
Mains frequency 50 Hz/60 Hz
Power consumption
Power On 23 watts
Power Off 5.2 watts
Power Save Mode 3 watts
Ambient temperature +5°C to +40°C
Relative humidity 10% to 80%
Dimensions Approx. 435(W) x 94(H) x 343(D) mm
Mass Approx. 4.7kg
Position for use Horizontal
Video output channel UHF E36 (adjustable between 22 — 69)
Possible number of TV channel 99
Number of pre-programmable memory blocks 8
Number of days in advance 365 or every day, or every week
Tuner
Aerial input B/G, D/K
VHF L: 47 MHz — 89 MHz
VHF H: 104 MHz — 300 MHz
302 MHz — 470 MHz
UHF: 470 MHz — 862 MHz
CATV
Video
Input (VIDEO IN) 0.5 V(p-p) to 2.0 V(p-p), 75 ohms
Output (VIDEO OUT) 1.0V(p-p) ± 0.2 V(p-p), 75 ohms
Resolution 250 lines (VHS)
400 lines (S-VHS)
Signal/noise ratio Better than 45 dB
Audio
Input (AUDIO IN) -8 dBs, 50k ohms (0dBs=0.775 Vrms) – for RCA connector -8 dBs, 10k ohms (0dBs=0.775 Vrms) – for SCART connector
Output (AUDIO OUT) -8 dBs, 1k ohms (0dBs=0.775 Vrms)
Accessories supplied Remote control unit
RF coaxial cable
Design and specifications are subject to change without notice.
Batteries - R6(SUM-3)/AA