
HM-1SS - Hand blender WILFA - Free user manual and instructions
Find the device manual for free HM-1SS WILFA in PDF.


| Product Type | Hand Blender |
| Brand | Wilfa |
| Model | HM-1SS |
| Power | 600 W |
| Voltage | 220-240 V, 50/60 Hz |
| Dimensions (L x W x H) | 40 x 8 x 8 cm |
| Weight | 0.8 kg |
| Cord Length | 1.5 m |
| Shaft Material | Stainless Steel |
| Handle Material | Plastic |
| Speed Settings | 2 Speeds + Turbo |
| Included Attachments | Blending Shaft, Whisk |
| Dishwasher Safe Parts | Blending Shaft, Whisk |
| Safety Features | Overheat Protection |
| Warranty | 2 Years |
| Country of Origin | China |
| Noise Level | < 80 dB |
| Usage | Blending, Mixing, Whisking |
Frequently Asked Questions - HM-1SS WILFA
User questions about HM-1SS WILFA
0 question about this device. Answer the ones you know or ask your own.
Ask a new question about this device
Download the instructions for your Hand blender in PDF format for free! Find your manual HM-1SS - WILFA and take your electronic device back in hand. On this page are published all the documents necessary for the use of your device. HM-1SS by WILFA.
USER MANUAL HM-1SS WILFA
natural_image
Modern kitchen hand mixer with a hand mixer and key, no visible text or symbolsHandmixer
NO BRUKSANVISNING
SE BRUKSANVISNING
DK BRUGSANVISNING
FI KÄYTTÖOHJE
GB INSTRUCTION MANUAL
VIKTIGE SIKKERHETSFORANSTALTNINGER
natural_image
Simple line drawing of a mechanical component with a spring and curved base (no text or symbols)natural_image
Hand holding a tool with a spring scale, no text or symbols visibleUTVIS FORSIKTIGHET: Trekk alltid ut støpselet før du setter inn eller trekker ut tilbehør. Bruk enten begge vispene eller begge eltekrokene. Bruk ikke en eltekrok sammen med en visp. Det kan ødelegge mikseren.
INNSTILLING AV HASTIGHETENE
natural_image
Simple line drawing of a mechanical component with a spring and curved base (no text or symbols)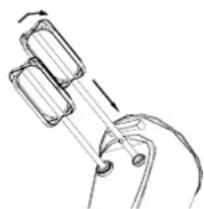
natural_image
Line drawing of a hand gripping a mechanical component with arrows indicating motion (no text or symbols)natural_image
Simple line drawing of a mechanical device with a spring and handle (no text or symbols)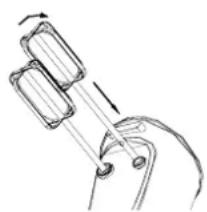
natural_image
Hand holding a tool with a spring scale and handle (no text or symbols visible)natural_image
Simple line drawing of a mechanical component with an arrow indicating motion (no text or symbols)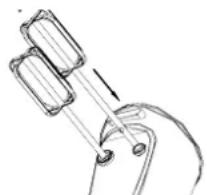
natural_image
Simple line drawing of a hand holding a curved object with two rectangular blocks, no text or symbols present.When using electrical appliances, basic safety precautions should always be followed, including the following:
- Read all instruction before using.
- To protect against risk of electrical shock, do not put Hand Mixer, other than beaters, in water or other liquid. This may cause personal injury and/or damage to the product.
- Close supervision is necessary when Hand Mixer is used by or near children, or incapacitated persons.
- Unplug from outlet when not in use, before putting on or taking off parts and before cleaning.
- Avoid contact with moving parts. Keep hands, hair, clothing, as well as spatulas and other utensils away from beaters during operation to the Hand Mixer.
- Do not operate any appliance with a damaged cord or plug, or after the appliance malfunctions or has been dropped or damaged in any manner. Return appliance to nearest service center for examination, repair, or electrical or mechanical adjustment.
- The use of accessory attachments not recommended or sold by the manufacturer may result in fire, electric shock or personal injury.
- Do not let cord hang over edge of table or countertop.
- Do not let cord or motor housing touch hot surfaces, including a stove.
- Do not use outdoors or for commercial purposes.
- Remove beaters from Hand Mixer before washing.
- Do not place Hand Mixer on or near a hot burner or in a heated oven.
- Switch off the appliance before changing accessories or approaching parts which move when in use
SAVE THESE INSTRUCTIONS
This appliance is for HOUSEHOLD USE ONLY. No user-serviceable parts inside. Power Unit never needs lubrication. Do not attempt to service this product.
Features
This 6 Speed Hand Mixer has been designed to assist you in preparing delicious foods.
Beater Eject Button
This Hand Mixer features a large and conveniently located beater eject button. The design allows for a smooth push of the thumb to release the beaters. There will not be a noticeable “click”.
Turbo of Power Feature
The Turbo of Power feature allows for an added boost to the selected speed setting at the press of a button. During especially heavy mixing tasks, press the button to drive through the mixture with ease. Once the button is released, the mixer will return to the original speed setting.
Handle
The handle has been designed for comfort to prevent fatigue of the hand during heavy or long mixing tasks.
Learning About Your Hand Mixer
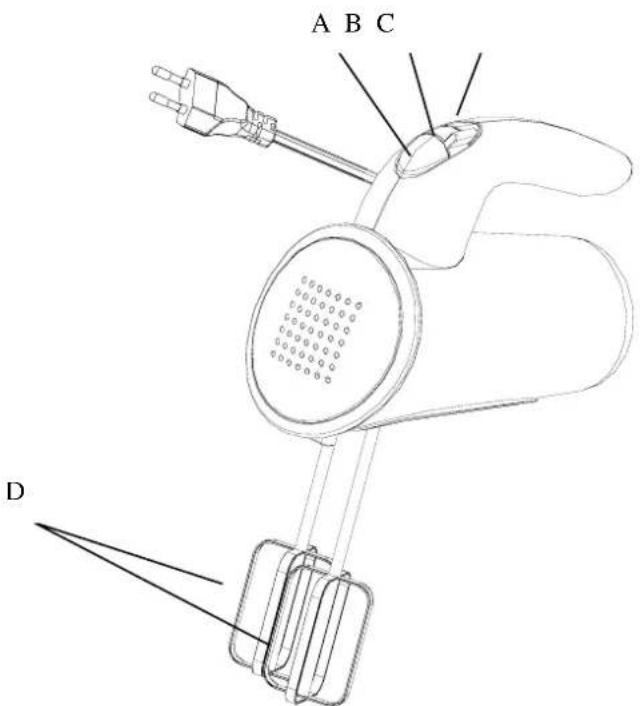
M. Beater Eject Button
N. On/Speed Control
O. Turbo of Power button
P. Beaters
Beaters /Dough Hooks
Beaters:
Spindly, thin Beaters are ideal for whisking sauces or whipping light, fluffy ingredients
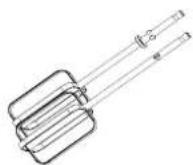
Dough Hooks:
Spiral Dough Hooks are designed to mix or knead heavier batters or bread dough. Hooks may also be used for gently mixing pastry dough.
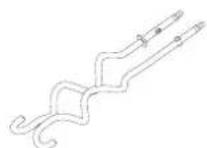
Before using for the first time
- Carefully unpack Hand Mixer.
- Wash Beaters and Dough Hooks in warm, soapy water. Rinse well and dry thoroughly.
- Wipe Mixer with a soft, clean cloth or sponge.
Never immerse Motor Housing in water or any other liquid.
Attaching Beaters and Dough Hooks
Be sure the Mixer is unplugged.
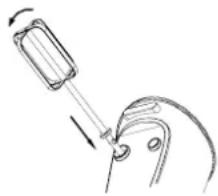
NOTE: One Beaters/Dough Hooks has a small, metal Washer-Ring (Collar) around the top of the Stem. The Beaters/Dough Hooks with the Washer-Ring is the one you insert into the bigger of the two holes in the Mixer.
-
Push the Beaters/Dough Hooks with the Washer-Ring into the bigger hole. Rotate the Beater until it locks into position. (See Figure 1.)
-
Push other Beaters/Dough Hooks/ (without Washer-Ring) into other Mixer hole. Rotate the Beater until it locks into position. (See Figure 2.)
-
After installing the Beaters/Dough Hooks gently pull on each Stem to be sure they are secured properly.
natural_image
Simple line drawing of a mechanical device with a spring and lever (no text or symbols)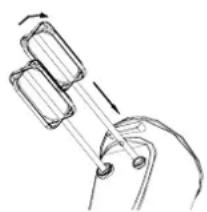
natural_image
Hand holding a tool with a spring scale and handle (no text or symbols visible)CAUTION: Always unplug Mixer from outlet before installing or removing Attachments.
Use either both Beaters or both Dough Hooks. Do not attempt to use a Dough with a Beater
This could damage the Mixer.
Removing Beaters
- Slide Speed Control Level to the "O" position.
- Unplug appliance.
- Push down on the Beater Eject Button to eject Beaters.
Using your Hand Mixer
- Before using your mixer for the first time, wash the beaters in hot, soapy water, or the dishwasher. Rinse and dry thoroughly.
- Be sure speed control is in the “O” position and unplugged from an electrical outlet. Insert beaters into the opening on the bottom of the mixer. Turn beater slightly and push in until beater clicks into position. Plug into the appropriate outlet. Turn mixer on and adjust speed setting using the control on the top of the unit.
Mixing
- Slowly guide mixer around the sides and through the center of the bowl, going in the same direction. Be careful not to over beat the mixture. Over beating tends to make some mixtures tough.
- Whenever scraping of the bowl is required, stop the mixer and scrape sides and bottom of bowl with a rubber spatula as needed. Turn speed control to "O" and rest mixer on its heel rest while adding ingredients. Be sure to position beaters over mixing bowl so any dripping will fall back into the mixing bowl.
- When mixing is complete, set speed control to "1", raise beaters slowly from batter to clean off clinging food. Be sure to turn unit to "O" before raising beaters completely out of mixing bowl.
Speed Settings
| Speed | Mixing Task | |
| 1 | Fold | Use when you start mixing |
| 2 | Stir | For combining liquids with dry ingredients |
| 3 | Mix | For mixing batters and dough recipes |
| 4 | Blend | For combining light mixtures; for fillings/puddings |
| 5 | Beat | For cake mixes and other light mixtures |
| 6 | Whip | For whipping cream and aerating eggs |
Care and Cleaning
Cleaning
Wash the beaters before and after every use. Beaters may be washed in a dishwasher and should be dried thoroughly. After removing plug from electrical outlet, clean mixer head with a damp cloth and wipe dry. DO NOT IMMERSE MIXER IN WATER. This may cause electrical shock, injury, or damage to the product. Avoid the use of abrasive cleaners that will mar the finish of your mixer. The motor of your mixer has been carefully lubricated at the factory and does not require any additional lubricant.
Maintenance
Other than the recommended cleaning, no further user maintenance should be necessary. If for any reason your Hand Mixer should require repairs, do not try to fix it yourself. Send it to the nearest service center. See www.wilfa.com for details
PROTECTION OF THE ENVIRONMENT- DIRECTIVE 2002/96/EC
In order to preserve our environment and protect human health, the waste electrical and electronic equipment should be disposed of in accordance with specific rules with the implication of both suppliers and users. For this reason, as indicated by the symbol

on the rating label or on the packaging, your appliance should not be disposed of
as unsorted municipal waste. The user has the right to bring it to a municipal collection point performing waste recovery by means of reuse, recycling or use for other applications in accordance with the directive.
Marketed by: AS WILFA
Industriveien
25
Postboks
146
1483 Skytta, Norway
Tlf: + 47 67 06 33 00
Fax: + 47 67 06 33 91

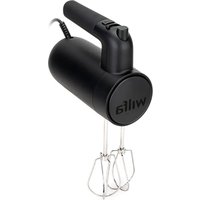
- Handmixer
- VIKTIGE SIKKERHETSFORANSTALTNINGER
- INNSTILLING AV HASTIGHETENE
- SAVE THESE INSTRUCTIONS
- Features
- Beater Eject Button
- Turbo of Power Feature
- Handle
- Beaters /Dough Hooks
- Before using for the first time
- Attaching Beaters and Dough Hooks
- Removing Beaters
- Using your Hand Mixer
- Mixing
- Care and Cleaning
- Cleaning
- Maintenance
- PROTECTION OF THE ENVIRONMENT- DIRECTIVE 2002/96/EC
Brand : WILFA
Model : HM-1SS
Category : Hand blender