KV 8001 - Coffee maker SEVERIN - Free user manual and instructions
Find the device manual for free KV 8001 SEVERIN in PDF.

| Product Type | Fully automatic coffee maker |
| Brand | Severin |
| Model | KV 8001 |
| Voltage | 230 V |
| Power Consumption | 1500 W |
| Pump Pressure (max) | 15 bar |
| Water Tank Capacity | 1.5 L |
| Bean Container Capacity | 140 g |
| Grounds Container Capacity | 12 portions |
| Dimensions (W x H x D) | 240 x 350 x 330 mm |
| Weight | Approx. 9 kg |
| Safety Standards | CE, CB, EMC |
| Grinder | Adjustable grinder with grind regulator |
| Milk System | Integrated milk frother with tube |
| Beverages | Espresso, coffee, cappuccino, latte macchiato, white coffee, milk froth |
| Water Filter | Compatible with Limpid water filter |
| Cleaning Programs | Rinse, milk system cleaning, full cleaning with tablet, descaling |
| Energy Saving | Auto power-off (programmable) |
| Display | LCD with e-Select dial and buttons |
| Included Accessories | Water filter, milk tube, cleaning tablets, water hardness test strips |
Frequently Asked Questions - KV 8001 SEVERIN
User questions about KV 8001 SEVERIN
0 question about this device. Answer the ones you know or ask your own.
Ask a new question about this device
Download the instructions for your Coffee maker in PDF format for free! Find your manual KV 8001 - SEVERIN and take your electronic device back in hand. On this page are published all the documents necessary for the use of your device. KV 8001 by SEVERIN.
USER MANUAL KV 8001 SEVERIN
- General information....4
Greeting 4
Notes about the operating instructions....4
- For your safety ....4
Proper use....4
Dangers....4
-
Technical data ....6
-
Overview....6
Scope of delivery....6
Accessories....6
Device 7
-
Switching on for the first time ....8
-
Your first coffee....9
Switching on/off....9
Operation 9
Preparing coffee specialties....10
Preparing coffee or espresso 10
Preparing coffee-milk specialties....11
Preparing coffee with coffee powder....13
- Individual settings....14
Setting the grinding fineness....14
Making individual settings for coffee preparation....15
Changing device settings....15
Language 16
Water hardness 16
"Limpid" water filter 16
Energy savings options 17
Resetting the device....17
- Maintenance ....18
Daily cleaning....19
Cleaning the water tank 19
Cleaning programs....19
Rinse coffee system....20
Cleaning the milk unit 20
Cleaning program....20
Descaling....21
Changing the "Limpid" water filter 22
Cleaning the brewing unit....22
Cleaning the bean container 23
- Troubleshooting....24
Display device information 25
-
Disposal....25
-
Tips for perfect coffee enjoyment ....26
1. General information
1.1 Greeting
Dear Customers,
We are pleased that you have selected a SEVERIN fully automatic coffee maker. Dive into the pleasurable world of coffee and milk specialties. Before you start, please take some time to get to know your machine with the help of the operating instructions. This will ensure that you will get the best possible results.
1.2 Notes about the operating instructions
Read the operating instructions completely before using the device. Keep the instructions for future reference. If you give the device to somebody, also give them the operating instructions.
Non-observance of these instructions can cause severe injuries and damage to the device. SEVERIN assumes no liability for damage that arises due to non-observance of these operating instructions.
2. For your safety
Important notes for your safety are marked in a special fashion. Be sure to follow these instructions to avoid accidents and damage to the device:

WARNING!
Indicates notes that must be heeded to prevent a danger or injury or a danger to life.

CAUTION!
Indicates notes that must be heeded to prevent a danger of slight injury.

CAUTION!
Indicates notes that must be heeded to prevent a danger of property damage.

NOTE!
Emphasises tips and other useful information.
2.1 Proper use
Your fully automatic coffee maker is intended exclusively for the non-commercial preparation of coffee specialties for household use.
No sparkling mineral water, milk or instant beverage powder (e.g. cappuccino, hot cocoa, etc.), flavourings (liquors, creamer, etc.) or coffee beans caramelized with additives may be put in the device.
2.2 Dangers
Since the device is operated with electrical current, there is a danger of electric shock. Be sure to follow the following cautionary measures:
- Never grab the mains plug with wet hands.
- When you pull the mains plug out of the outlet, always pull directly on the plug.
- Make sure that the power cable is not nicked or jammed and that it does not touch heat sources (e.g. hotplates, fire).
- Never immerse the device in water or other liquids.
- Only operate the device if the voltage specified on the rating plate matches the voltage in your outlet.
- If you are not going to be using the device for a while, in case of danger or defect, pull the mains plug from the outlet immediately.
- Never screw the device down and do not make any changes to the machine.
- Do not insert any pointy metal objects into the device openings.
On the coffee-milk dispenser of the device, there is a danger of burning due to hot water:
- Set up the device so that it is out of the reach of children.
- Do not touch the coffee-milk dispenser when the machine is switched on.
For particular groups of people, there is increased danger:
- This device is not intended to be used by children or people with limited physical, sensory or mental capacities or lacking experience and/or knowledge unless they are supervised by a person responsible for their safety or they have been trained how to use the device.
- Children should be supervised to ensure that they do not play with the device.
- Keep children away from the packaging material. There is a danger of suffocation.
Pathogens can form in the device due to insufficient hygiene.
- Adhere to the specified cleaning intervals.
A defective device can cause property damage and injuries:
- Check the device for damage each time before you commission it. Never operate a defective device.
- If the mains cable of the device is damaged, it must be replaced by an authorised dealer, customer service or by the manufacturer to avoid hazards.
- Repairs may only be made by the manufacturer or by service locations authorised by the manufacturer.
Incorrect handling of the device can cause property damage.
- Set up the device in a dry, clean place indoors on a level surface without direct sunlight.
- Never set up the device in unheated rooms where there is a danger of frost.
- Never set up the device on a hot surface or near strong sources of heat. The device could be damaged.
- Do not set up the device on a surface which could be damaged by water (e.g. untreated wood).
- Never pour milk into the water tank.
- Use only products recommended by SEVERIN to care for your device.
- Do not put the device in the dishwasher.
3. Technical data
Voltage 230 V
Output/power consumption 1500 W
Safety test CE, CB, EMC
Pump pressure (max.) 15 bar
Capacity of water tank 1.5 l
Capacity of bean container 140 g
Capacity of grounds container 12 portions
Dimensions (W x H x D) 240 mm x 350 mm x 330 mm
Weight approx. 9 kg
4. Overview
4.1 Scope of delivery
The device's scope of delivery includes:
- Your fully automatic coffee maker
• A "Limpid" water filter
• A milk tube for the milk steamer
• These operating instructions
• Water hardness test strips - Cleaning tablets
4.2 Accessories
The following accessories are available:
- "Limpid" water filter
- Milk cooler
- Cleaning tablets
- Descaling tablets
• A milk tube for the milk steamer
4.3 Device
Overview
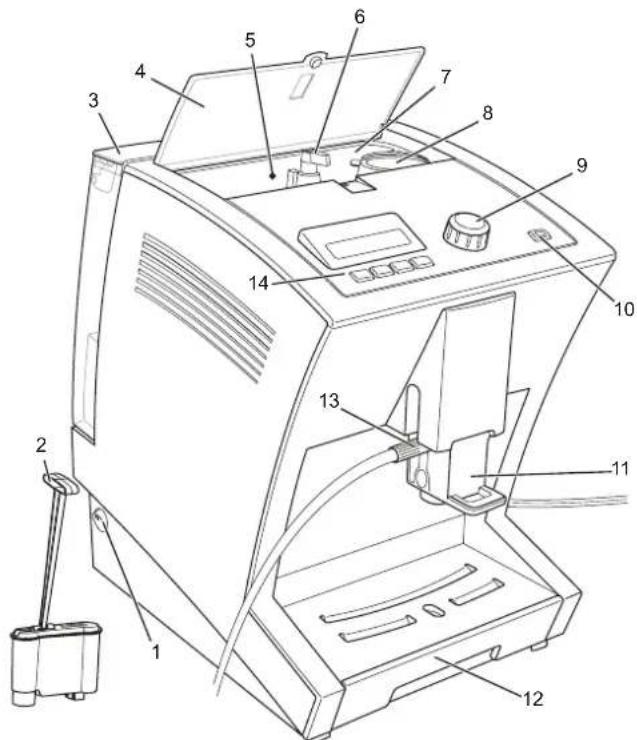
Fig. 1: Device overview
Item Designation Explanations
1 On/off switch
2 Water filter To improve the water quality.
3 Water tank For adding drinking water.
4 Bean container cover To protect the beans.
5 Bean container signal lamp
Lights up if the supply of beans is getting too low.
6 Grind regulator For adjusting the grinding of the coffee variety.
7 Bean container For adding unground beans.
8 Powder dosing chamber For adding a cup portion of coffee powder (e.g. low-caffeine coffee).
9 e-Select For selecting a coffee specialty and for selecting menu options and settings on the menu.
10 Menu button To call up and exit the menu.
11 Coffee-milk dispenser with height adjustment
The coffee-milk dispenser can be adjusted to the height of the container (cup/glass) below using the handle.
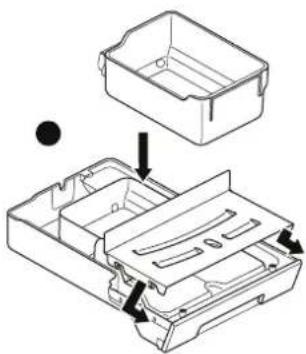
12 Drip tray with cup tray and grounds container
For catching water and coffee grounds.
13 Connection for milk tube For drawing milk for coffee specialties with milk (e.g. cappuccino).
14 Display with operating controls
Shows details about beverage preparation and the menu.
natural_image
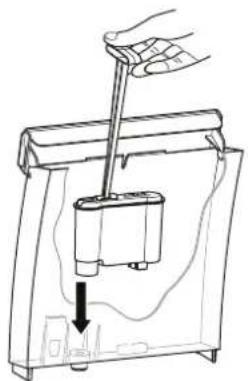
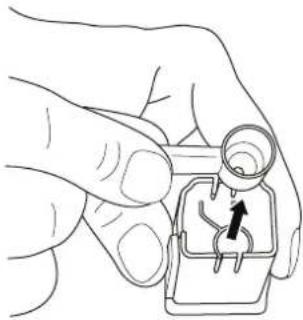
Line drawing of a hand using a tool to lift a battery into a container (no text or symbols)Fig. 2: Inserting the water filter Fig. 3: Inserting the water tank
natural_image
Line drawing of a hand holding a device with a scroll arrow pointing to the handle (no text or symbols present)5. Switching on for the first time
When you switch your device on for the first time, it first asks you for some basic settings.
- Plug the mains plug into the outlet.
- Switch the device on with the on/off switch.
The display shows:
PLEASE SELECT LANGUAGE
- Turn the e-Select until the desired language is shown and confirm it by pressing the e-Select.
The display shows:
PLEASE SELECT WATER HARDNESS
- Check the water hardness on a tap using the water hardness test strip. To do this, proceed according to the enclosed description of the test strips.
- Use the e-Select to select the water hardness and confirm your entry.
The display shows:
USE FILTER?
- Rinse the water tank thoroughly with water.
- If desired, insert the "Limpid" water filter into the water tank (Fig. 2) the water tank with cold drinking water up to the „Max" marking and insert it into the device (Fig. 3). Here, mre that the water tank hooks into the top of the device and lies close against the device.

NOTE!
A water filter improves the water quality of the water used by removing contaminants from the water. SEVERIN recommends the use of the "Limpid" water filter for high water quality.
- Select with the e-Select
• NO, if you do not want to use a water filter or
• YES, if you want to insert a water filter in the water tank.
The display shows: RINSING
Water runs out of the coffee-milk dispenser into the drip tray.
As soon as the rinsing process is complete, the display shows the „Beverage selection“ view.
6. Your first coffee
6.1 Switching on/off
Each time you switch the machine on or off, the device first rinses the brewing unit.
- Switch the device on or off with the on/off switch.
The display shows the text „SEVERIN“ and then: RINGING
The rinsing of the brewing unit is complete as soon as the „Beverage selection“ view is shown again.

NOTE!
The device switches off automatically after a programmable switch-off time (default setting: 2 hours). By pressing the on/off switch, you can switch off the device manually at any time.
6.2 Operation
"Beverage selection" view
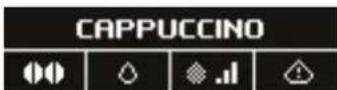
Symbols Meaning

To set the strength of the desired coffee.

weak coffee

normal coffee

strong coffee

individually-set quantity of beans

— Preparation with ground coffee
Symbols Meaning

To set the quantity of water.

small cup (125 ml)

medium cup (160 ml)

large cup (200 ml)

individually-set cup size

To set the milk/milk foam quantity of a milk specialty.

a little milk

an average quantity of milk

a lot of milk

- Individually-set quantity of milk

Indicates warning messages.

NOTE!
All symbols are not shown for each beverage; the symbols shown depend on whether or not the beverage is prepared with milk/coffee beans.
The device is operated using the e-Select and the operating controls.
- By turning the e-Select, you select a beverage; you prepare it by pressing.
- The e-Select lights up steady white if the device is waiting for an input from you.
- The e-Select blinks while the device is preparing a beverage.
- The e-Select blinks red if an error has occurred (see „9. Troubl‘9. Troubleshooting’ on page 24).
- By pressing the four operating controls below the display, you can adjust your coffee specialty to suit your individual needs.
"Device settings menu" view
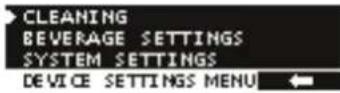
On this menu, you can make settings, perform care programs and display information.
- By pressing and holding the menu button (at least 3 seconds), you will reach the menu; you can exit it by pressing again.
- By turning the e-Select, you can select a menu option; confirm it by pressing.
- The e-Select lights up steady white if the device is waiting for an input from you.
- The e-Select blinks while the device is cleaning itself.
- With the button, you return to the previous menu without changing the setting.
6.3 Preparing coffee specialties
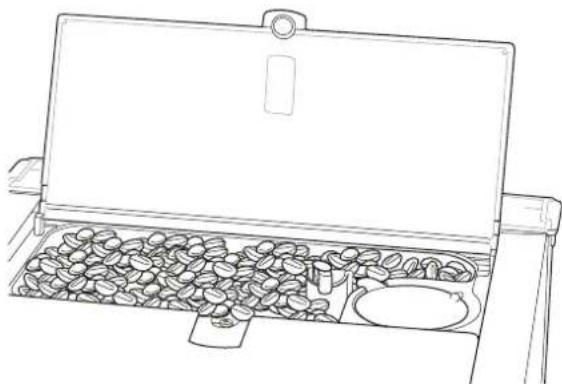
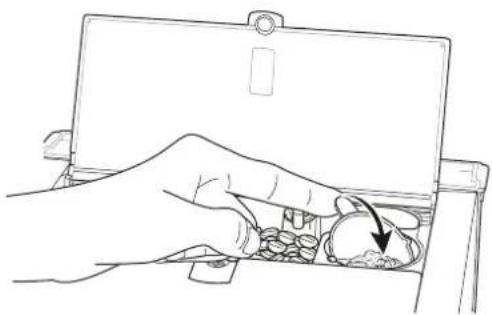
To prepare a coffee, first fill the bean container with beans.
- Open the cover of the bean container and wipe the bean container out with a damp cloth.
- Fill the bean container with coffee beans (Fig. 4)
- Close the cover of the bean container.
6.3.1 Preparing coffee or espresso
To prepare a coffee or espresso, there must be enough beans in the bean container and enough water in the water tank.
- Place a cup on the cup tray below the coffee-milk dispenser of the device and adjust the height of the coffee-milk dispenser to the cup height (Fig. 5).
- By turning the e-Select, select COFFEE or ESPRESSO.
natural_image
Line drawing of a portable stove with open lid and scattered coffee beans (no text or symbols)Fig. 4: Adding beans
- If desired, you can use the
• change the coffee strength.
- change the water quantity.

NOTE!
To prepare the coffee specialty with your own settings, press the operating control until displayed next to '7.2 Making individual settings for coffee preparation' on page 15)
- Press the e-Select.
The desired coffee specialty is prepared. - If you would like to change the coffee quantity during dispensing, turn the e-Select while the coffee is being dispensed.
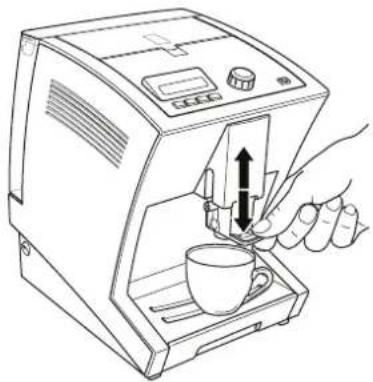
natural_image
Line drawing of a hand using a coffee machine to press coffee into a cup (no text or symbols present)Fig. 5: Placing the cup underneath and adjusting the dispenser height.
The display shows:
COFFEE QUANTITY
and under that, a bar with the set quantity in „ml“. The coffee dispensing will stop automatically after the selected quantity has been prepared. It can also be stopped early by pressing the e-Select.
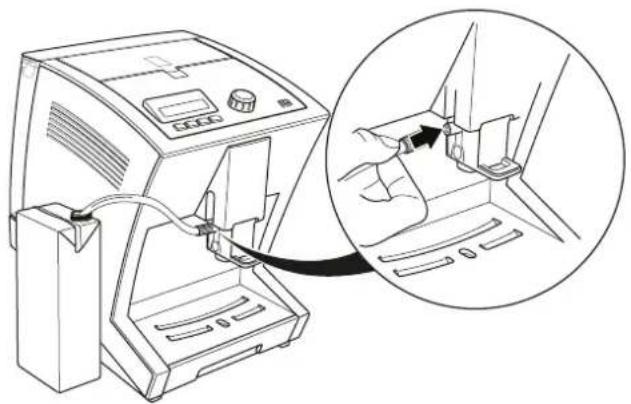
6.3.2 Preparing coffee-milk specialties
To prepare a cappuccino, a white coffee or a latte macchiato, there must be enough beans in the bean container and enough water in the water tank. Also place a container filled with milk (e.g. SEVERIN milk cooler) next to the device.

NOTE!
Coffee specialties prepared with milk are best if the milk is chilled to refrigerator temperature.
- Plug the milk tube onto the connection on the coffee-milk dispenser and hang the other end of the tube in the milk container (Fig. 6).
natural_image
Line drawing of a medical device with an inset showing a hand inserting a cable into a seat (no text or symbols present)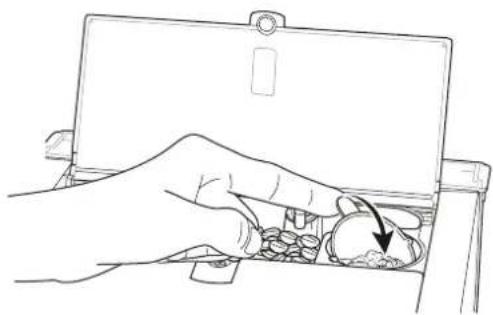
natural_image
Line drawing of a hand inserting a coin into a tray with a magnifying glass (no text or symbols)Fig. 6: Connecting the milk tube Fig. 7: Tipping over the powder dosing chamber

NOTE!
Make sure that the tube is submerged in the milk so that the milk can be drawn correctly by the device.
- Place a cup on the cup tray below the coffee-milk dispenser of the device and adjust the height of the coffee-milk dispenser to the cup height (Fig. 5).
- By turning the e-Select, select CAPPUCCINO, LATTE MACCHIATO, WHITE COFFEE, MILK FROTHOR MILK.
-
If desired, you can
-
change the coffee strength.
- change the water quantity.
• change the milk-milk froth quantity.

NOTE!
To prepare the coffee specialty with your own settings, press the operating control until displayed next to ('7.2 Making individual settings for coffee preparation' on page 15)
- Press the e-Select.
The desired coffee specialty is prepared. - If you would like to change the milk quantity during dispensing, turn the e-Select while the milk is being dispensed.
The display shows:
QUANTITY
and below this, a bar with the set milk dispensing time in seconds.
- If you would like to change the coffee quantity during dispensing, turn the e-Select while the coffee is being dispensed.
The display shows:
QUANTITY
and below this a bar with the set quantity in „ml“. The coffee dispensing stops automatically, but it can also be stopped by pressing the e-Select. After the preparation, the display shows the following for a short while: CLERN MILK UNIT?
-
Press
-
the √ button to perform the cleaning (see „8.8.3.2 Cleaning the milk unit“ on page 20) or
- the button if you only want to perform the cleaning later.

NOTE!
It is recommended that you clean the milk unit after each preparation.
6.4 Preparing coffee with coffee powder
You can also prepare a coffee specialty with coffee powder. This is especially useful if you want to prepare a decaffeinated coffee, for example.
- Proceed as described in the se'6.3.1 Preparing coffee or espresso'sso" '6.3.2 Preparing coffee-milk specialties" to select the desired beverage.
- Instead of selecting the strength of the coffee, use the 📋 button to select the symbol.
- After you have selected the desired water and milk quantities, press the e-Select.
The display shows
PLEASE ADD COFFEE POWDER - Open the cover of the bean container and fill the powder dosing chamber with coffee powder.

CAUTION!
Incorrect filling can damage the device.
—Only add coffee when the device asks you to.
-Only add coffee made of ground beans (no instant beverage powder, coffee granules, cocoa, etc.).
—Fill the powder dosing chamber just once for a cup portion, not multiple times.
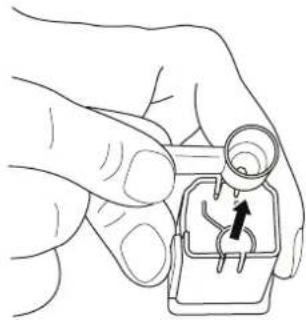
- Turn the powder dosing chamber over (Fig. 7).
- Turn the powder dosing chamber back to the initial position and close the cover of the bean container.
- Press the e-Select again.
The desired coffee specialty is prepared.
- To make changes to the liquid quantities while drawing, turn the e-Select as described in the sections '6.3.1 Preparing coffee or espresso' repar '6.3.2 Preparing coffee-milk specialties'
natural_image
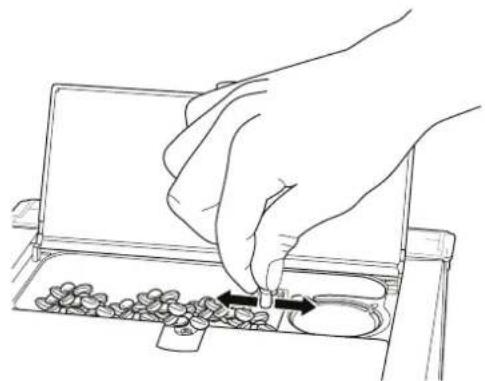
Line drawing of a hand inserting pills into a tray (no text or symbols)Fig. 8: Setting the grinding fineness
7. Individual settings
7.1 Setting the grinding fineness
The grinding fineness affects the taste of the coffee. Select the grinding fineness according to the type of coffee you are using.

CAUTION!
If the grinding coarseness is shifted and no coffee beans are being ground, the grinder can be damaged.
-Only shift the grinding fineness while the grinder is grinding.

NOTE!
For a light roast, you should set a fine grinding fineness; for a dark roast a medium grinding fineness is optimal. The roast is normally printed on the coffee package.
Here's how to set the grinding fineness:
- Place a cup on the cup tray below the coffee-milk dispenser of the device and adjust the height of the coffee-milk dispenser to the cup height.
- Open the cover of the bean container.
- By turning the e-Select, select COFFEE or ESPRESSO.
- Press the e-Select.
The grinder grinds. The coffee specialty is prepared.
- Set the grinding fineness of the beans on the grinder regulator while the grinder is grinding. To do this, press the grinder regulator down and turn it (Fig. 8)
• to the right in order to set a fine grinding coarseness.
• to the left in order to set a coarse grinding fineness.
As soon as you release the grinder regulator, it snaps upward automatically. - Close the cover of the bean container again.
7.2 Making individual settings for coffee preparation
You can adapt the coffee preparation individually to your personal desires. For each coffee specialty, there are various preparation variants available. You can prepare your desired coffee using the operating controls.
You can select the following preparation variants for the preparation of your coffee specialty.
Preparation variants
| Espresso/coffee | ||
| Quantity of coffee (espresso) | 20 – 50 ml50 – 250 ml | |
| Quantity of coffee (coffee) | ||
| Coffee strength very weak, weak, normal, strong, very strong | ||
| Temperature Coffee normal, high | ||
| Cappuccino/Latte macchiato | ||
| Quantity Coffee 20 – 250 ml | ||
| Quantity of milk froth 10 – 25 seconds | ||
| Coffee strength very weak, weak, normal, strong, very strong | ||
| Temperature Coffee normal, high | ||
| Pause time (only Latte macchiato) | 15, 30, 45 seconds | |
| White coffee | ||
| Quantity Coffee 20 – 250 ml | ||
| Quantity Milk 10 – 25 seconds | ||
| Coffee strength very weak, weak, normal, strong, very strong | ||
| Temperature Coffee normal, high | ||
Milk/milk froth
Quantity Milk 10 – 25 seconds

NOTE!
- The total fill quantity of the cup for beverages prepared with milk consists of the coffee quantity plus the milk/milk froth quantity! Take this into account when selecting your cup.
—The pause time is the time until the milk is added to the coffee. The layering of a latte macchiato can be influenced this way.
Here's how to make your own settings for the coffee preparation:
- Press the menu button for at least 3 seconds and use the e-Select to select the
BEVERAGE SETTINGS
menu option.
The display shows a list with the coffee specialties.
- Select the coffee specialty whose settings you would like to change.
The display shows the setting possibilities for the selected coffee specialty (cf. previous table: „Preparation variants").
- Select the setting that you would like to change.
The display shows a bar with the currently-selected setting.
- Turn the e-Select to change the setting and
- confirm the change by pressing the e-Select or
- interrupt the change with the button.
- Then press the menu button to exit the menu.
The display shows the „Beverage selection“ view.
7.3 Changing device settings
You can change the device settings.
7.3.1 Language
This is how to select the preferred language for the display.
-
Press the menu button for at least 3 seconds and use the e-Select to select the DEVICE SETTINGS menu option.
-
Then select the LANGUAGE menu option.
The display shows the available languages.
-
Turn the e-Select to change the setting and
-
confirm your entry by pressing the e-Select or
- interrupt the change with the button.

NOTE!
If you have accidentally selected the incorrect language, you can reset the device to the factory setting ('Resetting the device in case of incorrect language setting' on page 17).
7.3.2 Water hardness
Select the water hardness according to the water hardness in your household. Depending on the setting, your device will inform you when it is time to perform a descaling.

NOTE!
In order to operate your device optimally, set the water hardness according to the specifications of your water utility and the water test strip.
This is how to select the water hardness:
-
Press the menu button for at least 3 seconds and use the e-Select to select the DEVICE SETTINGS menu option.
-
Then select the
WATER HARDNESS menu option.
The display shows: HARDNESS 4 (DH). PLEASE SELECT WATER HARDNESS.
-
Turn the e-Select to change the setting and
-
confirm your entry by pressing the e-Select or
- interrupt the change with the button.
7.3.3 "Limpid" water filter
If you want to use a water filter, you must set the device accordingly. Depending on the setting, your device will inform you when it is time to perform a descaling.

NOTE:
The “Limpid” water filter improves the water quality of the water used by removing contaminants from the water. SEVERIN recommends the use of a water filter for high water quality.
This is how to set the device for the use of a water filter:
- Press the menu button for at least 3 seconds and use the e-Select to select the DEVICE SETTINGS menu option.
- Then select the
WATERFILTER OPTIONS menu option.
The display shows: USE FILTER?
- Select with the e-Select
• YES, if you want to insert a water filter in the water tank or
• No, if you do not want to use a water filter.
- Follow the steps in section
'8.3.5 Changing the "Limpid" water filter' on page 22.
7.3.4 Energy savings options
The device can switch itself off if it is not used for a longer period of time. You can set the time period.
Here's how to set the energy savings options:
-
Press the menu button for at least 3 seconds and use the e-Select to select the DEVICE SETTINGS menu option.
-
Then select the AUTO POWER-OFF menu option.
The display shows the currently-set time for the automatic switch-off.
- Turn the e-Select to change the setting and
- confirm your entry by pressing the e-Select or
- interrupt the change with the button.
7.3.5 Resetting the device
You can reset the device to the factory settings. All personal settings for coffee preparation are thus lost and the device starts once again with the commissioning
('5. Switching on for the first time' on page 8).
Resetting the device via the menu
Here's how to reset the device to the factory settings:
-
Press the menu button for at least 3 seconds and use the e-Select to select the DEVICE SETTINGS menu option.
-
Then select the FACTORY SETTINGS menu option.
The display shows: RESET DEVICE TO FACTORY SETTINGS?
- Press
- the √ button if you want to call up the factory settings or
- the ← button if you want to keep your personal settings.
The display shows the note DEVICE SET TO FACTORY DEFAULTS for a short while. All settings are reset. You must now make all the basic settings again ('5. Switching on for the first time' on page 8).
Resetting the device in case of incorrect language setting
If you have accidentally set an incorrect language and a resetting via the menu is not possible, you can also reset the device to the delivery state as follows:
-
Switch the device off.
-
Press the outer two buttons below the display and hold them down.
-
Switch the device on and continue to hold the buttons down until the message DEVICE SET TO FACTORY DEFAULTS. appears on the display.
All settings are reset. You must now make all the basic settings again ('5. Switching on for the first time' on page 8).
8. Maintenance
In order to take pleasure in your device for a long time and to enjoy equally good coffee the whole while, you must clean the device regularly. The following table provides and overview of all necessary cleaning activities. Some parts of the device must be cleaned by hand, others are handled by the device itself thanks to an appropriate cleaning program.
daily
Clean drip tray, coffee-milk dispenser and milk foamer.
('8.1 Daily cleaning' on page 19)
Change water in the water tank
Clean milk unit. ('8.3.2 Cleaning the milk unit' on page 20)
weekly
Clean the water tank.
('8.2 Cleaning the water tank' on page 19)
when the device indicates
Run the cleaning program.
('8.3.3 Cleaning program' on page 20)
Descaling. ('8.3.4 Descaling' on page 21)
at the latest every 2 months
Change the water filter.
('8.3.5 Changing the "Limpid" water filter' on page 22)
when necessary
Clean the bean container.
('8.5 Cleaning the bean container' on page 23)
Rinse the coffee unit.
('8.3.1 Rinse coffee system' on page 20)
Clean the brewing unit.
('8.4 Cleaning the brewing unit' on page 22)
Maintenance tips
Your device informs you about important maintenance intervals via a message on the display (cf. table). In this case, you can start the cleaning program directly:
- Press the √ button and perform the steps described in the corresponding sections of these instructions starting with step 3.
- If you want to run the cleaning program later, press the button.

CAUTION!
If you do not run the cleaning program right away, a warning symbol appears on the display as a reminder that you must still start a cleaning program. You can continue to use the device without limitation after the display of a maintenance message. However, the message will continue to be displayed in order to remind you about the necessity of maintenance and to prevent damage to the device.
-Clean the machine as soon as you can.

NOTE!
Milk is a food that can spoil. For your health, you should therefore always clean the milk unit as soon as possible.
natural_image
Line drawing of a hand inserting a component into a device (no text or symbols)Fig. 9: Removing the coffee-milk dispenser
natural_image
Hand holding a small mechanical component with a black arrow indicating direction (no text or symbols)Fig. 10: Removing the milk foaming nozzle
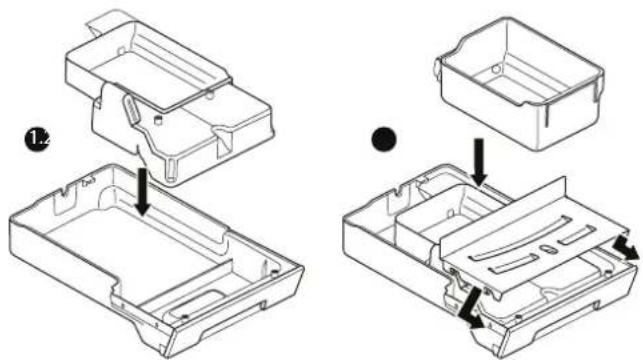
Fig. 11: Assembling the drip tray
8.1 Daily cleaning
Clean the drip tray, the coffee-milk dispenser and the milk foamer every day.
- Switch the device off and disconnect the plug.
- Pull the drip tray out of the device.
- Remove the grounds container and empty the coffee grounds.
- Clean both parts and the cup tray with clear water and a mild detergent.
- Remove the coffee-milk dispenser by pulling out the whole part out of the guide towards the bottom using the handles (Fig. 9).
- Pull the milk foamer nozzle on the connection for the supply out of the coffee-milk dispenser towards the top (Fig. 10).
- Clean both parts with clear water and mild detergent.
- Put the drip tray (Fig. 11) other parts back together and push the drip tray and the coffee-milk dispenser back into the device.

NOTE!
The drip tray including grounds container and the coffee-milk dispenser can be put in the dishwasher.
8.2 Cleaning the water tank
The water tank must be cleaned regularly for hygienic reasons.
- Remove the water tank and remove a water filter if you are using one.
- Clean the water tank with clear water and mild detergent.
- Re-insert the water filter if necessary.
8.3 Cleaning programs
The device has automatic cleaning programs. These can be started from the menu at any time.
8.3.1 Rinse coffee system
The brewing unit must be rinsed regularly in order to guarantee evenly high quality of the coffee preparation.
-
Press the menu button for at least 3 seconds and use the e-Select to select the CLEANING menu option.
-
Then select the RINSING menu option and press the e-Select.
The display shows:
RINSING
The rinsing is complete as soon as the "Beverage selection" view is displayed again.
8.3.2 Cleaning the milk unit
The milk unit must be cleaned regularly in order to guarantee evenly high quality of the milk coffee specialties.
-
Press the menu button for at least 3 seconds and use the e-Select to select the CLEANING menu option.
-
Then select the MILK SYSTEM menu option and press the e-Select.
The display shows:
PLEASE PLACE MILK TUBE IN WATER JAR
-
Plug the milk tube onto the connection on the coffee-milk dispenser and hang the other end of the tube in a container filled with 200 ml clear, cold water.
-
Press the e-Select to confirm.
The display shows:
PLEASE POSITION CONTAINER
-
Place a cup with a capacity of at least 200 ml on the cup tray below the coffee-milk dispenser of the device and adjust the height of the coffee-milk dispenser to the cup height.
-
Press the e-Select to confirm.
The display shows:
RINSING
The cleaning of the milk system is complete as soon as the „Beverage selection“ view is displayed again.
8.3.3 Cleaning program
The device has a cleaning program with which the coffee system can be rinsed and cleaned intensively with a cleaning tablet.

NOTE!
If you carry out the cleaning program immediately after the display of a cleaning message, steps 1 and 2 can be omitted.
-
Press the menu button for at least 3 seconds and use the e-Select to select the CLEANING menu option.
-
Then select the
CLEANING
menu option and press the e-Select.
The display shows:
PLEASE FILL WATER CONTAINER
-
Fill the water tank with water up to the max. marking and insert it into the device.
-
Press the e-Select to confirm.
The display shows:
PLEASE EMPTY GROUNDS CONTAINER
-
Remove the drip tray and empty it together with the grounds container.
-
Re-assemble all parts and push the drip tray back into the device.
-
Place a 500 ml container under the coffee-milk dispenser on the cup tray.
-
Press the e-Select.
The display shows:
CLEANING
- As soon as the command
PLEASE ADD CLEANING TAB
appears on the display, open the cover of the bean container, place the cleaning tablet into the powder dosing chamber and turn the powder dosing chamber.

NOTE!
Use SEVERIN cleaning tablets for fully automatic coffee makers. The SEVERIN cleaning tablets are optimally attuned to your device and can be purchased from your SEVERIN dealer.
-
Turn the powder dosing chamber back to the initial position and close the cover of the bean container.
-
Press the e-Select to continue.
The display shows:
CLEANING

NOTE!
The cleaning process can take as long as 15 minutes.
- As soon as the command
PLEASE EMPTY GROUNDS CONTAINER
appears on the display, repeat steps 5 and 6.
The cleaning program is complete as soon as the "Beverage selection" view is displayed again.
8.3.4 Descaling
Depending on the water hardness of the drinking water used, the device must be descaled at particular intervals so that no scale builds up in the system.

CAUTION!
Due to unsuitable descaler and if the descaling is not performed regularly, the device can be damaged.
-Use SEVERIN descaler, never vinegar or other acidic substances.
-Descale regularly.

NOTE!
No warranty is made for damage that is due to devices which have not been descaled regularly.

NOTE!
If you descale immediately after the display of a cleaning message, steps 1 and 2 can be omitted.
-
Press the menu button for at least 3 seconds and use the e-Select to select the CLEANING menu option.
-
Then select the
DESCALING
menu option and press the e-Select.
The display shows:
PLEASE ADD DESCALING SOLUTION
-
Fill the water tank halfway with water and place the descaling tablet in the water tank.
-
Wait until the descaling tablet has dissolved completely and then put the water tank on the device.
The display shows:
-
Remove the drip tray and empty it together with the grounds container.
-
Re-assemble all parts and push the drip tray back into the device.
-
Press the e-Select to continue.
The display shows: DESCALING

NOTE! The descaling process can take as long as 30 minutes.
- As soon as the command
appears on the display, empty the drip tray and the grounds container again, clean the parts with clear water and put them back in the device.
The display shows:
PLEASE RINSE CONTAINER AND AND FILL WITH WATER
-
Rinse the water tank thoroughly with clear water, then fill it with clear water and put it back in the device.
-
Press the e-Select to continue.
The display shows:
DESCALING
The descaling is complete as soon as the „Beverage selection“ view is displayed again.
8.3.5 Changing the "Limpid" water filter
For even water quality, the "Limpid" water filter must be changed regularly.

NOTE!
If you change the water filter immediately after the display of a cleaning message, steps 1 and 2 can be omitted.
-
Press the menu button for at least 3 seconds and use the e-Select to select the CLEANING menu option.
-
Then select the
INSERT WATER FILTER
menu option and press the e-Select.
The display shows:
PLEASE INSERT WATER FILTER
-
Empty the water tank and remove the water filter.
-
Insert a new water filter, fill the water tank with cold drinking water and set the water tank on the device.
-
Press the e-Select.
The display shows:
FILTER RINSING
The filter change is complete as soon as the „Beverage selection“ view is displayed again.
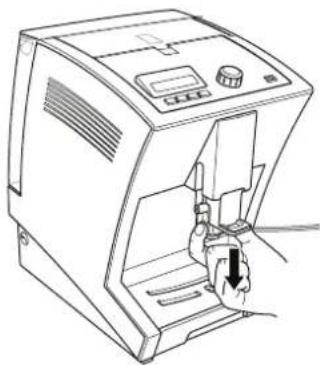
8.4 Cleaning the brewing unit
In addition to an integrated cleaning program, the device also offers you the opportunity to clean the brewing unit manually. For this, the brewing unit can be removed as follows:
- Switch the device off.
- Remove the water tank and shake out the remaining water.
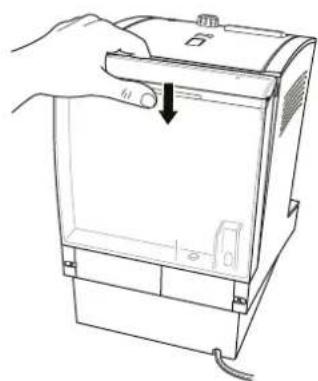
- Open the flap of the brewing unit on the back side of the machine by pressing down on the tabs with your thumbs and pulling towards you (Fig. 12)
- Remove the flap completely.
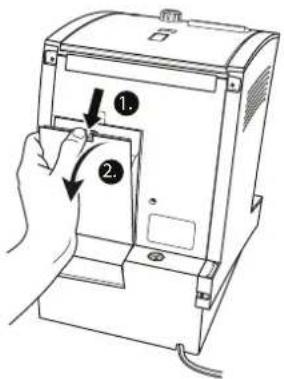
Fig. 12: Removing the cover of the brewing unit
The brewing unit is now visible.
- Pull the red lever of the brewing unit upwards and pull the brewing unit carefully downwards at an angle out of the machine (Fig. 13).
- Clean the brewing unit under running water.

CAUTION!
Incorrect handling of the brewing unit can cause water to escape from the machine.
—Do not take the brewing unit apart or adjust it.
—Make sure that the locking lever of the brewing unit is open when you insert it.
—Push the brewing unit carefully in from bottom to top.
- Insert the brewing unit into the machine from behind and push it in as far as it goes (Fig. 14).
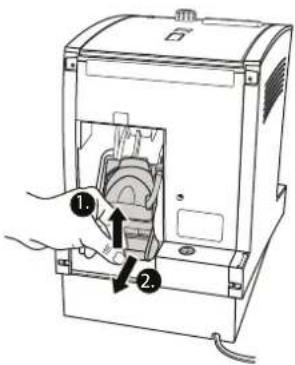
Fig. 13: Pulling out the brewing unit
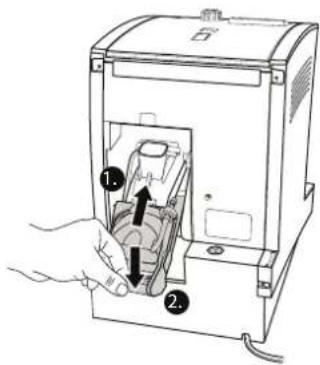
Fig. 14: Inserting the brewing unit
- Press the red lever of the brewing unit down. If the lever does not move, check the position of the brewing unit again and re-insert it.
The brewing unit is now inserted correctly. - Close the brewing unit again with the flap.
8.5 Cleaning the bean container
If you would like, you can wipe out the bean container with a damp cloth.

WARNING!
There is a danger of injuries and damage to the device if you put your fingers into the been feed or object fall into the bean feed.
—Switch the device off before starting cleaning.
—Do not reach into the bean feed.
-Do not let any objects fall into the bean feed.
9. Troubleshooting
In addition to the cleaning messages, the display also shows an appropriate message in case of a technical fault. The remedy is shown together with the fault message on the display.

NOTE!
If a technical fault has occurred, no more coffee can be prepared until the fault has been remedied.
Display Cause Remedy
| PLEASE INSERTBREWING UNITAND CLOSE THEDOOR. | The brewing unit is not inserted correctly/The flap of the brewing unit is not closed. | Insert the brewing unit('8.4 Cleaning the brewing unit' on page 22). |
| BREWING UNITBLOCKED -PLEASE CLEAN. | The brewing unit is not working properly. | Clean the brewing unit('8.4 Cleaning the brewing unit' on page 22). |
| CHECK BREWINGUNIT AND INSERT. | The brewing unit is not inserted or is not inserted correctly. | Insert the brewing unit('8.4 Cleaning the brewing unit' on page 22). |
| WATER SUPPLYERROR. | There is not enough water in the brewing unit. | Clean the water tank and especially its water discharge on the floor. Fill the water tank completely with water. If the problem persists, also clean the brewing unit ('8.4 Cleaning the brewing unit' on page 22). |
| INTERNAL ERROR (CON).PLEASE RE-START. | A system error occurred. | Switch the device off for several seconds and then switch it on again. |
Display Cause Remedy
| INTERNALERROR COHD.PLEASERESTART. | A system erroroccurred. | Switch the device off for several seconds and then switch it on again. |
| GRINDER EMPTY.PLEASE REFILL. | The bean container is full. Fill the bean container with beans('6.3 Preparing coffee specialties' on page 10). | |
| GRINDERBLOCKED.PLEASE CLEAN. | The grinder is blocked. Call customer service. | |
| SYSTEM ERROR.CONTACT SERVICE. | A system erroroccurred. | Call customer service. |
| TOO MUCHGROUND COFFEE, CHANGE GRINDING FINE-NESS OR QUANTITY. | There is too much coffee in the brewing unit. | Set a coarser grind on the grinder regulator ('7.1 Setting the grinding fineness' on page 14) and clean the brewing unit('8.4 Cleaning the brewing unit' on page 22). When you have added ground coffee via the powder dos-ing chamber, reduce the amount of coffee powder which you are putting in for a cup portion. |
| TOO LITTLEGROUND COFFEE, CHANGE GRINDING FINE-NESS OR QUANTITY. | There is too little coffee in the brewing unit. | Set a finer grind on the grinder regulator ('7.1 Setting the grinding fineness' on page 14) and clean the brewing unit ('8.4 Cleaning the brewing unit' on page 22). When you have added ground coffee via the powder dosing chamber, increase the amount of coffee powder which you are putting in for a cup portion. |
9.1 Display device information
For questions to customer service in case of a fault, you can display various device information on the display.
This is how to display device information:
- Press the menu button for at least 3 seconds and use the e-Select to select the INFORMATION menu option.
- If you want to have the number of beverages prepared with the device displayed, select the
QUANTITIES
menu option.
The display shows the number of coffee specialties prepared since the commissioning of the device. - If you want to have information about the device type displayed, select the DEVICE INFORMATION menu option.
The display shows the serial number of the device, the device version and the software version.
10. Disposal

CAUTION!
Incorrect disposal can cause environmental damage.
—The device may not be thrown away in household garbage.
-For disposal, heed the local disposal regulations and, in case of doubt, ask the responsible authorities about proper disposal.
- Dispose of packaging materials that are no longer needed according to local regulations.
- Dispose of the water filter in the normal household garbage.
- At the end of its life, hand the device over to a collection point for electrical scrap.
11. Tips for perfect coffee enjoyment
Situation Tip
| What kinds of coffee can I use? All types of coffee that are not treated after roasting (e.g. with sugar). | |
| My espresso/coffee does not have any foam. | Use the right beans. |
| The coffee is old. Use fresh coffee beans. | |
| Set a finer grind('7.1 Setting the grinding fineness' on page 14). | |
| Increase the quantity of coffee('6.3.1 Preparing coffee or espresso' on page 10). | |
| My espresso tastes bitter. Use a different type of coffee. | |
Situation Tip
| Set a higher brewing temperature ('7.2 Making individual settings for coffee preparation' on page 15). | |
| My espresso tastes bland. Set a finer grind | ('7.1 Setting the grinding fineness' on page 14). |
| Increase the strength of the coffee ('6.3.1 Preparing coffee or espresso' on page 10). | |
| The coffee flows very slowly out of the coffee-milk dispenser. | Set a coarser grind ('7.1 Setting the grinding fineness' on page 14). |
| Clean the coffee-milk dispenser ('8.1 Daily cleaning' on page 19). | |
| The coffee used is too oily. Use a different type of coffee. | |
| Descale the device ('8.3.4 Descaling' on page 21) | |
| What type of milk is best for foaming? Types of milk with a high protein content. The fat content does not matter. The milk should be slightly cooled. | |
| My milk does not foam. Clean the milk system ('8.3.2 Cleaning the milk unit' on page 20). | |
| When should I insert the water filter? With a water hardness >10 °dH. | |
US

SERVICE HOTLINE: 900 102 584
SEVERIN Service
Am Brühl 300
59846 Sundern
Alemania
E-mail: service@severin.com
Índice
- Información general....30
Saludo 30
Fig. 15: Vista general del aparato
1 Interruptor ON/OFF
natural_image
Line drawing of a hand using a tool to lift a battery into a container (no text or symbols)natural_image
Line drawing of a hand holding a device with a scroll arrow pointing to the interior (no text or symbols)Version: 1 2011-04-18
natural_image
Line drawing of a portable stove with open lid and scattered coffee beans (no text or symbols)natural_image
Line drawing of a hand using a coffee machine to press coffee into a cup (no text or symbols present)natural_image
Line drawing of a medical device with an inset showing a hand inserting a cable into a seat (no text or symbols present)Fig. 20: Conectar el manguito de leche
natural_image
Line drawing of a hand inserting a coin into a tray with a magnifying glass (no text or symbols)natural_image
Line drawing of a hand inserting pills into a tray (no text or symbols)natural_image
Line drawing of a portable electronic device with a hand inserting a plug into the front panel (no text or symbols)natural_image
Hand holding a small mechanical component with a black arrow indicating direction (no text or symbols)natural_image
Technical line drawing of a mechanical housing assembly with an arrow indicating a component (no text or symbols present)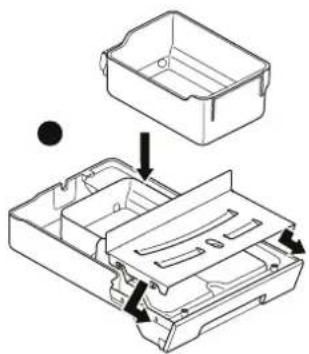
natural_image
Technical line drawing of a mechanical device with an open lid and internal compartments (no text or symbols)Fig. 25: Montar la bandeja de goteo
8.1 Limpieza diaria
natural_image
Line drawing of a hand using a tool to lift a battery into a container (no text or symbols)natural_image
Line drawing of a hand pressing down on a device casing with a downward arrow indicating the action (no text or symbols present)Version: 1 2011-04-18
O visor mostra:
LAVAGEM
Sai água da saída de café/leite para a bandeja de gotas.
natural_image
Line drawing of a portable stove with open lid and tray filled with round objects (no text or symbols)natural_image
Line drawing of a hand using a coffee machine to press coffee into a cup (no text or symbols present)natural_image
Line drawing of a medical device with an inset showing a hand inserting a cable into a seat (no text or symbols present)Fig. 34: Ligar o tubo de leite
natural_image
Line drawing of a hand inserting a coin into a laptop case (no text or symbols)natural_image
Line drawing of a hand using a tool to press small objects into a tray (no text or symbols)natural_image
Line drawing of a portable electronic device with a hand inserting a plug into the front panel (no text or symbols)Fig. 37: Retirar a saída de café/leite
natural_image
Hand holding a small mechanical component with a black arrow indicating direction (no text or symbols)natural_image
Technical line drawing of a mechanical housing component with an arrow indicating assembly (no text or symbols present)