Cangaroo - Stroller Emmaljunga - Free user manual and instructions
Find the device manual for free Cangaroo Emmaljunga in PDF.


| Brand | Emmaljunga |
| Model | Cangaroo |
| Product Type | Stroller (Pram/Pushchair) |
| Age Range (Seat Unit) | 6 months to 3 years |
| Age Range (With City Carry-cot) | From birth |
| Maximum Weight (Seat Unit) | 15 kg |
| Maximum Weight (City Carry-cot) | 9 kg |
| Compliance | EN 1888:2005 |
| Carry-cot Dimensions (Length x Width) | 795 mm x 430 mm |
| Harness Type | 5-point harness with crotch strap |
| Backrest Adjustment | Adjustable via straps |
| Front Wheel | Swivel with lock |
| Parking Brake | Foot-operated, locks rear wheels |
| Foldable | Yes, with safety catch |
| Handle Height Adjustment | Yes, via grey buttons |
| Accessories Included | Raincover, tray, front bar with cover, hood, apron |
| Compatible Accessories | City Carry-cot (original accessory, adapter required) |
| Care Instructions | Hand wash fabrics in lukewarm water, drip dry; lubricate axles every 3 months |
| Upholstery Material | Polyester fabrics |
| Warranty | 6 months manufacturing guarantee (GB only) |
Frequently Asked Questions - Cangaroo Emmaljunga
User questions about Cangaroo Emmaljunga
0 question about this device. Answer the ones you know or ask your own.
Ask a new question about this device
Download the instructions for your Stroller in PDF format for free! Find your manual Cangaroo - Emmaljunga and take your electronic device back in hand. On this page are published all the documents necessary for the use of your device. Cangaroo by Emmaljunga.
USER MANUAL Cangaroo Emmaljunga
IMPORTANT INFORMATION. KEEP FOR FUTURE REFERENCE. FOR THE PROPER USE OF THIS VEHICLE, BE SURE TO READ THIS USER'S MANUAL CAREFULLY. This product complies with EN 1888:2005
This product is intended as a means of transportation for one (1) child aged 6 months to 3 years, with a maximum weight of 15 kg.
With the City Carrycot (original accessory), the pushchair can be used from birth.
Warning! The seat unit is not intended for children under 6 months. The seat unit can be used when the child is old enough to sit unaided.
This product is not intended for jogging, skating/inlines. The outer length/width of the City Carrycot is 795 mm /430 mm
Warning! The City Carrycot is only intended for one child, which cannot sit unaided, roll over to the side or stand up on hands or knees.
Maximum weight of the child in the carrycot is 9kg.
Warning! Do not use the City Carrycot on a stand.
FI
natural_image
Person assembling a stroller with hands adjusting the seat (no visible text or symbols)natural_image
Close-up of a person adjusting a jacket with a pointing arrow and number 1 (no text or symbols on the jacket itself)natural_image
Close-up of a mechanical device with a bag and arrow indicator (no readable text or symbols)natural_image
Close-up of a mechanical device with a numbered arrow and number 3, no visible text or symbols beyond the numbernatural_image
Close-up of a mechanical device with a numbered component (4) and a metallic bracket, no visible text or symbols.natural_image
Close-up of a bicycle's seatbelt and chain, showing rope knot and metal frame (no text or symbols visible)natural_image
Close-up of a bicycle tire assembly with a numbered component (9) and no visible text or symbolsnatural_image
Close-up of a person's seatbelt being adjusted for a cable, with a numbered arrow pointing to the number 15 (no text or symbols on the main subject)natural_image
Close-up of a folded bed with two black arrows pointing to the seam, no visible text or symbolsnatural_image
Close-up of a mechanical component with directional arrows indicating motion (no text or symbols)Använda bromsen
natural_image
Close-up of a mechanical device with a dark fabric cover and metal frame (no visible text or symbols)Montera varukorgen
natural_image
Close-up of a bicycle's wheel and suspension system with a numbered arrow pointing to the number 23 (no text or symbols on the diagram itself)natural_image
Close-up of a hand adjusting a bicycle wheel rim with a curved arrow indicating motion (no text or symbols)natural_image
Person assembling a bicycle frame with arrows indicating parts (no text or symbols visible)natural_image
Close-up of a bicycle wheel and foot assembly with a hand adjusting the wheel (no visible text or symbols)natural_image
Diagram of a vehicle chassis frame with labeled components (no text or symbols present)Fälla in styreshandtaget
natural_image
Person assembling a stroller with a handle (no visible text or symbols)• Ta av klädseln.
2
natural_image
Close-up of hands using a tool to adjust or install a bicycle wheel (no visible text or symbols)natural_image
Close-up of a mechanical device with labeled parts (1), showing structural components and a wheel (no text or symbols beyond labels)natural_image
Close-up of a hand holding a black mechanical lever with metal joints (no text or symbols visible)natural_image
Close-up of hands using a tool to adjust or install a metal pipe (no visible text or symbols)natural_image
Close-up of a hand using a tool to adjust a metal bracket with a black clip (no text or symbols visible)natural_image
Close-up of hands using a tool to adjust or install a mechanical component (no visible text or symbols)natural_image
Close-up of hands using a tool to adjust or install a mechanical component (no visible text or symbols)natural_image
Person assembling a baby stroller with a handle (no visible text or symbols)natural_image
Line drawing of a hand holding a mechanical clamp or bracket, with arrows indicating force direction (no text or symbols)natural_image
Close-up of a car wheel and steering wheel assembly (no visible text or symbols)7
natural_image
Line drawing of a car seatbelt with directional arrows indicating rotation (no text or symbols)8
9
natural_image
Close-up of a hand pressing down on a car seatbelt, with a numbered arrow indicating '9' (no text or symbols present)Använda bromsen
natural_image
Person assembling a stroller in a wheelchair (no visible text or symbols)natural_image
Close-up of a person adjusting a jacket with a numbered arrow pointing to the pocket (no text or symbols visible)natural_image
Close-up of a mechanical device with a labeled component '2' and directional arrows, no readable text or symbols beyond the number.natural_image
Close-up of a mechanical device with a numbered label '3' pointing to a bandage (no readable text or symbols beyond the number)natural_image
Close-up of a mechanical device with a numbered arrow pointing to a component (no visible text or symbols)natural_image
Close-up of a bicycle's seatbelt and chain, showing rope knot and metal frame (no text or symbols visible)natural_image
Close-up of a motorcycle's wheel and suspension system with a numbered component (9), no visible text or symbolsMontering og anvendelse af 360 grader forhjul
natural_image
Close-up of a person's seatbelt being adjusted for a cable, with a numbered arrow pointing to the cable (no text or symbols visible)VIGTIGT
natural_image
Close-up of a folded fabric or carpet with two black arrows pointing to a seam or crack (no text or symbols visible)natural_image
Close-up of a mechanical component with directional arrows indicating motion (no text or symbols)Anvend bremsen
natural_image
Close-up of a mechanical assembly with a belt buckle and numbered component (22), no visible text or symbols.natural_image
Close-up of a mechanical device with visible internal components and mounting brackets (no text or symbols)natural_image
Close-up of a bicycle's wheel and suspension system, showing a numbered component (23) with no visible text or symbols beyond the number.natural_image
Close-up of a transparent fabric with a small white spot and an arrow pointing to it, no visible text or symbols.Slå stellet sammen
1
natural_image
Close-up of a hand adjusting a bicycle wheel rim with a dashed arrow indicating the angle (no text or symbols present)natural_image
Person using a bicycle lift tool to adjust the frame (no text or symbols visible)natural_image
Close-up of a bicycle wheel assembly with a hand adjusting the wheel (no visible text or symbols)natural_image
Diagram of a vehicle chassis frame with labeled component '3' (no text or symbols beyond label)natural_image
Person assembling a stroller with a handle (no visible text or symbols)natural_image
Close-up of hands using a tool to adjust or install a bicycle wheel (no visible text or symbols)natural_image
Close-up of a mechanical device with labeled parts (1), showing structural components and a wheel (no text or symbols beyond labels)natural_image
Close-up of a hand holding a black mechanical lever with metal joints (no text or symbols visible)natural_image
Close-up of hands using a tool to adjust or install a metal pipe (no visible text or symbols)OBS!
natural_image
Close-up of a hand using a tool to adjust or install a metal bracket (no text or symbols visible)natural_image
Close-up of hands using a tool to adjust or install a mechanical component (no visible text or symbols)natural_image
Close-up of hands using a tool to adjust or install a mechanical component (no visible text or symbols)natural_image
Person assembling a baby stroller with a handle (no visible text or symbols)natural_image
Line drawing of a mechanical clamp or bracket assembly with arrows indicating force direction (no text or symbols)natural_image
Close-up of a car wheel and steering wheel assembly (no visible text or symbols)Anvend bremsen
natural_image
Line drawing of a car seat assembly with directional arrows indicating rotation (no text or symbols)Justere kalechen
natural_image
Close-up of a hand pressing down on a car seatbelt, with a numbered arrow and bracket (no text or symbols)natural_image
Person assembling a stroller in a wheelchair (no visible text or symbols)natural_image
Close-up of a hand adjusting a jacket with a numbered arrow pointing to the pocket (no text or symbols visible)natural_image
Close-up of a mechanical device with a numbered component labeled '2' (no readable text or symbols beyond the number)natural_image
Close-up of a mechanical device with a numbered arrow pointing to part 3 (no text or symbols on the device itself)natural_image
Close-up of a bicycle seatbelt with a numbered arrow pointing to the seat area (no text or symbols visible)natural_image
Close-up of a bicycle's cable and suspension mechanism (no text or symbols visible)natural_image
Close-up of a motorcycle's handle and wheel assembly with a numbered component (9), no visible text or symbolsnatural_image
Close-up of a person's seatbelt being adjusted for a cable, with a numbered arrow pointing to the cable (no text or symbols visible)VIKTIG
natural_image
Close-up of a folded fabric or carpet with two black arrows pointing to a seam or seam (no text or symbols visible)natural_image
Close-up of a mechanical component with directional arrows indicating motion (no text or symbols)Bruk av bremsen
natural_image
Close-up of a mechanical assembly with a belt and numbered component (22), no visible text or symbols beyond the number.natural_image
Close-up of a dark fabric bag attached to a metal frame (no visible text or symbols)natural_image
Close-up of a motorcycle's wheel and suspension bracket, labeled with number 23 (no text or symbols beyond label)natural_image
Close-up of a hand adjusting a bicycle wheel rim with a dashed circular motion arrow (no text or symbols visible)La framhjulet rotere fritt
natural_image
Person using a bicycle lift tool to lift a metal frame (no text or symbols visible)- Trekk så de to sorte understellslåsene opp samtidig som vist på bildet.
ADVARSEL
natural_image
Close-up of a bicycle wheel and hand gripping the wheel, with an arrow pointing to the pivot point (no text or symbols visible)natural_image
Diagram of a car chassis frame with wheels and suspension components (no text or symbols)Justering av handtaket
natural_image
Person assembling a stroller with a handle (no visible text or symbols)natural_image
Close-up of hands using a tool to adjust or install a bicycle wheel (no visible text or symbols)natural_image
Close-up of a mechanical device with labeled parts (1), showing structural components and a wheel (no text or symbols beyond labels)natural_image
Close-up of a hand holding a black mechanical lever with metal joints (no text or symbols visible)natural_image
Close-up of hands using a tool to adjust or install a metal pipe (no visible text or symbols)natural_image
Close-up of a hand using a tool to adjust a metal bracket with a black clamp (no text or symbols visible)natural_image
Close-up of hands using a tool to adjust or install a mechanical component (no visible text or symbols)natural_image
Close-up of hands using a tool to adjust or install a mechanical component (no visible text or symbols)natural_image
Person assembling a baby stroller with a handle (no visible text or symbols)natural_image
Diagram of a small boat hull with two arrows pointing to the side panel (no text or symbols present)Legg madrassen i vognen (3)
ADVARSEL
natural_image
Line drawing of a hand holding a tool with arrows indicating movement or force (no text or symbols)natural_image
Close-up of a car wheel and steering wheel assembly (no visible text or symbols)Bruk av bremsen
natural_image
Line drawing of a car seat assembly with directional arrows indicating rotation (no text or symbols)natural_image
Person assembling a stroller with a handle (no visible text or symbols)natural_image
Close-up of a hand adjusting a jacket with a numbered arrow pointing to the pocket (no text or symbols visible)natural_image
Close-up of a mechanical device with a numbered component labeled '2' (no readable text or symbols beyond the number)natural_image
Close-up of a stroller with a numbered arrow pointing to the side panel (no text or symbols on the device itself)natural_image
Close-up of a bicycle seat with visible seat number 4 and mechanical components (no text or symbols)natural_image
Close-up of a bicycle's seatbelt and chain link (no text or symbols visible)natural_image
Close-up of a motorcycle's handle and wheel assembly with a numbered component (9), no visible text or symbolsnatural_image
Close-up of a person's seatbelt being adjusted for a cable, with a numbered arrow pointing to the cable (no text or symbols visible)WICHTIG
natural_image
Close-up of a folded fabric or carpet with two black arrows pointing to a seam or seam (no text or symbols visible)natural_image
Close-up of a mechanical component with directional arrows indicating motion (no text or symbols)natural_image
Close-up of a mechanical assembly with a belt and numbered component (22), no visible text or symbols beyond the number.natural_image
Close-up of a mechanical component with layered fabric and connectors (no visible text or symbols)natural_image
Close-up of a motorcycle's wheel and suspension bracket, labeled with number 23 (no text beyond label)natural_image
Close-up of a hand adjusting a bicycle wheel rim with a dashed circular motion arrow (no text or symbols visible)natural_image
Person using a bicycle lift tool to lift a metal frame (no text or symbols visible)natural_image
Close-up of a bicycle wheel and hand gripping the wheel, with an arrow pointing to the pivot point (no text or symbols visible)natural_image
Diagram of a vehicle chassis frame with labeled component '3' (no text or symbols beyond label)natural_image
Person assembling a stroller with a handle (no visible text or symbols)natural_image
Close-up of hands using a tool to adjust or install a bicycle wheel (no visible text or symbols)natural_image
Close-up of a mechanical suspension or lift mechanism with labeled component '1' (no text or symbols beyond label)natural_image
Close-up of a robotic arm gripping a metal frame with bolts (no text or symbols visible)natural_image
Close-up of hands using a tool to adjust or install a metal pipe (no visible text or symbols)natural_image
Close-up of a hand using a tool to adjust a metal bracket with a black clamp (no text or symbols visible)natural_image
Close-up of hands using a tool to adjust or install a mechanical component (no visible text or symbols)natural_image
Close-up of hands using a tool to adjust or install a bicycle wheel (no visible text or symbols)natural_image
Person assembling a baby stroller with a handle (no visible text or symbols)natural_image
Line drawing of a mechanical clamp or bracket assembly with arrows indicating force direction (no text or symbols)4
5
natural_image
Line drawing of a baby car seat with labeled parts (no text or symbols)natural_image
Close-up of a car wheel and steering wheel assembly (no visible text or symbols)natural_image
Line drawing of a car seat assembly with directional arrows indicating rotation (no text or symbols)natural_image
Close-up of a hand pressing down on a car seatbelt, with a numbered arrow and bracket (no text or symbols visible)Abnehmen der Wanne
Contents of the box ....58
Emmaljunga's original accessories ....58
Important safety information ....59-60
Assembly and usage of the seat-unit 61-64
Fold the pram ....65
Changing the seat -unit to City Carry-cot (Accessory) 66-67
Changing the Carry-cot to seat-unit (Accessory)....67
Assembly and usage of the City Carry-cot (Accessory) 68-69
Care and maintenance 70-71
Important!
In the manual the terminology City Carry-cot is used for the City Carry-cot/ Bassinet
PLEASE OBSERVE!
If you want to change the seat-unit to the Carry-cot or from Carry-cot to seat-unit, you need to buy a Carry-cot and an adaptor as an accessory. If you don't feel secure changing seat-unit/Carry-cot, please contact your local dealer, and they will help you.
Save the manual and all screws and washers in a safe place for future use. Please check that you have received all the necessary parts when purchasing the adapter.
Contents of the box
Cangaroo Pram
1 pc Folded chassis with tray
2 pc Rear wheels
1 pc Swivel wheel
1 pc Hood
1 pc Seat-unit with 5-point harness
1 pd Frontbar
1 pc Frontbar cover
1 pc Raincover
1 pc Instruction manual
Adapter to City Carry-cot (original accessory)
2 pc EasyFix attachments
2 pc Screws and domed cap
1 pc Allen key
City Carry-cot (original accessory)
1 pc City Carry-cot
1 pc Hood
1 pc Mattress
1 pc Apron
Emmaljunga's original accessories
Please use Emmaljunga's original accessories for maximum safety and comfort. Information about accessories that match can be found in our brochure or at any of our authorised retailers.
Important Safety Information
Please read the following Warnings and IMPORTANT instructions before use. Keep this manual handy for future reference.
... WARNING ...
Failure to follow the proper usage or the assembly instructions may cause serious injury to your child/children and/or cause damage to the construction of the vehicle.
WARNING! Child/children should never be left unattended
WARNING! Ensure that all locking devices are engaged before use.
WARNING! Use a harness as soon as your child can sit unaided.
WARNING! The seat-unit is not suitable for children under 6 months.
WARNING! Any load attached to the handle affects the stability of the pram/ pushchair.
WARNING! The product is not suitable for running or skating
WARNING! Always use the crotch strap in combination with the waist belt.
WARNING! Check that the pram body or seat-unit attachment devices are correctly engaged before use.
WARNING! Accessories or spare parts that are not approved by the manufacturer shall not be used.
WARNING! The lying unit/carry-cot (accessory) is only suitable for a child who cannot sit up unaided.
WARNING! Do not use the lying unit/carry-cot (accessory) if any part is broken, torn or missing.
WARNING! Never use the carry-cot (accessory) on a stand.
WARNING! Do not let children play unattended near the carry-cot.
EMMALJUNGA RECOMMENDS THAT YOU ALWAYS SECURE THE CHILD IN THE VEHICLE WITH THE 5-POINT HARNESS.
- This pram is intended for transportations of one (1) child from 6 months with a maximum weight of 15 kg. With the City Carry-cot (original accessory) the pram can be used from birth. Only use Emmaljunga Original accessory. The vehicle shall be used only for up to the number of children for which it has been designed.
• Always secure the child in the vehicle with the 5-point harness. - The safety of your child is your responsibility.
- Never leave your child unattended.
- The safe guards and instructions of this manual cannot cover all possible conditions and unforeseeable situations which may occur. It must be understood that common sense, caution, and care are factors which can not be built into this product. These factors are the responsibility of the person that uses the pram.
- It is important that these instructions are understood by all people who will use this vehicle and accessories. Always inform and instruct each person using the vehicle and accessories as to how this product should be used, even if the person will only use it for a short while.
- If any instructions are unclear and need further explanation or if you have any further questions please contact an authorised Emmaljunga retailer.
Important Safety Information
- City Carry-cot: is intended for children within the age group of 0-6 months. The depth from the top of the mattress to the top of the side of the body at, or any position within 300 mm from the harness attachment points should not be reduced to less than 150 mm when the mattress is in position. Do not add a mattress thicker than 25 mm.
- Seat part or pram body may not be used as a car seat.
- The vehicle is made for transportation only. Never use this vehicle as a bed for your child/children.
• Always store the pram away from children and do not allow children to play with or in it. - Never leave this vehicle without first engaging the parking device.
- The parking device should always be engaged while placing or removing your child/children.
- Avoid parking on a hill.
- For safety reasons, please only use Emmaljunga's original accessories.
• Overloading, incorrect folding, and the use of non-approved accessories may cause injury to your child/children and damage or break this vehicle. - Never leave this vehicle in dangerous locations, even when not occupied.
- Avoid using this vehicle on steps, stairs or escalators, as it may be dangerous to your child/children.
- Do not hang any load on the handle as it will affect the stability of the vehicle
- Never place items on the top of the hood.
- The shopping tray included with the chassis has a weight limit of 5 kg. Always place heavy items in the centre of the basket. This vehicle may become unstable if the weight in the basket is unevenly distributed.
- Items in the shopping tray should not protrude over the sides as items can get caught in the wheel spokes.
- Follow care and maintenance instructions.
Be aware of the risk of open fire and other source of strong heat, such as electric bar fires, gas fires, etc. In the near vicinity of the carry-cot.
Use the carry-cot only on a firm, horizontal level and dry surface.
• Cangaroo is only compatible with original Emmaljunga City Carry-cot. Do not use any other carry-cots.
Assembly and usage of seat-unit
1
natural_image
Person assembling a stroller with hands adjusting the seat (no visible text or symbols)Assembly of seat-unit fabrics
- Engage the parking device by pushing it down with your foot. (see page 63, ill. 14).
- Raise the handle, while you are holding one foot on one of the rear wheels, until the chassis locks click into the locked position
- Place the seat unit fabrics over the chassis, using the zippers and press-studs, located on the fabrics.
WARNING
- The chassis locks need to click into the locked position.
- Please make sure, before you use the pram that the chassis lock is in the locked position.
2
natural_image
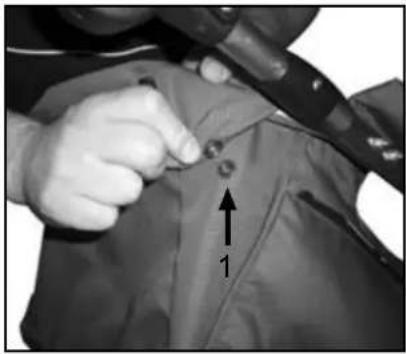
Close-up of a person adjusting a jacket with a pointing arrow and number 1 (no text or symbols on the jacket itself)- Place the fabrics around the metalbar between the handle. Lock it with the four press-studs (1).
3
natural_image
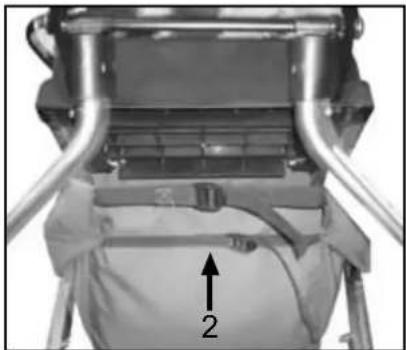
Close-up of a mechanical device with a bag and numbered component (no visible text or symbols)- Secure the two straps underneath the footrest (2).
4
natural_image
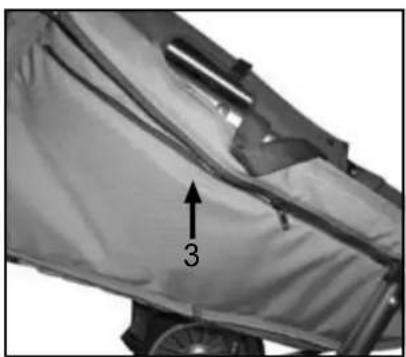
Close-up of a stroller with a numbered label '3' pointing to the side panel (no other text or symbols visible)- Secure the fabrics with the zippers on both sides of the seat-unit (3).
5
natural_image
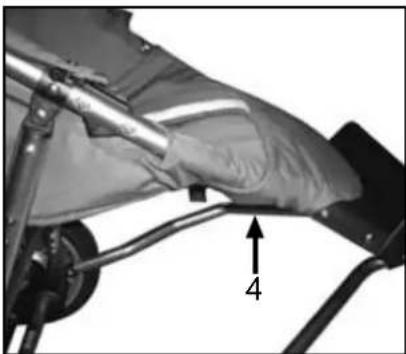
Close-up of a bicycle seat with visible frame and wheel, no text or symbols present- Fasten the fabrics with the press-studs (4) underneath the footrest(two on both sides).
Assembly and usage of seat-unit
6
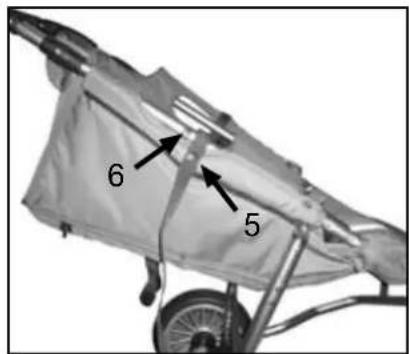
- Fasten the straps on the side of the fabrics with the press-studs (5) - one on both sides. The straps must be placed underneath the black plastic stud on the chassis(6).
7
natural_image
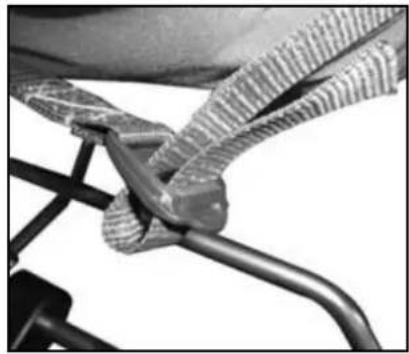
Close-up of a bicycle's seatbelt and chain, showing rope knot and metal frame (no text or symbols visible)- Pull the strap, underneath the backrest, through the plastic part as shown on the picture.
8
Attaching the rear-wheels
- Remove the plastic protection from the axles. Save them for future use.
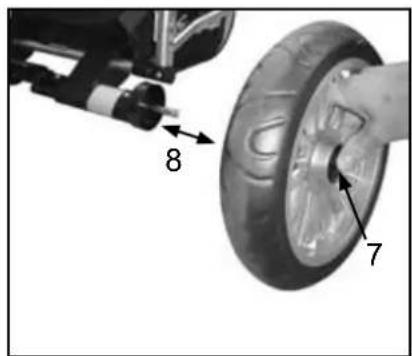
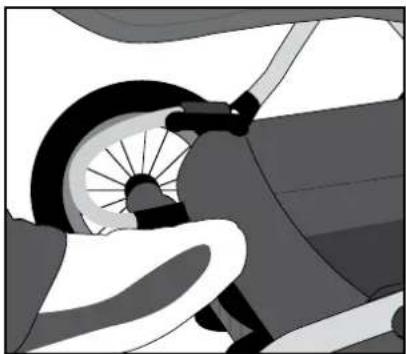
- Attach the wheels with the wheel cogs (8). Press in the hub cap's release button (7), push the wheels onto the axles as far as it can go. Release the button and pull the wheel towards you, until you hear a definite click. Repeat the same procedure for the other wheel.
- Please make sure that the wheels are attached properly and cannot be pulled off the axle.
IMPORTANT
- The wheels are greased and can leave marks on textiles. Please use wheel protection indoors to protect your floors.
- Risk of suffocation. Don't let your child play with or in some other way handle the plastic wheel protectors.
Attaching the front wheel
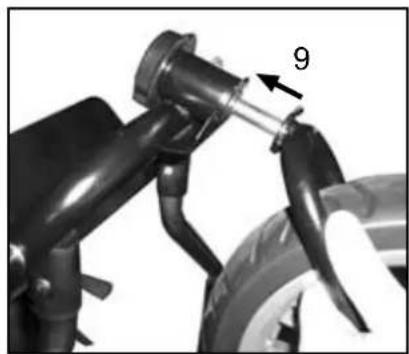
- Attach the front fork onto the front fork lock, while you are pressing the release button on the fork lock, as far as it can go. Release the button. Make sure that the wheel is attached properly and cannot be pulled off.
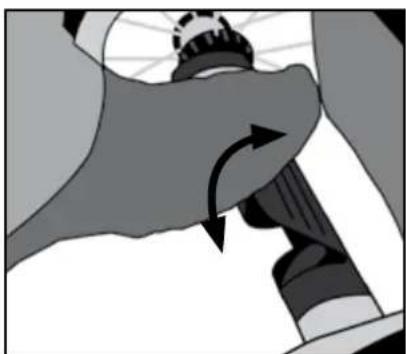
- You can lock the swivel wheel by engaging the red button (see page 65, ill. 1). To use the swivel wheel, pull the red button and turn it 180 degrees.
Assembly of the front bar
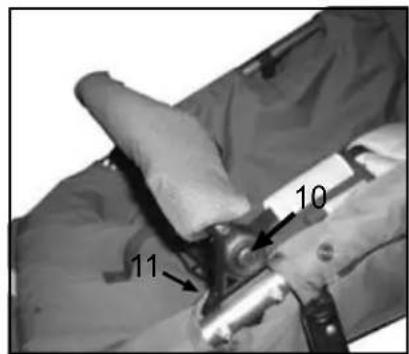
- Place the front bar into the plastic holders (11). Place the front bar cover over the front bar and zip.
- Fasten the crotch strap around the front bar.
- You can adjust the front bar simply by pressing the button on the plastic holders (10).
- You can remove the front bar by pressing the buttons on the inside of the plastic holders (11).
WARNING!
- Never carry the pram by the front bar!
9
natural_image
Close-up of a motorcycle's wheel and suspension system with a numbered component (9), no visible text or symbols10
Assembly and usage of seat-unit
11
12
natural_image
Close-up of a person's seatbelt buckle with a numbered label (15) pointing to the buckle detail (no other text or symbols visible)13
natural_image
Close-up of a fabric or carpet with two black arrows pointing to a seam or seam, no visible text or symbols.14
natural_image
Close-up of a mechanical component with directional arrows indicating motion (no text or symbols)15
Manual Cangaroo v. 1.2
Assembly of Hood
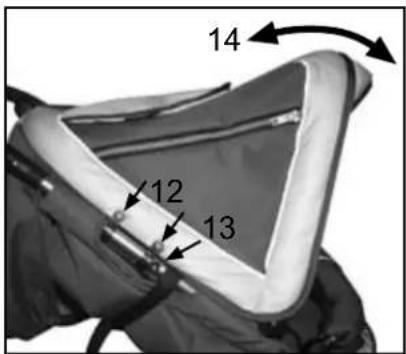
- Attach the hood by pressing the plastic parts around the frame (12) (two on both sides).
IMPORTANT!
- The plastic parts have to be placed above the black plastic stud on the chassis(13).
Adjusting the hood
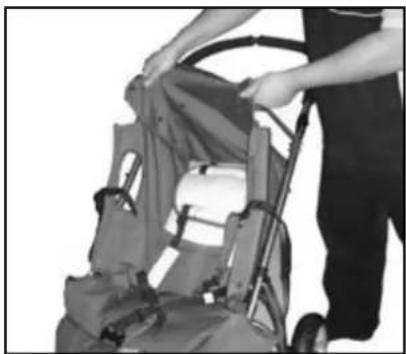
- Adjust the hood by gently pulling the front backwards and forwards (14) until it reaches the desired position.
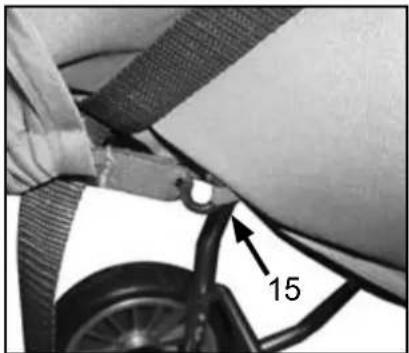
- Fasten the two plastic hooks on the hood apron to the back of the backrest as shown (15) - one on both sides.
IMPORTANT
• Never carry the carry-cot by the hood.
- Fasten the two plastic hooks on the hood apron to the back of the backrest
Adjusting the backrest
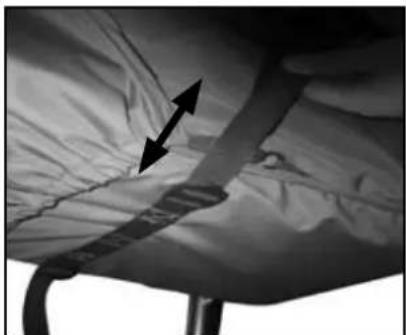
- The seat backrest can be adjusted by tightening the straps underneath the backrest. Ensure the backrest straps are adjusted to same level on both sides.
- You lower the backrest by loosening the straps on both sides of the backrest to desired position.
WARNING
- Please make sure that the backrest straps are adjusted to the same level on both sides.
Engaging the parking device
- Engage the parking device by pushing it down with your foot.
• Disengage the parking device by pulling up
WARNING!
- Never leave the vehicle without first engaging the parking device.
- The brake should always be engaged when you lift your child in and out of the pram
- Avoid uphill or downhill parking.
- Make sure that the cogs are attached properly on both rear wheels.
- Make sure that the brake pin engages into the cogs when the vehicle is parked into position.
Adjust the 5-point harness
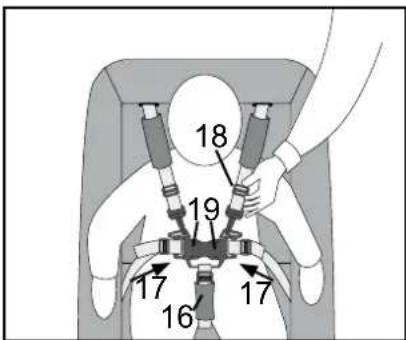
- Bring crutch strap (16) forward between the child's legs and up toward front of waist. Insert the waist straps (17) into the harness buckle until they "click" in place. Make sure waist straps are fastened.
- Adjust all straps, using the sliders (18).
- To release shoulder and waist straps, press the buttons (19) in the centre of the harness buckle.
WARNING
• Always use the harness when the child is placed in the vehicle.
• Always make sure that the harness is attached to the fabrics.
Assembly and usage of seat-unit
16
Assembly of Apron (Accessory)
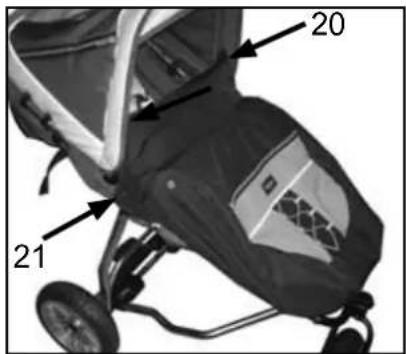
- Slip the apron over the footrest and pull toward the front of the hood. Snap the apron onto the four press-studs, two on each side (20 + 21).
IMPORTANT
- The hood cannot be pushed back with the apron attached to press studs inside the hood (20).
17
natural_image
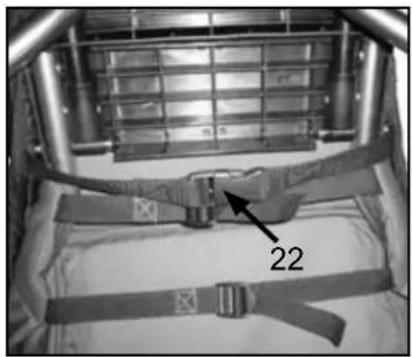
Close-up of a mechanical assembly with a belt and numbered component (22), no visible text or symbols beyond the number.- Fasten the apron, with the two straps in the end of the apron, underneath the footrest (22).
Use of the raincover (not shown)
- The raincover is attached by placing the raincover over the carry-cot and seat-unit. Please note that there is an opening in the raincover near the hood opening.
• Use the raincover that is supplied with the pram. - Always use the raincover when it's raining or snowing. If the pram is damp before the raincover is attached, wipe off fabrics first if possible.
- Make sure that the raincover is completely dry before it is placed back into it's bag.
18
natural_image
Close-up of a dark fabric bag attached to a metal frame (no visible text or symbols)Assembly of Tray
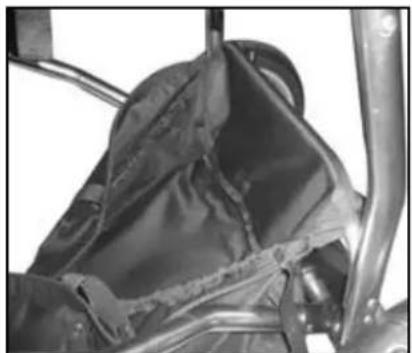
- Wrap the end of the tray around the metalbar, above the footbrake, and secure it with the three press studs on the inside of the tray.
- The tray can be removed for washing. Remove the wooden plate before washing.
19
natural_image
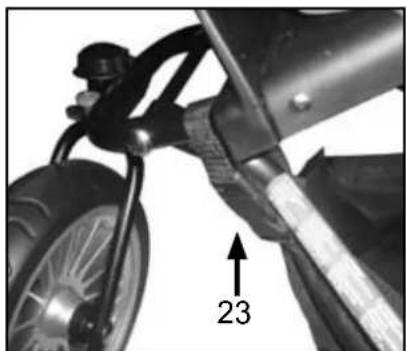
Close-up of a motorcycle's wheel and suspension bracket, showing a numbered arrow pointing to the number 23 (no text or symbols on the diagram itself)- Wrap the two straps in the end of the tray around the chassis underneath the footrest and lock with the plastic lock (23).
20
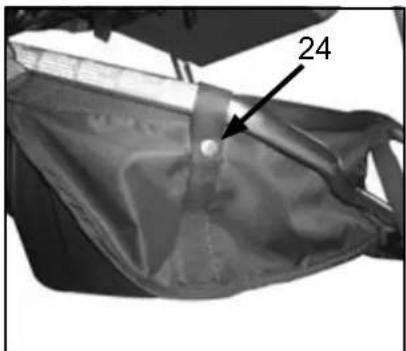
- Wrap the tray straps around the sides of the chassis and lock the press-studs (24) - one on both sides.
Folding the pram
1
natural_image
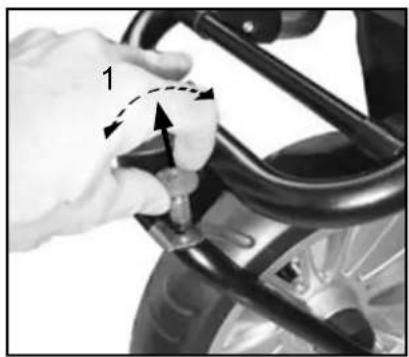
Close-up of a hand adjusting a bicycle wheel rim with a tool, no visible text or symbolsUnlock the front wheel
- Engage the parking device by pushing it down with your foot. (see page 63, ill. 14).
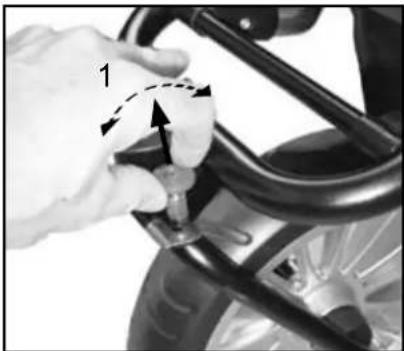
- If the front wheel is locked, you may first unlock it by pulling the red button and turn it 180 degrees (1).
2
natural_image
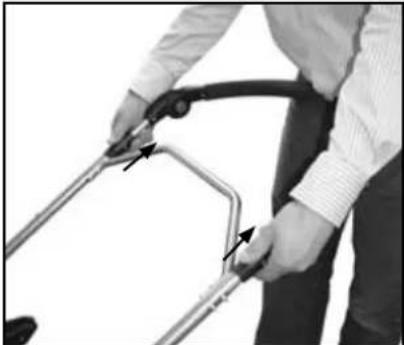
Person assembling a bicycle frame with arrows indicating parts (no text or symbols visible)- Release the chassis locks, located on both side of the handle, by pulling the black plastic parts up towards you with both hands.
WARNING
- Make sure that the area is clear. Remember the child's active safety is your responsibility.
3
natural_image
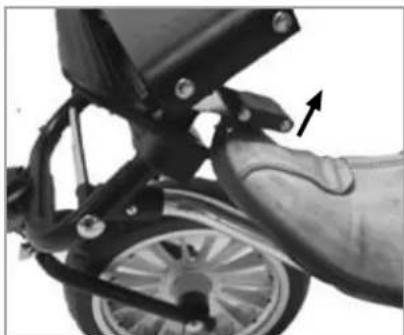
Close-up of a bicycle wheel assembly with a hand adjusting the wheel (no visible text or symbols)- Pull the safety catch up towards you with your foot or hand. The safety catch is situated on the left side of the chassis by the footrest and prevents the chassis from folding involuntarily.
4
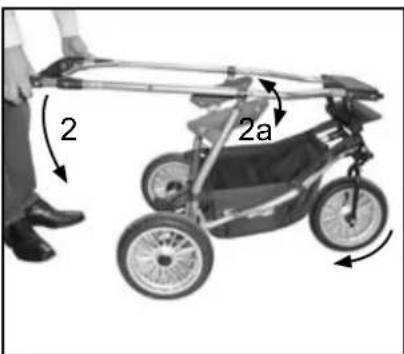
- Fold the pram by pushing the handle downwards (2). The front wheel automatically folds underneath the chassis.
If you fold the pram with the Carrycot placed on the chassis, the black EasyFix attachment (2a) can turn in a position, so that the Carrycot is no longer horizontal, when you unfold the pram again. If that is the case, fold the pram again and hold the Carrycot horizontal when you unfold the pram.
5
natural_image
Diagram of a vehicle chassis frame with labeled components (no text or symbols present)Adjust the handle
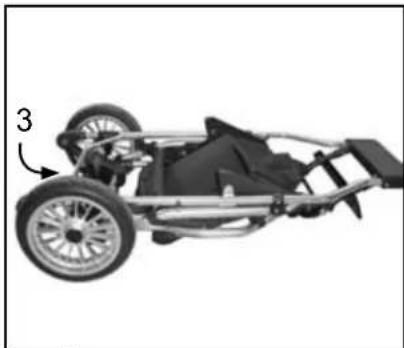
- If you want to make the folded chassis more compact, you can fold the handle inwards by pressing the grey buttons on the inside of the handle, and adjusting it to the required position, while holding the grey buttons pressed in (3).
How to adjust the height of the handle (not shown)
- Adjust the height by pressing the grey buttons on the inside of the handle. Keep the buttons pressed in while you adjust to the required position.
- If you need to make more space you can remove the wheels by pressing in the hub cap's release mechanism and pulling the wheel off the axle.
Changing the seat-unit to City Carry-cot
1
natural_image
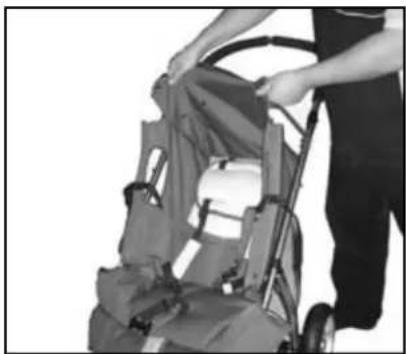
Person assembling a stroller with a handle (no visible text or symbols)• Take off the fabrics.
2
natural_image
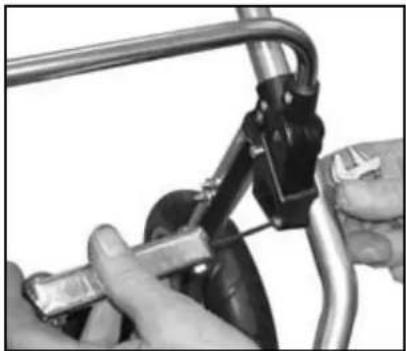
Close-up of hands using a tool to adjust or install a bicycle wheel (no visible text or symbols)- Remove the screws that hold the front bar and save them for future use. They will be needed again when the seat unit is reassembled.
3
natural_image
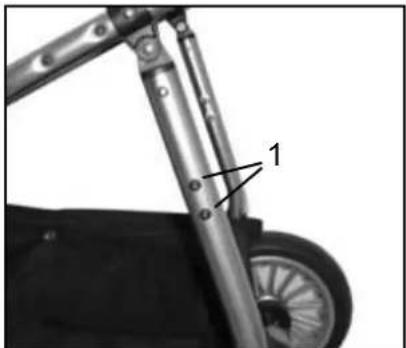
Close-up of a mechanical suspension system with labeled component '1' (no text or symbols beyond label)- Remove the two black screws (1) shown on the picture and pull them through the holes from the other side of the tubes. (save the washers for future use.)
4
natural_image
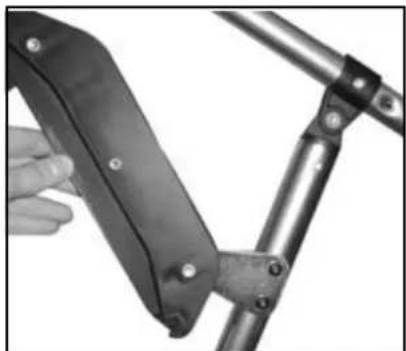
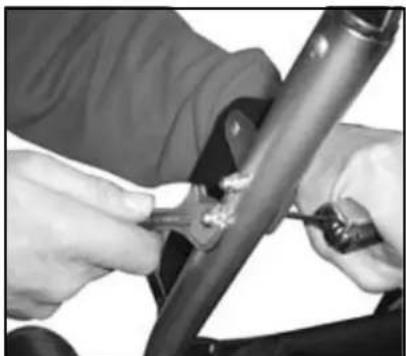
Close-up of a robotic arm gripping a metal frame with bolts (no text or symbols visible)- Push the black screws through the metalplate and the tube from the inside of the chassis. Ensure that the metalplate is pointing towards the rear of the chassis, when you mount the screws. Observe that there is a left and right side of the adapter.
- Observe that there is a left and right side of the adapter.
5
natural_image
Close-up of hands using a tool to adjust or install a metal pipe (no visible text or symbols)- Lock the screws with the domed cap.
Changing the seat-unit to City Carry-cot
6
natural_image
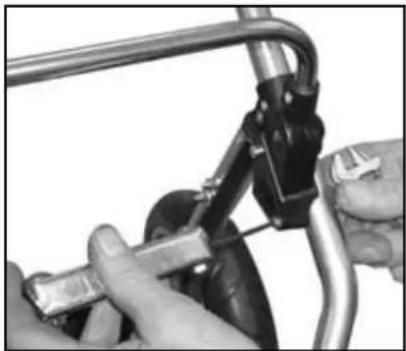
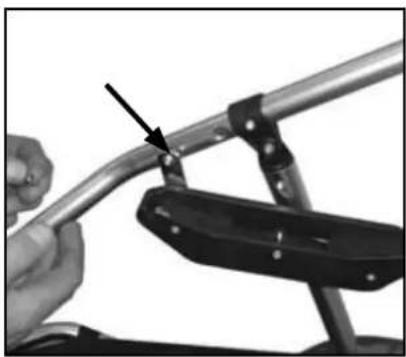
Close-up of a hand using a tool to adjust a metal bracket with a black clamp (no text or symbols visible)- Fasten the other end of the adapter with the screw and domed cap which comes with the adapter. Do not tighten the cap too tight, but leave 0.5 mm, so that the chassis can be folded.
Now you can place the City Carry-cot on the chassis (see page 69, ill. 8).
Changing the City Carry-cot to seat-unit
1
natural_image
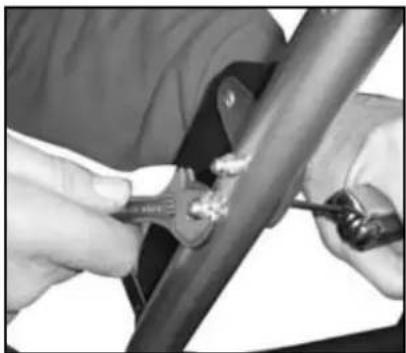
Close-up of hands using a tool to adjust or install a mechanical component (no visible text or symbols)- Reassemble the seat unit by following the instructions in reverse, pictures 6-3. The black screws and caps have to be put back in place as they were when you bought the pram, using the washers, so that the caps and washers are placed on the inside of the chassis.
2
natural_image
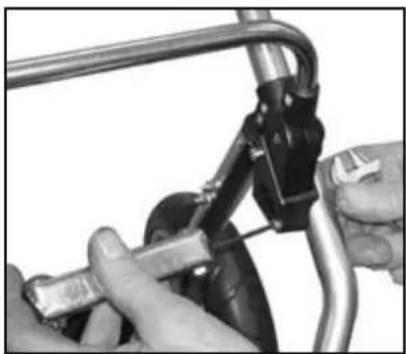
Close-up of hands using a tool to adjust or install a bicycle wheel (no visible text or symbols)- Assemble the front bar with the screws that you saved together with the front bar.
3
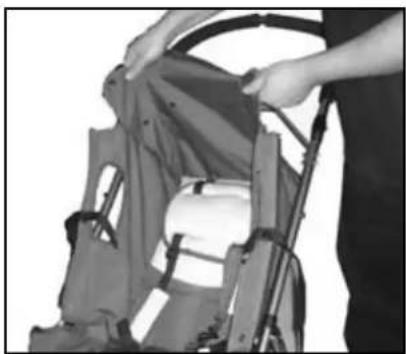
natural_image
Person assembling a baby stroller device (no visible text or symbols)- Place the seat unit fabrics over the chassis, using the zippers and press-studs, located on the fabrics.
Assembly and usage of the City Carry-cot (Accessory)
1
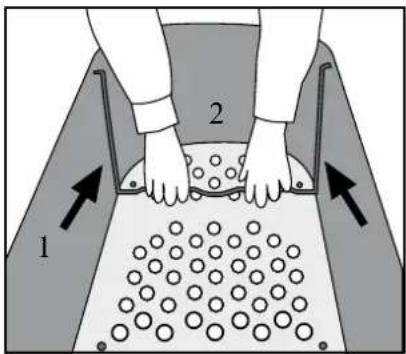
Assembly of pram body
- Remove plastic covers from mattress, fabrics and discard. Slide the two metal support brackets (1) onto the base (2) of the pram body. - The base is made of wood.
WARNING
- Risk of suffocation. Do not let your children play with the plastic bag. - Make sure that the metal support bars are attached so that the pram stability and safety will not be jeopardised.
2
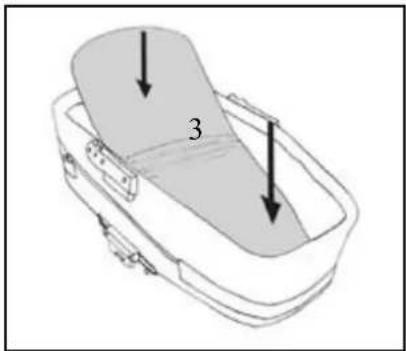
- Insert the mattress (3).
WARNING
- The depth from the top of the mattress together with other bed accessories to the carry-cot upper part must be at least 140mm. - Do not add a mattress thicker than 25 mm.
3
natural_image
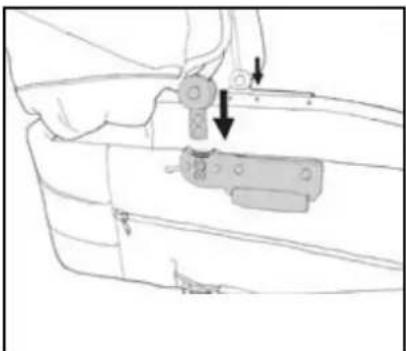
Line drawing of a mechanical clamp or bracket assembly with arrows indicating force direction (no text or symbols)- Attach the hood to the pram body by pushing the plastic leg of the hood into the plastic holders on the pram body. Make sure they snap into place.
4
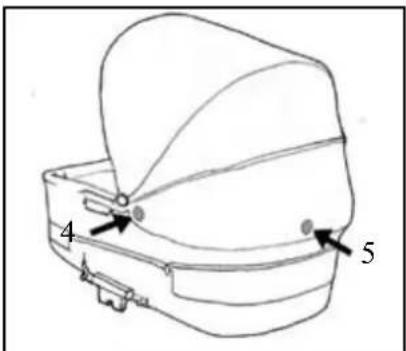
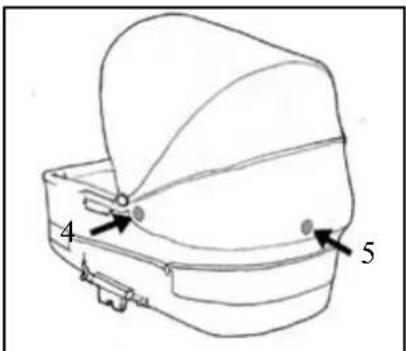
- Press the hood fabric onto the plastic holder (4), on each side. Press the velcro (5) onto the pram body. - The press studs on the back of the hood is to use when the hood is rolled up for better ventilation when it is hot.
5
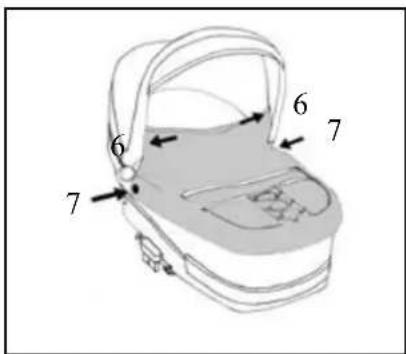
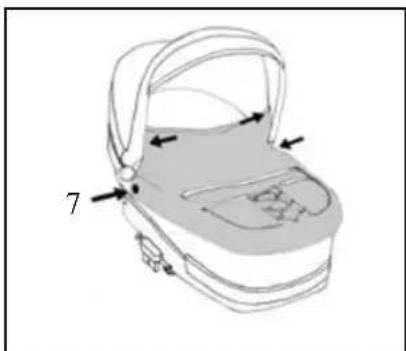
- Press the apron onto the hood (6) and onto the plastic holder (7) on each side.
IMPORTANT
- The hood cannot be pushed back when the apron is snapped onto the hood without releasing the press studs (6)
Assembly and usage of the City Carry-cot (Accessory)
6
natural_image
Close-up of a car wheel and steering wheel assembly (no visible text or symbols)7
natural_image
Line drawing of a car seatbelt with directional arrows indicating rotation (no text or symbols)8
9
natural_image
Close-up of a hand pressing down on a car seatbelt, with a numbered arrow and bracket (no text or symbols)Engaging the parking device
- Engage the parking device by pushing it down with your foot.
• Disengage the parking device by pulling up
WARNING
- Never leave the vehicle without first engaging the parking device.
- The brake should always be engaged when you lift your child in and out of the pram
- Avoid uphill or downhill parking.
- Make sure that the cogs are attached properly on both rear wheels.
- Make sure that the brake pin engages into the cogs when the vehicle is parked into position
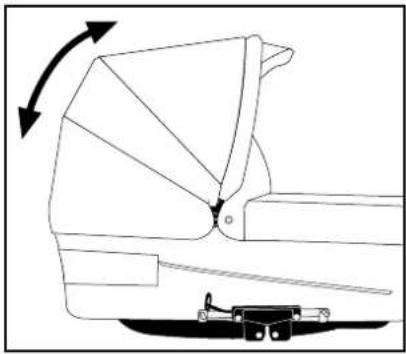
Adjusting the hood
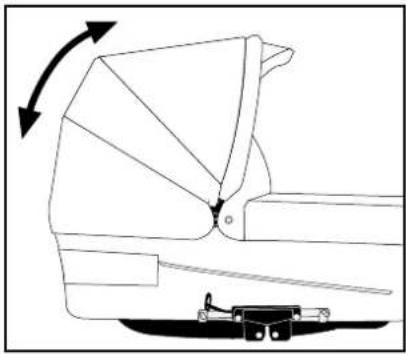
- Adjust the hood by gently pulling the hood forward into desired position.
- Do not adjust the hood while the apron is attached.
IMPORTANT
- Never carry the carry-cot by the hood.
- Never lift the carry-cot when it is assembled onto the chassis.
Attachment of the carry-cot
- Engage the parking device.
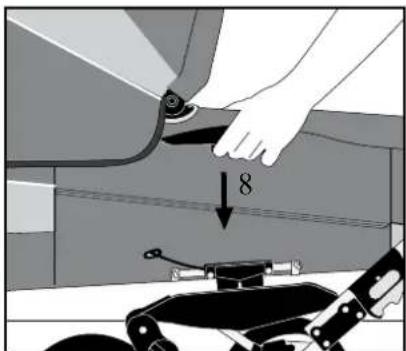
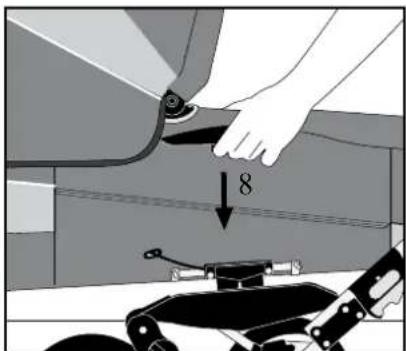
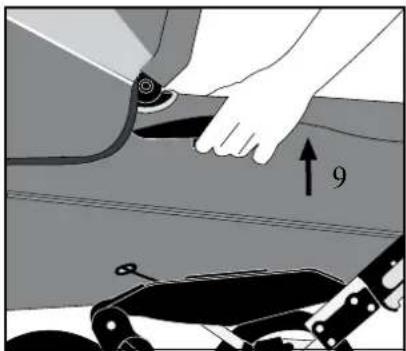
- Lift the carry-cot by handles and push the Easy Fix into the attachments (8) on both sides of the chassis until it locks into its position.
To release the carry-cot
- Start by engaging the parking device.
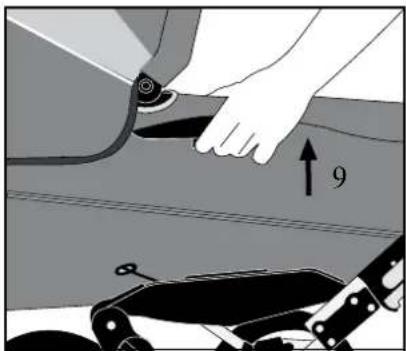
- Pull the Easy Fix grip towards you and then lift the carry-cot straight up. When the Easy-Fix cannot be pushed any further, the top part can then be removed.
WARNING
- Don't let any child be placed in the carrycot when it is being attached or released
- Hold the handles steadily until the carry-cot is in place.
- Make sure that the carry-cot is in place, before you start to use the vehicle.
- Never lift the carry-cot when it is assembled onto the chassis
Use of the rain cover (not shown)
- The rain cover is attached by placing the rain cover over the carrycot and seat-unit. Please note that there is an opening in the rain cover near the hood opening.
• Use the rain cover that is supplied with the pram. - Always use the rain cover when it's raining or snowing. If the pram is damp before the rain cover is attached, wipe off the fabrics first if possible.
- Make sure the rain cover is completely dry before it is placed back into its bag.
Care and maintenance
General care and maintenance instructions
- Never expose your vehicle to excessive sunlight for long periods of time.
• Always use a rain cover when it is snowing or raining. - Never store your vehicle in cold and/or damp places.
- Should the chassis become wet, dry it off promptly. Make sure the vehicle is completely dry before storing.
- If the vehicle is used near the ocean or salted roads, spray the chassis with a hose, and dry.
- Take care when transporting or storing the chassis since the surface is delicate. Scratches to the chassis surface, that arise after the sale is not a valid complaint.
Routine Inspection
- Regularly clean the chassis and metal parts of the vehicle dry off and lubricate all joints of the chassis. Spokes, and fenders on all wheels, should frequently be wiped off with a dry cloth. When the pram is used during the winter time, cleaning of the pram should be done at least once a week. Lack of maintenance could cause corrosion on the spokes and fenders. Should corrosion on the surface occur, which is a possibility, you are required to remove this with a corrosion cleaning agent.
- It is recommended to lubricate the wheel axles and suspension system every three months (clean axles with a cloth prior to lubrication). Axles may be lubricated with petroleum jelly or automobile oil.
Check that:
- all chassis locking devices are functioning properly.
- all rivets, nuts and bolts are firmly tightened and not broken.
- all plastic parts are not cracked or broken.
- the wheel bushings are in a good condition.
- all velcros are securely fastened on backrest pocket and seat board flap.
- the press-stud is securely fastened on the footrest flap.
- all elastic straps are in a good condition.
- the secondary locking mechanism is intact and can move freely.
- The handles and the bottom of the carrycot (original accessory) should be inspected regularly for signs of damage and wear.
PLEASE OBSERVE
- When in need of servicing with original parts and other technical issues that require a professional decision, always get in touch with your retailer where your Emmaljunga product was purchased. All Emmaljunga products come with a 6 month manufacturing guarantee. This guarantee does not apply when issues arise through normal wear and tear. This information is relevant for Great Britain only.
WARNING
- Tyres can when in contact with PVC-floor or other plastic materials cause discoloration. Always use wheel protection if the pram/stroller is stored on delicate surfaces.
Care and maintenance
Washing instructions
- Hood:
Take off and extend the hood. Shower the hood from the inside (interior fabric) with luke warm water. Use mild liquid soap as detergent. Cleanse it thoroughly. Drip dry the fully extended hood.
- Seat fabric and 5-point harness:
Remove the seat fabric from the chassis. Remove the seat-board; store it in a dry place. Hand wash seat fabrics in lukewarm water. Use mild liquid soap as detergent. Cleanse thoroughly. Drip dry the seat fabric. Only wipe the nylon straps and plastic parts clean with a damp cloth. Do not hand wash. Make sure the harness is dry before reassembly.
- Front bar padding:
Remove the front bar padding/apron. Hand wash in luke warm water. Use mild liquid soap as detergent on the surface of the exterior fabric. Handle non-woven interior material with care. Drip-dry.
- Pram body (City Carry-cot):
Wipe the exterior fabric and the interior lining material, clean with a damp cloth. Do not hand wash. Use a mild liquid soap as a detergent. Drip dry. Dry the pram body in its fully extended position. Make sure the wooden base is protected from any water.
General Information
- Ironing: If any fabric part needs to be ironed, always use a 100 % cotton cloth in-between the iron and the fabric to protect the fabric surface. Iron the exterior fabrics (100 %) polyester and the interior fabrics on gentle heat (110°C on the iron).
- Make sure all parts are completely dry before reassembly. Check the trimmings and the seam on the seat fabric underneath the backrest-pocket.
- You may apply a material protector (like Scotchgard™) on the exterior fabric after washing. Always apply before reassembly.
WARNING
- Do not place child/children in stroller for at least 24 hours after applying a material protector.
Reassembly after washing
WARNING
- Make sure all parts are assembled correctly according to the instructions in this manual.
Sisällysluettelo
Sisällysluettelo
natural_image
Person assembling a stroller in a wheelchair (no visible text or symbols)natural_image
Close-up of a person adjusting a jacket with a numbered arrow pointing to the pocket (no text or symbols visible)natural_image
Close-up of a mechanical device with a bag and arrow indicator (no readable text or symbols)natural_image
Close-up of a stroller with a numbered arrow pointing to the side panel (no text or symbols on the device itself)natural_image
Close-up of a mechanical device with a numbered arrow pointing to a component (no visible text or symbols)natural_image
Close-up of a bicycle's seatbelt and chain, showing rope knot and metal frame (no text or symbols visible)natural_image
Close-up of a motorcycle's wheel and suspension system with a numbered component (9), no visible text or symbolsnatural_image
Close-up of a person's seatbelt being adjusted for a cable, with a numbered arrow pointing to the cable (no text or symbols visible)natural_image
Close-up of a folded fabric or carpet with two black arrows pointing to a seam or seam (no text or symbols visible)Selkänojan säätö
natural_image
Close-up of a mechanical component with directional arrows indicating motion (no text or symbols)Jarrun käyttö
natural_image
Close-up of a mechanical assembly with a belt and numbered component (22), no visible text or symbols beyond the number.natural_image
Close-up of a dark fabric bag attached to a metal frame (no visible text or symbols)Tavarakorin asennus
natural_image
Close-up of a motorcycle's wheel and suspension bracket, labeled with number 23 (no text or symbols on the diagram itself)natural_image
Close-up of a hand adjusting a bicycle wheel rim with a dashed circular motion indicator (no text or symbols)natural_image
Person using a bicycle lift tool to lift a metal frame (no text or symbols visible)natural_image
Close-up of a bicycle wheel and hand gripping the wheel, with an arrow pointing to the pivot point (no text or symbols visible)natural_image
Diagram of a car chassis frame with wheels and chassis, no text or symbols presentnatural_image
Person assembling a stroller with a handle (no visible text or symbols)natural_image
Close-up of hands using a tool to adjust or install a mechanical component (no visible text or symbols)natural_image
Close-up of a mechanical support structure with labeled component '1' (no text or symbols beyond label)natural_image
Close-up of a mechanical lever mechanism with a hand adjusting the part (no visible text or symbols)natural_image
Close-up of hands using a tool to adjust or install a mechanical component (no visible text or symbols)natural_image
Close-up of a hand using a tool to adjust a metal bracket with a black clamp (no text or symbols visible)natural_image
Close-up of hands using a tool to adjust or install a mechanical component (no visible text or symbols)natural_image
Close-up of hands using a tool to adjust or install a mechanical component (no visible text or symbols)natural_image
Person assembling a baby stroller device (no visible text or symbols)natural_image
Line drawing of a mechanical clamp or bracket assembly with arrows indicating force direction (no text or symbols)natural_image
Close-up of a car wheel and steering wheel assembly (no visible text or symbols)Jarrun käyttö
natural_image
Line drawing of a car seat assembly with directional arrows indicating rotation (no text or symbols)Kuomu säätäminen
natural_image
Close-up of a hand pressing down on a car seatbelt, with a numbered arrow and bracket (no text or symbols)VAROITUS
Instruction manual for Cangaroo & City Bassinet
© 2007 Emmaljunga Barnvagnsfabrik AB
All rights reserved
Emmaljunga Barnvagnsfabrik AB
- Använda bromsen
- Montera varukorgen
- Fälla in styreshandtaget
- Montering og anvendelse af 360 grader forhjul
- VIGTIGT
- Anvend bremsen
- Slå stellet sammen
- OBS!
- Justere kalechen
- VIKTIG
- Bruk av bremsen
- La framhjulet rotere fritt
- ADVARSEL
- Justering av handtaket
- WICHTIG
- Abnehmen der Wanne
- Important!
- PLEASE OBSERVE!
- Contents of the box
- Cangaroo Pram
- Adapter to City Carry-cot (original accessory)
- City Carry-cot (original accessory)
- Emmaljunga's original accessories
- Important Safety Information
- ... WARNING ...
- EMMALJUNGA RECOMMENDS THAT YOU ALWAYS SECURE THE CHILD IN THE VEHICLE WITH THE 5-POINT HARNESS.
- Assembly and usage of seat-unit
- Assembly of seat-unit fabrics
- WARNING
- Attaching the rear-wheels
- IMPORTANT
- Attaching the front wheel
- Assembly of the front bar
- WARNING!
- Assembly of Hood
- Adjusting the hood
- Adjusting the backrest
- Engaging the parking device
- Adjust the 5-point harness
- Assembly of Apron (Accessory)
- Use of the raincover (not shown)
- Assembly of Tray
- Folding the pram
- Unlock the front wheel
- Adjust the handle
- How to adjust the height of the handle (not shown)
- Changing the seat-unit to City Carry-cot
- Changing the City Carry-cot to seat-unit
- Assembly and usage of the City Carry-cot (Accessory)
- Assembly of pram body
- Attachment of the carry-cot
- To release the carry-cot
- Use of the rain cover (not shown)
- Care and maintenance
- General care and maintenance instructions
- Routine Inspection
- Check that:
- PLEASE OBSERVE
- Washing instructions
- General Information
- Reassembly after washing
- Sisällysluettelo
- Selkänojan säätö
- Jarrun käyttö
- Tavarakorin asennus
- Kuomu säätäminen
- VAROITUS
Brand : Emmaljunga
Model : Cangaroo
Category : Stroller