
PHPO 3170 - Pizza oven Philco - Free user manual and instructions
Find the device manual for free PHPO 3170 Philco in PDF.


| Type | Pizza oven |
| Brand | Philco |
| Model | PHPO 3170 |
| Product dimensions (WxDxH) | 488.5 x 440 x 284.5 mm |
| Internal cavity dimensions | 344 x 330 x 110 mm |
| Weight | 10.5 kg |
| Power consumption | 1600 - 1850 W |
| Voltage / Frequency | 220 - 240 V, 50/60 Hz |
| Pizza stone size | 320 x 320 x 10 mm |
| Power cord length | 0.9 m |
| Temperature range | 80°C - 450°C |
| Timer range | 1 - 30 minutes |
| Preset pizza menus | 5 (Neapolitan, Thin Crust, Pan Pizza, New York, Frozen) |
| Control type | Digital with upper/lower temperature setting |
| Display | Digital screen for time and temperature |
| Included accessories | Pizza shovel, pizza cutter, cheese/pizza spatula |
| Safety features | Overheat protection, NTC sensor, fault code display (E1-E5) |
| Cleaning method | Stone self-cleaning via high heat; do not use water or detergent on stone |
| Usage | Indoor domestic use only |
| Warranty | Not specified; refer to manufacturer |
Frequently Asked Questions - PHPO 3170 Philco
User questions about PHPO 3170 Philco
0 question about this device. Answer the ones you know or ask your own.
Ask a new question about this device
Download the instructions for your Pizza oven in PDF format for free! Find your manual PHPO 3170 - Philco and take your electronic device back in hand. On this page are published all the documents necessary for the use of your device. PHPO 3170 by Philco.
USER MANUAL PHPO 3170 Philco
Famous for Quality the World Over

natural_image
PHILCO® kitchen appliance with digital display and control buttons (no visible text or symbols on main body)PHPO 3170
User's Manual Návod k obsluze Návod na obsluhu Instrukcja obsługi Használati útmutató
PHILCO®

Famous for Quality the World Over
PIZZA OVEN
PHPO 3170
User's Manual
CONTENTS
PART 1: IMPORTANT SAFEGUARD MEASURES AND SUGGESTIONS....3
PART 2: PRODUCT STRUCTURE DIAGRAM....9
PART 3: PRODUCT INSTRUCTIONS FOR USE....10
PART 4: PIZZA-MAKING RECIPES ....14
PART 5: CLEANING AND MAINTENANCE....18
PART 6: TROUBLESHOOTING....19
PART 7: PRODUCT SPECIFICATIONS AND PARAMETERS....20
PART 8: FAULT CODE....21
PART 1: IMPORTANT SAFEGUARD MEASURES AND SUGGESTIONS
Warning
■ Do not soak the power cord, plug or the whole machine in water or clean it under the faucet to avoid damage or danger.
■ Avoid any liquid entering the equipment to prevent electrical shock or short circuit.
■ Do not cover the electrical cooling fan and socket during work.
■ The appliance will become hot during the operation. Be careful not to contact the inner wall of the furnace chamber and the door to avoid the risk of scald.
■ Do not pour the oil into the inner cavity, as it can cause a fire hazard.
■ Make sure that your output voltage coincides with the voltage specified on the electrical rating.
■ Make sure that the power supply you provide can carry no less than 10A.
■ Before use, please check the electrical power cord and accessories for any damage.
■ Children should be supervised to ensure that they do not play with the appliance and keep it where inaccessible to the child.
■ Do not hang the power cord on the edge of a sharp table or counter or to contact hot surfaces.
■ Do not plug in or operate the control panel.
■ During operation, do not let the door of the device open for a long time to keep the heat in the device and save energy.
■ Pizza furnace and pizza stone maintain heat for a long time after use, and do not try to move hot stone with the machine without fully cooling.
■ Do not place this appliance on or near the tablecloth, curtains, wallpaper or other flammable materials to avoid burning.
■ Connecting to the external power cord is not allowed.
■ Do not put cardboard, plastic, paper or other flammable materials into the bakery.
■ Devices should be placed on a horizontal or stable desktop when used. Do not place on plastic, board or any other unheated, easily worn surface.
■ Do not place appliances on the wall or other appliances, which need to be kept approximately 10 cm. Do not place anything on the top of the device.
■ Do not use this product unattended.
■ Excess flour and burnt food on the stone can ignite at high temperatures. If this happens, keep the door closed and the flames will extinguish themselves. If flames are not extinguished within 15 seconds, unplug the unit.
■ When choosing a spot to use your oven, make sure there is room for adequate ventilation on all sides.
■ After use, turn off the power button, and then unplug the plug from the socket to avoid pulling the power cord directly.
■ If the power cord or electrical component is damaged, it must be replaced or repaired by the manufacturer, maintenance department or qualified professional to avoid danger.
■ The device cannot be operated by an external timer or a separate remote control system.
■ In the process of baking, the accessible parts will become very hot, and children should stay away.
■ Children over 8 years of age and persons with physical, sensory or intellectual defects or little experience and knowledge may use the appliance if they have received supervision or guidance on the safe use of the appliance and are aware of its hazards. Children are not allowed to play with the utensils. Cleaning and user maintenance should not be performed by children unless they are older than 8 years and supervised.
■ Take care of the children and make sure the appliances are out of their reach.
■ This appliance is suitable for domestic and similar purposes, such as:
- Staff kitchen used in shops, offices and other working environments
- farm
- Inns, motels and other residential environments
- Accommodation plus (next day) breakfast environment.
Attention
■ Pizza stone is never be in water, it will damage the stone.
■ Do not wash the pizza stone with detergent, which can penetrate the pores of the stone and transfer to food.
■ Do not clean the pizza stones with pointed objects or high-pressure cleaners, otherwise there will be scratches and food debris will seep into them.
■ Do not use disinfectant to treat the pizza stone. Due to the high temperature in the furnace, it is not necessary to disinfect the stone.
■ The device can only be used to make pizza and similar flat baked goods.
■ Do not put a large food into the baking, there is a fire hazard.
■ Before not using or cleaning, remove the electrical plug from the socket and let it cool first and then clean.
■ Do not use any accessories provided other than this machine.
■ This appliance is suitable for home use, and is not used outdoors.
■ Unplug when not using electrical appliances.
■ The manufacturer does not bear all the problems caused by the incorrect use of the guest.
- When first using it, you may smell a slight smell and smoke. Don’t be nervous. This is due to the production residue, which is completely normal and will slowly disappear after use.
■ Do not unplug the electrical appliance immediately after cooking to avoid electrical damage caused by rising residual temperature inside the electrical appliance.
■ After cooking, the machine cooling, should remove the power plug, clean the furnace cavity, clean the pizza stone, and then put it in a ventilated, dry and no corrosive gas environment.
■ Do not use a coarse detergent or clean the appliance glass door with a sharp metal scraper. If the surface of the glass is scratched, the glass can break.
PART 2: PRODUCT STRUCTURE DIAGRAM
PRODUCT COMPONENTS:

| 1. Housing 5. Door handle | |
| 2. Door seal ring 6. Pizza shovel | |
| 3. Pizza Stone 7. Pizza cutter | |
| 4. Door components 8. Cheese/Pizza spatula |

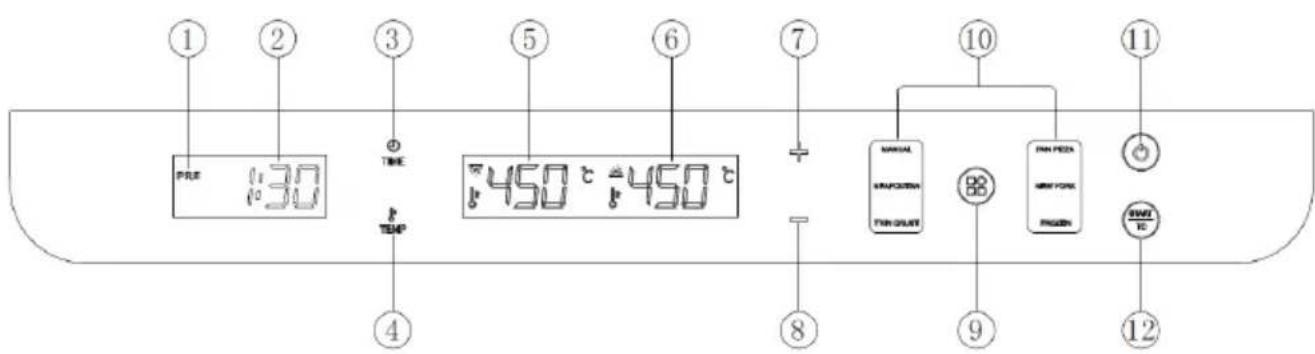
| 1. Preheat indicator light 7. Increase time or temperature |
| 2. Countdown time 8. Reduce time or temperature |
| 3. Time adjustment 9. Function selection button |
| 4. Temperature adjustment 10. Pizza style preset menu |
| 5. Upper tube temperature display 11. Power switch |
| 6. Lower tube temperature display 12. Start /Timer control |
PART 3: PRODUCT INSTRUCTIONS FOR USE
BEFORE THE FIRST USE
- Carefully remove all packaging materials and choose to place this product in a flat place.
-
Read and remove any sticker from the device, but the nameplate label shall remain on the device.
-
Wipe the oven and inside and stone with a wet cloth and let them dry or dry.
-
Put the pizza stone in the oven, manually set the upper and lower temperature at 450irc C, press the start button, and run the empty load for 15 minutes to burn the substances produced by the manufacture.
-
In the first use, you may smell a slight smell and lampblack, and do not be nervous by the production residue produced during combustion. This is completely normal and will slowly disappear after no-load operation.
-
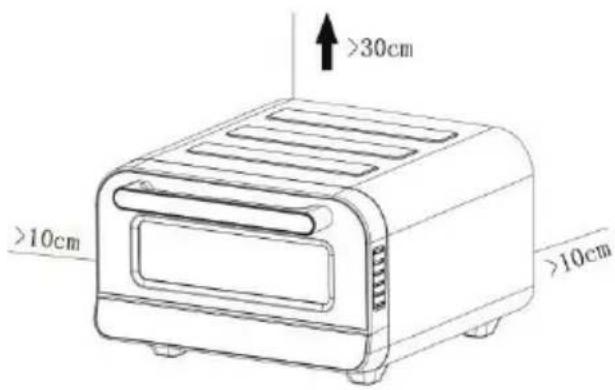
Place the machine on a stable, horizontal surface. Leave at least 10 cm on the back and sides, >30 cm on the top, and take care to stay away from combustible materials such as curtains and wall cloth.
PRODUCT OPERATING INSTRUCTIONS
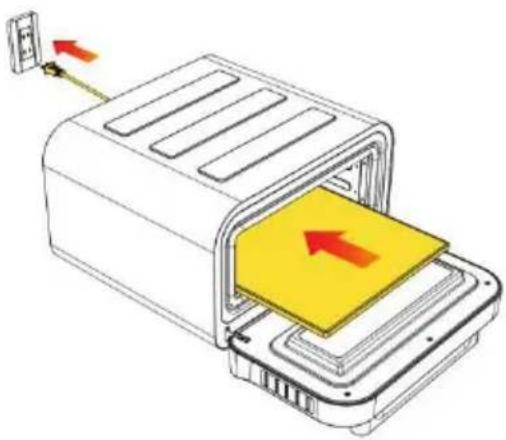
- Plug in the pizza machine and make sure the pizza stone is in the oven.
natural_image
Diagram of a device with a yellow component and red directional arrows indicating movement or force (no text or symbols present)- After turning on the power supply, Click on the “key, that is, enter the standby state. If there is no operation within 10 minutes, it will jump to shut down.

-
Turn on the power button, press the "key, one of the five pizza preset values, or you can manually set it to adjust the up and down temperature.
-
Temperature setting: press the first “ 30 ” key, the temperature on the digital screen flashes, press the second time, the digital screen temperature flashes, the temperature flashes, press the “+” or “-” key to adjust the temperature to 10 °C step, the adjustment range is 80 °C - 450 °C.
-
Timing setting: press "①" key, digital screen digital flashing, when the time flashes, press "+" or "-" key to adjust the timing time, the adjustment range is 1 minute - 30 minutes.
-
After selecting the preset pizza, press the “key, and the oven enters the preheating state.

-
During the preheating process, the digital tube will be on, and the preheating indicator will be on. When the temperature reaches the preset temperature, the preheating indicator will go off, and the prompt sound will be issued to put the pizza in.
-
When the pizza machine is preheated, prepare the ingredients and then put them on the pizza dough. The preheating time depends on the selected temperature and the current temperature of the pizza machine, but in a range of 2 to 30 minutes.
-
When the set temperature is reached, the time digital screen will light up and sound a prompt, put the pizza into the stove with a shovel, and then close the door.

natural_image
Line drawing of a microwave oven with a pizza inside, showing blade and tray (no text or symbols)- Press the "SOB" button again, and the time countdown begins. After the time is completed, the "beep", "beep" and "beep" prompt tone will be issued, indicating that the baking is finished.
- When the timer is over, the pizza will "beep", "beep" and "beep". Open the door, shovel the pizza with a shovel, remove it from the cavity and close the door.
Note: The heating will not turn off when the timer is over.
- If you want to make multiple pizzas, heat the pizza machine for about five minutes and return to the preset temperature before baking the next one.(Prepare your next pizza while the pizza machine is heated).
- After baking the pizza, don't pull off the pizza machine. Instead, press the "button to turn down the machine. At this time, the cooling fan will continue to blow and cool, and after the machine completely cool, finally dial the machine plug.
- You can use the pizza cutter and pizza spatula to cut the pizza and take the pizza to the plate as below photo.

natural_image
Line drawing of a hand using a pipette to cut a slice of pizza (no text or symbols)
natural_image
Simple line drawing of a slice of pizza with a knife, no text or symbols presentPIZZA MENU
- Generally, thick-crust pies bake longer at lower temperatures, while thin-crust pies bake less at higher temperatures.
- Five default pizza menus allow you to quickly bake a delicious pizza (the default temperature and time of the upper and lower tubes are shown in the table below).
| Menu Default | upper tube temperature | Default bottom tube temperature | Adjustable temperature range | Default time | Adjustable Time range |
| MANUAL 450 °C | 450 °C 80 °C~4 | 50 °C 1min 30s | ~30min | ||
| NEAPOLITAN 400 °C | 400 °C 200 °C | °C~450 °C 2mins | 1~10min | ||
| THIN CRUST 270 °C | 330 °C 80 °C | ~450 °C | 6 mins 1~10min | ||
| PAN PIZZA | 220 °C 340 °C | 80 °C~450 °C | 12mins | 1~30min | |
| NEW YORK | 240 °C | 270 °C | 80 °C~450 °C | 8mins | 1~20min |
| FROZEN | 240 °C 200 °C | 80 °C~450 °C | 14mins | 1~20min |
Note: The timer cannot control the heat or power of the pizza stove. Its suggested time depends on the dough, sauce and ingredients, and is just a reference. You should not be left unattended when baking the pizza.
PART 4: PIZZA-MAKING RECIPES
| NEAPOLITAN pizza dough | ||
| Ingredients for 3 pizza cakes Instructions for using the mixing bowl | Bread maker instructions for stirring | |
| Ingredient:- 300 ml of room-temperature water- 500 g No.00 flour (high protein flour)- 10g salt- 3g of active dry yeast | - In a mixing bowl, mix the flour and salt.- The active dried yeast was dissolved in water at room temperature and then added to the flour mixture.- Mix these materials together until the dough begins to form.- Rub the dough for about 10 minutes until smooth and elastic.- Roll the dough into a ball and place it in a bowl coated with olive oil. Cover with a wet cloth or plastic wrap and ferment at room temperature for 8-10 hours, or until it doubles its volume.- Gently knead the dough into a 12-inch pizza crust.- You can then add the ingredients you want and bake until the crust turns golden brown and the cheese bubbles. | - Add room temperature water and active dry yeast to the pan of the bread maker and stand for 5 minutes.- Add the flour and salt in the pan.- Select the Dough program and start the toaster.- Once the procedure is complete, the dough is removed from the pot, kneaded into a ball, and then placed in a bowl coated with little olive oil, covered with a wet cloth or plastic film, left at room temperature for 8-10 hours, or until the size is doubled.- Gently knead the dough into a 12-inch pizza crust.- Then you can add the ingredients you want and bake until the crust is golden brown. The cheese is bubbling. |
| Thin, crisp pizza dough | ||
| Ingredients for 3 pizza cakes Instructions for using the mixing bowl | Bread maker instructions for stirring | |
| Ingredient:- 180 ml of warm water- 300 grams of medium-gluten flour- 6g olive oil- 9g sugar- 6g salt- 3g of active dry yeast | - In a mixing bowl, mix the flour, sugar, and salt.- Remove the yeast in warm water and add to the flour mixture with olive oil.- Mix these materials together until the dough begins to take shape.- Knead the surface gently sprinkled with flour for about 5 minutes until smooth.- Roll the dough into a ball and place it in a bowl coated with olive oil. Cover with a wet cloth or plastic wrap and let stand for 30 minutes.- Roll the dough thin and make a 12-inch pizza crust.- You can then add the ingredients you want and bake until the crust turns golden brown and the cheese bubbles. | - Add warm water to the mixer of the baker.- Add the olive oil to the pan.- Add in the plain flour.- A small hole was dug in the middle of the dry raw material, and sugar, salt, and active dry yeast were added- Select the Dough program and start the toaster.- Once the procedure is complete, remove the dough from the pan and roll it out into a very thin 12-inch pizza crust.- You can then add the ingredients you want and bake until the crust turns golden brown and the cheese bubbles. |
| Pan pizza dough | ||
| Ingredients for 2 pizza Instructions for using the mixing bowl | Bread maker instructions for stirring | |
| Ingredient:- 240 ml of warm water- 400 grams of medium-gluten flour- 30g olive oil- 8g sugar- 8g salt- 4g of active dry yeast | - In a mixing bowl, mix the flour, sugar, and salt.- The active dry yeast was dissolved in warm water and allowed to stand for 5 min.- Add the yeast and olive oil to the flour mixture.- Mix these materials together until the dough begins to form.- Rub the dough for about 10 minutes until smooth and elastic.- Roll the dough into a ball and place it in a bowl coated with olive oil. Cover with a wet cloth or plastic wrap and ferment at room temperature for 1-2 hours, or until it doubles its volume.- Preheat the machine to a 220 °C. Gently flatten the dough and then press it in a 12-inch greased pan to make a crust.- You can then add the ingredients you want and bake until the crust turns golden brown and the cheese bubbles. | - Add warm water to the mixer of the baker.- Add the olive oil to the pan.- Add in the plain flour.- A small hole was dug in the middle of the dry raw material, and sugar, salt, and active dry yeast were added- Select the Dough program and start the toaster.- Once the procedure is complete, remove the dough from the pan, gently flatten it and press it into a 12-inch greased pan to making the crust.- Once the dough is formed in the pan, cover and rest for another 15-30 minutes.- You can then add the ingredients you want and bake until the crust turns golden brown and the cheese bubbles. |
| New York pizza dough | ||
| Ingredients for 3 pizza cakes Instructions for using the mixing bowl | Bread maker instructions for stirring | |
| Ingredient:- 360 ml of water at room temperature- 480 grams of bread flour- 21g olive oil- 12g sugar- 12g salt- 6g of active dry yeast | - In a mixing bowl, mix the flour, sugar, and salt.- The active dry yeast was dissolved in warm water and allowed to stand for 5 min.- Add the yeast and olive oil to the flour mixture.- Mix these materials together until the dough begins to form.- Rub the dough for about 10 minutes until smooth and elastic.- Roll the dough into a ball and place it in a bowl coated with olive oil. Cover with a wet cloth or plastic wrap and ferment at room temperature for 1-2 hours, or until it doubles its volume.- Spread the dough over a lightly flour surface and roll it into a 12-inch circle.- You can then add the ingredients you want and bake until the crust turns golden brown and the cheese bubbles. | - Add warm water to the mixer of the baker.- Add the olive oil to the pan.- Add in the plain flour.- A small hole was dug in the middle of the dry raw material, and sugar, salt, and active dry yeast were added- Select the Dough program and start the toaster.- Once the procedure is complete, remove the dough from the pan and roll it into a 12-inch round pizza crust.- You can then add the ingredients you want and bake until the crust turns golden brown and the cheese bubbles. |
PART 5: CLEANING AND MAINTENANCE
Note: Please unplug the plug before cleaning and cool it down.
- Cleaning your oven is mainly about cleaning the stones, because heating is the best way to clean it, so it is basically a hands-on process.
- After each pizza, gently brush the flour and debris from the stone with a long wire brush.
- Wooden handles are less prone to heat and melt than plastic handles. Do not scrub the stones with a brush.
- After the oven runs a full cooling cycle, slide the stone out of the oven and gently brush off any ashes or burnt debris. Turn the stone over and brush off below if needed.
- Don't get wet or soak the stone in water, which will damage the stone.
- Don't get wet or soak the stones in water, which will damage the stones. They can't be cleaned in the dishwasher.
- This stone cannot be cleaned in the dishwasher.
- If necessary, brush or wipe off the dust or debris inside the oven after the oven is completely cooled.
- It is important to remove as much food residue as possible / food stuck to stones to reduce smoking. If food is stuck to the stone so that the dough cannot touch it any more well, turn the stone over and let the stuck food sit below, then put the stone back in the oven and bake individually in a 450 °C oven for 30 minutes. This allows the stuck food to burn off the stone. After the baking cycle ends, let the cooling cycle run adequately.
- Store the stone in the oven between uses and remove it only when it is flipped or cleaned.
- Over time, inside the stone and oven may change color, but discoloration does not affect performance.
PART 6: TROUBLESHOOTING
Note: Please unplug the plug before cleaning and cool it down.
| Problems Reason Handling method | ||
| Raw pizza stuck to the shovel. - | There is not enough flour at the bottom.- Pizza is spent too long on the shovel.- The pizza is too heavy. | - Make sure the dough is covered with flour.- Pizza before the baking cavity, less ingredients.- Don't let the pizza stay on the shovel for more than a minute or two, or it will start to stick.- After placing the pizza on the stone, pull the shovel out with a quick, short motion. |
| Large smoke in the baking process. | - Too much raw flour is put on the stone. | - When making pizza, the flour is just enough to prevent the dough from sticking.- Wipe off the excess flour at the bottom of the pizza.- Do not open the door during the period. |
| The surface is too black. - The top temperature is too high. | - Reduce the upper temperature.- Increase the temperature below. | |
| Not familiar. - Stone is not hot enough. - Put the pizza into the | furnace chamber, must ensure that the preheating is completed, the countdown number to light up.- Increase the baking time. | |
| Food on fire. - The food is over | cooked.- Put the extra flour or baked food on a stone. | - If the food catches fire, do not open the door, the flame will extinguish itself.- To prevent fire, stay next to the pizza machine, take out the food after completion, use the stone after cooling, brush the stone clean. |
| Steam emerges from the door. | - This is normal, and door ventilation releases steam produced by high moisture food. | - There is moisture on the top of the workbench, just dry. |
PART 7: PRODUCT SPECIFICATIONS AND PARAMETERS
| Rated voltage / rated frequency / power 220 - 240 V, 50/60 Hz,1600 - 1850 W |
| Product dimension 488.5 × 440 × 284.5 mm |
| Internal cavity size 344 × 330 × 110 mm |
| Product weight 10.5 kg |
| Power line length Exposure 0.9 m |
| Pizza stone size 320 × 320 × 10 mm |
APPENDIX 1
Circuit schematic diagram

PART 8: FAULT CODE
| Code Code | interpretation Possible cause | |
| E1 NTC out-of-order Temperature sensor is open | ||
| E2 High temperature protection Temperature sensor over-temperature | ||
| E3 Upper temperature sensor fault Upper temperature sensor has a short circuit / reverse connection | ||
| E4 Lower temperature sensor failed Lower temperature sensor short circuit / reverse connection | ||
| E5 Communication failure Poor line contact | ||
This product shall not be disposed of together with the household waste. The product must be processed in authorized places to recycle electrical and electronic appliances. Refuse waste, help save natural resources, and ensure that products are disposed of in an environmentally friendly and healthy way.
INSTRUCTIONS AND INFORMATION REGARDING THE DISPOSAL OF USED PACKAGING MATERIALS
Dispose of packaging material at a public waste disposal site.
DISPOSAL OF USED ELECTRICAL AND ELECTRONIC APPLIANCES

The meaning of the symbol on the product, its accessory or packaging indicates that this product shall not be treated as household waste. Please, dispose of this product at your applicable collection point for the recycling of electrical & electronic equipment waste. Alternatively in some states of the European Union or other European states you may return your products to your local retailer when buying an equivalent new product. The correct disposal of this product will help save valuable natural resources and help in preventing the potential negative impact on the environment and human health, which could be caused as a result of improper liquidation of waste. Please ask your local authorities or the nearest waste collection centre for further details. The improper disposal of this type of waste may fall subject to national regulations for fines.
For business entities in the European Union
If you wish to dispose of an electrical or electronic device, request the necessary information from your seller or supplier.
Disposal in other countries outside the European Union
If you wish to dispose of this product, request the necessary information about the correct disposal method from local government departments or from your seller.

This product meets all the basic EU regulation requirements that relate to it.
Changes to the text, design and technical specifications may occur without prior notice and we reserve the right to make these changes.
PHILCO®
Famous for Quality the World Over
PEC NA PIZZU
PHPO 3170
Návod k obsluze
OBSAH
ČÁST 1: DŮLEŽITÁ BEZPEČNOSTNÍ OPATŘENÍ A NÁVRHY ...... 3
ČÁST 2: SCHÉMA STRUKTURY PRODUKTU 9
ČÁST 3: POKYNY K POUŽITÍ PRODUKTU....10
ČÁST 4: RECEPTY PRO PŘÍPRAVU PIZZY....14
ČÁST 5: ČIŠTĚNÍ A ÚDRŽBA 18
ČÁST 6: ODSTRANĚNÍ MOŽNÝCH PROBLÉMŮ ......19
ČÁST 7: TECHNICKÉ ÚDAJE A PARAMETRY PRODUKTU....20
ČÁST 8: CHYBOVÉ KÓDY....21
ČÁST 1: DŮLEŽITÁ BEZPEČNOSTNÍ OPATŘENÍ A NÁVRHY
Varování
natural_image
Diagram of a device with a yellow component and red directional arrows indicating movement or force (no text or symbols present)natural_image
Line drawing of a microwave oven with a pizza inside, showing food being placed on the tray (no text or symbols)natural_image
Line drawing of a hand using a pipette to cut a slice of pizza (no text or symbols)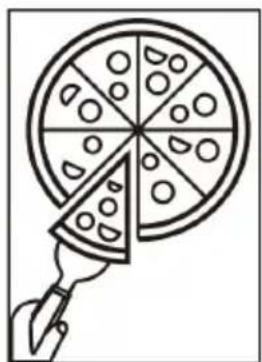
natural_image
Simple line drawing of a slice of pizza with a knife, no text or symbols presentMENU NA PŘÍPRAVY PIZZY
Famous for Quality the World Over
PEC NA PIZZU
PHPO 3170
Návod na obsluhu
Vážený zákazník,
- Hostince, motely a iné ubytovacie prostredia
| 1. Kryt 5. Rukovät dvierok | |
| 2. Tesniaci krúžok dvierok 6. Lopatka na pizzu | |
| 3. Kameň na pizzu 7. Rezač na pizzu | |
| 4. Komponenty dvierok 8. Špachtľa na syr/pizzu |
ČASŤ 3: POKYNY NA POUŽITIE PRODUKTU
PRED PRVÝM POUŽITÍM
natural_image
Diagram of a device with a yellow component and red directional arrows indicating movement or force (no text or symbols)natural_image
Line drawing of a microwave oven with a pizza inside, showing blade and tray (no text or symbols)natural_image
Line drawing of a hand using a pipette to cut a slice of pizza (no text or symbols)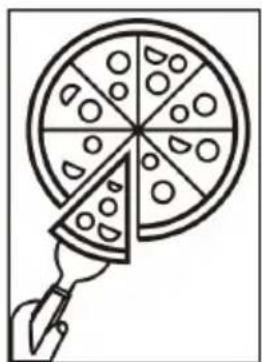
natural_image
Simple line drawing of a slice of pizza with a knife, no text or symbols presentMENU NA PRÍPRAVY PIZZE
Famous for Quality the World Over
PIEC DO PIZZY
PHPO 3170
Instrukcja obsługi
SPIS TREŚCI
CZEŚĆ 1: WAŻNE ŚRODKI OSTROŻNOŚCI I ZALECENIA....3
CZEŚĆ 2: RYSUNEK POGLĄDOWY URZĄDZENIA....9
CZĘŚĆ 3: INSTRUKCJA UŻYCIA PRODUKTU....10
CZEŚĆ 4: PRZEPISY NA PIZZĘ....14
CZEŚĆ 5: CZYSZCZENIE I KONSERWACJA....18
CZEŚĆ 6: USUWANIE MOŻLIWYCH USTEREK....19
CZEŚĆ 7: SPECYFIKACJA I PARAMETRY PRODUKTU .....20
CZEŚĆ 8: KODY BŁĘDÓW....21
CZĘŚĆ 1: WAŻNE ŚRODKI OSTROŻNOŚCI I ZALECENIA
Ostrzeżenie
natural_image
Diagram of a device with a yellow component and red directional arrows indicating movement or force (no text or symbols present)natural_image
Line drawing of a microwave oven with a pizza inside, showing food being placed on a tray (no text or symbols)natural_image
Line drawing of a hand using a pipette to cut a slice of pizza (no text or symbols)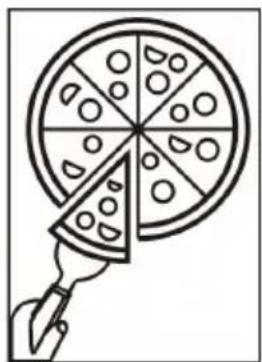
natural_image
Simple line drawing of a slice of pizza with a knife, no text or symbols presentWSTĘPNIE USTAWIONE PARAMETRY PRZYGOTOWANIA PIZZY
Famous for Quality the World Over
PIZZAKEMENCE
PHPO 3170
Használati útmutató
TARTALOM
natural_image
Diagram of a device with a yellow component being inserted into a slot, showing directional arrows (no text or symbols)natural_image
Line drawing of a microwave oven with a pizza inside, showing blade and tray (no text or symbols)natural_image
Line drawing of a hand using a pipette to cut a slice of pizza (no text or symbols)
natural_image
Simple line drawing of a slice of pizza with a knife, no text or symbols presentMENÜ PIZZA SÜTÉSÉHEZ
is a pending or registered trademark of Electrolux Home Products, Inc. and used under a license from Electrolux Home Products, Inc.
- PHPO 3170
- PHILCO®
- PIZZA OVEN
- CONTENTS
- PART 1: IMPORTANT SAFEGUARD MEASURES AND SUGGESTIONS
- Warning
- Attention
- PART 2: PRODUCT STRUCTURE DIAGRAM
- PRODUCT COMPONENTS:
- PART 3: PRODUCT INSTRUCTIONS FOR USE
- BEFORE THE FIRST USE
- PRODUCT OPERATING INSTRUCTIONS
- PIZZA MENU
- PART 5: CLEANING AND MAINTENANCE
- Note: Please unplug the plug before cleaning and cool it down.
- PART 6: TROUBLESHOOTING
- PART 7: PRODUCT SPECIFICATIONS AND PARAMETERS
- APPENDIX 1
- INSTRUCTIONS AND INFORMATION REGARDING THE DISPOSAL OF USED PACKAGING MATERIALS
- DISPOSAL OF USED ELECTRICAL AND ELECTRONIC APPLIANCES
- For business entities in the European Union
- Disposal in other countries outside the European Union
- PEC NA PIZZU
- OBSAH
- ČÁST 1: DŮLEŽITÁ BEZPEČNOSTNÍ OPATŘENÍ A NÁVRHY
- Varování
- MENU NA PŘÍPRAVY PIZZY
- ČASŤ 3: POKYNY NA POUŽITIE PRODUKTU
- PRED PRVÝM POUŽITÍM
- MENU NA PRÍPRAVY PIZZE
- PIEC DO PIZZY
- SPIS TREŚCI
- CZĘŚĆ 1: WAŻNE ŚRODKI OSTROŻNOŚCI I ZALECENIA
- Ostrzeżenie
- WSTĘPNIE USTAWIONE PARAMETRY PRZYGOTOWANIA PIZZY
- PIZZAKEMENCE
- TARTALOM
- MENÜ PIZZA SÜTÉSÉHEZ
Brand : Philco
Model : PHPO 3170
Category : Pizza oven