
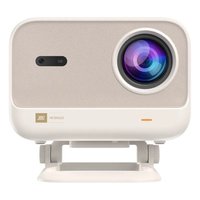
U11 - Video projector Yaber - Free user manual and instructions
Find the device manual for free U11 Yaber in PDF.


| Product Type | Smart Video Projector |
| Model | U11 |
| Native Resolution | 1920 x 1080 |
| Aspect Ratio | 4:3 / 16:9 |
| Display Technology | LCD |
| Light Source | LED |
| Color Gamut | 16.7 million colors |
| Weight | 5.29 lb (2.4 kg) |
| Power Supply | AC 100-240 V, 50/60 Hz |
| Input Ports | 2 x HDMI, 2 x USB, 1 x RJ45 (Ethernet), 1 x AV |
| Output Port | 3.5 mm Headphone Jack |
| Projection Methods | Front/Rear on Desk, Front/Rear on Ceiling |
| Focus | Auto focus and manual focus |
| Keystone Correction | Automatic and manual 4-point correction |
| Wireless Connectivity | Wi-Fi (screen mirroring), Bluetooth (audio devices) |
| Supported Video Formats | MP4, MKV, WMV, 3GP, MPG, VOB, TP, TS, DAT, MOV, FLV, 4K H.264/H.265 (≤30fps) |
| Supported Audio Formats | AAC, LPCM, MP3, APE, MP3 |
| Supported Image Formats | JPG, JPEG, BMP, PNG |
| Supported Document Formats | TXT, Word, Excel, PowerPoint |
| Operating System | Android 9.0 |
| Warranty | 3 years (email aftersales@yaber.com) |
| Package Contents | Projector, HDMI cable, 3-in-1 AV cable, Remote control (batteries not included), Power cord, Cleaning cloth, Lens cover, Quick tutorial |
Frequently Asked Questions - U11 Yaber
User questions about U11 Yaber
0 question about this device. Answer the ones you know or ask your own.
Ask a new question about this device
Download the instructions for your Video projector in PDF format for free! Find your manual U11 - Yaber and take your electronic device back in hand. On this page are published all the documents necessary for the use of your device. U11 by Yaber.
USER MANUAL U11 Yaber
natural_image
Line drawing of a Yaber washing machine with circular vent and control buttons (no text or symbols on body)U11 SMART PROJECTOR
EN
CONTENS
YABER Lifetime Professional Support 1
Tips 1
Package List - - - - - - - - - - - - - - - - - - - - - - - - - - - - - - - - - - - - - 2
Projector Specifications - - - - - - - - - - - - - - - - - - - - - - - - - - - - - - 3
Projector Overview----3
Remote Contol 5
Installation - - - - - - - - - - - - - - - - - - - - - - - - - - - - - - - - - - 6
- Installation Method----6
- Projection Distance and Size- - - - - - - - - - - - - - - - - - - - - - - - - - - - - - - - - - - - - - 7
- Install on the Ceiling - - - - - - - - - - - - - - - - - - - - - - - - - - - - - - - - - - - - - - - 7
Setting Up The Projector 9
-
Select The Insert Signal Source- - - - - - - - - - - - - - - - - - - - - - - - - - - - - - - - 9
2.USB Disk Input Mode- - - - - - - - - - - - - - - - - - - - - - - - - - - - - - - 9
2.1 Play Video/Audio/Image/Office in the USB Disk Input Mode - - - - - - - - - - - - - - - - - - - - - - - - - - - - - - - - - - - - - - - - - - - - - - 9
2.2 Play Interface 10 -
WiFi Setting - - - - - - - - - - - - - - - - - - - - - - - - - - - - - - - - - - - - - - - - 13
3.1 iOS Cast (for iOS Devices) 13
3.2 Maxhub Share (for Android Devices) 13
-
Bluetooth Setting 14
-
Projector Image Setting- - - - - - - - - - - - - - - - - - - - - - - - - - - - - - - - - - - 15
5.1 Projection Mode 15
5.2 Focus 16
5.3 Keystone Correction 16
Signal Lines Connection 19
- Connect the Devices via the HDMI port 19
- Connect to the DVD Player----19
- Connect to the Sound bar/Speaker 20
- Connect to the Computer - - - - - - - - - - - - - - - - - - - - - - - - - - - - - - - - - - - 20
Warranty 21
Yaber Lifetime Professional Support
Dear customer,
Thank you for your support of YABER! Before using your projector, please take a moment to read through the manual thoroughly. Should you encounter any issues, simply email aftersales@yaber.com with your order number and a brief explanation of the problem. Our team will respond within 24 hours with a fast and effective solution.
Many common issues such as signal or sound problems, failed Bluetooth or WiFi connections, dark spots, or choppy animations can often be resolved through simple adjustments to the settings. Rest assured that all of our projectors have undergone a rigorous 100% inspection and packaging process prior to shipping.
If you have any further questions or concerns, please don't hesitate to contact us. We welcome the opportunity to improve and guarantee that we will work with you to find a satisfactory solution.
Thank you for your understanding and for choosing YABER!
Best regards, The YABER Service Team.
Tips
- Do not place projector in too warm or too cold room, because the high temperature or low temperature will shorten lifespan of the device. The working environment would be 5°C \~35°C better.
- The ventilation is equipped for the projector to work stably. Don't cover the vent with cloth, blanket or other things. Don't insert anything into the slit of the projector, or it may produce a short circuit or an electric shock to your device and cause damage.
- The projector shall be strictly protected from strong impact, extrusion and vibration. Do not try to move and on strong impact, extrusion and vibration. Do not try to move and the internal circuit faults.
- Lens, as the core component of the projector, is directly related to the picture definition and effect. The excessive dust thereon will affect image quality. The dirty lens shall be wiped with soft cotton cloth for the glass lens surface. Hard cloth or abrasives shall not be used.
Package List

Yaber U11 Projector HDMI Cable 3-in-1 AV Cable

natural_image
Line drawing of a remote control with buttons and a central rotary knob (no text or symbols)
natural_image
Simple line drawing of a U-shaped electrical plug with two terminal leads (no text or symbols)
natural_image
Decorative square frame with scalloped border (no text or symbols)Remote Control Power Cord Cleaning Cloth

natural_image
Simple line drawing of a circular object with a small protrusion at the top (no text or symbols)
Lens Cover Quick Tutorial
Projector Specifications
| Model No. U11 | |||
| Native Resolution 1920*1080 Aspect Ratio 4:3/16:9 | |||
| Display Tech LCD Light Source LED | |||
| Color Game 16.7M Full Size 8.32x6.3 inch | |||
| Weight 5.29 lb Power Voltage AC100-240V ~ 50/60Hz | |||
| Output Port Headphone Input Port | RJ45/HDMI/USB/AV | ||
| Projection Method | Front/Rear on Desk, Front/ Rear on Ceiling | ||
| Operation Mode | Remote control | ||
| Video Format | MP4/MKV/WMV/3GP/MPG/VOB/TP/TS/DAT/MOV/FLV/ 4K H.264/H.265(≤30fps) | ||
| Audio Format | AAC_LC/HE_AAC/HE_AACV2/LPCM/MP3/APE/MP3 | ||
| Image Format | JPG/JPEG/BMP/PNG | ||
| Document Format | TXT/WORD/EXCEL/PPTX | ||
Projector Overview

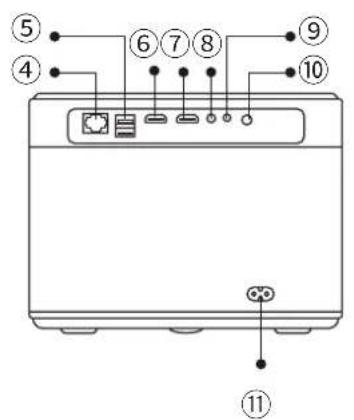
natural_image
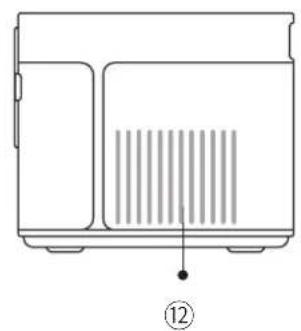
Line drawing of a microwave oven with ventilation slots and a numbered label (12) at the bottom right corner.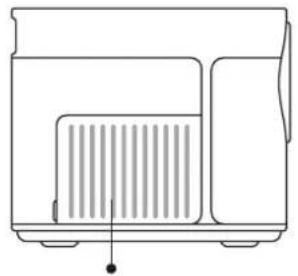
natural_image
Line drawing of a microwave oven with ventilation slots and lid (no text or symbols)13
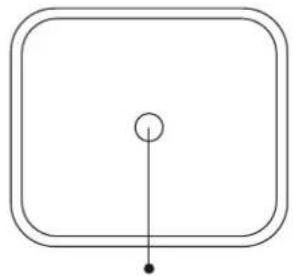
natural_image
Simple geometric diagram with a square and a central circle connected by a vertical line (no text or symbols)14

natural_image
Pure electrical connector diagram without any text, numbers, or symbols15
16 17
| 1 Projector lens Optical coated glass lens | |
| 2/10 IR window Infrared signal receiver | |
| 3 Camera Auto-focus lens | |
| 4 RJ45 Network port | |
| 5 USB Ports USB 1 port /USB 2 port | |
| 6/7 HDMI Ports HDMI Input | |
| 8 AV Interface Separates audio and video transmission | |
| 9 Headphone Jack 3.5mm Headphone Output | |
| 11 Power Cord Port Insert the power cord | |
| 12/13 | Cooling outlet Prevent the projector from overheating |
| 14 | Power button Turn on/off power |
| 15 | Bottom Label Nameplate on the bottom of the projector |
| 16 | Machine Feet Height adjustment machine feet |
| 17 | Screw hole Bracket screw hole (1/4 inch), also supports hoisting |
Remote Control

| Button Turn on/off the power | |
| Source key Select the input | signal source |
| Arrow keys | Used to adjust the parameter of the projector in the menu mode |
| Menu | Press once: Operate picture and sound settings in AV or HDMI Mode Press twice in succession: select 16:9/4:3 projection |
| One-touch autofocus auto-trapezoid | Press once: automatic image focus, automatic trapezoidal adjustment |
| Volume + Volume up | |
| Volume - Volume down | |
| Mute key Close the sound | |
| Home button Return to the | home page |
| OK Confirm the option/Play | or pause the video |
| Return key Return to the previous menu | |
| Focus+/Focus- Screen focus | adjustment |
Note:
- Install 2 pieces of AAA batteries into the remote controller before using it. Do not combine new batteries with old ones in remote controller, which can cause operation failure due to insufficient power supply.
- When using the remote controller, please make sure that the signal transmitter of the remote controller aims at infrared signal receiver of the projector.
- If you are not using the remote controller for an extended period, please take out batteries to prevent batteries leakage.
Installation
1. Installation Method
The projector can be hanged on the ceiling with special hanger frame, and placed on the stable desk to project the image according to the operating environment and requirements. The installation method is as follows:
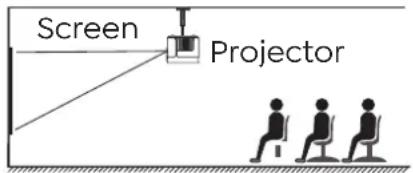 1. Front projection Ceiling mount 1. Front projection Ceiling mount | 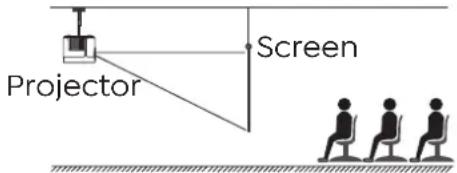 2. Rear projection Ceiling mount 2. Rear projection Ceiling mount |
 3. Front projection Desk mount 3. Front projection Desk mount | 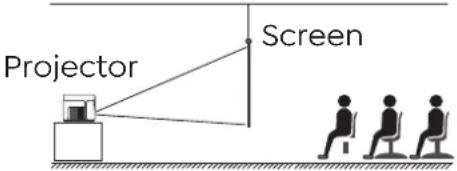 4. Rear projection Desk mount 4. Rear projection Desk mount |
2. Projection Distance and Size
| Aspect Ratio: 16:9 | |
| Distance (ft.) Screen Size | |
| 5 50" | |
| 8 80" | |
| 10 100" | |
| 12 120" | |
| 13.4 120" | |
| 16.8 150" | |
The recommended projection distance is about 8ft-10ft.
The image size depends on the distance between projector and screen, there may be 3% deviation among above listed data. Different settings cause various distances.
3. Install on the Ceiling

natural_image
Line drawing of a square electronic device with a circular lens and mounting feet (no text or symbols)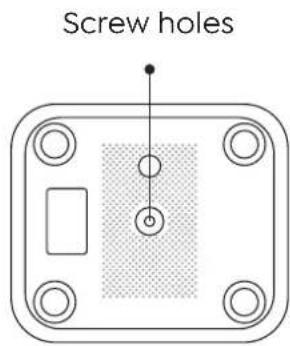
Note: Please purchase an universal projector ceiling mount, attach the projector with 1/4 inch screws.
Use The Projector
1. Turn on/off the projector
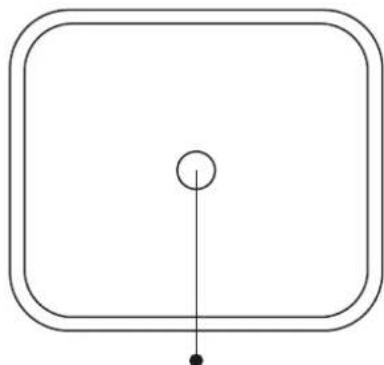
Connect the projector to the power supply, the projector will enter the standby state, and the signal indicator light on the cover will be red.
Power on: Press the power button on the body, or the power button on the remote control, and the indicator light turns blue to enter the working state.
Shutdown: In the working state, press the power button on the body, or the power button on the remote control, the indicator light will change from blue to red, and the projector will be turned off.
natural_image
Simple geometric diagram with a circle at center and two vertical lines extending outward (no text or symbols)Power button
2. Focus Adjustment
* When starting the U11 projector for the first time, please wait patiently for 2-3 seconds, the projector will automatically adjust the focus. If the image is not clear, you can press the focus button "F+", "F-" to adjust the focal length of the lens, click or long press the focus button until the image is clear.
Note: If it's still blurry, try adjusting the throw distance.

3. Keystone Correction Adjustment
* When the U11 projector is started for the first time, the projector will automatically perform keystone correction. Or you can also use the digital 4P keystone correction of the projector to change the image to be rectangle(vertical and horizontal). Detail please refer the page xxx of this manual.
Setting Up The Projector
The projector's home page is as follow.

1. Select The Insert Signal Source
Select the desired insert signal source (AV/HDMI1/HDMI2) on the home -page.
Note: If you connect the external device (Such as TV box, Fire TV Stick, DVD Player, USB flash disk, Computer etc.), please must select the corresponding signal source. If you choose wrong, the projector will show no signal.
2. USB Disk Input Mode
2.1 Play Video/Audio/Image/Office in the USB Disk Input Mode
- Insert the USB Disk, Select the icon [Media]
- Select the option [All/Video/Audio/Image]
- Select the desired file (or folder to enter the subfolder) in the USB disk, then press the [OK] button to play it.
Notice: Yaber U11 projector supports USB disk to directly play PPT, Word, Excel files.

Warm Tips: If the projector cannot recognize the USB disk, please refer to the following methods to solve the problem.
Please confirm whether your USB disk meets the following formats.
- FAT32: 8G/16G/32G
- NTFS: 64G
If it is not, please format the USB disk. Before you format the USB disk, if you have anything on your USB disk, make sure to backup everything. After these steps, everything will be lost forever.
How to convert USB disk format to FAT32 format?
- Plug-in your usb disk into the computers USB port.
- Open up File Explorer and right-click on the drive.
- Choose Format.
- In the File System dropdown, please choose the FAT32 format.
- Click Start and close this window when finished.
If the problem is still not solved, please send your problem to this email: aftersales@yaber.com
2.2 Play Interface
Click the "OK" button to get the play interface.

| Playing setting Include Function | ||
| Play List the videos of c | current folder change video from the current folder | |
| Play mode | repeat all, auto exit, repeat one, random, play list | change play mode |
| Aspect Ratio auto, 16:9, | 4:3, zoom1, zoom2 set video aspect ratio | |
| Audio Track audio track | set audio track | |
| Subtitle Track subtitle track | ack set subtitle track | |
| Encoding Standard iso, | windows set encoding standard | |
| Region Language various language set region language | ||
| External Subtitle external | subtitle choose | subtitle from other folders |
| Progress Jump | progress jump | fast forward video to specific time |
| Information | resolution, size, duration, bitrate see the basic video information | |
| Picuture & Sound | piture and sound mode | set picture and sound mode |
| Menu | Content | Mode | Function |
| Picture Mode | Standard/Soft/Dynamic/Vivid/User | Contrast | Modify the picture parameters in the range 0-100 |
| Brightness | |||
| Sharpness | |||
| Color | |||
| Sound Mode | Standard/Music/Moive/News/Users | Bass | Modify the sound parameters in the range 0-100 |
| Treble |
2.3 Music Play Interface

| Playing setting Include Function | ||
| Play List the musics of current folder change music from the current folder | ||
| Play mode | repeat all, auto exit, repeat one, random, play list | change play mode |
| Information size, duration, bitrate see the basic music information | ||
| Picture&Sound piture and sound mode set picture and sound mode | ||
| Lyric Encode various encoding standard set encoding standard | ||
2.4 Picture Play Interface
| Playing setting Include Function | ||
| Play List the pictures of | current folder | change picture from the current folder |
| Play Slide start, stop | start playing slides from the current folder | |
| Interval Time 3 sec, 5 sec | c, 8 sec, 12 sec set interval time of playing slides | |
| Aspect Ratio | auto, full screen, zoom out, original, zoom1, zoom2 | set picture aspect ratio |
| Rotate default, rotate right, rotate left rotate picture | ||
| Set as wallpaper | Set as wallpaper | Set as wallpaper |
| Information resolution, size | see the basic picture information | |
| Picture&Sound | piture and sound mode set picture and sound mode | |
3. WiFi Setting
Wireless Connection
Warming Tips:
- The fluency of screen mirroring with wireless connection will be affected by the network environment. A bandwidth of 100Mbit or more is recommended when using screen mirroring.
- Make sure your mobile device is close to the projector when using wireless connection. A distance within 1 meter is recommended.
- Some mobile devices may not support screen mirroring due to the compati- bility.
- Any questions, please feel free to contact us via aftersales@yaber.com.
3.1 iOS Cast (for iOS Devices)
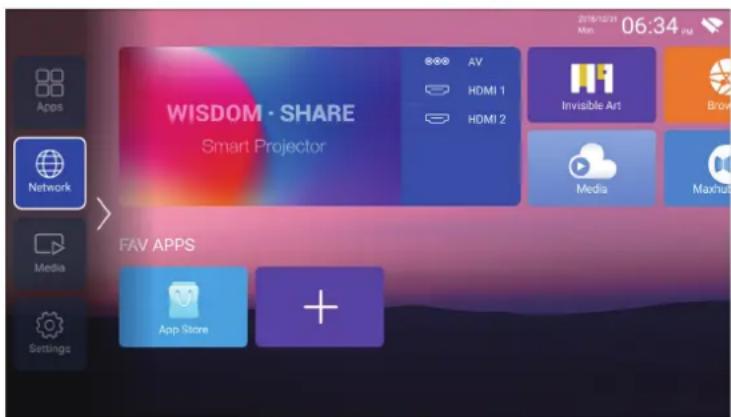
- Go to home page -- Press the left button - Select the [ Network ] menu - Select [ Wireless Net Mode ] - Select your home Wi-Fi from the list - Connect the Yaber Ull projector to your home Wi-Fi
-
Select the [ Settings ] menu on your iOS device - Turn on the [ Wi-Fi ] function - Connect your iOS device to the same home network as the projector.
-
Open the [ Control Center ] on your iOS device - Select the [ Screen Mirroring ] function Select and connect the iOS Cast receiver named [TV-XXXX ] - your iOS device screen will be displayed on the projection screen after 3 seconds.
3.2 Maxhub Share (for Android Devices)
- Make sure Yaber Ull projector and your Android device are connected with the same Wi-Fi, operations refer to the [1] and [2] from iOS Cast (for iOS Device)
- Go to home - Select the [ Maxhub Share ] app - Press the OK button to enter the [ Maxhub Share ] app.

-
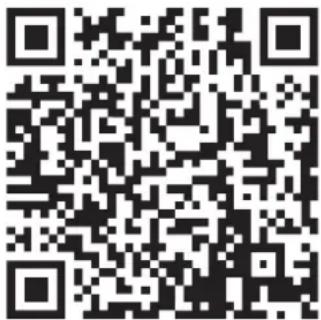
Scan the QR code and download the app on your Android device
-
Open [Maxhub Share] app on your Android device - Select TV named [TV-XXXX] -Your Android device screen will be displaced on the projection screen after 3 seconds.

Note:
-
Different brands of Android phones have different operations for select Screen Mirroring Display, please refer to your phones manual. [ Multiscreen/Wireless display/WLAN display/Screen mirroring/Wireless projection/Smart view etc. ]
-
Not all Android phones support this function. Please make sure it is supported before use.
4. Bluetooth Setting
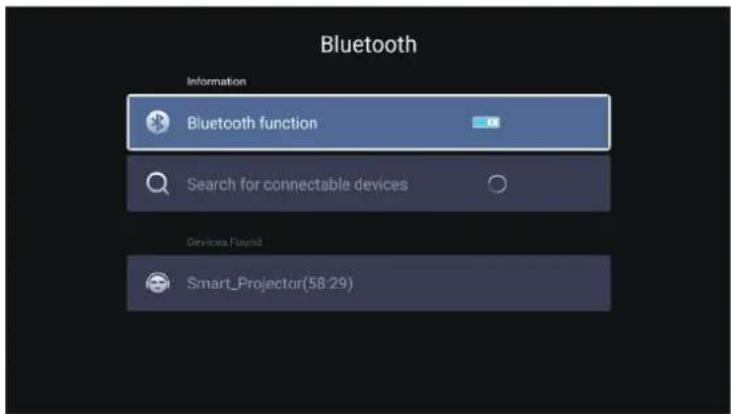
Go to home page -- Select the [ Setting ] menu -- Select the [ Bluetooth ] Option -- Open the Bluetooth function and your Bluetooth device -- Scan the Bluetooth devices nearby automatically -- Choose the Bluetooth device desired -- it will be paired and connected automatically.
Note:
- The Yaber Ull projector is compatible with the Bluetooth headsets, Bluetooth speakers and Air Pods, but not the Bluetooth keyboards or Bluetooth phones.
- If you have any question, please feel free to contact us via aftersales@yaber.com.
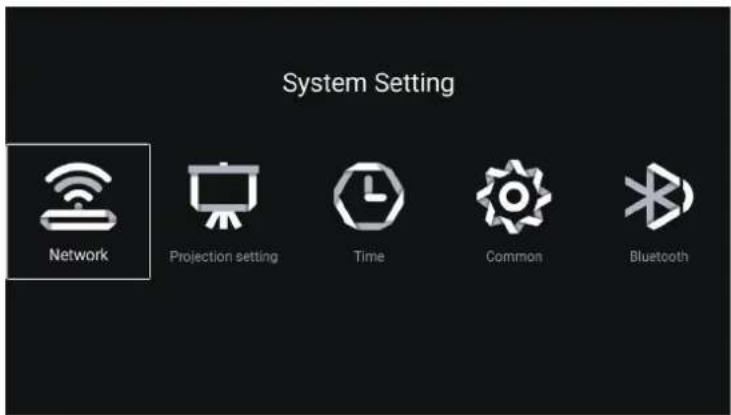
5. Projector System Setting
5.1 Projection Mode

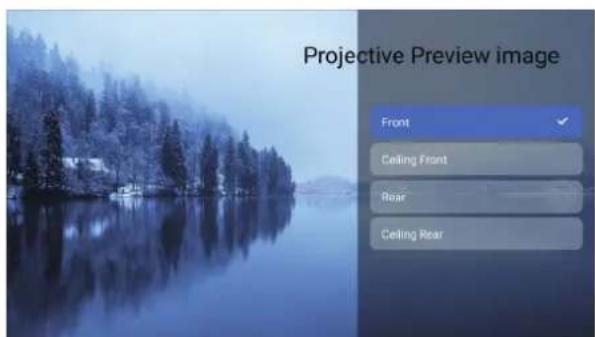
5.2 Focus

5.2.1 Automatic Focusing after boo
Turn on this button, when you start the projector, please wait patiently for 2-3 seconds, the projector will automatically focus after powering on.
5.2.2 Movement Auto focus
Turn on this button, the projector will automatically focus when changing the position.
Notice:
-
Use autofocus when your setting up your projector or when you need to quickly adjust the focus of your image.
-
Use manual focus mode when you need more precise control over the focus of your image. Long press the focus button "F+", "F-" until the image is clear.
5.3 Keystone Correction

5.3.1 Automatic Correction after boot
Turn on this button, when you start the projector, please wait patiently for 2-3 seconds, the projector will adjust keystone automatically.
5.3.1 Automatic Correction after boot
Turn on this button, when you start the projector, please wait patiently for 2-3 seconds, the projector will adjust keystone automatically.
5.3.2 Automatic Correction after displacement
Turn on this button, the projector will automatically keystone correction when changing the position.
Notice: If you are not satisfied with the automatically corrected image, the projection screen is not rectangular, you can adjust it by 4-point keystone correction.

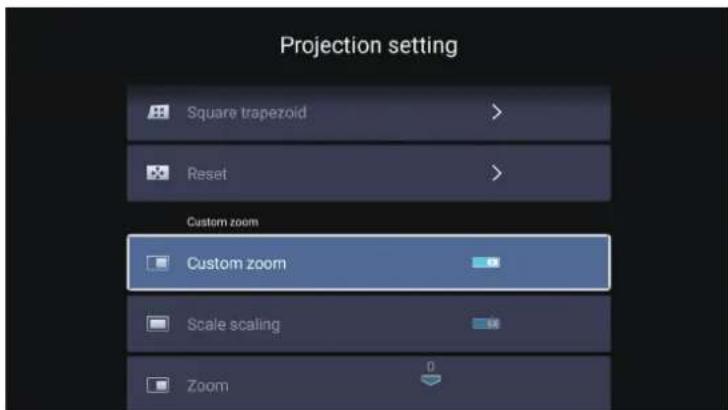
5.4 Zoom
* Select the [ Custom Zoom ] option, press the "OK" button on the remote controller to enter the submenu [ Scale scaling ], press the "OK" key to select this button to enter a three-level menu [ Zoom ], you can adjust the projection size by adjusting the parameters, zoom range is 50%–100%.
6. System Update
Go to home page -- Select the [ Setting ] menu -- Select the [ System Info ] Option -- Select the [ System Upgrade ]
Notice: If the software currently is the latest, you do not need to upgrade the software. During the upgrade process, if you have any question, please feel free to contact us via aftersales@yaber.com.

7. Common
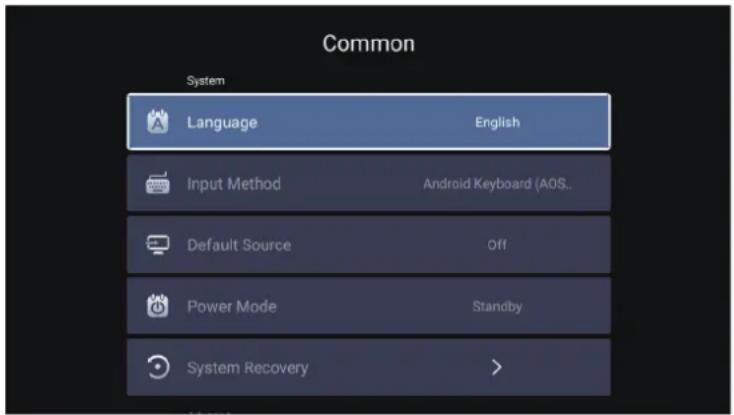
| Menu Function | |
| Language | Set up system language |
| Input method Set current input method | |
| Wallpaper Change wallpaper | |
| Default source Set up default source: AV, HDMI1, HDMI2 | |
| Power mode Set power mode: standby, on, last | |
| System Recovery Recover the system and all data | |
| The device name Change projector name | |
Signal Lines Connection
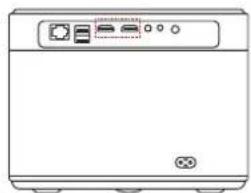
Yaber U11 projector has 7 interfaces, HDMI port*2/ USB port*2/ 3.5mm headphone output*1/ Network port*1/ AV port*1, please select the correct port to connect your device (PC, DVD Player, Fire TV stick, TV box, Sound bar, USB disk, PS4 etc.)

1. Connect the Devices via the HDMI ports
- Connect your Fire TV stick ( or PC, TV box, PS4 etc.) to the HDMI port of the projector;
- Enter the home page to select the corresponding HDMI as the signal source.
2. Connect to the DVD Player
- Turn on your DVD player and the projector.
- Connect to the DVD Player and the projector with the HDMI cable.
3.Enter the home page to select the corresponding HDMI as the signal source.
Note: When the projector is connected to the DVD player via the HDMI cable, if there is no sound, it may be that the output signal of the HDMI port of the DVD player is not compatible with HDCP, please try to connect your Sound bar/Speaker.
natural_image
Front view of a kitchen appliance with control panel and buttons (no text or symbols visible)
flowchart
graph LR
    A["HDMI"] <--> B["Switch"]
    B --> C["Switch"]
    C --> D["HDMI"]
    D --> E["Monitor"]
3. Connect to the Sound bar/Speaker
If your speaker has AUX port, please use your 3.5mm audio cable connect the projector and your speaker as the picture shows.

natural_image
Front view of a kitchen appliance with control panel and buttons (no text or symbols)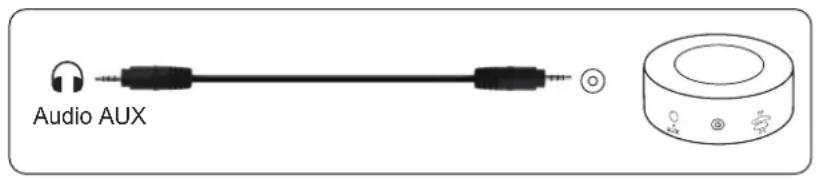
4. Connect to the Computer
- Connect to the computer and U11 projector with the HDMI cable (Included).
- Select the HDMI source to project any files on your computer;
- On your laptop, hold down the key "Win+P" board keys to change your display mode.

Computer only: it is the default option – only displays on the main monitor.
Duplicate: makes all of the monitors display the same thing duplicating the desktop on each monitor.
Extend: makes all of your monitors act like one big monitor extending the desktop across all of them.
Projector only: Displays only on the secondary monitor like a projector.
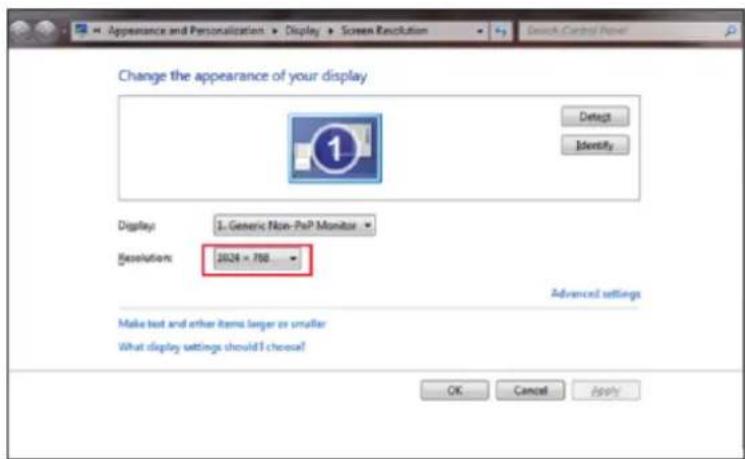
You can change the screen resolution on the Projector Only Mode
Step: Start > Control Panel > Appearance and Personalization > Adjust Screen Resolution
Warranty
Thank you so much for your purchase and support. We provide 3-year warranty for U11 projector. If you have any questions, please feel free to contact us via aftersales@yaber.com
FCC STATEMENT :
This device complies with Part 15 of the FCC Rules. Operation is subject to the following two conditions:
This device may not cause harmful interference, and
This device must accept any interference received, including interference that may cause undesired operation.
Warning: Changes or modifications not expressly approved by the party responsible for compliance could void the user's authority to operate the equipment.
NOTE: This equipment has been tested and found to comply with the limits for a Class B digital device, pursuant to Part 15 of the FCC Rules. These limits are designed to provide reasonable protection against harmful interference in a residential installation. This equipment generates uses and can radiate radio frequency energy and, if not installed and used in accordance with the instructions, may cause harmful interference to radio communications. However, there is no guarantee that interference will not occur in a particular installation. If this equipment does cause harmful interference to radio or television reception, which can be determined by turning the equipment off and on, the user is encouraged to try to correct the interference by one or more of the following measures:
Reorient or relocate the receiving antenna.
Increase the separation between the equipment and receiver.
Connect the equipment into an outlet on a circuit different from that to which the receiver is connected.
Consult the dealer or an experienced radio/TV technician for help.
FCC Radiation Exposure Statement:
This equipment complies with FCC radiation exposure limits set forth for an uncontrolled environment. This equipment should be installed and operated with minimum distance 20cm between the radiator & your body.
This device contains license-exempt transmitter(s)/receiver(s) that comply with Innovation, Science and Economic Development Canadas license-exempt RSS(s). Operation is subject to the following two conditions:
(1) This device may not cause interference.
(2) This device must accept any interference, including interference that may cause undesired operation of the device.
This equipment complies with IC exposure limits set forth for an uncontrolled environment. This equipment shall be installed and operated with minimum distance 20cm between the radiator & body.
Correct Disposal of this product

This marking indicates that this product should not be disposed with other household wastes throughout the EU. To prevent possible harm to the environment or human health from uncontrolled waste disposal, recycle it responsibly to promote the sustainable reuse of material resources. To return your used device, please use the return and collection systems or contact the retailer where the product was purchased. They can take this product for environmentally safe recycling.
Declaration of Conformity
We (EU based importer is responsible for this declaration)
Prolinx GmbH
(Company name)
Brehmstr.56, 40239 Duesseldorf, Germany
(Company address)
declare under our sole responsibility that the product
Trade name: Yaber
Equipment: Entertainment Projector
Model No.: U11
to which this declaration relates is in conformity with the essential requirement set out in the Council Directive on the Approximation of the laws of the Member States relating to RED Directive(2014/53/EU) & RoHS(2011/65/EU) product is responsible to affix CE marking, the following standards were applied:
EN 62368-1:2014+A11:2017
EN IEC 62311:2020
ETSI EN 301 489-1 V2.2.3(2019-11)
ETSI EN 301 489-17 V3.2.4(2020-09)
ETSI EN 301 489-3 V2.1.1(2019-03)
EN 55032:2015+A11:2020
EN 55035:2017 +A11:2020
EN IEC 61000-3-2:2019
EN 61000-3-3:2013+A1:2019
ETSI EN 300 328 V2.2.2(2019-07)
ETSI EN 301 893 V2.1.1(2017-05)
Position: Approbation Manager
Signature: Georgewang
Place/Date: Shenzhen, China/Mar.22-2022
Scan and download the PDF user manual
Where to Get More Help
Support@yabertech.com aftersales@yaber.com www.yaberglobal.com
@Yaber Entertainment Projector @Yaber Entertainment Projector

- CONTENS
- YABER Lifetime Professional Support 1
- Tips 1
- Package List - - - - - - - - - - - - - - - - - - - - - - - - - - - - - - - - - - - - - 2
- Projector Specifications - - - - - - - - - - - - - - - - - - - - - - - - - - - - - - 3
- Projector Overview----3
- Remote Contol 5
- Installation - - - - - - - - - - - - - - - - - - - - - - - - - - - - - - - - - - 6
- Setting Up The Projector 9
- Signal Lines Connection 19
- Warranty 21
- Yaber Lifetime Professional Support
- Tips
- Package List
- Projector Specifications
- Projector Overview
- Remote Control
- Note:
- Installation
- Installation Method
- Projection Distance and Size
- Install on the Ceiling
- Use The Projector
- Turn on/off the projector
- Focus Adjustment
- Keystone Correction Adjustment
- Setting Up The Projector
- Select The Insert Signal Source
- USB Disk Input Mode
- Play Video/Audio/Image/Office in the USB Disk Input Mode
- How to convert USB disk format to FAT32 format?
- Play Interface
- Music Play Interface
- Picture Play Interface
- WiFi Setting
- iOS Cast (for iOS Devices)
- Maxhub Share (for Android Devices)
- Bluetooth Setting
- Projector System Setting
- Projection Mode
- Focus
- Automatic Focusing after boo
- Movement Auto focus
- Notice:
- Keystone Correction
- Automatic Correction after boot
- Automatic Correction after displacement
- Zoom
- System Update
- Common
- Signal Lines Connection
- Connect the Devices via the HDMI ports
- Connect to the DVD Player
- Connect to the Sound bar/Speaker
- Connect to the Computer
- Warranty
- FCC STATEMENT :
- FCC Radiation Exposure Statement:
- Correct Disposal of this product
- Declaration of Conformity
- Where to Get More Help
Brand : Yaber
Model : U11
Category : Video projector