
MSC 472 BTDAB - Hi-Fi GoGen - Free user manual and instructions
Find the device manual for free MSC 472 BTDAB GoGen in PDF.


| Product Type | Hi-Fi System with CD, DAB+, FM, Bluetooth, USB, AUX |
| Brand | GoGen |
| Model | MSC 472 BTDAB |
| Main Unit Dimensions (W x H x D) | 200 x 129 x 236.2 mm |
| Speaker Dimensions (W x H x D) | 129 x 200 x 212.5 mm |
| Total Weight | Approx. 4.2 kg |
| Power Supply | AC 100–240 V, 50/60 Hz |
| Power Consumption | 29 W (Standby < 1 W) |
| Radio Frequencies | FM 87.5–108 MHz; DAB+ 174.928–239.200 MHz |
| Presets | 30 each for DAB+ and FM |
| Bluetooth Version | 5.3 (Supports A2DP, AVRCP) |
| USB Support | FAT32, up to 32 GB, MP3/WMA |
| CD Playback | Audio CD, CD-R, CD-RW, MP3 CD |
| Speaker Impedance | 4 Ω |
| Power Output | 2 x 15 W RMS |
| Audio Input | 3.5 mm AUX IN |
| Alarm Functions | Dual alarm with snooze (5/10/15/30 min) |
| Sleep Timer | 15 min to 2 hours |
| Equalizer Presets | Selectable via EQ button |
| Operating Temperature | +5°C to +35°C |
| Cleaning Instructions | Disconnect power; clean with dry soft cloth; avoid solvents |
| Safety Class | Class 1 Laser Product (invisible laser radiation when open) |
| User Serviceable Parts | None; always contact qualified service for repairs |
Frequently Asked Questions - MSC 472 BTDAB GoGen
User questions about MSC 472 BTDAB GoGen
0 question about this device. Answer the ones you know or ask your own.
Ask a new question about this device
Download the instructions for your Hi-Fi in PDF format for free! Find your manual MSC 472 BTDAB - GoGen and take your electronic device back in hand. On this page are published all the documents necessary for the use of your device. MSC 472 BTDAB by GoGen.
USER MANUAL MSC 472 BTDAB GoGen
natural_image
Front view of a GoGEN audio recording device with two speakers and control knobs (no visible text or symbols on the device body)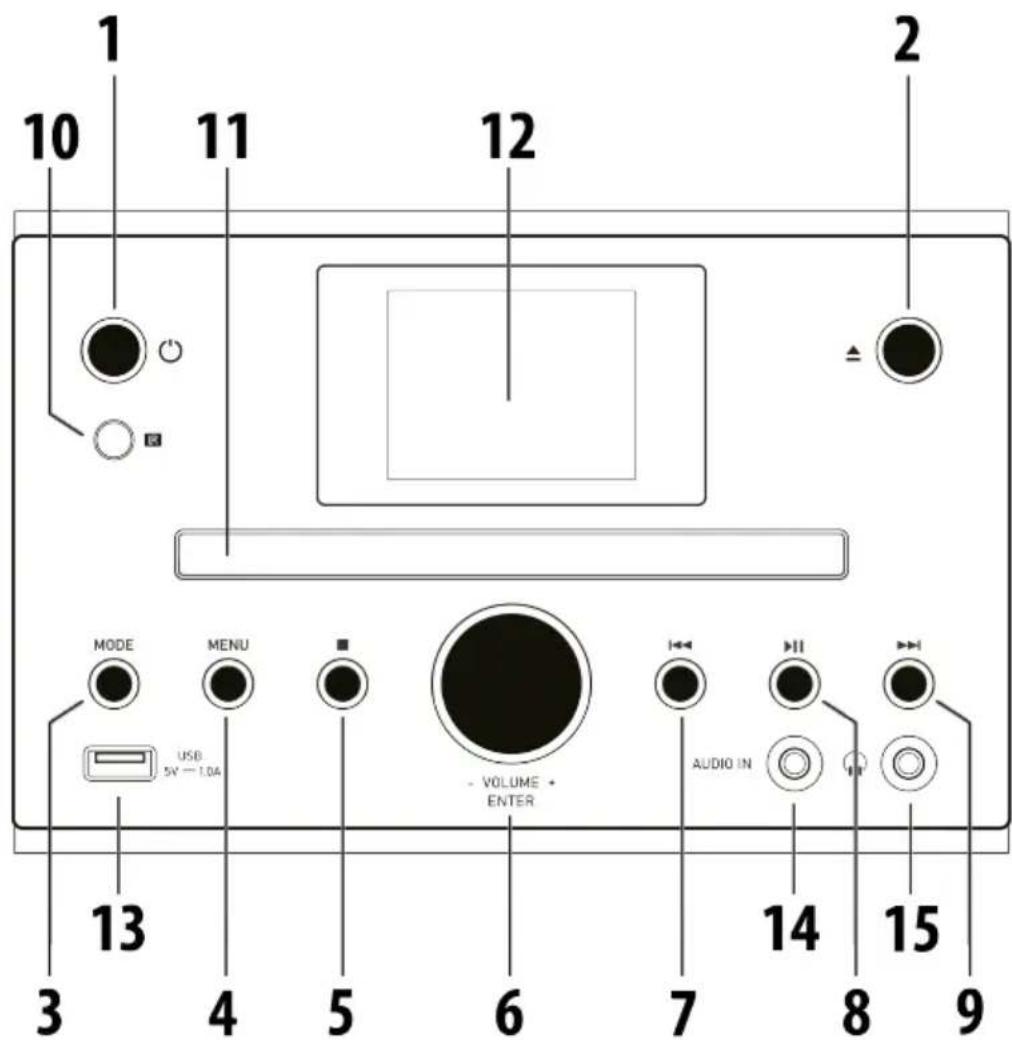
ÚVOD
PŘÍPRAVA A POUŽÍVÁNÍ DÁLKOVÉHO OVLADAČE
Instalace baterií
PRÍPRAVA A POUŽÍVANIE DIALKOVÉHO OVLÁDAČA
Inštalácia batérii
- Thank you for buying our product.
- Please read through these operating instructions, so you will know how to operate your equipment properly. After you finished reading the instructions manual, put it away in a safe place for future reference.
DANGER
Invisible laser radiation when open and interlock failed or defeated. Avoid direct exposure to beam.
This Product is classified as a Class 1 LASER PRODUCT.
THE CLASS 1 LASER PRODUCT label is located on the rear exterior.
SAFETY
General
- Do not drop the device and do not expose it to liquid, moisture or humidity. These might lead to damage to the device.
- If the device is moved from a cold environment into a warmer one, do let it adapt to the new temperature before operate the device. Otherwise, it might lead to condensation and cause malfunctions in the device.
- Do not use the device in the dust environment as dust can damage the interior electronic components and lead to malfunctions in the device.
- Protect the device from strong vibrations and place it on stable surfaces.
- Do not attempt to disassembly the device.
- If the device is not using for a long period of time, disconnect it from the power supply by unplugging the power plug. This is to avoid the risk of fire.
- The ventilation should not be impeded by covering the ventilation openings with items, such as newspapers, table-cloths, curtains, etc.
- No naked flame sources, such as lighted candles, should be placed on the apparatus.
Battery handling and usage
- Only adults should handle battery. Do not allow a child to use this apparatus unless the battery cover is securely attached.
- Remove batteries if exhausted or if they will not be used again for a long period. The incorrect use of batteries can cause electrolyte leakage and will corrode the compartment or cause the batteries to burst, therefore:
-Do not mix battery types, e.g. alkaline with zinc carbonate.
- When inserting new batteries, replace all batteries at the same time.
- Batteries contain chemical substances, so they should be disposed of properly.
Risks associated with high volumes
Connect headphones with volume set low and increase it if required. Prolonged listening through some headphones at high volume settings can result in hearing damage. To prevent possible hearing damage, do not listen at high volume levels for long periods.
PLACEMENT
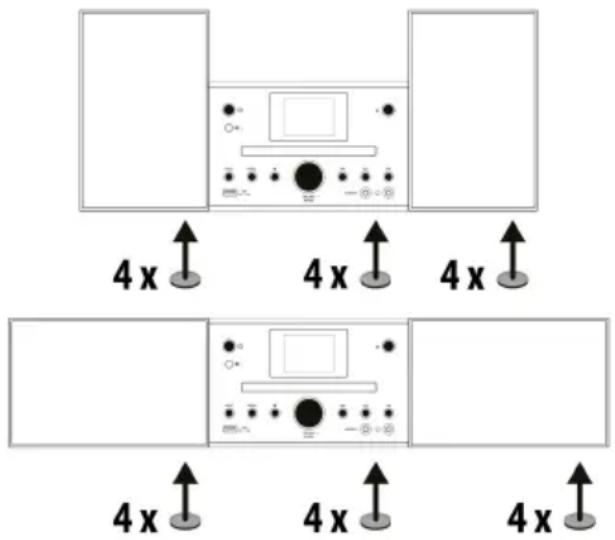
Speakers can be placed horizontally or vertically.
Attaching the non-skid pads
Apply the accessory non-skid pads to the bottom surfaces of the main unit.
Attach non-slip accessory pads to the bottom surfaces of the speakers depending on the placement of the speakers you choose.
PREPARING THE REMOTE CONTROL
To install the batteries
Lift off the battery compartment cover from the rear of the remote control. Insert 2 x 1,5V AAA size batteries in accordance with the diagram in the battery compartment. Take care to observe the correct polarity.
Remote control operation
To operate the unit with the remote control, point the remote handset at the remote sensor on the front panel and press the appropriate button on the remote handset. The remote works best within a range of 4 meters from the front panel and on an angle of 60 degrees. Bright sunlight or room light conditions can interfere with the remote control. If the remote operation is unsatisfactory or stops working entirely, first try replacing the remote batteries, then try reducing the room lighting conditions.
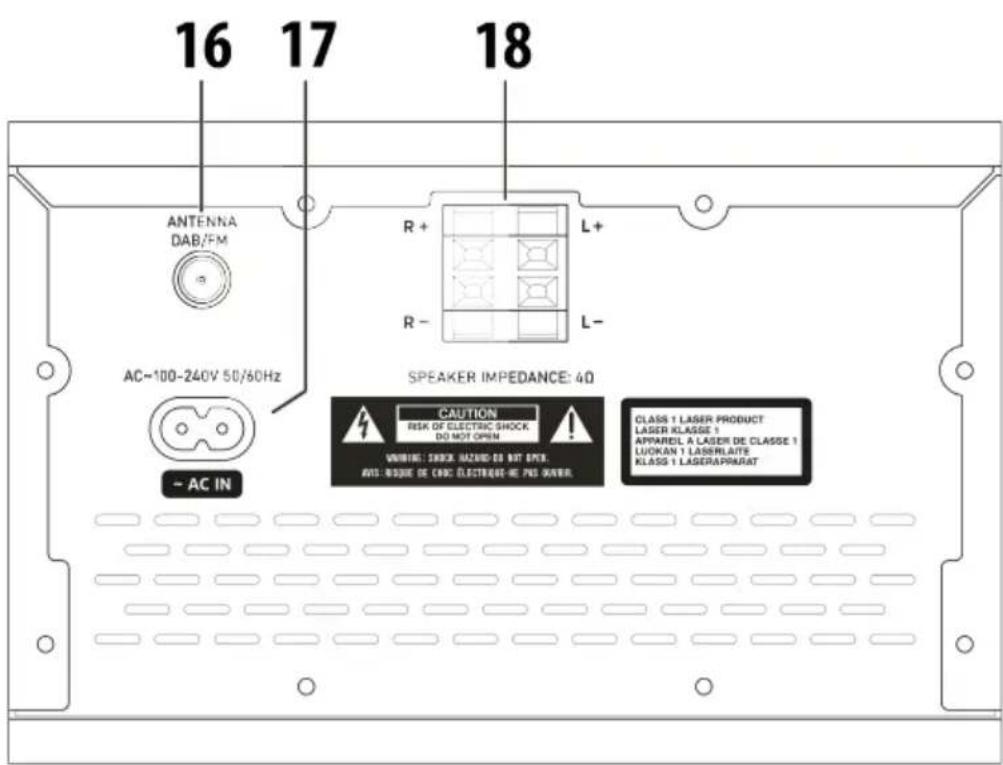
PRODUCT OVERVIEW AND CONTROL BUTTONS
- button
- button
- MODE button
- MENU button
- button
- VOLUME/ENTER knob
- button
- button
- button
- Remote Control Sensor
- Disk tray
- Display
- USB port
- AUDIO IN socket
- Headphone output
- DAB/FM antenna socket
- Mains Cable socket
- Speaker output
REMOTE CONTROL BUTTONS
| ▲ | Open / Close disc tray |
| ◎ | Power On/OffAlarm Off |
| ▶II | BT/USB/CD: Start/Pause playback |
| ■ | BT/USB/CD: Stop playback |
| |◀/▶| | BT/USB/CD: Press to skip to the previous/next track |
| ↔ | USB/CD: Repeat playback |
| × | USB/CD: Random playback |
| SLEEP | Sleep timer |
| TIMER | Alarm1/Alarm2 setting |
| P.BASS | X-Bass |
| BACK | Step back |
| SCAN | DAB/FM: Press to start a full scan |
| EQ | Select equalizer preset |
| MODE | Mode selection |
| MENU | Open the menu |
| VOL+/- | Increase/Decrease volume |
| ^/∨ | Move up/downDAB/FM: Press to skip to the previous/next preset station |
| < / > | DAB: Press to view the Station listFM: Press repeatedly to set desired station/frequencyPress and hold to search for the previous/next station |
| ENTER | Confirm entryDAB : Press to view the picture or information in the full-screen size |
| 0~9 | Press to select a preset 1-9 directly |
| ✕ | Mute, unmute |
| MEMORY | DAB/FM: Press and hold to store a radio station to the presetsPress to select a presetUSB/CD: Programmed playback |
GETTING STARTED
CONNECTION AND PREPARATION
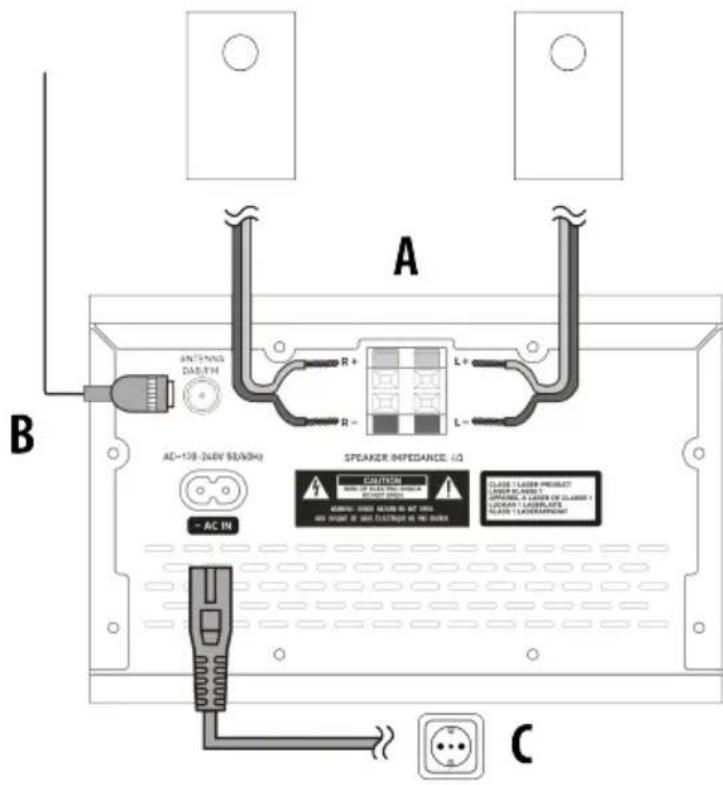
A - Speakers connection
- Push open the tabs and insert the exposed wire.
- The provided speaker wire with a red tube is for the (+) terminal. Connect the wire with the red tube the (+) terminal, and the other wire to the (−) terminal.
NOTE: Do not connect any speakers other than those supplied with this system. Both speakers can be used on either the right or the left side.
B - Antenna connection
Connect the wire antenna to the DAB/FM antenna socket. Extend the wire antenna fully and fix it to a wall or door frame for best results.
C - Mains Power
NOTE: Connecting the unit to any other power source may cause damage the unit.
Unwind the mains cable to its full length. Connect the mains cable to the socket on the back of the main unit and then to the mains socket. The unit is now connected and ready to use.
WARNING: Make sure the unit is not resting on top of the mains cable, as the weight of the unit may damage the mains cable and create a safety hazard. If the mains cable is damaged it must be replaced by the manufacturer, its service agent, or similarly qualified persons in order to avoid a hazard.
BASIC OPERATION
Powering ON/OFF
- Press to switch on the unit.
- Press again to switch the unit back to Standby mode.
- Disconnect the power cable from the main socket to switch the unit off completely.
NOTE: When the unit is idle for approximately 15 minutes, it automatically switches to Standby mode.
Mode selection
Press the MODE button repeatedly to switch between DAB, FM, AUX, BT (Bluetooth), USB, CD modes.
Language
NOTE: The default language is Czech. Available languages are Slovak, English, Polish, and Hungarian.
- In DAB or FM mode, press and hold MENU to enter the menu.
- Rotate the VOLUME knob to select
and then press the knob to confirm. - Rotate the VOLUME knob select the desired language and then press the knob to confirm the selection.
Volume
Rotate the VOLUME knob to adjust the volume.
NOTE: If you wish to turn the sound off, press ✗ on the remote control. Press ✗ again or press VOL +/- on the remote control or turn the VOLUME knob on the unit to resume normal listening.
Menu operation
- Press and hold MENU to enter the menu.
- Rotate the VOLUME knob or press / on the remote control to move through the items.
- Press the VOLUME knob or press ENTER on the remote control to confirm.
- Press the MENU or press BACK on the remote control to step back or exit the menu.
Manual clock setting
NOTE: The clock will update automatically if you can receive a DAB+ signal in your location. To synchronize to the current local time, ensure the unit is placed near the DAB+ signal for a short period.
- Press and hold MENU and select
- Select
in the sub-menu and set the time.
PRESETS
You can store up to 30 of your favorite DAB or FM stations to the memory. This will enable you to access your favorite stations quickly and easily. To store a preset, you must first be listening to the station that you would like to save.
Storing to Presets 1 \~ 30
- Press and hold MEMORY, the display will show
. - Press / to select your desired preset station number, then press ENTER to confirm.
- The station will be stored in few seconds and the display will show
.
Recalling Presets 1 \~ 9
- Press the number button 1 \~ 9 to select the station you want to listen to.
Recalling Presets 1 \~ 30
- Press MEMORY, the display will show
. - Press / to select your desired preset station number, then press ENTER to confirm.
NOTE: When listening to a preset station, the ★ icon shows its number at the bottom of the display.
DAB OPERATION
If the unit is connected to the mains power and then switched on for the first time, the unit will automatically enter into the DAB mode and perform auto scan function. During the scan the display will show
Station list
- Press ◀ view the Station list.
- To select the stations press ↗, then press ENTER to confirm.
Full Scan
The Full Scan will search for the DAB+ stations.
• To activate Full Scan, press SCAN.
- Once a full scan is complete, the radio returns to play the first station on the station list.
Manual tuning
This can help you align your antenna or add stations that are missing after a full scan.
- Press and hold MENU and select
in the main menu. - Press ↑ to cycle through the DAB channels, which are numbered from 5A to 13F.
- After your desired channel number is selected, press ENTER to confirm. The display will show the signal strength.
NOTE: You will not see any new radio stations or hear anything during manual tuning.
DAB Display (Info.)
To view further information about the station you are listening to press MENU.
Press ENTER to view the picture or information in the full-screen size.
DRC (dynamic range compression)
If you are listening to music with a high dynamic range in a noisy environment, you may wish to compress the audio dynamic range. This makes quiet sounds louder, and loud sounds quieter.
- Press and hold MENU and select
in the main menu. - Select
, or , then press ENTER to confirm.
Prune Invalid
You may remove all unavailable stations from the list.
- Press and hold MENU and select
in the main menu. - Select
or , then press ENTER to confirm.
FM OPERATION
Full Scan
The Full Scan will search for the FM stations.
• To activate Full Scan, press SCAN.
- When the full scan is complete, all found stations are saved to presets.
- Press ↗ to skip to the previous/next preset station.
NOTE: The search may not stop at a station with a very weak signal.
Manual Scan
- To search for FM stations manually, press < / > repeatedly until your desired frequency is reached.
NOTE: Each press will increase/decrease the frequency by 0,05 MHz. If reception is poor, adjust the position of the aerial or try moving the radio to another location.
FM Display (Info.)
To view further information about the station you are listening to press MENU.
Audio setting
This unit will automatically switch between stereo and mono mode, but you can override this and toggle this function manually. This can be helpful when receiving poor signal reception.
- Press and hold MENU and select
- Select
or , then press ENTER to confirm.
Scan Setting
This is a scan setting to search all stations, or just search stations with a strong signal.
- Press and hold MENU and select
in the main menu. - Select
or , then press ENTER to confirm.
CD / CD-MP3
NOTE: The unit can play digital audio CD / CD-MP3 discs: finalized digital audio CD-Recordable (CD-R) discs, finalized digital audio CD-Rewritable (CD-RW) discs, and CD-DA format digital audio discs.
- In CD mode, press ▲ to open the disc tray.
- Place the CD with the label side up into the CD compartment, and then press ▲ to close the disc tray. The display shows the total number of folders*/tracks.
NOTE: If there is no disc or the disc can't be read,
- The playback starts automatically. If not press ▶!
- To view the ID3 info, press MENU on the remote control.
Playback
- Press ▶to play/pause the playback.
- Press to skip to the previous/next track.
- Press and hold to fast forward/rewind.
- Press ↗ to select a folder.
- Press ■ to stop the playback.
Playback modes
- Repeat playback: Press 📊 on the remote control repeatedly to select one of the modes: Repeat one 📊 The current track will be played repeatedly / Repeat all - 📊 tracks will be played repeatedly / Repeat folder 📊 The current folder will be played repeatedly.
- Random playback: Press ✗ on the remote control to play all tracks in random order.
Programmed playback
Up to 20 CD tracks or 99 MP3 tracks can be stored in the memory in any order. Programming is possible in STOP mode only.
- Press MEMORY to enter programming mode.
(Position 1) and (Track 1) will show on the display.
• To add a track to the list, follow these steps:
-Press/ to select a track
(To skip to the first track in the next/previous folder* press ↗).
- Press MEMORY to confirm.
-Repeat the previous steps to add more tracks.
- Once it is completed, press ▶to start the playback of the programmed tracks.
- Press ■ twice to cancel the programmed playback.
* These options are available only for CD-MP3 discs that contain more than one folder.
COMPACT DISC MAINTENANCE
Always use a compact disc bearing the mark as shown.
Notes on handling discs
Removing the disc from its storage case and loading it. Do not touch the reflective recorded surface. Do not stick paper or write anything on the surface. Do not bend the disc.

Storage
Store the disc in its case. DO not expose discs to direct sunlight or high temperatures, high humidity or dusty places.
Cleaning a disc
Should the disc become soiled, wipe off dust, dirt and fingerprints with a soft cloth. The disc should be cleaned from the center to the edge. Never use benzene, thinners, record cleaner fluid or anti-static spray. Be sure to close the CD door, so the lens is not contaminated by dust. Do not touch the lens.
USB
NOTE: The unit supports USB drives (FAT32) with up to 32 GB of memory. Only support MP3, WMA audio formats. Do not use any USB extension cable for connecting the USB drive. The unit may not be compatible with all USB drives, this is not an indication of a problem with the unit.
- In USB mode, insert a USB drive into the USB port. The display shows the total number of folders/tracks.
- The playback starts automatically. If not press ▶!
- To view the ID3 info, press MENU on the remote control.
Playback / Playback modes / Programmed playback
All playback features are the same as CD / CD-MP3, see section above.
AUDIO IN
This unit provides AUDIO IN socket, through this 3,5 mm jack external audio sources can be connected to this unit and be amplified.
- In AUX mode, connect your device with a cable (not included) to the AUDIO IN socket.
- Adjust the volume to your desired level.
NOTE: When using an external device, all playback features can only be controlled by the external device.
BLUETOOTH
- In Bluetooth mode,
will flash on the display. This means the unit is not paired with any Bluetooth device. - Activate Bluetooth of mobile phone and search for device name MSC 472 BTDAB then connect it. If the pairing is successful, the display will show
.
Disconnecting the paired mobile phone
- Long press ■ to disconnect the current device. The unit will be in pairing mode,
Playback
- Adjust the volume to your desired level.
- Press ▶to play/pause the playback.
- Press to skip to the previous/next track.
NOTE: The operational range between the unit and the device is approximately 8 meters. If the signal strength is weak, your Bluetooth receiver may disconnect, but it will re-enter pairing mode automatically. For better signal reception, remove any obstacles between the unit and the Bluetooth device. Compatibility with all devices and media types is not guaranteed. Some mobile phones with Bluetooth functions may connect and disconnect as you make and end calls. This is not an indication of a problem with the unit.
ALARM
There are two wake-up alarms with a snooze function. Each alarm can be set separately.
- Press TIMER on the remote control or select
in the main menu. - Set Alarm 1 and/or Alarm 2.
NOTE: When the alarm is set, the and/or icon shows at the bottom of the display.
- To cancel the sounding alarm press
- To snooze the alarm press ENTER.
NOTE: You can set the snooze time (5, 10, 15, 30 min.). To adjust rotate the VOLUME knob or press ▲/▼ on the remote control. The unit will return to standby mode for the set time.
SLEEP TIMER
- Press SLEEP on the remote control or select
in the main menu. - Set the desired time from 15 min to 2 hours.
NOTE: When the sleep time is set, the icon with the remaining time shows at the bottom of the display.
SYSTEM SETTINGS
BACKLIGHT
Select
Set the desired time
LANGUAGE
Select
TIME/DATE
Select
Select
Select
EQ
Select
FACTORY RESET
Select
NOTE: After the system reset, all the tuned stations, and FM/DAB preset stations will be erased.
SYSTEM VERSION
Select
SPECIFICATIONS
GENERAL
Power Supply AC 100 \~ 240 V; 50/60 Hz
Power consumption 29 W
Standby Power consumption < 1 W
Total weight Approx. 4,2 kg
Dimensions - Main unit 200 x 129 x 236,2 mm
Dimensions - Speaker 129 x 200 x 212,5 mm
Operation temperature +5°C \~ +35°C
RADIO SECTION
FM Frequency Range 87,5 – 108 MHz
DAB+ Frequency Range 174,928 – 239,200 MHz
Presets DAB+ 30 / FM 30
CD SECTION
Frequency Response 20 Hz – 20 kHz
BLUETOOTH SECTION
Bluetooth V 5.3 - Supports A2DP, AVRCP profiles
BT Frequency Range 2402 – 2480 MHz
EIRP 2,31 mW
AUDIO SECTION
Power output 2 x 15 Watts RMS
WE RESERVE THE RIGHT TO CHANGE TECHNICAL SPECIFICATIONS.
PACKAGE CONTENTS
Main Unit, 2 x Speakers, User manual, Remote control, DAB/FM antenna, 12 x Non-skid pads, Power cord, 2 x 1,5V AAA size batteries
MAINTENANCE / CLEANING
- Ensure the unit is fully unplugged from the mains socket before cleaning.
- Never use any harsh or strong solvents to clean the device since these may damage the surface of the device. Dry, soft cloth is appropriate, however, if the device is extremely dirty, it may be wiped off with a slightly moist cloth. Make sure the device is dried off after cleaning.
When you are necessary to ship the device, store it in its original package. Save the package for this purpose.

WARNING: DO NOT USE THIS PRODUCT NEAR WATER, IN WET AREAS TO AVOID FIRE OR INJURY OF ELECTRIC CURRENT. ALWAYS TURN OFF THE PRODUCT WHEN YOU DON'T USE IT OR BEFORE A REVISION. THERE AREN'T ANY PARTS IN THIS APPLIANCE WHICH ARE REPARABLE BY CONSUMER. ALWAYS APPEAL TO A QUALIFIED AUTHORIZED SERVICE. THE PRODUCT IS UNDER A DANGEROUS REPARABLE BY CONSUMER. ALWAYS APPEAL TO A QUALIFIED AUTHORIZED SERVICE. THE PRODUCT IS UNDER A DANGEROUS TENSION.


TO AVOID DANGER OF SUFFOCATION, KEEP THE PLASTIC BAG AWAY FROM BABIES AND CHILDREN. DO NOT USE THIS BAG IN CRIBS, BEDS, CARRIAGES OR PLAYPENS. THIS BAG IS NOT A TOY.
Disposal of old Electrical & Electronic Equipment
(Applicable in the European Union and other European countries with separate collection systems)
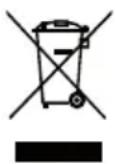
This symbol on the product or on its packaging indicates that this product shall not be treated as household waste. Instead it shall be handed over to the applicable collection point for the recycling of electrical and electronic equipment. By ensuring this product is disposed of correctly, you will help prevent potential negative consequences for the environment and human health, which could otherwise be caused by inappropriate waste handling of this product. The recycling of materials will help to conserve natural resources. For more detailed information about recycling of this product, please contact your local Civic Office, your household waste disposal service or the shop where you purchased the product.

Bluetooth®
The Bluetooth® word mark and logos are registered trademarks owned by Bluetooth SIG, Inc. and any use of such marks by JENMART INDUSTRIAL (HK) CO., LIMITED is under license. Other trademarks and trade names are those of their respective owners.
Hereby, ETA a.s. declares that the radio equipment type MSC472BTDAB is in compliance with Directive 2014/53/EU. The full text of the EU declaration of conformity is available at the following internet address: www.GoGEN.cz/declaration_of_conformity
WPROWADZENIE
PRZYGOTOWANIE PILOTA
Instalacja baterii
STACJE ZAPISANE W PAMIĘCI
Frequency Response 20 Hz – 20 kHz
BLUETOOTH SZEKCIÓ
Bluetooth V 5.3 - A2DP, AVRCP profilok támogatva
BT frekvencia tartomány 2402 – 2480 MHz
EIRP 2,31 mW
AUDIO SZEKCIÓ
natural_image
Abstract black and white circular logo with stylized white 'S' shape (no text or symbols)
- ÚVOD
- PŘÍPRAVA A POUŽÍVÁNÍ DÁLKOVÉHO OVLADAČE
- Instalace baterií
- PRÍPRAVA A POUŽÍVANIE DIALKOVÉHO OVLÁDAČA
- Inštalácia batérii
- DANGER
- SAFETY
- General
- Battery handling and usage
- Risks associated with high volumes
- PLACEMENT
- Attaching the non-skid pads
- PREPARING THE REMOTE CONTROL
- To install the batteries
- Remote control operation
- PRODUCT OVERVIEW AND CONTROL BUTTONS
- GETTING STARTED
- CONNECTION AND PREPARATION
- A - Speakers connection
- B - Antenna connection
- C - Mains Power
- BASIC OPERATION
- Powering ON/OFF
- Mode selection
- Language
- Volume
- Menu operation
- Manual clock setting
- PRESETS
- Storing to Presets 1 \~ 30
- Recalling Presets 1 \~ 9
- Recalling Presets 1 \~ 30
- DAB OPERATION
- Station list
- Full Scan
- Manual tuning
- DAB Display (Info.)
- DRC (dynamic range compression)
- Prune Invalid
- FM OPERATION
- Manual Scan
- FM Display (Info.)
- Audio setting
- Scan Setting
- CD / CD-MP3
- Playback
- Playback modes
- Programmed playback
- COMPACT DISC MAINTENANCE
- Notes on handling discs
- Storage
- Cleaning a disc
- USB
- Playback / Playback modes / Programmed playback
- AUDIO IN
- BLUETOOTH
- Disconnecting the paired mobile phone
- ALARM
- SLEEP TIMER
- SYSTEM SETTINGS
- BACKLIGHT
- TIME/DATE
- EQ
- FACTORY RESET
- SYSTEM VERSION
- SPECIFICATIONS
- RADIO SECTION
- CD SECTION
- BLUETOOTH SECTION
- AUDIO SECTION
- WE RESERVE THE RIGHT TO CHANGE TECHNICAL SPECIFICATIONS.
- PACKAGE CONTENTS
- MAINTENANCE / CLEANING
- Disposal of old Electrical & Electronic Equipment
- (Applicable in the European Union and other European countries with separate collection systems)
- Bluetooth®
- WPROWADZENIE
- PRZYGOTOWANIE PILOTA
- Instalacja baterii
- STACJE ZAPISANE W PAMIĘCI
- BLUETOOTH SZEKCIÓ
- AUDIO SZEKCIÓ
Brand : GoGen
Model : MSC 472 BTDAB
Category : Hi-Fi