
GFACM20S - Coffee maker GORENJE - Free user manual and instructions
Find the device manual for free GFACM20S GORENJE in PDF.

| Product Type | Super Automatic Coffee Machine |
| Brand | Gorenje |
| Model | GFACM20S |
| Functions | Single Cup Espresso, Double Cup Espresso, Americano, Cappuccino, Latte, Hot Water, Manual Froth, Manual Clean, Bean Emptying |
| Coffee Bean Capacity | 200 g |
| Water Tank Capacity | 1.5 L |
| Milk Tank Capacity | 0.5 L |
| Adjustable Coffee Outlet Height | 85 - 115 mm |
| Number of Grind Settings | 15 (1 = finest, 15 = coarsest) |
| Power Consumption | 1450 W |
| Voltage / Frequency | 220-240 V / 50-60 Hz |
| Material | Plastic, Stainless Steel |
| Safety Features | Auto shut-off after 28 min inactivity, Thermal cut-out protection |
| Descaling Indicator | Yes |
| Auto Cleaning Cycle | Yes |
| Energy Saving Mode | Yes (sleep mode after 28 min) |
| Warranty | 2 years |
| Included Accessories | Cleaning brush |
| Removable Parts | Brewer, Water Tank, Milk Tank, Drip Tray, Drip Plate, Residue Collection Container |
| Milk Frother Type | Integrated steam wand |
Frequently Asked Questions - GFACM20S GORENJE
User questions about GFACM20S GORENJE
0 question about this device. Answer the ones you know or ask your own.
Ask a new question about this device
Download the instructions for your Coffee maker in PDF format for free! Find your manual GFACM20S - GORENJE and take your electronic device back in hand. On this page are published all the documents necessary for the use of your device. GFACM20S by GORENJE.
USER MANUAL GFACM20S GORENJE
COFFEE MACHINE
GFACM20S
NAVODILA ZA UPORABO SI....3
UPUTE ZA UPORABU HR 33
UPUTSTVO ZA UPOTREBU SRB 63
INSTRUCTION MANUAL EN....123
gorenje
Life Simplified
natural_image
Line drawing of a modern water dispenser with two containers and a handle (no text or symbols)KAVNI APARAT
GFACM20S
POMEMBNA VARNOSTNA NAVODILA
natural_image
Line drawing of a portable water heater with open lid, showing internal components and airflow direction (no text or symbols)1. Posoda za vodo:
natural_image
Diagram of a circular device with rotating components and directional arrows, no text or symbols presentnatural_image
Line drawings of two water heaters with directional arrows indicating movement (no text or symbols)
natural_image
Simple line drawing of a cylindrical device with a vertical double-headed arrow indicating height (no text or symbols)
natural_image
Technical line drawing of a mechanical assembly with an inset showing a detail (no text or symbols)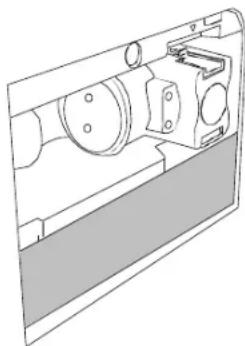
natural_image
Technical line drawing of a mechanical assembly with no visible text or symbols4. Penilnik mleka
natural_image
Line drawing of a microwave oven with a digital display unit and a separate sensor device (no text or symbols)
8. Odcejalna plošča
Priprava ene skodelice espressa
natural_image
Line drawing of a coffee maker with a cup and lid, no text or symbols present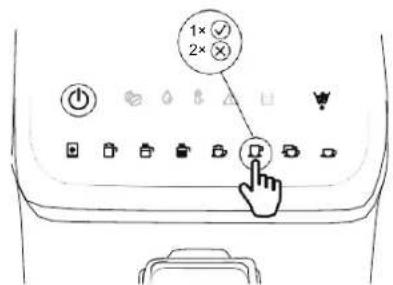
natural_image
Line drawing of a coffee maker with a teapot and cup, no text or symbols present

Priprava kapučina
Priprava bele kave
Priprava vroče vode
natural_image
Line drawing of a coffee maker with a cup and stand, showing a magnified view of the cup (no text or symbols)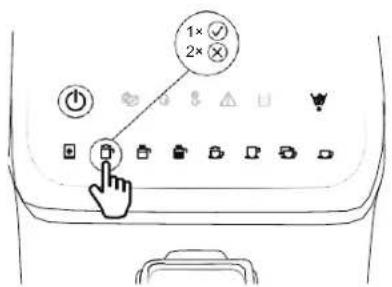
Ročno penjenje
Ročno čiščenje
natural_image
Simple line drawing of a light bulb with radiating lines, no text or symbols presentnatural_image
Line drawing of a hand cleaning a cloth with sparkles above (no text or symbols)natural_image
Line drawing of a modern water dispenser with a side-mounted sink and control panel (no text or symbols)APARAT ZA KAVU
GFACM20S
UPUTE ZA UPORABU
HR
VAŽNE SIGURNOSNE NAPOMENE
3. Gumb za podešavanje mljevenja
- Okrenite gumb za podešavanje mljevenja u smjeru suprotnom od kazaljke na satu u krajnji lijevi položaj.
- Podesite gumb za podešavanje mljevenja u skladu s navedenim položajem.
- Odaberite postavku mljevenja okretanjem gumba u smjeru kazaljke na satu.
NAPOMENA: Kada se prvi put koristi novi aparat za kavu, predlažemo da odaberete postavku mljevenja višu od 8. Postavku mljevenja možete podesiti u rasponu od 1 (najsitnije) do 15 (najkrupnije). Broj na gumbu za podešavanje mljevenja označen strelicom označava stvarno odabranu postavku mljevenja.
OPREZ!
Predlažemo da postavku mljevenja podešavate jedan po jedan zarez kako biste izbjegli oštećenja.
natural_image
Line drawings of two water heaters with directional arrows indicating movement (no text or symbols)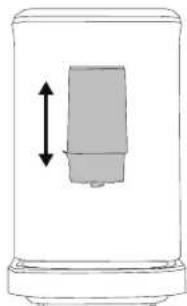
natural_image
Simple line drawing of a cylindrical container with a vertical double-headed arrow indicating width (no text or symbols)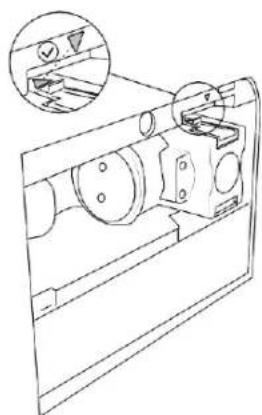
natural_image
Technical line drawing of a mechanical device with an inset showing a close-up view of a component (no text or symbols present)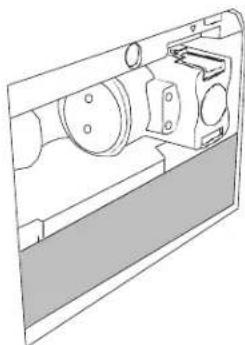
natural_image
Technical line drawing of a mechanical assembly with no visible text or symbolsnatural_image
Line drawing of a portable electric oven with a door handle and control panel, showing internal compartments and a separate outlet (no text or symbols)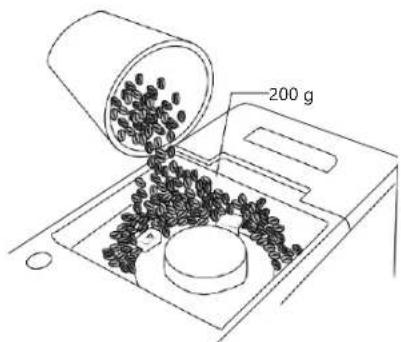
8. Pločica za prikupljanjetekućine
natural_image
Line drawing of a three-tier refrigerator front panel with control buttons and icons (no text or symbols)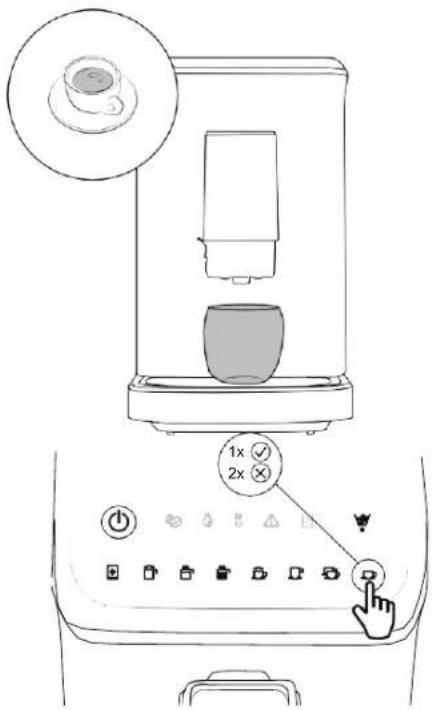
Priprema jedne šalice Espressa
- Stavite šalicu ispod izlaznog otvora za kavu.
- Provjerite je li čep pjenilice za mlijeko dobro zatvoren.
- Pritisnite tipku "Jedna šalica Espressa "☐" i držite je najmanje 0,2 sekunde. Uređaj će početi pripremati jednu šalicu espressa. Indikator Jedne šalice espressa "☐" stalno će svijetliti tijekom procesa pripreme.
- Kad je priprema jedne šalice espressa gotova, uređaj automatski prelazi u stanje pripravnosti.
- Pritisnite tipku Jedna šalica espressa "☐" i zadržite je najmanje 0,1 sekundu ako želite poništiti trenutnu funkciju.
Priprema dviju šalica espressa
Priprema kave Americano
natural_image
Line drawing of a coffee maker with a cup and a teacup, no text or symbols present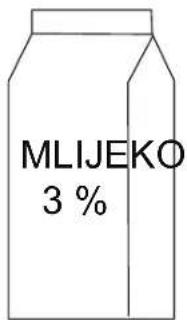
Priprema Cappuccina
Priprema Lattea
Priprema vruće vode
natural_image
Line drawing of a coffee maker with a cup and stand, showing a magnified view of the cup (no text or symbols)
Ručno čišćenje
- Stavite šalicu ispod izlaznog otvora za kavu.
- Pritisnite tipku Ručno čišćenje "☐" i držite je najmanje 0,2 sekunde. Uređaj će pokrenuti ciklus ručnog čišćenja.
- Nakon čišćenja, uređaj automatski prelazi u stanje pripravnosti.
- Pritisnite tipku Ručno čišćenje "☑" zadržite je najmanje 0,1 sekundu ako želite poništiti trenutnu funkciju.
Ispraznite preostala zrna kave
natural_image
Simple line drawing of a light bulb with radiating lines, no text or symbols presentSavjeti za kavu izvrsnog okusa
natural_image
Line drawing of a hand cleaning a cloth with sparkles above (no text or symbols)Uklanjanje mineralnih naslaga
-
Uređaj treba očistiti od kamenca kad istodobno trepere indikatori Vruća voda" " i Ručno čišćenie " +".
-
Napunite spremnik za vodu vodom i sredstvom za uklanjanje kamenca do MAKSIMALNE razine kako je naznačeno na spremniku za vodu (omjer vode i sredstva za uklanjanje kamenca je 4:1; za detalje pogledajte upute na sredstvu za uklanjanje kamenca; koristite "sredstvo za uklanjanje kamenca u kućanstvu"). Također možete koristiti limunsku kiselinu umjesto sredstva za uklanjanje kamenca (sto dijelova vode na tri dijela limunske kiseline).
-
Stavite spremnik (šalicu) na pločicu za prikupljanje tekućine
-
Istodobno pritisnite tipke Vruća voda 📋 i Ručno čišćenje " ✉ i zadržite ih 1 sekundu. Uređaj započinje proces uklanianja kamenca.
-
Cijeli proces uklanjanja kamenca traje oko 10 minuta. Osam (8) funkcionalnih indikatora treperi polako s lijeva na desno.
-
Nakon završetka uklanjanja kamenca, indikatori Vruća voda "☐" i Ručno čišćenje "☐" prestaju treperiti.
natural_image
Line drawing of a modern water dispenser with two containers and a handle (no text or symbols)APARAT ZA KAFU
GFACM20S
VAŽNE PREDOSTROŽNOSTI
- Poklopac posude za kafu u zrnu
- Dugme za podešavanje mlevenja
- Rezervoar za vodu
- Jedinica za kuvanje
- Posuda za sakupljanje ostataka
- Vrata
-
Unutrašnja posuda za sakupljanje tečnosti
-
Četkica za čišćenje
- Posuda za sakupljanje tečnosti
- Rešetka za kapanje
- Poklopac izlaznog otvora za kafu
- Penilica za mleko
- Rezervoar za mleko
- Izlazni otvor za kafu
- Kontrolna ploča
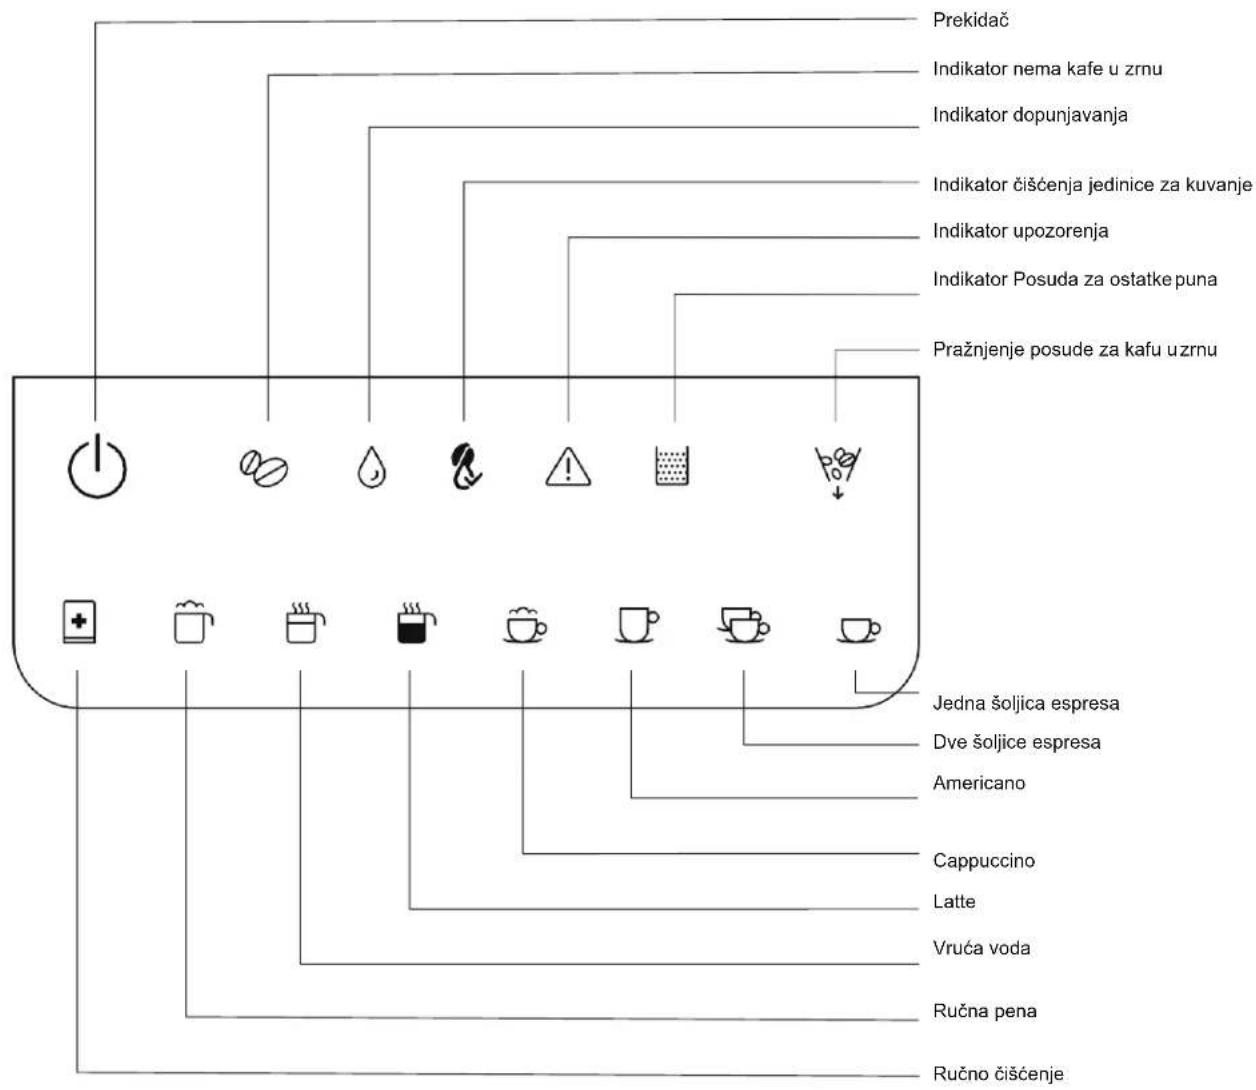
KONTROLNA PLOČA
PRE PRVE UPOTREBE
Proverite da li je sav pribor kompletan i da li je uređaj oštećen. Proverite i proučite sve delove i njihove funkcije. Preporučujemo da sačuvate originalnu ambalažu za buduću upotrebu. Zatim sledite uputstva u nastavku.
Pre prve upotrebe, uklonite rezervoar za vodu, rezervoar za mleko, posudu za zrno i penilicu za mleko i isperite ih čistom vodom.
Proverite i uverite se da su svi uklonjivi delovi pravilno i čvrsto postavljeni:
natural_image
Line drawing of a kitchen appliance with a lid, drawer, and water dispenser (no text or symbols)natural_image
Two line drawings of a water heater device, one showing internal components and the other showing a water leveler with a handle (no text or symbols)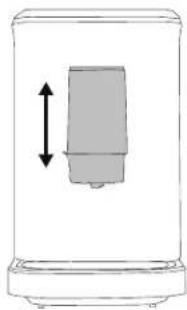
natural_image
Simple line drawing of a cylindrical container with a vertical double-headed arrow indicating width (no text or symbols)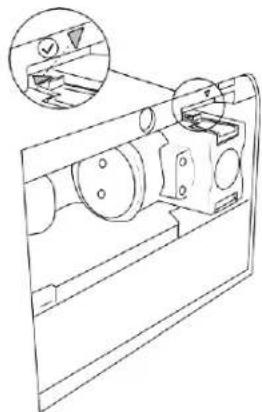
natural_image
Technical line drawing of a mechanical assembly with an inset showing a close-up view of a component (no text or symbols present)
natural_image
Technical line drawing of a mechanical assembly with no visible text or symbols4. Penilica za mleko
- Otvorite poklopac izlaznog otvora za kafu i uverite se da je penilica za mleko čvrsto postavljena.
- Ako je penilica za mleko pravilno postavljena, zatvorite poklopac izlaznog otvora za kafu i umetnite spojnu cev.
- Umetnite drugi kraj spojne cevi u rezervoar za mleko.
5. Podešavanje visine izlaznog otvora za kafu
- Visina izlaznog otvora za kafu može se podesiti između 85 i 115 mm.
natural_image
Line drawing of a microwave oven with a digital display and a small fan (no text or symbols)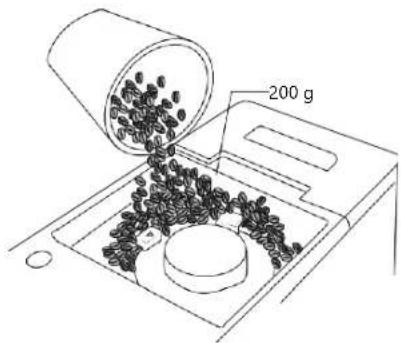
8. Rešetka za kapanje
-
Postavite rešetku za kapanje na posudu za sakupljanje tečnosti. Rešetka za kapanje mora biti pravilno postavljena tako da se posuda za držanje kafe, mleka ili vruće vode može postaviti na nju.
-
Umetnite posudu za sakupljanje tečnosti u uređaj.
NAPOMENA: Posuda za sakupljanje tečnosti prikuplja vodu iz otvora za izdavanje tokom svakog ispiranja i samočišćenja, kao i kafu koja se može prosuti tokom kuvanja. Zbog toga očistite i ispraznite posudu za sakupljanje tečnosti svaki dan.
9. Napunite posudu za kafu u zrnu
sa odgovarajućom količinom svežeg zrna kafe, 200 g, i zatvorite poklopac posude za zrno.
* Uređaj će automatski izvršiti ciklus čišćenja svaki put kada se pocne pripremati za rad.
natural_image
Line drawing of a kitchen appliance front panel with control buttons and a handle (no text or symbols)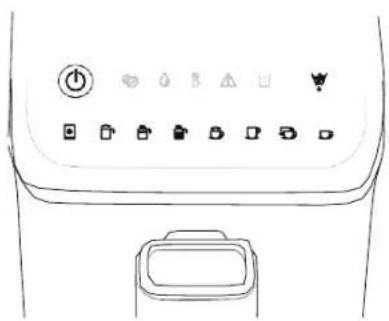
natural_image
Line drawing of a refrigerator front panel with control buttons and icons (no text or symbols)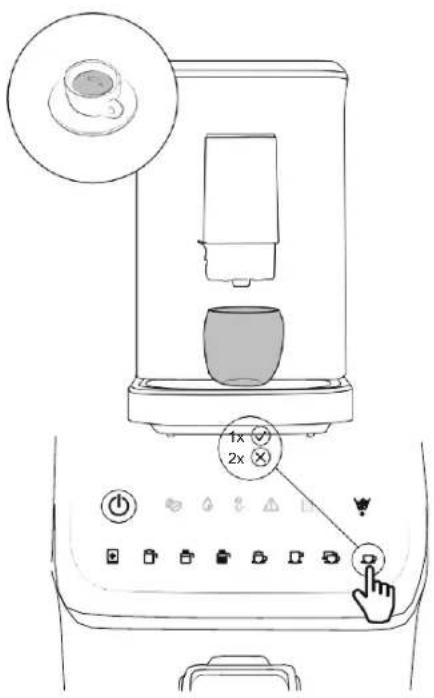
Skuvajte Americano
- Stavite šolju za kafu ispod izlaznog otvora za kafu.
- Proverite i uverite se da je čep penilice za mleko čvrsto zatvoren.
- Pritisnite taster Americano “držite ga najmanje 0,2 sekunde. Uređaj će početi da pravi Americano. Indikator Americano “če stalno biti upaljen tokom procesa kuvanja.
- Kada je Americano pripremljen, uređaj automatski prelazi u režim pripravnosti.
- Pritisnite taster Americano “☐” i držite ga još najmanje 0,1 sekundu ako želite da otkažete trenutnu naredbu.
natural_image
Line drawing of a coffee maker with a cup and a teacup, no text or symbols present
Skuvajte kapučino
- Stavite posudu za kafu ispod izlaznog otvora za kafu.
- Napunite rezervoar za mleko odgovarajućom količinom hladnog mleka. NAPOMENA: Nakon izvršene naredbe „Cappuccino“, aktiviraće se mehanizam za zaštitu od pregrevanja kotla. Ako morate da koristite funkciju “Vruća voda”, ostavite uređaj da miruje oko 3–5 minuta. Zatim se može aktivirati funkcija “Vruća voda” ...
**
(1) Preporučujemo da koristite mleko temperature od 5–10 °C, a sadržaj proteina u mleku treba da bude najmanje 3%.
(2) Sipajte mleko u rezervoar za mleko, ali nemojte prekoračiti oznaku „Max“ na rezervoaru za mleko.
- Umetnite cev za mleko tako da bude čvrsto na mestu.
- Uklonite silikonsku cev sa poklopca rezervoara za mleko i zatim je povežite sa penilicom za mleko i poklopcem rezervoara za mleko.
- Pritisnite taster Cappuccino “☐” i držite ga najmanje 0,2 sekunde. Uređaj će početi da priprema kapučino
- Kada je kapučino pripremljen, uređaj automatski prelazi u režim pripravnosti.
- Pritisnite taster Cappuccino “ 📄” i držite ga još najmanje 0,1 sekundu ako želite da otkažete trenutnu naredbu.
NAPOMENE:
- Nakon svake upotrebe, ako u rezervoaru za mleko ostane još mleka, odložite ga u frižider, a silikonsku cev i penilicu za mleko potrebno je očistiti što je pre moguće.
-
Preporučujemo da koristite visoku šolju kako biste sprečili prelivanje ili prskanje mlečne pene.
(1) Uklonite silikonsku cev i isperite je pod tekućom vodom.
(2) Uklonite poklopac izlaznog otvora za kafu i isperite ga pod tekućom vodom.
(3) Uklonite penilicu za mleko i isperite je pod tekućom vodom.
(4) Nakon čišćenja, vratite sve delove i uverite se da su čvrsto na mestu -
Nakon svake upotrebe, ponovite gore navedenu radnju ako u rezervoaru za mleko nema mleka.
- Isperite rezervoar za mleko pod tekućom vodom.
- Uklonite rezervoar za mleko i isperite ga pod tekućom vodom.
- Uklonite cev za mleko i isperite je pod tekućomvodom.
natural_image
Line drawing of a coffee maker with a cup and lid, showing its side profile (no text or symbols)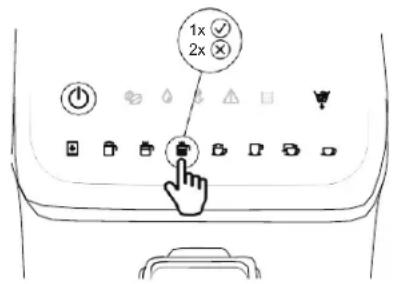
Skuvajte Latte
natural_image
Line drawing of a coffee maker with a steaming cup and mug, no text or symbols present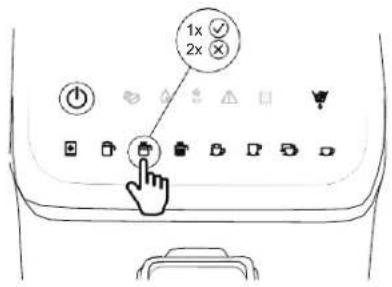
Priprema tople vode
- Stavite šolju ispod izlaznog otvora za kafu.
NAPOMENA: Zapremina šolje bi trebalo da bude veća od 120 ml. - Proverite i uverite se da je čep penilice za mleko čvrsto zatvoren.
- Pritisnite taster Vruća voda "☐" i držite ga najmanje 0,2 sekunde. Uređaj će početi da priprema vruću vodu.
- Kada je vruća voda spremna, uređaj automatski prelazi u režim pripravnosti.
- Pritisnite taster Vruća voda "☐" i držite ga još najmanje 0,1 sekundu ako želite da otkažete trenutnu naredbu.
natural_image
Line drawing of a coffee maker with a cup and stand, showing a magnified view of the cup (no text or symbols)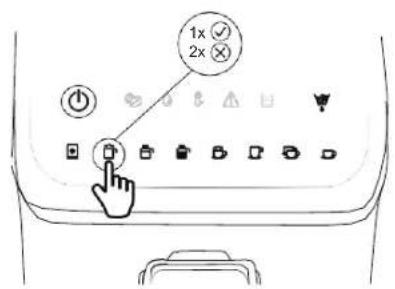
Ručna pena
* Nakon korišćenja funkcije „Ručna pena“, aktiviraće se mehanizam za zaštitu od pregrevanja kotla. Ako želite da koristite funkciju “Vruća voda”, ostavite uređaj da miruje 3–5 minuta. Nakon toga funkcija „Vruća voda“ se može aktivirati.
natural_image
Simple line drawing of a light bulb with radiating lines, no text or symbols presentnatural_image
Simple line drawing of a hand cleaning a cloth with sparkles above (no text or symbols)Uklanjanje mineralnih naslaga
-
Uređaj mora da se očisti od kamenca kada indikatori Vruća voda "☐" i Ručno čišćenje "☐"istovremeno trepere.
-
Napunite rezervoar za vodu vodom i sredstvom za uklanjanje kamenca do MAKSIMALNOG nivoa kako je naznačeno na rezervoaru za vodu (odnos vode i sredstva za uklanjanje kamenca je 4:1; za detalje pogledajte uputstvo za sredstvo za uklanjanje kamenca; koristite „sredstvo za čišćenje kamenca u domaćinstvu“). Možete koristiti i limunsku kiselinu umesto sredstva za uklanjanje kamenca (sto delova vode na tri dela limunske kiseline).
-
Postavite posudu (šolju) na rešetku za kapanje.
-
Istovremeno pritisnite tastere Vruća voda "☐" i Ručno čišćenje "☐" i držite ih 1 sekundu. Uređaj započinje proces uklanjanja kamenca.
-
Ceo postupak uklanjanja kamenca traje oko 10 minuta. Osam (8) funkcionalnih indikatora treperi polako sa leva na desno.
-
Nakon završetka uklanjanja kamenca, indikatori Vruća voda "☐" i Ručno čišćenje "☐" prestaju da trepere.
natural_image
Line drawing of a modern water dispenser with two containers and a handle (no text or symbols)ΚΑΦΕΜΑΤ
GFACM20S
natural_image
Line drawings of a water heater with open lid, side panel, and side cup (no text or symbols)1. Резервоар за вода:
natural_image
Diagram of a mechanical component with a rotating arrow and circular base, no text or symbols presentnatural_image
Line drawings of two water heaters with directional arrows indicating movement (no text or symbols)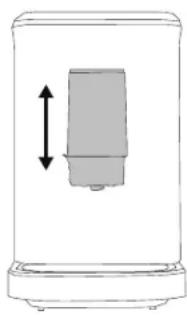
natural_image
Simple line drawing of a cylindrical device with a vertical double-headed arrow indicating width (no text or symbols)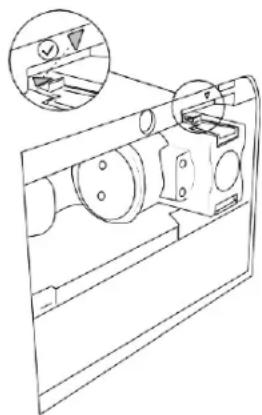
natural_image
Technical line drawing of a mechanical assembly with a magnified inset showing a detail (no text or symbols)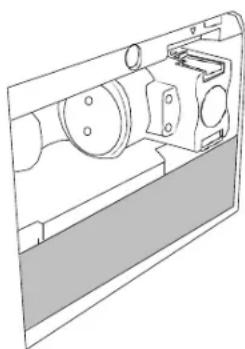
natural_image
Technical line drawing of a mechanical assembly with no visible text or symbolsnatural_image
Line drawing of a portable electronic device with ports and a control panel, showing no text or symbols.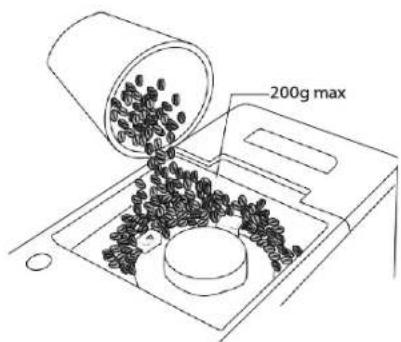
8. Сад за цедење
natural_image
Line drawing of a coffee maker with a cup and lid, no text or symbols present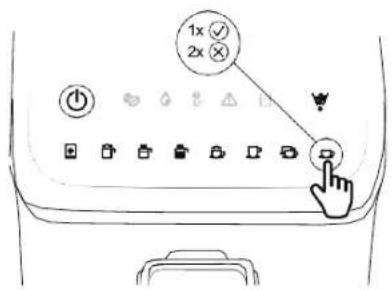
natural_image
Line drawing of a water dispenser with two cups and a tray, showing a magnified inset of two cups (no text or symbols)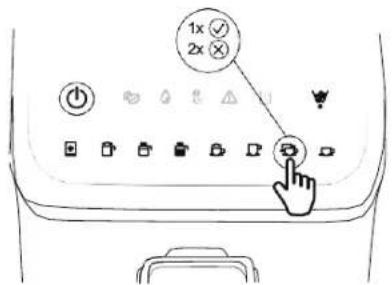
Една шолја еспресо
natural_image
Line drawing of a coffee maker with a cup and teapot, no text or symbols present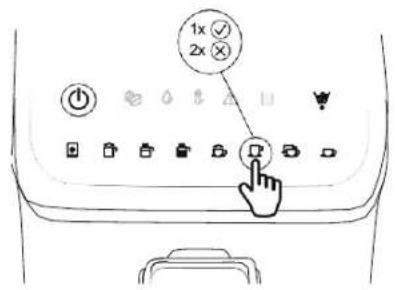
Кафе американо
natural_image
Line drawing of a coffee maker with a cup and a plate, no text or symbols present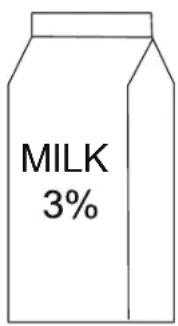
Капучино
natural_image
Line drawing of a coffee maker with a cup and lid, showing its base and side view (no text or symbols)
Лате
natural_image
Line drawing of a coffee maker with a steaming cup and mug, no text or symbols present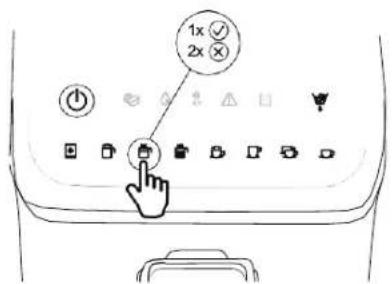
Врела вода
natural_image
Line drawing of a coffee maker with a cup and a tray, showing a magnified view of the cup (no text or symbols)
Рачно правење пена
natural_image
Simple line drawing of a black plug connected to a wall-mounted electrical outlet (no text or symbols)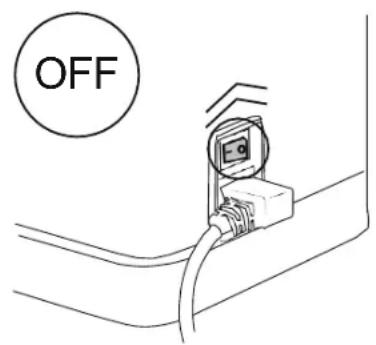
natural_image
Simple line drawing of a light bulb with radiating lines, no text or symbols presentnatural_image
Simple line drawing of a hand cleaning a cloth with sparkles above (no text or symbols)Отстранување бигор
natural_image
Line drawing of a modern water heater with a side-mounted drain and a smaller cylindrical container (no text or symbols)COFFEE MACHINE
GFACM20S
INSTRUCTION MANUAL EN
IMPORTANT SAFEGUARDS
When using electrical appliances, basic precautions should always be observed, including the following:
- Before using, check that the voltage in your mains corresponds to the data shown on the appliance nameplate.
- If the supply cord is damaged, it must be replaced by the manufacturer, its service agent, or a similarly qualified person in order to avoid a hazard.
- The machine should not be used by children younger than 8 years old.
This machine can be used by children aged from 8 years and above and by persons with reduced physical, sensory or mental capabilities or lack of experience and knowledge if they have been given supervision or instruction concerning use of the machine in a safe way and if they understand the hazards involved. Cleaning and user maintenance shall not be made by children unless they are older than 8 and supervised. Keep the machine, its accessories and its cord out of the reach of children aged less than 8 years. Children should be supervised to ensure that they do not play with the machine.
4. Cleaning and user maintenance shall not be made by children unless they are supervised.
5. To disconnect, turn any control to "OFF" and remove the plug from the wall outlet. Always hold the plug; never pull the cord.
6. Unplug from outlet when not in use and before cleaning. Allow to cool before installing or removing parts, and before cleaning the appliance.
7. Any use of accessories not recommended by the appliance manufacturer may result in fire, electric shock, or injury to persons.
8. Do not use outdoors.
9. Do not use the appliance for other than intended use.
10. Do not let the cord hang over the edge of a table or a counter or touch a hot surface.
11. Do not place on or near a hot gas or electric burner, or in a heated oven.
12. Do not let the coffee machine operate without water.
13. To protect against fire, electric shock, and injury to persons, do not immerse cord, plug, or in water or other liquid.
14. Do not place a hot container on a hot or cold surface.
15. The container is designed for use with this appliance. It must never be used on a range top (cooking hob).
16. Do not clean the container with cleansers, steel wool pads, or other abrasive material.
17. Be careful not to get burned by steam during the brewing cycles.
18. Some parts of appliance are hot when operated. Do not touch them with your hands. Use handles or knobs only.
19. The appliance must not be immersed in any liquid.
20. This machine is intended for normal household use only. It is not intended for use in environments such as staff kitchens of shops, offices, farms or other work environments.
21. Warning of potential injury from misuse.
22. The heating element surface may still be hot after use.
23. The coffee machine may not be placed in a cabinet when in use.
24. Switch off the appliance and disconnect from power supply before changing accessories or approaching parts that move when in use.
25. CAUTION: In order to avoid a hazard due to inadvertent resetting of the thermal cut-out, this appliance must not be powered through an external switching device, such as a timer, or connected to a circuit that is regularly switched on and off by the utility.
26. Always disconnect the appliance from power supply if it is left unattended and before assembling, disassembling, or cleaning.
27. Follow the instructions above, including the instructions in the section "CLEANING AND MAINTENANCE".
28. Save these instructions.
- Bean box cover
- Grind setting knob
- Water tank
- Brewer
- Residue collection container
- Door
-
Inner drip tray
-
Cleaning brush
- Drip tray
- Drip plate
- Coffee outlet cover
- Milk frother
- Milk tank
- Coffee outlet
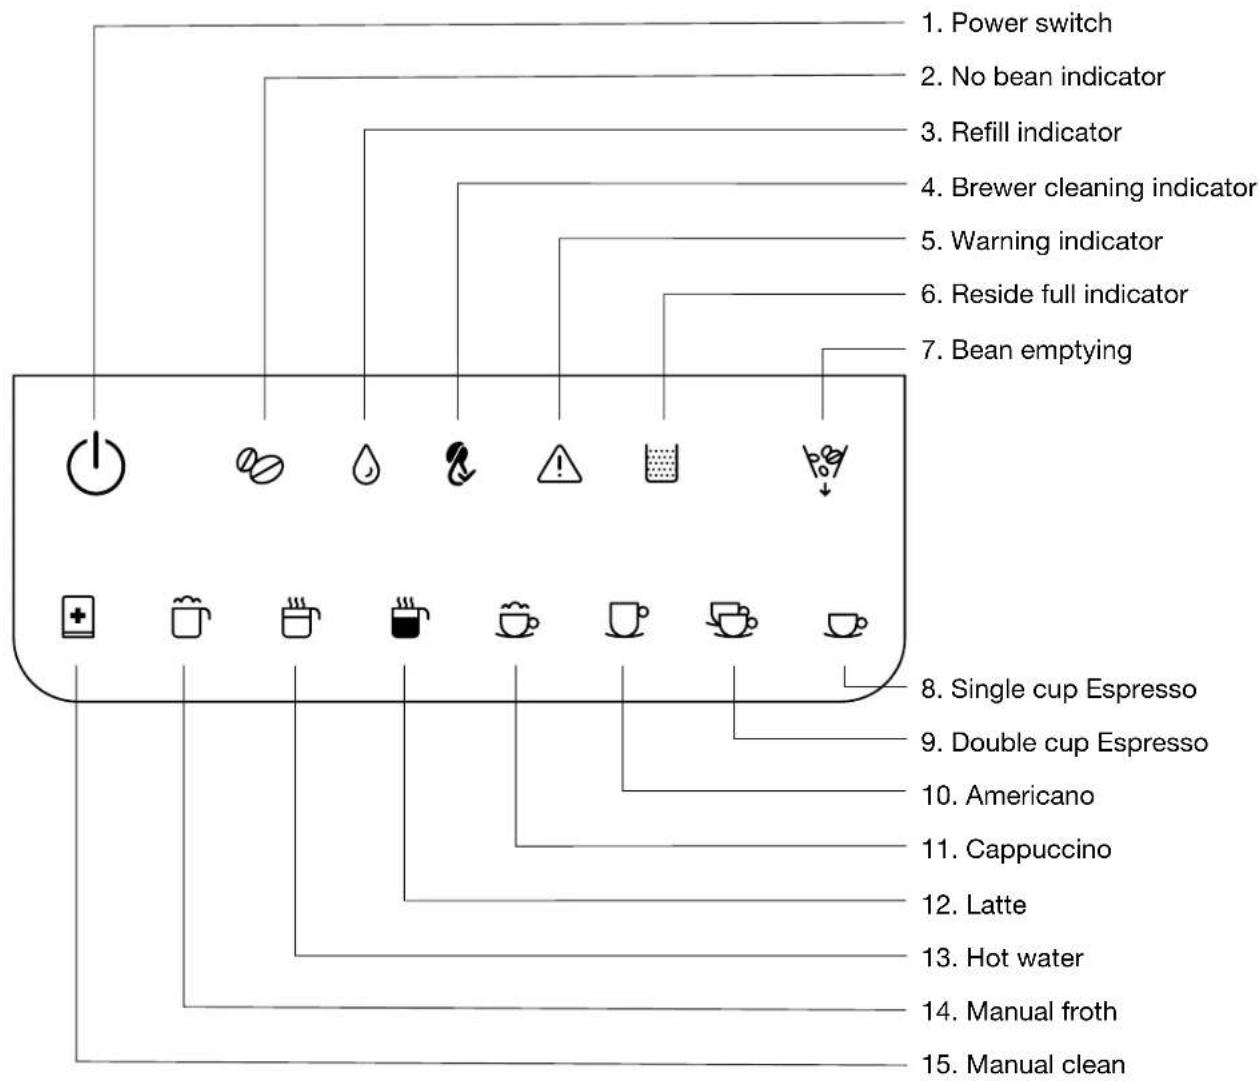
- Control panel
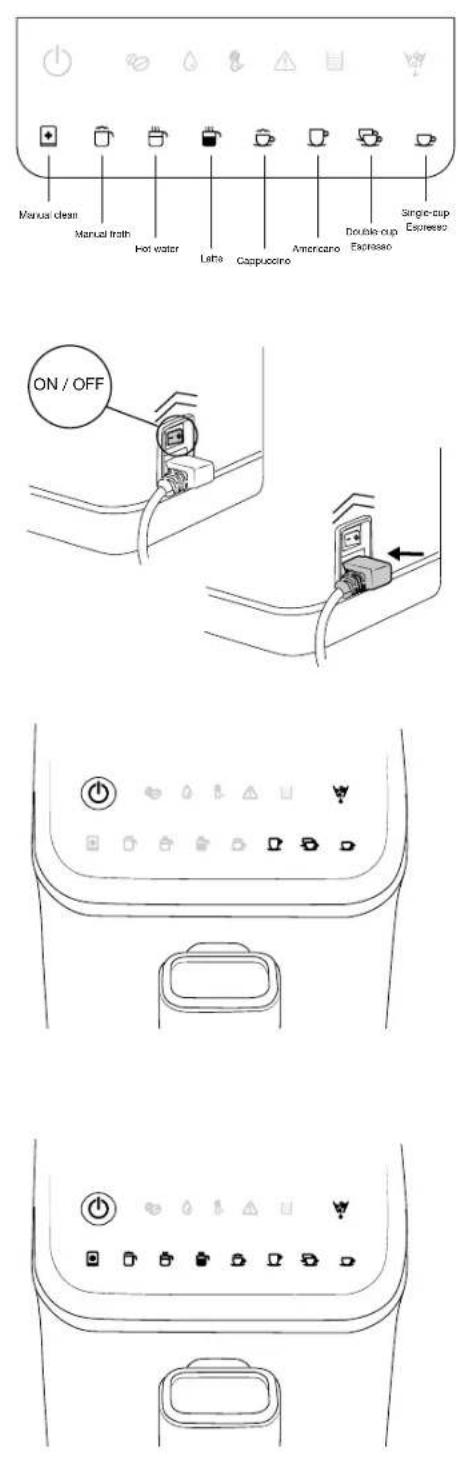
CONTROL PANEL
BEFORE THE FIRST USE
Check that all accessories are complete, and that the unit is not damaged. Check and understand all the parts and their functions. We recommend keeping the original packaging for future use. Then, follow the instructions below.
Before using for the first use, please remove the water tank, milk tank, brewer, and milk frother, and rinse them with clean water.
Check and make sure all the removable parts are correctly and firmly installed:
natural_image
Line drawing of a container with liquid inside, showing two arrows indicating flow or movement (no text or symbols)1. Water tank:
Fill the water tank with fresh water up to the Max mark. Install it into the unit and make sure it is properly placed. Close the water tank lid.
natural_image
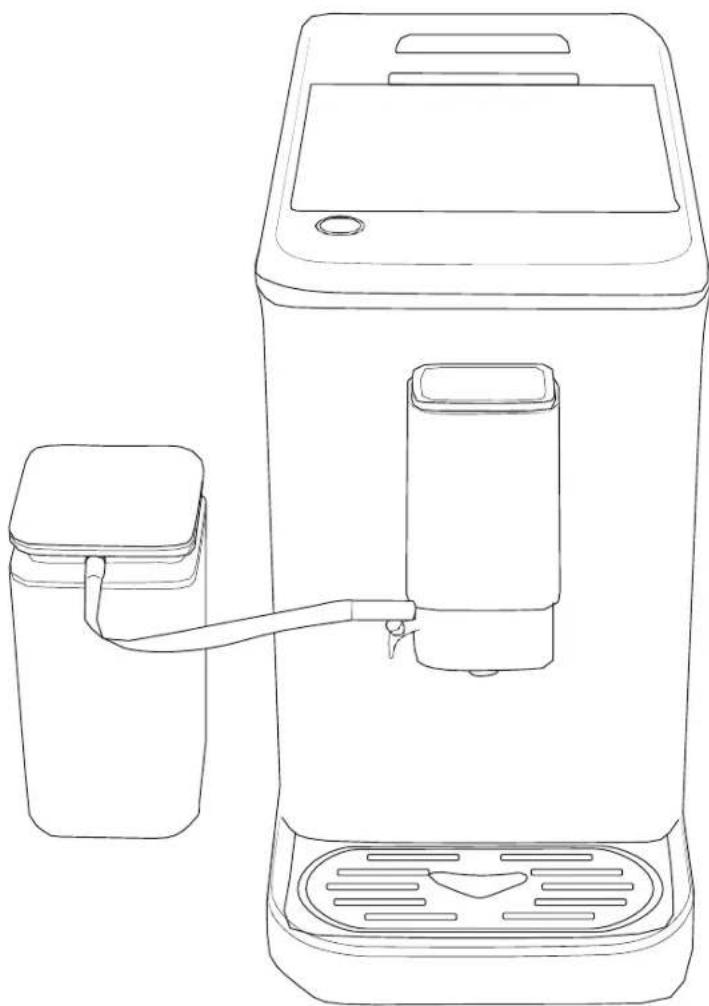
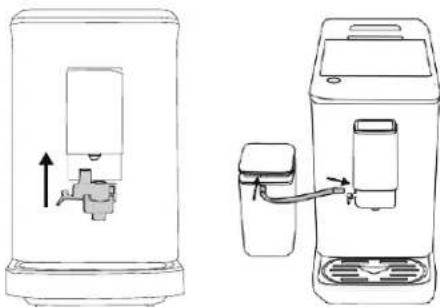
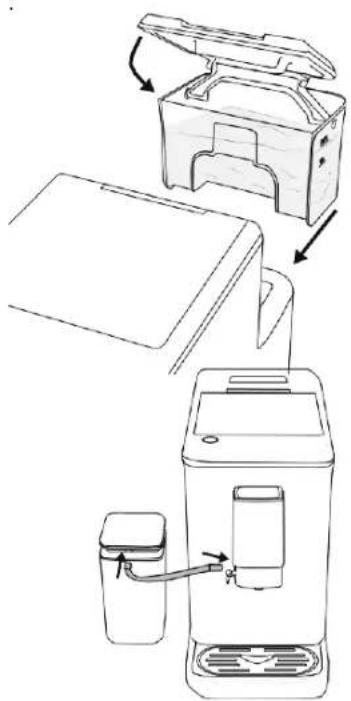
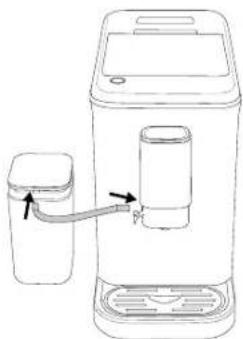
Line drawing of a water dispenser with a side arm and control panel (no text or symbols)2. Milk tank:
- Insert the milk tube into the hole of the milk frother at the side of the coffee outlet.
- Insert the other end of the milk tube into the milk tank lid.
- Install the milk tank and milk tank lid, making sure they are firmly in place.
- The milk tube can be folded. Please install it firmly if it is loose.
natural_image
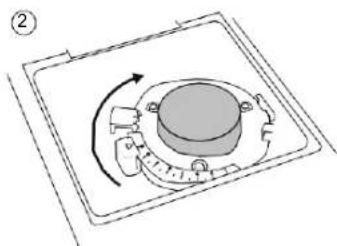
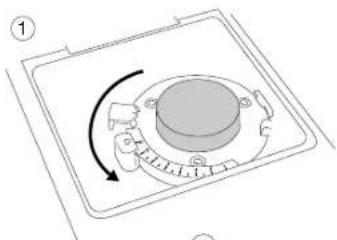
Diagram of a circular device with a curved arrow indicating rotation or movement, no text or symbols present3. Grind setting knob
- Turn the grind setting knob bracket counterclockwise to the leftmost position.
- Cover the grind setting knob according to the specified position.
- Select the grinding setting by turning the knob clockwise. NOTE: When a new coffee machine is used for the first time, we suggest selecting a grind setting higher than 8. The grind setting can be adjusted in the range from 1 (finest) to 15 (coarsest). The number on the grind setting knob indicated by the arrow is the actual selected grind setting.
natural_image
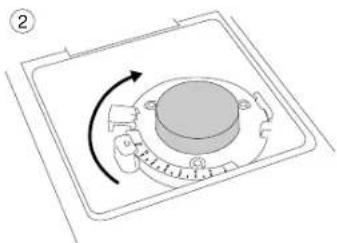
Diagram of a circular component with directional arrows indicating rotation, enclosed in a square frame (no text or symbols)CAUTION!
We suggest adjusting the grind setting one notch at one time to avoid any damage.
natural_image
Diagram showing two water levelers with directional arrows indicating flow or movement (no text or symbols present)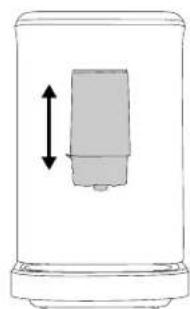
natural_image
Simple line drawing of a cylindrical container with a vertical double-headed arrow indicating width (no text or symbols)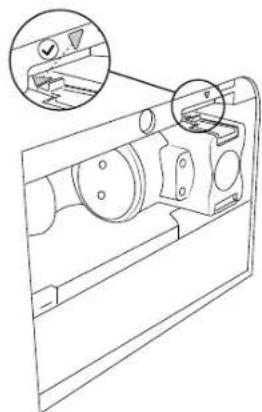
natural_image
Technical line drawing of a mechanical component with internal parts and a magnified inset showing a detail (no text or symbols)
natural_image
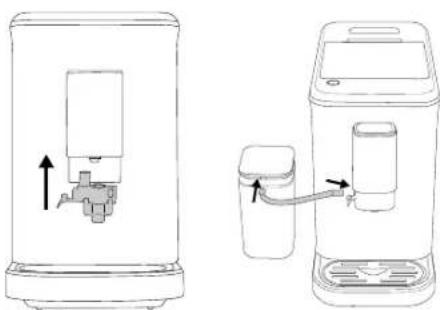
Technical line drawing of a mechanical assembly with no visible text or symbols4. Milk frother
- Open the coffee outlet cover and make sure the milk frother is installed firmly in place.
- If the milk frother is properly installed, please close the coffee outlet cover and insert the connecting tube.
- Insert the other end of the connecting tube into the milk tank.
5. Adjusting the height of the coffee outlet
- The height of the coffee outlet can be adjusted between 85 and 115 mm.
6. Brewer
- Open the door and check whether the brewer is properly installed and firmly in place.
A. Check whether the arrow of the brewer is aligned with the arrow of the upper bracket.
B. An audible click indicates that the brewer is correctly assembled.
C. The warning indicator “⚠️” will be constantly lit if the brewer is not installed in place.
- Close the door.
A. The whole door and body are on the same horizontal plane.
B. The warning indicator “⚠️” will flash if the door is not closed properly.
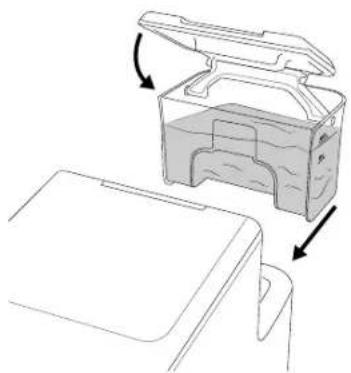
7. Inner drip tray and residue collection container
- Open the door and check whether the drip tray is installed in place.
- Open the door and check whether the residue collection container is installed in place.
- If the inner drip tray is not correctly installed, the warning indicator "⚠ will flash. The appliance cannot operate if there is foreign object at the front of the residue collection container.
INSTRUCTION MANUAL EN

natural_image
Line drawing of a portable food appliance with a hand inserting a button (no text or symbols)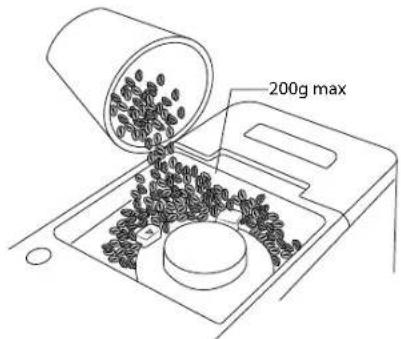
8. Drip plate
- Place the drip plate on the drip tray. The drip plate must be correctly installed so that the container can be placed on it for holding coffee, milk, or hot water.
- Insert the drip tray into the appliance.
NOTE: The drip tray collects the water from the dispensing spout during each rinse & self-cleaning, as well as coffee that might be spilled during brewing. Therefore, clean and empty the drip tray every day.
9. Fill the bean box
with a suitable amount of fresh coffee beans, 200 g, and close the bean box cover.
CAUTION!
If the grinding blade is removed, please make sure that the grinding blade has been correctly reinstalled before filling the bean box with coffee beans.
OPERATION
This appliance is a multifunctional coffee machine. It has the functions of "Single cup espresso", "Double cup espresso", "Americano", "Cappuccino", "Latte", "Hot water", "Manual froth", "Manual clean", and "Bean-emptying".
* The appliance will automatically perform a cleaning cycle each time it is started to prepare for operation.
* The coffee will come out drip by drip at the beginning (2–3 seconds after the brewing starts) and at the end (6–8 seconds before brewing is completed) of the brewing process. This is normal.
Power on and Preheat
- Connect the appliance to power mains with suitable rated voltage and press the on/off button at the back of the appliance.
- Press the power switch “ ⏻” for at least 0.3 second. Its corresponding indicator flashes, and the appliance enters into self-check status.
NOTE: Please refer to the section of "TROUBLESHOOTING" if there is a warning.
-
Place a container (cup) under the coffee outlet.
-
The Manual clean indicator “☑” lights up and the Power switch indicator “☑” flashes. Then, the appliance enters the preheating stage and the auto-clean mode.
- After the preheating of the coffee boiler is completed, the indicators of Single-cup Espresso “Double-cup Espresso” “Americano” “and Bean-emptying” will light up, and the appliance can be operated normally.
- During the preheating of the steam boiler, the indicators of Cappuccino “ Latte “ Hot water “ Manual froth “ and Manual clean “ will flash, which means the appliance cannot be operated. When preheating of the steam boiler is completed, the functional indicators will be constantly lit and the appliance can be operated normally.
- All functional indicators will be constantly lit when all preheating stages are completed. Then, the appliance will enter the standby mode.
natural_image
Line drawing of a coffee maker with a cup and lid, no text or symbols present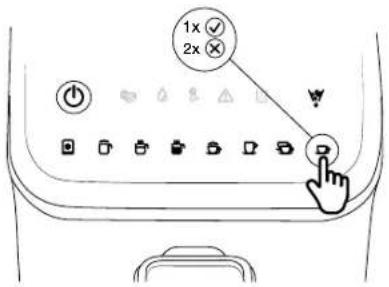

natural_image
Line drawing of a water dispenser with two cups, showing a close-up inset of two cups (no text or symbols)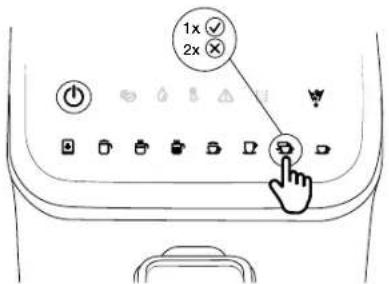
Brew Single-cup Espresso
- Place a coffee container under the coffee outlet.
- Check and make sure the plug of milk frother is closed well in position.
- Press the Single-cup Espresso key “☐” and hold it for at least 0.2 second. The appliance will start brewing a single cup of espresso. The of Single cup espresso indicator “☐” will be constantly lit during the brewing process.
- When the single cup of espresso is brewed, the appliance automatically enters the standby mode.
- Press the Single-cup Espresso key “☐” and hold it for at least 0.1 second again if you wish to cancel the current function.
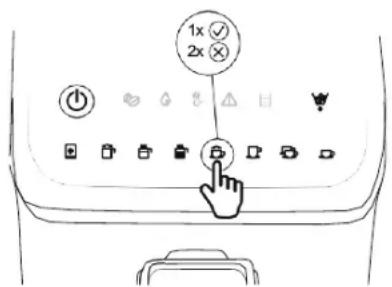
Brew two cups of Espresso
- Place two coffee cups under the coffee outlet.
- Check and make sure the plug of the milk frother is closed tightly.
- Press the Double cup espresso key “☐” and hold it for at least 0.2 second. The appliance will start brewing two cups of espresso. The Double cup espresso indicator “☐” will be constantly lit during the brewing process.
NOTE: Two cups of espresso are brewed by combining two brewing cycles for a single cup of espresso in succession, so please do not remove the coffee cups during the brewing process.
- When the appliance finished brewing the two cups of espresso, it automatically enters the standby mode.
- Press the Double cup espresso key "☐" and hold it for at least 0.1 second again if you wish to cancel the current function.
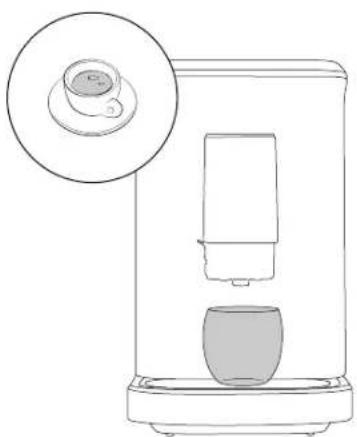
Brew Americano
- Place a coffee cup under the coffee outlet.
- Check and make sure the plug of the milk frother is closed tightly.
- Press the Americano "☐" key and hold it for at least 0.2 second. The appliance will start to brew an Americano. The Americano indicator "☐" will be constantly lit during the brewing process.
- When the Americano is brewed, the appliance automatically enters the standby mode.
- Press the Americano key “☐” and hold it for at least 0.1 second again if you wish to cancel the current function.

natural_image
Line drawing of a coffee maker with a cup and a tray, showing its side profile (no text or symbols)
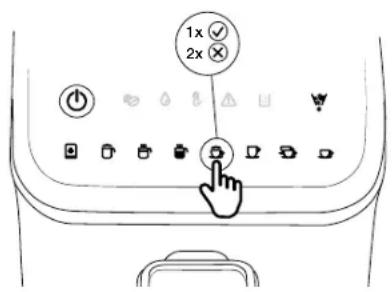
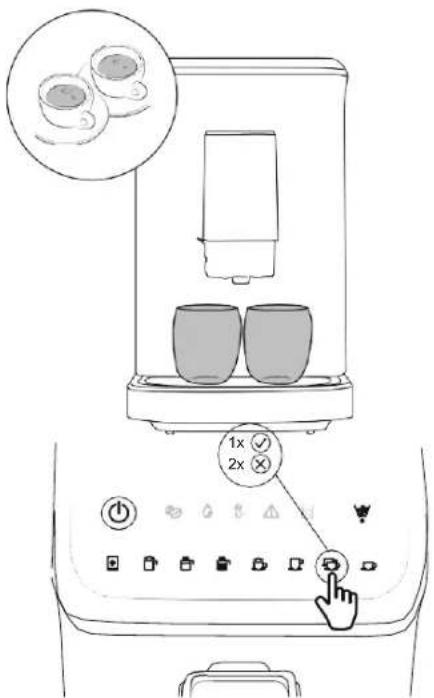
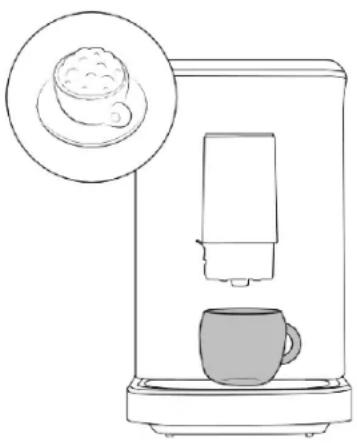
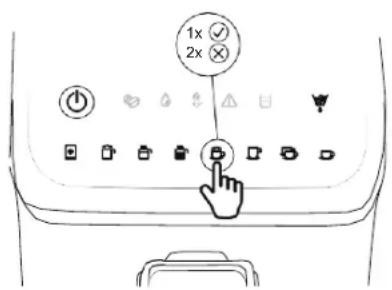
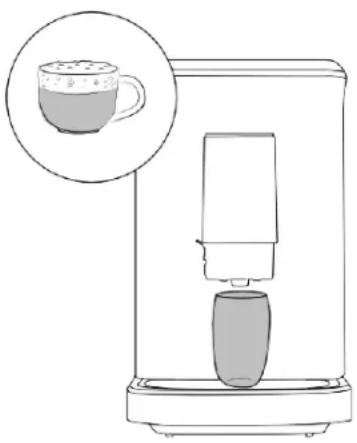
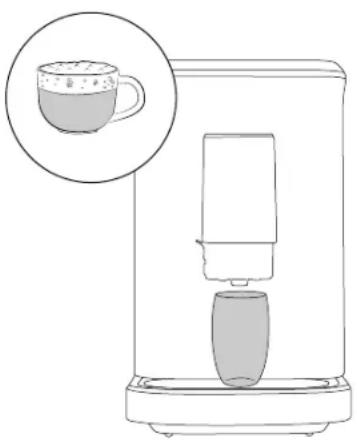
Brew Cappuccino
- Place a coffee container under the coffee outlet.
- Fill the milk tank with appropriate amount of cold milk. NOTE: After the "Cappuccino" function is conducted, the overheating protection mechanism for the boiler will be activated. If you have to use the "Hot water" function, leave the appliance to rest for about 3–5 minutes. Then, the "Hot water" function can be activated.
**
(1) We recommend using milk at a temperature of 5–10 °C, and the protein content of milk should be at least 3 %.
(2) Pour the milk into the milk tank, but do not exceed the "MAX" mark on the milk tank.
- Insert the milk tube so it is firmly in place.
- Remove the silicone tube from the milk tank lid and then connect it with the milk frother and milk tank lid.
- Press the Cappuccino "☐" key and hold it for at least 0.2 second. The appliance will start to brew cappuccino.
- When the cappuccino is brewed, the appliance automatically enters the standby mode.
- Press the Cappuccino “💡” key and hold it for at least 0.1 second again if you wish to cancel the current function.
NOTES:
-
After each use, if there is still milk in the milk tank, please store it in the refrigerator, but the silicone tube and milk frother should be cleaned as soon as possible.
-
We recommend using a tall cup to prevent the frothed milk from spilling over or splashing.
(1) Remove the silicone tube and rinse it with tap water.
(2) Remove the coffee outlet cover and rinse it with tap water.
(3) Remove the milk frother and rinse it with tap water.
(4) After cleaning, replace all parts, making sure they are firmly in place
- After each use, please repeat the above operation if there is no milk in the milk tank.
(1) Rinse the milk tank with tap water.
(2) Remove the milk tank and rinse it with tap water.
(3) Remove the milk tube and rinse it with tap water.
natural_image
Line drawing of a water dispenser with a cup, showing its internal structure and a magnified inset (no text or symbols)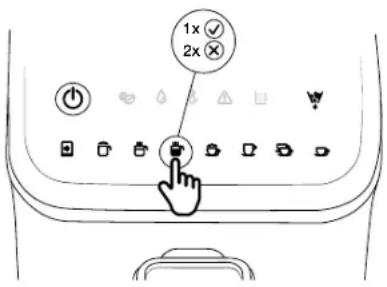
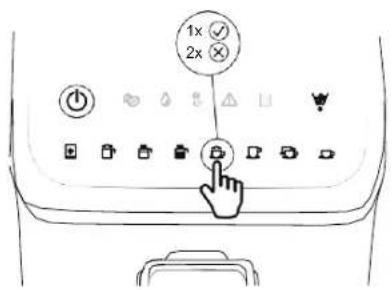
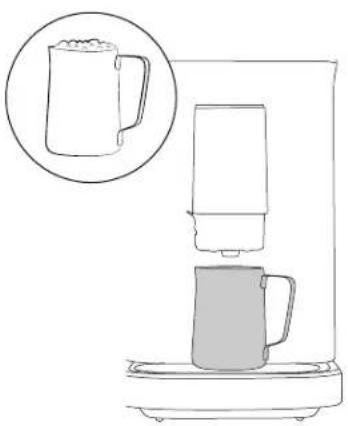
Brew Latte
- Place a coffee cup under the coffee outlet.
- Fill the milk tank with appropriate amount of cold milk. NOTE: After the "Latte" function is conducted, the overheating protection mechanism for the boiler will be activated. If you want to use the "Hot water" function, leave the appliance to rest for about 3–5 minutes. Then, the "Hot water" function can be activated.

(1) We recommend using milk at a temperature of 5–10 °C, and with protein content of at least 3%.
(2) Pure the milk into the milk tank, but do not exceed the "MAX" mark on the milk tank.
-
Insert the milk tube, making sure it is firmly in place.
-
Remove the silicone tube from the milk tank lid and connect it to the milk frother and milk tank lid.
- Press the Latte key "☐" and hold it for at least 0.2 second. The appliance will start to brew latte.
- When your latte is brewed, the appliance will automatically enter the standby mode.
- Press the Latte key "☐" and hold it for at least 0.1 second again if you wish to cancel the current function.
NOTES:
- After each use, if there is still milk in the milk tank, please store it in the refrigerator, but the silicone tube and milk frother should be cleaned as soon as possible.
- We recommend to use a tall cup to prevent the frothed milk from spilling over or splashing.
(1) Remove the silicone tube and rinse it with tap water.
(2) Remove the coffee outlet cover and rinse it with tap water.
(3) Remove the milk frother and rinse it with tap water.
(4) After cleaning, replace all parts, making sure they are firmly in place.
- After each use, please repeat the above operation if there is no milk in the milk tank.
(1) Rinse the milk tank with tap water.
(2) Remove the milk tank and rinse it with tap water.
(3) Remove the milk tube and rinse it with tap water.
INSTRUCTION MANUAL EN

natural_image
Line drawing of a coffee maker with a steaming cup and its base, showing its interior (no text or symbols)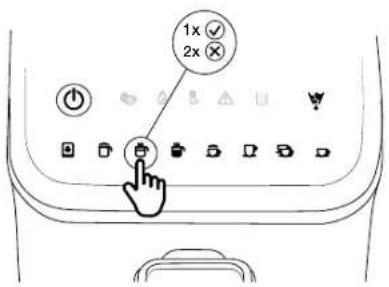
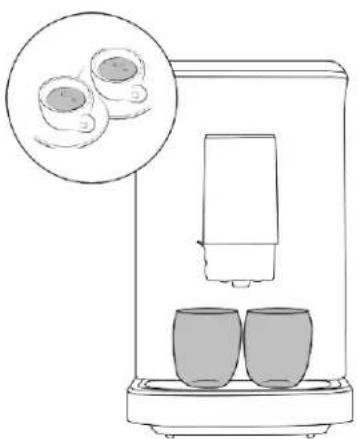
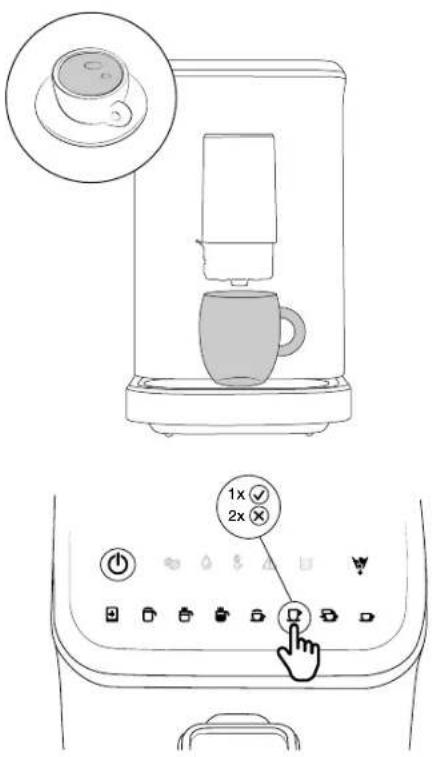
Make hot water
- Place a cup under the coffee outlet. NOTE: The capacity of the cup should be more than 120ml.
- Check and make sure the plug of the milk frother is closed tightly.
- Press the Hot water "☐" key and hold it for at least 0.2 second. The appliance will start to make hot water.
- When hot water is ready, the appliance automatically enters the standby mode.
- Press the Hot water key “☐” and hold it for at least 0.1 second again if you wish to cancel the current function.
CAUTION!
Please do not touch the water container with your hands while the appliance is heating up water. Please be careful when removing the cup to prevent any burns as there will be still a little hot steam dispensed from the coffee outlet when water heating is completed.
natural_image
Line drawing of a coffee maker with a cup and tray, showing a magnified view of the cup (no text or symbols)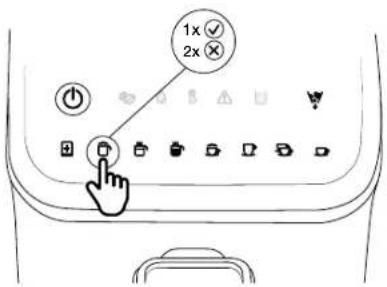
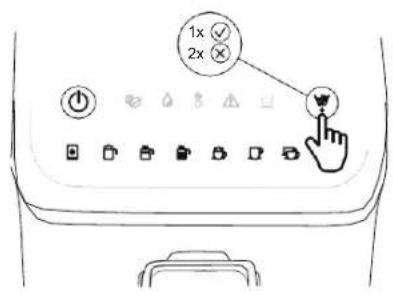
Manual froth
* After the "Manual froth" function is used, the overheating protection mechanism for the boiler will be activated. If you have to use the "Hot water" function, leave the appliance to rest for about 3-5 minutes. Then, the "Hot water" function can be activated.
- Place a milk container under the coffee outlet.
NOTE: The capacity of the milk container should be more than 160ml.
- Fill the milk reservoir with appropriate amount of cold milk.
\*\*
(1) We recommend using milk at a temperature of 5–10 °C and with protein content of at least 3%.
(2) The milk filled in the milk tank should not exceed the "MAX" mark on the milk tank.
- Press the Manual froth key “☐” and hold it for at least 0.2 second. The appliance will start to conduct the manual froth function.
- When the milk frothing process is completed, the appliance automatically enters the standby mode.
- Press the Manual froth key “☐” and hold it for at least 0.1 second again if you wish to cancel the current function.
NOTES:
- After each use, if there is still milk in the milk tank, please store it in the refrigerator, but the silicone tube and milk frother should be cleaned as soon as possible.
- We recommend using a tall cup to prevent the frothed milk from spilling over or splashing.
(1) Remove the silicone tube and rinse it with tap water.
(2) Remove the coffee outlet cover and rinse it with tap water.
(3) Remove the milk frother and rinse it with tap water.
(4) After cleaning, replace all parts, making sure they are firmly in place.
- After each use, please repeat the above operation if there is no milk in the milk tank.
(1) Rinse the milk tank with tap water.
(2) Remove the milk tank and rinse it with tap water.
(3) Remove the milk tube and rinse it with tap water.
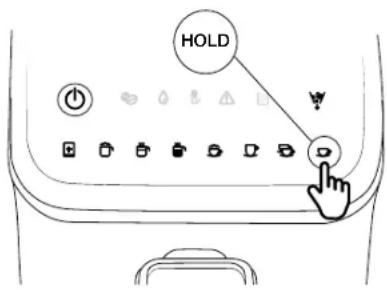
Manual clean
- Place a cup under the coffee outlet.
- Press the Manual clean key “☐” and hold it for at least 0.2 second. The appliance will start the manual clean cycle.
- After cleaning, the appliance automatically enters the standby mode.
- Press the Manual clean key “☐” and hold it for at least 0.1 second again if you wish to cancel the current function.
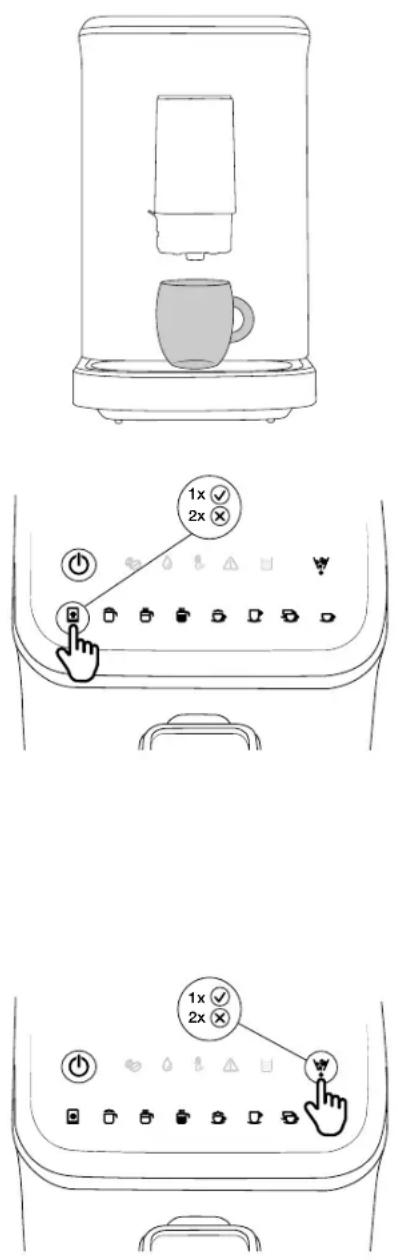
Empty the residual coffee beans
* This function is used for emptying the beans in the bean box. Please use it carefully to avoid waste.
- Press the Bean emptying key “?” and hold it for at least 1 second. The appliance will start the bean-emptying process. At that time, the Bean emptying indicator “will be constantly lit while other functional indicators are switched off.
- Remove the residue collection container and empty the ground coffee in it.
- When the process is complete, the appliance automatically enters the standby mode.
- Press the Bean emptying key “▼” and hold it for at least 0.3 second again if you wish to cancel the current function. NOTE: The bean emptying process only lasts 15 seconds each time. Please repeat the above operation if there is a lot of coffee beans left in the bean box.
Energy-saving mode
- Press the Power switch “☐” and hold it for at least 0.2 second; the appliance enters the sleep mode. At that time, all indicators turn off and all functions are inactive.
- The appliance will enter the sleep mode if there is not any operation within 28 minutes. At that time, all the indicators turn off and all the functions are inactive.
- During sleep mode, press the Power switch “ ⏻” and hold it for at least 0.2 second. The appliance will conduct a self-check, preheat, and return to standby mode.
NOTES:
- When the appliance is powered on continuously, press the Power switch “ ⭕ and hold it for at least 0.2 second to activate the appliance after more than 4 hours. The auto-clean function of the appliance will be activated.
- If the appliance is powered off, the auto-clean function will be activated after you press the Power switch " and hold it for at least 0.2 second.
- Please refer to the section of "Power on and preheating" for details.
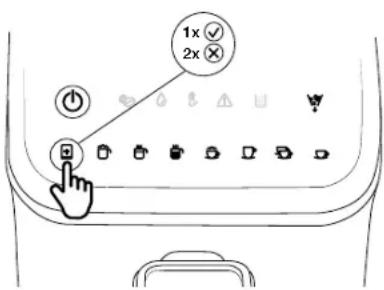
Set the coffee and milk dispensing amount
1. Setting the coffee dispensing amount:
When the appliance starts dispensing coffee, press the selected functional key and hold it for 2 seconds. The buzzer beeps and the corresponding indicator of the selected functional key flashes. At that time, the appliance enters the mode for setting the coffee dispensing amount. As soon as the coffee in the cup reaches the required level, release the selected functional key. Then, the appliance stops operating and the newly set coffee dispensing amount is stored.
The range of coffee dispensing amount is as follows:
(1) Single cup Espresso: 30-100ml
(2) Double cup Espresso: (30-100ml)*2
(3) Americano: 110-180ml
2. Operation for setting the milk dispensing amount:
When the appliance starts dispensing milk, press the selected functional key and hold it for 2 seconds. The buzzer beeps and the corresponding indicator of selected functional key flashes. At that time, the appliance enters the mode for setting the milk dispensing amount. As soon as the milk in the cup reaches the required level, release the selected functional key, the appliance stops operating, and the newly set milk dispensing amount is saved. The operation for setting the milk dispensing amount only applies to the functions of “Cappuccino” and “Latte”.
The range of milk dispensing amount is as follows:
(1) Cappuccino: Coffee: 30-100ml + Milk: 10-40 seconds
(2) Latte: Coffee: 30-100ml + Milk: 10-40 seconds.
Factory reset
Simultaneously press the Single cup espresso “☐” and Double cup espresso key “☐” and hold them for 2 seconds; all parameters will be reset to the factory default setting.
CLEANING AND MAINTENANCE
natural_image
Simple line drawing of a black plug connected to an open electrical outlet (no text or symbols)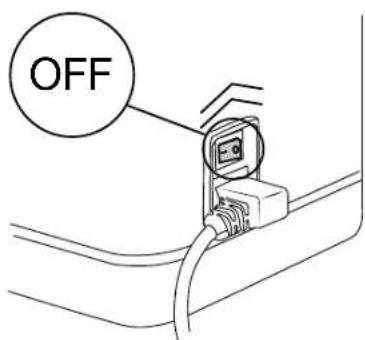

natural_image
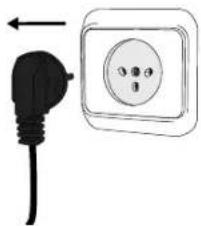
Simple line drawing of a light bulb with radiating lines, no text or symbols presentCAUTION!
Be sure to unplug this appliance before cleaning and let the appliance cool down completely. To protect against electrical shock, do not immerse cord, plug or unit in water or liquid. Please unplug the appliance after each use.
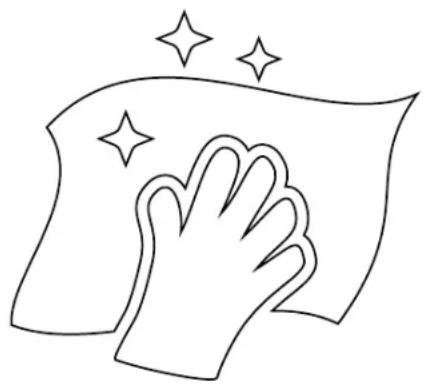
- Wipe the outer surface of the product with a soft damp cloth to remove stains, but avoid using abrasive cleaning tools as they will scratch the product. Do not use alcohol or solvent cleaners.
- Water droplets may buildup in the area above the drip plate or countertop during brewing. To control the dripping, wipe off the area with a clean, dry cloth after each use of the product.
- Do not wash the brewer, water tank, milk tank, drip tray, drip plate, inner drip tray, residue collection container, and door into the dishwasher.
- Empty the water from the drip plate and drip tray, and coffee grounds from the inner drip tray and residue collection container, and clean these parts thoroughly.
- Clean the parts by following the description and operation as follows:
Hints for great-tasting coffee
-
A clean coffee machine is essential for making tasty coffee. It is necessary to clean the coffee machine as specified in the "CLEANING AND MAINTENANCE" section regularly. Always use fresh room-temperature water when brewing coffee.
-
Store unused ground coffee in a cool and dry place. After a new bag of ground coffee is unpacked, reseal it tightly and store it in the refrigerator to maintain its freshness.
| Detachable parts When to clean How to clean | |
| Residue-collection container For Single cup espresso, Latte, and Cappuccino, clean once every 8 brewing cycles.For Double cup espresso, clean once every 4 brewing cycles.We recommend cleaning it on the same day if it has not been used for a long time. | 1. Open the door.2. Remove the residue collection container.3. Empty the coffee puck from the residue collection container.4. Rinse the residue collection container under tap water.5. Install the residue collection container into the appliance.6. Close the door and the cleaning is completed. |
| Brewer For Single cup espresso, Latte, and Cappuccino, clean once every 8 brewing cycles.For Double cup espresso, clean once every 4 brewing cycles.We recommend cleaning it on the same day if it has not been used for a long time. | 1. Open the door.2. Remove the brewer.3. Rinse the brewer under tap water.4. Install the brewer into the appliance.5. Close the door and the cleaning is completed. |
| Water tank Once every week. 1. Remove the water tank from | the coffee machine.2. Rinse the water tank under tap water. |
| Detachable parts When to clean How to clean | ||
| Milk tank | After every use. | 1. Remove the connecting tube from the appliance after every use.2. Rinse the milk tank under tap water.3. Store the milk tank suitably after cleaning. |
| Milk frother After every use. 1. Remove the coffee outlet | cover.2. Remove the milk frother from the coffee outlet.3. Rinse the milk frother under tap water.4. Install the milk frother, making sure it is firmly and correctly in place and that the part with the plug is on the left.5. Install the coffee outlet cover, and the cleaning is completed. | |
| Drip tray Empty the drip tray every day and clean it once every week. | 1. Remove the drip tray.2. Add some cleaning solution and rinse the drip tray under tap water.3. After cleaning, install the drip tray again. | |
| Grinder | Clean it once every week. | |
| Powder dispensing channel Check it once a week. | Method 1:1.Simultaneously press the “Bean-emptying” key “ ” and the “Single cup espresso” key “ ” and hold them for 2 seconds. Their corresponding indicators flash and the door is opened.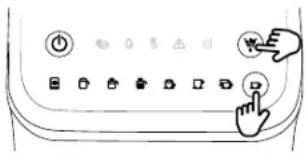 2.Open the door and use a toothpick to loosen the ground coffee in the powder dispensing channel. Then, close the door when the is ground coffee falls down.3.Simultaneously press the “Bean-emptying” key “ ” and the “Single cup espresso” key “ ” and hold them for at least 0.3 second again. Their corresponding indicators extinguish, and the door is closed.Method 2:If there are a few remaining coffee beans in the bean box, press the, hold and press the “Bean-emptying” key “ ” and hold it for at least one second. The appliance will keep working until the ground coffee that blocks the powder dispensing channel is released. Then, the appliance returns to normal operating mode.NOTE: If the ground coffee becomes obviously finer during the use of the appliance, or the coffee puck left over after the brewing process is complete is smaller, please check the powder dispensing channel for any blockage. The powder dispensing channel should be cleaned once every week. 2.Open the door and use a toothpick to loosen the ground coffee in the powder dispensing channel. Then, close the door when the is ground coffee falls down.3.Simultaneously press the “Bean-emptying” key “ ” and the “Single cup espresso” key “ ” and hold them for at least 0.3 second again. Their corresponding indicators extinguish, and the door is closed.Method 2:If there are a few remaining coffee beans in the bean box, press the, hold and press the “Bean-emptying” key “ ” and hold it for at least one second. The appliance will keep working until the ground coffee that blocks the powder dispensing channel is released. Then, the appliance returns to normal operating mode.NOTE: If the ground coffee becomes obviously finer during the use of the appliance, or the coffee puck left over after the brewing process is complete is smaller, please check the powder dispensing channel for any blockage. The powder dispensing channel should be cleaned once every week. | |
| Brewing base | Check it once a week. Clean the coffee residue around the brewing base with a brush. | |
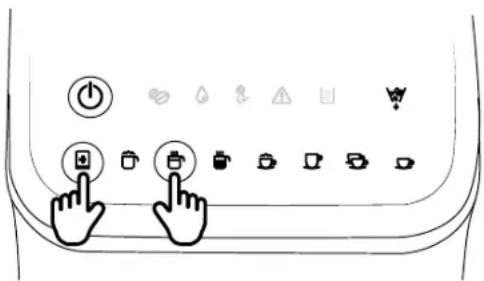
| Brewing system bracket Check it once a week. 1. When the appliance is | powered on, simultaneously press the Manual Clean key “ ➕ ” and Double cup espresso “ ➕ ” key and hold them for 1 second to enter the mode for cleaning the dead corner of the brewer.2. After entering the brewer cleaning mode, the brewer moves to the bottom.3. After the brewing door is opened (the appliance stays in the safe protection state), the dead corner of the brewer can be cleaned.4. When you finish cleaning, close the brewing door.5. Simultaneously press the Manual Clean key “ ➕ ” and Double cup espresso “ ➕ ” key and hold them for 1 second to exit the cleaning mode. | |
natural_image
Line drawing of a hand cleaning a cloth with sparkles above (no text or symbols)Clean the brewing system and frothing system manually
- Fill the water tank with an appropriate amount of room-temperature water, but do not exceed the MAX water level. Then, close the water tank lid.
- Install the brewer assembly into the brewing chamber of appliance and close the brewing chamber door.
- Place the drip plate on the drip tray, and place a cup (container) on the drip plate.
- Activate the "Manual clean" function to clean the brewing system and the milk frothing channel. After preheating, all functional indicators will be constantly lit, and the appliance enters the standby mode. Press the Manual clean key " and hold it for at least 0.2 second. The appliance will enter the manual clean mode.
NOTE: If the milk-frothing channel has to be cleaned, please install the milk tank and fill the milk tank with some clean water instead of milk. If the milk-frothing channel does not require cleaning, please tightly close the milk frother plug.
- After cleaning, the appliance automatically enters the standby mode.
- Open the brewing chamber door and clean the coffee grounds in the brewing system with a brush.
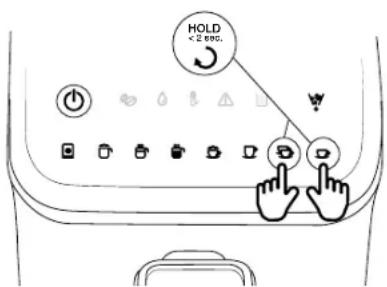
Removing mineral deposits
- The appliance has to be descaled when the indicators of Hot water “ 📄 and Manual clean “ ✪ flash at the same time.
- Fill the water tank with water and descaler to the MAX level as indicated on the water tank (the ratio of water to descaler is 4:1; for details, please refer to the instructions for the descaler; please use a "household descaler"). You may also use the citric acid instead of the descaler (one hundred parts of water to three parts of citric acid).
- Place a container (cup) on the drip plate.
- Simultaneously press the Hot water key “☐” and the Manual clean key “☐” and hold them for 1 second. The appliance starts the descaling process.
- The whole descaling procedure lasts about 10 minutes. The eight (8) functional indicators flash slowly from left to right.
- After the descaling is completed, the Hot water “☐” and Manual clean “☐ indicators stop flashing.
NOTE: When descaling is complete, the counter for coffee brewing cycles will be reset to zero, and it will restart counting. The descaling prompt will pop up when the appliance has brewed a total of 500 cycles of coffee again.
TROUBLE SHOOTING
| Problem Cause Solution | ||
| The Refill indicator “💡” flashes. | Not enough water in the water tank. | 1. Refill the water tank. 2. Please contact the service department if the problem cannot be solved. |
| The Warning indicator “⚠️” flashes. | The grind setting knob, door and inner drip tray are not properly installed. | 1. Correctly install the grind setting knob, door, and inner drip tray. 2. Please contact the service department if the problem cannot be solved. |
| The Warning indicator “⚠️” is constantly lit. | The brewer or inner drip tray is not correctly installed. | 1. Correctly install the brewer or inner drip tray. 2. Please contact the service department if the problem cannot be solved. |
| The No bean indicator “💡” is constantly lit. | Not enough coffee beans in the bean box. | Fill the bean box with coffee beans and then run the coffee machine to brew coffee. Then, the coffee bean warning can be cancelled. |
| The Residue full indicator “💡” is constantly lit. | The residue collection container needs to be cleaned. | 1. Remove the residue collection container and inner drip tray for cleaning. After 2 seconds, the “Residue full indicator” “💡” turns off. 2. Please contact the service department if the problem cannot be solved. |
| The Brewer cleaning indicator “💡” is constantly lit. | The brewer needs to be cleaned. | 1. Remove the brewer for cleaning. After 2 seconds, the “Brewer cleaning indicator” “💡” turns off. 2. Please contact the service department if the problem cannot be solved. |
| The Single cup Espresso “☐” and Warning indicators “⚠️” flash at the same time. | The grinding motor does not work normally. | 1. Turn off the appliance and restart it.2. Please contact the service department if the problem can not be solved. |
| The Hot water indicator “☐” flashes. | The overheating protection mechanism for the boiler is activated. | 1. If you wish to use the “Hot water” function, wait for the appliance to cool down for 3–5 minutes. Then, the “Hot water” function can be activated. |
| The No bean indicator “☐” and Warning indicator “⚠️” flash at the same time. | The appliance has performed 16 consecutive bean grinding cycles, and the time for each grinding was shorter than 5 minutes. The grinding has to cool down for 5 minutes. During this time, all functions are inactive. | 1. The appliance will rest for 5 minutes. Alternatively, turn off the appliance and restart it.2. Please, contact the service department if the problem cannot be solved. |
| The Hot water indicator “☐” and Warning indicator “⚠️” flash at the same time. | The flow meter has no signal, and the water-dispensing is abnormal. | 1. Fill the water tank with water.2. Please contact the service department if the problem cannot be solved. |
| The Latte indicator “☐” and Warning indicator “⚠️” flash at the same time. | The switch element has no signal and the brewing motor does not work normally. | 1. Turn off the appliance and restart it.2. Please contact the service department if the problem cannot be solved. |
| The crema is not rich. The ground coffee is too coarse. | Turn the grind setting knob clockwise to select the proper setting. | |
| The type of coffee bean used is wrong. | Use the coffee beans which are suitable for brewing espresso. | |
| Coffee comes out slowly or comes out drip by drip. | The coffee is ground too finely ground coffee is too fine. | Turn the grind setting knob anticlockwise to select the proper setting. |
| The machine can not be activated. The power source is not | The power plug is not firmly in the socket/outlet. | Connect the power plug firmly to the power mains and the power socket on the appliance. |
| connected correctly. | Connect the power source of the machine. | |
| The on/off button is not turned on. | Turn on the on/off button. | |
| The brewer can not be removed. | The machine is not turned off correctly. | Turn off the machine and then turn it on again to reset the brewer. Please contact the after-sales department if the problem cannot be solved. |
| The brewer is blocked. Contact the after-sales department. | ||
| The milk foam is too large or sprays from the milk outlet. | The milk is not cold enough or the milk used is not suitable for frothing. | We recommend using milk at a temperature of 5–10 °C, and with protein content of at least 3%. |
| The milk frother is too dirty. Clean the milk frother. | ||
| Both the residue full indicator and brewer cleaning indicator illuminate. | You may have emptied the residue collection container and cleaned the brewer while the coffee machine was turned off. | Please always empty the residue collection container and clean the brewer when the coffee machine is turned on. Reinstall both parts after waiting for at least 3 seconds. |
| The residue collection container is not full, but the appliance prompts you to empty the residue collection container or clean the brewer. | The counter was not reset after the residue collection container was emptied or the brewer was cleaned. | After replacing the residue collection container or the brewer, always wait for about 3 seconds to make sure the counter is reset to zero. Always empty the residue collection container and clean the brewer when the coffee machine is turned on. The counter will not be reset if the residue collection container is emptied, or the brewer is cleaned when the coffee machine is turned off. |
| The coffee machine can grind coffee beans, but there is no coffee coming out of the grinder. | Please check the deeply roasted coffee beans for any oil on the surface. The powder dispensing channel will be blocked if the coffee beans are dampened or there is too much oil on the surface. | 1. Simultaneously press the “Bean-emptying” key “ ” and the “Single cup espresso” key “ ” and hold them for 2 seconds. The door is opened, and their corresponding indicators flash.2. After the door is opened, use the cleaning brush to loosen the ground coffee in the powder dispensing channel, and then close the door when ground coffee falls down.3. Then, simultaneously press the “Bean-emptying” key “ ” and the “Single cup espresso” key “ ” and hold them for at least 0.3 second again. Their corresponding indicators extinguish, and the door is closed. |
| The coffee machine makes loud noise. | It is normal that the coffee machine makes noise during operation. | If the coffee machine starts to make any unusual noise, please lubricate the brewing system and contact the after-sales department. |
This equipment is labelled in compliance with the European Directive 2012/19/EC on waste electric and electronic equipment – WEEE. The Directive specifies the requirements for collection and management of waste and electric equipment effective in the entire European Union.
ENVIRONMENT
At the end of the appliance's useful life, do not discard it with common household waste. Take is to an authorized recycling centre. This will help preserve the environment.
WARRANTY AND REPAIR
For more information or in case of problems, please contact the Gorenje Call Centre in your country (phone number listed in the International Warranty Sheet). If there is no such centre in your country, please contact the local Gorenje dealer or Gorenje's small domestic appliance department.
For personal use only!
GORENJE WISHES YOU A LOT OF PLEASURE IN USING YOUR APPLIANCE.
gorenje
Life Simplified


- gorenje
- Life Simplified
- POMEMBNA VARNOSTNA NAVODILA
- Posoda za vodo:
- Penilnik mleka
- Odcejalna plošča
- Priprava ene skodelice espressa
- Priprava kapučina
- Priprava bele kave
- Priprava vroče vode
- Ročno penjenje
- Ročno čiščenje
- VAŽNE SIGURNOSNE NAPOMENE
- Gumb za podešavanje mljevenja
- OPREZ!
- Pločica za prikupljanjetekućine
- Priprema jedne šalice Espressa
- Priprema dviju šalica espressa
- Priprema kave Americano
- Priprema Cappuccina
- Priprema Lattea
- Priprema vruće vode
- Ručno čišćenje
- Ispraznite preostala zrna kave
- Savjeti za kavu izvrsnog okusa
- Uklanjanje mineralnih naslaga
- VAŽNE PREDOSTROŽNOSTI
- KONTROLNA PLOČA
- PRE PRVE UPOTREBE
- Penilica za mleko
- Podešavanje visine izlaznog otvora za kafu
- Rešetka za kapanje
- Napunite posudu za kafu u zrnu
- Skuvajte Americano
- Skuvajte kapučino
- NAPOMENE:
- Skuvajte Latte
- Priprema tople vode
- Ručna pena
- Резервоар за вода:
- Сад за цедење
- Една шолја еспресо
- Кафе американо
- Капучино
- Лате
- Врела вода
- Рачно правење пена
- Отстранување бигор
- IMPORTANT SAFEGUARDS
- CONTROL PANEL
- BEFORE THE FIRST USE
- Water tank:
- Milk tank:
- Grind setting knob
- CAUTION!
- Milk frother
- Adjusting the height of the coffee outlet
- Brewer
- Inner drip tray and residue collection container
- INSTRUCTION MANUAL EN
- Drip plate
- Fill the bean box
- OPERATION
- Power on and Preheat
- Brew Single-cup Espresso
- Brew two cups of Espresso
- Brew Americano
- Brew Cappuccino
- NOTES:
- Brew Latte
- Make hot water
- Manual froth
- \*\*
- Manual clean
- Empty the residual coffee beans
- Energy-saving mode
- Set the coffee and milk dispensing amount
- Setting the coffee dispensing amount:
- The range of coffee dispensing amount is as follows:
- Operation for setting the milk dispensing amount:
- The range of milk dispensing amount is as follows:
- Factory reset
- CLEANING AND MAINTENANCE
- Hints for great-tasting coffee
- Clean the brewing system and frothing system manually
- Removing mineral deposits
- ENVIRONMENT
- WARRANTY AND REPAIR
Brand : GORENJE
Model : GFACM20S
Category : Coffee maker