
GZ-3641 - Oven Guzzanti - Free user manual and instructions
Find the device manual for free GZ-3641 Guzzanti in PDF.


| Product Type | Electric Mini Oven |
| Brand | Guzzanti |
| Model | GZ-3641 |
| External Dimensions (W x D x H) | 552 x 458.5 x 353.5 mm |
| Internal Dimensions (W x D x H) | 395 x 390 x 196.5 mm |
| Power Supply | 220-240 V ~ 50/60 Hz, 16 A |
| Bottom Heater Power | 875 W |
| Top Heater Power | 750 W |
| Grill Heater Power | 1500 W (750 W + 750 W) |
| Turbo Fan Power | 13-15 W |
| Turnspit Power | 4-6 W |
| Oven Lamp Power | 15-25 W |
| Thermostat Range | 40 - 220 °C |
| Timer Range | 0 - 90 min (continuous operation option) |
| Oven Functions | Upper/Lower Heating, Lower Heating, Grill, Turbo Fan, Turbo + Grill, Turbo + Lower, Turbo + Upper/Lower, Defrost, Yoghurt, Steam Cleaning |
| Hotplate Functions | Single or separate control (optional on some models) |
| Door Type | Glass oven door |
| Accessories Included | Circular pouch (optional), Rectangular disc, Cable grid, Chicken rotation skewer, Square tray |
| Cleaning Method | Steam cleaning with water; wipe with damp cloth; do not immerse |
| Safety Features | Grounded plug required, automatic shut-off with timer, child safety warnings |
| Lamp Replacement | 220-240 V AC, 15-25 W, type E14 or G9 |
| Compliance | WEEE Directive, recyclable packaging |
Frequently Asked Questions - GZ-3641 Guzzanti
User questions about GZ-3641 Guzzanti
0 question about this device. Answer the ones you know or ask your own.
Ask a new question about this device
Download the instructions for your Oven in PDF format for free! Find your manual GZ-3641 - Guzzanti and take your electronic device back in hand. On this page are published all the documents necessary for the use of your device. GZ-3641 by Guzzanti.
USER MANUAL GZ-3641 Guzzanti
ELEKTRICKÁ MINI TROUBA ELEKTRICKÁ MINI RÚRA MINI PIEKARNIK ELEKTRYCZNY ELEKTROMOS MINI SÜTŐ ELEKTRIČNA MINI PEČICA ELEKTRISCHER MINI-BACKOFEN ELECTRIC MINI OVEN
GZ-3601, GZ-3611
Návod k obsluze Návod na obsluhu Instrukcja obsługi Használati útmutató Navodila za uporabo Gebrauchsanleitung Instruction manual
Vážený zákazníku,
natural_image
Isometric view of a slatted metal sheet with a labeled measurement point (no text or symbols beyond the number 11)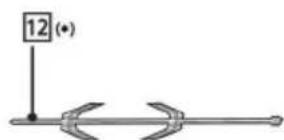
natural_image
Line drawing of a mechanical component with a knob and arrow, no text or symbols present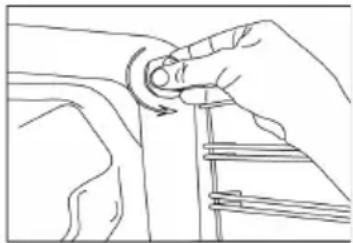
natural_image
Line drawing of a hand holding a circular object with an arrow indicating rotation (no text or symbols)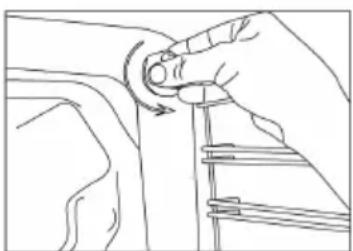
natural_image
Line drawing of a hand holding a tool near a mechanical component (no text or symbols)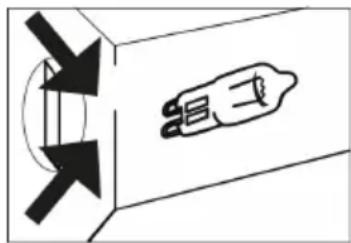
natural_image
Pure diagram of a mechanical component with directional arrows and a central symbol (no text or labels)natural_image
Symbol of a trash bin crossed with no text or numbers, representing waste sorting or disposal (no text present)natural_image
Symbol of a trash bin crossed with no text or numbers, representing environmental restriction (no text present)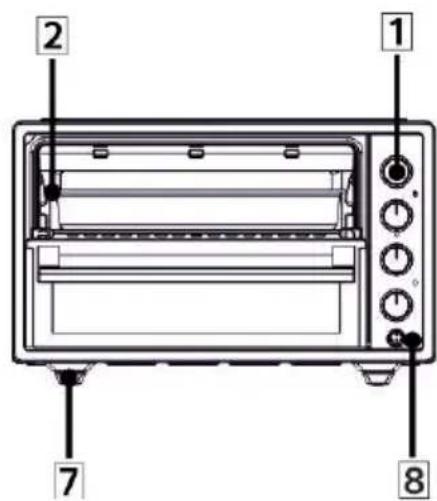
natural_image
Isometric view of a slatted metal sheet with a labeled measurement point (no text or symbols beyond the number 11)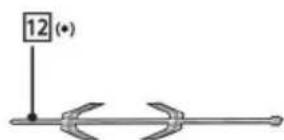
natural_image
Line drawing of a mechanical component with a knob and arrow indicating rotation (no text or symbols)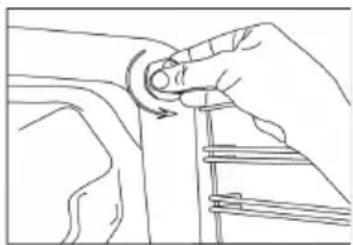
natural_image
Line drawing of a hand holding a circular knob with an arrow, next to a mechanical component (no text or symbols)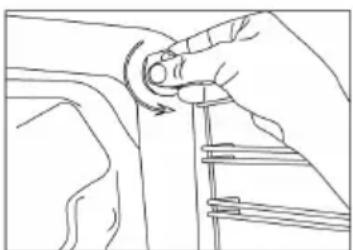
natural_image
Line drawing of a hand adjusting a mechanical component (no text or symbols)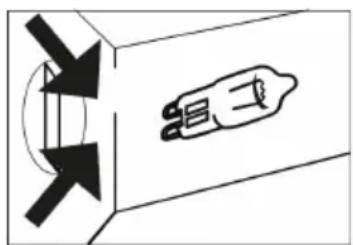
natural_image
Pure diagram of a hand holding a device with directional arrows, no text or symbols presentnatural_image
Symbol of a trash bin crossed with no text or numbers, representing waste sorting or disposal (no text present)natural_image
Symbol of a trash bin crossed with no text or numbers, representing environmental restriction (no text present)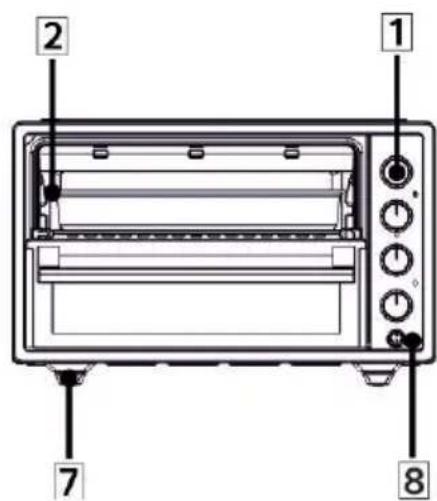
natural_image
Isometric view of a striped rectangular surface with a labeled point '11' (no text or symbols beyond the number)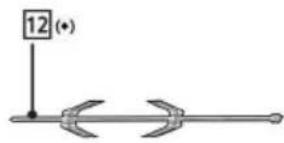
natural_image
Line drawing of a mechanical component with a knob and arrow, no text or symbols present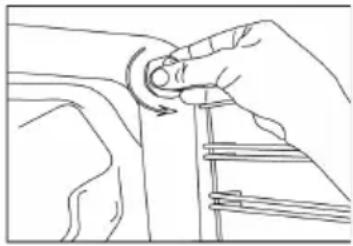
natural_image
Line drawing of a hand holding a circular knob with an arrow, next to a ladder (no text or symbols)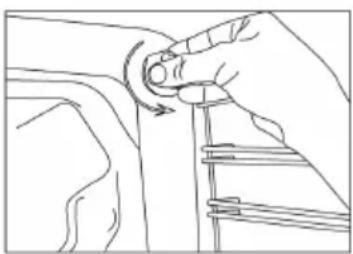
natural_image
Line drawing of a hand adjusting a curved mechanical component (no text or symbols)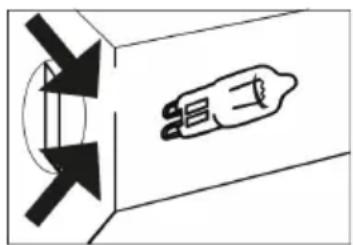
natural_image
Pure diagram of a hand holding a device with directional arrows, no text or symbols presentnatural_image
Symbol of a trash bin crossed with no visible text or labelsnatural_image
Symbol of a trash bin crossed with no text or numbers, representing environmental protection (no text present)natural_image
Line drawing of a mechanical component with a knob and lever mechanism (no text or symbols)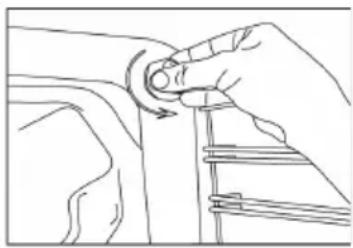
natural_image
Line drawing of a hand holding a circular object with an arrow indicating rotation (no text or symbols)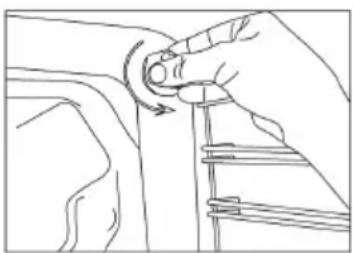
natural_image
Line drawing of a hand adjusting a mechanical component with a curved arrow (no text or symbols)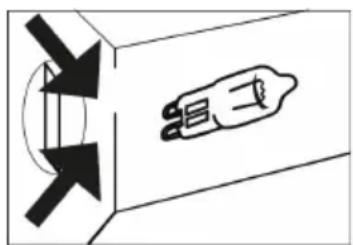
natural_image
Pure diagram of a mechanical or electrical component with directional arrows and a central symbol (no text or labels)natural_image
Symbol of a trash bin crossed with no text or numbers, representing waste sorting or disposal (no text present)natural_image
Symbol of a trash bin crossed with no text or numbers, representing waste sorting or disposal (no text present)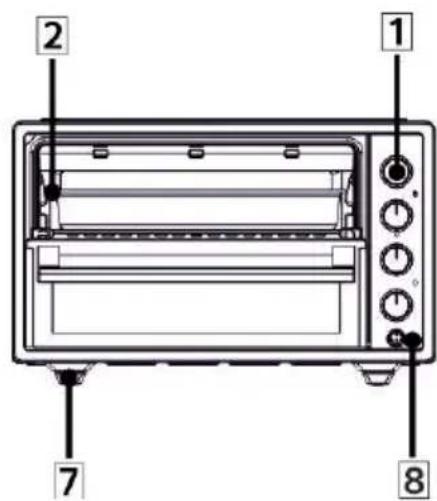
natural_image
Isometric view of a slatted metal sheet with a labeled measurement point (no text or symbols beyond the number 11)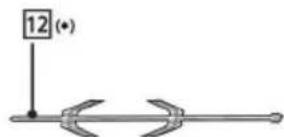
natural_image
Line drawing of a hand holding a circular object with an arrow indicating rotation (no text or symbols)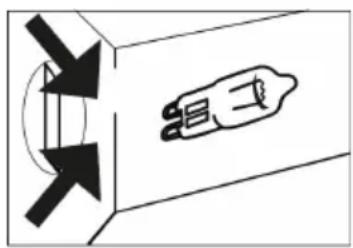
natural_image
Pure diagram of a hand holding a device with directional arrows, no text or symbols presentnatural_image
Symbol of a trash bin crossed with no text or numbers, representing waste sorting or disposal (no text present)natural_image
Symbol of a trash bin crossed with no text or numbers, representing environmental protection (no text present)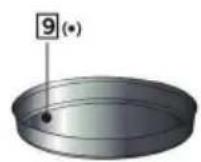
natural_image
Diagram of a striped rectangular object with a labeled point '11' pointing to it (no text or symbols on the object itself)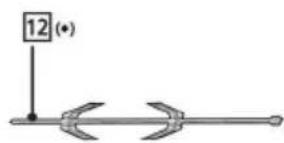
natural_image
Line drawing of a mechanical component with a knob and arrow, no text or symbols present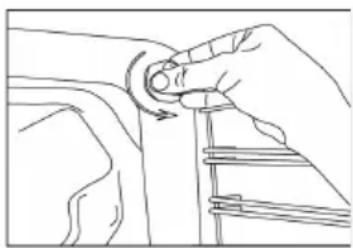
natural_image
Line drawing of a hand holding a circular object with an arrow indicating rotation (no text or symbols)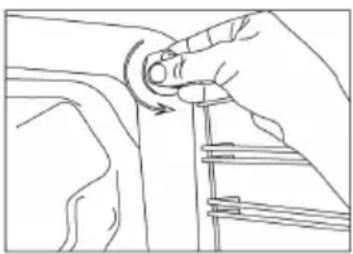
natural_image
Line drawing of a hand adjusting a curved mechanical component (no text or symbols)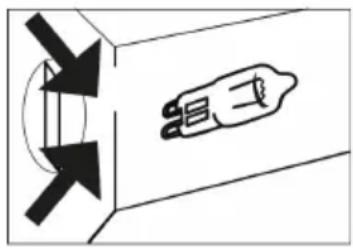
natural_image
Pure diagram of a hand holding a device with directional arrows, no text or symbols presentnatural_image
Symbol of a trash bin crossed with no visible text or labelsnatural_image
Symbol of a trash bin crossed with no text or numbers, representing environmental protection (no text present)We thank you for the confidence that you have placed in us. Our aim is to ensure that you use this product with great efficiency.
This product is manufactured in modern facilities, in a rigorous work environment without harming the nature according to the total quality approach.
As in every electrical appliance, please read the operation manual carefully before you use your midi oven to serve in a most efficient way and keep the features as new as the first day for a long time.
NOTE:
This operation manual is prepared for several models. Some features may not be included in your device.
Product images are schematic.
This product is manufactured in eco-friendly modern facilities without harming the nature.
"Complies with the WEEE Regulations."
WARNINGS
This product is manufactured in accordance with the safety regulations. Inappropriate use can lead to personal injury and damage to the device.
Do not place anything that can be inflammable, ignitable, meltable or perishable by heat even the device is not operating to prevent potential risks.
The device cannot be operated with external settings or remote control system.
Door surface may be overheated while the device is operating.
Do not pour could water on the tray or in the oven while the device surface is still hot. Device surface may get damaged as a result of rapid heat changes and lead to personal injuries.
An additional ventilation may be required as a result of heavy use of the device for an extended period, for example; opening a window or more effective ventilation or increasing the mechanic ventilation system if existing. Before using the midi-oven keep away the inflammable materials such as curtains, tulle or paper from the device.
Do not place inflammable or ignitable materials on or in the device.
Keep children away from the device.
This device is not intended for use by the persons who have lack of experience or knowledge or physical, sensory and mental disability (including children) without supervision and management of a person who is responsible for the device safety.
The device can be used by children over age of 8 and adults whose physical, sensory and mental skills are decreased or persons who have lack of experience or knowledge only in the case that they are under supervision or have been instructed about safe use of the device and against danger of burning.
Children should not play with the device.
Cleaning and maintenance cannot be performed by children without supervision.
Device will get overheated during operation and will remain hot for a short period of time after operating; do not touch and do not let children touch the heating surfaces.
Keep away the device and the cable from children under age of 8. Children must be kept under supervision to prevent them from playing with the device.
Device is intended to be used in households or similar places.
Do not press the door with heavy materials, do not lean or place heavy materials on the door while the oven door is open and do not carry by holding the oven door.
Use your device for cooking or heating food only.
Please do not use your device other than intended use (warming the environment, commercial purpose, etc.).
Please ensure the device is unplugged before replacing the device lamp to prevent to be exposed to a possible high voltage.
ELECTRICAL CONNECTION AND SAFETY
Device needs 16 Amperage current. If necessary, get skilled people for installing the device.
Your device is set suitable for 220-240V,\~ 50/60Hz power source. If your mains values are different than the mentioned values, please contact with a qualified electrician or technician for further guidance.
Electrical connection of your device must be done with grounded wall sockets only installed according to the instructions. If there is no grounded wall socket in the place that you will use your device, please contact to authorized service.
Producer company cannot be held liable for the damages caused by ungrounded wall sockets. If the feeding cord is damaged, this cord should be replaced by the manufacturer or their authorized service or an expert with expertise at same level to prevent risks. Device cable should not touch the hot parts of the device.
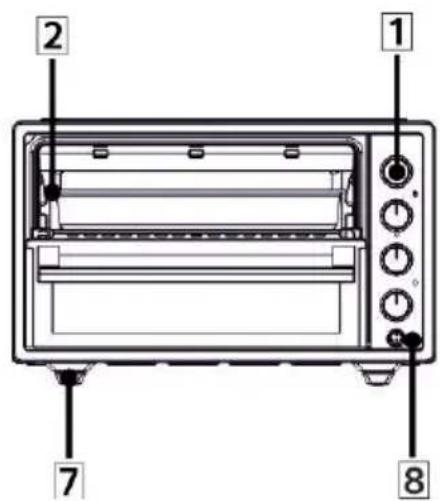
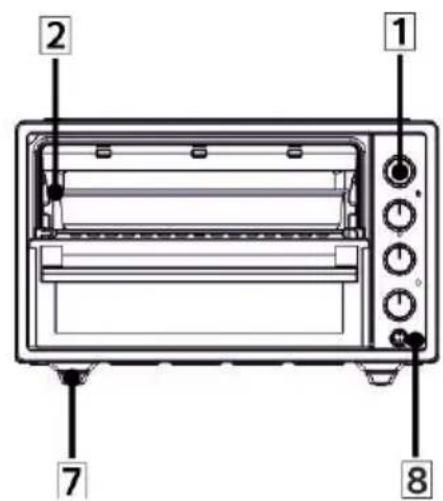
DESCRIPTION OF OVEN AND CONTROL PANEL
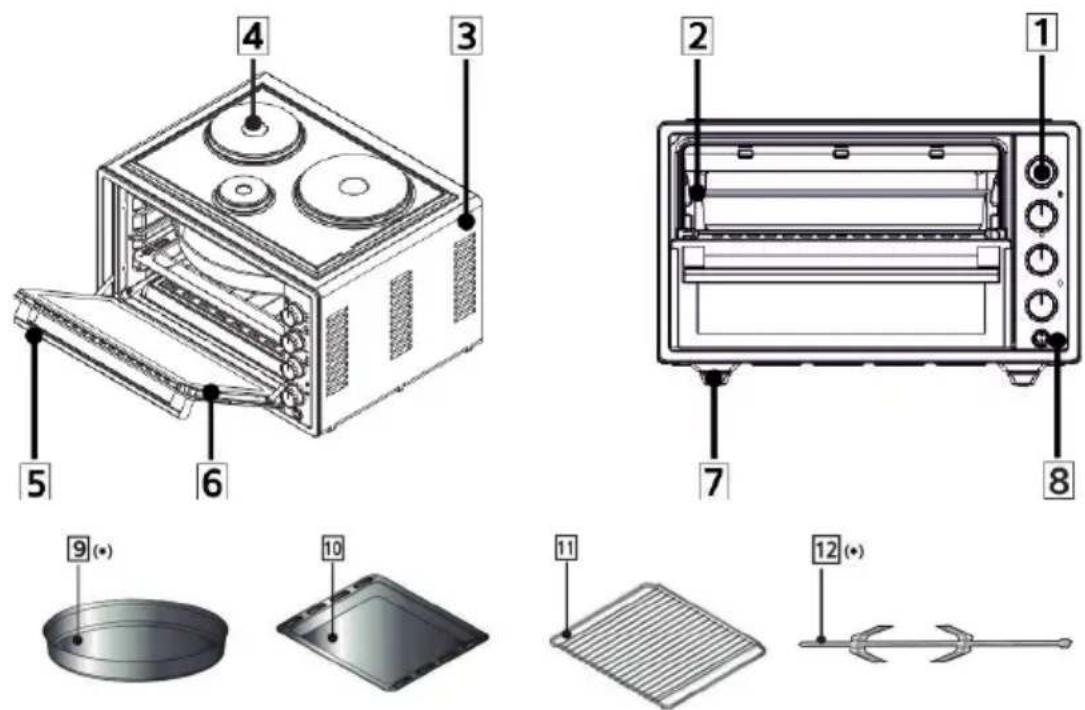
- Control buttons
- Boiler
- Oven body
- Kitchen (optional)
- Handle
-
Glass oven door
-
Feet of the oven
- Control panel
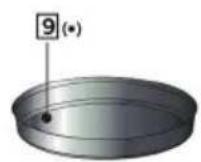
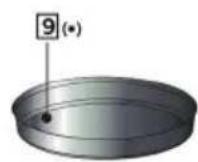
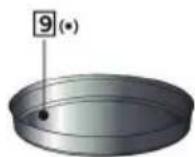
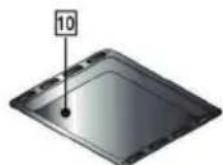
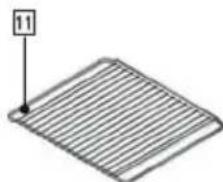
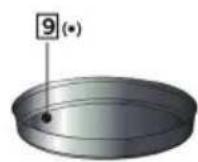
- Circular pouch (optional)
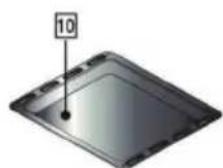
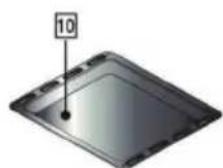
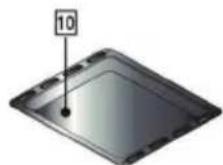
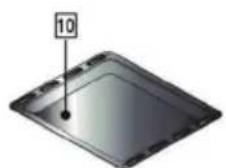
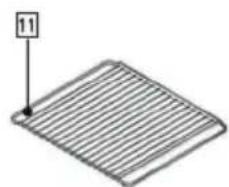
- Rectangular disc
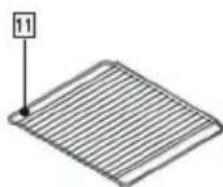
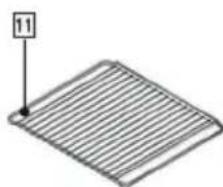
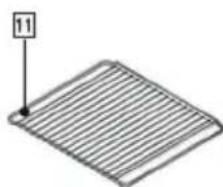
- Cable grid
- Chicken rotation
TECHNICAL SPECIFICATIONS
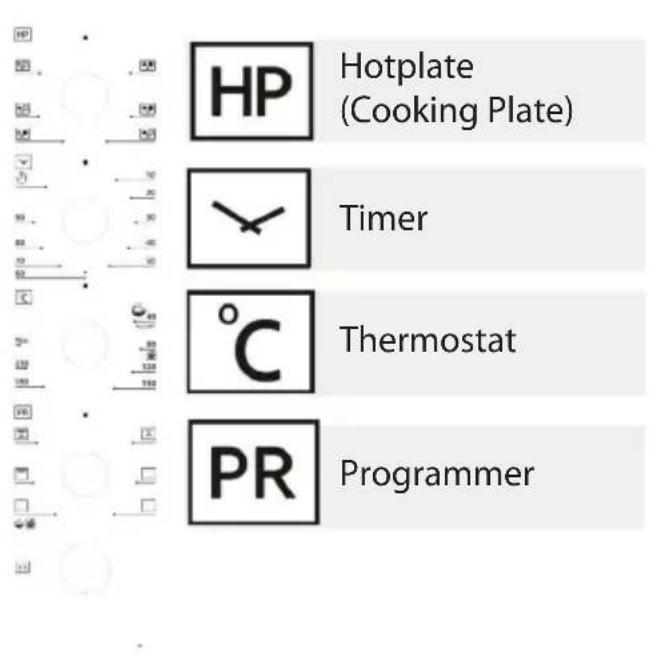
Timer:
Enables adjusting of cooking time. When the set time has expired, timer shall cut off the power of the heaters and provide a warning with a tingling sound. Set the timer, program and thermostat buttons to "0" to turn off your appliance.
When the timer is set to √it shall operate indefinitely.
Thermostat:
Thermostat ensures a temperature from 40 to 220^ inside the oven. Used with oven program function button. When the temperature in your oven reaches the set value, the thermostat will break the circuit and thermostat light will go off. If the temperature drops below the set temperature, the thermostat will be activated and the indicator light will illuminate.
Programmer:
Allows you to select oven functions. Functions are described in the next section. The function selection button and oven thermostat button shall be set to a desired temperature rate. Otherwise selected function button does not operate. Hotplate and oven functions do not operate simultaneously.
Chicken roast function:
Only chicken roast motor operates. Provides chicken roast by rotating the skewer. Grill heater can also be used for roasting.
Hotplate Programmer:
Enables selection of Hotplate (Cooking Plate) functions.
Hotplates can be controlled from a single button or individual buttons. Does not operate with oven functions simultaneously.
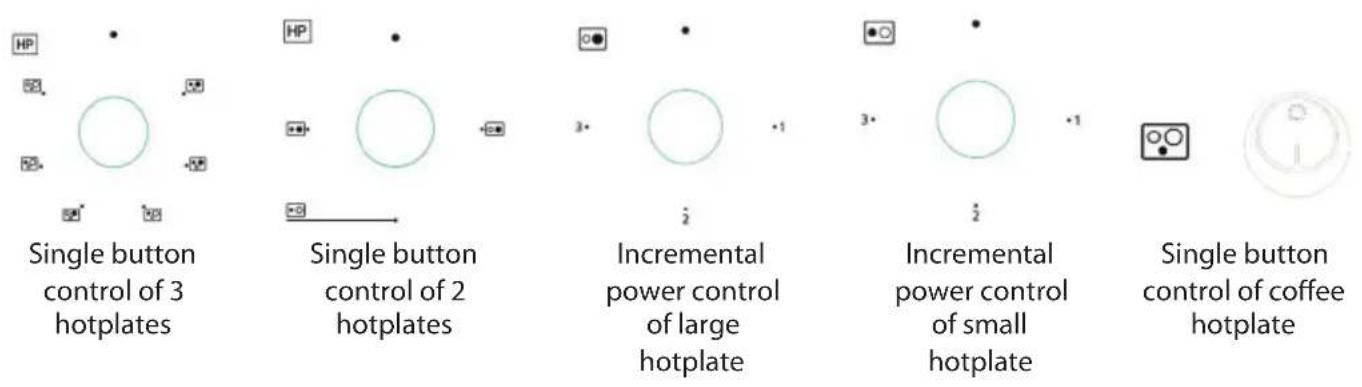
Operation of the Oven Functions
Oven functions may change based on the model each minimidi oven may not include all of the specified oven functions.

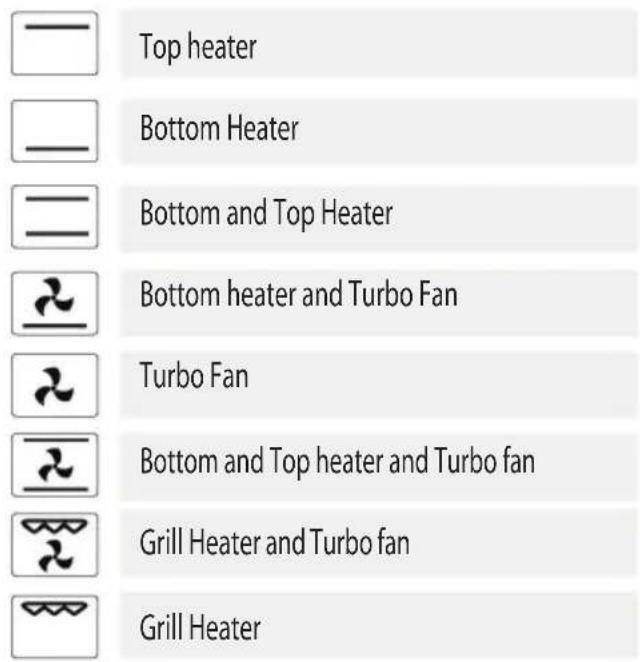
Upper and Lower Heating
Upper and Lower heating are activated. The food is cooked simultaneously from top and bottom. It is applicable for instance for cooking cake, patty or cakes or stew in moulds or containers. Use a single tray for cooking.

Lower heating
Only lower heating are activated. It is applicable for instance to bake pizza or food that requires to be browned on the lower section.

Turbo fan backed up with Grill
Grill heater operates with fan motor simultaneously. Suitable for meatballs, chicken and pastry to be roasted.

Grill
The grill cooker is used to grill meats such as steaks, sausages and fish. Place tray to the lower rack and put water inside the tray while.

High heating
Only upper heating, upper heating are activated.
Thanks to the turbo fan feature, the heat is dispersed homogeneously in the oven. It is applicable for instance for cooking cake, patty or cakes or stew in moulds or containers. Use a single tray for cooking.

Turbo fan supported lower heating
Lower heating operates with turbo fan motor simultaneously.
The hot air is dispersed homogeneously in the oven. To cook the bottom parts of crispy pita or spicy pancake.

Turbo fan supported upper and lower heating
Turbo fan, upper and lower heating are activated simultaneously. Thanks to the turbo fan feature, the heat is dispersed homogeneously in the oven. It is applicable for instance for cooking cake, patty or cakes or stew in moulds or containers. Use a single tray for cooking.
| External | width | 552 | mm | |||
| External | depth | 458.5 | mm | |||
| External | height | 353.5 | mm | |||
| Internal | width | 395 | mm | |||
| Internal | depth | 390 | mm | |||
| Internal | height | 196.5 | mm | |||
| Thermostat | 40 - 220 °C | |||||
| Timer (*) | 0 a 90 min. | |||||
| Bottom | heater | 875 | W | |||
| Top | heater | 750 | W | |||
| Grill heater | 1500 W (750 W + 750 W) | |||||
| Supply voltage | 220 - 240 V ~ 50 / 60 Hz | |||||
| Turbo fan (*) | 13 - 15 W | |||||
| Turnspit | 4 | - | 6 | W | ||
| Oven lamp (*) | 15 - 25 W | |||||
| Hot plate (*) | ∅ 180 HP | 1500 W | ||||
| ∅ | 145 | HP | 1000 | W | ||
| ∅ | 80 | HP | 300 | W |
(*): Included in some models.
CURING YOGHURT
Select thermostat switch to yoghurt mode whilst the oven is empty, set the program switch to lower resistance, and preheat the oven for 10 minutes. In the meantime, start curing your yoghurt in your utensil. Please make sure that the utensil you will use is suitable for use inside an electrical oven and its size is appropriate for the size of your oven.
For curing, boil the fresh milk you have purchased at 90^ for 10-15 minutes, and then let it cool down to 43 - 45^ (curing temperature).
Add yeast with a ratio of 1%-3% and stir slowly while the milk is at this temperature. Put the utensil with the milk and the added yeast to the 1st shelf of the pre-heated oven without closing its lid and close the oven door and set the timer to position for manual operation.
After 5 hours, remove the cured yoghurt from the oven and keep it at room temperature for 15-20 minutes. Keep the yoghurt without shaking it for 1 day at 4°C in a refrigerator. After 1 day, yoghurt is ready to be consumed. Bon appetite!
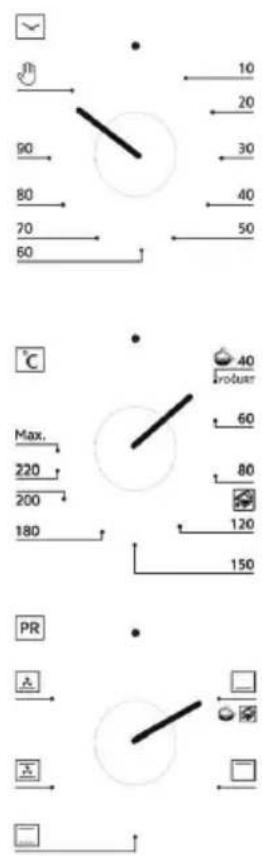
STEAM CLEANING
This allows easier cleaning of the dirt as it can be softened by the steam occurred inside the oven without using chemicals.
Remove all accessories from the oven. Put 2 glasses of water inside the square tray, and place the tray to the bottom shelf.
Bring the thermostat to steam cleaning 📂ode. Set the timer to 30 minutes.
Bring the program switch to lower resistance mode.
After operating the oven for 30 minutes, open the door and wipe the inner surface of the oven with a clean damp cloth.
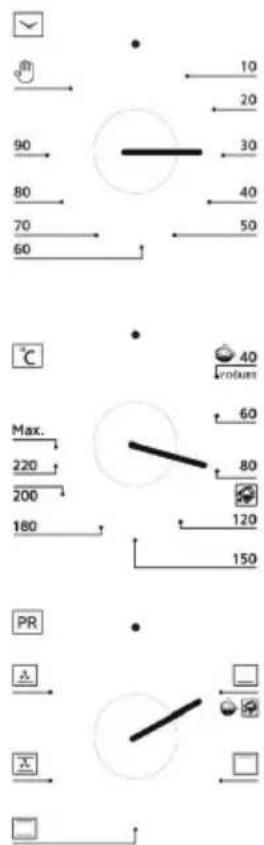
COOKING TABLE
You can find information for the food ranges that we tested in our laboratories to determine the cooking values in the below table. Cooking times may differ depending on the mains voltage, nature of the food to be cooked, quantity and the temperature. The foods that you cook by using these values may not be suitable for your taste. You can try different values to have results suitable to your taste.
| Foods Thermostat value(°C) | Cooking Time(minutes) | Shelf order |
| Cookie 170 - 180 25 - 30 1st Shelf | ||
| Cake 170 - 190 40 - 50 1st Shelf | ||
| Pie 180 - 200 40 - 50 1st Shelf | ||
| Tray Cake 170 - 180 20 - 30 1st Shelf | ||
| Cup Cake 170 - 180 35 - 40 1st Shelf | ||
| Pasta Bake 180 - 190 25 - 30 1st Shelf | ||
| Fish 220 - MAX 30 - 40 1st Shelf | ||
| Lamb 220 - MAX 90 - 120 1st Shelf | ||
| Sheep | 220 - MAX 90 - 120 1st Shelf | |
| Beef 220 - MAX 90 - 120 1st Shelf | ||
| Turkey | 220 - MAX 45 - 55 1st Shelf | |
| Chicken Piece | 220 - MAX 75 - 100 1st Shelf | |
| Defrosting | 60 - 120 | 55 - 60 |
Please pre-heat your oven before cooking.
You can use the time as the pre-heating period until the heating lamp first turns off.
USING THE OVEN
Insert the plug in a grounded wall socket. Bring the timer to manual or automatic cooking position. Set the thermostat to appropriate temperature according to the cooking table. If you set the timer to a position between 1 to 90 minutes, you will hear a warning sound when cooking time is up and the oven will automatically be turned off. New ovens can give off a slight fume and smell on first use due to hardening of protection materials on the heaters. This is normal, not a manufacturing defect. Defrosting: Remove the material to be defrosted from its container and place on the grill. Place the square tray under the grill to keep the defrosted water. In this way, defrosted products will not stay in their defrosted water. Never use the defrosted water (for health) and dispose it.
You can use the defrosting feature as described in the cooking table.
During defrosting, it is recommended to use top and bottom heater and turbo fan (☑) As the defrosting period differs depending on the weight of product, check the process from time to time.
Do not cook with square and round trays at the same time in the oven. Before cooking, we recommend to pre-heat the oven for 8-10 minutes.
This oven is intended for use in house cooking. Please do not use it for other purposes.
IF THE OVEN DOES NOT WORK
Please check if the device cable is inserted in the wall socket correctly. Check the electrical mains.
Check the fuse.
Check if there is any damage on the power cable. If the problem continues, contact to authorized service.
OVEN LAMP (\*)
WARNING: Please ensure that the device is deactivated (all its operation buttons must be in off position) and disconnected from the mains to prevent possible exposure to high voltage.
First turn all operation buttons to off position, then discodisconnect the device from the mains power supply and then let it cool down completely.
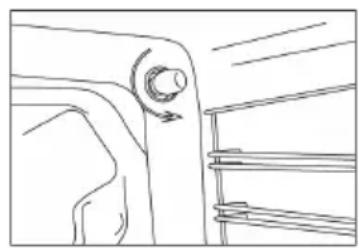
Remove the glass protection by turning as seen in the side figure.
Then remove the lamp by turning, and insert the new lamp with same specifications as the previous one. Lamp specifications should be as follows: 220 - 240 V, AC, 15 - 25 W
Type E14 Type G9
natural_image
Line drawing of a mechanical component with a knob and arrow, no text or symbols present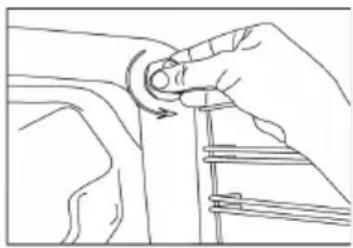
natural_image
Line drawing of a hand holding a circular object with an arrow indicating rotation (no text or symbols)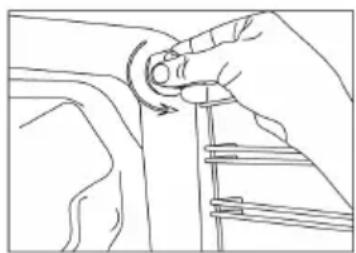
natural_image
Line drawing of a hand adjusting a mechanical component with a curved arrow (no text or symbols)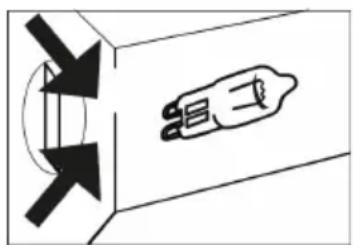
natural_image
Pure diagram of a hand holding a device with directional arrows, no text or symbols presentFinally insert again the glass protection in place.
MAINTENANCE AND CLEANING
Unplug the device and let it cool down completely.
Device will get overheated during operation and will remain hot for a short period of time after operation. Do not touch the heated parts when operating and wait until the device has completely cooled down before cleaning it.
Do not clean the inner parts, door and tray of the oven and the other parts with bristle brushes, scrubbers or knives, etc. Do not use abrasive detergents.
Clean the inner and outer surfaces of your device using a slightly damp soft cloth ensuring that no water or moist will enter into any openings of the device. Then wipe it dry using a dry soft cloth.
To protect against fire, electric shock or personal injury, NEVER immerse cord, plug, or any part of your appliance in water or any other liquid and never put them under running water to clean them. The only parts of the appliance that can be washed are its removable cooking accessories (trays, rack & turnspit).
COMPLIANCE WITH WEEE REGULATION AND DISPOSING OF THE WASTE PRODUCT
natural_image
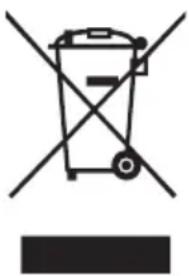
Symbol of a trash bin crossed with no text or numbers, representing waste sorting or restriction (no text present)1- This product does not contain hazardous and banned substances set forth in the Control of Waste Electrical and Electronic Equipment Regulation issued by the European authorities. Product complies with the WEEE Regulations.
2- This product is manufactured with recyclable and re-usable high quality parts and materials. Therefore please do not dispose your products with domestic or other waste at the end of its lifetime. Take
it to a collection point for recycling of electrical and electronic equipment. Ask these collection points to your local government.
Help to protect the environment and natural sources by recycling the used products. Before disposing the product please cut the electrical cable to make it unfunctional for the safety of children.
PACKAGING INFORMATION
Packaging of the product is manufactured with recyclable materials in accordance with the European directives. Please do not dispose the packaging with domestic or other waste - dispose it in the appropriate recycle bin. Please contact your local authorities for further guidance.
DISPOSAL OF USED ELECTRICAL AND ELECTRONIC EQUIPMENT
natural_image
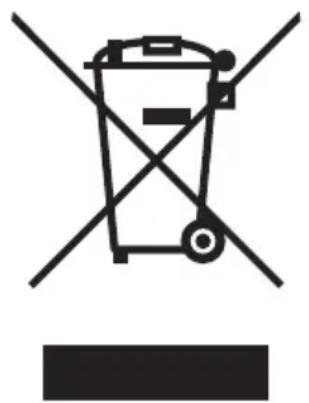
Symbol of a trash bin crossed with no text or numbers, representing environmental restriction (no text present)This symbol on products or original documents means that used electric or electronic products must not be added to ordinary municipal waste. For proper disposal, renewal and recycling hand over these appliances to determined collection points. Alternatively, in some European Union states or other European countries you may return your appliances to the local retailer when buying an equivalent new appliance. Correct disposal of this product helps save valuable natural resources and prevents potential negative effects on the environment and human health, which could result from improper waste disposal. Ask your local authorities or collection facility for more details. In accordance with national regulations penalties may be imposed for the incorrect disposal of this type of waste.
For business entities in European Union states
If you want to dispose of electric or electronic appliances, ask your retailer or supplier for the necessary information.
Disposal in other countries outside the European Union.
This symbol is valid in the European Union. If you wish to dispose of this product, request the necessary information about the correct disposal method from the local council or from your retailer.

- ELEKTRICKÁ MINI TROUBA ELEKTRICKÁ MINI RÚRA MINI PIEKARNIK ELEKTRYCZNY ELEKTROMOS MINI SÜTŐ ELEKTRIČNA MINI PEČICA ELEKTRISCHER MINI-BACKOFEN ELECTRIC MINI OVEN
- NOTE:
- WARNINGS
- ELECTRICAL CONNECTION AND SAFETY
- DESCRIPTION OF OVEN AND CONTROL PANEL
- TECHNICAL SPECIFICATIONS
- Timer:
- Thermostat:
- Programmer:
- Chicken roast function:
- Hotplate Programmer:
- Operation of the Oven Functions
- Upper and Lower Heating
- Lower heating
- Turbo fan backed up with Grill
- Grill
- High heating
- Turbo fan supported lower heating
- Turbo fan supported upper and lower heating
- CURING YOGHURT
- STEAM CLEANING
- COOKING TABLE
- USING THE OVEN
- IF THE OVEN DOES NOT WORK
- OVEN LAMP (\*)
- MAINTENANCE AND CLEANING
- COMPLIANCE WITH WEEE REGULATION AND DISPOSING OF THE WASTE PRODUCT
- PACKAGING INFORMATION
- DISPOSAL OF USED ELECTRICAL AND ELECTRONIC EQUIPMENT
- For business entities in European Union states
- Disposal in other countries outside the European Union.
Brand : Guzzanti
Model : GZ-3641
Category : Oven