
BS-801 - Hi-Fi System Vivax - Free user manual and instructions
Find the device manual for free BS-801 Vivax in PDF.

| Product Type | Hi-Fi System with Karaoke |
| Brand | Vivax |
| Model | BS-801 |
| Bluetooth Version | 5.0 |
| Bluetooth Range | Up to 10 meters (line of sight) |
| TWS Function | Yes, pair two speakers for stereo sound |
| RMS Output Power | 80W |
| Speakers | 2x 8" woofers + 1x 3" midrange + 1x 3" tweeter |
| LED Lighting | Color-changing front speaker lights |
| FM Radio | Digital FM with preset storage |
| Microphone Inputs | 1x wireless (included) + 1x wired 6.35mm (1/4") |
| Guitar Input | 1x 6.35mm (1/4") |
| AUX Input | 3.5mm stereo |
| Audio Output | RCA line out |
| USB Playback | MP3 files, up to 64GB |
| Battery Type | Built-in rechargeable lead-acid, 4500mAh |
| Battery Life | Up to 12 hours at moderate volume, ~2 hours at max volume |
| Charging Time | Approximately 6-7 hours |
| Power Supply | AC 100-240V, 50/60Hz |
| Dimensions (Approx.) | 343 mm (width) x ? x ? (depth and height not specified) |
| Accessories Included | Power cable, remote control, wireless microphone, user manual |
| Cleaning | Wipe with soft damp cloth; do not use solvents |
Frequently Asked Questions - BS-801 Vivax
User questions about BS-801 Vivax
0 question about this device. Answer the ones you know or ask your own.
Ask a new question about this device
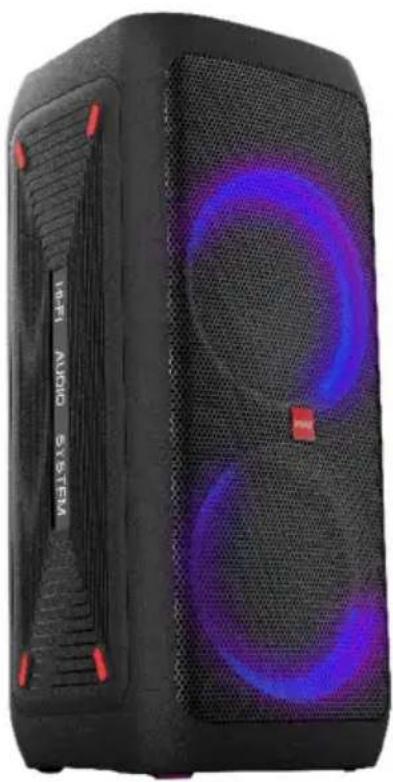
Download the instructions for your Hi-Fi System in PDF format for free! Find your manual BS-801 - Vivax and take your electronic device back in hand. On this page are published all the documents necessary for the use of your device. BS-801 by Vivax.
USER MANUAL BS-801 Vivax
natural_image
Black and white photo of a modern electronic device with blue circular LED patterns (no visible text or symbols)Karakteristike
- Bluetooth 5.0 wireless-domet 10 metara.
- TWS (True Wireless Stereo) funkcija – uparivanje 2 zvučnika kao par
- 2x8" Bas zvučnik + srednjetonski 1x3" + visokotonski zvučnik 1x3"
• Audio izlaz 80W RMS
• LED rasvjeta s promjenom boje svjetla
• Digitalni FM radio - Bežični mikrofon + 1x ulaz za mikrofon i 1x ulaz za gitaru (5mm)
• AUX IN 3,5mm audio ulaz
• AUDIO OUT RCA izlaz
• USB priključak - podržava MP3 format, do 64GB
• Ugrađena punjiva baterija 4500mAh - Trajanje baterije: do 12 sati na srednoj jačini, do 2h na maksimalnoj jačini
Oprema uz uređaj:
• Kabel za napajanje i punjenje
- Upute za uporabu
• Daljinski upravljač
- Bežični mikrofon
Dobrodošli
PREGLED DIJELOVA I KOMANDI
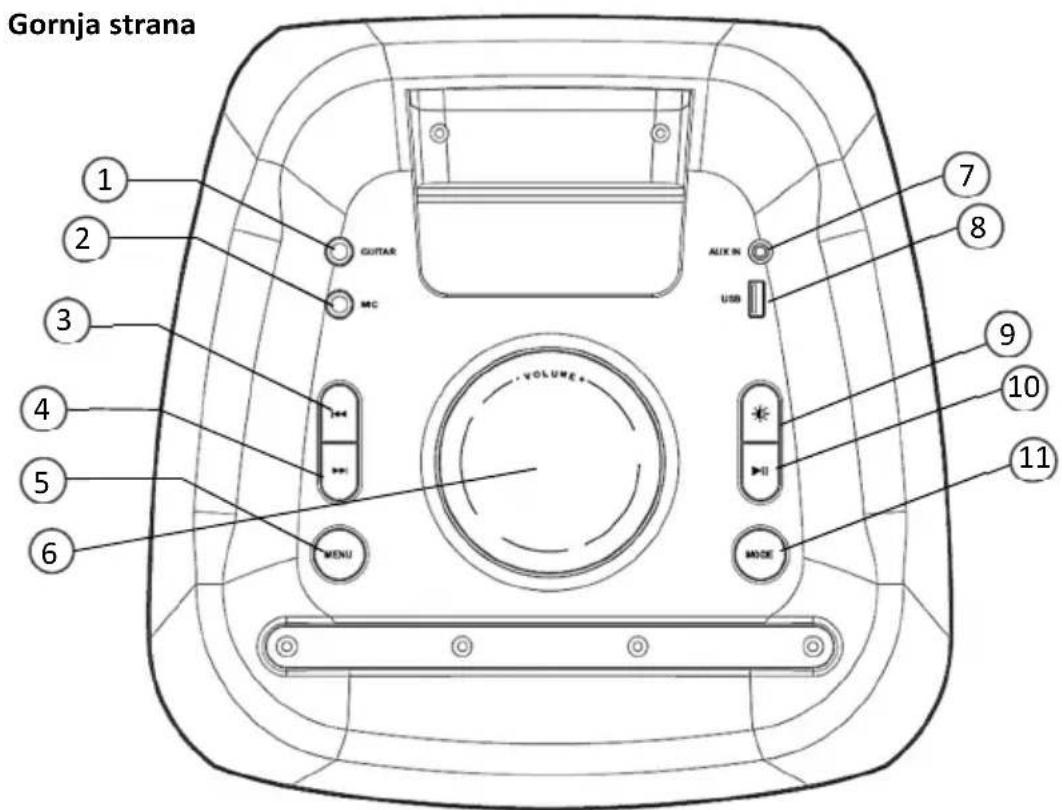
Kontrolna ploča
Stražnja strana
1. GUITAR IN:
5mm gitarski ulaz
2. MIC IN:
Ulaz za žičani mikrofon. Ugodite jačinu i Echo efekat pritiskom na tipku MENU (od abir opcije za ugađanje) i okrenite Volume tipku.
3. |◀◀: (Prethodni zapis):
USB mod: Kratko pritisnite tipku za odabir prethodnog zapisa.
Dulje pritisnite tipku (dulje od 3 sek.) za pretragu zapisa unatrag.
BT mod: Kratko pritisnite tipku za odabir prethodnog zapisa.
10. ▶II / PLAY / PAUSE:
USB/BT mod: Pritisnite tipku za Reprodukci ju/Pauziranje odabranog zapisa.
FM mod: Pritisnite tipku za Automatsku pretragu i spremanje FM Radio stanica u memoriju uređaja. Nakon završetka pretrage, započeti će reprodukcija FM Radio stanice spremljene na prvom programskom mjestu (P01).
Line in mod Nema funjaci
11. MODE:
Pritisnite za odabir moda rada: FM / Bluetooth spajanje / LINE IN / USB Mod.
BLUETOOTH, WIRELESS (BEŽIČNO SPAJANJE)
Uparivanje & reprodukcija
OTKLANJANJE POTEŠKOĆA
natural_image
Black and white photo of a black audio system with blue circular graphics (no visible text or symbols)Karakteristike
- Bluetooth 5.0 wireless-domet 10 metara.
• TWS (True Wireless Stereo) funkcija – uparivanje 2 zvučnika kao par - 2x8" Bas zvučnik + srednjetonski 1x3" + visokotonski zvučnik 1x3"
• Audio izlaz 80W RMS
• LED rasveta s promenom boje svetla - Digitalni FM radio
- Bežični mikrofon + 1x ulaz za mikrofon i 1x ulaz za gitaru (5mm)
• AUX IN 3,5mm audio ulaz
• AUDIO OUT RCA izlaz
• USB priključak - podržava MP3 format, do 64GB
• Ugrađena punjiva baterija 4500mAh - Trajanje baterije: do 12 sati na srednoj jačini, do 2h na maksimalnoj jačini
Oprema uz uređaj:
• Kabl za napajanj e i punjenje
- Uputstva za upotrebu
- Daljinski upravljač
- Bežični mikrofon
Dobrodošli
Zahvaljujemo na kupovini audio uređaja VIVAX BS-801. Molimo vas da pažljivo pročitate i sledite sva uputstva navedena u ovom priručniku kako biste s lakoćom mogli da koristite ovaj proizvod. Preporučujemo da ova uputstva sačuvate kako biste ih, u slučaju potrebe, mogli koristiti u budućnosti.
VAŽNA SIGURNOSNA UPOZORENJA
Uređaj je tako dizajniran i proizveden da je potpuno siguran za upotrebu ukoliko se njime pravilno rukuje. Međutim, nepravilna upotreba može da dovede do potencijalnih opasnosti kao što su električni udar ili požar. Pažljivo pročitajte sva uputstva o bezbednosti i upotrebi pre instalacije i upotrebe i pridržavajte se svih upozorenja navedenih u priručniku kao i na uređaju.
OPREZ: KAKO BI SE SMANJILA OPASNOST OD ELEKTRIČNOG UDARA, NEMOJTE DA OTVARATE UREĐAJ. U UREĐAJU NEMA DELOVA ILI KOMANDI KOJE SU NAMJENJENE PODEŠAVANJU OD STRANE KORISNIKA. ZA POPRAVKE KONTAKTIRAJTE OVLAŠĆENI SERVIS.
- Voda i vlaga – Uređaj ne sme da se upotrebljava u blizini vode ili u prostorijama sa visokom vlažnošću vazduha - npr. u blizini kade, umivaonika, sudopera, bazena ili u vlažnom podrumu, perionici i slično.
- Ventilacija – Uređaj treba postaviti tako da se ne ometa pravilna ventilacija uređaja. Npr. uređaj ne sme da se stavlja na krevet, kauč, tepih i slične površine koje mogu blokirati ventilacijske otvore. Takođe, ne sme da se stavlja u ugrađene instalacije, poput polica za knjige ili ormariće, koje mogu ometati ili blokirati protok vazduha kroz ventilacijske otvore.
- Vrućina – Uređaj smestite dalje od izvora toplote kao što su radijatori, grejalice, peći i drugi uređaji (uključujući i pojačala) koji stvaraju toplinu.
- Izvor napajanja – Uređaj sme da se priključi samo na električno napajanje koje je navedeno u uputstvima i koje je naznačeno na uređaju (5VDC, 1A Max).
- Zaštita kabla za punjenje – Kabl za punjenje treba da bude smešten tako da nije verovatno da će se po njemu gaziti ili ga pritiskati drugim predmetima. Nemojte da uvijate, gnječite ili savijate kabl ili da vučete uređaj za kabl.
- Čišćenje – Uređaj čistite mekanom vlažnom krpom. Nemojte da koristite rastvarače ili abrazivna sredstva. To može nepovratno da ošteti uređaj.
- Strani predmeti i ulazak tečnosti – Pazite da strani predmeti ne padnu na uređaj. Isto tako pazite da se na uređaj ne prospe voda ili neka druga tečnost. Ukoliko se to dogodi, odmah isključite uređaj i kontaktirajte servis.
- Dodaci – Nemojte da koristite bilo kakve dodatke na uređaju, osim ako ih nije odobrio ili preporučio proizvođač.
- Ukoliko se uređaj ne koristi – Ako uređaj neće biti u upotrebi duže vremena, npr. mesec dana ili duže, kabl za punjenje treba da odspojite sa uređaja, kako bi se sprečilo oštećenje baterije uređaja. Čuvajte uređaj na suvom i tamnom mestu.
-
Servis – Nemojte da pokušavate da popravljate ili prepravljate uređaj. Popravke uređaja prepustite stručnom i ovlašćenom servisnom osoblju.
-
UPOZORENJE: Uređaj sadrži punjive baterije. Ukoliko baterije postanu slabe ili se istroše, za promenu baterija, kontaktirajte ovlašćeni servis ili prodavca.
-
Uređaj i baterije ne smeju biti izloženi preteranom zagrevanju i toploti, npr. sunčevoj svetlosti, zagrevanju ili vatri.
-
Hemikalije u bateriji mogu da uzrokuju nadraživanje kože. Ako hemikalije dotaknu vašu kožu, odmah je operite.
-
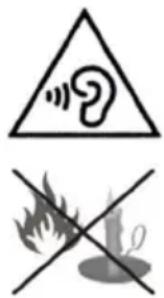
Duža upotreba Audio uređaja ili upotreba na visokoj jačini može trajno da oštetiti vaš sluh. Ako osetite zujanje u ušima ili druge probleme odmah prekinite upotrebu. Preporuka je da koristite uređaj na umerenoj jačini.
- Mesta izložena vibracijama mogu da utiču na oštećenje unutrašnjih delova uređaja. Uređaj ne sme da bude smešten u blizini otvorenog plamena i izvora jake toplote, kao što su električne grejalice, peći i sl.
- Nemojte dozvoliti deci da se igraju uređajem! Ovaj aparat nije prikladan da ga koriste osobe (uključujući decu) sa
10. ▶II / PLAY / PAUSE:
USB / BT režim: Pritisnite taster za Reprodukciju/Pauziranje odabranog zapisa.
FM režim: Pritisnite taster za Automatsku pretragu i spremanje FM Radio stanica u memoriju uređaja. Nakon završetka pretrage, započeti će reprodukcija FM Radio stanice spremljene na prvom programskom mestu (P01).
Line in režim Nema funkciju.
11. MODE:
Pritisnite za odabir režima rada: FM / Bluetooth / LINE IN / USB Režim.
Pritisnite i držite pritisnut taster duže od 3 sek. za Uklj./Isklj. glasovne obavesti o odabranom režimu rada uređaja.
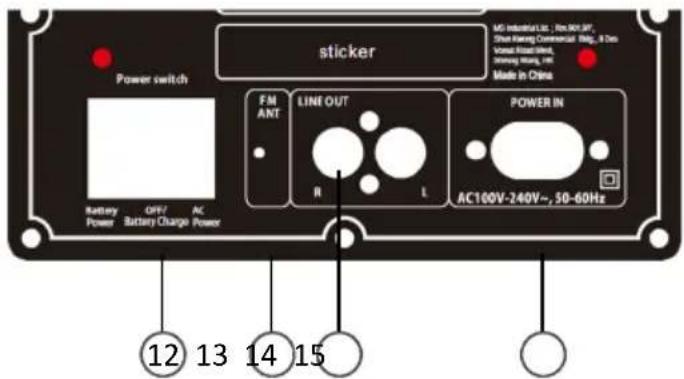
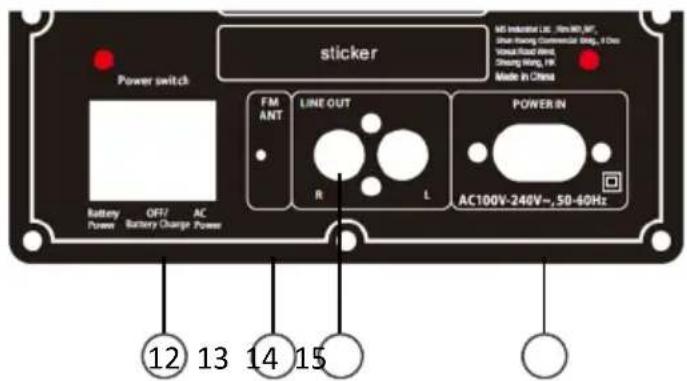
12. POWER SWITCH:
Press sklopku za idabir jednog od 3 moguća položaja: AC Power (rad uređaja na AC napajanju 100-240V, 50/60Hz), OFF (uređaj je isključen i punjenje baterije je aktivno), Battery Power (Rad na baterijsko napajanje).
13. FM ANT:
BLUETOOTH, WIRELESS (BEŽIČNO SPAJANJE)
Uparivanje & reprodukcija
OTKLANJANJE POTEŠKOĆA
U slučaju pojave poteškoća u radu, pročitajte donja uputstva pre nego što uređaj odnesete na popravku. U slučaju da niste u mogućnosti otkloniti problem pomoću donjih uputstava, molimo kontaktirajte ovlašćenog trgovca ili službu za korisnike.
natural_image
Black and white photo of a black audio system device with blue circular LED patterns (no text or symbols visible)Карактеристики
ПРЕГЛЕД НА ДЕЛОВИ И КОМАНДИ
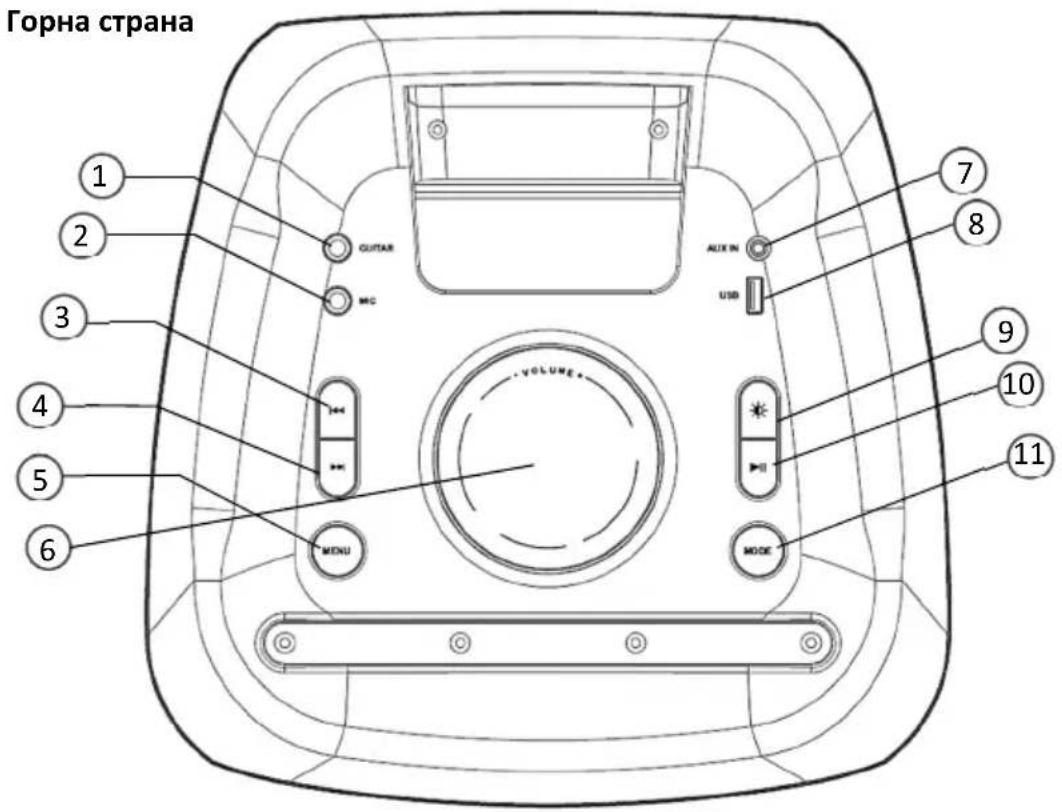
Задна страна
Контролна плоча
1. GUITAR IN:
10. ▶ II / PLAY / PAUSE:
Rm.1503A,15/F,Shun Kwong Commercial Bldg.,No.8 Des Voeux Road West,Sheu Wan, Hong Kong
member of M SAN Grupa
KOMPANI
Потпишано

Rm.1503A,15/F,Shun Kwong Commercial Bldg.,No.8 Des Voeux Road West,Sheung Wan,Hong Kong
Subjekti i deklaratës:
Produkt: BOKS
member of M SAN Grupa
KOMPANI
Nënshkruar
Margareta Gnjatovic Spirov Manager
natural_image
Black audio system device with blue glowing effect, no visible text or symbols on bodyKarakteristikat:
Line in mode: Asnjë funksion
4. ▶▶|: Next:
Line in mode: Asnje funksion.
5. MENU
10. ▶II / PLAY/PAUSE:
Line in mode: No function.
20. ▶▶|: Next
Line in mode: No function
21. |◀◀ : Previous
Line in mode: Pa funksion
22. BUTONAT ME NUMRA :
USB/SD mode: Zgjidhni numrin e pista
FM Radio mode: Zgjidhni kanalet FM
Other mode: Asnjë funksion
BATERIA E TELEKOMANDËS (opcioni, vetëm disa modele)
natural_image
Crossed black-and-white symbol of crossed-out items (no text or labels)MËNJANIMI I PROBLEMEVE
natural_image
Black and white photo of a modern audio system with blue circular effects on the front panel (no visible text or symbols)Karakteristike
4. ▶▶|: Next (Naslednji zapis):
10. ▶ II PLAY / PAUSE:
BLUETOOTH, WIRELESS (BREŽIČNO SPAJANJE)
Spajanje & predvajanje
ODPRAVLJANJE TEŽAV
V primeru pojava težav, v celoti preberite ta navodila, preden boste napravo odnesli na popravilo. V primeru, da naprave ne morete usposobiti s pomočjo navodil, se obrnite na pooblaščenega prodajalca ali servis.
OPOZORILO: V nobenem primeru sami ne popravljajte in odpirajte naprave, saj se bo tako garancija prekinila.
Bluetooth/MP3 Player with FM Radio and Karaoke
natural_image
Black and white electronic device with blue glowing rings, labeled 'Liber System' on the side (no other text or symbols visible)Features:
- Bluetooth 5.0 with wireless range 10m.
- TWS (True Wireless Stereo) function – connection 2 speakers as pair
- 2x8" Powerfull Woofer + 1x3" middle speaker driver + tweeter 1x3"
- RMS output 80W
• LED color changing lights - Digital FM radio
- 1x Wireless Microphone + 1x Microphone and guitar inputs (5mm)
• AUX IN 3,5mm audio input
• AUDIO OUT RCA audio output - USB playback port - supports MP3 file format, up to 64GB
• Built-in rechargeable battery 4500mAh. - Playing time: Aprox: 12 hours at Mid volume, up to 2h on Max volume
Accessories:
- Power and charger cable
- User manual
- Remote controller
- Wireless Microphone
Welcome
Thank you for purchasing the Bluetooth Audio system VIVAX BS-801.
It is important to read this user manual prior to using your new product for the first time. In order to fully benefit from this product, please follow the instructions in this user manual very carefully. Store this user manual in a safe place for future reference. We are sure your new Micro Audio system will satisfy your needs.
IMPORTANT SAFETY INSTRUCTIONS
When used in the directed manner, this unit has been designed and manufactured to ensure your personal safety. However, improper use can result in potential electrical shock or fire hazards. Please read all safety and operating instructions carefully before installation and use, and keep these instructions handy for future reference. Take special note of all warnings listed in these instructions and on the unit.
CAUTION: TO REDUCE THE RISK OF ELECTRIC SHOCK, DO NOT REMOVE COVER. NO USER SERVICEABLE PARTS INSIDE, REFER SERVICING TO QUALIFIED SERVICE PERSONNEL.
- Water and Moisture – The unit should not be used near water. For example: near a bathtub, washbowl, kitchen sink, laundry tub, swimming pool or in a wet basement.
- Ventilation – The unit should be situated so that its location or position does not interfere with its proper ventilation. For example, it should not be situated on a bed, sofa, rug or similar surface that may block ventilation openings. Also, it should not be placed in a built-in installation, such as a bookcase or cabinet, which may impede the flow of air through the ventilation openings.
- Heat – The unit should be situated away from direct sunlight or heat sources such as radiators, heat registers, stoves or other appliances (including amplifiers) that produce heat.
- Power Sources – The unit should be connected to a power supply only of the type described in the operating instructions or as marked on the appliance.
- Charger Cable Protection – Charger cable should be routed so that they are not likely to be walked on or pinched by items placed upon or against them.
- Cleaning – The unit should be cleaned only using a warm damp cloth. Do not use solvents, etc.
- Objects and Liquid Entry – Care should be taken so that objects do not fall and liquids are not spilled into any openings or vents located on the product. In that case, immediately disconnect power supply and contact authorized service.
- Attachments – Do not use attachments not recommended by the product manufacturer.
- Periods of Non use – If the unit is to be left unused for an extended period of time, such as a month or longer, the power charging cable should be unplugged from the unit to prevent damage. Storage device on dry and dark place.
-
Servicing – The user should not attempt to service the unit beyond those methods described in the user's operating instructions. Service methods not covered in the operating instructions should be referred to qualified service personnel.
-
WARNING: Unit contains Rechargeable batteries. To change batteries in case that battery became weak, contact your Official Service or Dealer.
-
Unit and batteries should not be exposed to excessive heat, such as sunshine, heat registers, or fire.
-
Battery chemicals can cause a rash. If the batteries leak, clean the battery compartment with a cloth. If chemicals touch your skin, wash immediately.
-
Using Audio product prolonged periods or at a high volume can damage your hearing permanently. If you experience noise in the ears or other problems immediately stop using the unit. It is recommended to use Audio unit at a moderate volume.
- Place exposed to vibration can affect the damage of internal parts of the device. The device should not be placed near open flames and sources of intense heat, such as, electric heaters.
- Do not allow children to play with device.
This appliance is not intended for use by persons (including children) with reduced physical, sensory or mental capabilities, or lack of knowledge and experience to use the appliance, unless they are supervised by a person who is responsible for their safety or you're not received training on the use of appliances.
- Place the unit on a hard and flat surface so that the unit does not tilt.
- Do not cover the unit. Adequate ventilation with a minimum gap of 15cm between the ventilation holes and surrounding surfaces is necessary to prevent heat build-up
PREPARATION FOR USE
Unpacking and Setup
* Carefully remove the unit from the display carton and remove all packing material from the unit itself.
* Do not remove any labels located on either the back or button cabinet of the unit.
POWER SUPPLY-CHARGING
The unit is supplied with powerfull rechargeable battery 4500mAh. Unit can play music many hours powered by battery. When the battery becomes weak, the device will turn off. Please use the attached Power cable, plug in into AC Power socket to charge battery.
-
Power off the unit („OFF / Battery Recharge“ Power Switch position).
You can charge unit in ON state („AC Power“ POWER SWITCH position), but charging will go slower.
Note: When playing music during charging, please put the volume to middle, because for some music with heavy bass, the charger may can not afford the high current temporarily under the maximum volume -
Put the provided Power cable into the AC Power socket on the back side of the unit.
-
Connect the other end of the Power Cable to Power outlet 100-240V, 50/60Hz.
-
The charging indicator keep Red lighting.
- Charge time should be aprox. 6-7 hours.
- When Battery is fully charged, the indicator light will become green.
- Charge time should be aprox. 6-7 hours. - When Battery is fully charged, the indicator light will become green.
ATTENTION: In order to prolong the life of battery, please do not leave unit continuously on Charger or charge unit more than 10 hours.
OVERVIEW OF THE PLAYER
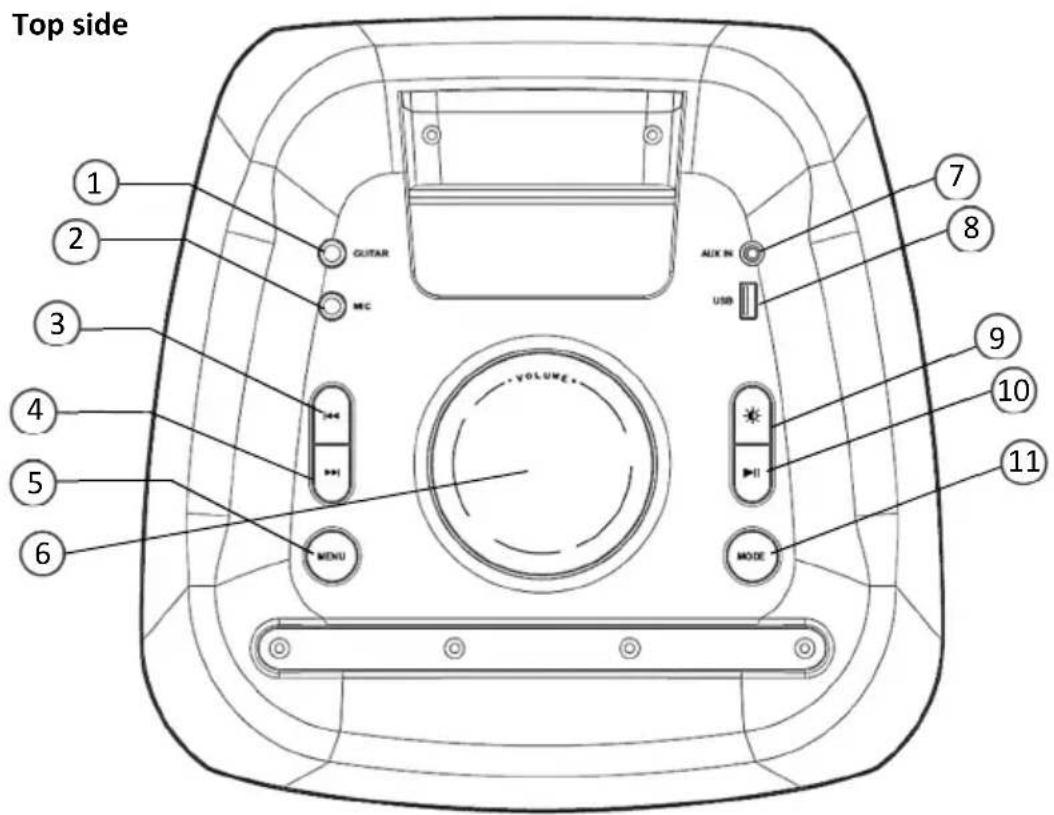
Control Panel
Back side
1. GUITAR:
5mm Wired Guitar input.
2. MIC IN:
Wired Microphone input. Adjust Microphone Volume and Echo affect by pressing MENU button and rotate Volume button.
3. |◀◀: Previous track:
USB mode:
Short press the button to select
Previous track
Long Press button (above 3 seconds) to search fast backward.
BT mode: Short Press to select the Previous track.
Long Press no function.
FM mode: Short press to select the Previous FM channel
Long Press above 3 seconds to step FM searching.
Line in mode:
No function
4. ▶▶| NEXT TRACK:
USB mode: Short press the button to select Next track Long Press button (above 3 seconds) to search fast forward.
BT mode: Short Press to select the Next track
Long Press no function.
FM mode: Short press to select the Next FM channel
Long Press above 3 seconds to step FM searching
Line in mode: No function
5. MENU:
Short press the screen to display: Bass (b) / Treble (t) / MIC vol (CU) / Echo (EC), when the screen shows the sound effect you want to adjust, turn the volume knob to adjust it; Long Press above 3 seconds for reset Audio settings to default factory settings.
6. VOLUME:
Rotate button to adjust volume.
7. AUX IN:
Analog 3,5mm Audio input. Connect External Audio device to Play Audio.
8. USB:
USB Memory reader. Once you insert USB memory, unit will automatically switch into Reading mode.
9. LIGHT

Change Front Speakers Led light illumination.
10. PLAY / PAUSE ▶ || :
USB / BT mode: Short press the button to Play/Pause track.
FM mode: Short press the button for Automatic search and store FM station into unit memory. After search all FM band, searching will be stopped and FM Radio station will start with play the first FM station (P01).
Line in mode No function.
11. MODE:
Short P ress button to skip between working modes: FM / Bluetooth connection / LINE IN / USB Mode
Press button longer than 3 seconds to turn On/Off Voice prompt.
12. POWER SWITCH:
Press button to choose one of 3 available working modes: AC Power (work on AC power supply), OFF/Battery Charge (Power off and Charging the battery), Battery Power (work on DC Battery power).
13. FM ANT:
FM Antena wire. Elongate antenna to achieve better FM Radio reception.
14. LINE OUT:
To connect other Audio speaker or Audio Amplifier
15. POWER IN:
Power cable socket. Insert Power cable into socket for charging or working unit on AC 100-240V/50-60Hz Power supply.
OPERATION
USB
Simply insert your USB media and the unit will automatically enter USB mode and a voice prompt can be heard (if you turn on Voice prompt function). Alternatively, you can select the USB mode by short pressing the MODE button repeatedly until display show desired working mode.
You can now play or scroll through the tracks using the Play/Pause ▶||, |◀◀ Previous track or ▶▶| Next track buttons.
BLUETOOTH WIRELESS
Pairing & Playing Audio
After initial pairing, the unit will stay paired unless unpaired manually by the user or erased due to a reset of the device. If your device should become unpaired or you find it is unable to connect, repeat the steps listed here.
- Press the MODE button to select BLUE Mode. The display will show "BLUE" to announce Bluetooth Mode.
- Using the controls on your Bluetooth device, scan for and select BS-801 in your Bluetooth settings to pair. Refer to the user's manual for your specific device for instructions on pairing and connecting Bluetooth devices.
- When successfully paired, the display will turn solid, a voice will announce be heard
- Use the controls on the connected device to select and begin playing audio. Audio played through the connected Bluetooth device will now be heard through the speaker. Use the controls on the speaker or the connected device to play, pause, and adjust volume.
To pair another Bluetooth device, you must first break the current Bluetooth connection by pressing BT button. A voice will be heard and the display will flash "blue" which is now in pairing mode for the new device.
FM RADIO
Radio Tuning and Saving Station Presets
An FM receiver is built into the speaker. Adjust the position of the speaker to improve FM radio reception.
-
Press the MODE button to switch to FM Radio Mode. The display will show an FM radio frequency and a voice will announce FM Mode (if voice prumpt is turn on).
-
Press ▶ || to automatically scan and save FM stations as presets. Saved radio stations will be assigned a "Pxx" number.
- Press |◀◀ Previous track or ▶▶| Next track buttons to cycle through presets FM Radio stations.
Note: When searching or listening FM Radio stations, better reception will be achieved if the unit is not plugged on AC power (working on batteries). It is recommended that the device operate in battery mode during the FM Radio play.
AUX IN
Requires a 3,5mm audio cable (not included). Note: Equalizer settings are not usable in AUX In Mode.
- Press MODE to swift to LINE IN Mode, the display will show "LINE IN" and a voice will announce LINE IN Mode.
- Connect 3,5mm audio cable to the AUX IN on the unit and the audio output/headphone jack on an audio device.
- Use the controls on the connected device to select and play audio.
MICROPHONE AND GUITAR INPUTS
Requires a microphone and/or guitar with a 1/4 in. audio cable or 1/4 in. adapter (not included).
- Connect a microphone to the Mic input and/or a guitar to the Guitar input on the unit. The speaker will play audio from the microphone and/or guitar as long as it is connected.
- Use the controls on the speaker to adjust microphone volume and Mic effects.
TWS (True Wireless Stereo) function:
If you have one more this speaker, you can connect two speakers as a pair for a stronger stereo and surrounding effect.
Note: This function is active under BT, LINE IN, FM working modes. Can not use in USB mode!
Please follow the steps below for TWS setup:
- Turn On two speakers and enter into Bluetooth mode
- Long press PAUSE button on one speaker for 2 seconds, "SLAV" will flash on the display. When the "SLAV" stop flashing means it has connected with each other;
- The speaker which show "BLUE" is main speaker, and another one show "SLAV" is the slave speaker.
Note: It will spend some seconds when first time pairing; - Turn on the Bluetooth on your phone, find "bluetooth name" and pair it;
Note: The two speakers can play the same music in TWS mode after connect successfully. The two speakers can automatically achieve TWS re-connection..
WARNINGS:
DO NOT CHARGE THE SPEAKER OR A MOBILE DEVICE WHILE IT IS NEAR WATER OR IF IT MAY GET WET.
DO NOT LEAVE DEVICE UNATTENDED DURING THE BATTERY CHARGE!
ALWAYS DISCONNECT POWER CABLE IF UNIT WILL NOT USE LONGER TIME!
IF YOU DO NOT USE THE DEVICE FOR A LONG TIME, CHARGE THE BATTERY EVERY 6 MONTHS.
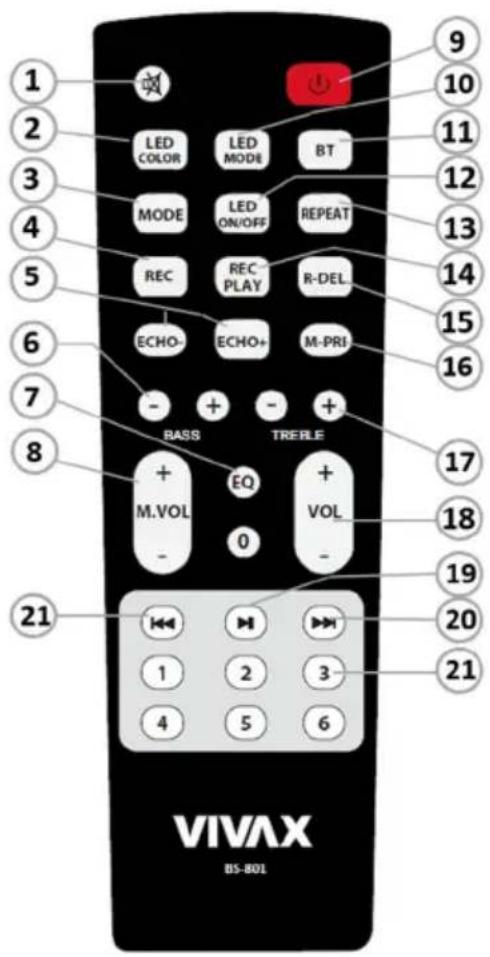
REMOTE CONTROLLER
-
MUTE: Sound mute in any mode
-
LED CO LOR: Change LED Color Illumination
-
MODE: Short Press button to skip between working modes: FM / Bluetooth connection / LIN IN (AUX) / USB Mode
-
REC (RECORDING): USB must be inserted; Press button to start record function in any mode. If you want to stop the Recording press "REC PLAY" button to stop and play the record.
Note: You can record sound from Mic and Guitar input only and it would stop playing music when open Record in any mode. The Product would record an empty file even when not plugged a Mic and Guitar! The recording file is WAV format saved into USB device.
-
ECHO + / -: Adjust Microphone Echo effect
-
BASS +/-: Adjust Bass sound
-
EQ: Press button to change preset Audio modes: FLAT, POP, ROCK, JAZZ, BASS
-
M VOL. : Adjust Microphone Volume
-
STANDBY SWITCH : Press to Power On/Standby
-
LED MODE: Press button to change LED Light mode
-
BT (BLUETOOTH): Switch to Bluetooth working mode.
-
LED ON/OFF: Press to Turn On/Off LED light
-
REPEAT: Press but ton to make the single repeat and repeat all.
-
REC PLAY (RECORDING PLAY): Play Recorded track saved on USB
-
R DEL (DELETE RECORDING): Delete Recording (Delete the files that already saved in USB)
-
M-PRI (MICROP HONE PREFERENTIAL): Give priority to Mic voice volume according to music track, only can work when the Mic jack connected
-
TREB LE +/-: Adjust Tereble sound
-
VOLUME +/- : Adjust Master Volume
-
▶ || PLAY / PAUSE:
USB mode: Short press the button to Play/Pause track.
FM mode: Short press the button for Automatic search and store FM station into unit memory. After search all FM band, searching will be stopped and FM Radio station will start with play teh first FM station (P01).
Line in mode: No function.
20. ▶▶| NEXT SONG:
USB mode: Short press the button to select Next track. Long Press button (above 3 seconds) to search fast forward.
BT mode: Short Press to select the Next track. Long Press no function.
FM mode: Short press to select the Next FM channel. Long Press above 3 seconds to step FM searching
Line in mode: No function
21. | ◀ ◀ PREVIOUS SONG:
USB mode: Short press the button to select Previous track. Long Press button (above 3 seconds) to search fast backward.
BT mode: Short Press to select the Previous track.
Long Press no function.
FM mode: Short press to select the Previous FM channel. Long Press above 3 seconds to stop FM searching.
Line in mode: No function
22. NUMERIC BUTTONS:
USB mode: Choose track number
FM Radio mode: Choose FM channels
Other mode: No function
REMOTE CONTROL BATTERIES (not included in all models)
Open the battery compartment and insert 2xAAA batteries, (Preferably Alkaline) with the correct polarity as indicated by the “+” and “-” symbols inside the compartment.
WARNING:
- Dispose of your batteries in a designated disposal area. Do not throw the batteries into a fire.
- Do not mix battery types or combine used batteries with new ones.
- Remove depleted batteries immediately to prevent battery acid from leaking into the battery compartment.
• If you do not intend to use the remote control for a long time, remove the batteries. - Batteries should not be exposed to excessive heat, such as sunshine, heat registers, or fire.
- Battery chemicals can cause a rash. If the batteries leak, clean the battery compartment with a cloth. If chemicals touch your skin, wash immediately.
- Place the unit on a hard and flat surface so that the unit does not tilt.
- Do not expose the unit to excessive humidity, rain, sand or excessive heat caused by heating equipment or direct sunlight.
- Do not cover the unit. Adequate ventilation to prevent heat build-up.
- To clean the set, use a soft dry cloth. Do not use any cleaning agents containing alcohol, ammonia, benzene or abrasives as these may harm the cabinet.
natural_image
Cross symbol of crossed-out medical products (no text or labels)TROUBLESHOOTING
If a fault occurs, it is important you first check the points listed below before taking the unit for repair. If you are unable to remedy a problem by following these hints, consult your dealer or service center.
WARNING: no circumstances should you try to repair the unit yourself, as this will invalidate the warranty.
No Sound / Power
- Volume not adjusted
Adjust the VOLUME
- Battery is Empty
- Connect the power cord for charging
No reaction to operation of any of the controls
- Electrostatic discharge
Switch off the unit. Connect it after a few seconds
TECHNICAL SPECIFICATIONS
| TECHNICAL SPECIFICATIONS | |
| GENERAL | |
| Power Requirement AC: 100-240V, 50/60Hz | |
| Power consumption 80W | |
| Battery / Working time* | Lead-acid, 4500mAh / Aprox. 2h on Max / 12h on moderate volume |
| Dimensions | Approx. 343 |
| Operation temperature +5°C - +35°C | |
| RECEIVER SECTION | |
| FM Tuning Range FM: 87.5-108 MHz | |
| BT Range | 2402-2480 MHz, Max Antenna gain: 0dBi, Range up to 10m*** |
| AUDIO SECTION | |
| Output Power Maximum 80 Watt | RMS, 40Hz-18kHz, SNR >70dB |
| Speakers Bass: 2x200mm, / Mid: 1x76mm, Twitter: 1x76mm, | |
| ACCESSORIES | |
| Instruction Booklet 1 | |
| 2 pin AC Power cable 1 | |
| Remote controller | 1 |
| Wireless Microphone | 1 |
* Design and specifications subject to change without notice.
** Working battery time is aproximative; It depends about room temperature, battery condition and how unit is use.
*** Bluetooth range is affected by walls, obstructions, and movement. For optimal performance, place the product in your room at line of sight, so it is unaffected by walls, furniture, etc.
Disposal of Waste Electrical & Electronic Equipment
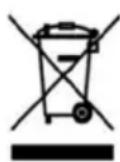
This symbol on the product(s) and / or accompanying documents means that used electrical and electronic products should not be mixed with general household waste. For proper treatment, recovery and recycling, please take this product(s) to designated collection points where it will be accepted free of charge. Alternatively, in some countries you may be able to return your products to your local retailer upon purchase of an equivalent new product. Disposing of this product correctly will help save valuable resources and prevent any potential negative effects on human health and the environment, which could otherwise arise from inappropriate waste handling. Please contact your local authority for further details of your nearest designated collection point. Penalties may be applicable for incorrect disposal of this waste, in accordance with your national legislation.
Disposal of waste batteries

Check local regulations for disposal of waste batteries or call your local customer service in order to get instructions on the disposal of old and used batteries. The batteries in this product should not be disposed of with household waste. Be sure to dispose of old batteries in special places for disposal of used batteries that are found in all retail shops where you can buy batteries.
EU Declaration of Conformity
This device is manufactured in accordance with the applicable European standards and in accordance with applicable RED Directives 2014/53/EU and Regulations. The full text of the EU declaration of conformity is available at the following internet address: www.msan.hr/dokumentacijaartikala

POŠTOVANI!
Zahvaljujemo na kupnji Vivax uređaja i nadamo se da ćete biti zadovoljni odabirom. Ako u jamstvenom roku bude potreban popravak proizvoda, molimo savjetujte se sa ovlaštenim prodavačem koji Vam je proizvod prodao ili nas kontaktirajte na dolje navedene brojeve i adrese. MOLIMO VAS DA PRIJE UPORABE PROIZVODA PAŽLJIVO PROČITATE UPUTE PRILOŽENE UZ PROIZVOD!
JAMSTVENI LIST HR
VIVAX
MODEL UREĐAJA
SERIJSKI BROJ
DATUM PRODAJE
BROJ RAČUNA PRODAVATELJA
POTPIS I PEČAT PRODAVATELJA
POTPIS I PEČAT PRODAVCA
PRAVA POTROŠAČA NA OSNOVU ZAKONA O ZAŠTITI POTROŠAČA I NESAOBRAZNOSTI PROIZVODA
U skladu sa članom 49 Zakona o zaštiti potrošača ("Sl.glasnik RS" br.88/2021) roba je saobrazna ako:
- Odgovara opisu koji je dao prodavac i ako ima svojstva robe koju je prodavac pokazao potrošaču kao uzorak ili model,
- Ima svojstva potrebna za naročitu upotrebu za koju je potrošač nabavlja, a koja je bila poznata prodavcu ili mu je morala biti poznata u vreme zaključenja ugovora, te ako ima svojstva potrebna za redovnu upotrebu robe iste vrste,
- Po kvalitetu i funkcionisanju odgovara onome što je uobičajeno kod robe iste vrste i što potrošač može osnovano da očekuje s obziorm na prirodu robe i javna obećanja o posebnim svojstvima robe data od strane prodavca, proizvođača ili njihovim predstavnika, naročito ako je obećanje učinjeno putem oglasa ili na ambalaži robe.
Ako isporučena roba nije saobrazna ugovoru (član 51 Zakona o zaštiti potrošača), potrošač ima pravo da zahteva od prodavca da otkloni nesaobraznost, bez naknade, opravkom ili zamenom, odnosno da zahteva odgovarajuće umanjenje cene ili da raskine ugovor u pogledu te robe.
POTPIS I PEČAT PRODAVATELJA
GARANCIJSKA IZJAVA
- Ovom garancijom garantira proizvođač proizvoda, preko KIM TEC d.o.o., kao uvoznika i davatelja garancije u Republici Bosni i Hercegovini besplatan popravak istog u skladu s važećim propisima i u skladu s uvjetima opisanim u ovom garantnom listu. Ovom garancijom garantiramo da će predmet ove garancije raditi bez greške uzrokovane eventualnom lošom izradom i lošim materijalom izrade. Svi eventualno nastali kvarovi biti će besplatno otklonjeni u ovlaštenom servisu u garantnom roku.
UVJETI GARANCIJE:
Garantni rok počinje teći od dana kupnje proizvoda i traje 12 mjeseci, osim za Vivax Imago televizore za koje garancija traje 24 mjeseca
- U slučaju kvara na proizvodu koji je predmet ove garancije, obavezujemo se da ćemo isti popraviti u najkraćem mogućem roku, a najkasnije u roku od 30 dana. Ako se proizvod ne može popraviti ili se ne popravi u roku od 30 dana, biti će zamijenjen novim. Ako popravak proizvoda traje duže od 10 dana, garancija se produljužuje za vrijeme trajanja popravka.
- Garancija se priznaje samo uz račun o kupnji, te uz ovaj garantni list koji mora biti ispravno popunjen odnosno mora sadržavati datum prodaje, pečat i potpis prodavatelja.
- Davalac garancije osigurava servis i rezervne dijelove 7 godina od datuma kupnje.
GARANCIJA NE OBUHVAĆA:
POTPIS I PEČAT PRODAVCA
- Ovom izjavom o saobraznosti proizvođač proizvoda, preko KIM TEC CG d.o.o., kao uvoznika i davaoca prava u Crnoj Gori besplatan popravak istog u skladu s vazećim propisima i u skladu s uslovima opisanim u ovoj izjavi o saobraznosti. Ovom izjavom o saobraznosti istićemo da će predmet ovog prava raditi bez greške uzrokovane eventualnom lošom izradom i lošim materijalom izrade. Svi eventualno nastali kvarovi biće besplatno otklonjeni u ovlašćenom servisu u predviđenom roku za reklamaciju.
- USLOVI REKLAMACIJE: Rok za reklamaciju počinje teći od dana kupovine proizvoda i traje 24 mjeseca.
- U slučaju kvara na proizvodu koji je predmet reklamacije, obavezujemo se da ćemo isti popraviti u najkraćem mogućem roku, a najkasnije u roku od 15 dana. Ako se proizvod ne može popraviti ili se ne popravi u roku od 15 dana, biće zamijenjen novim.
- Pravo na reklamaciju se priznaje uz fiskalni račun o kupovini, ili uz ovu izjavu o saobraznosti koji mora biti ispravno popunjen odnosno mora sadržati datum prodaje, pečat i potpis prodavca.
- Davalac izjave o saobraznosti osigurava servis i rezervne djelove 7 godina od datuma kupovine.
- PRAVO NA REKLAMACIJU NE OBUHVATA


- Karakteristike
- Oprema uz uređaj:
- Dobrodošli
- PREGLED DIJELOVA I KOMANDI
- Kontrolna ploča
- GUITAR IN:
- MIC IN:
- |◀◀: (Prethodni zapis):
- ▶II / PLAY / PAUSE:
- MODE:
- BLUETOOTH, WIRELESS (BEŽIČNO SPAJANJE)
- Uparivanje & reprodukcija
- OTKLANJANJE POTEŠKOĆA
- VAŽNA SIGURNOSNA UPOZORENJA
- OPREZ: KAKO BI SE SMANJILA OPASNOST OD ELEKTRIČNOG UDARA, NEMOJTE DA OTVARATE UREĐAJ. U UREĐAJU NEMA DELOVA ILI KOMANDI KOJE SU NAMJENJENE PODEŠAVANJU OD STRANE KORISNIKA. ZA POPRAVKE KONTAKTIRAJTE OVLAŠĆENI SERVIS.
- POWER SWITCH:
- FM ANT:
- Карактеристики
- ПРЕГЛЕД НА ДЕЛОВИ И КОМАНДИ
- Контролна плоча
- ▶ II / PLAY / PAUSE:
- Karakteristikat:
- ▶▶|: Next:
- MENU
- ▶II / PLAY/PAUSE:
- ▶▶|: Next
- |◀◀ : Previous
- BUTONAT ME NUMRA :
- BATERIA E TELEKOMANDËS (opcioni, vetëm disa modele)
- MËNJANIMI I PROBLEMEVE
- ▶▶|: Next (Naslednji zapis):
- ▶ II PLAY / PAUSE:
- BLUETOOTH, WIRELESS (BREŽIČNO SPAJANJE)
- Spajanje & predvajanje
- ODPRAVLJANJE TEŽAV
- Bluetooth/MP3 Player with FM Radio and Karaoke
- Features:
- Accessories:
- Welcome
- IMPORTANT SAFETY INSTRUCTIONS
- PREPARATION FOR USE
- Unpacking and Setup
- POWER SUPPLY-CHARGING
- OVERVIEW OF THE PLAYER
- Control Panel
- GUITAR:
- |◀◀: Previous track:
- ▶▶| NEXT TRACK:
- MENU:
- VOLUME:
- AUX IN:
- USB:
- LIGHT
- PLAY / PAUSE ▶ || :
- LINE OUT:
- POWER IN:
- OPERATION
- USB
- BLUETOOTH WIRELESS
- Pairing & Playing Audio
- FM RADIO
- Radio Tuning and Saving Station Presets
- AUX IN
- MICROPHONE AND GUITAR INPUTS
- TWS (True Wireless Stereo) function:
- WARNINGS:
- REMOTE CONTROLLER
- ▶▶| NEXT SONG:
- | ◀ ◀ PREVIOUS SONG:
- NUMERIC BUTTONS:
- REMOTE CONTROL BATTERIES (not included in all models)
- WARNING:
- TROUBLESHOOTING
- No Sound / Power
- No reaction to operation of any of the controls
- TECHNICAL SPECIFICATIONS
- Disposal of Waste Electrical & Electronic Equipment
- Disposal of waste batteries
- EU Declaration of Conformity
- POŠTOVANI!
- JAMSTVENI LIST HR
- VIVAX
- MODEL UREĐAJA
- SERIJSKI BROJ
- DATUM PRODAJE
- BROJ RAČUNA PRODAVATELJA
- POTPIS I PEČAT PRODAVATELJA
- POTPIS I PEČAT PRODAVCA
- PRAVA POTROŠAČA NA OSNOVU ZAKONA O ZAŠTITI POTROŠAČA I NESAOBRAZNOSTI PROIZVODA
- GARANCIJSKA IZJAVA
- UVJETI GARANCIJE:
- GARANCIJA NE OBUHVAĆA:
Brand : Vivax
Model : BS-801
Category : Hi-Fi System