
CHO-60PM075A W - Range hood Vivax - Free user manual and instructions
Find the device manual for free CHO-60PM075A W Vivax in PDF.

| Product Type | Range Hood (Cooker Hood) |
| Brand | Vivax |
| Model | CHO-60PM075A W |
| Color | White |
| Mounting Type | Wall-mounted or Under-cupboard |
| Dimensions (Width) | 600 mm |
| Dimensions (Depth) | 500 mm (approx.) |
| Power Supply | 220-240 V, 50 Hz |
| Number of Speeds | 3 (Low, Medium, High) |
| Control Type | Mechanical push buttons |
| Exhaust Diameter | 150 mm |
| Installation Distance | 65-75 cm above cooking surface |
| Lighting | LED, max 2 W |
| Grease Filter | Aluminum, washable (monthly cleaning recommended) |
| Charcoal Filter | Optional, replace every 3 months or 120 hours |
| Air Discharge Options | Horizontal or vertical |
| Recirculation Mode | Yes (with charcoal filter) |
| Motor Type | Centrifugal fan |
| Warranty | 3 years |
Frequently Asked Questions - CHO-60PM075A W Vivax
User questions about CHO-60PM075A W Vivax
0 question about this device. Answer the ones you know or ask your own.
Ask a new question about this device
Download the instructions for your Range hood in PDF format for free! Find your manual CHO-60PM075A W - Vivax and take your electronic device back in hand. On this page are published all the documents necessary for the use of your device. CHO-60PM075A W by Vivax.
USER MANUAL CHO-60PM075A W Vivax
VAŽNE SIGURNOSNE UPUTE

Simbol munje u trokutu upozorava korisnika na prisutnost opasnog napona koji nije izoliran unutar proizvoda i koji može biti dovoljno snažan da predstavlja rizik od strujnog udara.

Uskličnik unutar trokuta upozorava korisnika na važne upute za rad i održavanje u dokumentu priloženom u ambalaži.

OPREZ

RIZIK OD STRUJNOG UDARA NE OTVARAJ
Nemojte otvarati poklopac. Korisniku ni u kojem slučaju ne smije obavljati radove unutar uređaja. Samo kvalificirani tehničar ima pravo obavljati popravke. U slučaju nepridržavanja sigurnosnih uputa, proizvođač neće snositi odgovornost za štetu.
SIGURNOSNE NAPOMENE
- Uređaj ne smiju koristiti osobe (uključujući djecu) sa smanjenim tjelesnim, senzornim ili mentalnim sposobnostima ili nedostatkom iskustva i znanja, osim ako su pod nadzorom ili su im dane upute za sigurno korištenje.
- Djeca moraju biti pod nadzorom kako se ne bi igrala uređajem.
- Ovaj uređaj mogu koristiti djeca u dobi od 8 godina i iznad i osobe sa smanjenim fizičkim, senzornim ili mentalnim sposobnostima ili nedostatkom iskustva i znanja, ako su pod nadzorom ili su doble upute za korištenje uređaja na siguran način i razumiju opasnosti povezane s tim korištenjem.
- Djeca se ne smiju igrati uređajem.
- Djeca ne smiju čistiti i održavati uređaj bez nadzora.
-
U prostoriji se mora o sigurati odgovarajuća ventilacija kada se napa koristi istodobno s uređajima na plin ili druga goriva (ne odnosi se na uređaje koji cirkuliraju ili ispuštaju zrak natrag u prostoriju).
-
Ako se čišćenje ne provodi u skladu s uputama, može doći do požara!
- Nemojte flambirati i kuhati s otvorenim plamenom ispod nape!
- OPREZ: Pristupačni dijelovi mogu se jako zagrijati kada se koriste s uređajima za kuhanje.
- Odvodni zrak nape ne smije se ispuštati u dimovodnu instalaciju koja se koristi za ispuštanje dima iz uređaja koji sagorijevaju plin ili druga goriva.
- Kad se napa montira iznad p linskog uređaja, udaljenost mora biti najmanje 65cm.
- Strogo se moraju poštivati propisi koji se odnose na ispuštanje zraka i provjetravanje prostora.
- Ako je kabel napajanja oštećen, mora ga zamijeniti proizvođač, ovlašteni servis ili druga kvalificirana osoba kako bi se izbjegla opasnost od strujnog udara.
- Nikada ne odvajajte kabel napajanja iz utikača povlačenjem za kabel. Ne dodirujte kabel mokrim rukama Nikada nemojte pomicati uređaj povlačenjem kabela i pazite da se kabel ne zaplete.
- Uvijek isključite uređaj iz napajanja prije montaže, rastavljanja ili čišćenja.
-
Korisnik ne smije ostavljati uređaj bez nadzora dok je uređaj u radu.
-
Ovaj uređaj namijenjen je isključivo za uporabu u kućanstvu i samo u svrhu za koju je namijenjen.
- Ovaj je uređaj namijenjen samo za korištenje u zatvorenim prostorima
- Za ovaj uređaj nije predviđena mogućnost upravljanja vanjskim tajmerom ili odvojenim sustavom na daljinsko upravljanje. Vaš uređaj ne smije koristiti isti kabel za napajanje ili osigurač kao i drugi uređaji.
- Koristite samo odgovarajući priključak za napajanje i utičnicu za ovaj uređaj.
- Neadekvatno čišćenje i održavanje uređaja može dovesti do oštećenja uređaja ili površine uređaja što može negativno utjecati na životni vijek uređaja i dovesti do opasnih situacija. Takva oštećenja nisu uključena u jamstvo.
- UPOZORENJE: Isključite uređaj s napajanja prije promjene dijelova ili približavanju pomičnim dijelovima.
- Uređaj ne smijete čistiti parnim čistačem.
- Korištenje dodatnog pribora, koji proizvođač uređaja nije odobrio ili preporučio, može uzrokovati opasnosti.
- Uređaj koristite samo za svrhu za koju je namijenjen.
natural_image
Diagram of airflow around a mechanical structure with directional arrows indicating movement (no text or symbols)b. Prije ugradnje isključite uređaj i izvucite kabel iz utičnice.
natural_image
Hand inserting a plug into an electrical outlet (no text or symbols visible)natural_image
Technical line drawing of a mechanical component labeled A, showing a rectangular base with holes and a circular feature, with two upward arrows indicating motion or force direction (no text or symbols beyond label A)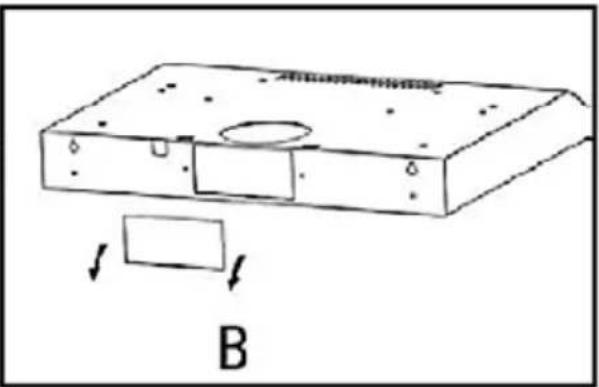
natural_image
Simple line drawing of a rectangular electronic device with a circular opening and a rectangular component, labeled B (no text or symbols on the device itself)natural_image
Simple line drawing of a boat navigating a curved road with floating houses and a banana (no text or symbols)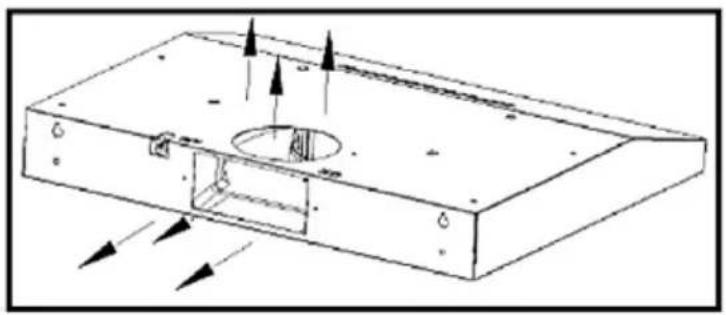
natural_image
Technical line drawing of a mechanical component with directional arrows indicating movement or force (no text or symbols)Unutarnja recirkulacija zraka:
Za unutarnju cirkulaciju zraka, u napu je potrebno ugraditi ugljeni filtar.
Okrenite regulator u položaj za unutarnju cirkulaciju (prema gore), Montirajte poklopac na odvod zraka i uključite napu, Zrak će prolaziti kroz napu i ugljeni filtar i pročišćen od neugodnih mirisa ponovno se vratiti u vašu prostoriju.
Napomena: Ugljeni filtar postavlja se na stražnjoj strani rešetke i mora se mijenjati jednom u tri mjeseca ili po potrebi u ovisnosti o učestalosti korištenja nape.
Oprez: Ugljeni filtar se ne može prati ni reciklirati. Treba ga mijenjati nakon 120 sati korištenja.
Ugljieni filtar ne smije se izlagati velikoj toplini.
Napomena
natural_image
Four circular icons with different leaf and sun symbols, no text or labels presentVerzija 1
natural_image
Technical line drawing of a mechanical component with grid pattern and directional arrows (no text or symbols)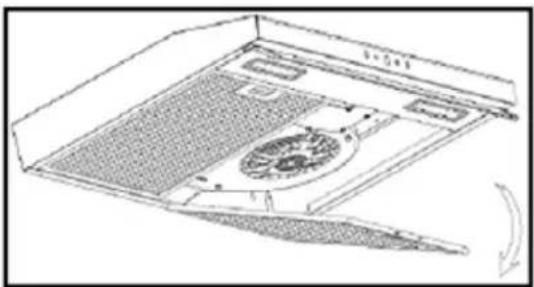
natural_image
Technical line drawing of a mechanical or architectural component with no visible text or symbolsUPOZORENJE
natural_image
Technical line drawing of a mechanical assembly with no visible text or symbolsZamjena svjetla (Izvlačni model)
natural_image
Diagram of airflow around a mechanical structure with directional arrows indicating movement (no text or symbols)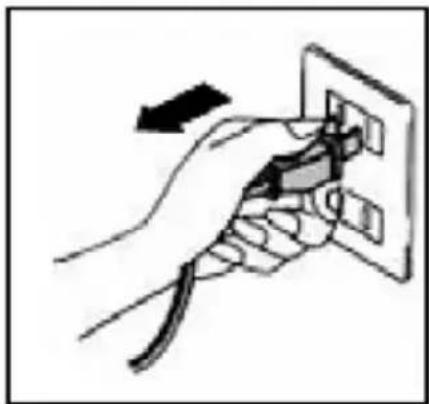
natural_image
Hand inserting a plug into an electrical outlet (no text or symbols visible)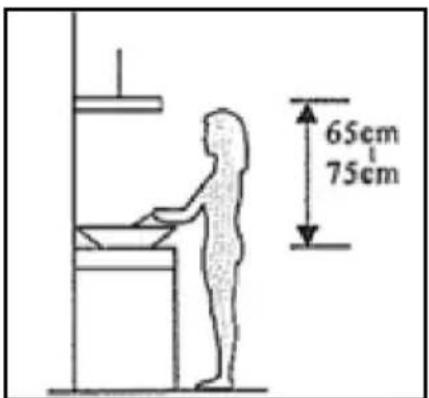
Oprez! Obratite pažnju na upozorenje u uputstvu o radu uređaja kada se vazduh ispušta iz prostorije.
Kada je aspirator instaliran pored kuhinjske ploče koji se snabdeva energijom koja nije električna (plinska ploča) i kada uređaji rade istovremeno, negativni pritisak u sobi ne sme biti veći od 4 Pa ( 4 × 10^5 bara)
1. Montaža uskog "Slim" modela
natural_image
Two technical diagrams (A and B) showing a mechanical component with arrows indicating motion or force, no text or symbols present.Podešavanje ventilacije vazduha
natural_image
Technical line drawing showing a mechanical component and its internal structure with directional arrows (no text or symbols)Unutrašnja recirkulacija:
Za unutrašnju recirkulaciju vazduha, u aspiratoru je potrebno ugraditi ugljeni filter.
Okrenite regulator u položaj za unutrašnju cirkulaciju (prema gore), Montirajte poklopac na odvod vazduha i uključite aspirator, vazduh će prolaziti kroz aspirator i ugljeni filter i ponovno se vraćati u vašu prostoriju.
natural_image
Diagram of a mechanical component with an arrow indicating rotation, no text or symbols present
Napomena
- Odvodno crevo se ne isporučuje uz aspirator, kupuje je se posebno.
- Skinite zaštitni film s kućišta aspiratora pre montaže.
KORISNIČKE INSTRUKCIJE
Mehanička / Elektronska tastatura

natural_image
Four circular icons with different leaf and sun symbols, no text or labels presentVerzija 1
natural_image
Technical line drawing of a mechanical component with grid pattern and directional arrows (no text or symbols)
natural_image
Technical line drawing of a mechanical or architectural component with no visible text or symbolsUPOZORENJE
Ako je LED osvetljenje neispravno, mora da je zameni proizvođač, njegov servis ili slična kvalifikovana osoba kako bi se izbegla opasnost od električnog udara.
natural_image
Technical line drawing of a mechanical assembly with no visible text or symbolsZamena svetla (Model sa opcijom razvlačenja)
- Isključite uređaj, zatim odspojite uređaj sa električnog napajanja.
- Uklonite aluminijumske filtere.
- Odvojite LED osvetljenje pritiskom na metalnu zakačku i odspojite kabl napajanja LED osvetljenja.
- Zamenite LED osvetljenje istim tipom LED sijalice, nazivnog napona i snage (Max 2W)
UPOZORENJE
Ako je LED osvetljenje neispravno, mora da je zameni proizvođač, njegov servis ili slična kvalifikovana osoba kako bi se izbegla opasnost od električnog udara.
REŠAVANJE PROBLEMA
natural_image
Hand inserting a plug into an electrical outlet (no text or symbols visible)natural_image
Simple line drawing of a rectangular electronic component with mounting holes and a circular feature, labeled 'A' (no text or symbols on the diagram itself)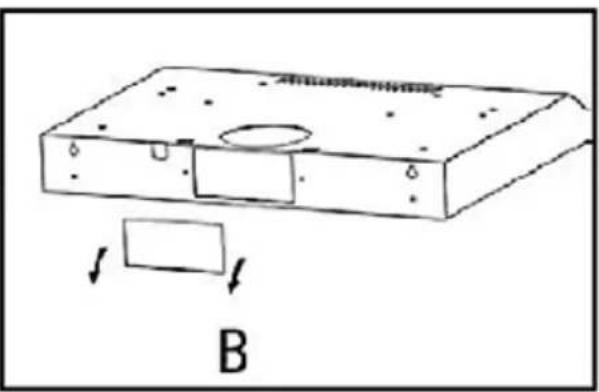
natural_image
Simple line drawing of a rectangular electronic device with a circular opening and a rectangular component, labeled B (no text or symbols on the device itself)natural_image
Simple line drawing of a boat navigating a road with floating houses (no text or symbols)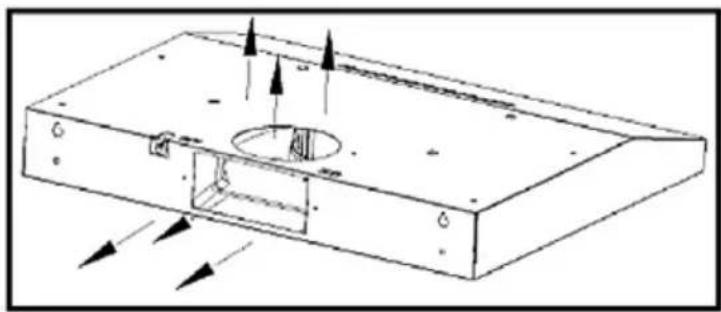
natural_image
Technical line drawing of a mechanical component with directional arrows indicating movement or force (no text or symbols)natural_image
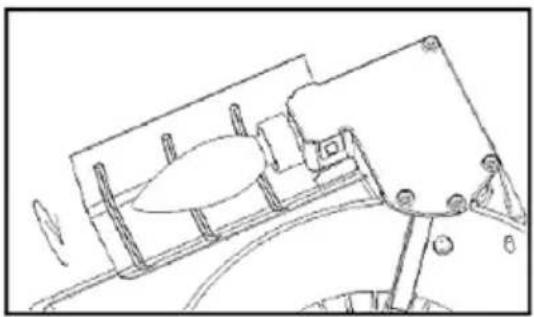
Mechanical component diagram showing a piston-like structure with an arrow indicating rotational motion (no text or symbols)
natural_image
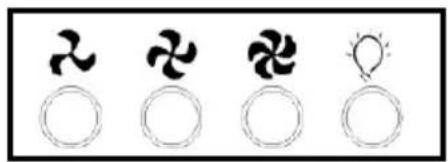
Four circular icons with different symbols: a fan, a three-blade fan, a four-blade fan, and a sun-like light bulb (no text or labels)Верзија 1
natural_image
Technical line drawing of a mechanical component with internal grid pattern and mounting bracket (no text or symbols)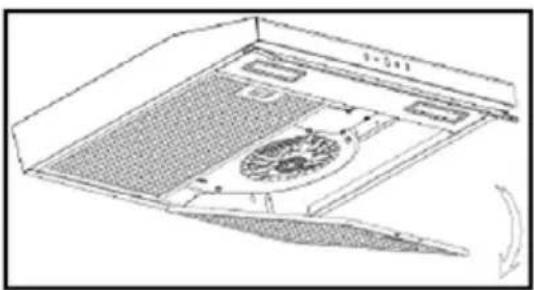
natural_image
Technical line drawing of a mechanical device with internal components and a cutting tool (no text or symbols)ПРЕДУПРЕДУВАЕ
natural_image
Technical line drawing of a mechanical assembly with no visible text or symbolsnatural_image
Diagram of airflow around a mechanical structure with directional arrows indicating movement (no text or symbols)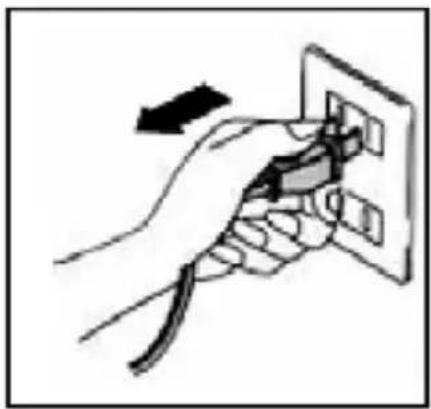
natural_image
Hand inserting a plug into an electrical outlet (no text or symbols visible)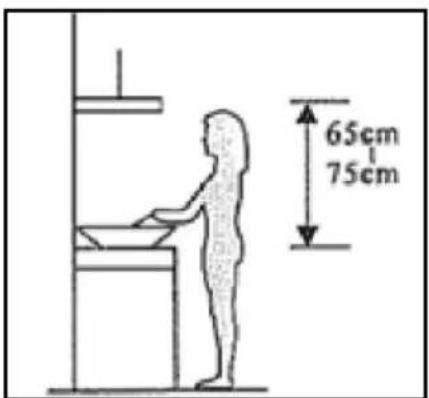
natural_image
Simple line drawing of a rectangular electronic component with mounting holes and a circular top, labeled 'A' (no text or symbols on the diagram itself)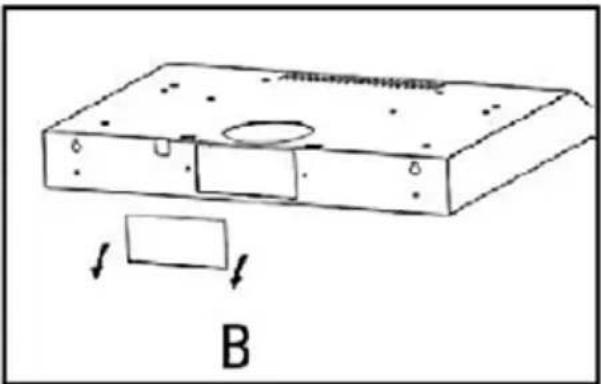
natural_image
Technical line drawing of a rectangular electronic device with a circular opening and two arrows indicating motion or force (no text or symbols)natural_image
Simple line drawing of a car with motion arrows and house symbols (no text or labels)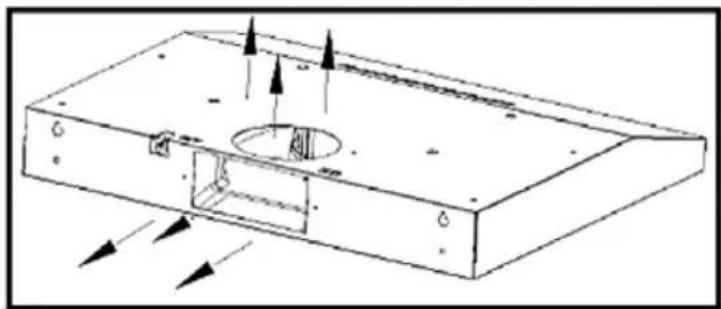
natural_image
Technical line drawing of a mechanical component with internal cavity and directional arrows (no text or symbols)Riciklimi:
natural_image
Diagram of a mechanical component with arrows indicating motion or force direction (no text or symbols)
Vërejtje:
natural_image
Four circular icons with different symbols: a fan, a propeller, a turbine, and a light bulb (no text or labels)Versioni 1
0 Butoni i fikjes (Off button)
natural_image
Technical line drawing of a computer rack with grid pattern and mounting bracket (no text or symbols)
natural_image
Technical line drawing of a mechanical device with internal components and a rotating arrow (no text or symbols)KUJDES
natural_image
Technical line drawing of a mechanical assembly with no visible text or symbolsnatural_image
Diagram of airflow around a mechanical structure with directional arrows indicating movement (no text or symbols)natural_image
Hand inserting a plug into an electrical outlet (no text or symbols visible)natural_image
Diagram of a device with labeled section A and directional arrows indicating movement (no text or symbols beyond label)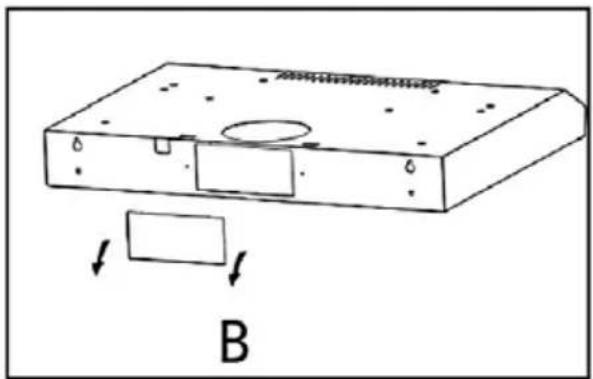
natural_image
Diagram of a rectangular electronic device with a circular component and two arrows indicating direction (no text or symbols)natural_image
Simple line drawing of a car with a moving car and floating houses (no text or symbols)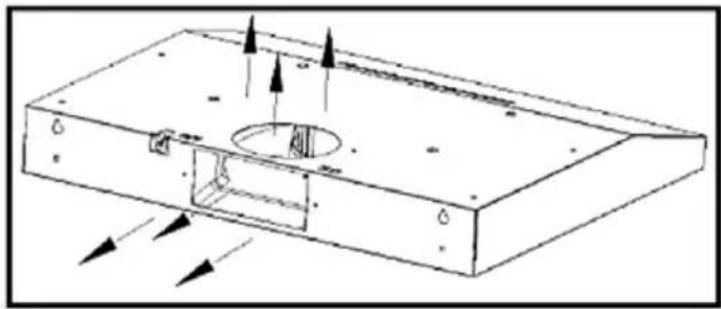
natural_image
Technical line drawing of a mechanical component with directional arrows indicating movement or force (no text or symbols)Recikliranje:
natural_image
Five circular icons with different symbols: a fan, a propeller, a turbine, and a sun (no text or labels)Različica 1
0 Gumb za izklop
natural_image
Technical line drawing of a mechanical component with grid pattern and directional arrows (no text or symbols)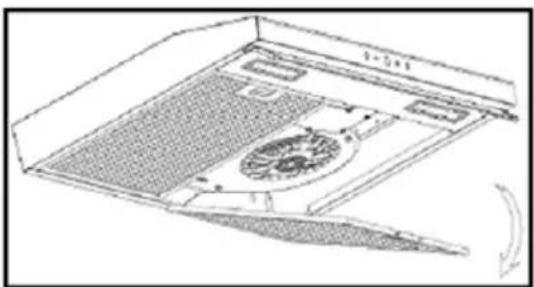
natural_image
Technical line drawing of a mechanical device with internal components and a circular component, showing no text or symbols.OPOZORILO
natural_image
Technical line drawing of a mechanical assembly with no visible text or symbolsZamenjava žarnice (Teleskopski model)
- Izklopite enoto in napravo izključite iz omrežja.
- Odstranite aluminijasti filter za maščobo..
- Odstranite LED lučko tako, da stisnete kovinske sponke
- Novo LED žarnico zamenjajte z isto vrsto in nazivno napetostjo (Maks 2W)

OPOZORILO
Thank you for choosing this cooker hood.
This instruction manual is designed to provide you with all required instructions related to the installation, use and maintenance of the appliance.
In order to operate the unit correctly and safety, please read this instruction manual carefully before installation and usage.
The cooker hood use high quality materials, and is made with a streamlined design. Equipped with large power electricmotor and centrifugal fan, it also provides strong suction power, low noise operation, non-stick grease filter and easy assembly installation
It is important that you read these instructions before using your product and we strongly recommend that you keep them in a safe place for future reference.
WELCOME!
This device meets the highest standards, innovative technology and high comfort use.
Read these instructions carefully before using your new unit, and keep it carefully.
If you follow the instructions, your new appliances will provide you with many years of good service.
READ CAREFULLY THIS MANUAL AND KEEP THEM FOR FUTURE REFERENCE!
IF YOU SELL OR TRANSFER DEVICE TO OTHER PEOPLE, BE SURE TO INCLUDE THESE INSTRUCTIONS!
IMPORTANT SAFETY INSTRUCTIONS WARNING

The flash with the symbol of arrowhead, inside an equilateral triangle alerts the user about the presence of a dangerous tension not isolated inside the product which can be sufficiently powerful to constitute a risk of electrocution.

The point of exclamation inside an equilateral triangle alerts the user about the presence of important operating instructions and maintenance in the document enclosed in the package.

CAUTION

RISK OF ELECTRIC SHOCK DO NOT OPEN
Do not open the cover. In no case the user is allowed to operate inside the unit. Only a qualified technician from the manufacture is entitled to operate. By ignoring the safety instructions, the manufacturer cannot be hold responsible for the damage.
SAFETY PRECAUTIONS
- The appliance is not to be used by persons (including children) with reduced physical, sensory or mental capabilities or lack of experience and knowledge, unless they have been given supervision or instruction.
- Children being supervised not to play with the appliance.
- This appliance can be used by children aged 8 years and above and persons with reduced physical, sensory or mental capabilities, or lack of experience and knowledge, if they have been given supervision or instruction concerning use of the appliance in a safe way and understand the hazards involved.
- Children shall not play with the appliance.
- Cleaning and user maintenance shall not be mad by children without supervision.
-
There shall be adequate ventilation in the room when the range hood is used at the same time as appliances burning gas other fuels (not applicable to appliances that only discharge air back to the room).
-
There is a fire risk if cleaning is not carried out in accordance with the instructions!
- Do not flame under the range hood
- CAUTION: Accessible parts may become hot when used with cooking appliances.
- The Air must not be discharged into a flue that is used for exhausting fumes from appliances brning gas or other fuels.
- Whenthe range hood i slocated abovegas appliance, this distance shell be atleast 65cm
- Regulations concerning the discharge of air have to be fulfilled.
- If the supply cord is damaged, it must be replaced by the manufacturer, its service agent or similarly qualified persons in order to avoid a hazard.
- Never unplug the feed cable from the plug by tugging on the cable. Do not touch the feed cable with wet hands. Never move the appliance by pulling the cord and make sure the cord cannot become entangled.
- Always disconnect the appliance from the supply before assembling, disassembling or cleaning.
- The user must not leave the device unattended while it is in work.
- This appliance is only to be used for household purposes and only for the purpose it is made for.
- This appliance is intended for indoor use only
- The appliance is not intended to be operated by means of an external timer or a separate remote-control system. Your device must not be used connected to the same
power cable or fuse with another device.
- Only use the appropriate power connection and power socket for this device.
- Failure to maintain the appliance in a clean condition could lead to damage of the surface that could adversely affect the life of the appliance and possibly result in a hazardous situation. Such damages are not included in the warranty.
- WARNING: Switch off the appliance before changing accessories or approaching parts which move in use.
- Steam cleaner is not to be used.
- The use of accessory attachments, not recommended or sold by the appliance manufacturer, may cause hazards.
- Do not use appliance other than for its intended use.
Electrical connection
Make sure that the voltage (see name plate) and your home power supply match.
The mains plug should only be inserted into a correctly installed 220-240 V \~ 50 Hz socket.
No user-serviceable parts inside. Refer servicing to qualified service personnel.
Only plug this unit into a properly earthed outlet. If in doubt seek advice from a suitably qualified engineer.
Failure to follow these instructions can result in death, fire, or electrical shock.
INSTALLATION
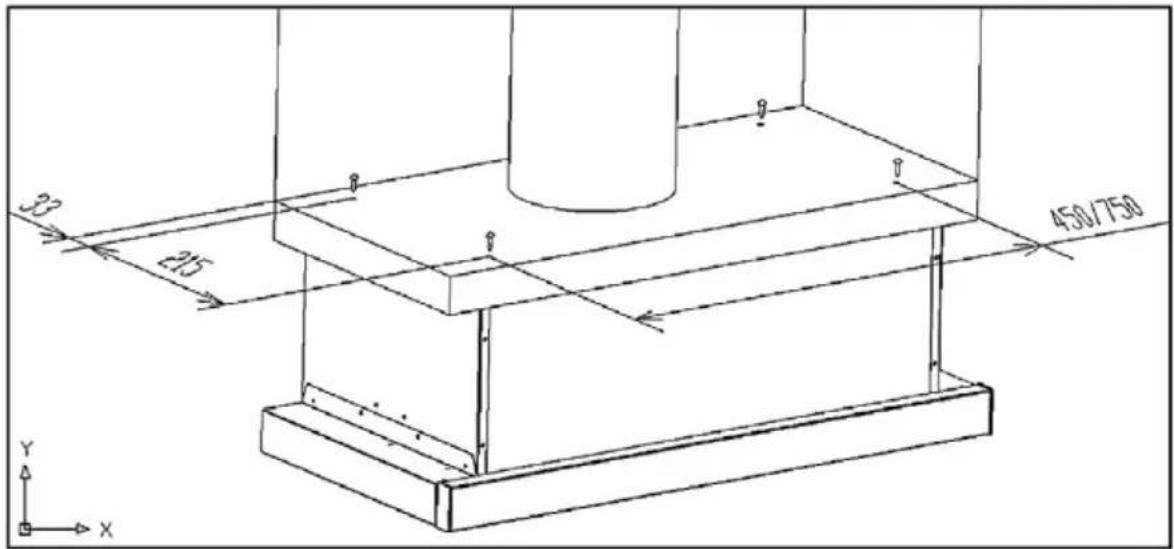
1. Prepare for installation
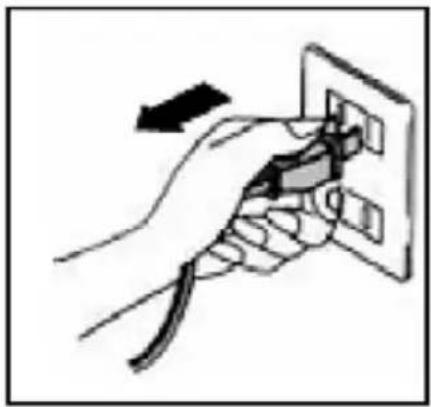
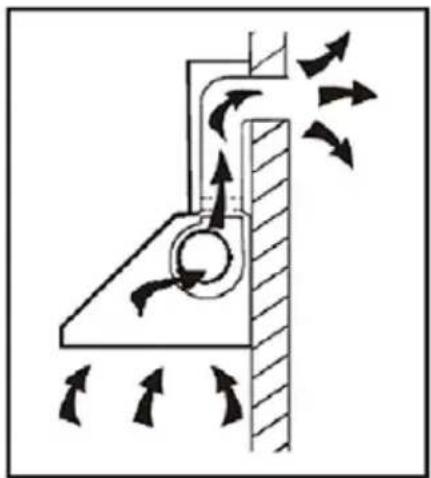
a. If you have an outlet to the outside, your cooker hood can be connected as below picture by means of an extraction duct (enamel, aluminum, flexible pipe or inflammable material with an interior diameter of 150mm).
b. Before installation, turn the unit off and unplug it from the outlet.
c. The cooker hood should be placed at a distance of 65\~75cm above the cooking plane for best effect.
natural_image
Diagram of airflow around a mechanical structure with directional arrows indicating movement (no text or symbols)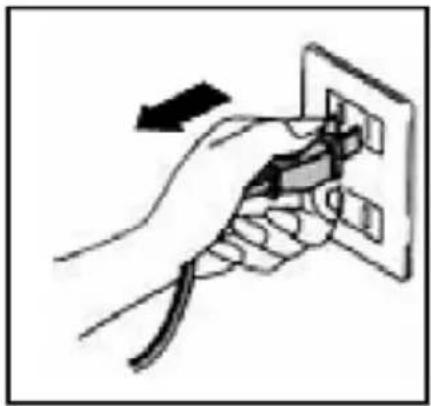
natural_image
Hand holding a power outlet plug with a cable, no text or symbols visible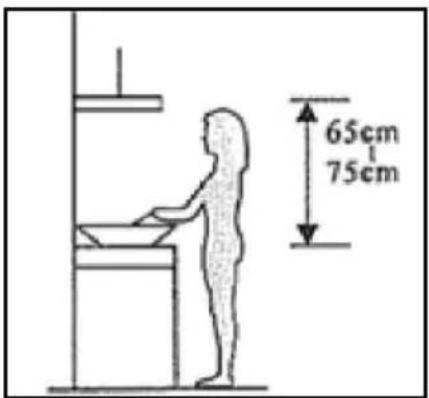
Attention! Observe the warning in the instruction sheet concerning the operation of the appliance when air is discharged from the room.
When the range hood and appliance supplied with energy other than electricity are simultaneously in operation, the negative pressure in the room must be not exceed 4 Pa ( 4 × 10^5 Bar)
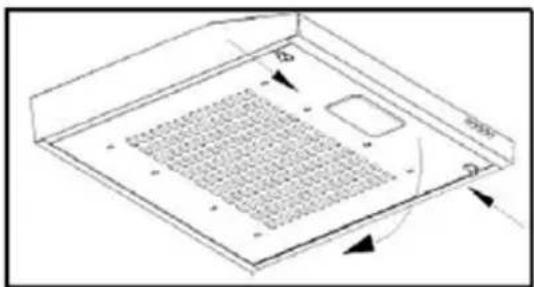
1. Slim model installation
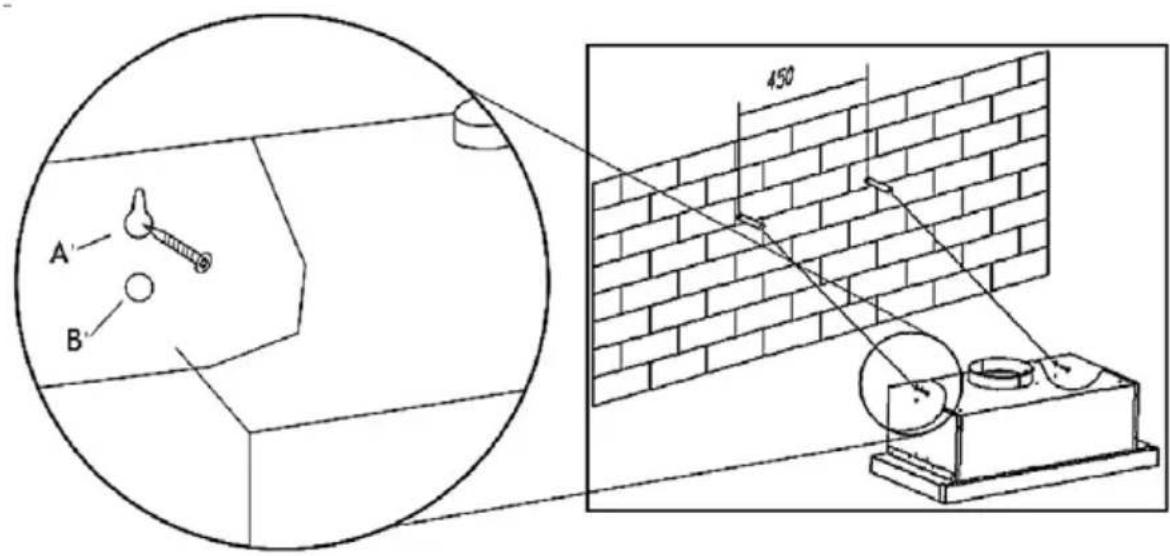
Option 1: Wall Installation
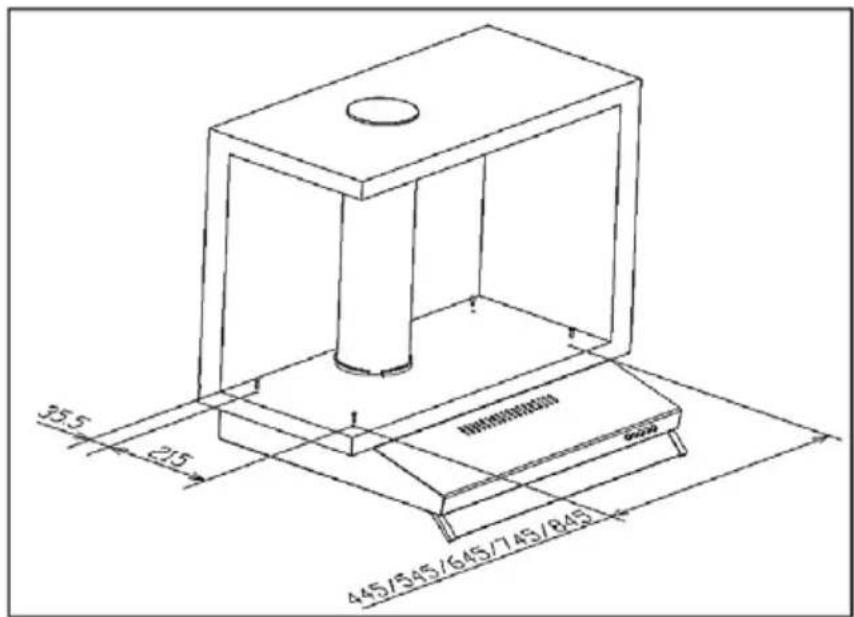
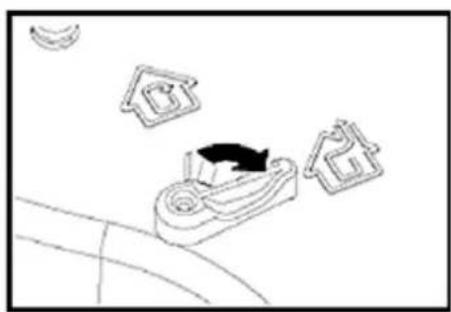
- To install onto the wall drill 2 holes of ∅8mm on a suitable place according with the centre distance of hole in the back of the cooker hood.
- Insert the nut into the holes.
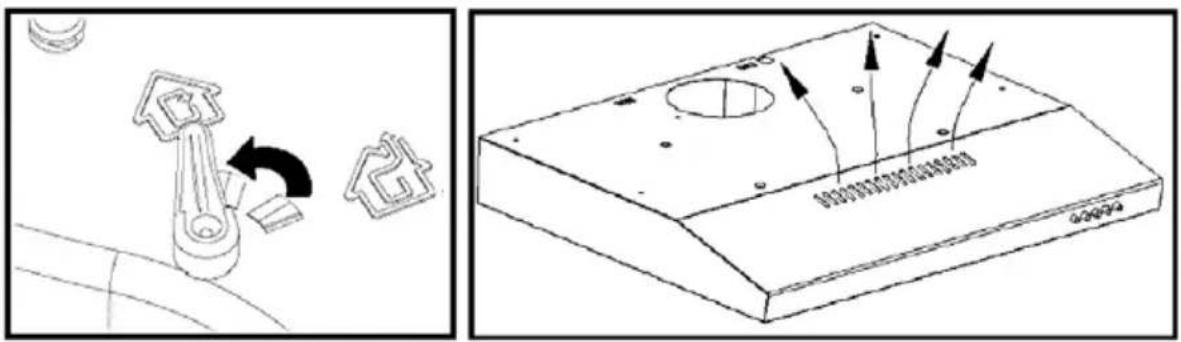
- Insert the screws into the nuts and tight. Put the cooker hood onto the tighten screws.
• Fix the cooker hood with safety screw. The two safety
vents are positioned on the back casing, with diameter of 6mm.
- Put the one way valve onto the cooker hood.
•
Option 2: Installation under cupboard
- Drill 4 holes of 6mm diameter at the bottom of the hanging cupboard
- Put the one way valve on the cooker hood, then install the cooker hood on the bottom of the hanging cupboard, tighten the hood with enclosed 4 screws.
Note
- The extensible pipe are optional accessory, not supplied.
-
Take off protection film before installation.
-
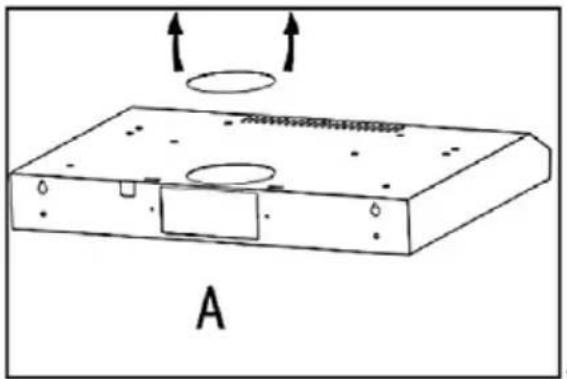
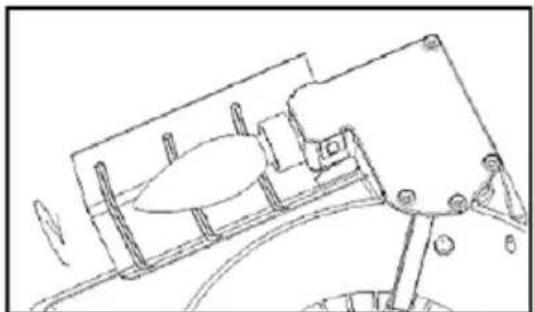
There are 2 methods for ventilation, including 'horizontal ventilation' and 'vertical ventilation'. Please pay attention to the ventilation method when installation.
Vertical ventilation:
See Pic A, please use tool take out the round cover before using, and the air can be vented from top
Horizontal ventilation:
See Pic B, please use tool take out the rectangular cover before using, and the air can be vented from back.
The rectangular air outlet for horizontal ventilation is not supplied.
natural_image
Diagram of a device with labeled section A and directional arrows indicating movement (no text or symbols beyond label)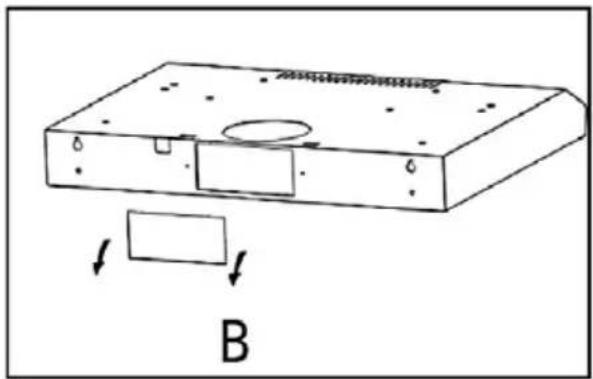
natural_image
Diagram of a device casing with a rectangular component and labeled part B, showing internal structure and mounting holes (no text or symbols beyond labels)Air ventilation setting
Outdoor exhausting:
Turn the adjuster to outdoor position, install the outlet, turn on the cooker hood, then the air will be vented from the outside outlet.
natural_image
Simple line drawing of a car with a moving car and floating houses (no text or symbols)
natural_image
Technical line drawing of a mechanical component with directional arrows indicating movement or force (no text or symbols)Recycling:
The recycling mode with carbon filter ,Turn the adjuster to indoor position, install the outlet cover, turn on the cooker hood, then the air can be vented from the inside outlet.
Note: The charcoal filter is mounted on the back of the grill and must be changed once three month.
Warning: The charcoal cannot be washed or recycled. It should be changed at most after 120 hours using. The carbon filter shouldn't be exposed to heat.
2. Telescopic model installation
Option 1: Wall Installation
To install onto the wall drill 2 holes of ∅8mm on a suitable place according with the centre distance of hole in the back of the cooker hood.
- Insert the nut into the holes.
- Insert the screws into the nuts and tight. Put the cooker hood onto the tighten screws.
- Fix the cooker hood with safety screw. The two safety vents are positioned on the back casing, with diameter of 6mm.
- Put the one way valve onto the cooker hood.
Option 2: Installation under cupboard
Drill 4 holes of 6mm diameter at the bottom of the hanging cupboard
- Put the one way valve on the cooker hood, then install the cooker hood on the bottom of the hanging cupboard, tighten the hood with enclosed 4 screws
Note: The extensible pipe are optional accessory, not supplied. Take off protection film before installation
OPERATION
Mechanic/Electronic Push button
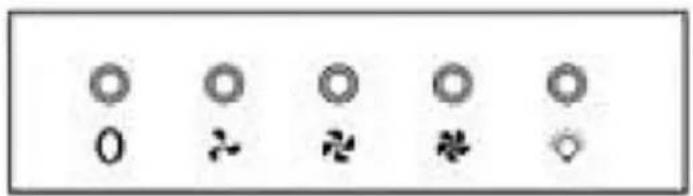

natural_image
Four circular icons with different leaf-like and sun-like symbols, arranged horizontally (no text or labels)Version 1
0 Off button
It's used for turning off the fan.
Low Speed button
It's used for Ventilation on the kitchen. It is suitable for simmering and cooking which do not make much steam.
Medium Speed button
Airflow speed is ideally for ventilation in standard cooking operation.
High Speed button
When high density of smoke or steam produced, press high-speed button for highest effective ventilation.
Light button
NOTE: If Low / Medium/ High speed buttons are press at the same time, the unit will only operate at the highest speed
Mechanic Rocker button (telescopic model)
It just appear in TELESCOPIC MODEL
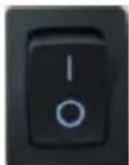
Light button: On the left side of hood
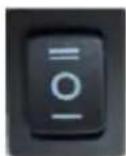
Speed button: On the right side of hood.
"=" High speed
"-" Low speed
"o" Off
MAINTENANCE
Before any maintenance or start to cleaning switch the unit off and disconnect unit from mian supply!
Regular Cleaning
Use a soft cloth moistened with hand-warm mildly soapy water or household cleaning detergent. Never use metal pads, chemical, abrasive material or stiff brush to clean the unit.
Grease Filter Monthly Cleaning
WARNING: Clean the filter every month to prevent any risk of fire.
The filter collects grease, smoke and dust.
The filter is directly connected with efficiency of the cooker hood. If not cleaned, the grease residue (potential flammable) will saturate on the filter. Clean it with household cleaning detergent.
Annual Cleaning for Activated Carbon Filter
Apply to unit that installed internal air circulation (not vented to the outside).
This filter traps odours and must be replaced at least once a year depending on how frequent the cooker hood used.
To prurchase a new Carbon Filter, contact your dealer or Service centre.
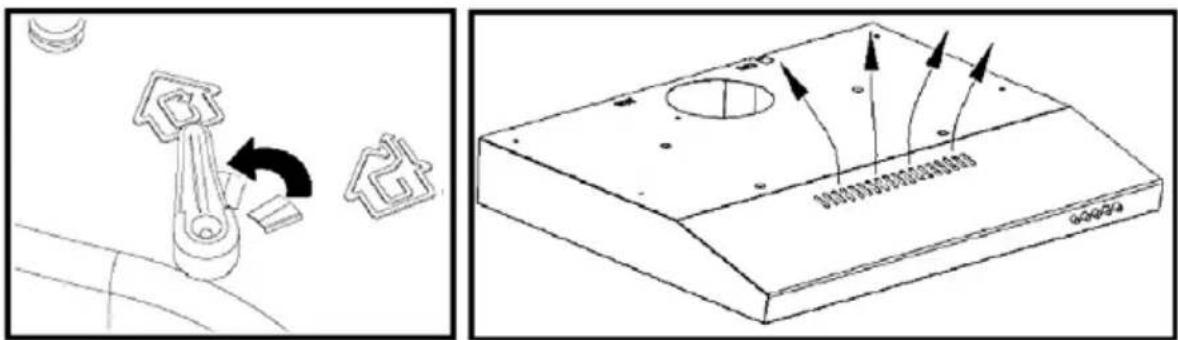
Light Bulb replacement (Slim models)
- Switch the unit Off and unplug the appliance from mains supply.
- Remove the lamp cover.
- Unscrew or remove the bulb
- Replace with the same type and rating voltage new bulb/lamp (Max 2W)
natural_image
Technical line drawing of a computer monitor or rack with grid pattern and ventilation slots (no text or symbols)
natural_image
Technical line drawing of a laptop with internal components and a scroll wheel (no text or symbols)WARNING
If the supply LED bulb is damaged, it must be replaced by the manufacturer, its service agent or similarly qualified persons in order to avoid a hazard.
natural_image
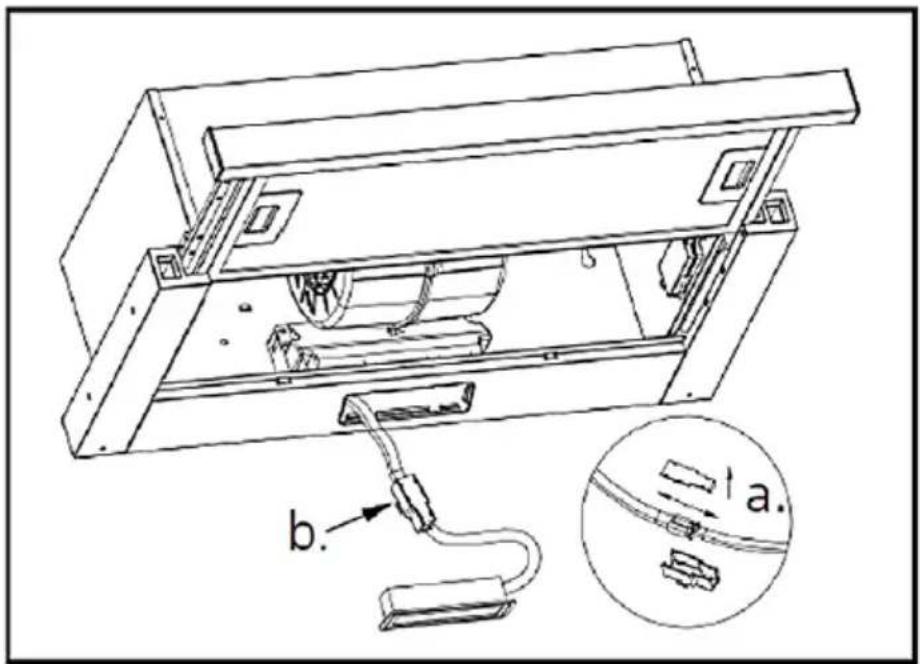
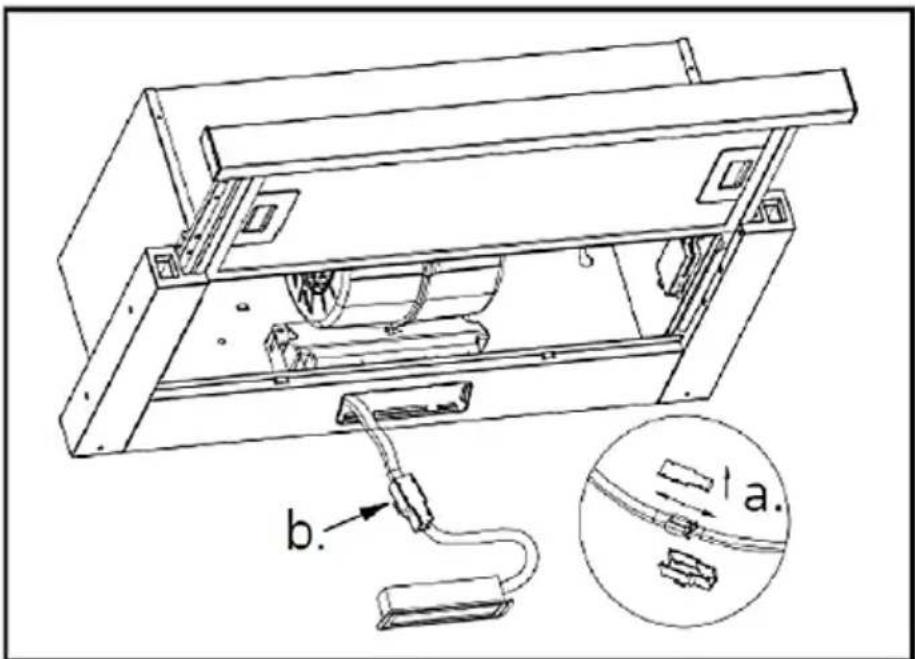
Technical line drawing of a mechanical assembly with no visible text or symbolsLight Bulb replacement (Telescopic models)
- Switch the unit Off and unplug the appliance from mains supply.
- Remove the aluminium grease filter.
- Remove the LED light by squeezing the metal clips
- Replace with the same type and rating voltage new bulb/lamp (Max 2W)
natural_image
Technical line drawing of a mechanical assembly with labeled component 'a.' (no text or symbols beyond label)WARNING
If the supply LED bulb is damaged, it must be replaced by the manufacturer, its service agent or similarly qualified persons in order to avoid a hazard.
TROUBLESHOOTING
The following simple issues can be handled by the user. Please call the after-sale service department if the issues are not settled!
| Problem Possible cause Solution | ||
| Light on, but fan does not work | The fan blade is jammed | Switch of the unit and repair by The motor is damaged. qualified service personnel only |
| The motor is damaged | ||
| Both light and fan do not work | The light bulb burned | Replace the bulb with correct rating |
| Power cord looses | Plug in to the power supply again. | |
| Serious Vibration of the unit | The fan blade is damaged. | Switch of the unit and repair by qualified service personnel only. |
| The fan motor is not fixed tightly. | Switch of the unit and repair by qualified service personnel only | |
| The unit is not hung properly on the bracket | Take down the unit and check whether the bracket is in proper location. | |
| Suction performance not good | Too long distance between the unit and the cooking plane | Readjust the distance to 65-75cm |
TRANSPORT AND SERVICE
WARNING: Handling and transportation. It is required to perform transportation of device in its own original box. Metal, Plastic or Glass parts may be broken during Incorrect packaging. Its electrical parts may be damaged.
Unplug It while It is operating for transport, maintenance or repair purposes.
DISPOSAL OF ELECTRICAL AND ELECTRONIC EQUIPMENT
To protect our environment and to recycle the raw materials used as completely as possible, the consumer is asked to return unserviceable equipment to the public collection system for electrical and electronic.
The symbol of the crossed indicates that this product must be returned to the collection point for electronic waste to feed it by
recycling the best possible raw material recycling.
By ensuring this product you will prevent possible negative effects on the environment and human health, which could otherwise be caused due to improper disposal of that product. The recycling of materials from this product, you will help to preserve a healthy environment and natural resources.
For detailed information about the collection of EE products contact the dealer where you purchased the product.
EU DECLARATON OF CONFORMITY
This device is manufactured in accordance with the applicable European standards and in accordance with all applicable Directives and Regulations.
EU declaration of conformity can be downloaded from the following link: www.msan.hr/dokumentacijaartikala

natural_image
A plain gray horizontal bar with no text, symbols, or markings.JAMSTVENI LIST HR
VIVAX
MODEL UREĐAJA
SERIJSKI BROJ
DATUM PRODAJE
BROJ RAČUNA PRODAVATELJA
POTPIS I PEČAT PRODAVATELJA
POTPIS I PEČAT PRODAVATELJA
GARANCIJSKA IZJAVA
-
Ovom garancijom garantira proizvođač proizvoda, preko KIM TEC d.o.o., kao uvoznika i davatelja garancije u Bosni i Hercegovini besplatan popravak istog u skladu s važećim propisima i u skladu s uvjetima opisanim u ovom garantnom listu. Ovom garancijom garantiramo da će predmet ove garancije raditi bez greške uzrokovane eventualnom lošom izradom i lošim materijalom izrade. Svi eventualno nastali kvarovi biti će besplatno otklonjeni u ovlaštenom servisu u garantnom roku.
-
UVJETI GARANCIJE: Garantni rok počinje teći od dana kupnje proizvoda i traje:
| 60 MJESECI (5 godina) | HLADNJACI,VERTIKALNE I HORIZONTALNE ŠKRINJE |
| 36 MJESECI (3 godine) | ŠTEDNJACI, PERILICE I SUŠILICE RUBLJA, PERILICESUĐA, KUHINJSKE NAPE, UGRADBENE PEĆNICE IPLOČE, GRIJALICE VODE |
- U slučaju kvara na proizvodu koji je predmet ove garancije, obavezujemo se da ćemo isti popraviti u najkraćem mogućem roku, a najkasnije u roku od 45 dana. Ako se proizvod ne može popraviti ili se ne popravi u roku od 45 dana, biti će zamijenjen novim.
- Garancija se priznaje samo uz račun o kupnji, te uz ovaj garantni list koji mora biti ispravno popunjen odnosno mora sadržavati datum prodaje, pečat i potpis prodavatelja.
- Davalac garancije osigurava servis i rezervne dijelove 7 godina od datuma kupnje.