
32LE20K - TV Vivax - Free user manual and instructions
Find the device manual for free 32LE20K Vivax in PDF.

| Product Type | LED Smart TV |
| Model | 32LE20K |
| Display Size | 32 inches (80 cm) |
| Display Resolution | 1366 x 768 pixels |
| Audio Output (RMS) | 6W + 6W |
| Power Consumption | 55 W |
| Power Supply | 100-240V ~ 50/60Hz |
| Dimensions with Stand (WxHxD) | 731 x 486 x 177 mm |
| Weight with Stand | 3.9 kg |
| Operating System | Android 11 |
| Processor | Quad Core 1.45GHz ARM Cortex A55 |
| Graphics | Mali-G31 MP2 |
| RAM / Storage | 1GB / 8GB |
| TV Tuner | DVB-T2/C/S2, Analog PAL/SECAM |
| Connectivity | HDMI (2, one with ARC), USB (2), LAN, Wi-Fi, Bluetooth, Optical Audio Out, CI+ Slot, AV Composite |
| Remote Control | Bluetooth voice remote with Google Assistant |
| Smart Features | Google Assistant, Chromecast built-in, Google Play, Netflix, YouTube, Prime Video |
| Media Playback | USB media player, supports various video/audio/image formats |
| Recording | USB recording and timeshift |
| Wall Mount Pattern | 75 x 75 mm |
| Cleaning | Unplug before cleaning, use soft damp cloth, no liquid or abrasive cleaners |
| Safety | Keep ventilation gaps, avoid heat sources, do not open back cover |
| Spare Parts Availability | 7 years from date of purchase (by distributor) |
| Repair Service | Authorized service centers; warranty conditions apply |
| General Information | Manufacturer: M SAN Grupa d.d., Vivax brand; EU Declaration of Conformity available online |
Frequently Asked Questions - 32LE20K Vivax
User questions about 32LE20K Vivax
0 question about this device. Answer the ones you know or ask your own.
Ask a new question about this device
Download the instructions for your TV in PDF format for free! Find your manual 32LE20K - Vivax and take your electronic device back in hand. On this page are published all the documents necessary for the use of your device. 32LE20K by Vivax.
USER MANUAL 32LE20K Vivax
Postavke (Settings) 34
Izbornik snimanja
Ostale informacije
Rješavanje problema 37
Formati podržanih zapisa 38
RF Podaci 40
Tehničke specifikacije 41
Odlaganje istrošenog uređaja 42
EU Izjava o sukladnosti 42
EPREL Informacijski list 42
Jamstvena izjava (na kraju uputa)
DOBRODOŠLI
Ovaj uređaj zadovoljava najviše standarde, inovativnu tehnologiju te visoku udobnost korištenja.

Media player — Pristupite svojim muzičkim zapisima, slikama i video materijalima putem vašeg USB medija te ih pokrenite direktno na TV prijamniku.

Kontrolirajte sve funkcije pomoću jednog daljinskog upravljača. Priključite vaš televizor direktno na zemaljsku, ili kabelsku mrežu te uživajte u sadržajima u najvišoj kvaliteti.
Popis pribora uz uređaj
Prilikom otvaranja kutije i instalacije uređaja, provjerite da li ste uz vaš uređaj dobili sav potreban pribor:
- Korisnički priručnik s jamstvenom izjavom
- Daljinski upravljač
- Baterije x2
- Nogice (stalak)
natural_image
Front view of a white HBOV home control with multiple remote and keyboard keys (no visible text or symbols on the device itself)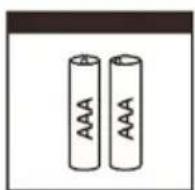
natural_image
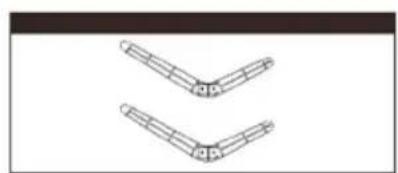
Two identical 3D mechanical bracket diagrams with no text or symbolsSlike služe samo kao referenca i mogu se neznatno razlikovati od stvarnog proizvoda. Pri tome funkcionalnost ostaje ista.

Munja sa simbolom strelice unutar trokuta upozorava korisnika na prisutnosti opasnog neizoliranog napona unutar proizvoda, te koji može biti dovoljno jak da bi predstavljao rizik od strujnog udara ili ozljeda.

Uskličnik unutar trokuta upozorava korisnika o prisutnosti važnih uputa o rukovanju i održavanju u dokumentu priloženom u pakiranju.

OPREZ

RIZIK OD STRUJNOG UDARA NE OTVARAJTE UREĐAJ
natural_image
Symbolic illustration of a candle crossed with a flame, representing fire or smoke (no text or numbers present)20. Uporaba Slušalica - Oprez
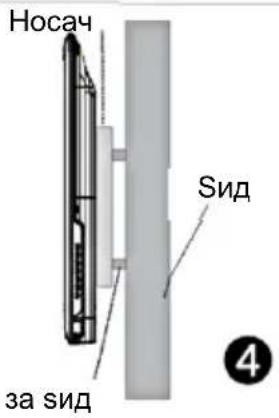
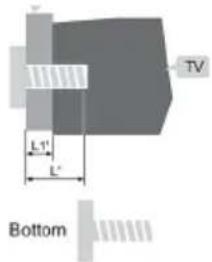
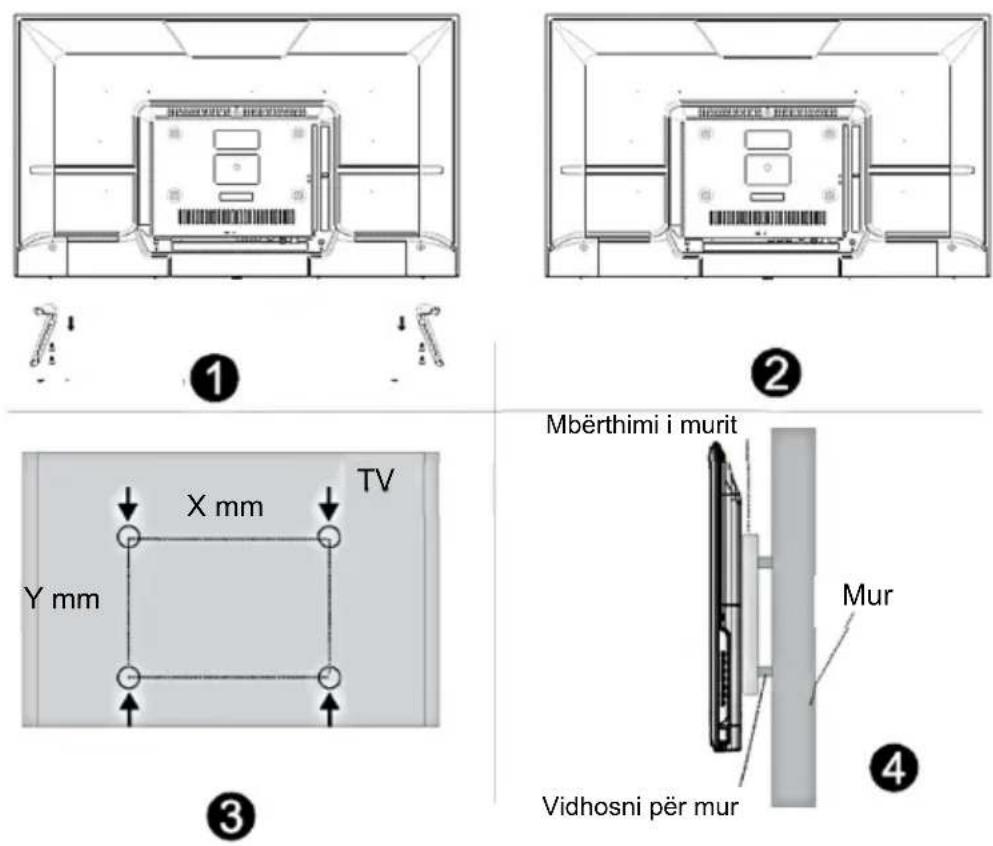
Instalacija na zid
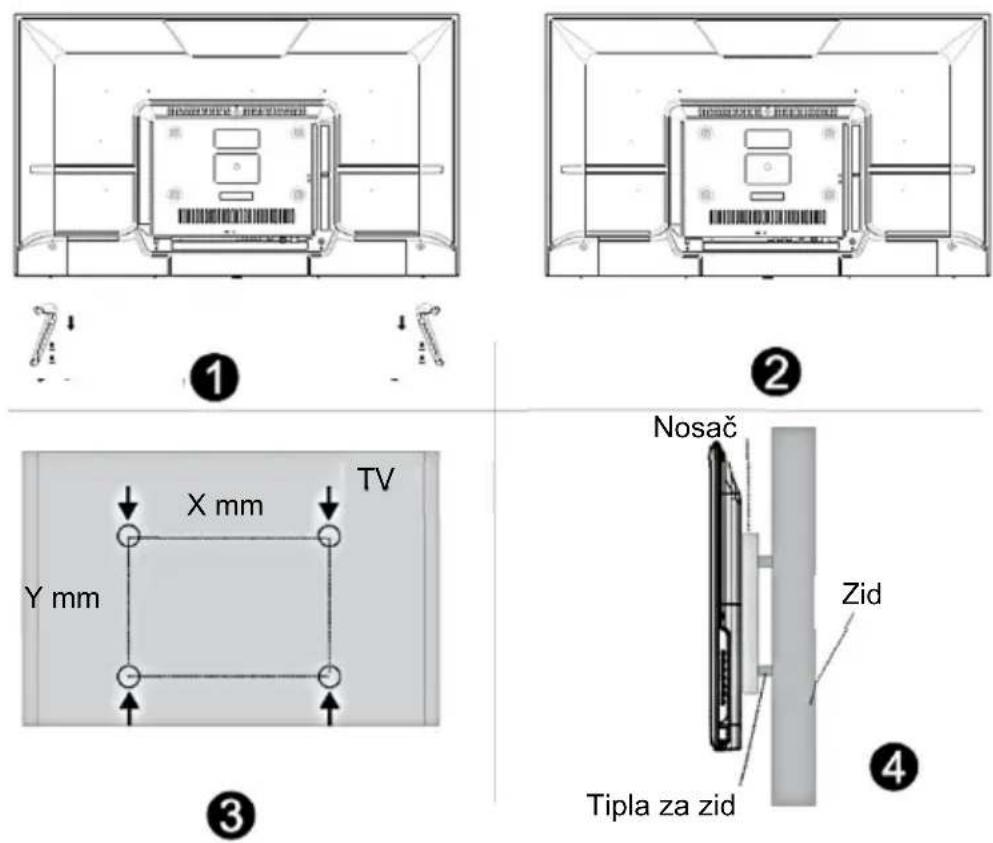
| Veličina zaslona | X Y | |
| 32“ 75 mm | 75 mm | |
| 40" 200 mm | 100 mm | |
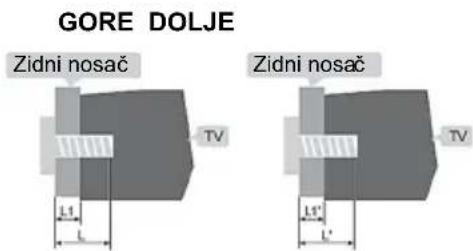
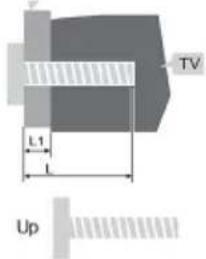
| Vijci nosača televizora na zid | Gore: 2x M4 (L1+8mm)VijakDolje: 2xST4 (L'=L1'+8)Samonarezujući vijak s ravnom glavom | |
- Prije postavljanja TV prijamnika na zid, obavezno uklonite nogice ili stalak.
- Ako postavite televizor na strop ili kosi zid, može doći do pada uređaja i ozbiljnih ozljeda. Koristite samo kvalitetan i odgovarajući zidni nosač, a za ugradnju kontaktirajte vašeg prodavača ili ovlašteni servis.
- Kako biste spriječili ozljede, TV mora biti čvrsto pričvršćen sukladno uputama za instalaciju nosača.
- Koristite vijke i dimenzije dane u uputi za ugradnju nosača.
- Zidni nosač i pripadajući dijelovi nosača su dodatna oprema koja se nabavlja odvojeno i nisu dio standardnog seta pribora koji se isporučuje s TV uređajem.
- Slika montaže je samo inormativna. Za detaljnije upute, molimo vas da proučite upute koje ste dobili uz zidni nosač.
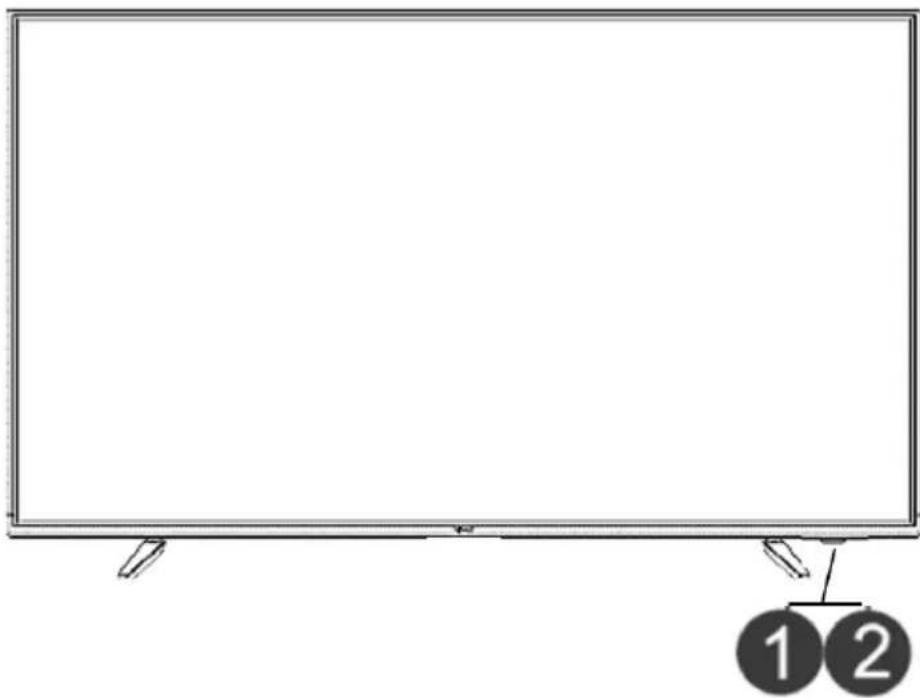
Prednja strana tv prijamnika
natural_image
Front view of a blank rectangular TV with two numbered buttons at the bottom (1 and 2), no text or symbols on the screen or frame.In OSD menu and smart mode, press OK rocker to confirm the operation.
Kanal +/-: U TV modu, pomaknite tipku gore/dolje za odabir kanala.
Navigacija: U pametnom načinu rada pomaknite tipku gore/dolje za odabir stavke.
Napomena:
We recommend to use Control panel commands for basic functions only, e.g. On / Off, CH up / down or Volume adjustment.
For more advanced settings please use Remote control!
Priključite USB uređaj kao što je USB memorija ili USB tvrdi disk ili digitalnu kameru za pregledavanje fotografija, slušanje glazbe ili gledanje video materijala. Ovaj ulaz koristi se i za nadogradnju software-a. Nadogradnja će se izvršiti automatski čim USB sa datotekama za nadogradnju bude umetnut u USB sučelje.
NAPOMENE
- Prilikom priključenja tvrdog diska ili USB memorije, uvijek priključite adapter napajanja spojenog uređaja u izvor napajanja. Preopterečenje USB priključka može dovesti do oštećenja. Najveća dozvoljena potrošnja struje USB ulaza iznosi 500mA.
- TV prijamnik ne podržava samostalne, nestandardne tvrde diskove visokih performansi koji nemaju vanjsko napajanje, ukoliko je zahtjevana struja jača ili jednaka 500mA. To može dovesti do oštećenja TV uređaja ili tvrdog diska.
- USB utor podržava napon od 5V.
- Maksimalna podržana veličina prostora za pohranu je 1T.
▶ OPTICAL DIGITAL AUDIO OUT
▶ COMMON INTERFACE (CI+ SUČELJE)
Umetnite CI modul za otvaranje kodiranih programa kao što su PAYTV ili HD PAYTV programi.

flowchart
graph LR
    A["TV JACK"] --> B["COMMON INTERFACE(CARD FACE FRONT)"]
    B --> C["CAM CARD"]
    C --> D["SMART CARD"]
    D -->|1| C
    C -->|2| B
NAPOMENE
- Prije umetanja/uklanjanja CI modula osigurajte da je televizor isključen. Zatim umetnite CI karticu u CI modul u skladu sa uputama proizvođača.
- Nemojte učestalo umetati ili uklanjati CI modul pošto to može dovesti do oštećenja sučelja ili dovesti do kvara.
- CI modul i karticu morate dobaviti od pružatelja usluga za Programe koje želite gledati.
- Umetnite CI modul sa Smart Karticom u smijeru prikazanom na modulu i Smart kartici.
- CI nije podržan u nekim državama i regijama; provjerite sa ovlaštenim distributerom.
AV INPUT
natural_image
Simple line drawing of a battery with an arrow pointing to its side (no text or symbols)
natural_image
Simple line drawing of a battery pack with two plates and a handle (no text or symbols)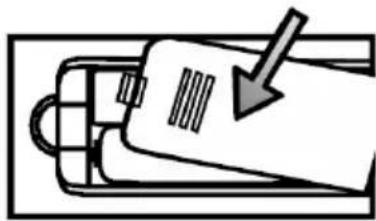
natural_image
Simple line drawing of a device with an arrow pointing to it, no text or symbols presentNAPOMENE
Odabir jezika prikaza (OSD Language)
Brzo postavljanje TV-a sa svojim Android ^TM telefonom (Quickly set up your TV with your Android ^TM phone)
Uz jednostavno korištenje Wi-Fi mreže, vašeg Android telefona i Google Account računa, jednostavno možete prenjeti podatke i postavke sa svog Google Account računa na TV.
Pritisnite ▼ / ▲ i OK z odabir opcija
-
"Continue (Nastavi)"
-
"Skip (Preskoči)"
Prijenos podataka s vašeg Google telefona (pogledajte 1. korak Prijenos podataka)
Prijedite na drugi korak postavljanja. (pogledajte korak 2: Skip (Preskoči)).
1. Prijenos podataka sa svog Google računa (Quick Setup)

Odabr Regije/Države (Region/Country)
Pritisnite tipku ▼ / ▲ i OK za odabir zemlje u kojoj instalirate TV prijamnik.
Postavljanje Lozinke (Password)
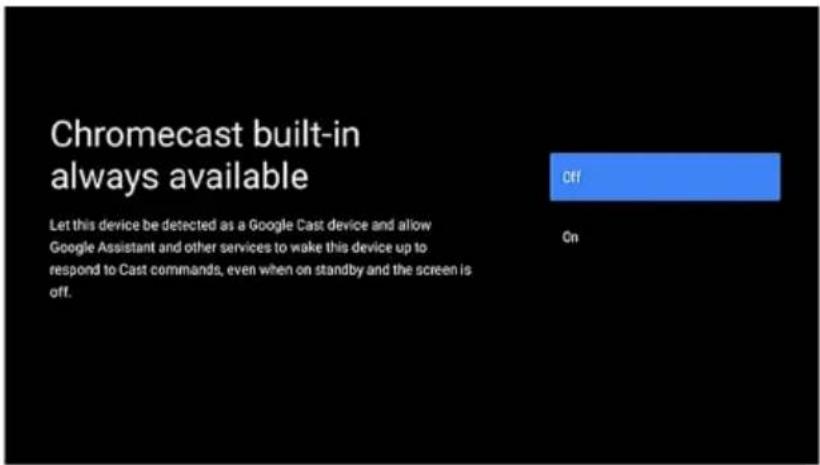
Postavljanje Chromecast built-in™ funkcije (Setting Chromecast built-in™)
Ovime omogućujete da ovaj uređaj bude otkriven kao Chromecast built-in uređaj i dopuštate Google Account i drugim uslugama da "probude" ovaj uređaj kako bi odgovorio na Cast naredbe, čak i kada je u stanju čekanja i zaslon isključen.

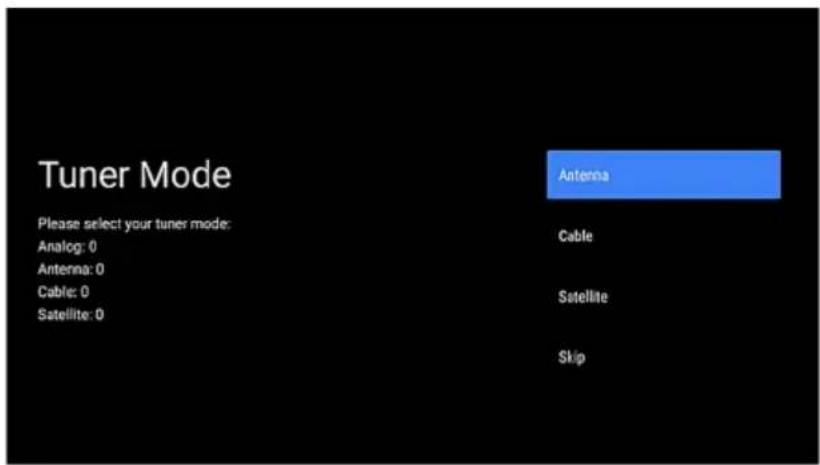
Način rada TV Tunera (Tuner Mode)
Odaberite vrstu kanala za koje želite izvršiti automatsku pretragu TV kanala.
Možete odabrati: Antena (ATV, DVB scan)
Kabel
Satelit
Ili odaberite funkciju Skip (Preskoči) za preskakanje Auto pretrage.
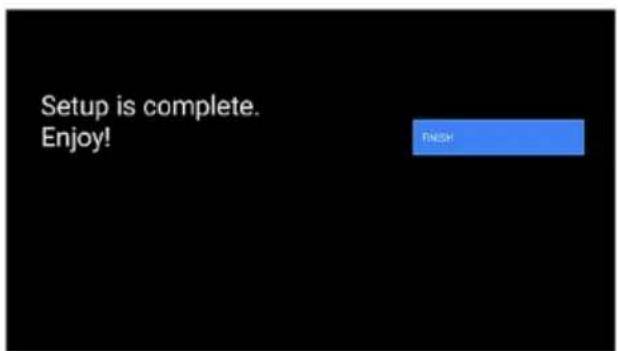
Slijedite upute na ekranu.
Čestitamo!
Sada je vaš TV spreman za korištenje
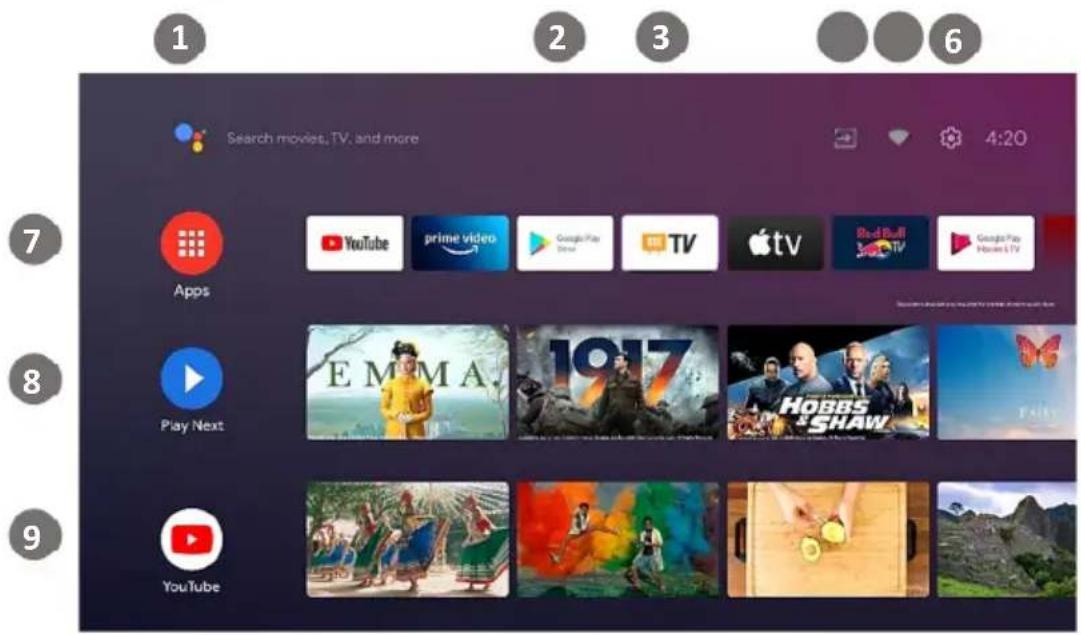
Početna stranica (Home page)
Pritisnite tipku "HOME ↑" na daljinskom za prikaz početnog zaslona
- Google voice search 5. Wi-Fi status
- Google Play 6. Postavke
- TV Aplikacija za gledanje TV kanala 7. App Lista
- Lista izvora
- Play Next Lista
- YouTube Lista
Možete se jednostavno kretati kroz dostupne opcije ili aplikacije koristeći navigacijske tipke ▼ / ▲ / ◀ / ▶ za odabir stavke i pritisnite OK za potvrdu.
Odabir izvora
1. Kanali (Channels)
Pritisnite tipke ◀ / ▶ za odabir jednog od mogućih podizbornika.

Programski vodič (Program Guide)
Otvaranje elektroničkog programskog vodiča (EPG) s informacijama o TV kanalima, rasporedu itd.
Kanal Channel:
U ovom izborniku možete skenirati dostupne TV kanale.
Mod Instalacije kanala (Channel Installation Mode)
- Postavite vrstu pretrage (Antena, Kabel, Satelit)
- Postavite automatsku ili ručnu pretragu ili jednokanalnu pretragu.
• LCN (Logičko kanalno numeriranje) - Vrsta pretrage kanala (svi, samo besplatni kanali)
• Uredi popis kanala
Automatska nadogradnja kanala (Auto Channel Update)
Poruka za nadogradnju kanala (Channel Update Message)
Vrsta pretrage / Vrsta spremanja kanala (Channel Scan Type / Channel Store Type)
Možete odabrati vrstu kanala za pretragu/spremanje: Svi, Samo besplatni TV kanali itd...
Odabir omiljene mreže (Favorite Network Select)
Odaberite svoju omiljenu mrežu za pretragu kanala
Analogno Fino ugađanje kanala (Analog Channel Fine tune)
Postavljanje i fino ugađanje analognih TV kanala
2. TV Opcije (TV Options)
- Ulazi (Source)
Odabir dostupnih izvora spojenih na vaš TV prijemnik. - Slika (Picture)
Ugađanje postavki slike.
• Zvuk (Sound)
Ugađanje postavki zvuka.
• Postavke uštede energije (Power)
Ugađanje postavki napajanja (npr. Sleep Timer-a, Auto isključenja itd.) - Cl kartica
Postavke CI kartice - Napredne opcije (Advanced options)
Soundtracks Audio, Plavi ekran, HbbTV opcije, Podnaslovi, Postavke teleteksta i postavke informacija o sustavu - Postavke (Settings)
Ista funkcija kao i Postavka u izborniku Smart mod.
Ulazi (Source)
Ista funkcija kao što je opisano u poglavlju: Odabir izvora
Slika (Picture)
Mod Slike (Picture mode):
Korisnik (User)- > Standard- > Živo (ViVid)- > Sport- > Film (Movie)- > Igre (Game)
Svjetlina/Kontrast/Zasićenje/Nijansa Brightness/Contrast/Saturation/HUE
Korisnik (User)- > Standard- > Živo (ViVid)- > Sports- > Film (Movie)- > Muzika (Music)-> Vijesti (News)->Auto.
Sistem zvuka (System sounds):
Stil zvuka (Sound Style):
Možete postaviti predefiniriani zvuk: Korisnik (User)- > Standard- > Živo (ViVid)- > Sports- > Film (Movie)- > Muzika (Music)- > Vijesti (News)- > Auto
Balans/bas/Visoki/Surround (Balance/Bass/Treble/Surround):
Postavke uštede energije (Power)
Pritisnite tipke [◀] / [▶] za odabir opcije Uštede energije (Power).
Za ugađanje parametara koristite tipke 【▼】 / 【▲】 ; za odabir stavke i ugađanje vrijednosti pritisnite 【◀】 / 【▶】 .
Možete ugađati:
Audio jezik / Drugi Audio jezik (Audio Language / 2nd Audio Language)
Odaberite željeni audio jezik. Ako je dostupan, ovaj audio kanal će se reproducirati u slučaju višejezičnog emitiranja.
Audio zapisi (Sound Tracks)
Odaberite opciju Postavljanje da biste prilagodili/postavili zvučne zapise
Plavi zaslon (Blue Mute)
MHEG (Multimedia and Hypermedia Experts Group)
MHEG je interaktivni sustav za kreiranje aplikacija koje se koriste u digitalnom zemaljskom TV sustavu Ujedinjenog Kraljevstva (npr. Freeview). Tekstualne usluge (crvena tipka u virtualnoj tipkovnici) koja se prikazuje na nekim kanalima služi za ulaz u interaktivne usluge teksta/slike.
Teletext
Kanal (Channel)
Odaberite opciju Kanal (Channel) za ulazak u ugađanja kanala.
Za više informacija, molim pogledajte poglavlje: Kanali / Kanal (Channels/Chanel).
Računi / Prijava (Accounts & Sign-in)
Za postavljanje Google Account računa uđite u izbornik postavki računa i prijave.
Apps
Slika/Zvuk (Picture/Sound):
Usage & Diagnostics
RF (Radiation Exposure) podaci:
Ova oprema je u skladu s CE granicama izloženosti zračenju utvrđenim za nekontrolirano okruženje. Ovu opremu treba instalirati i koristiti s minimalnim razmakom od 20 cm između uređaja i tijela.
Frekvencija, način rada i najveća odašiljena snaga u EU navedeni su u nastavku:
- 2400-2483.5MHz: ≤20 dBm (EIRP) (2.4G)
- 5150-5250MHz: ≤23 dBm (EIRP) (5.8G)
- 5250-5350MHz: ≤23 dBm (EIRP) (5.8G)
- 5470-5725MHz: ≤30 dBm (EIRP) (5.8G)
- 5725-5875MHz: ≤33 dBm (EIRP) (5.8G)
Uređaj je ograničen na uporabu u zatvorenom prostoru samo kada radi u frekvencijskom rasponu od 5150 do 5350MHz i 5725-5875MHz.
 | AT | BE | BG | HR | CY | CZ | DK |
| EE | FI | FR | DE | EL | HU | IE | |
| IT | LV | LT | LU | MT | NL | PL | |
| PT | RO | SK | SI | ES | SE | UK |
Tehničke Specifikacije
| Model B Series 32LE20K B Series 40LE20K | ||
| Dimenzija s postoljem (mm) | 731 x 486 x 177 904 x 57 | 2 x 177 |
| Dimenzija bez postolja (mm) | 731 x 433 x 68 904 x 519 | x 72 |
| Težina s postoljem (kg) | 3,9 6,7 | |
| Težina bez postolja (kg) | 3,8 6,6 | |
| Veličina zaslona 32" (80cm) 40" (100cm) | ||
| Rezolucija 1366 x 768 1920 x 1080 | ||
| Audio snaga (RMS) | 6 W +6 W 6 W + 6 W | |
| Nazivna snaga 55 W 55 W | ||
| Napajanje 100-240V ~ 50/60Hz | ||
| AV Sistem boje PAL NTSC | ||
| TV Sistem | PAL/SECAM-B/G, D/K, DVB-T+C DVB-T2 H 265, DVB-S/S2 | |
| Radni uvjeti | Temperature: 5°C - 45°C Humidity: 20% - 80% RH Atmosfere pressure: 86 kPa - 106 kPa | |
| IC Core / Software / Mem. | Quad Core 1,45GHz ARM Cortex A55 / Mali-G31 MP2 / Android 11 / 1GB/8GB | |
| HDMI mod | 480I / 60Hz, 480P / 60Hz, 576I / 50Hz, 576P / 50Hz, 720P / 50Hz, 720P / 60Hz, 1080I / 50Hz, 1080I / 60Hz, 1080P / 50Hz, 1080P / 60Hz 640 x 480, 800 x 600, 1024 x 768 60Hz, 1920x1080 60Hz | |
Napomene: !
Vivax ne može jamčiti da će se sve aplikacije moći instalirati i da će sve aplikacije raditi ispravno.
Medija plejer — Pristupite svojoj muzici, slikama i filmovima preko mreže ili USB medija i pokrenite ih na televizoru.

Sve radi pomoću jednog daljinskog upravljača. Spojite televizor na antenu, satelitsku antenu ili kablovsku mrežu i uživajte u sadržajima, u visokom kvalitetu.
Spisak dodatne opreme uz uređaj
Prilikom otvaranja pakovanja i instalacije uređaja, proverite da li ste uz vaš uređaj dobili sav potreban pribor:
- Korisnička uputstva s izjavom o sabraznosti
- Daljinski upravljač
- Baterije x2
- Stalak ili nogice

natural_image
Front view of a white HBO Max remote control with multiple function keys and buttons (no readable text or symbols)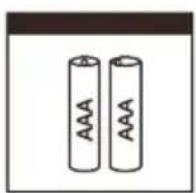
natural_image
Two identical line drawings of a bent mechanical component or bracket, no text or symbols present.Slike služe samo kao referenca i mogu da se neznatno razlikuju od stvarnog proizvoda. Pri tome funkcionalnost ostaje ista.

Munja sa simbolom strelice unutar trougla upozorava korisnika na prisutnosti opasnog neizolovanog napona unutar proizvoda koji može da bude dovoljno jak da bi predstavljao rizik od strujnog udara i povreda.

Uzvičnik unutar trougla upozorava korisnika na uputstva o rukovanju i održavanju, priložena u pakovanju.

OPREZ

RIZIK OD STRUJNOG UDARA NE OTVARAJTE UREĐAJ
Ne otvarajte zadnji poklopac. Ni u kom slučaju korisniku nije dozvoljen rad unutar televizijskog seta. Samo kvalifikovani tehničar iz ovlašćenog servisa ima dozvolu za takav rad.

Glavni utikač koristi se za isključivanje televizora iz napajanja. Kada je utikač priključen na napajanje, uređaj će da bude u stanju mirovanja (standby).

Nepravilna zamena baterije, uključujući zamenu druge baterije sličnog ili istog tipa, može da dovede do opasnosti od požara ili eksplozije. Ne izlažite baterije toploti, poput sunčeve svetlosti, vatri ili sličnim vremenskim nepogodama.

natural_image
Symbolic illustration of a candle crossed with a flame, representing heat or urgency (no text present)natural_image
Top-down schematic of a device layout with no visible text, numbers, or symbols
1

natural_image
Top-down schematic of a device layout with no visible text, numbers, or symbols2
3
Tipla za zid
| Veličina ekrana | X | Y |
| 32“ 75 mm | 75 mm | |
| 40" 200 mm | 100 mm | |
| Šrafi nosača televizora na zid | Gore: 2x M4 (L1+8mm)ŠrafDole: 2xST4 (L'=L1'+8)Samonarezujući šraf s ravnom glavom | |
- Pre podešavanja TV prijemnika na zid, obavezno uklonite nogice ili stalak.
- Ako postavljate televizor na plafon ili kosi zid, može da dođe do pada uređaja i ozbiljnih povreda. Koristite samo kvalitetan i odgovarajući zidni nosač, a za ugradnju kontaktirajte vašeg prodavca ili ovlašćeni servis.
- Kako biste sprečili povrede, TV mora da bude čvrsto pričvršćen prema uputstvima za instalaciju nosača.
- Koristite šrafove i dimenzije date u uputstvu za montažu nosača.
- Zidni nosač i pripadajući delovi nosača su dodatna oprema koja se nabavlja odvojeno i nisu deo standardnog seta pribora koji se isporučuje s TV uređajem.
- Slika montaže je samo inormativna. Za detaljna uputstva, molimo vas da proučite uputstva koja ste dobili uz zidni nosač.
Prednja strana tv prijemnika
natural_image
Front view of a blank rectangular TV with two side clips and a numbered label '1' and '2' below (no text or symbols on the screen)| Opis | ||
| 1 | IR Senzor | Prima signal iz daljinskog upravljača. Ne postavljajte nikakve prepreke između senzora pošto to može da utiče na ispravan rad i kontrolu uređaja putem daljinskog upravljača. |
| 2 | Indikator stanja | Plavo svetlo svetli u modu čekanja. Plavo svetlo svetli kada je televizor uključen. |
NAPOMENE
In OSD menu and smart mode, press OK rocker to confirm the operation.
Channel +/-: U TV režimu, pomerite dugme Gore/Dole da biste izabrali kanal
Navigation: U pametnom režimu, pomerite dugme Gore/Dole da biste izabrali stavku.
U OSD meniju, pomerite navigator gore/dole/levo/desno da biste izvršili rad sa menijem
Volume +/-: U meniju koji nije na ekranu, pomerite navigator levo/desno da biste smanjili/povećali jačinu zvuka.
Ikone odgovaraju tipkama daljinskog upravljača kao što je opisano u nastavku:
Napomena:
Preporuča se korišćenje upravljačke ploče samo za osnovne funkcije, npr. Uklj. / Isklj., CH gore / dole ili podešavanje zvuka.
Za naprednija podešavanja koristite daljinski upravljač!!
Spojite USB uređaj kao što je USB memorija ili USB tvrdi disk ili digitalnu kameru za pregledavanje fotografija, slušanje muzika ili gledanje video materijala. Ovaj ulaz koristi se i za nadogradnju softvera. Nadogradnja će da se izvrši automatski čim USB sa datotekama za nadogradnju bude umetnut u USB ulaz.
NAPOMENE
- Prilikom spajanja tvrdog diska ili USB memorije uvek priključite adapter napajanja priključenog uređaja u izvor napajanja. Preopterečenje USB priključka može da dovede do oštećenja. Najveća dozvoljena potrošnja struje iznosi 500mA.
- TV prijemnik ne podržava samostalne, nestandardne tvrde diskove koji nemaju spoljno napajanje, ako je zahtevana struja jača ili jednaka 500mA. To može da dovede do oštećenja TV uređaja ili tvrdog diska.
- USB ulaz podržava napon od 5V.
- Maksimalna podržana veličina prostora za spremanje je 1T.
Ako želite reprodukovati DTV video, brzina prenosa USB uređaja za skladištenje ne sme biti manja od 5 MB/s.
▶ DIGITAL AUDIO OUT : OPTICAL DIGITAL AUDIO OUT
Za reprodukciju TV Audio sadržaja na spoljnom uređaju, priključite spoljni digitalni audio uređaj na Digitalni optički izlaz TV uređaja. Pre spajanja digitalnog audio sistema na optički priključak trebali bi smanjiti jačinu zvuka TV uređaja i audio sistema da bi izbegli nenadano pojačanje zvuka.
TV DIGITAL AUDIO
Audio pojačalo

▶ COMMON INTERFACE (CI INTERFEJS)
Umetnite CI modul za otvaranje kodiranih programa kao što su PAYTV ili HD PAYTV programi.

flowchart
graph LR
    A["TV JACK"] --> B["COMMON INTERFACE(CARD FACE FRONT)"]
    B --> C["CAM CARD"]
    C --> D["SMART CARD"]
    C -->|①| D
    C -->|②| B
NAPOMENE
- Pre umetanja/uklanjanja CI modula obezbedite da je televizor isključen. Zatim umetnite CI karticu u CI modul prema uputstvima proizvođača modula.
- Nemojte stalno da umećete ili uklanjate CI modul pošto to može dovesti do oštećenja ili kvara.
- CI modul i karticu morate nabaviti od pružatelja usluga za Programe koje želite primati.
- Umetnite CI modul sa Smart Karticom u smeru prikazanom na modulu i Smart kartici.
- CI nije podržan u nekim državama i regiama: proverite sa ovlašćenim distributerom.
AV INPUT
Koristite audio i video kablove kako bi povezali TV prijemnik sa spoljnim A/V uređajem putem kompozitnog video/audio priključka. (Video = žuti konektor, Audio levo = beli konektor i Audio desno = crveni konektor).
- Pritisnite taster SOURCE → i kada se prikaže meni sa listom izvora, pritisnite tastere [▲/▼] da bi odabrali izvor [AV] na koji je priključen spoljni A/V uređaj i za potvrdu pritisnite taster OK.
natural_image
Simple line drawing of a battery with an arrow pointing to its side (no text or symbols)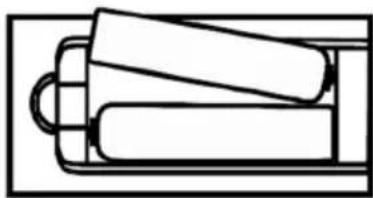
natural_image
Simple line drawing of two stacked cylindrical objects inside a rectangular frame (no text or symbols)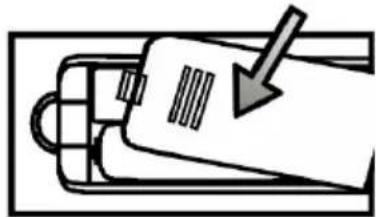
natural_image
Simple line drawing of a device with an arrow pointing to it, no text or symbols presentNAPOMENE
- Slika proizvoda služi samo za informaciju, stvarni proizvod može da se razlikuje u izgledu.
- Stare baterije odložite u označeno mesto za odlaganje. Nemojte da bacate baterije u vatru.
- Ne mešajte tipove baterija te ne kombinujte korišćene sa novim baterijama.
- Odmah zamenite prazne baterije da bi sprečili curenje kiseline u odeljak za baterije daljinskog upravljača.
- Ako ne planirate da koristite daljinski upravljač duže vreme uklonite baterije.
- Baterije ne smeju da se izložu preteranoj toploti poput sunčeve svetlosti, grijelica ili vatri.
- Hemikalije iz baterija mogu da izazovu osip i opekline na koži. Ako baterije cure očistite odeljak krpom. Ako hemikalije dođu u doticaj sa kožom, odmah operite kožu.
Odabir jezika (OSD Language)
Napomena:
Ako na internet želite priključiti TV putem kabla, jednostavno umetnite kabl (nije isporučen) u priključak „LAN” na zadnjoj strani televizora
Brzo podešavanje TV-a sa tvojim Android™ telefonom (Quickly set up your TV with your Android™ phone)
Uz jednostavno korišćenje Wi-Fi mreže, vašeg Android telefona i Google Account računa, jednostavno možete preneti podatke i podešavanja sa svog Google Account računa na TV.
Pritisnite ▼ / ▲ i o izbor opcija
- "Continue (Nastavi)"
- "Skip (Preskoči)"
Prenos podataka sa vašeg Google telefona (pogledajte 1. korak Prenos podataka)
Odabr Regije/države-(Region/Country)
Podešavanje lozinke (Password)
Podešavanje Chromecast built-in™ funkcije (Setting Chromcast built-in™)
Ovime omogućujete da ovaj uređaj bude otkriven kao Chromecast built-in uređaj i dopuštate Google Account asistentu i drugim uslugama da "probude" ovaj uređaj kako bi odgovorio na Cast naredbe, čak i kada je u stanju čekanja i ekran isključen.
Način rada TV Tunera (Tuner Mode)
Izaberite vrstu tunera za koje želite izvršiti automatsko pretraživanje TV kanala.

Možete izabrati: Antena (DVB T/T2)
Kabl (DVBC)
Satelit (DVBS/S2)
Ili odaberite funkciju Skip (Preskoči) za preskakanje Auto pretraživanja.
Sledite uputstva na ekranu.
Čestitamo!
Sada je vaš TV spreman za upotrebu
Početna stranica (Home page)
Pritisnite taster "HOME 🔒" na daljinskom za prikaz početnog ekrana
- Google voice search 5. Wi-Fi status
- Google Play 6. Podešavanja
- TV Aplikacija za gledanje TV kanala 7. App Lista
- Lista Izvora
- Play next Lista
- YouTube Lista
Možete se jednostavno kretati kroz dostupne opcije ili aplikacije koristeći navigacione tastere ▼ / ▲ / ◀ / ▶ za izbor stavke i pritisnite OK za potvrdu.
Izbor izvora (Inputs)
Pritisnite ▼ / ▲ za odabir "SOURCE ➕" ulaznog signala.
1. Kanali (Channels)
Pritisnite tastere ◀ / ▶ za izbor jednog od mogućih podmenija.
Programski vodič (Program Guide)
Otvaranje elektronskog programskog vodiča (EPG) s informacijama o TV kanalima, rasporedu itd.
Kanal (Channel):
U ovom meniju možete skenirati dostupne TV kanale.
Režim Instalacije kanala (Channel Installation Mode)
- Postavite vrstu pretrage (Antena, Kabl, Satelit)
- Postavite automatski ili ručno pretraživanje ili jednokanalno pretraživanje.
• LCN (Logičko numerisanje kanala) - Vrsta pretraživanje kanala (svi, samo besplatni kanali)
- Uredi listu kanala
Automatska nadogradnja kanala (Auto Channel Update)
Poruka za nadogradnju kanala (Channel Update Message)
TV sistem će povremeno proveravati i prikazati poruku da su neki novi kanali dostupni.
Roditeljska kontrola (Parental Controls)
Uredite i prilagodite sva ograničenja roditeljskog nadzora, lozinku itd...
Licence otvorenog koda (Open Source License)
Lista licenci otvorenog koda i ugovori.
Kanal podmeni (Channels Submenu)
Pretraživanje kanala (Channel Scan):
Pretraga TV kanala.
Nadogradnja pretraživanja (Update Scan):
Pretraživanje samo novih TV kanala.
Pretraživanje jednog kanala (Single RF Scan):
Pretraživanje odabranog RF kanala.
Ručno ažuriranje servisa (Manual Service Update)
Ručno podešavanje ažuriranja kanala
LCN
Sortiranje kanala prema rasporedu koji daje lokalni distributer usluga TV kanala za lokaciju ili zemlju. Ako vaš lokalni distributer usluga TV kanala nudi sortiranje kanala, funkcija LCN (logičko numerisanje kanala) mora biti podešena na "Uključeno" pre pretraživanja kanala.
Vrsta pretraživanja / Vrsta čuvanja kanala (Channel Scan Type / Channel Store Type)
Možete odabrati vrstu kanala za pretraživanje/čuvanje: Svi, Samo besplatni TV kanali itd...
Izbor omiljene mreže (Favorite Network Select)
Izaberite svoju omiljenu mrežu za pretraživanje kanala
Analogno Fino podešavanje kanala (Analog Channel Fine tune)
Slika (Picture)
Mod Slike (Picture mode):
Korisnik (User)- > Standard- > Živo (ViVid)- > Sport- > Film (Movie)- > Igre (Game)
Pozadinsko osvetljenje (Backlight):
Podesite intezitet pozadinskog osvetljenja u skladu sa uslovima prostorije i vašim željama.
Napomena:: Više pozadinsko osvetljenje povećava potrošnju vašeg TV-a!
Svetlina/Kontrast/Zasićenje/Nijansa Brightness/Contrast/Saturation/HUE
Podesite parametre slike prema uslovima prostorije i vašim željama.
Oštrina (Sharpness)
Korisnik (User)- > Standard- > Živo (ViVid)- > Sports- > Film (Movie)- > Muzika (Music)- > Vesti (News)->Auto.

Sistem zvuka (System sounds):
Stil zvuka (Sound Style):
Možete postaviti predefinisani zvuk: Korisnik (User)- > Standard- > Živo (ViVid)- > Sports- > Film (Movie)- > Muzika (Music)- > Vesti (News)- > Auto
Balans/bas/Visoki/Surround Balance/Bass/Treble/Surround:
Prilagodite zvuk u skladu s uslovima prostorije i vašim željama.
Ekvilajzer detalji (Equalizer Detail):
Equalizer podešavanja.
Kašnjenje zvučnika (Speaker Delay):
Podešavanje uštede energije (Power)
Pritisnite tastere [◀] / [▶] za izbor opcije Uštede energije (Power).
Audio jezik / Drugi Audio jezik (Audio Language / 2nd Audio Language)
Izaberite željeni audio jezik. Ako je dostupan, ovaj audio kanal će se reprodukovati u slučaju višejezičnog emitovanja.
Audio zapisi (Sound Tracks)
Odaberite opciju Podešavanje da biste prilagodili/podesili zvučne zapise
Plavi ekran (Blue Mute)
MHEG (Multimedia and Hypermedia Experts Group)
MHEG je interaktivni sistem za kreiranje aplikacija koje se koriste u digitalnom zemaljskom TV sistemu Velike Britanije (npr. Freeview). Tekstualne usluge (crvena tastera u virtuelnoj tastaturii) koja se prikazuje na nekim kanalima služi za ulaz u interaktivne usluge teksta/slike.
Teletext
Podešavanje teleteksta i izbor željenog jezika teleteksta
Sistemske informacije (System Information)
Prikaz informacija o kanalu i sistemu
Podešavanja(Settings)
Kanal (Channel)
Odaberite opciju Kanal (Channel) za ulazak u podešavanja kanala.
Za više informacija, molim pogledajte poglavlje: Kanali(Kanal (Channels/Chanel).
Nalozi / Prijava (Accounts & Sign-in)
Za podešavanje Google Account naloga uđite u meni za podešavanje naloga i prijavu.
Apps
Slika/Zvuk (Picture/Sound):
Podešavanje parametara Slike/Zvuka
Memorija (Storage):
Upravljanje memorijom TV-a
Usage & Diagnostics
Davanje dozvole za automatsko slanje dijagnostičkih informacija.
Dostupnost (Accessibility):
Upravljajte dodatnim uslugama emitovanja kao što su: audio opis, za osobe oštećenjem sluha, prevodi.
Ponovno pokretanje (Restart):
RF (Radiation Exposure) podaci:
Ova oprema je u skladu sa CE granicama izloženosti zračenju utvrđenim za nekontrolisano okruženje. Ovu opremu treba instalirati i koristiti sa minimalnim razmakom od 20 cm između uređaja i tela.
Frekvencija, način rada i najveća prenosiva snaga u EU navedeni su u nastavku:
- 2400-2483.5MHz: ≤20 dBm (EIRP) (2.4G)
- 5150-5250MHz: ≤23 dBm (EIRP) (5.8G)
- 5250-5350MHz: ≤23 dBm (EIRP) (5.8G)
- 5470-5725MHz: ≤30 dBm (EIRP) (5.8G)
- 5725-5875MHz: ≤33 dBm (EIRP) (5.8G)
Uređaj je ograničen na upotrebu u zatvorenom prostoru samo kada radi u frekvencijskom rasponu od 5150 do 5350MHz i 5725-5875MHz.
 | AT | BE | BG | HR | CY | CZ | DK |
| EE | FI | FR | DE | EL | HU | IE | |
| IT | LV | LT | LU | MT | NL | PL | |
| PT | RO | SK | SI | ES | SE | UK |
Tehničke Specifikacije
| Model B Series 32LE20K B Series 40LE20K | ||
| Dimenzija s postoljem (mm) | 731 x 486 x 177 904 x 57 | 2 x 177 |
| Dimenzija bez postolja (mm) | 731 x 433 x 68 904 x 519 | x 72 |
| Težina s postoljem (kg) | 3,9 6,7 | |
| Težina bez postolja (kg) | 3,8 6,6 | |
| Veličina ekrana 32" | (80cm) 40" (100cm) | |
| Rezolucija 1366 x 768 | 1920 x 1080 | |
| Audio snaga (RMS) | 6 W +6 W 6 W + 6 W | |
| Nazivna snaga 55 W | 55 W | |
| Napajanje 100-240V ~ 50/60Hz | ||
| AV Sistem boje PAL NTSC | ||
| TV Sistem | PAL/SECAM-B/G, D/K, DVB-T+C DVB-T2 H 265, DVB-S/S2 | |
| Radni uslovi | Temperature: 5°C - 45°C Humidity: 20% - 80% RH Atmosfere pressure: 86 kPa - 106 kPa | |
| IC Core / Software / Mem. | Quad Core 1,45GHz ARM Cortex A55 / Mali-G31 MP2 / Android 11 / 1GB/8GB | |
| HDMI režim | 480I / 60Hz, 480P / 60Hz, 576I / 50Hz, 576P / 50Hz, 720P / 50Hz, 720P / 60Hz, 1080I / 50Hz, 1080I / 60Hz, 1080P / 50Hz, 1080P / 60Hz 640 x 480, 800 x 600, 1024 x 768 60Hz, 1920x1080 60Hz | |
Napomene: !
natural_image
Front view of a white HBO Max remote control with multiple function keys and buttons (no readable text or symbols)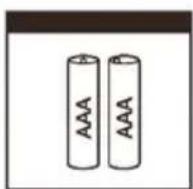
natural_image
Two identical line drawings of a mechanical bracket or bracket with no text or symbolsnatural_image
Top-down architectural diagram of a modern office building (no text or symbols visible)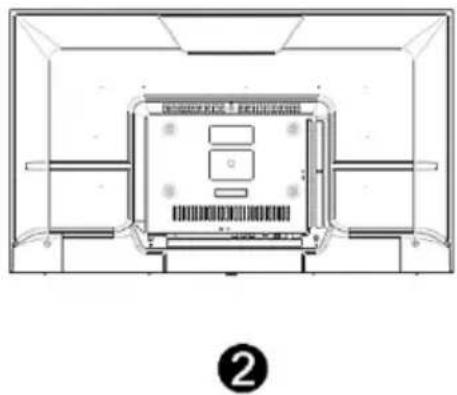
natural_image
Top-down schematic of a device layout with labeled components (no text or symbols)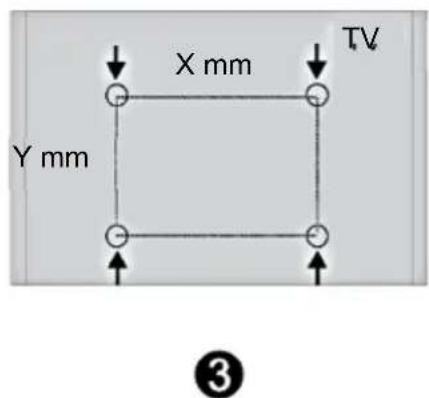
| Големина на екран | X Y | |
| 32“ 200 mm 200 mm | ||
| 40" 400 mm 200 mm | ||
| Vijci nosača televizora na zid | Горна : 2x M4 (L1+8mm)ЗаврткаДолна : 2xST4 (L'=L1'+8)Саморезни вици со равним глава | |
ГОРЕ
Sиден носач
долу
Sиден носач
natural_image
Front view of a blank rectangular screen with two corner clips and a numbered label '1' and '2' below (no text or symbols on the screen itself)▶ OPTICAL DIGITAL AUDIO OUT
natural_image
Simple line drawing of a battery with an arrow pointing to its side (no text or symbols)
natural_image
Simple line drawing of a tray with two stacked sheets, no text or symbols present
natural_image
Simple line drawing of a device with a paper clip and arrow pointing to it (no text or symbols)НАПОМЕНА

Почетна страница
-
Google voice search 5. Статус на Wi-Fi
-
Google Play 6. Поставки
-
ТВ апликација 8. Список со апликации
-
Список на извори
-
Play Next Список
-
YouTube Список
Програмски водич (Program Guide)
Родителска контрола (Parental Controls)
Телетекст
Канал (Channel)
Вграден Chromecast built in (Chromecast built-in)
RF (Radiation Exposure) податоци::
natural_image
Front view of a white remote control with black and red buttons, no visible text or symbols on the device itself.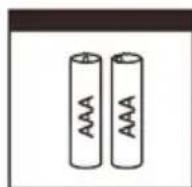
natural_image
Pure mechanical linkage diagram without any text, numbers, or symbolsnatural_image
Symbolic illustration of a candle crossed out by two crossed lines, representing fire or smoke (no text present)I nstalimi në mur
natural_image
Front view of a blank rectangular TV with two side clips and a numbered label '1' and '2' below (no text or symbols on the screen)Vërejtje:
▶ OPTICAL DIGITAL AUDIO OUT: OPTIKE DIGITAL AUDIO OUT
▶ CI COMMON INTERFACE (CI+INTERFEJS KRYESOR)
natural_image
Simple line drawing of a battery with an arrow pointing to its side (no text or symbols)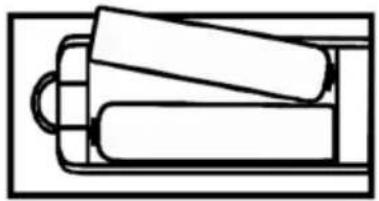
natural_image
Simple line drawing of a battery pack with two plates and a handle (no text or symbols)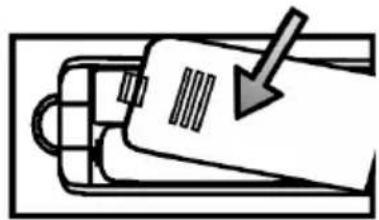
natural_image
Simple line drawing of a device with an arrow pointing to it, no text or symbols presentSHËNIME
PËRDORIMI I TELEKOMANDËS
(Quickly set up your TV with your Android™ phone
Shtypni ▼ / ▲ dhe
Vendosja e fjalëkalimit tuaj (Setting your Password)
Vendosja e Chromecast built-in™ të integruar (Setting Chromecast built-in™)
Modaliteti i sintonizuesit (Tuner Mode)
Ti mund te zgjedhesh: Antena (ATV, DVB scan)
Kabllor
Satelitor
- Google voice search 5. Statusi i lidhjes Wi-Fi
- Google Play 6. Cilësimet
- Aplikacion TV për shikimin e kanaleve televizive 7. Lista e aplikacioneve
-
Lista e burimeve 8. Lista e Play Next
-
Lista e YouTube
Udhëzues programi (Program Guide)
Kontrollet prindërore (Parental Controls)
Skanim i vetëm RF (Single RF Scan):
2. TV Opsionet (TV Options)
- Inputet (Source)
• Zëri -Audio (Sound)
Ndriçimi/Kontrasti/Ngopja/HUE (Brightness/Contrast/Saturation/HUE)
Mprehtësia (Sharpness)
Temperatura ngjyra (Color temperature)
Balance/Bas/Treble/Serround: (Balance/Bass/Treble/Surround):
Aktivizimi (Power)
Këngë zanore (Sound Tracks)
Teletekst
Kanali (Channel)
Data Ora (Date&Time):
Foto/Zëri (Picture/Sound):
Magazinimi (Storage):
Chromcast built-in i integruar
Vendndodhja (Location)
Konfigurimi i vendndodhjes
Përdorimi & Diagnostifikimi (Usage & Diagnostics):
Lista e orarit (Schedule List):
• Headphones Requires pairing with eligible phone and Internet connection.
• TV requires Internet connection.
- Home automation devices requires compatible device.
- Services whose names or logos are shown in this manual, availability of services varies by country and language.
- Services whose names or logos are shown in this manual subscriptions for services may be required.
- Sequences shortened and simulated.
Contents
Welcome 3
Important Safety Instructions 5
Positioning th eTV set 9
Installation 10
Stand Installation 10
Wall mount Installation 11
TV Front 12
Control Panel 13
Antenna and Power Connection 13
TV Rear 14
Connections 15
Remote Controller 19
Installing batteries in the Remote Controller 21
Using the Remote Control 22
First time installation 23
Home Page 27
Source select 27
Setting menu 28
Channels 28
Program Guide 28
Channel 28
TV Options 30
Source 30
Picture 30
Sound 31
Power 32
CI Card 33
Advanced Options 33
Settings 34
Record Bar 36
Other Information 37
Trouble Shooting 37
RF (Radiation Exposure) Data 40
Technical Specifications 41
Disposal of Waste Electrical & Electronic Equipment 42
EU Declaration of Conformity 42
EPREL product Fiche 42
Warranty Declaration (at the end of the Manual
WELCOME
This device lives up to the highest standards, innovative technology and high user comfort.

With this TV you can do it fast and simple, whilst in the comfort of your living room.

Media player — access your music, pictures and videos from your network or USB storage media and play them directly on your TV.

Everything works with one remote control now. Connect your TV directly to your terrestrial, satellite antenna or cable and enjoy contents in high quality without loss
The Accessories
When opening the box and installing the machine, make sure you have get all the necessary accessories:
- User manual with warranty declaration
- Remote Control
- Battery x2
- Screws for stand + stand
Note:
Images in this manual are for reference only.
natural_image
Front view of a white remote control with various function keys and buttons (no readable text or symbols)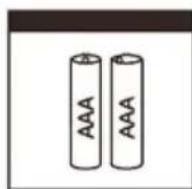
natural_image
Two identical line drawings of a V-shaped mechanical component or bracket, no text or symbols present.
The flash with the symbol of arrowhead, inside an equilateral triangle alerts the user about the presence of a dangerous tension not isolated inside the product which can be sufficiently powerful to constitute a risk of electrocution.

The point of exclamation inside an equilateral triangle alerts the user about the presence of important operating instructions and maintenance in the document enclosed in the package.

CAUTION

RISK OF ELECTRIC SHOCK DO NOT OPEN
Do not open the back cover. In no case the user is allowed to operate inside the TV set. Only a qualified technician from the manufacture is entitled to operate.

Main plug is used as the disconnect device, the disconnect device shall remain ready for operating.

Incorrect replacement of the battery may lead to the risk, including the replacement of another similar or the same type. Do not expose batteries to heat such as sun or fire or something like that.

The device should not be exposed to dripping and spraying and it can not be placed under objects filled with liquids.
Please read the following safeguards for your TV and retain for future reference. Always follow all warnings and instructions marked on the television.
IMPORTANT SAFETY INSTRUCTIONS
1. Read, Retain, Follow All Instructions
Read all safeties and operations about the TV. Retain them safely for future reference. Follow all operations and instructions accordingly.
WARNING: People (including children) with reduced physical, nervous or mental disabilities or who lack experience and / or knowledge of safe use of the device do not allow the use of electrical devices unattended!
2. Heed Warnings
Adhere to all warnings on the appliance and in the operating instructions.
3. Cleaning
Unplug the TV from the wall outlet before cleaning. Do not use liquid, abrasive, or aerosol cleaners. Cleaners can permanently damage the cabinet and screen. Use a soft dampened cloth for cleaning.
4. Attachments and Equipment
Never add any attachment and/or equipment without approval of the manufacturer as such additions may result in the risk of fire, electric shock or other personal injury.
5. Water and Moisture
The apparatus shall not be exposed to dripping of splashing and that no objects filled with liquids, such as vases, shall be placed on the apparatus.
6. Setting
Do not place this TV on an unstable cart, stand or table. Placing the TV on an unstable base can cause the TV to fall, result in serious personal injuries as well as damage to the TV. Use only a cart, stand, bracket or table recommended by the manufacturer or salesperson.
7. Ventilation
Slots and openings in the cabinet are provided for ventilation and to ensure reliable operation for the TV and to protect it from overheating. Do not cover the ventilation openings in the cabinet and never place the set in a confined space such as built-in cabinet unless proper ventilation is provided. Leave a minimum 10 cm gap all around the unit.
8. Power Source
This TV should be operated only from the type of power source indicated on the marking label. If you are not sure of the type of power supplied to your home, consult your appliance dealer or local power company.
9. Grounding or Polarization
TV equipped with this sign have a polarized alternating current line plug. The unit has a double insulation (Class II Protection), and no need additional grounding. Do not defeat the safety purpose of the polarized plug. For check do you need Grounding socket, check rating plate on the unit back side.

10. Lightning
For added protection for this TV during a lightning storm, or when it is left unattended and unused for long periods of time, unplug it from the wall outlet and disconnect the antenna or cable system. This will protect the TV from damage due to lightning and power-line surge.
11. Power Lines and Antenna cables
An outside antenna system should not be located in the vicinity of overhead power lines or other electric light or power circuits, or where it can fall into such power lines or circuits. Where installing an outside antenna system, extreme care should be taken to keep from touching such power lines or circuits as contact with them might be fatal.
12. Overloading
Do not overload wall outlets and extension cords as this can result in a risk of fire or electric shock.
13. Object and Liquid Entry
Never push any kinds of object into this TV through openings as they may come up against dangerous voltage points or short-out parts that could result in fire or electric shock. Never spill any kinds of liquid on or into the TV.
14. Outdoor Antenna Grounding
If an outside antenna or cable system is connected with the TV, be sure the antenna or cable system is grounded so as to provide protection against voltage surges and built-up static charges. Section 810 of the National Electric Code, ANSI/NFPA No. 70-1984, provides information with respect to proper grounding of the mast and supporting structure, grounding of the lead in wire to an antenna discharge unit, connection to grounding electrodes, and requirements for the grounding electrode.
15. Servicing
Do not attempt to service this TV yourself as opening or removing covers may expose you to dangerous voltage or other hazards. Refer all servicing to qualified service personnel.
16. Damage Requiring Service
Unplug the TV from the wall outlet and refer servicing to qualified service personnel under the following conditions:
- When the power-supply cord or plug is damaged.
- If liquid has been spilled, or objects have fallen into the TV.
- If the TV has been exposed to rain or water.
- If the TV operates abnormally by following the operating instructions. Adjust only those controls that are covered by the operating instructions as an improper adjustment of other controls may result in damage and will often require extensive work by a qualified technician to restore the TV to its normal operation.
- If the TV has been dropped or the cabinet has been damaged.
17. Replacement Parts
When replacement parts are required, be sure the service technician has used replacement parts specified by the manufacturer or have the same characteristics as the original part. Unauthorized substitutions may result in fire, electric shock or other hazards.
18. Safety Check
Upon completion of any service or repair to the TV, ask the service technician to perform safety checks to determine that the TV is in safe operating condition.
19. Heat
The product should be situated away from heat sources such as radiators, heat registers, stoves, or other products (including amplifiers) that product heat. The TV should not be placed near open flames and sources of intense heat.

20. Earphones use - Attention
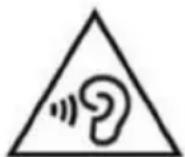
Excessive sound pressure from earphones and headphones can cause hearing loss. If you notice any disturbance or hum noise in your ears, stop using the headset or earphones. To prevent possible hearing damage, do not listen at high volume levels for long periods
-
Power cord and Plug should be easily accessible. Do not put a TV or furniture on the power cord. A damaged power cord or plug can cause fire or electric shock. Do not bend or squeeze the power cord. Unplug your TV from main supply to hold the plug and pull it from the power outlet. Never pull the power cord. Never touch a power cord / plug with wet hands, it could cause a short circuit or electric shock. Never make a knot in the cord or tie it with other cables.
-
The instructions for installation or use provided with non-floor standing televisions likely to be used in the home and weighing over 7 kg shall contain the following information or equivalent:
WARNING
Never place a television set in an unstable location. A television set may fall, causing serious personal injury or death. Many injuries, particularly to children, can be avoided by taking simple precautions such as:
- Using cabinets or stands recommended by the manufacturer of the television set.
- Only using furniture that can safely support the television set.
- Ensuring the television set is not overhanging the edge of the supporting furniture.
- Not placing the television set on tall furniture (for example, cupboards or bookcases) without anchoring both the furniture and the television set to a suitable support. -Not placing the television set on cloth or other materials that may be located between the television set and supporting furniture.
- Educating children about the dangers of climbing on furniture to reach the television set or its controls.
If your existing television set is being retained and relocated, the same considerations as above should be applied.
- This appliance is not intended for use by persons (including children) with reduced physical, sensory or mental capabilities, or lack of knowledge and experience to use the appliance, unless they are supervised by a person who is responsible for their safety or you're not received training on the use of appliances
Children do not always correctly recognize possible danger situations.
Swallowing batteries can be fatal. Keep batteries out of the reach of small children. If the battery is swallowed, immediate contact medical help.
Packaging equipment and protective bags keep away from children. There is a risk of suffocation.
LED Panel
Materials used when generating this product are made up of fragile elements. Therefore, product can be broken when in cases of falling over or bumps. LED panel is a high tech product and offers you high detailed images. From time to time, a few inactive pixels on screen can appear in blue, green or red steadily. This hes no effect over the product performance.
No matter in what circumstances, please keep the TV panel vertically placed, if any tilt, the tilt angle between panel and vertical plane must not exceed 15^ (the rule applies to frameless series product)
Positioning the TV set
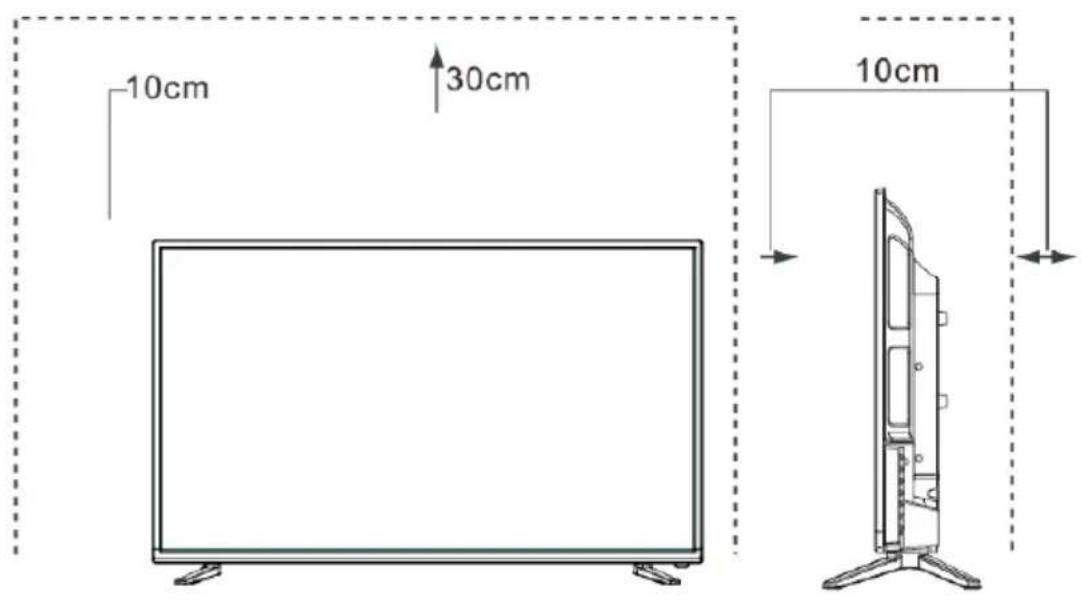
Place the TV set on a firm and flat surface, leaving a space of at least 10cm around the set and 30cm from the top of the set to the wall.
Note:
Above TV drawing is for reference only, actual product could be a slightly different.
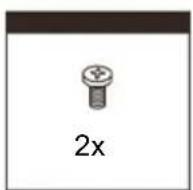
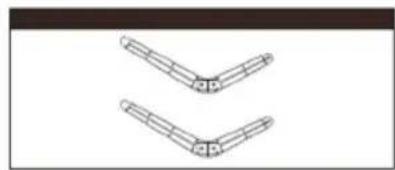
INSTALLATION
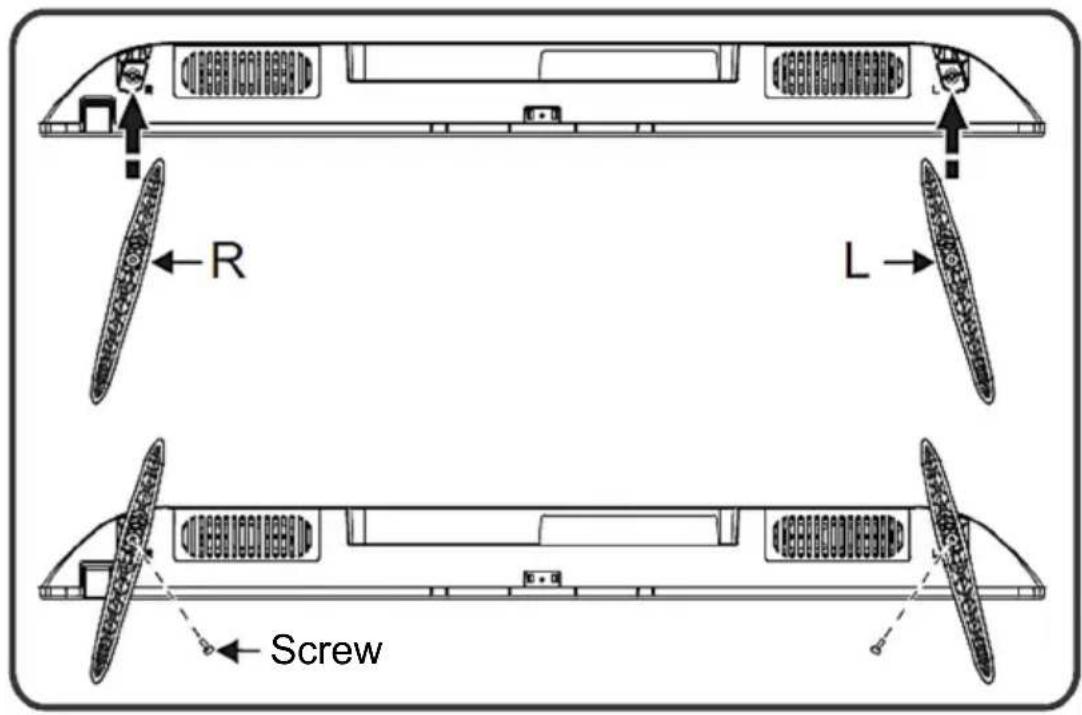
Stand installation
Notes
- The TV screen is very fragile, and must be protected at all times when removing the base stand. Be sure that no hard or sharp object, or anything that could scratch or damage the screen, come into contact with it. DO NOT exert pressure on the front of the TV at any time because the screen could crack.
- For tabletop use, the TV must be attached to the provided stand as shown on this page.
- Product images are only for reference, actual product may vary in appearance
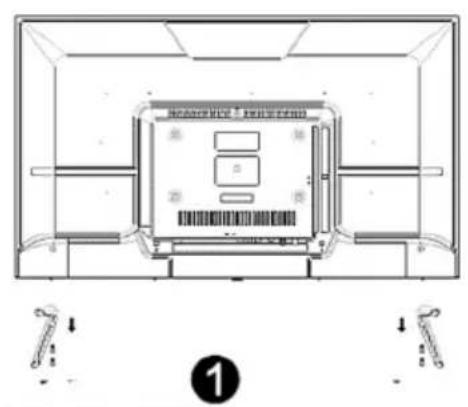
WARNING! Be sure to disconnect the AC power cord before installing a stand or wall-mount brackets.
CAUTION!
Carefully place your TV facedown on a soft, cushioned surface to prevent damage to the TV or scratching to the screen.
Follow the illustrations and textual instructions below to complete the installation steps:
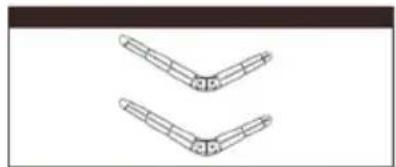
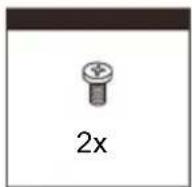
- Attach the stand to the TV set as shown in the picture.
- Use the screws to fix the stand tightly.
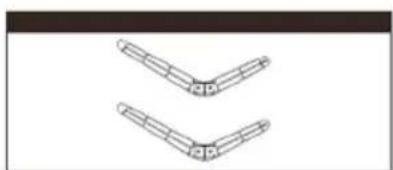
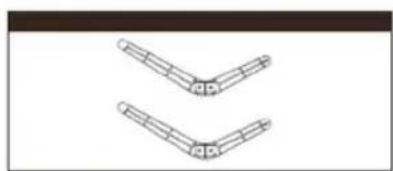
Wall mount installation
natural_image
Top-down schematic of a device layout with no visible text, numbers, or symbols
| Display Size | X | Y |
| 32" 75 mm | 75 mm | |
| 40" 200 mm | 100 mm | |
| TV to Wall mount bracket screws | Up: 2x M4 (L1+8mm)Machine screwsBottom: 2xST4 (L'=L1'+8)Flat tail self-tapping screws | |
- Remove the stand before installing the TV on the wall mount.
- If you install the TV on a ceiling or slanted wall, it may fall and result in severe injury. Use an authorized wall mount and contact the local dealer or qualified personnel.
- To prevent injury, TV must be securely attached to the floor/wall in accordance with the installation instructions.
- Use the screws and wall mounts that meat the specs
- The bracket and mount part for wall is optional part and it is not part of the accessories.
- The fixing picture is for reference only. For installation, please follow instructions supplied with wall mount bracket.
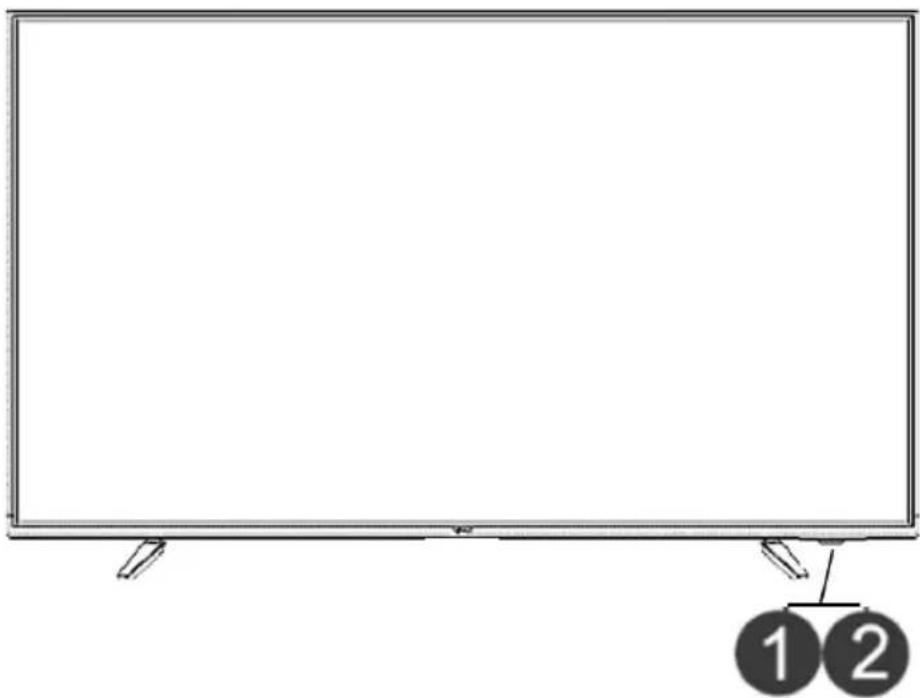
TV Front

natural_image
Front view of a blank rectangular TV with two side clips and a numbered label '1' and '2' below (no text or symbols on the screen)| Description | ||
| 1 IR Remote Sensor | Receive remote signals from the remote control.Do not put anything near the sensor, as its function may be affected. | |
| 2 Power Indicator Blue light up in standby mode. | ||
NOTES
The Picture is Only for Reference.
Powering on the TV requires several seconds to load program.
Do not rapidly turn the TV off as it may cause the TV to work abnormally.
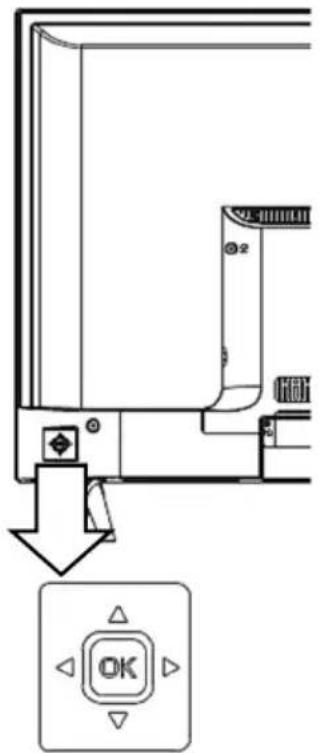
Control Panel
Power ON: After plugging power cord into the electrical socket, you can press OK rocker to turn on the TV.
Power OFF: In power on state, long press OK rocker to switch to standby mode.
PopUp menu: In non-OSD menu, press OK rocker to display the menu.
In OSD menu and smart mode, press OK rocker to confirm the operation.
Channel +/-: In TV mode, move rocker Up/Down to select the channel
Navigation: In smart mode, move rocker Up/Down to select item.
In OSD menu, move rocker
Up/Down/Left/Right to do menu operation
Volume +/-: In non-OSD menu, move rocker Left/Right to decrease/increase the volume.
The icons Corresponding to the button of remote as described below:

Note:
We recommend to use Control panel commands for basic functions only, e.g. On / Off, CH up / down or Volume adjustment.
For more advanced settings please use Remote control!
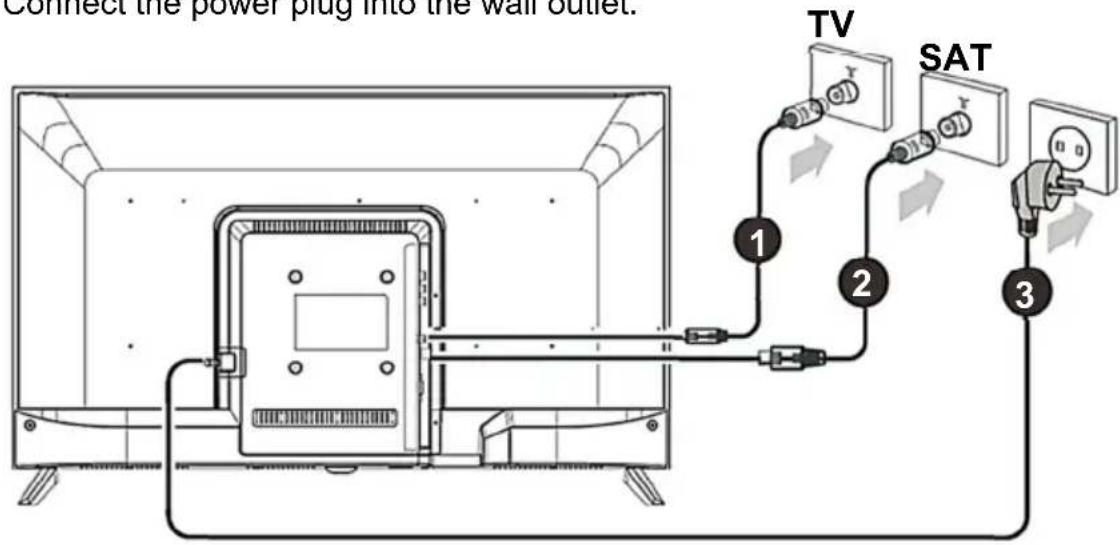
Antenna and Power Connection
- Connect the antenna cable into the antenna input terminal at the rear panel and wall antenna socket.
- Connect the power plug into the wall outlet.
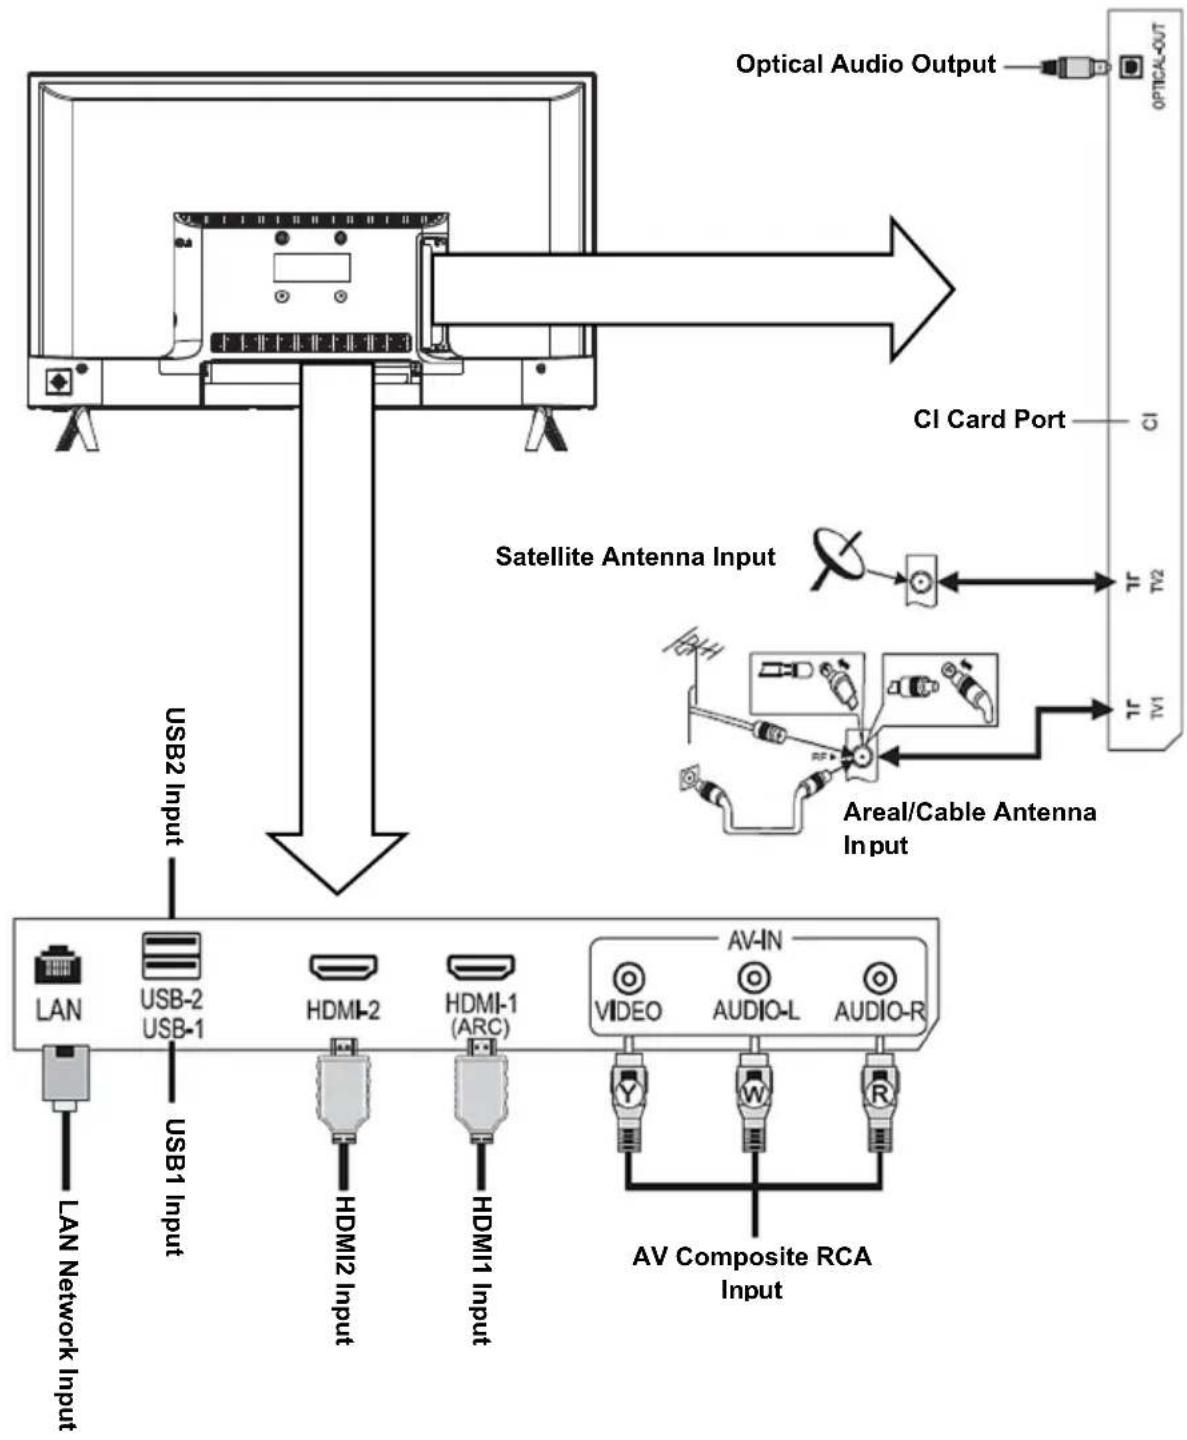
TV Rear
flowchart
graph TD
    A["Optical Audio Output"] --> B["CI Card Port"]
    B --> C["Satellite Antenna Input"]
    C --> D["Areal/Cable Antenna Input"]
    D --> E["AV Composite RCA Input"]
    E --> F["VIDEO"]
    E --> G["AUDIO-L"]
    E --> H["AUDIO-R"]
    C --> I["USB2 Input"]
    C --> J["USB1 Input"]
    C --> K["LAN Network Input"]
    C --> L["USB-2 USB-1"]
    C --> M["HDMI-2"]
    C --> N["HDMI-1 (ARC)"]
    C --> O["LAN"]
Check the jacks for position and type before making any connections. Loose connections can result in image or color problems. Make sure that all connections are tight and secure.
Not all A/V devices have the ability to connect to a TV, please refer to the user's manual of your A/V device for compatibility and connections procedure.
Before connecting external equipment, remove the mains plug from the wall socket. This may cause electric shock.
▶ CONNECTIONS
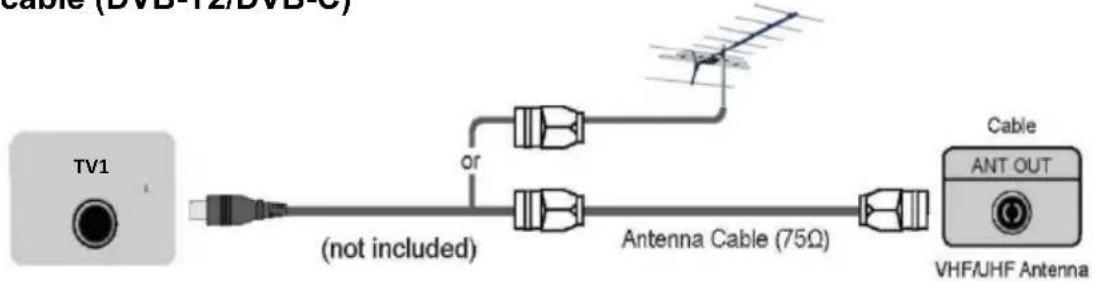
▶ TV1 (T/C/T2) 75Ω Connect (DVB-T2) an outdoor VHF/UHF antenna or cable (DVB-T2/DVB-C)
▶ TV2 (S/S2) 75Ω (S2) Connect (DVB-S2) an outdoor Satellite dish or Sat. Cable convection.

flowchart
graph LR
    A["TV JACK"] --> B["TV2"]
    B --> C["(not included)"]
    C --> D["Antenna Cable (75Ω)"]
    D --> E["Cable"]
    E --> F["ANT OUT"]
    G["SAT Antenna"] --> D
    H["SAT cable socket"] --> E
▶ HDMI1, HDMI2 Digital connection

Connect an HDMI cable from an external A/V equipment.
Some devices such as DVD player require HDMI signal to be set to output in the device's settings.
Please consult your device user manual for instructions. Please note that the HDMI connector provides both video and audio signals, it's not necessary to connect an audio cable.
- Press [SOURCE →] button, when the list of Input Source appears, press [▲/▼] to select the source [HDMI], then press [OK] to connect
Note: HDMI1 supports ARC (Audio Return Channel) function. With this function, you don't need to connect RCA Audio cables to your external Audio device.
▶ USB

Connect the USB devices such as hard drives, USB sticks and digital cameras for browsing photos, listening music and watching recorded movies. At the same time update is also an easy thing and will be done just by plugging the USB with the updating files into the same interface.
NOTES
- When connecting a hard disk or a USB hub, always connect the mains adapter of the connected device to the power supply. Exceeding a total current consumption may result in damage. The maximum current consumption is 500mA.
- For individual non-standard high-capacity mobile hard disk, if it's impulse current is greater than or equal 500mA, it may cause TV-rebooting or self-locking. So the TV does not support it.
- The USB port supports a voltage of 5V.
- The maximum supported storage space of the hard disk is 1T.
- If you want to play the video streaming of a DTV program, the transfer rate of the USB storage device must not be less than 5MB/s.
▶ OPTICAL: DIGITAL AUDIO OUT
Connect to an external digital audio device.
Before connecting a digital audio system to the COAXIAL SPDIF DIGITAL AUDIO jack, you should decrease the volume of both the TV and the system to avoid that the volume suddenly become bigger.
TV SOCKET DIGITAL AUDIO
Audio Amplifier

▶ CI: COMMON INTERFACE
Insert the CI module for watching scrambled services like pay-tv channels or some HD channels

flowchart
graph LR
    A["TV JACK"] --> B["COMMON INTERFACE(CARD FACE FRONT)"]
    B --> C["CAM CARD"]
    C --> D["SMART CARD"]
    D -->|1| C
    C -->|2| B
NOTES
- Before you insert/remove the CI module, ensure that the TV is switched off. Then insert the CI card into the CI module in accordance with the Service Provider's instructions.
- Do not repeatedly insert or remove the Common Access Module as this may damage the interface and cause a malfunction.
- You must obtain a CI module and card from the service provider of the channels you want to watch.
- Insert the CI module with the SmartCard in the direction marked on the module and SmartCard.
- CI is not supported in some countries and regions; check with your authorized dealer.
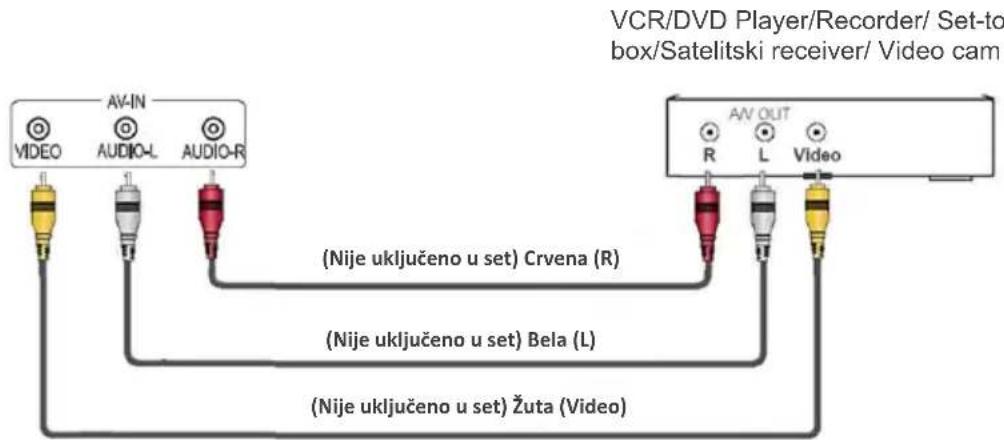
▶ INPUT (AV Composite)
Connect the Composite cable from an external A/V Device.
Use the audio and video cables to connect the external A/V device's composite video/audio jacks to the TV's jacks. (Video = yellow, Audio Left = White, and Audio Right = Red)
- Press [SOURCE →] button, when the list of Input Source appears, press [▲/▼] to select the source [AV] and press [OK] to connect.
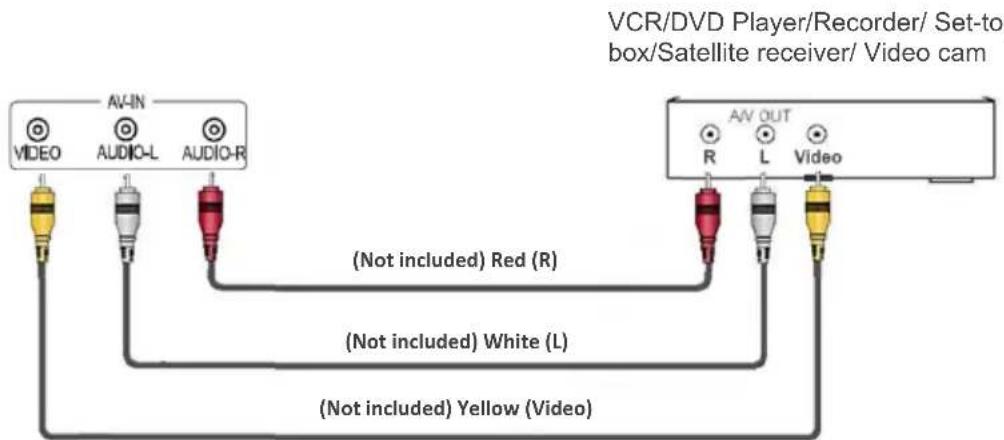
RCA Cables (Not included) in set Red (R)
▶ LAN RJ45 INPUT
Connect the RJ45 LAN (Local Area network) cable for connecting to external modem or network access equipment.
Your TV will require an internet connection to operate all functions. Data usage charges may apply.

To access the internet, you must subscribe high speed broadband internet service from your internet service provider.
Your TV can be connected to your home network in two ways:
- Wired: Using the RJ45 (LAN) connector on the back panel.
- Wireless: Using the internal wireless or external wireless USB adapter and your home wireless network.
Note: The following instructions are just the usual ways to connect your TV to the wired or wireless network. The connection method may be different depending on your actual network configuration. If you have any questions about your home network, please refer to your ISP (Internet Service Provider)
Connecting to a wired network:
-
Ensure you have:
-
An ethernet cable long enough to reach your TV
- A router or modem with an available Ethernet port
- A high-speed inte-rnet connection
- An Ethernet (LAN) port on the back of the TV
- Connect your ethernet cable to the router and to the Ethernet port on the back of the TV.
- Use the Network Settings to confi-gure the TV.
Connecting to a wireless network:
To connect to a wireless network
-
Ensure you have:
-
A router broadcasting a high- speed wireless signal
-
A high-speed internet connection
-
Use the Network Settings to configure the TV.
flowchart
graph TD
    A["Router"] --> B["Modem"]
    B --> C["Internet"]
    D["RJ45 Ethernet Port on the back panel"] --> E["TV Set"]
    style A fill:#f9f,stroke:#333
    style B fill:#ccf,stroke:#333
    style C fill:#cfc,stroke:#333
    style D fill:#fcc,stroke:#333
    style E fill:#cff,stroke:#333
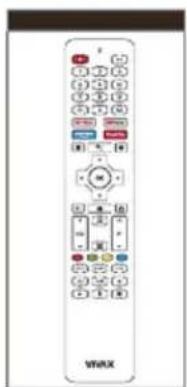
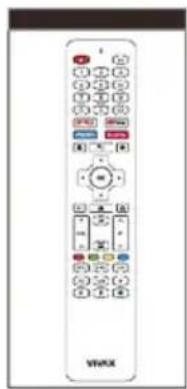
REMOTE CONTROLLER
Bluetooth voice remote control operation - Bluetooth Pairing
If the Bluetooth of remote control is not paired, press the Google voice search button then long press [VOL-] +[ ← ] keys to pair. When the TV show the device, select it and press [OK] key to finish.

Note:
- Some models may not be supported.
- Your Location must correspond to the language for exact search results. Some functions may not be available if your location settings and language settings are different.
- You can change the language according to language input settings. The languages available for voice recognition features may be changed in accordance with service operation policy.
- Details of service may vary by model.
- Before you use voice recognition, you should make sure remote control paired.
- MICROPHONE for Google voice search function
- POWER ⏻ : Press for turning the TV On/Off
- MUTE: Mute sound
- NUMBER (0-9) button: pressing these buttons digits are entered. Channels on ATV and DTV are directly elected, Entering passwords for parental lock.
- INFO ⓘ : Press to display the source and channel info
- LAST ⇌: Return to the previous viewed channel
- NETFLIX : Direct access to Netflix App
- YouTube : Direct access to YouTube App
- prime video: Direct access to Prime video App
- Google Play: Direct access to Google Play App
- : Bookmark launche's recommended videos
- SETUP ⚙ : Open setting menu.
- 🎨: Find new favorites
with voice search. Jump right to a show or movie just by saying it, or try browsing with a voice search like "find action movies". Press the voice button on your remote to get started.
- ▲/▼/◄/►: Use buttons to select or adjust option / navigation buttons to navigate through menus
OK button: Press OK button to confirm option or adjustment
- HOME ↑ : Show Home Screen
- BACK←: Return to previous Menu item
- EPG ☐: DTV Mode: Launches Electronic Program Guide (EPG)
- Source ☐: Select the Signal source
- VOL +/-: Increase/Decrease volume
- P : Scrolling programs Up/Down
- MENU : Enter into Non-Smart Main Menu or Exit
- RED / GREEN / YELLOW / BLUE keys: Special functions keys.
Shortcut to teletext page options, corresponding with color on the screen (TXT Mode) or commands or options in the EPG and other menus according to colored commands shown on the screen
- MTS: Switch between multi channel sound modes (NICAM in ATV or Select Audio language in DTV mode)
- SUBTITLE: Select Subtitle language
- TTX: Open/Close teletext
- AD: Open the associated Audio menu
- USB: Open USB Storage device
- REC DTV Mode: Start recording current DTV channel on the external USB memory
- PLAY ▶: Playback in media mode
- TIMESHIFT (II): Time Shift /Pause key
- STOP ■: Stop Playback in media mode.
Note: All picture in this manual are examples, only for reference, actual product may differ from the pictures.
The buttons not mentioned here are not used
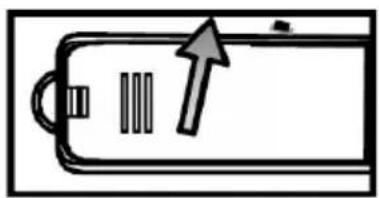
▶ Installing Batteries in the Remote Control
Slide the back cover to open the battery compartment of the remote control. Insert two AAA size batteries. Make sure to match the (+) and (-) ends of the batteries with the (+) and (-) ends indicated in the battery compartment.
Close the battery compartment cover.
(1) Gently open battery cover (2) Insert the batteries back
(3) Gently push cover
natural_image
Simple line drawing of a battery with an arrow pointing to its side (no text or symbols)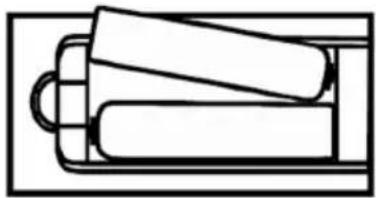
natural_image
Simple line drawing of a tray with two stacked rectangular blocks, no text or symbols present.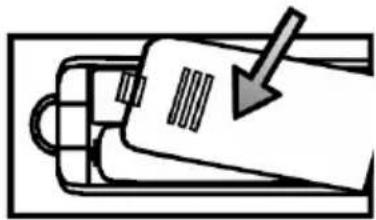
natural_image
Simple line drawing of a device with an arrow pointing to it, no text or symbols presentNOTES
- Product image is only for reference, actual product may vary in appearance.
- Dispose of your batteries in a designated disposal area. Do not throw the batteries into a fire.
- Do not mix battery types or combine used batteries with new ones.
- Remove depleted batteries immediately to prevent battery acid from leaking into the battery compartment.
- If you do not intend to use the remote control for a long time, remove the batteries.
- Batteries should not be exposed to excessive heat, such as sunshine, heat registers, or fire.
- Battery chemicals can cause a rash. If the batteries leak, clean the battery compartment with a cloth. If chemicals touch your skin, wash immediately.
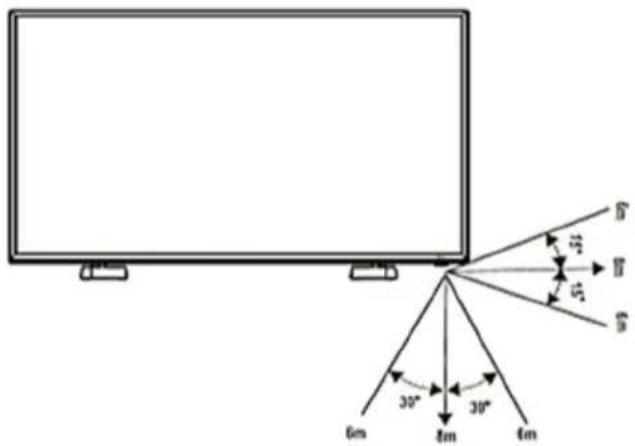
Remote Control Operation Range
Point the remote control at the TV within no more than 5 metres from the remote control sensor on the TV and within 60° in front of the TV.
The operating distance may vary depending on the brightness of the room.
Using the Remote Control
- Turning your TV on and off
Turning off to standby mode: Press [OK] button on the back of TV or press 📍 on the remote control to switch to standby mode. You can activate the unit again by pressing [OK] or ⏻ button.
Power indicator: Light indicates standby mode. There will be no light when the power switch is in the off position.
▶ NOTE
Remove the connection from the wall power outlet if you do not intend to use the unit for long periods, for example if you plan to be away a few days. Wait at least 5 seconds after turning off if you want to re-start the TV.
- SOURCE Ⓥ:Selecting the Input Source
Select the Input Source depending on the video device you have connected to your TV.
To select the Input Source: Press [SOURCE] button. When the list of Input Source appears, press [▲/▼] to select the source, then Press [OK] to connect.
- Adjusting the volume
Press [VOL+/VOL-] to increase or decrease the volume.
Press [Mute] to turn the sound off. Press [Mute] again to turn the sound back on.
- Changing channels
Press the [ ∧ P ∨ ] buttons to go to the next higher or lower channel. Or, Press the number buttons to select a channel. For example, to select channel 12, press [1], then press [2].
- Audio function
Pressing [MTS] button the TV screen will display the Audio options such as Stereo, Dual I, Dual II, Mixed.
- Displaying Channel List
Press [OK] to display the full list of digital and analogue channels available.
• Electronic Programming Guide (EPG)


Provides convenient access to the television programs that will be available in the next 7 days. The info
displayed by the EPG is made available by the commercial television networks for digital channels only. The EPG also provides a simple way to program the recording of your favorite programs. There is no need to setup complicated timers.
FIRST TIME INSTALLATION
Connect an RF cable from the Tv's input called "TV1" and to your TV Aerial socket.
For navigation and confirm selected item use Arrow buttons and OK button on the remote controller.
Then follow the wizard to set :
Pairing Your Remote Controller via Bluetooth.
To activate Google voice search and some other Remote functions, you have to pair your Remote controller with TV set
Press BACK and VOL- key 3 secs until red light blink Repeat the same procedure to Unpair your Remote controller
Select OSD Language
Press ▼ / ▲ and OK button to select the language to be used for menus and messages.
Select your Wi-Fi network
Press ▼ / ▲ and OK button to select Wi-Fi network settings
Enter Wi-Fi Password and choose "OK (√)" to confirm and connect to Wi-Fi network.
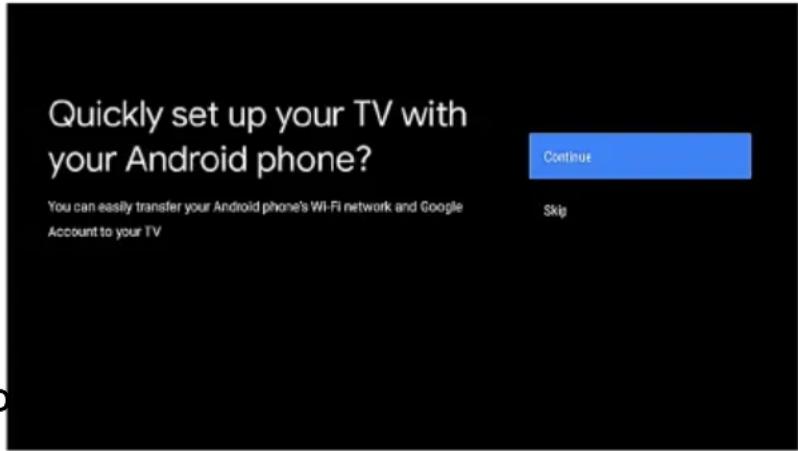
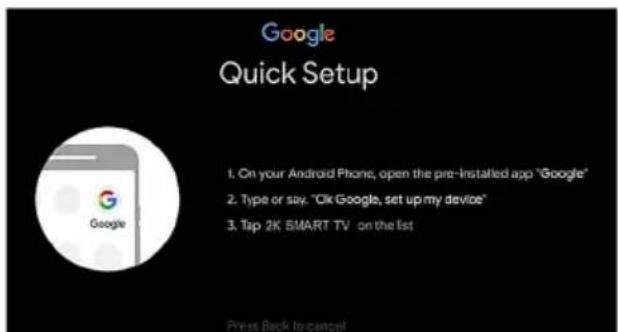
Quickly set up your TV with your Android™ phone
Using Wi-Fi network and your Android Smart-phone, you can easily transfer your Google Account settings and account data to your TV.
Press ▼ / ▲ and OK button to select options:
- "Continue" Transfer Data from your Android Smartphone (see step 1 Transfer Data)
- "Skip" Skip to another setup step. (see step 2: Skip)
1. Transfer Data from your Android Smartphone
Follow the screen instructions:
- Open Google app on your Android Smartphone or continue with step 2.
- Tap "2K SMART TV" or "4K SMART TV", depends on your TV model name.
- Choose option "Pair" to pair your Android device.
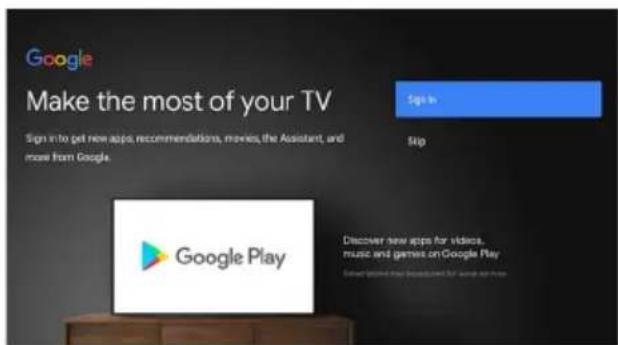
- Accept "Energy Saving Tips" and disclaimer about "Network Privacy Policy"
-
To Sign in, select option "Sign In" and follow instructions on the screen.
-
Accept "Terms of Service" and "Google Services"
-
Choose "Allow" to allow Google to Search and Share with your TV's Apps like Netflix, Prime video etc.
-
Choose "Turn On" to allow Google voice search to give info specific to you on this device.
-
Walk trough the fetures of your TV by pressing ▶ button.
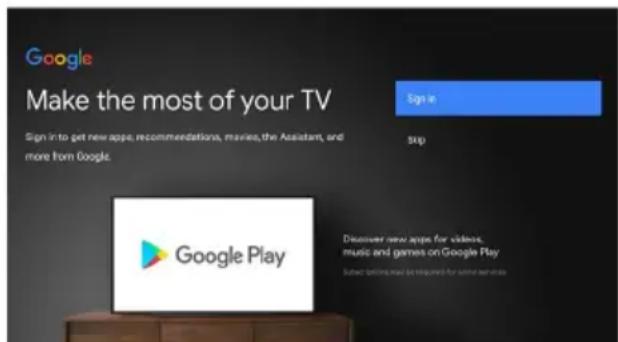
2. Skip
To continue with setup, choose option "Sign In" and press OK button.
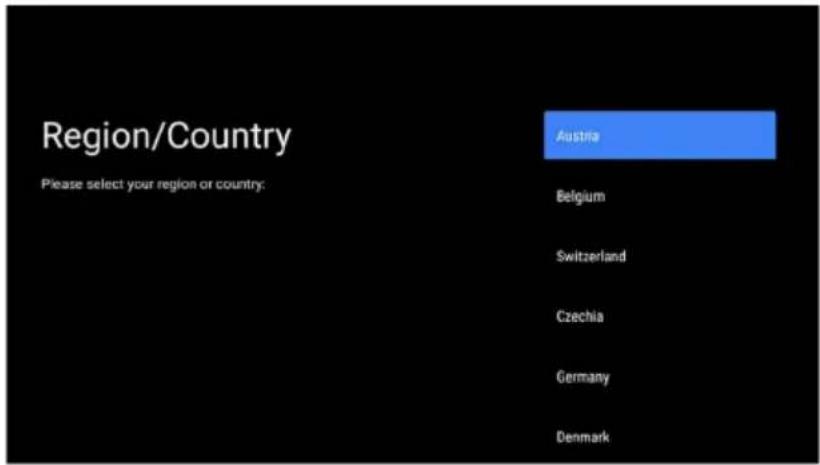
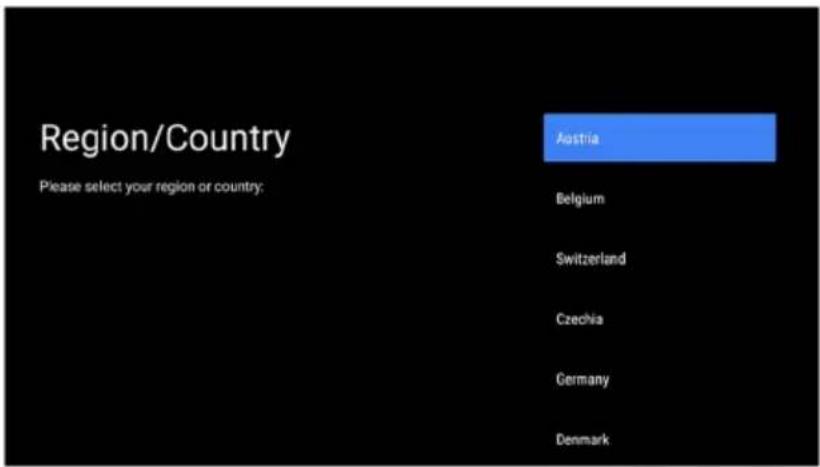
Select Region/Country-Area
Press ▼ / ▲ and OK button to select the Country in which TV receiver is installed.
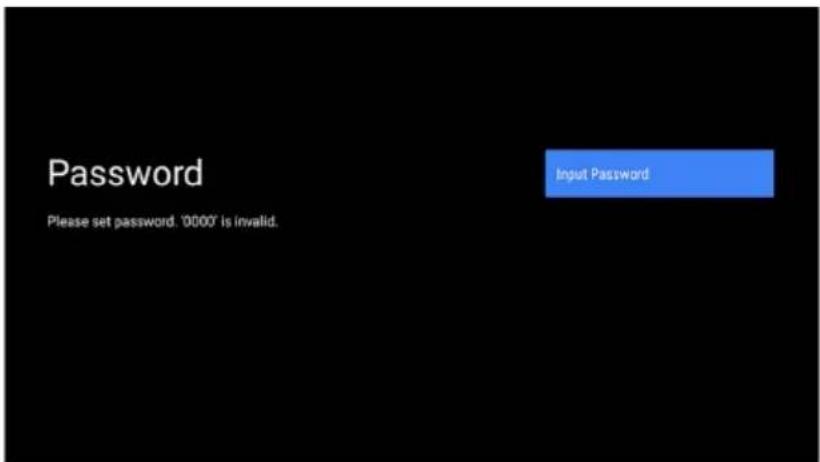
Setting your Password
You need to setup your password. The password is important because you will not able to enter into some setting menus without enter a correct password! Please remember your password! "0000" Password is invalid.
Setting Home or Retail (Store) working mode
In case that you need Store presentation, select "Retail-Store" mode. If you will use your TV for standard Home use, select "Home", the following screen will appear.
Press OK button to confirm selection.

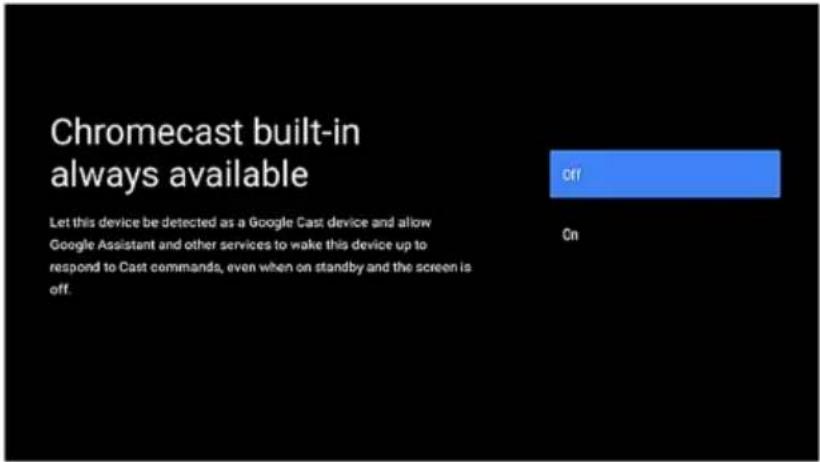
Setting Chromecast built-in™
In this menu, you can enable Chromecast built-in so you can easily cast your favorite movies, music, and more to your TV.
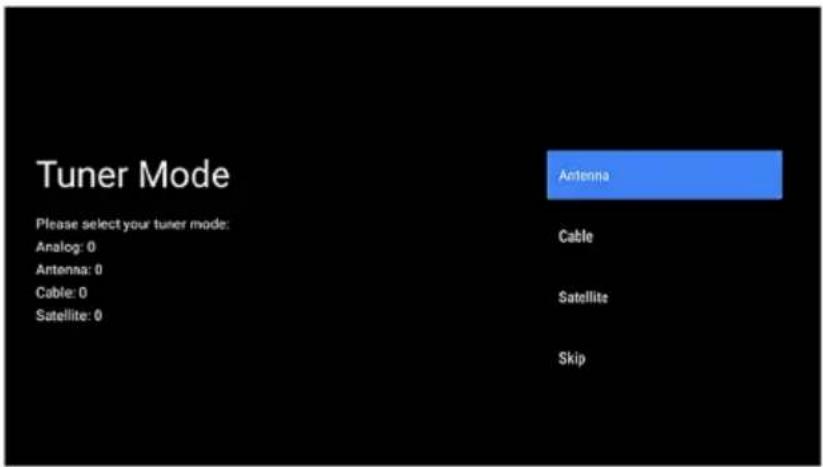
Tuner Mode
Select type of channels which you want to perform auto scan.
You can choose: Antenna (ATV, DVB scan) Cable
S a t t e l i t e
Or choose Skip to Skip Auto search function. Follow the instruction on the screen.
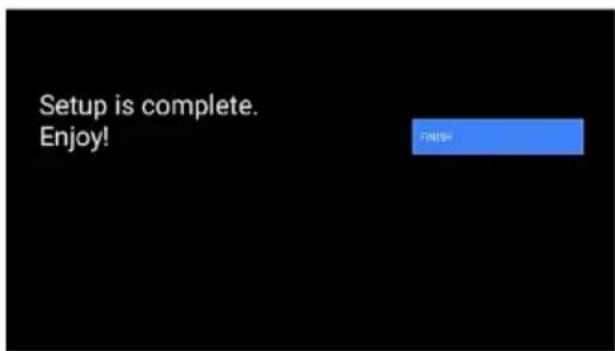
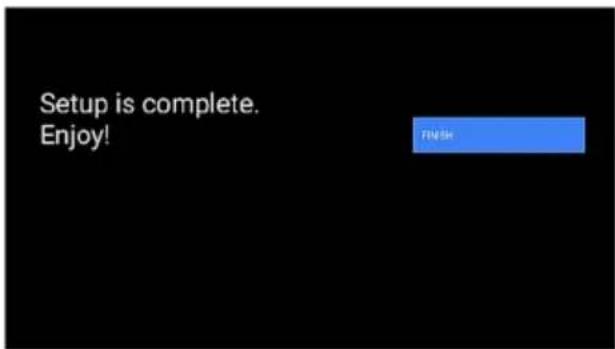
Congratulations! Now, your TV is ready to use.
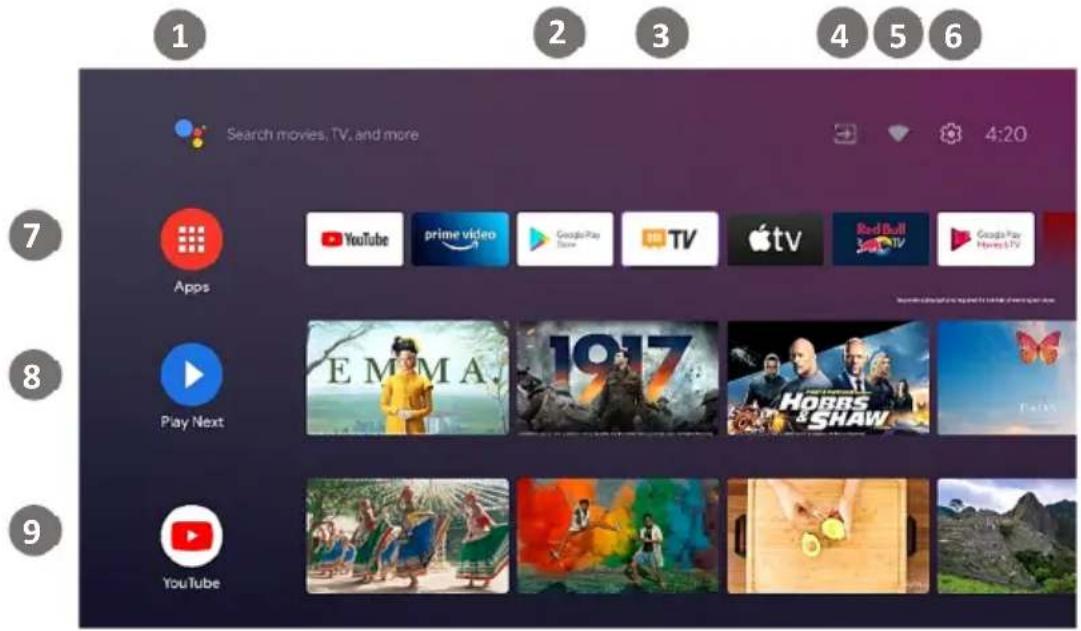
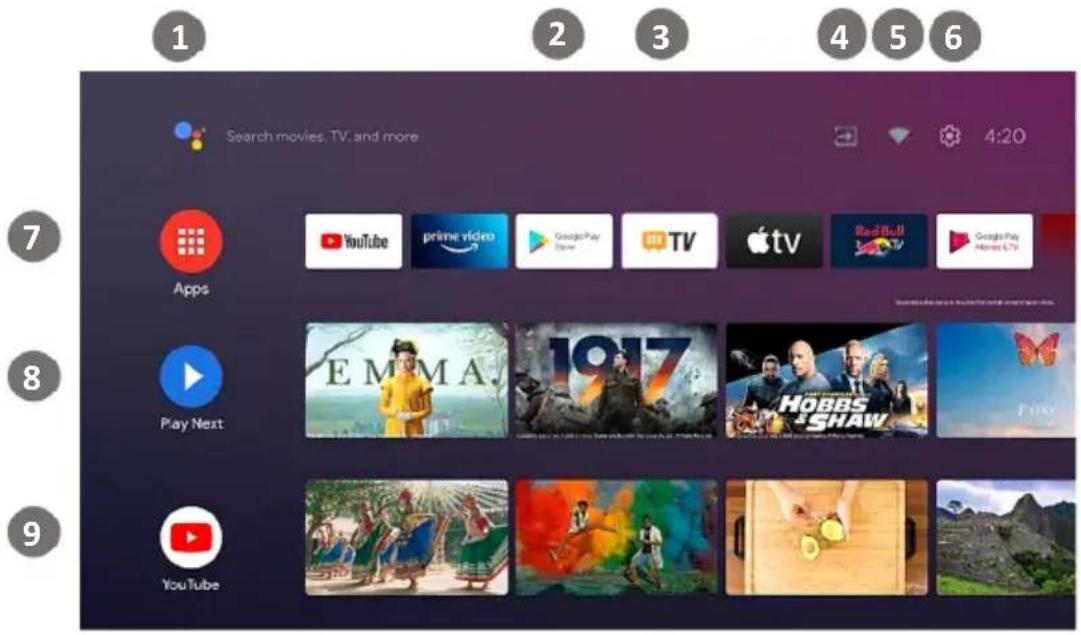
Home page
Press "HOME " 🔊" button on the remote to show Home screen:
- Google voice search 5. Wi-Fi Connection status
- Google Play 6. Settings
- TV App for watching TV channels 7. App List
- Source list 8.Play Next List 9. YouTube List
You can easily navigate trough available options or Apps using the navigation buttons ▼ / ▲ / ◀ / ▶ to select item and press OK to confirm.
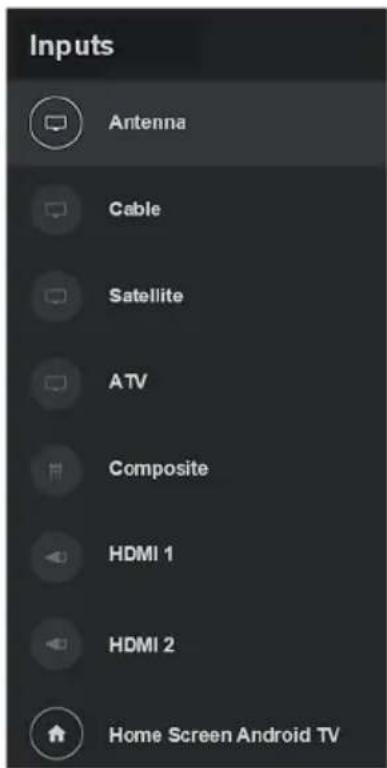
Source select
Press ▼ / ▲ button to select "SOURCE ➕" signal you want to select.
You can celect:
Home Screen General page where you can easily choose TV mode/Sources or Apps
Antenna Standard TV wieving mode
Cable Cable TV wieving mode
Satellite Satellite TV wieving mode
ATV Analog TV wieving mode
Composite Composite Audio/Video input source
HDMI 1,2 HDMI Audio/Video input source
*Available sources depend on your TV set model. Please, for more info, refer section "Inputs/Outputs".
Press OK button to confirm selected SOURCE item.
The same function you can access by pressing ✉ button on the remote control.
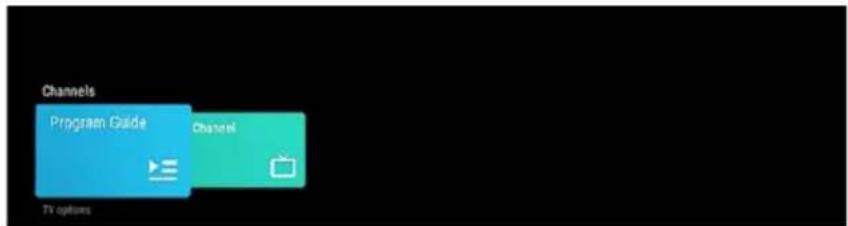
Setting Menu
In Standard TV mode, press the [MENU :≡ ] key to display the main TV menu.
The main menu is divided into three main submenus:
- Channels
- TV Options
- Record
Press ◀ / ▶ buttons to choose one of available sub-menues:
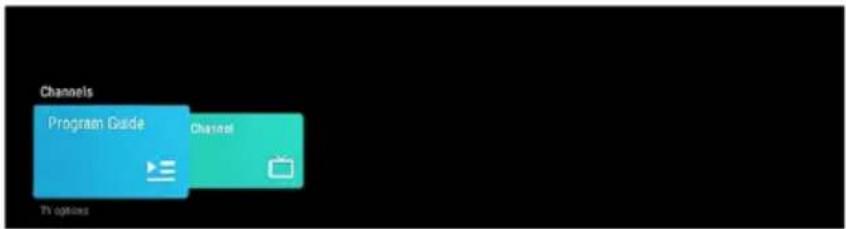
Program Guide
Open Electronic program Guide (EPG) with TV Channel Info, Schedule etc.
Channel:
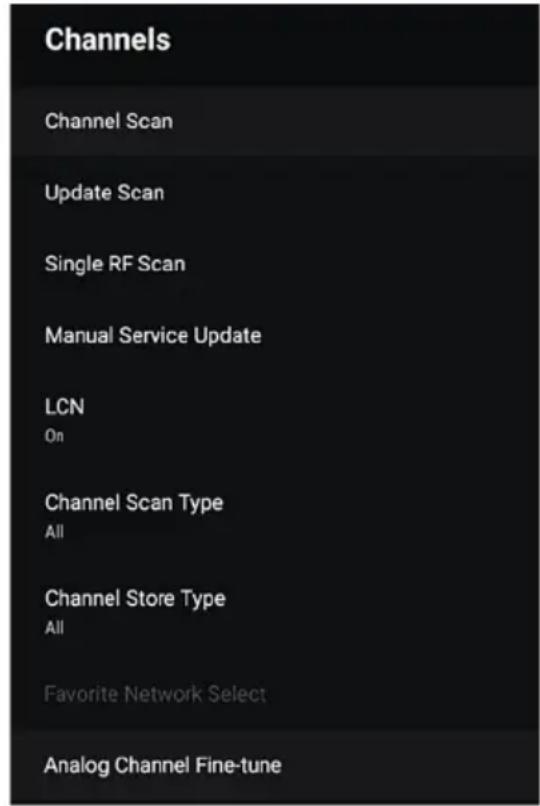
In this menu you can scan available TV channels.
Channel Installation Mode
- Adjust type of Scan (Antenna, Cable, Satellite)
- Adjust Auto or manual Scan or Single channel scan
• LCN (Logical Ch. numbering) - Type of Channels scan (All, Free channels only)
- Edit Channel list
Auto Channel Update
TV system will check and update Channel list periodically
Channel Update Message
TV system will periodically check and display a message that some new channels are available.

Parental Controls
Edit and adjust all parental control restrictions, password etc...
Open Source License
Open Source License list and agreements.
Channels Submenu
Channel Scan:
Scan TV Channels
Update Scan:
Scan only new TV Channels
Single RF Scan:
Scan selected RF channel only
Manual Service Update
Manual setup of Channel update
LCN
your local provider offers Channel sorting according to location or country. If your local provider offers channel sorting, the LCN (logical channel numbering) feature must be set to 'On' before searching.
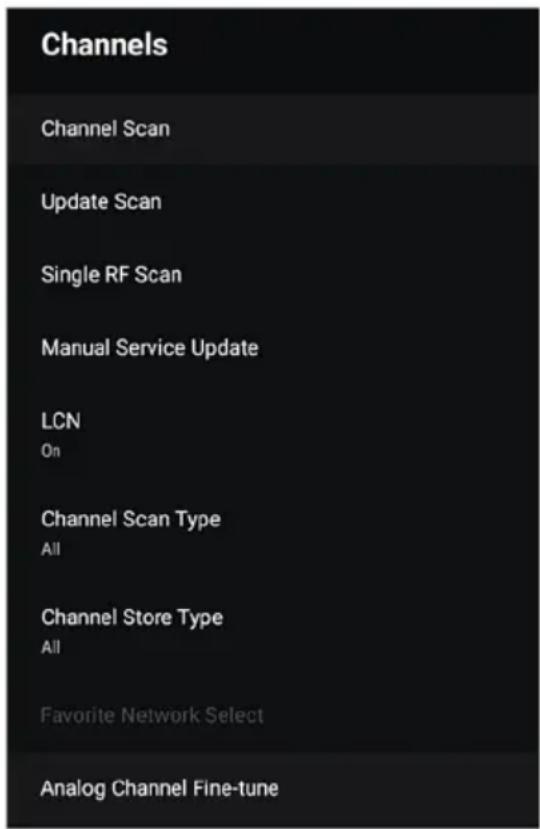
Channel Scan Type / Channel Store Type
You can choose type of Search/Store channels: All, Free TV Channels only etc...
Favorite Network Select
Choose your Favorite network for Channel search.
Analog Channel Fine tune
Setup and fine tune of the analog TV channels.
2. TV Options
In this Menu bar you can adjust all the parameters of your TV:
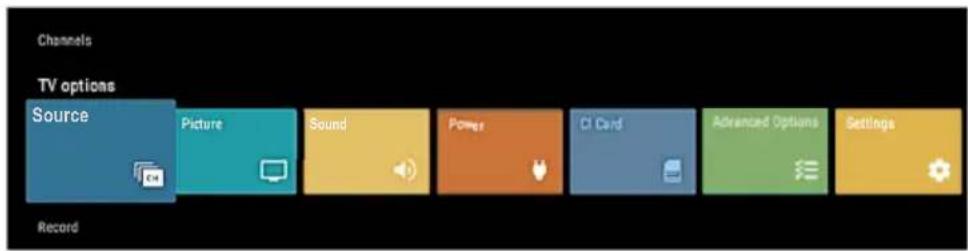
- Source
Choose available Source connected to your TV set.
• Picture Adjust Picture settings - Sound
Adjust Audio settings
• Power Adjust Power settings (e.g Sleep Timer, Auto Power Off etc.) - CI Card Setting and viewing CI Card
- Advanced options Soundtracks Audio, Blue screen, HbbTV options, Subtitle, teletext settings and System informations settings)
- Settings The same function as Setting in Smart mode menu.
Source
The same function as described in chapter: Source select
*Available sources depend on your TV set model. Please, for more info, refer section "Inputs/Outputs".

Picture
User- > Standard- > ViVid- > Sport- > Movie- > Game
Backlight:
Adjust backlight brightness according to room conditions and your preferences.
Note: Higher backlight will increase power consumption of your TV!
Brightness/Contrast/Saturation/HUE
Adjust picture parameters according to room conditions and your preferences.
Sharpness
Adjust picture sharpness
Color temperature
Adjust Color Temperature (Color balance). In this menu you can adjust RGB gain separately.
bar
Picture | Picture Mode | Standard | Value | | :--- | :--- | :--- | | Backlight | | 79 | | Brightness | | 50 | | Contrast | | 50 | | Saturation | | 50 | | HUE | | 0 | | Sharpness | | 10 | Color Temperature Advanced Video Reset to DefaultAdvanced Video
In this Menu you can adjust: DNR/MPEG NR (Dynamic Noise Reduction), Picture Vivid, Luma Control, Local Contrast, Flash Tone, DI Film Mode, Blue Stratch etc...
Rest to Default
Reset all Picture parameters to dfault value.
Sound
User- > Standard- > ViVid- > Sport- > Movie- > Music->News->Auto.

System sounds:
Turn On/Off System sounds.
Sound Style:
You can adjust preset Sounds: User- > Standard- > ViVid- > Sport- > Movie- > Music- > News->Auto
Balance/Bass/Treble/Surround:
Adjust Sound according to room conditions and your preferences.
Equalizer Detail:
Equalizer settings.
Speaker Delay:
Adjust Speaker delay if your TV has sound delay between picture and sound.
Digital Output/Digital Output Delay:
Adjust Digital Audio output and set Delay if any.
Auto Volume Control:
Set ON/Off Auto volume control to equalize a different Sound volume on some boradcast channels.
Downmix Mode:
Reproducing 5.1 channels of audio through a lesser number of speakers requires a process called downmixing. The Downmixing combines the Left, Right, Center, Left surround, and Right surround channels in Stereo or Mono sound.
You can choose: Stereo or Surround.
Dialogue Enhancer:
Setup and Enhance Vocals in Audio.
Power
- Sleep timer
- Picture Off
- Switch off timer、
- No Signal Auto Power Off: If no signal, Auto turn Off.
- Auto Sleep: Auto Turn of if no any control active in preset time.
CI Card
Audio Language / 2nd Audio Language
Select preferred Audio language. If available, this Audio channel will play in case of multilanguage broadcast.
Sound Tracks
Choose Setup option to adjust/setup SoundTracks
Blue Mute
Blue screen when no signal.
Default Channel
Power on on selected channel
MHEG PIN Protection (option)
MHEG (Multimedia and Hypermedia Experts Group)
MHEG is a interactive system for creating applications used on the UK digital terrestrial TV system (e.g. Freeview). The text services (red button) found on some channels to enter into text/picture interactive services.
You can turn function On/Off
HBBTV Setting (option)
HbbTV (Hybrid Broadcast Broadband TV) is a global standard that aims to seamlessly blend TV broadcasts with internet content on connected TVs.
Subtitle
Subtitle settings and choosing preferred Subtitle language
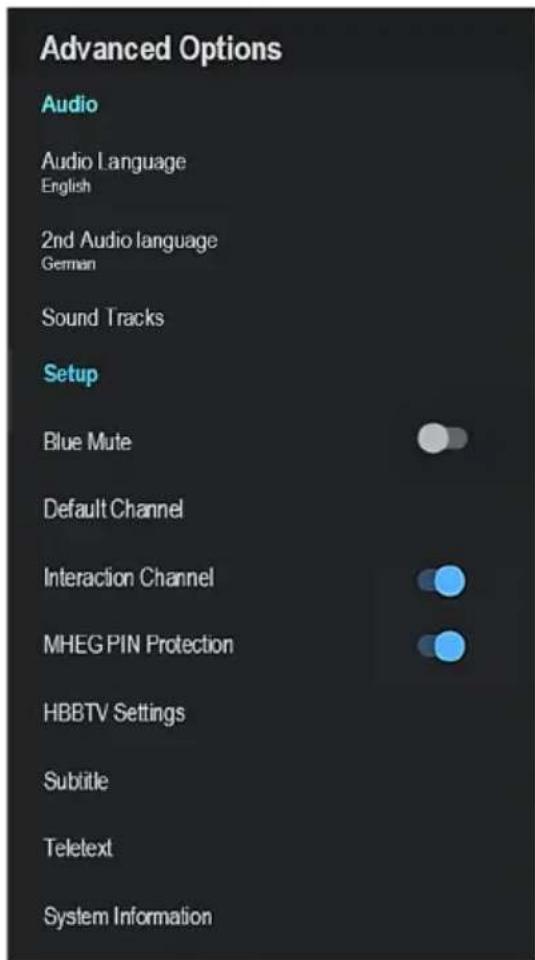
Teletext
Teletext settings and choosing preferred Teletext language
System Information.
Channel and System Information display.
Settings
Press 【◀】 / 【▶】 button to select SETTING in the main menu. Press OK button to adjust. Press ▼ / ▲ button to select the option that you want to adjust in the SETTING menu.
Set your device name:
Setup Device name
Network & Internet:
Click the network & Internet option to enter the network settings page as:
Wi-Fi :
Turn On/Off Wi-Fi connection. When option is active, you can select preferred Wi-Fi network for connection.
If you connect LAN cable on LAN connection, a such connection takes precedence over a Wi-Fi connection.
Also, in the menu you can manually preset all connection parameters such as: Proxy Settings, IP settings etc...
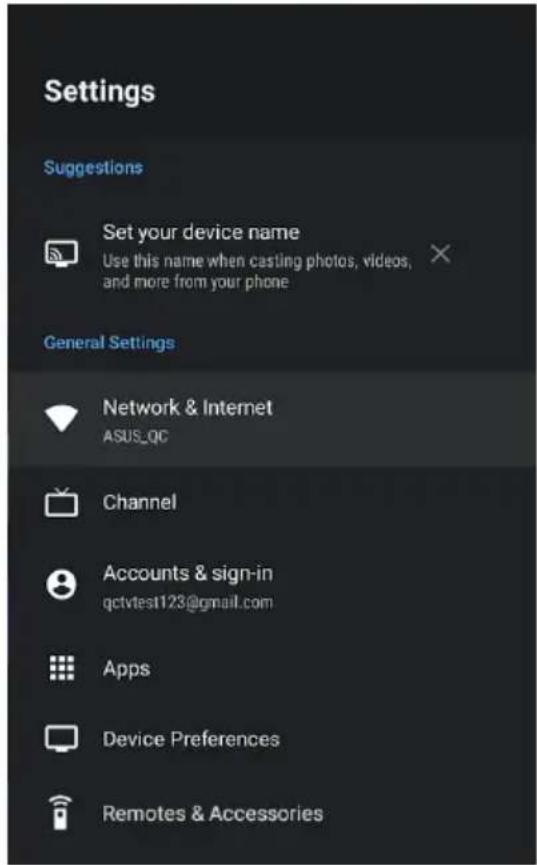
Channel settings
Click the Channel option to enter the channel interface.
For more info, please refere to chapter: Channels/Chanel.
Account & Sign-in
To setup Google Account, please enter to Account & Sign-in settings menu.
Apps
To setup Apps permissions, Security & Restriction, Access to Apps etc, please entr to Apps menu.
Device preferences
In Device preferences Menu you can adjust main TV parameters:
About:
Main info about TV System, System update, Restart TV etc.
Date&Time:
Setting System Time and Time zone
Timer:
Adjust Power On/Power Off Time
Language:
Adjust OSD Language
Keyboard:
Setting keyboard preferences
Inputs:
Adjust Input names, HDMI CEC control
Power:
Adjust Sleep Timer, Picture Off (only Audio), SwitchOff Timer, No signal power Off time
Picture/Sound:
Adjust Picture and Audio user settings
Storage:
Managing TV Storage
Home Screen
Preset Channels, Video previews, Reorder Apps etc...
Retail Mode
Set Retail/Home mode.
Chromecast built-in
Chromecast built-in settings and informations.
Screen saver / Energy saver
Setup Screen server in case if you use your TV as Audio device only.
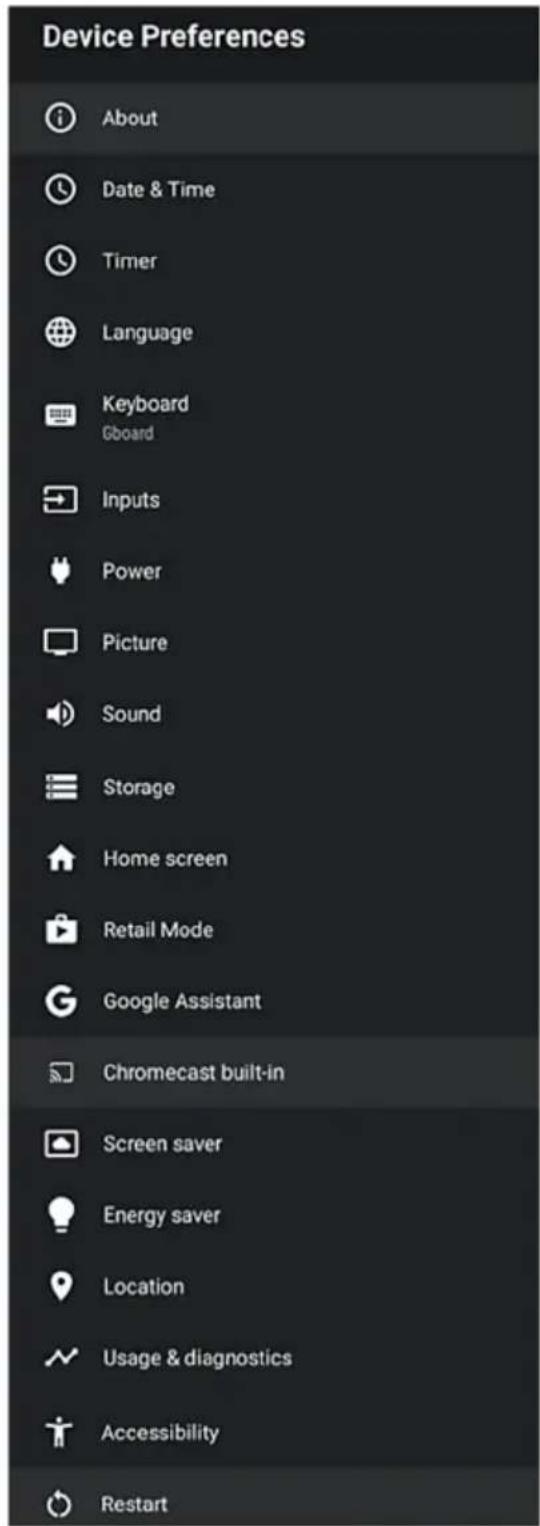
Location
Location Setup
Usage & Diagnostic
Give an permissions to automatically send diagnostic information to Google.
Accessibility:
Manage additional broadcast services as: Audio Description, Hearing Impaired, Captions
Restart:
Restart unit (clear work memory).
Note:
Restart will not clear user data and settings.
If you need to Reset TV set, than you should make Factory reset located in Device Preferences-
About. With this option all data will be erased from TV and TV will be set on Initial factory state!
Remotes & Accessories
To add and connect remote devices via Bluetooth, please enter into this menu.
3. Record
Record List:
Look over and manage users recording file list.
Device Info:
Look over device details
Schedule List:
Timetable list for viewing, adding and deleting Recording events.
Time Shift Mode:
Time shift switch, users need to turn on time shift mode to use time shift function.
Other Information
Troubleshooting
If the TV does not operate as usual or appears to be faulty please read carefully this section. Many operational issues can be resolved by users.
It is also advisable to unplug the TV from the AC socket on the wall for 60 seconds or more, then reconnect and start again. This simple procedure helps in restoring stable conditions for electric circuits and firmware of the unit.
Please contact Manufacturer Customer Care if the problem is unresolved or you have other concerns.
| SYMPTOMS | POSSIBLE S SOLUTION |
| No sound or picture. | Check if the power cord is plugged into a powered AC outlet.A power switch on the right side bottom edge of the front panel must be turned on. Press the [POWER] button in the remote control to activate the unit from Standby.Check to see if LED light is either red or blue. If illuminated, power to TV is OK. |
| I have connected an external source to my TV and I get no picture and/or sound. | Check for the correct output connection on the external source and for the correct input connection on the TV.Make sure you have made the correct selection for the input mode for the incoming signal. |
| When I turn On my television, there is a few second delay before the picture appears. Is this normal? | Yes, this is normal. That is the TV searching for previous setting information and initializing the TV. |
| Picture is normal, but no sound. | Check the volume settings.Check if Mute mode is set "on". |
| Sound but no picture or black and white picture. | If black and white picture first unplug TV from AC outlet and re-plug after 60 seconds.Check that the Colour is set to 50 or higher.Try different TV channels. |
| Sound and picture distorted or appear wavy. | An electrical appliance may be affecting TV set. Turn off any appliances, if interference goes away, move appliance farther away from TV.Insert the power plug of the TV set into another power outlet. |
| Sound and picture is blurry or cuts out momentarily. | If using an external antenna, check the direction, position and connection of the antenna.Adjust the direction of your antenna or reset or fine tune the channel. |
| Horizontal/vertical stripe on picture or picture is shaking. | Check if there is interfering source nearby, such as appliance or electric tool. |
| The plastic cabinet makes a "clicking" type of sound. | "Click" sound can be caused when the temperature of the television changes. This change causes the television cabinet to expand or contract, which makes the sound. This is normal and the TV is OK.. |
| Remote control does not work. | Confirm that TV still has power and is operational.Change the batteries in the remote control.Check if the batteries are correctly installed. |
playable format list
| Video Codec Resolution Container | ||
| MPEG 1/2 1920x1080 | MPEG program stream .dat / .vob / .mp g / .mpeg | |
| MPEG transport stream .ts / .trp / .tp | ||
| MP4 .mp4 / .mov | ||
| 3GPP .3 | ||
| AVI .avi | ||
| MKV .mkv | ||
| OGM .o | ||
| ASF .asf | ||
| MPEG4 1920x1080 | MP4 .mp4 / .mov | |
| MPEG program stream .dat / .vob / .mp g / .mpeg | ||
| ASF .asf | ||
| MPEG transport stream .ts / .trp / .tp | ||
| 3GPP .3 | ||
| AVI .avi | ||
| OGM .o | ||
| WMV .wmv | ||
| FLV .flv | ||
| MKV .mkv | ||
| H.264 | 1920x1080(HD and FHD models)4096×2340(UHD models) | FLV .flv |
| MP4 .mp4 / .mov | ||
| 3GPP .3 | ||
| MPEG transport stream .ts / .trp / .tp | ||
| ASF .asf | ||
| WMV .wmv | ||
| AVI .avi | ||
| MPEG program stream .dat / .vob / .mp g / .mpeg | ||
| H.264 o.264 | ||
| OGM .o | ||
| MKV .mkv | ||
| HEVC / H.265 | 1920x1080(HD and FHD models)4096×2340(UHD models) | MP4 .mp4 / .mov |
| 3GPP .3 | ||
| MPEG transport stream .ts / .trp / .tp | ||
| MKV .mkv | ||
| FLV .flv | ||
| AVI .avi | ||
| H.265 .265 | ||
| VC1 1920x1080 | MPEG transport stream .ts / .trp / .tp | |
| 3GPP .3 | ||
| MP4 .mp4 / .mov | ||
| VC1 .vc1 | ||
| ASF .asf | ||
| WMV .wmv | ||
| AVI .avi | ||
| MKV .mkv | ||
| VP8 | 1920x1080 | MKV .mkv |
| FLV .flv | ||
| AVI .avi | ||
| 3GPP .3 | ||
| MP4 .mp4 / .mov | ||
| OGM .o | ||
| WebM | ||
| VP9 | 1920x1080(HD and FHD models)4096x2176(UHD models) | MKV .mkv |
| WebM | ||
| Audio Codec Sample rate Container | |||
| MPEG 1/2 Layer1 | 16-48kHz | MP3 .mp3 | |
| AVI .avi | |||
| ASF .asf | |||
| WMV .wmv | |||
| DivX .divx | |||
| MKV .mkv | |||
| 3GPP .3 | gpp / .3gp | ||
| MP4 .mp4 / .mov | |||
| FLV .flv | |||
| MPEG transport stream .ts | /.trp / .tp | ||
| MPEG program stream .dat | /.vob / .mp g / .mpeg | ||
| WAV .wav | |||
| OGM .o | gm | ||
| MPEG 1/2 Layer2 | 16-48kHz | MP3 .mp3 | |
| AVI .avi | |||
| ASF .asf | |||
| WMV .wmv | |||
| DivX .divx | |||
| MKV .mkv | |||
| 3GPP .3 | gpp / .3gp | ||
| MP4 .mp4 / .mov | |||
| FLV .flv | |||
| MPEG transport stream .ts | /.trp / .tp | ||
| MPEG program stream .dat | /.vob / .mp g / .mpeg | ||
| MPEG2 Layer3 8-48kHz | MP3 .mp3 | ||
| AVI .avi | |||
| ASF .asf | |||
| WMV .wmv | |||
| DivX .divx | |||
| MKV .mkv | |||
| 3GPP .3 | gpp / .3gp | ||
| MP4 .mp4 / .mov | |||
| FLV .flv | |||
| MPEG transport stream .ts | /.trp / .tp | ||
| MPEG program stream .dat | /.vob / .mp g / .mpeg | ||
| AC3 | 32kHz, 44.1kHz 48kHz | AC3 .ac3 | |
| AVI .avi | |||
| MKV .mkv | |||
| DivX .divx | |||
| 3GPP .3 | gpp / .3gp | ||
| MP4 .mp4 / .mov | |||
| MPEG transport stream .ts | /.trp / .tp | ||
| MPEG program stream .dat | /.vob / .mp g / .mpeg | ||
| WMV .wmv | |||
| ASF .asf | |||
| OGM .o | gm | ||
| EAC3 (DDP) | 32kHz, 44.1kHz 48kHz | EAC3 | .ec3 |
| AVI .avi | |||
| MKV .mkv | |||
| DivX .divx | |||
| 3GPP .3 | gpp / .3gp | ||
| MP4 .mp4 / .mov | |||
| MPEG transport stream .ts | /.trp / .tp | ||
| MPEG program stream .dat | /.vob / .mpg / .mpeg | ||
| WMV .wmv | |||
| ASF .asf | |||
| OGM .o | gm | ||
| AAC, HEAAC | 8-48kHz | AAC .ec3 | |
| AVI .avi | |||
| MKV .mkv | |||
| DivX .divx | |||
| 3GPP .3gpp / .3gp | |||
| MP4 .mp4 / .mov | |||
| MPEG transport stream .ts / .trp / .tp | ||
| MPEG program stream .dat / .vob / .mpg / .mpeg | ||
| WMV .wmv | ||
| ASF .asf | ||
| OGM .ogm |
| Image Photo | Resolution | |
| JPEG | Base-line | 15360 x 8640 |
| Progressive | 1024 x 8640 | |
| PNG | Base-line | 9600 x 6400 |
| Progressive | 1200 x 800 | |
| BMP | 9600 x 6400 | |
| GIF | 6400 x 4800 |
| Subtitle Subtitle Parser | |
| .srt | SubRip |
| .ssa / .ass | Substation AlphaAdvanced SubStation Alpha |
| .smi | SAMI |
| .sub | MicroDVDSubldx (VobSub) |
| .txt | TMPlayer |
If the media codec is not supported by the player, a warning will be given.
REMARK:
It may happen that due to different versions of the 'Codec' version and file format, the device may not support some of above formats. If this happens, convert your record to another compatible format. The manufacturer is not responsible for the incompatibility of the device and your records and the possible loss of the contents of your files.
RF (Radiation Exposure) Data:
This equipment complies with CE radiation exposure limits set forth for an uncontrolled environment. This equipment should be installed and operated with minimum distance 20cm between the product radiator & body.
The frequency, mode and the maximum transmitted power in EU are listed below:
- 2400-2483.5MHz: ≤20 dBm (EIRP) (for 2.4G product only)
- 5150-5250MHz: ≤23dBm (EIRP)
- 5250-5350MHz: ≤23dBm (EIRP)
- 5470-5725MHz: ≤30dBm (EIRP)
- 5725-5875MHz: ≤33dBm (EIRP)
The device is restricted to indoor use only when operating in the 5150 to 5350MHz and 5725-5875MHz frequency range.
 | AT | BE | BG | HR | CY | CZ | DK |
| EE | FI | FR | DE | EL | HU | IE | |
| IT | LV | LT | LU | MT | NL | PL | |
| PT | RO | SK | SI | ES | SE | UK |
Technical Specifications
| Model B Series 32LE20K B Series 40LE20K | ||
| Size with stand (mm) | 731 x 486 x 177 904 x 57 | 2 x 177 |
| Size without stand (mm) | 731 x 433 x 68 904 x 519 | x 72 |
| Weight with stand (kg) | 3,9 6,7 | |
| Weight without stand (kg) | 3,8 6,6 | |
| Display Size 32" (80cm) 40" (100cm) | ||
| Display resolution | 1366 x 768 1920 x 1080 | |
| Audio power (RMS) | 6 W +6 W 6 W + 6 W | |
| Rating Power 55 W | 55 W | |
| Power supply 100-240V ~ 50/60Hz | ||
| AV Color System PAL NTSC | ||
| Television System | PAL/SECAM-B/G, D/K, DVB-T+C DVB-T2 H 265, DVB-S/S2 | |
| Working conditions | Temperature: 5°C - 45°C Humidity: 20% - 80% RH Atmosfere pressure: 86 kPa - 106 kPa | |
| IC Core / Software / Mem. | Quad Core 1,45GHz ARM Cortex A55 / Mali-G31 MP2 / Android 11 / 1GB/8GB | |
| HDMI mode | 480I / 60Hz, 480P / 60Hz, 576I / 50Hz, 576P / 50Hz, 720P / 50Hz, 720P / 60Hz, 1080I / 50Hz, 1080I / 60Hz, 1080P / 50Hz, 1080P / 60Hz 640 x 480, 800 x 600, 1024 x 768 60Hz, 1920x1080 60Hz | |
Notes: !
Vivax can not guarantee that all applications will be able to be installed and that all installed applications will work properly. It primarily depends on the App publisher and Google Play. This problem is not considered as device failure and it is not covered by the warranty.
Android TV
Android TV gives you a smarter, easier way to get more from your TV.
Google voice search
Find new favorites
Google Play
Google Play brings your favorite apps and games to your TV. Watch, play, and do- whatever you want, whenever you want.
Chromecast built-in
Easily cast your favorite movies, music, and more to your TV with Chromecast built-in.
Manufactured under license from Dolby Laboratories. Dolby and the double-D symbol are trademarks of Dolby Laboratories
The terms HDMI, HDMI High-Definition Multimedia Interface, HDMI trade dress and the HDMI Logos are trademarks or registered trademarks of HDMI Licensing Administrator, Inc.
"CI Plus" logo is a trademark and a trademark of CI Plus LLP company.


Google, Android, Google Play, Android TV and other marks are trademarks of Google LLC.
Information on Disposal for Users of Waste Electrical & Electronic Equipment (private households)

This symbol on the product(s) and / or accompanying documents means that used electrical and electronic products should not be mixed with general household waste. For proper treatment, recovery and recycling, please take this product(s) to designated collection points where it will be accepted free of charge. Alternatively, in some countries you may be able to return your products to your local retailer upon purchase of an equivalent new product. Disposing of this product correctly will help save valuable resources and prevent any potential negative effects on human health and the environment, which could otherwise arise from inappropriate waste handling. Please contact your local authority for further details of your nearest designated collection point. Penalties may be applicable for incorrect disposal of this waste, in accordance with your national legislation.
Disposal of waste batteries

Check local regulations for disposal of waste batteries or call your local customer service in order to get instructions on the disposal of old and used batteries. The batteries in this product should not be disposed of with household waste. Be sure to dispose of old batteries in special places for disposal of used
batteries that are found in all retail shops where you can buy batteries.
EU Declaration of Conformity
Hereby, M SAN Grupa d.d. declares that the radio equipment type TV set is in compliance with Directive 2014/53/EU (RED Directive).
The full text of the EU declaration of conformity is available at the following internet address: www.msan.hr/dokumentacijaartikala

EPREL Product fiche
Information sheet data entered into the EPREL database". For more info and Product Fiche, please scan QR code on the Energy label or visit Vivax web site: www.vivax.com

32LE20K
40LE20K
POŠTOVANI!
Zahvaljujemo na kupnji Vivax uređaja i nadamo se da ćete biti zadovoljni odabirom. Ako u jamstvenom roku bude potreban popravak proizvoda, molimo savjetujte se sa ovlaštenim prodavačem koji Vam je proizvod prodao ili nas kontaktirajte na dolje navedene brojeve i adrese. MOLIMO VAS DA PRIJE UPORABE PROIZVODA PAŽLJIVO PROČITATE UPUTE PRILOŽENE UZ PROIZVOD!
JAMSTVENI LIST HR
VIVAX
MODEL UREĐAJA
SERIJSKI BROJ
DATUM PRODAJE
BROJ RAČUNA PRODAVATELJA
POTPIS I PEČAT PRODAVATELJA
POTPIS I PEČAT PRODAVATELJA
GARANCIJSKA IZJAVA
- Ovom garancijom garantira proizvođač proizvoda, preko KIM TEC d.o.o., kao uvoznika i davatelja garancije u Republici Bosni i Hercegovini besplatan popravak istog u skladu s važećim propisima i u skladu s uvjetima opisanim u ovom garantnom listu. Ovom garancijom garantiramo da će predmet ove garancije raditi bez greške uzrokovane eventualnom lošom izradom i lošim materijalom izrade. Svi eventualno nastali kvarovi biti će besplatno otklonjeni u ovlaštenom servisu u garantnom roku.
UVJETI GARANCIJE:
Garantni rok počinje teći od dana kupnje proizvoda i traje 12 mjeseci, osim za Vivax Imago televizore za koje garancija traje 24 mjeseca
- U slučaju kvara na proizvodu koji je predmet ove garancije, obavezujemo se da ćemo isti popraviti u najkraćem mogućem roku, a najkasnije u roku od 30 dana. Ako se proizvod ne može popraviti ili se ne popravi u roku od 30 dana, biti će zamijenjen novim. Ako popravak proizvoda traje duže od 10 dana, garancija se produljužuje za vrijeme trajanja popravka.
- Garancija se priznaje samo uz račun o kupnji, te uz ovaj garantni list koji mora biti ispravno popunjen odnosno mora sadržavati datum prodaje, pečat i potpis prodavatelja.
- Davalac garancije osigurava servis i rezervne dijelove 7 godina od datuma kupnje.
GARANCIJA NE OBUHVAĆA:
POTPIS I PEČAT PRODAVCA
- Ovom izjavom o saobraznosti proizvođač proizvoda, preko KIM TEC CG d.o.o., kao uvoznika i davaoca prava u Crnoj Gori besplatan popravak istog u skladu s vazećim propisima i u skladu s uslovima opisanim u ovoj izjavi o saobraznosti. Ovom izjavom o saobraznosti istićemo da će predmet ovog prava raditi bez greške uzrokovane eventualnom lošom izradom i lošim materijalom izrade. Svi eventualno nastali kvarovi biće besplatno otklonjeni u ovlašćenom servisu u predviđenom roku za reklamaciju.
- USLOVI REKLAMACIJE: Rok za reklamaciju počinje teći od dana kupovine proizvoda i traje 24 mjeseca.
- U slučaju kvara na proizvodu koji je predmet reklamacije, obavezujemo se da ćemo isti popraviti u najkraćem mogućem roku, a najkasnije u roku od 15 dana. Ako se proizvod ne može popraviti ili se ne popravi u roku od 15 dana, biće zamijenjen novim.
- Pravo na reklamaciju se priznaje uz fiskalni račun o kupovini, ili uz ovu izjavu o saobraznosti koji mora biti ispravno popunjen odnosno mora sadržati datum prodaje, pečat i potpis prodavca.
- Davalac izjave o saobraznosti osigurava servis i rezervne djelove 7 godina od datuma kupovine.
- PRAVO NA REKLAMACIJU NE OBUHVATA

- Izbornik snimanja
- Ostale informacije
- Jamstvena izjava (na kraju uputa)
- DOBRODOŠLI
- Popis pribora uz uređaj
- OPREZ
- RIZIK OD STRUJNOG UDARA NE OTVARAJTE UREĐAJ
- Uporaba Slušalica - Oprez
- Instalacija na zid
- Prednja strana tv prijamnika
- Napomena:
- NAPOMENE
- ▶ OPTICAL DIGITAL AUDIO OUT
- ▶ COMMON INTERFACE (CI+ SUČELJE)
- AV INPUT
- Odabir jezika prikaza (OSD Language)
- Brzo postavljanje TV-a sa svojim Android TM telefonom (Quickly set up your TV with your Android TM phone)
- Prijenos podataka sa svog Google računa (Quick Setup)
- Odabr Regije/Države (Region/Country)
- Postavljanje Lozinke (Password)
- Postavljanje Chromecast built-in™ funkcije (Setting Chromecast built-in™)
- Način rada TV Tunera (Tuner Mode)
- Početna stranica (Home page)
- Odabir izvora
- Kanali (Channels)
- Programski vodič (Program Guide)
- Kanal Channel:
- Mod Instalacije kanala (Channel Installation Mode)
- Automatska nadogradnja kanala (Auto Channel Update)
- Poruka za nadogradnju kanala (Channel Update Message)
- TV Opcije (TV Options)
- Ulazi (Source)
- Slika (Picture)
- Mod Slike (Picture mode):
- Svjetlina/Kontrast/Zasićenje/Nijansa Brightness/Contrast/Saturation/HUE
- Sistem zvuka (System sounds):
- Stil zvuka (Sound Style):
- Balans/bas/Visoki/Surround (Balance/Bass/Treble/Surround):
- Postavke uštede energije (Power)
- Audio jezik / Drugi Audio jezik (Audio Language / 2nd Audio Language)
- Audio zapisi (Sound Tracks)
- Plavi zaslon (Blue Mute)
- Teletext
- Kanal (Channel)
- Računi / Prijava (Accounts & Sign-in)
- Apps
- Slika/Zvuk (Picture/Sound):
- Usage & Diagnostics
- RF (Radiation Exposure) podaci:
- Napomene: !
- Spisak dodatne opreme uz uređaj
- Prednja strana tv prijemnika
- ▶ DIGITAL AUDIO OUT : OPTICAL DIGITAL AUDIO OUT
- ▶ COMMON INTERFACE (CI INTERFEJS)
- Odabir jezika (OSD Language)
- Brzo podešavanje TV-a sa tvojim Android™ telefonom (Quickly set up your TV with your Android™ phone)
- Odabr Regije/države-(Region/Country)
- Podešavanje lozinke (Password)
- Podešavanje Chromecast built-in™ funkcije (Setting Chromcast built-in™)
- Izbor izvora (Inputs)
- Kanal (Channel):
- Režim Instalacije kanala (Channel Installation Mode)
- Roditeljska kontrola (Parental Controls)
- Licence otvorenog koda (Open Source License)
- Kanal podmeni (Channels Submenu)
- LCN
- Pozadinsko osvetljenje (Backlight):
- Svetlina/Kontrast/Zasićenje/Nijansa Brightness/Contrast/Saturation/HUE
- Oštrina (Sharpness)
- Balans/bas/Visoki/Surround Balance/Bass/Treble/Surround:
- Ekvilajzer detalji (Equalizer Detail):
- Kašnjenje zvučnika (Speaker Delay):
- Podešavanje uštede energije (Power)
- Plavi ekran (Blue Mute)
- Sistemske informacije (System Information)
- Podešavanja(Settings)
- Nalozi / Prijava (Accounts & Sign-in)
- Memorija (Storage):
- Dostupnost (Accessibility):
- Ponovno pokretanje (Restart):
- НАПОМЕНА
- Почетна страница
- Програмски водич (Program Guide)
- Родителска контрола (Parental Controls)
- Телетекст
- Канал (Channel)
- Вграден Chromecast built in (Chromecast built-in)
- RF (Radiation Exposure) податоци::
- I nstalimi në mur
- Vërejtje:
- ▶ OPTICAL DIGITAL AUDIO OUT: OPTIKE DIGITAL AUDIO OUT
- ▶ CI COMMON INTERFACE (CI+INTERFEJS KRYESOR)
- SHËNIME
- PËRDORIMI I TELEKOMANDËS
- (Quickly set up your TV with your Android™ phone
- Vendosja e fjalëkalimit tuaj (Setting your Password)
- Vendosja e Chromecast built-in™ të integruar (Setting Chromecast built-in™)
- Modaliteti i sintonizuesit (Tuner Mode)
- Udhëzues programi (Program Guide)
- Kontrollet prindërore (Parental Controls)
- TV Opsionet (TV Options)
- Ndriçimi/Kontrasti/Ngopja/HUE (Brightness/Contrast/Saturation/HUE)
- Mprehtësia (Sharpness)
- Temperatura ngjyra (Color temperature)
- Balance/Bas/Treble/Serround: (Balance/Bass/Treble/Surround):
- Aktivizimi (Power)
- Këngë zanore (Sound Tracks)
- Teletekst
- Kanali (Channel)
- Data Ora (Date&Time):
- Foto/Zëri (Picture/Sound):
- Magazinimi (Storage):
- Chromcast built-in i integruar
- Vendndodhja (Location)
- Përdorimi & Diagnostifikimi (Usage & Diagnostics):
- Lista e orarit (Schedule List):
- Contents
- Welcome 3
- Record Bar 36
- WELCOME
- The Accessories
- Note:
- CAUTION
- RISK OF ELECTRIC SHOCK DO NOT OPEN
- IMPORTANT SAFETY INSTRUCTIONS
- Read, Retain, Follow All Instructions
- Heed Warnings
- Cleaning
- Attachments and Equipment
- Water and Moisture
- Setting
- Ventilation
- Power Source
- Grounding or Polarization
- Lightning
- Power Lines and Antenna cables
- Overloading
- Object and Liquid Entry
- Outdoor Antenna Grounding
- Servicing
- Damage Requiring Service
- Replacement Parts
- Safety Check
- Heat
- Earphones use - Attention
- WARNING
- LED Panel
- Positioning the TV set
- INSTALLATION
- Stand installation
- Notes
- WARNING! Be sure to disconnect the AC power cord before installing a stand or wall-mount brackets.
- CAUTION!
- Wall mount installation
- TV Front
- Control Panel
- Antenna and Power Connection
- ▶ CONNECTIONS
- ▶ USB
- ▶ OPTICAL: DIGITAL AUDIO OUT
- ▶ CI: COMMON INTERFACE
- ▶ INPUT (AV Composite)
- ▶ LAN RJ45 INPUT
- Connecting to a wired network:
- Connecting to a wireless network:
- REMOTE CONTROLLER
- Bluetooth voice remote control operation - Bluetooth Pairing
- ▶ Installing Batteries in the Remote Control
- Remote Control Operation Range
- Using the Remote Control
- - Turning your TV on and off
- ▶ NOTE
- - SOURCE Ⓥ:Selecting the Input Source
- - Adjusting the volume
- - Changing channels
- - Audio function
- - Displaying Channel List
- • Electronic Programming Guide (EPG)
- FIRST TIME INSTALLATION
- Select OSD Language
- Select your Wi-Fi network
- Quickly set up your TV with your Android™ phone
- Transfer Data from your Android Smartphone
- Follow the screen instructions:
- Skip
- Select Region/Country-Area
- Setting your Password
- Setting Home or Retail (Store) working mode
- Setting Chromecast built-in™
- Tuner Mode
- Home page
- Source select
- Setting Menu
- Program Guide
- Channel:
- Channel Installation Mode
- Auto Channel Update
- Channel Update Message
- Parental Controls
- Open Source License
- Channels Submenu
- Channel Scan:
- Update Scan:
- Single RF Scan:
- Manual Service Update
- Channel Scan Type / Channel Store Type
- Favorite Network Select
- Analog Channel Fine tune
- TV Options
- Source
- Picture
- Backlight:
- Brightness/Contrast/Saturation/HUE
- Sharpness
- Color temperature
- Advanced Video
- Rest to Default
- Sound
- System sounds:
- Sound Style:
- Balance/Bass/Treble/Surround:
- Equalizer Detail:
- Speaker Delay:
- Digital Output/Digital Output Delay:
- Auto Volume Control:
- Downmix Mode:
- Dialogue Enhancer:
- Power
- CI Card
- Audio Language / 2nd Audio Language
- Sound Tracks
- Blue Mute
- Default Channel
- MHEG PIN Protection (option)
- HBBTV Setting (option)
- Subtitle
- System Information.
- Settings
- Set your device name:
- Network & Internet:
- Wi-Fi :
- Channel settings
- Account & Sign-in
- Device preferences
- About:
- Date&Time:
- Timer:
- Language:
- Keyboard:
- Inputs:
- Power:
- Picture/Sound:
- Storage:
- Home Screen
- Retail Mode
- Chromecast built-in
- Screen saver / Energy saver
- Location
- Usage & Diagnostic
- Accessibility:
- Restart:
- Remotes & Accessories
- Record
- Record List:
- Device Info:
- Schedule List:
- Time Shift Mode:
- Other Information
- Troubleshooting
- REMARK:
- RF (Radiation Exposure) Data:
- Technical Specifications
- Notes: !
- Android TV
- Google voice search
- Google Play
- Information on Disposal for Users of Waste Electrical & Electronic Equipment (private households)
- Disposal of waste batteries
- EU Declaration of Conformity
- EPREL Product fiche
- POŠTOVANI!
- JAMSTVENI LIST HR
- VIVAX
- MODEL UREĐAJA
- SERIJSKI BROJ
- DATUM PRODAJE
- BROJ RAČUNA PRODAVATELJA
- POTPIS I PEČAT PRODAVATELJA
- GARANCIJSKA IZJAVA
- UVJETI GARANCIJE:
- GARANCIJA NE OBUHVAĆA:
- POTPIS I PEČAT PRODAVCA
Brand : Vivax
Model : 32LE20K
Category : TV