
CDM 390 BTDAB - Radio GoGen - Free user manual and instructions
Find the device manual for free CDM 390 BTDAB GoGen in PDF.


| Product Type | DAB+/FM Radio with Bluetooth and CD Player |
| Brand | GoGen |
| Model | CDM 390 BTDAB |
| Dimensions (W x H x D) | Approx. 300 x 150 x 100 mm |
| Weight | Approx. 1.5 kg |
| Power Supply | AC 100-240V, 50/60 Hz or 6 x LR14 (C) batteries (not included) |
| Main Functions | DAB+ and FM RDS radio, Bluetooth streaming, CD/MP3 playback, USB playback, AUX input, alarm with dual alarm clock, sleep timer, 20 preset stations |
| Audio Output | 2 x 3W RMS stereo speakers |
| Display | LCD with backlight |
| Connectivity | Bluetooth 5.0, USB-A port, 3.5 mm AUX input, headphone jack |
| Radio Bands | DAB+ (Band III) and FM (87.5-108 MHz) |
| Media Support | CD, CD-R/RW, MP3 discs, USB flash drives up to 32 GB |
| Maintenance & Cleaning | Clean with a soft, dry cloth. Do not use abrasive cleaners or solvents. Keep ventilation slots free of dust. |
| Safety Precautions | Do not expose to water or moisture. Do not disassemble. Use only the supplied AC adapter. Keep away from children under 3 years due to small parts. |
| Spare Parts & Repairability | Spare parts available through GoGen customer service. For repairs, contact an authorized service center. Refer to user manual for troubleshooting. |
| General Information | Portable design with carrying handle. Suitable for home or travel. Operating temperature: 5°C to 35°C. |
Frequently Asked Questions - CDM 390 BTDAB GoGen
User questions about CDM 390 BTDAB GoGen
0 question about this device. Answer the ones you know or ask your own.
Ask a new question about this device
Download the instructions for your Radio in PDF format for free! Find your manual CDM 390 BTDAB - GoGen and take your electronic device back in hand. On this page are published all the documents necessary for the use of your device. CDM 390 BTDAB by GoGen.
USER MANUAL CDM 390 BTDAB GoGen
natural_image
Abstract logo design with white stylized 'S' inside a black circle (no text or symbols)CDM 390 BTDAB
GoGEN
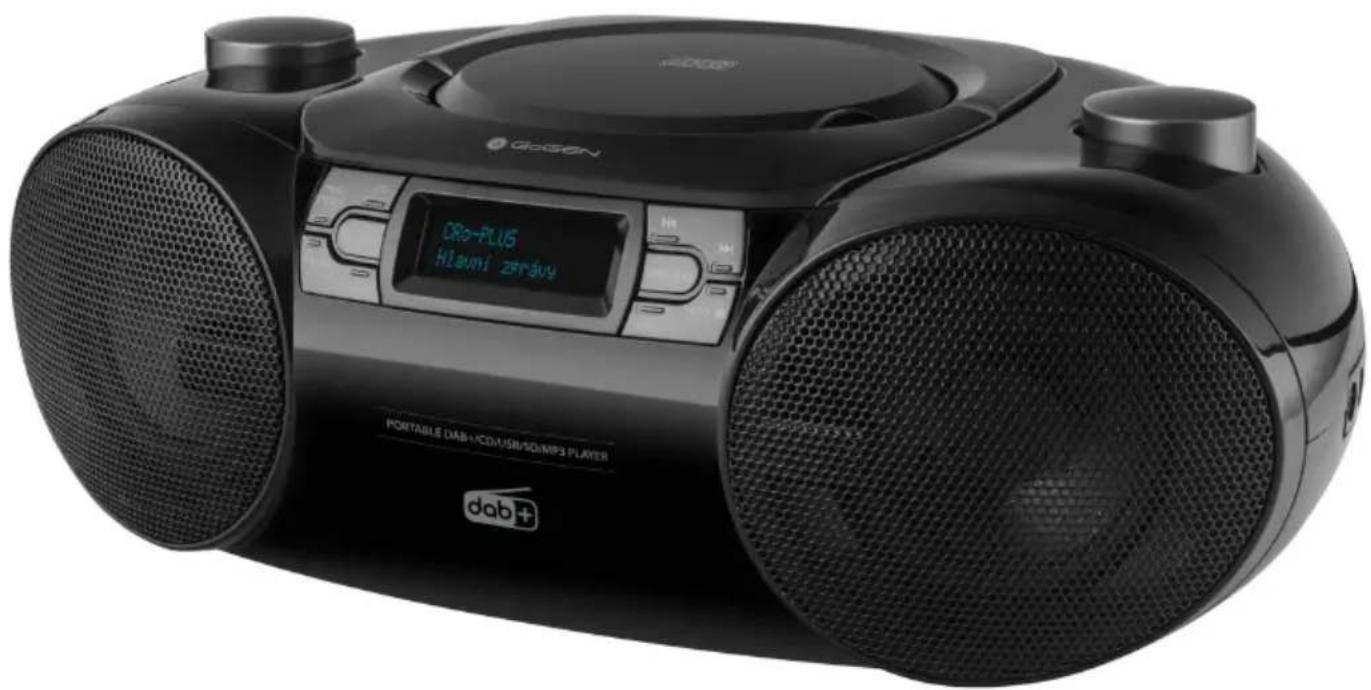

PŘENOSNÉ DAB RÁDIO S CD, USB A BLUETOOTH PRENOSNÉ DAB RÁDIO S CD, USB A BLUETOOTH PRZENOŠNE RADIO DAB Z CD, USB I BLUETOOTH PORTABLE DAB RADIO WITH CD, USB AND BLUETOOTH HORDOZHATÓ DAB RÁDIÓ CD-VEL, USB-VEL ÉS BLUETOOTH-TAL
NÁVOD K POUŽITÍ NÁVOD NA POUŽITIE INSTRUKCJA OBSŁUGI USER MANUAL HASZNÁLATI UTASÍTÁS
natural_image
Symbol of a trash bin crossed with a diagonal line and a horizontal bar below (no text or labels)natural_image
Symbol of a trash bin crossed with a diagonal line and a horizontal bar below (no text or labels)natural_image
Symbol of a trash bin crossed with a diagonal line and a horizontal bar below (no text or labels)Thanks for your purchase of our product. Please read through this manual before making connections and operating this product. Retain this manual for future reference.
Note: The player is not compatible with all disc; Some of the disc could not read, caused by the disc is dirty, disc of poor quality, etc.
PACKAGE CONTENTS:
- User manual
FOR YOUR ATTENTION
IMPORTANT NOTES:
- Please read through this manual before making connections and operating this product. Retain this manual for future reference.
- Don't open the cabinet of this unit. No user-serviceable parts inside. Refer servicing to qualified personnel only.
- Switch off the unit when you don't use it. Switch off the unit and disconnect it from the AC power supply when it is not being used for a long time.
- Don't install the unit in a place exposed to heating sources or direct sunshine.
- Don't install the unit in a place exposed to moisture or rain.
- The apparatus shall not be exposed to dripping or splashing and any object filled with liquids, such as vases shall not be placed on it.
- Install the unit on a horizontal, flat and firm surface with good ventilation. Never block the vents which will cause malfunction resulted from overheating.
- Use a soft and clean rag to clean the outside of the unit. Never clean it with chemicals or detergent.
- This book is only a guide for user's operation, not a criterion for configuration.
- Only use attachments / accessories specified by the manufacturer.
- Where the Mains plug is used as the disconnect device, the disconnect device shall remain readily operable.
- Minimum distances around the apparatus for sufficient ventilation;
- No naked flame sources, such as lighted candles, should be placed on the apparatus
WARNING: The batteries shall not be exposed to excessive heat such as sunshine, fire or the like.
CAUTION: Danger of explosion if battery is incorrectly replaced. Replace only with the same or equivalent type.


The lightning flash is intended to alert the user to the presence of dangerous voltage within the product's enclosure, and touching the internal components may result in a risk of electric shock to persons.
The exclamatory mark is intended to alert the user to the presence of important operating instructions.
To reduce the risk of electric shock or fire, do not open the cover. Refer servicing to qualified service personnel.
This mark indicates this unit belongs to class 1 laser product. The laser beam may produce radiation harm to the directly touching human body.
DEVICE LAYOUT
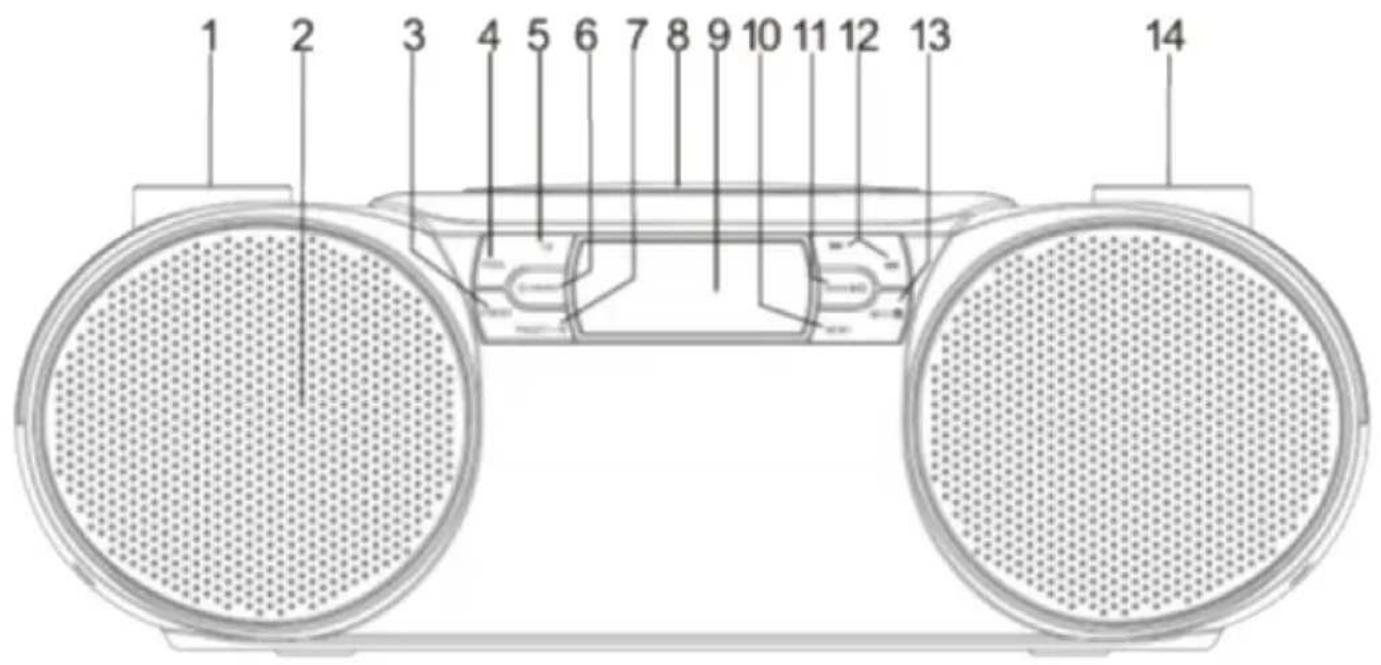
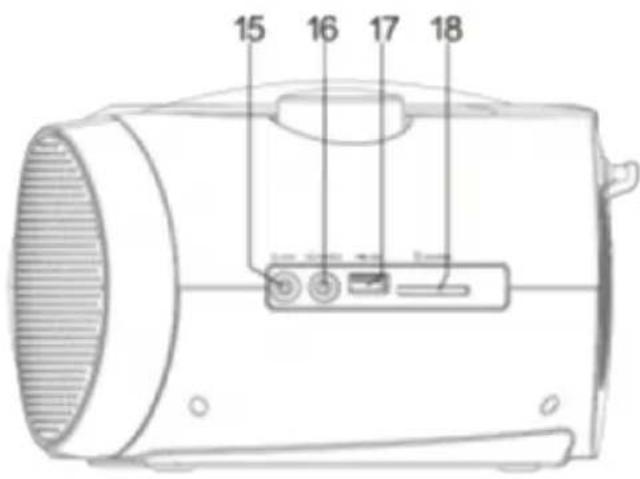
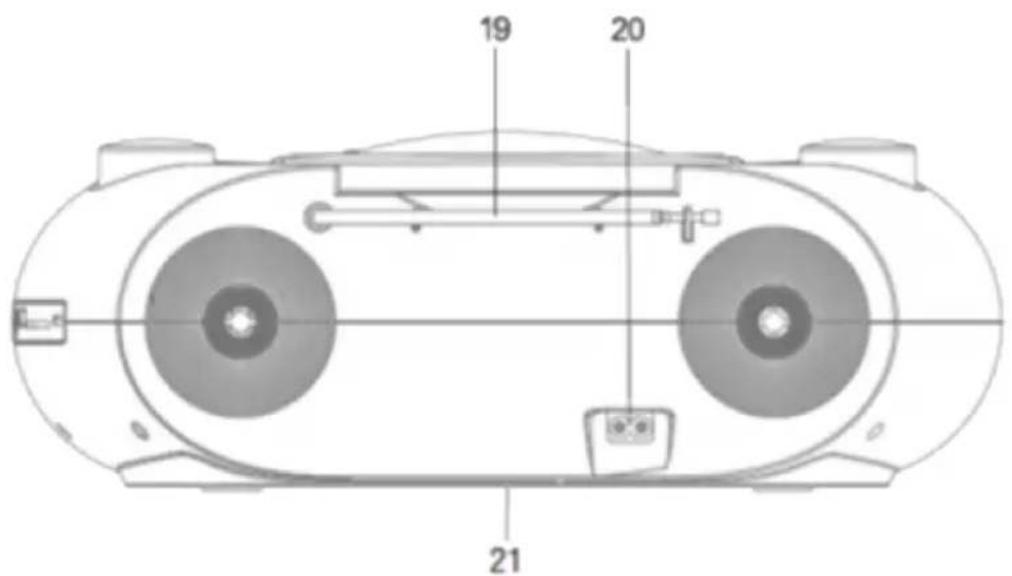
EN - 35
- Volume knob
- Speaker
- P.Mode (Repeat, Repeat 1, Random)
- Program/Preset
- EQ (Flat/Rock/Pop/Classic/Jazz)
- Standby/ Source
- P+ / +10
- CD door
- LCD display
- Menu (System menu, DAB menu, FM menu)
- Enter/▶(Play/pause, Auto Scan, Pairing)
- SKIP Back-/ |←→ SKIP Forward+/
- Info/
- Tuning knob
- Aux-in jack
- Earphone jack
- USB port
- SD/MMC card slot
- FM Antenna
- AC socket
- Battery compartment
POWER SUPPLY
AC POWER
Connect the AC power cord to:
- the AC\~ MAINS socket on the unit.
- the wall socket.
BATTERY POWER
- Open battery compartment.
- Insert 8 batteries (type: R-20, UM-1 or D-cells) with correct polarity (+/-) as indicated.
- Close the battery compartment.
NOTE: Batteries contain chemical substances, so they should be disposed of properly.
Batteries are not supplied with the accessories.
FUNCTIONS
TURN ON
Press button, the system switches to the last selected source.
To select another source, press ⏻/SOURCE button repeatedly.
SWITCH TO STANDBY MODE
- Press and hold button 2 seconds to switch the system to standby mode.
The clock (if set) appears on the display panel.
- The display backlight becomes dim.
NOTE: In CD, CARD, USB, Aux and Bluetooth mode, the product switches to standby mode automatically when there is no audio detected for over 15 minutes.
SET TIME
- In standby mode, press MENU button to enable system menu, press ENTER to access.
- Press I repeatedly to select TIME, press ENTER.
- With the TIME menu, press I repeatedly you can:
[Set Time/Date]
[Auto update]: Update the time from:
- [Update from Any]
- [Update from DAB]
- [Update from FM]
- [No Update]
[Set 12/24 hour]
[Set date format]
Press ENTER button to save the setting.
Or press STOP button to previous step.
Or press MENU to exit the menu.
If the system is idle for 30 seconds, it exits time setting mode automatically.
PLAY CD
- Press SOURCE button to select CD source.
- Lift up the disc tray.
- Insert a disc with the printed side facing up, then close the disc tray.
- Plays starts automatically.
PLAY FROM USB DEVICES/ SD-MMC CARD
Make sure that the USB device or memory card contains playable audio content.
- Press SOURCE button to select either USB or CARD source.
- Insert the USB storage device into USB socket or memory card into card slot.
- Plays starts automatically. If not, press ▶||
Note: Please do NOT use a USB extension cable to connect your USB flash drive. Such cable can pick up additional interference which can corrupt the data flow. Always connect your USB flash derive directly to the USB port without USB extension cable. The maximum current for USB is 0.5A.
PLAY FROM BLUETOOTH-ENABLED DEVICES
- The effective operating range between the system and the paired device is approximately 10 meters (30 feet).
- Any obstacle between the system and the device can reduce the operational range.
- Compatibility with all Bluetooth devices are not guaranteed.
-
This system is auto enabled Bluetooth pairing mode.
-
Press SOURCE button to select Bluetooth source.
• [BLUETOOTH] is displayed. - The CD sound machine enters pairing mode, and [Not Connected] is displayed on the screen and blinks.
- On your Bluetooth device, enable Bluetooth and search for Bluetooth devices that can be paired (refer to the user manual of the device).
- When [CDM 390 BTDAB] is displayed on your device, select it to start pairing and connection.
After successful pairing and connection, the product plays music sound and [Bluetooth Connected] is displayed on the screen.
- Play audio on your Bluetooth device.
• Audio streams from your Bluetooth device to the product.
- To skip to previous/next track, press ◀◀. ▶▶
- To pause or resume the playback, press ▶II
DISCONNECT THE BLUETOOTH-ENABLED DEVICE
- Press ENTER/ button for 2 seconds;
- Disable Bluetooth on your device; or
- Move the device beyond the communication range.
CONNECT ANOTHER BLUETOOTH-ENABLED DEVICE
Disable Bluetooth on the current device, and then connect another device.
PLAY FROM AN EXTERNAL DEVICE (AUX)
You can also listen to an external audio device such as an MP3 player through this product.
- Press SOURCE button repeatedly to select [AUX] source.
- Connect an audio cable (3.5mm, not supplied) to:
- the AUX-in socket on the unit.
- the headphone socket on an external device.
- Play the external audio device (see the device's user manual).
- Adjust the main volume on the external device and main unit.
NOTE: Please always turn the volume level to the maximum on external device. Otherwise, the main unit will switch to standby mode (ECO mode) as no audio signal input. This is not a mal-function.
PLAY OPTIONS
CONTROL PLAY
In CD, USB or CARD mode, you can control play through the following operations.
/▶▶ Short press: Skip to the previous or next track;
Press and hold: To fast forward or fast-reverse the track during playback, then release to resume play.
P+/+10 Press to skip the tracks in 10 multiples.
▶ Start or pause play.
■ Stop play.
P.MODE REP-1: Play the current track repeatedly.
REP-DIR: Play the current music folder repeatedly.
REP-ALL: Play all tracks repeatedly.
RANDOM: Play tracks randomly.
Tip: Only REP-1 and ALL can be selected when you play the programmed tracks.
PROGAM TRACKS
In playing CD disc, you can program a maximum of 20 tracks. CD-MP3, USB or CARD mode, you can program a maximum of 99 tracks.
- Press to stop playback.
- Press PROG to active the programming mode.
• [MEM] [P 01 F- -01 001] is displayed and blinks. - Press 1 repeatedly to select a track, then press PROG to confirm.
- Or press +10 to skip the tracks in 10 multiples, then press PROG to confirm.
- Repeat steps 3-4 to program more tracks.
- To play the programmed tracks, press .▶II
- To erase the program, press STOP button twice.
ADJUST SOUND
During play, you can adjust volume and select different sound effects.
• VOLUME +/-
Turns the volume knob on the top of product for increase or decrease volume level.
- SOUND
Press EQ button to select a pre-set sound effect: [FLAT] > [ROCK] > [POP] > [JAZZ] > [CLASSIC]
LISTEN TO FM RADIO
TUNE TO FM RADIO STATIONS
For optimal reception, fully extend and adjust the position of the FM antenna.
-
Press SOURCE repeatedly to select FM source.
-
Press and hold 1/4 for 2 seconds.
• [SCANNING] is displayed.
- The product tunes to a station with strong reception automatically.
- Repeat step 2 to tune to more stations.
To tune to a station with weak signal: Turns the tuning knob until you find better reception.
STORE RADIO STATIONS AUTOMATICALLY
You can program a maximum of 30 pre-set FM radio stations.
-
In FM mode
-
Press and hold ENTER button for 2 seconds
• [Auto Scanning...] is displayed.
- The unit stores all the available FM radio stations.
- The first stored radio station is broadcast automatically.
STORE RADIO STATIONS MANUALLY
You can program a maximum of 30 pre-set FM radio stations.
-
Tune to desired FM radio station.
-
Press and hold PROG/PRESET for 2 seconds to activate the storing mode.
-
Press 🐃 or 🐃ns the tuning knob repeatedly to allocate a number (1 to 30) to this radio station, then press ENTER to confirm.
- The [Preset number stored] are displayed.
- Repeat the above of steps to store other stations.
NOTE: To remove a pre-stored station, store another station in its place.
SELECT A PRESET RADIO STATION
-
In FM mode, press PROG/PRESET button to enable station recall.
-
Press ▶ or ▶ns the tuning knob repeatedly to select a preset number
-
Press ENTER to confirm.
DISPLAY FM INFORMATION
On the display of FM broadcasting, the first line shows station name, and the second line shows the service information for the current station.
Press INFO/ repeatedly to cycle through the following information (if available).
- Radio text
- Program type (PTY)
- Ensemble name
- Stereo or mono reception
- Time
- Date
USE FM MENUS
- In FM mode, press MENU to access the FM menus.
- Press 🖼 or turns the tuning knob repeatedly to toggle through the menus:
[Scan setting]
• [All stations]: Scan all the available FM stations.
• [Strong stations only]: Scan the strong FM stations only.
[Audio setting]
• [Stereo allowed]: Stereo broadcast
- [Forced mono]: to improve the reception, change to monaural sound
3. Press ENTER to enter the menu.
LISTEN TO DAB RADIO STATIONS
For optimal reception, fully extend the antenna and adjust its position.
You can program a maximum of 30 DAB radio stations.
Check with local retailer or go to www.WorldDAB.org for applicable DAB radio frequencies in your area.
FOR THE FIRST TIME USE
- Press SOURCE repeatedly to select the DAB source.
• [Full scan] menu is displayed.
-
Press ENTER to activate the automatic search.
-
This product automatically stores radio stations with sufficient signal strength.
• After the search is complete, the first stored radio station is broadcast automatically. -
Press 1 or turns the tuning knob repeatedly to select a station, and then listening.
PROGRAM RADIO STATIONS
- Tune to a DAB radio station.
- Press and hold PROG/PRESET for 2 seconds to activate the programming.
- Press 1 or turns the tuning knob repeatedly to allocate a number (1 to 30) to this radio station, then press ENTER to confirm.
- The radio station is stored with the selected sequence number.
- Repeat the above of steps to program more DAB radio stations.
NOTE: If you store a radio station with the sequence number of another one, the earlier one is overwritten.
DISPLAY DAB INFORMATION
On the display of DAB broadcasting, the first line shows station name, and the second line shows the service information for the current station.
Press INFO/ repeatedly to cycle through the following information (if available).
• Dynamic label segment (DLS)
- Signal strength
- Program type (PTY)
- Ensemble name
- Frequency
- Signal error rate
- Bitrate codec
- Time
- Date
USE DAB MENUS
-
In DAB mode, press MENU to access the DAB menus.
-
Press ▶ or ▶ns the tuning knob repeatedly to toggle through the menus.
• [Full scan]: Scan for the DAB stations.
- [Manual tune]: Tune to a station manually.
- [DRC] (Dynamic range control): Reduces the volume of loud sounds or amplifies quiet sounds thus reducing or compressing an audio signal's dynamic range.
- [Prune]: Remove invalid stations[System]: Access system setting menu.
- Press ENTER to enter the menu.
Tip: You can press INFO/ button back to previous step.
Or press MENU button to exit DAB menu.
RE-SCAN FOR STATIONS
[Full scan] is used to perform a wide range search for DAB radio stations.
Press ENTER to activate the automatic search.
- This product automatically stores radio stations with sufficient signal strength.
TUNE TO A STATION MANUALLY
With this feature, you can tune to a specific channel/frequency manually. In addition to antenna orientation for better radio reception, the optimal reception can also be obtained with this feature.
- Press ENTER to access the station list.
- Press ▶ or ▶ns the tuning knob repeatedly to select a station.
- Press ENTER to confirm the option.
REMOVE INVALID STATIONS
This option lists active stations and removes any stations that are in the list but have no service in your area.
- Press ENTER to access the [PRUNE] menu.
- Press / or turns the tuning knob repeatedly to an option.
• [N]: Return to the previous menu.
• [Y]: Remove invalid stations from the station list.
3. Press ENTER to confirm the selection.
SYSTEM MENUS
- Press ENTER to access system menu.
- Press 1 or turns the tuning knob repeatedly to select a sub-menus.
For details, refer to the section below:
• [Sleep]: Set the sleep timer
• [Alarm]: Set the Alarm time
• [Time]: Set the time
- [Backlight]: Adjust the display brightness
• [Language]: Czech, English, Polish, Slovak, Hungarian
- [Factory Reset]: Reset the product to factory default status.
- [Software Upgrade]: Upgrade the software.
- [SW version]: Check the version of current software of this product.
SET THE SLEEP TIMER
This unit can switch to standby automatically after a preset period.
When the unit is turned on, press MENU button and enter to [System] menu, select [SLEEP] then press ENTER to access.
Press I or turns the tuning knob repeatedly to select the sleep timer period (90, 60, 45, 30, 15, Off).
- When the sleep timer is activated, Z^Z appears.
To deactivate sleep timer:
Access to [System] menu > [Sleep], Press ▶ or turns the tuning knob repeatedly until SLEEP OFF is displayed.
- When sleep timer is deactivated, Z^Z disappears. Set the Alarm
-
Press MENU button access to [System] menu > [Alarm].
-
Press 1 or turns the tuning knob repeatedly until to set Alarm
-
On time.
• Duration: 15>30>45>60>90 minutes - Source: Wake up source from Buzzer, DAB, FM, CD, USB, CARD
• Daily > Once > Weekends > Weekdays - Date
- Alarm sound level
-
Alarm On/Off
-
Press ENTER to confirm the selection.
- When the Alarm is activated, Alarm 1 icon appears.
When the ALARM sounds ON, press SOURCE button to turn off the alarm sound.
Or press ENTER button to snooze the alarm (9 minutes).
Note: If CD,USB or CARD is selected as alarm source, yet there is no disc inserted or no USB/ card connected, the system switches to the BUZZER source automatically.
If alarm source selected FM or DAB, please tune the desired broadcast stations in advance.
LISTEN THROUGH THE HEADPHONE
Plug a headphone into the 3.5mm socket on the unit.
TECHNICAL SPECIFICATIONS
| Output Power 2 x 6 W RMS | |
| Support Disc CD,CD-R,CD-RW,MP3-CD,WMA-CD | |
| FM frequency 87.5 - 108 MHz | |
| DAB frequency 174.928 - 239.920 MHz | |
| Bluetooth V5.0+EDR, support A2DP profile | |
| Frequency range 2402 – 2480 MHz | |
| Max transmit power (EIRP): 0,717 mW | |
| Power source AC 230 V ~ 50 Hz | DC 12V (D SIZE, UM-1, LR20 x 8) |
| Operation power Consumption 28W | |
| Standby power Consumption < 1W (with display info) | |
| Dimensions 389W x 227D x 142H mm | |
| Weight 2000 g | |
| USB Rating 5V / 500 mAh (Not for charging purpose) | |
| USB flash memory (USB 1.1) | |
| USB flash players (USB 1.1) | |
WE RESERVE THE RIGHT TO CHANGE TECHNICAL SPECIFICATIONS.

WARNING: DO NOT USE THIS PRODUCT NEAR WATER, IN WET AREAS TO AVOID FIRE OR INJURY OF ELECTRIC CURRENT. ALWAYS TURN OFF THE PRODUCT WHEN YOU DON'T USE IT OR BEFORE A REVISION. THERE AREN'T ANY PARTS IN THIS APPLIANCE WHICH ARE REPARABLE BY CONSUMER.
ALWAYS APPEAL TO A QUALIFIED AUTHORIZED SERVICE. THE PRODUCT IS UNDER A DANGEROUS TENTION.


TO AVOID DANGER OF SUFFOCATION, KEEP THE PLASTIC BAG AWAY FROM BABIES AND CHILDREN. DO NOT USE THIS BAG IN CRIBS, BEDS, CARRIAGES OR PLAYPENS. THIS BAG IS NOT A TO Y.
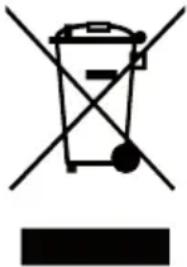
Disposal of old Electrical & Electronic Equipment (Applicable in the European Union and other European countries with separate collection systems)
natural_image
Symbol of a trash bin crossed out by two crossed lines, with a blank rectangular base below (no text or labels)This symbol on the product or on its packaging indicates that this product shall not be treated as household waste. Instead it shall be handed over to the applicable collection point for the recycling of electrical and electronic equipment. By ensuring this product is disposed of correctly, you will help prevent potential negative consequences for the environment and human health, which could otherwise be caused by inappropriate waste handling of this product. The recycling of materials will help to conserve natural resources. For more detailed information about recycling of this
product, please contact your local Civic Office, your household waste disposal service or the shop where you purchased the product.
Hereby, ETA a.s. declares that the radio equipment type CDM390BTDAB is in compliance with Directive 2014/53/EU. The full text of the EU declaration of conformity is available at the following internet address: http://www.gogen.cz/declaration_of_conformity
[FLAT] > [ROCK] > [POP] > [JAZZ] > [CLASSIC]
FM RÁDIÓ HALLGATÁSA
KERESSE MEG A KÍVÁNT FM CSATORNÁT!
CSATORNÁK MANUÁLIS KERESÉSE
natural_image
Symbol of a trash bin crossed with a diagonal line and a horizontal bar below (no text or labels)natural_image
Abstract logo design with white stylized 'S' inside a black circle (no text or symbols)GoGEN
- CDM 390 BTDAB
- GoGEN
- PACKAGE CONTENTS:
- FOR YOUR ATTENTION
- IMPORTANT NOTES:
- DEVICE LAYOUT
- POWER SUPPLY
- AC POWER
- BATTERY POWER
- FUNCTIONS
- TURN ON
- SWITCH TO STANDBY MODE
- SET TIME
- PLAY CD
- PLAY FROM USB DEVICES/ SD-MMC CARD
- PLAY FROM BLUETOOTH-ENABLED DEVICES
- DISCONNECT THE BLUETOOTH-ENABLED DEVICE
- CONNECT ANOTHER BLUETOOTH-ENABLED DEVICE
- PLAY FROM AN EXTERNAL DEVICE (AUX)
- PLAY OPTIONS
- CONTROL PLAY
- PROGAM TRACKS
- ADJUST SOUND
- LISTEN TO FM RADIO
- TUNE TO FM RADIO STATIONS
- STORE RADIO STATIONS AUTOMATICALLY
- STORE RADIO STATIONS MANUALLY
- SELECT A PRESET RADIO STATION
- DISPLAY FM INFORMATION
- USE FM MENUS
- [Scan setting]
- [Audio setting]
- Press ENTER to enter the menu.
- LISTEN TO DAB RADIO STATIONS
- FOR THE FIRST TIME USE
- PROGRAM RADIO STATIONS
- DISPLAY DAB INFORMATION
- USE DAB MENUS
- RE-SCAN FOR STATIONS
- TUNE TO A STATION MANUALLY
- REMOVE INVALID STATIONS
- SYSTEM MENUS
- SET THE SLEEP TIMER
- To deactivate sleep timer:
- LISTEN THROUGH THE HEADPHONE
- WE RESERVE THE RIGHT TO CHANGE TECHNICAL SPECIFICATIONS.
- Disposal of old Electrical & Electronic Equipment (Applicable in the European Union and other European countries with separate collection systems)
- FM RÁDIÓ HALLGATÁSA
- KERESSE MEG A KÍVÁNT FM CSATORNÁT!
- CSATORNÁK MANUÁLIS KERESÉSE
Brand : GoGen
Model : CDM 390 BTDAB
Category : Radio