
PHGR 9000 - Grill Philco - Free user manual and instructions
Find the device manual for free PHGR 9000 Philco in PDF.


| Product Type | Contact Grill |
| Brand | Philco |
| Model | PHGR 9000 |
| Rated Power | 1750-2100 W |
| Rated Voltage | 220-240 V |
| Rated Frequency | 50/60 Hz |
| Control Type | Digital touch panel with rotary knob |
| Preheat Function | Yes, with indicator light |
| Cooking Modes | Automatic programs for beef, pork, chicken, fish, shrimp, sausage, bacon, sandwich; Manual DIY mode |
| Doneness Levels | Rare, Medium, Well-done (for selected programs) |
| Automatic Food Thickness Detection | Yes, adjusts time and temperature automatically |
| Defrost Function | Yes, snowflake program |
| Positions | Closed, Open (100°), Horizontal (flat) |
| Baking Trays | 2 removable, non-stick, dishwasher safe |
| Oil-Receiving Box | Removable, dishwasher safe |
| Safety Features | Automatic shut-off after prolonged use; child safety lock not specified but supervision required |
| Cleaning | Baking trays and oil box dishwasher safe; appliance body wipe with dry cloth; do not immerse |
| Indicator Lights | Standby, Preheat, Cooking, Doneness (Rare/Medium/Well-done) |
| Maximum Food Height | 50 mm (for optimal automatic cooking; higher requires manual setting) |
| Power Cord | Short cord provided; extension cord allowed with caution |
Frequently Asked Questions - PHGR 9000 Philco
User questions about PHGR 9000 Philco
0 question about this device. Answer the ones you know or ask your own.
Ask a new question about this device
Download the instructions for your Grill in PDF format for free! Find your manual PHGR 9000 - Philco and take your electronic device back in hand. On this page are published all the documents necessary for the use of your device. PHGR 9000 by Philco.
USER MANUAL PHGR 9000 Philco
Famous for Quality the World Over
CONTACT GRILL KONTAKTNÍ GRIL KONTAKTNÝ GRIL GRILL KONTAKTOWY KONTAKTGRILL

PHGR 9000
REMOVE THE BAKING TRAY 5
REMOVE OIL-RECEIVING BOX....5
Thank you for buying a PHILCO brand product. So that your appliance serves you well, please read all the instructions in this user's manual.
1. IMPORTANT SAFEGUARDS
IMPORTANT NOTE: Please read the manual carefully before operating your product. Retain it for future reference.
Please refer to different parts of this manual or corresponding icons before operation, maintenance, and installation of products.
When using electrical appliances, basic safety precautions should always be followed:
- Read all instructions before using the machine.
- This appliance can be used by children aged from 8 years and above and persons with reduced physical, sensory or mental capabilities or lack of experience and knowledge if they have been given supervision or instruction concerning use of the appliance in a safe way and understand the hazards involved.
-
Children shall not play with the appliance. Children shall not play with the appliance. Cleaning and user maintenance shall not be made by children unless they are older than 8 and supervised.
-
This appliance is intended to be used in household and similar applications such as:
-
Staff kitchen areas in shops, office and other working environments;
- farm houses;
- by clients in hotels, motels and other residential type environments;
-
bed and breakfast type environments;
-
If the supply cord is damaged, it must be replaced by the manufacturer, its service agent or similarly qualified persons in order to avoid a hazard.
-
Please turn off and unplug the appliance before cleaning, maintenance or relocation and whenever it is not in use.
-
This appliance as well as the cooking utensils used and the surface of the appliance can become very hot, do not touch the hot surface of the hob.
-
That appliances are not intended to be operated by means of an external timer or separate remotecontrol system.
-
In order to prevent electric shock, please do not immerse the power cord and plug or part of them in water or other liquids.
-
Power supply should be cut off when it is not in use or before cleaning. Please clean the baking tray after it cools down.
-
Please do not put it on hot coal gas or electric stoves, or in a heated oven.
-
Care should be taken when moving appliances containing hot oil or other hot liquid.
-
Do not heat or preheat without two cooking trays in the grill.
-
To disconnect, turn any control to „off,” then remove plug from wall outlet.
a) A short power-supply cord is to be provided to reduce the risk resulting from becoming entangled in or tripping over a longer cord.
b) Longer extension cords are available and may be used if care is exercised in their use.
c) If a long extension cord is used:
1) The marked electrical rating of the extension cord should be at least as great as the electrical rating of the appliance;
2) The longer cord should be arranged so that it does not drape over the countertop or table top where it can be pulled on by children or tripped over unintentionally.
HOUSEHOLD USE ONLY SAVE THESE INSTRUCTIONS
2. PRODUCT DISPLAY

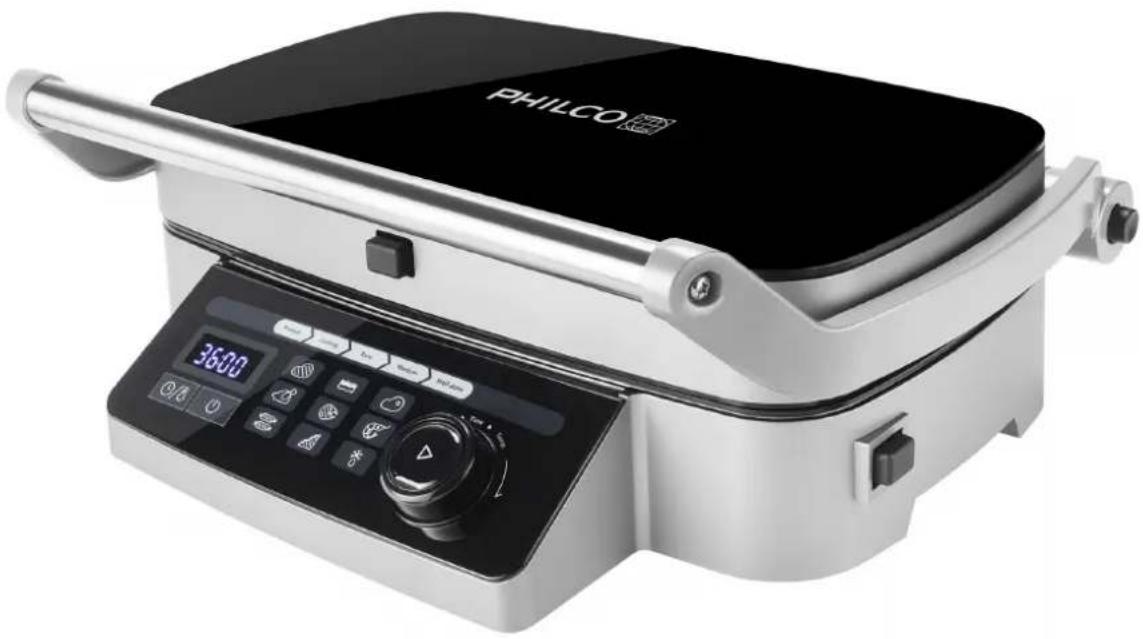
3. CONTROL PANEL

- Automatic programs (this is not a touch area)
- Touch control buttons for setting temperature/time and for turning the machine off
- Rotating knob for setting temperature/time or selecting programs including their launching
- Roast level indicator
4. TECHNICAL SPECIFICATION
| Product model Rated voltage | Rated frequency Rated power | ||
| PHGR 9000 220-240V-50/60HZ 1750-2100W | |||
5. BEFORE USE
The first use of the product will have a small amount of lampblack, is a normal phenomenon. Place the grill on a clean, flat surface. The grill can be positioned in three ways:
CLOSED POSITION
Place the upper housing on the base This position is used to start and heat when using a contact grill.

OPEN POSITION
Open the upper housing at 100°. To adjust the grill to this position, you need to lift the rocker by hand until you feel that the upper housing is locked in this position. Release your hands and keep the upper housing in this position until you close it.
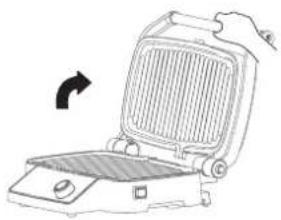
HORIZONTAL PLACEMENT
The upper and lower baking trays can be placed horizontally, and the upper and lower trays are arranged in a row to form a large cooking area as a grill.

-
Adjust grill to open position.
-
Put your left hand on the rocker bar and push it gently in your direction and press the spring button at the same time. Push the rocker bar back until the upper housing is level. If the grill is in an open position and you want to adjust to a closed position, you need to gently pull the handle toward yourself until the upper housing is level.
REMOVE THE BAKING TRAY
- When the baked machine is in the cooling state, adjust it to the open position. Press the ON/OFF button for the baking tray.
a. The lower baking tray's switch button is on the right side of the base.
b. The upper baking tray switch button is located in the middle of the upper housing.
- Grasp the baking tray with both hands and gently pull it out of the reflector.

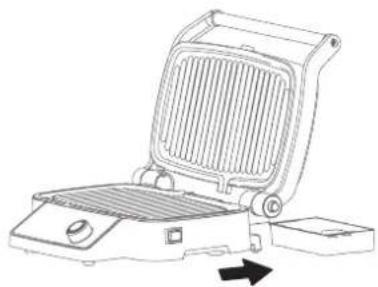
REMOVE OIL-RECEIVING BOX
Make sure the oil tray slides into the center of the rear of the base before use. Oil stains on the baking tray can flow into the oil-receiving box through the oil receiving port. When the baked machine is completely cooled down, it can be removed and cleaned in the dishwasher.
- Plug in the power supply and touch the "button," then products will get into standby state and the nixie tube indicator light displays "----".
- Place frozen food to the BBQ and close the upper cover. To defrost the food, select the drop and snowflake programme.
- Select the required programme and press the „D“. button. The appliance will start to preheat. When selecting the pork, beef or fish programme, the doneness indicator will start flashing and you will be able to select the level of doneness (Rare/Medium/Well-done). The level of doneness can be selected by rotating the knob. Indicator light “Preheat” flickers indicating that the machine is in the preheating state, and the indicator light up all the time indicating that the preheating progress is finished.
- Open the upper housing after preheating and put the food on the baking tray, then close the upper housing and start cooking. Indicator light „Cooking“ is on.
Note:
a. If the machine is on for a long time, the safety system will automatically shut down the machine.
b. The machine can automatically identify the thickness of food and automatically adjust the cooking time and temperature. The degree of cooking can be shown by a display light.
c. To achieve the best results, refrain from opening the appliance while cooking.
d. Food higher than 50 mm should be set manually. The BBQ is not able to set the preparation time optimally.
e. It is normal to have smoke when cooking.
-
When the food meets your need (Rare/Medium/Well-done), open the upper housing and take out the food.
-
When the cooking is over, return to step 1. If you continue cooking, repeat step 2, 3, 4 and 5.
-
When the lid is opened, only DIY function is available to operate.
Please do not open the lid when it is preheating. It will turn to DIY function after 10 seconds when the lid is opened.
- For manual DIY preparation after the BBQ has been switched on, press the TIME/TEMPERATURE button. First select time using the rotating knob. After you press the TIME/TEMPERATURE button again, you will be able to use the rotating knob to set temperature. Then simply confirm your choice using the "(play)" button and the BBQ will start to heat up.
6. AUTOMATIC GEAR RECIPE
For the best grilling results always wait for the food to reach the ambient temperature after seasoning. It will lose less juice during grilling and the resulting dish will be juicier and tastier.
| Item Doneness How to operate Results | |||
| Beef | Rare | 1. Make your steak dry with kitchen paper in 2-5°C.2. Seasoned well and broached with some butter melted or olive oil Extra virgin. | This doneness is making the steak's fat melt and cause the butter with great flavor effect, with a lot of moisture and very juicy texture. A rare steak is red at the very center, following by a pink ring around the center and then comes a brown crust on the outside. |
| Medium | The steak will not have a red center anymore and the red color will be replaced by a pink throughout color. At this doneness level, the steak will retain the buttery and flavorful taste, just like the rare level, but will have less juice and will be less tender due to more moisture evaporating. | ||
| Well | When your steak reaches this level, it will retain just a little bit of pink color inside and will still be tender but not as much as other doneness levels. This temperature level will make the steak become drier and less tender than most people like. | ||
| Pork | Rare | 1. Make your steak dry with kitchen paper in 2-5°C.2. Seasoned well and broached with some butter melted or olive oil Extra virgin | Pinkish overall color with outer brow portion, juicy and tender. Perfect doneness for cooking pork loin or tenderloin. |
| Medium | Mostly brown color, with little pink color inside.This cooking doneness is recommended to cook fatty meats like top loin. | ||
| Well | Brown-grey color throughout, firm to touch. Is recommended to the ones can't see any pink part on the meet, but we still keep light moisture without completely overcook the meet. | ||
| Chicken | Rare | 1. Make your steak dry with kitchen paper in 2-5°C.2. Seasoned well and broached with some butter melted or olive oil Extra virgin. | Pinkish overall color with outer white portion, juicy and tender. Perfect doneness for cooking Breast without skin. |
| Medium | Mostly brown color, with little pink color inside.This cooking doneness is recommended to cook meats with skin like boneless drumsticks. | ||
| Well | Brown-grey color throughout, firm to touch. This cooking doneness is recommended to cook the foods with bones, but still keeping light moisture without completely overcooking the meat. Perfect for chicken wings, or whole drumsticks. | ||
| Fish | Rare | 1. Make your steak dry with kitchen paper in 2-5°C.2. Seasoned well and broached with some butter melted or olive oil Extra virgin. | Surface is well sealed and brown and the inner part keep juicy, completely tender and easy to melt in mouth. Perfect for any type of fish has been frozen before to cook, to prevent parasites issues of this cooking doneness. |
| Medium | Surface is well sealed and brown and the inner part keep less juice, almost completely cook and perfect for people like fish well cook. | ||
| Well | Well browned and completely cook, It's dry and not much moisture on the inner part. People who really can accept moisture on their fish will accept this doneness. | ||
| Shrimp | Rare 1. Make your steak dry with kitchen paper in 2-5°C.2. Seasoned well and broached with or olive oil Extra virgin. | Keep juicy and part of it is raw, best to the one like their seafood less cooked. | |
| Medium | Almost all cooked, keeping moisture but no raw parts. | ||
| Well | Browned and flavored, well-cooked to the ones don't like the felling of no cook seafood. | ||
| Sandwich | Cook | 1. Buttered your bread to get better results and good flavors. | Get good and even brown in all your sized sandwiches and get well tempered in the inner part, without burning the outside part. |
| Sausage | Rare | 1. Make your steak dry with kitchen paper in 2-5°C.2. Seasoned well and broached with some butter melted or olive oil Extra virgin. | Pinkish overall color with outer white portion, juicy and tender. Perfect doneness for cooking pre Boiled sausages. |
| Medium | Mostly brown color, with little pink color inside. Cooking doneness is recommended to cooking Breakfast sausages like Chipolata or merguez. | ||
| Well | Brown-grey color throughout, firm to touch. Is recommended for raw sausages that don't have any precook process. | ||
| Bacon | Rare | 1. Preheat the appliance but keeping just more you eat on it. | Light cook, Just tempered your bacon without burned parts. Perfect for cured bacons. |
| Medium Well cook | choice for parboiled bacons. | ||
| Well Well-cooked and crispy, to the one likes his bacon | on well toasted. | ||
* Chicken/Shrimp/Bacon/Sausage/Sandwich" programs will only available for chosen by well-done.
7. CARE AND CLEANING
- Please remove the baking tray to avoid damaging the surface of the baking tray before cleaning. Oil trays and baking trays are safe in the dishwasher. If you don't want to put them in the dishwasher, you can use a small amount of detergent to clean the baking tray, then rinse thoroughly and remove the residues and wipe thoroughly with a paper towel.
- Appliances and power cord cannot be put into the dishwasher after removing the baking tray. If the machine is dirty, it needs to wait until it is completely cooled before cleaning with a dry cloth. Note:
a. Please do not try to clean any part of the grill with metal wash pads, steel wire cotton, etc. Use only nylon or non-metal cleaning pads.
b. Do not immerse the grill in water or other liquids. Make sure the grill is dry before storage. Any other servicing should be performed by an authorized service representative.
8. FAULT EXPLANATION
| Nixie tube display Cause Fault Analysis and Phenomena Checkpoints and exclusions | |||
| E1 Open circuit of lower baking tray sensor | Unplugged lower baking tray sensor or broken connection wire | Deliver the appliance to the authorized Maintenance Department | |
| E2 Short circuit of lower baking tray sensor | Lower baking tray sensor breakdown or connection wire melting adhesion | ||
| E3 Open circuit of upper baking tray sensor | Unplugged upper baking tray sensor or broken connection wire | ||
| E4 Short circuit of upper baking tray sensor | Upper baking tray sensor breakdown or connection wire melting adhesion | ||
INSTRUCTIONS AND INFORMATION REGARDING THE DISPOSAL OF USED PACKAGING MATERIALS
Dispose of packaging material at a public waste disposal site.
DISPOSAL OF USED ELECTRICAL AND ELECTRONIC APPLIANCES
The meaning of the symbol on the product, its accessory or packaging indicates that this product shall not be treated as household waste. Please, dispose of this product at your applicable collection point for the recycling of electrical & electronic equipment waste. Alternatively in some states of the European Union or other European states you may return your products to your local retailer when buying an equivalent new product. The correct disposal of this product will help save valuable natural resources and help in preventing the potential negative impact on the environment and human health, which could be caused as a result of improper liquidation of waste. Please ask your local authorities or the nearest waste collection centre for further details. The improper disposal of this type of waste may fall subject to national regulations for fines.
For business entities in the European Union
If you wish to dispose of an electrical or electronic device, request the necessary information from your seller or supplier.
Disposal in other countries outside the European Union
If you wish to dispose of this product, request the necessary information about the correct disposal method from local government departments or from your seller.

This product meets all the basic EU regulation requirements that relate to it.
Changes to the text, design and technical specifications may occur without prior notice and we reserve the right to make these changes.
OBSAH
- DŮLEŽITÉ BEZPEČNOSTNÍ POKYNY .... 3
- JEDNOTLIVÉ ČÁSTI SPOTŘEBIČE......4
- OVLÁDACÍ PANEL....4
- TECHNICKÉ ÚDAJE 4
- PŘED POUŽITÍM 4
UZAVŘENÁ POLOHA 4
OTEVŘENÁ POLOHA 5
VODOROVNÁ POLOHA 5
VYJMUTÍ GRILOVACÍ DESKY 5
VYJMUTÍ ODKAPÁVACÍ MISKY NA TUK 5
KONKRÉTNÍ PROVOZNÍ KROKY 6
- RECEPT AUTOMATICKÉ PŘÍPRAVY ...... 6
- PÉČE A ČISTĚNÍ......7
- POPIS PORUCHY 7
Vážený zákazníku,
OTEVŘENÁ POLOHA
VODOROVNÁ POLOHA
VYJMUTÍ ODKAPÁVACÍ MISKY NA TUK
KONKRÉTNÍ PROVOZNÍ KROKY
OTVORENÁ POLOHA
VODOROVNÁ POLOHA
VYBRATIE ODKVAPKÁVACEJ MISKY NA TUK
KONKRÉTNE PREVÁDZKOVÉ KROKY
Famous for Quality the World Over
CONTACT GRILL KONTAKTNÍ GRIL KONTAKTNÝ GRIL GRILL KONTAKTOWY KONTAKTGRILL
PHGR 9000
POZYCJA OTWARTA
POZYCJA POZIOMA
WYJMOWANIE MISKI NA TŁUSZCZ
KONKRETNE KROKI OBSŁUGI
NYITOTT HELYZET
VÍZSZINTES HELYZET
A ZSÍRGYÚJTÓ TÁL KIEMELÉSE
KONKRÉT ÜZEMELTETÉSI LÉPÉSEK
- CONTACT GRILL KONTAKTNÍ GRIL KONTAKTNÝ GRIL GRILL KONTAKTOWY KONTAKTGRILL
- IMPORTANT SAFEGUARDS
- HOUSEHOLD USE ONLY SAVE THESE INSTRUCTIONS
- PRODUCT DISPLAY
- CONTROL PANEL
- TECHNICAL SPECIFICATION
- BEFORE USE
- CLOSED POSITION
- OPEN POSITION
- HORIZONTAL PLACEMENT
- REMOVE THE BAKING TRAY
- REMOVE OIL-RECEIVING BOX
- NOTE
- AUTOMATIC GEAR RECIPE
- CARE AND CLEANING
- FAULT EXPLANATION
- INSTRUCTIONS AND INFORMATION REGARDING THE DISPOSAL OF USED PACKAGING MATERIALS
- DISPOSAL OF USED ELECTRICAL AND ELECTRONIC APPLIANCES
- OBSAH
- VÁŽENÝ ZÁKAZNÍKU
- OTEVŘENÁ POLOHA
- VODOROVNÁ POLOHA
- VYJMUTÍ ODKAPÁVACÍ MISKY NA TUK
- KONKRÉTNÍ PROVOZNÍ KROKY
- OTVORENÁ POLOHA
- VYBRATIE ODKVAPKÁVACEJ MISKY NA TUK
- KONKRÉTNE PREVÁDZKOVÉ KROKY
- POZYCJA OTWARTA
- POZYCJA POZIOMA
- WYJMOWANIE MISKI NA TŁUSZCZ
- KONKRETNE KROKI OBSŁUGI
- NYITOTT HELYZET
- VÍZSZINTES HELYZET
- A ZSÍRGYÚJTÓ TÁL KIEMELÉSE
- KONKRÉT ÜZEMELTETÉSI LÉPÉSEK
Brand : Philco
Model : PHGR 9000
Category : Grill